

David Womby
-
Posts
2,763 -
Joined
-
Last visited
Content Type
Events
Profiles
Forums
Media Demo
Everything posted by David Womby
-
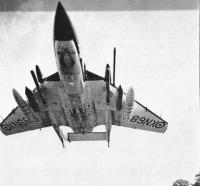
FWIW, this was my first ever whif built in 2008 using the old Airfix F-111A.- After almost 10 years of service in the RAF, the F-111K that filled the place of the cancelled TSR2, had its first upgrade program. The airframe had proved surprisingly robust and very successful for low level penetration missions. The main elements of the 1978 upgrade were avionics and only a few external differences were discernable after work was completed. An LRMTS (Laser Ranger and Marked Target Seeker) was fitted under the nose. A Marconi ARI18228 RWR suite was fitted to the fin top the same way it was being fitted to the Phantom fleet. An ECM pod was integrated into the starboard weapons bay door containing a barrage noise jammer for long range detection radars similar to the Red Shrimp used on the Vulcan . In keeping with the rest of the RAF attack fleet, the Merlins lost their light aircraft grey undersides and were repainted in standard wraparound dark sea grey / dark green camouflage. This one is XV928, one of the second batch of F-111K deliveries, and is depicted around 1981 when serving with 27 squadron.
-

Jaguar takeoff and landing configs.?
David Womby replied to David Womby's topic in Aircraft Cold War
Thanks. I forgot. How about parked - intake side doors closed, slats down, flaps/ailerons up, airbrakes open? David -
I just want to check I have this right. Take off - intake side doors open, slats down, flaps/ailerons partially down. Landing - intake side doors closed, slats down, flaps/ailerons fully down, airbrakes closed? Thanks David
-
Sorry but the extended wings thing is a common misconception due to a photo of the two F-111K airframes where a table looks like the end of the extended wing. Here is config. drawing showing what is F-111A, what was to be unique to F-111K and what is from FB-111 (note there would be a retractable IFR ahead of the cockpit too). David
-
To match what was planned to be bought as the F-111K, you need to trim the wings and change the intakes to F--111A standard. However, as it is whatif, you could leave everything as is, paint it up in RAF colours and call it part of a second delivery of F-111K Mk2 or Merlin FGR2? David
-
I wonder if that F-111B is still in their boneyard. David
-
I found a pic of RK479. It's in the old Profile Publications pamphlet on the Barracuda. It doesn't show the whole airframe but the cockpit back and the upper starboard wing. the caption says 'gloss navy (not midnight) blue'. David
-
Thanks, Dave. I'll try to get a copy. David
-
Looking for advice on SAAF Mirages F-1s in 1/72 scale
David Womby replied to RAGATIGER's topic in Aircraft Cold War
Weapons fit depends on which version you plan building - the CZ (interceptor) or the AZ (ground attack) - and also which stage in its life as some weapons were late additions. I built this one. It's the old Heller F1C converted to F1AZ 1 Squadron SAAF 1996 but never fitted the weapons. I have them though - it was going to be US-style MK82 bombs on the underfuselage pylon and outer wing pylons and I planned to adjust some Matra Magic missiles to serve as V3B Kukri AAMs on the wingtips. David -
I've seen decal sheets, and artwork in an old issue of SAM, for RK479 in all-over blue serving on a carrier visiting Oslo post WW2. Some cite the carrier as Illustrious others as Vengeance. There was a thread here: https://www.britmodeller.com/forums/index.php?/topic/234991868-post-war-barracuda-cod-aircraft/ My question is does anybody know where the evidence is that this machine was blue? I've seen no photos and not read any account describing it anywhere. Thanks David
-
So it does. I didn't spot that. David
-
Are the pylons different colours on the two airframes here? Also, is this an asymmetric load with the AIM9 only under the port wing? David
-
Definitely for a Hunter F1 to F5 as Claudio says. David
-
(Fly) RNZAF Bristol Freighter MK.31
David Womby replied to follasha's topic in Ready for Inspection - Aircraft
Always great to see an RNZAF bird and such an unusual one at that! David -
Now that is something special. I love it. David
-
Childhood Memories -- A Tale of Two Fords
David Womby replied to billn53's topic in Ready for Inspection - Aircraft
Love them both and I think the Stone Age one looks quite acceptable as is. I am curious about the amount of time that went into each? David -
Two early British Jets in 1/72 Meteor and Swallow
David Womby replied to Robert's topic in Ready for Inspection - Aircraft
Very nice work. David -
No rush. I'll not start building this until after New Year. Thanks I am pretty sure they had a blue nosewheel door with the 3 digits of the serial in yellow. David
-
Thanks for that and more so for the 54 Sqdn ones. Got any showing the nosewheel door of a 54 Sqdn machine, by any chance? 😉 David
-
Thank you, Giorgio. I think prior to the code letter allocations, they wore the 3 digits of the serial on the nosewheel door? David
-
I just found one at Sepecat.Info http://sepecat.info/coppermine/displayimage.php?pid=1808 Any others? David
-
Scale AIrcraft Modelling Vol 1 No. 2 (Nov 1978 for 60p!) has an article on Jaguars. The opening page has a photo of a 54 Squadron GR1 "taken shortly after the Jaguars arrived in August 1974 when the aircraft still had their pointed noses". I have photos of the OCU aircraft with those noses fitted but this one is in full 54 Squadron markings. However, the serial and code letter is not visible due to shadow. Are there any pics anywhere that show a pointed nose GR1 in full squadron markings complete with a serial and code? David
-
Airfix Grumman Avenger as AS.5 XB443/384/C of 814 Squadron, HMS Centaur c.1955. This is the Airfix kit with FreightDog decals. I scratchbuilt the large AS.5 radome and the stores rack under the port wing ( a big thanks to fatalbert for his help on that). The launch rails are the Airfix rockets minus fins and warheads and squared off. The arrestor hook is homemade and relocated. Airfix's representation of the exhausts is pathetic but I left them alone to keep this as OOB as I could. I got a few details wrong and mislaid one decal but I'm not telling you where. The whitewall tyres/tires were a pain to paint and are a bit rough but this aircraft actually was fitted with them! Thanks for looking. David
- 8 replies
-
- 26
-

-

-
TIL - Today I Learned
-
This is Airfix's Meteor III done as EE337/FD/051. She was one of the Meteors used to test operations on carriers but this is her later in 1948 at RNAS Ford. I added an arrestor hook from plastic rod and faired in the gunports with the tips of wooden toothpicks. The exhaust nozzles also needed shortening for this one and some bumps on the nacells had to be removed. It's a nice little kit for its vintage. This was built from a first release and included a stand! The fit was very good all round and it had delicate, but raised, detail. I did sand off the rivets from the fuselage as they were invisible on the real thing but left the control surfaces alone. It's brush painted with Testors ModelMaster Sky and Vallejo EDSG. The roundels are from a 1970s sheet by Stoppel decals and went on like a dream - no yellowing, no cracking, good adhesion. I wish I had more of them! The serials and codes are homemade decals. I also did decals for the wing walkways but only one worked so 90% of those are drawn on with a Sharpie marker (though I see the final coat of matt clear wiped a bit of them off!!). David
- 4 replies
-
- 33
-
-