

leewhitty
-
Posts
26 -
Joined
-
Last visited
leewhitty's Achievements
")
Newbie (1/9)
40
Reputation
-
ahhh cheers nothing i can do now haha thought it was strange to have no underside markings i examined the decal instructions and wondered why there was nothing on the underside might be a fault on the instructions (or i have just been a daft bugger and missed it somehow)
-
Academy F4F-4 first kit in a year or two i have managed to finish decals were awful i know academy decals have a bad name but they were absolute sods. Not the best ive done but thought id upload it anyway
- 6 replies
-
- 10
-

-
 Academy Me 262 1/72 GenLt Adolf Galland JV44 1945 Thought id upload my latest completed model built out of the box. Overall a good kit but the fact the panel lines on the engine halves dont match up is the only bad thing i can aim at this kit. Any comments or questions welcome let me know what you think..... the weathering around the engines is actually a lot more subtle the photo has made it quite stark cheers
 -
Gorgeous nothing more to say about it
-
An Eduard Spitfire IXc in the natural metal
leewhitty replied to Chris Jephcott's topic in Ready for Inspection - Aircraft
Looks brilliant the weathering on the bare metal looks superb -
Derelict Vampire phase 1. Airfix 1:72
leewhitty replied to Michaelvk's topic in Ready for Inspection - Aircraft
Stunning the weathering looks superb -
Close shave - Eduard 1/48 Hansa Brandenburg D.1
leewhitty replied to Haris Ali's topic in Ready for Inspection - Aircraft
Very nicely done. Unusual diorama really adds to the standard of the modelling -
DPRKAF MiG 15 1:72nd Airfix
leewhitty replied to leewhitty's topic in Ready for Inspection - Aircraft
Alreet thanks for all the great comments Thanks. The humbrol pigments seem very good on first use i simply applied them using a small paintbrush straight from the pot then sealed them using a light spray of humbrol matt acrylic spray. Ive added a few points below which i hope help. Positive points: *Easy to use straight from the pot *good colour range i have a few already and they seem to blend fairly well. (although I did mainly use the plain black on this model) *they go on quite smooth which i mention because they do look quite course in the pot. *Slow build up of pigments on the model is essential (see Negative points) but provides some very suble effects *Adhere very well to a matt coat (not tested on a gloss finish) but they do need sealed after with a topcoat (unless you like messing hands every time you handle your model haha) Negative points: * If applied to thick they can be a nightmare to remove as they did not come off with a cotton bud soaked in water as other pigments do if you make a mistake. (Although it did blend any accidental streaks in nicely with the rest of the finish) hope that helps Thanks. this is the sequence which i painted everything hope it helps 1. I pre shaded all the panel lines with matt black first 2. I Then Airbrushed the green over the entire top half of the model. 3. Tamiya Tape was cut into the relevant shapes for the camo scheme and apllied to the model as per the diagram in the instructions and all seams sealed with maskol 4. The Sand areas where then given a light coat and then preshaded with matt black again before a final sand coat was applied over the top. 5. The tape was removed and the top half of the model masked in preparation for the black underside. 6. Flat Black was sprayed over the whole underside then each panel was sprayed with a lighter grey leaving black around the edges. 7. Nato Black was then sprayed over the top to blend the previous two layers and achieve the depth of colour required. 8. A gloss coat and decals followed. Sealed with another gloss coat then a matt coat was applied ready for the powders. 9. Powders where applied then sealed with a final matt coat Cheers Thanks again everyone for all the great comments next up a ME262 i think -
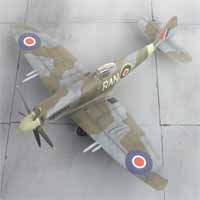
Thought id upload my latest aircraft. The kit went together with no problems however the fit of the canopy caused a bit of trouble. Its not my best model but im fairly happy with it as i had a few problems with the gloss coat being a little bit patchy in some places. Painted with Tamiya Acrylics, humbrol acrylic clear sprays and weathered using humbrols new black weathering powders. Any thoughts welcome. Cheers
-
Tamiya 1/48 A-1J "Skyraider" - they called me "Spad"
leewhitty replied to Canoner's topic in Ready for Inspection - Aircraft
Superb Build -
Very nice build. Top Job
-
Looks Cracking mate cant wait to see it in the flesh. If my MiG 15 turns out anything like it i'll be chuffed. regards Lee
-
Russian Airfix 72nd Airacobra
leewhitty replied to leewhitty's topic in Ready for Inspection - Aircraft
Thanks for the compliments I originally put alot more of an explanation on the original post but my browser crashed so i had to redo the whole thing. incase anyone was curious the kit is pretty much out of the box bar the cockpit door glazing is made from clear acetate and the prop and spinner which where raided from the bits box and modified (i believe that they may be an early spitfires prop but they looked about right compaired to refernce photos) I did modify the kit prop to see if it was usable but the spit parts looked marginally better. the undercarriage has been carefully carved to provide a bit more detail aerial is stretched sprue. painted using tamiya acyrilics yeah the amount of filler on the wing roots is unbelievable i got round it with a small strip of plasticard fillered then sanded to shape. th kit requires so much filler in places my mate at work suggested id be better off carving an airacobra out of a block of wood rather than use the kit the kit does require work to get to a decent standard but overall its a decent kit when built. only downside the amount of filler cost more than the plane did haha. cheers for the comments -
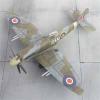
thought id upload this for anyones comments or thoughts cheers
-
simply sensational