


nimrod54
-
Posts
5,992 -
Joined
-
Last visited
-
Days Won
3
Content Type
Events
Profiles
Forums
Media Demo
Posts posted by nimrod54
-
-
9 hours ago, Corsairfoxfouruncle said:
Taking shape nicely
Thanks Dennis. It has gone together nicely considering its age.
John
4 hours ago, CliffB said:How is the fit John? In the photo, it looks like there's a bit of an over-hang at the front?
Cheers
User error Cliff, I haven't taped the two sections together very well at the front end. Of course I will have to check it again when I fit the chrome trim down the centre line.
Cheers
John
-
 1
1
-
-
During a brief lull between the storms that have been forecast, I have managed to get some more work done on the DB 5 today. The bodyshell was masked off inside before I sprayed on the top colour using one of the new MIG Cobra acrylic paint colours. I will leave this for a couple of days before I try out the 2K Clearcoat and Hardener from the same paint range. My apologies for the dark images which means that the pale green colour of the paint does not show up too well.

by John L, on Flickr
by John L, on Flickr
Thanks for dropping by.
Regards
John
-
10
-
-
On 01/04/2024 at 21:19, John Masters said:
Lovely looking auto! Elegant and sporty.
My sister is currently going through chemo. She’s my hero. You too. Keep going for that next target, then pick another. 🙏🏻💪🏻Thanks John. Hope that your sisters treatment is going well. I have my penultimate session of chemo later this week.
Here is a brief update on progress over the past week Apart from the window glass the interior is now complete, the engine was fitted and and the steering linkages connected. All the underside details have been painted up too.
by John L, on Flickr
by John L, on Flickr
by John L, on Flickr
The body has also had a coat of primer, it now needs sanding before I add a second layer followed by another sanding session before starting on the topcoats. I also took the opportunity to check the fit of the bonnet parts.
by John L, on Flickr
I am not sure how much I will get done over the rest of this week, but should be back in the swing of things next week.
Cheers for now.
John
-
10
-
-
49 minutes ago, Pig of the Week said:
Your leather seats look very lush and most leather-like 👍
I'd agree about the blue, I reckon the current colour is a bit bright, purely imho...
Thanks buddy. The kit calls for French Blue which isn't to far away from the plastic colour. I'm thinking of something similar to Humbrol Midnight Blue, the chrome trim should look good against that.
Cheers
John
-
2
-
-
My main focus over the past week has been directed at painting and assembly of the Record's interior, I brushed a few thin coats of Citadel's Doombull Brown on the seats and interior trim which gives it a nice red-brown colour.
by John L, on Flickr
by John L, on Flickr
Then after assembling the interior I masked it off and sprayed the black areas before a small amount of further detail painting. Once everything had dried I decided that it might be time for a test fit of interior and body shell so these parts were loosely assembled. I think that the red brown looks good against the blue, but I am still drawn towards a dark blue shade for the body.
by John L, on Flickr
I have also completed assembly of the steering linkages on the chassis frame and miraculously I did this without burning any fingers. The chassis now requires some detail painting of springs, exhaust etc, before I fix those along with the engine and the remaining front hub parts in place. The completed chassis unit and interior can then be joined together.
by John L, on Flickr
I will try and catch up with my other builds over the next few days.
John
-
8
-
-
10 hours ago, CliffB said:
I can almost smell the leather

Leather painting is underway Cliff.
John
-
1
-
-
18 hours ago, Wings unlevel said:
Beautiful work so far befitting a beautiful machine!
Thanks Gerard. It's coming together nicely for a small kit.
Regards
John
10 hours ago, CliffB said:This is looking really nice John. Are the speedo and rev counter aftermarket decals?
Cheers
Thanks Cliff. The decals are provided with the kit. I am not sure if they are printed by Cartograph.
Cheers
John
-
2
-
-
I've replaced the clunky looking gearstick with something a little finer using brass tubing and glue for the gearknob. Then assembled the interior components and detailed the underside.
by John L, on Flickr
by John L, on Flickr
I have also started painting some of the interior detail such as the headliner and engine bay.
by John L, on Flickr
Thanks for stopping by.
John
-
11
-
-
I have made some progress with this, though I haven't tackled the heating of the steering parts yet. After checking the instructions it seems that the later work will allow me to position the front wheels.
Here are the assembled components that will make up the the chassis and interior.
by John L, on Flickr
by John L, on Flickr
Time to make a decision on the steering and also the paint colour for the interior, I am thinking of a reddish-brown which I feel may be a good match for a blue body. I haven't decided yet if that is going to be French Blue or something darker.
Cheers.
John
-
10
-
-
Here are how things are since the last update. The fuselage has had a first pass of filling and sanding, I have to do some rescribing of panel lines after that work and the area around the cockpit window needs some attention.
by John L, on Flickr
by John L, on Flickr
The wings have been assembled and are ready for some clean up.
by John L, on Flickr
On 10/03/2024 at 06:07, CliffB said:However, you've given me a bad case of 'drawer-envy' (I could only afford one set of those!). They're good though, aren't they.
Better try and keep the rest of the set up out of shot then Cliff.
 And I agree, they are good.
Cheers
John.
-
8
-
-
The cylinder block has now been painted with dull aluminium and the panels on the side picked out with a semi matt aluminium. Rocker covers had some chrome finish applied, rhe exhaust was brushed with errr.. Exhaust Manifold suprisingly enough, and the carburettors were painted using aluminium and black. All of those details along with a few smaller items were then attaxhed to the engine block.
by John L, on Flickr
by John L, on Flickr
The next stage of build for this one is the chassis and steering etc, the assembly of which uses a technique that was often used for cars etc when I was 'nobbut a lad' - that was the melting of a short pin with a heated flat blade/screwdriver, thus enabling parts to move - something that would definitely be frowned on by todays 'elf n safety' brigade.

I'll let you know if the parts move and how many fingers I burn .

John
-
8
-
 2
2
-
-
Both of the fuselage halves have now been rescribed with the exception of the rudder area, I'll do that along with any areas that need further work one I have tidied the upper and lower joins up. I've also added some weight in the cockpit area - hopefully there is enough in there to keep it on the undercarriage, if not the stand option will come into play.
by John L, on Flickr
by John L, on Flickr
After leaving things overnight to set up I glued the two halves together. There was evidence of some warping when I was glueing them up and it took a combination of glues to get the halves together. Following some initial tidying, mainly to remove the super glue whilst it was still soft enough from the areas that I had used it, I have decided to leave the fuselage for a few days to set properly.
by John L, on Flickr
Meanwhile I have made a start on assembling the wings.
by John L, on Flickr
Hope to get more done on those over the next few days.
John
-
8
-
-
Earlier in the week I decided to make a start on this little kit and added some paint to the seats and interior, choosing to use a tan colour for this.
by John L, on Flickr
I am midway through painting up the dashboard and door cards before I add those parts to this sub assembly.
John
-
12
-
-
Here are the photos of progress so far on the 727, As I said in my earlier posting, I have glued the doors and windows in place on each of the fuselage halves and made a start on rescribing the raised panel lines by simply using those as a guide. The doors and windows will be replaced with decals, so I will have to do some filling around those before sanding them flush with the fuselage.
by John L, on Flickr
by John L, on Flickr
I hope to get the fuselage assembled over the coming week.
Back with more soon.
John
-
10
-
-
8 hours ago, Wings unlevel said:
Beautiful minimalist livery. Great choice.
I have always liked this scheme, it looked great on their B-707's too.
John.
-
1
-
-
On 01/03/2024 at 21:09, Andres Alvarado said:
Beautiful choice John!! I flew so many times in it as a child and my old man was involved in the acquisition and the paint scheme design for the Chilean Air Force one.... ahh the memories.
Cheers!!
That is a terrific photo Andres, thanks for posting it. I am pleased that the prospect of this build has brought back some memories for you.
I have made a start on the build and have fitted the doors and windows in each fuselage half, they will need some filling and a sand to tidy up any gaps. I have also made a start on rescribing some panel lines on one of the fuselage halves. I'll post some photos of the work that I have done so far tomorrow.
Regards.
John
-
1
-
-
4 hours ago, Corsairfoxfouruncle said:
Very nice to see a classic airliner. At least you're not going to make a disco out of it.
https://edm.com/news/new-nightclub-inside-fuselage-boeing-727-200-plane
That's some disco Dennis. I take it that entrance is via the rear airstairs.
-
1
-
2
-
-
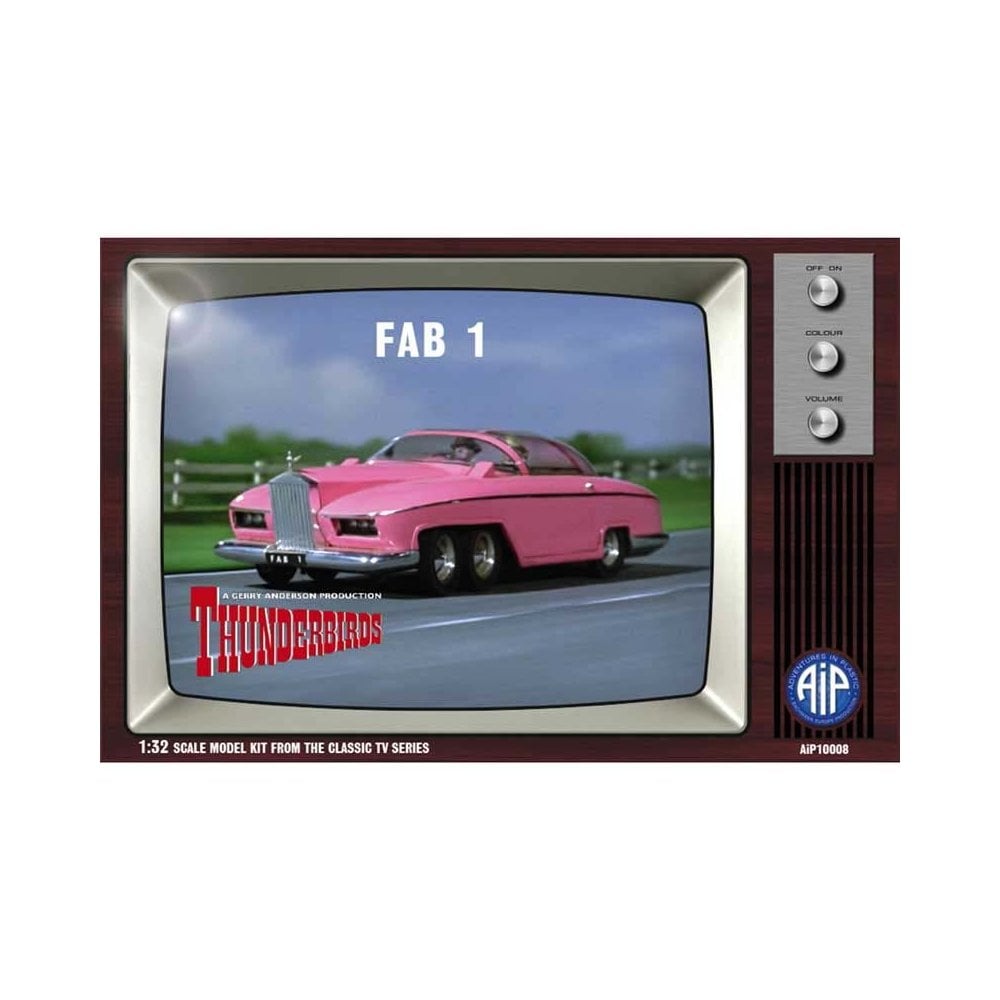
1 hour ago, Mjwomack said:
Excellent choice! But what is it?! I mean Sci-Fi/ Wattiff/ Concept car from the Paris car show in 1968!!!!
totally distracted now, and other retailers are available.
Don;t ask me!!!,
 I just thought that it was the Very Pink, six wheeled vehicle powered by a Rolls Royce engine that someone may or may not have been looking for.
Always happy to help
John
-
2
-
-
A third entry, and for me an iconic Baby Boomer, following the release of the film Goldfinger, the Corgi version of James Bond's Aston Martin DB5 became the must have toy back in the mid-60's.
For this build I am using the 1/43 Airfix starter set version which should make up into a nice little representation of this classic Grand Tourer,
by John L, on Flickr
Here are the main sprues,
by John L, on Flickr
and the clear parts decals, paints and glue.
by John L, on Flickr
John.
-
18
-
-
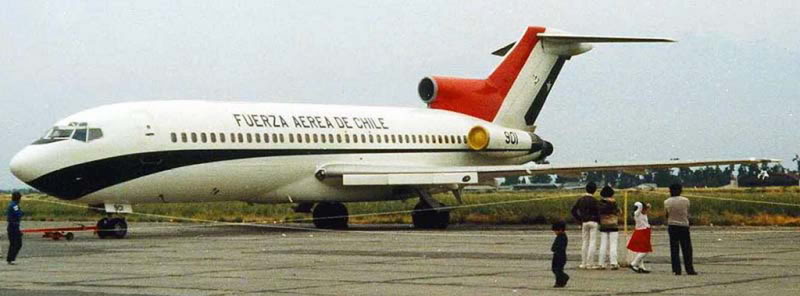
Another build from me, and a switch back to Civil Aviation for this one. This is the Airfix boxing of the Boeing 727 kit and a quick check of the measurements indicate that it scales out to around those for -100 short body version and I will be using a set of 26 Decals for this classic Lufthansa Scheme.
Here is an image from Airliners.net of D-ABIB at Stockholm -Arlanda in August 1964.
Box and contents photos.
by John L, on Flickr
The fuselage parts have some slight warping but should pull together OK.
by John L, on Flickr
The wing parts will need a bit of tidying to remove a bit of flash.
by John L, on Flickr
Here are the remaining parts including a stand, obviously issued when these came as a standard item in Airfix kits.
by John L, on Flickr
And finally my choice of decals for this build.
by John L, on Flickr
by John L, on Flickr
Hope to get started on this soon.
John
-
18
-
-
25 minutes ago, Mjwomack said:
Sounds like we're back to the Court Airlines sunburn liveried 1-11s! Actually I think I know where you're going with this and I approve
This might help in your quest.
https://www.scalemodelshop.co.uk/wp-content/uploads/2022/05/1629744983-64509100.jpg
Cheers
John. (No affiliation to Scale Model Shop)
-
1 hour ago, Mjwomack said:
Just the one? And I was hoping that the broad 'definition' or maybe soft-focus on what was Rolls Royce would give you plenty of choice!
Don't worry MJ, there is plenty of choice to go at with Derwent's, Spey's and Trent's and even the MT30's used in some modern Naval vessels.
I am certain something else will materialise before the start. 🤔
John.
-
1
-
-
Cheers Cliff. I'll take some more photos and add a topic later today. Who knows it might even be both in the end. 🤔😄
John.
-
1
-
-
56 minutes ago, Pig of the Week said:
Nice motor 👍
Might be worth checking out some underbonnet pics of that vehicle if poss, the block could have likely been painted rather than just a metallic finish ? I'm thinking of Austin / Morris green as an example..
Cheers Buddy and thanks for your suggestions.
There are two colour call outs in the instructions using old Heller paint codes 7008 which is Matt Aluminium and 7010 Matt Black. From some photos that I have found the rocker covers range from polished Aluminium to a Greyish Black and the Carburretors are highly polished in some cases - black in others, I had planned to use Vallejo Metal Colors to represent the different shades of metal surfaces. and these paints require a black gloss primer to get the correct shade. I am sure things will look OK once I start adding a few other details.
Thanks again.
Regards.
John
-
2
-


Aston Martin DB5
in Baby Boomers GB 1946-1964
Posted
Cheers chaps. I must admit that the colour shows up better on my phone than the laptop.
John