
Leaderboard


Popular Content
Showing content with the highest reputation on 19/04/24 in Posts
-
My first HKM kit and I was really chuffed with the fit of the kit. It is beautifully engineered and fits together nicely except for the top of the fuselage which gave me some issues. I believe this is a known issue. I got the seam sorted but for some unknown reason decided to run a line of rivets down it and in some of the pics it looks like the seam is there. Don't know what I was thinking as the real thing didn't have rivets there. Still a great kit and I would recommend it to anyone. I was so impressed that I got hold of a B-17 before they all disappeared with the popularity of "Masters of the Air". Primed with Mr. Finishing Surfacer 1500 Black. Painted with. Colourcoats Zinc Chromate Green, Insignia Red and Deep Bronze Green. Tamiya Olive Drab lightened with a lot of Yellow, Neutral Grey, Nato Black, Rubber Black, Clear Red, Clear Green, Clear Yellow and Gun Metal. Mr Hobby Metallic Dark Iron. Xtreme Metals Aluminium and Steel. Weathered with Daler Rowney Graduate Yellow and White oils. Abteilung 502 Starship Filth,Smoke and Paynes Grey oils. Vallejo Pigments Finished with AK 3rd Gen Matt varnish. This gives a really nice satin finish when thinned 80/20 with their own 3rd Gen thinner. Aftermarket used. CMK 3D printed seats. Brassin Resin Wheels Eduard photoetch Master Barrels ASK Masking kit. On with some pics. If I had to start again I'd put some more yellow in the olive drab to get a lighter effect but I am happy with the end result. Thanks for looking, Cheers, Alistair41 points
-
Finished this Do17Z built in the WW2 twins group build. It's the modern Airfix 1/72 kit which goes together quite nicely, apart from the engines which are a bit of a pain. Displayed next to my old tool version WIP thread:38 points
-
Good evening all, Here today I have my 2nd attempt at this Revell kit. The first was a disaster, broke pylons, glued the wings too far forward amongst other things. Parts used for this kit were the SBS models nose and pitot tubes and also the freightdog conversion kit. All other little modifications were scratch built (badly) by me and the decals were supplied by Xtradecal. I opted to use tiny neodymium magnets to connect the pylons to the wings which have turned out to work really well. Thanks for looking Dave26 points
-
Finally finished the meng models Husky ..I wanted to complete something different and after finding a few online pictures of the vehicle with a mine roller off I went the project stalled due to lack of information on the roller but after some shall I say interaction with Pearson engineering they came up trumps…. so here it is .mengs kit has been heavily modified to create the spec of the vehicle at the time …BV storage locker was opened a new radio table full radio fit along with boomerang..The roller is scratch built and each wheel has an independent suspension unit which works [no idea why on a static model ] a fun and frustrating build at times but I’m pleased . the vehicle is depicted on base in the lashkar valley prior to another deployment..19 points
-
Hi Everyone, Had this kit lurking about unstarted for a couple of years, as I wanted to do a different scheme to the kit offerings So here`s Revell`s 1/48 Ventura done as an earlier aircraft in the two colour US Navy scheme and 1943 markings Finished to represent an aircraft flown by VB/VPB-136, Adak, Aleutian Islands, 1943 Built from a combination of the Octopus marked boxing and the more recent RAF marked issue The decals all came from the stash and used Steve Ginters `Naval Fighters Number 86` as main reference The `Grumpys` are a bit of artistic license as early Venturas often had factory applied Walt Disney Cartoon figures painted on them. Added a few blinds and curtains to the windows as quite a few photo`s seen to show. Lastly here it is with my earlier effort of the same kit in the markings of VB/VPB-135 also an Aleutians based aircraft Hope you enjoy, thanks for looking Cheers Russ17 points
-
Hello all Tamiya Hetzer with numerous self-printed details, such as tracks, MG, tool clamps, etc. Figures from Alpine, bridge from Styro. Water effects with wood glue, lamp post made from barbecue spit with self-designed signs. Painting and weathering was the most fun and felt like it took months 🤪 I hope you like it! MD Cheers!15 points
-
Hello! Here’s my recent project, the Bf-110C. It has been in my "need to build" list for a while, such an iconic bird. However, I have to say, after several built Eduard kits, this one was kind of a disappointment. I mean, the details are great, specially in the cockpit, but it has some fitting issues. The nose/guns bay is engineered to be built open, because if you decide, like me, to have it closed, brace for impact! You’ll end up with steps, gaps and a lot of sanding and scribing. Also, the area being rounded doesn’t help either. The machine guns are really fragile (broke one of them a few times). The landing gears are just ok, I’ve added a lead wire to simulate hydraulic lines, and they also require attention to have them in place. And let’s not forget the clear parts. The landing light is a chunk of clear plastic way larger than its place to be. And, to glue the front lateral windows and gunner panels in the open position is also a hard task, for they don’t have any decent points of contact with the fuselage and/or other panels. To maintain these areas free of excess glue is quite challenging. The kit has a few row of rivets between the engines and the fuselage, so I’ve decided to rivet it all, and I’m happy with the result. Rose the riveter was the tool of choice. A very nice point are these new Eduard decals that you can remove the film from afterwards. They’ve worked great and the final effect is really good! Paints were a mix of Gunze lacquer and aqueous, well diluted for the motling, when needed. Hope you’ll enjoy. Cheers!11 points
-
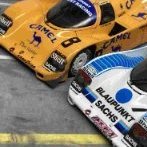
Hi there, this is my interpretation of Bob Wollek's 1987 Joest Porsche. It's mostly built OOB, based on the well-known Hasegawa kit. I added the front flaps which are specific for the no. 8 car. They were scratch-built from black sheet. Decals are from Reji, they went on really well. The paint is Camel Yellow, sealed with 1K clear from the can.10 points
-
I've been struggling with finding time to do much modelling over the past several months, so, when the Panzer VI Tiger STGB 2 Single Type Group Build appeared in the GB calendar, I thought this might be the oportunity to get something made! The start of the GB also coincided with me having some holiday time to use up and the Easter break was available too. I decided to make a 1/72 kit that I thought I could get built relatively quickly. So,, below, is the result of my efforts. I'd had this Dragon kit for quite a while and it turned out to be rather good. The original kit was released in 2010. The DS tracks were still okay. I know some people have had some real problems with DS tracks and I'd had one set where one run had crumbled before I got to use them fairly recently. But these seemed to work rather well in this scale. The kit also included some photoetched parts, which I think, added nicely to the detailing. The other thing was that I'd wanted to make a grey Tiger 1 for quite a while. As usual, everything was painted with acrylic paints, which were thinned with water, and mostly applied with flat brushes. I use fine pointed brushes for any detail painting. The only extras I used were the mud texture stuff, 'European Mud' from Vallejo and a brush bristle for the aerial. The WIP thread for this can be found: HERE And finally, to hopefully show how small a 1/72nd Tiger 1 actually is!: The Tiger STGB is still ongoing with lots of rather good modelling going on. Make sure you ccheck it out, or even take part, if you get chance. Comments and suggestions welcome. Kind regards, Stix10 points
-
The sight that greeted me when I came up the garden path10 points
-
9 points
-
COMPLETED!!!!!!! THANKS to those who wanted to give me invaluable advice and to the others for their patience. Here some picture. For the complete story and many other photos I refer you to the site https://brunoperfetto.weebly.com/f-4-phantom-fgr2.html Bye!!!9 points
-
Nice little model from fine molds. quality is very good and easy to assemble. mostly snap kit. I did a few modifications : for example the propeller blades were all aligned ( didn't look realistic). I also added some reinforcement to the stabilizers. Camo was hand painted . last time I hand painted camo on airplane I was 10 years old back in the eighties 😆 ( a harrier ) I want to make a little diorama next , but first I need to watch the film again for inspiration. I had this Nausicaa scene laying around in my room , so I tried a cross over ( sorry for this 😬)8 points
-
I've finally got something in the gallery! It's an Airfix Do17Z-2. Generally quite a pleasant build apart from the engines. Pleased with the result. Thread here:8 points
-
Having been quiet for a few days; well quietish on BM. The same could not be said for the Martian cave where I have been trying to juggle this beast with soldering another Zeppelin. Mrs Martian says that some of the expressions emanating from my room would make a Vogon blush. However, further reading has established that these as a bulkhead either end of the bunk compartment and that the same had a deckhead which supported a stool for the astrodome. This lets me off having to detail the entire interior of the hull. Most of the time has been spent sorting out the bulkhead and adding structure to the starboard side of the hull, all the time trying to ensure that it meets up with the portside structure. It did: eventually. I have some tidying up of the bulkhead and partition that goes just aft of it to do, so I am going to have to let the glue cure for a day or two. After a final push, you know, the one @general melchett is always going on about, we can then begin to think about adding equipment to the hull. No Melchett! not your secret "chum" Miss Lucy 'Quipment! Anyone up for helping his Generalship with an ice cold shower? The bit I am not looking forward to is the equipment rack that fits in what had been the galley on the dedicated flying boat versions of the Mariner. I keep thinking that it would be fun to do an Operation High Jump boat used for the aerial mapping of Antarctica....... Anyhow, I'm waffling now so let's have some pictures and thanks for looking. Martian 👽8 points
-
It's been a hard day's night, and I'm sleeping like a cat. . .7 points
-
So here are my key references for shape: The IWM profile photo (top left) seems to be the best representation and shows up quite large inaccuracies in all the drawn profiles. The next photo down is a pretty good match too, but the silver and trim photo is not sufficiently side on to help me in my simplistic analysis. But I now have my definitive profile to guide me through that conversion. ....after the Baltimore... ...and the Tempest 1... ...and my stalled Arado 234 in Twins... ...and two Mileses in Golden Age... ...and a Blitzbuild coming up too! Regards, Adrian7 points
-
Getting shape now. DW suggest you put on the fenders and mudguards first but after a bit of dry fitting I knew this wouldn't work. There is a bit of warpage of the base so you need the aid of clamps to get the two parts to match. One side was alright so I heavily glued that side and let it dry. Then went to work on the other. It fitted well in the end. Cheers all and have a good day.👍7 points
-
This model has been a side project for a while, something to do a bit on when motivation on other kits lapses. A couple of weeks ago I finished it, so here it is. It's the 1/144 Roden Fw200 built from the second release which features Hitler's personal Fw200 "Immelman III" in its various schemes it wore throughout WW2. I chose the earliest available scheme from September 1939, just as the war was beginning, when it looked more like an airliner than a military aircraft. She's pretty big! Next to my Roden He111 in the same scale:6 points
-
Thanks @cobraleader, @elger, @Stew Dapple, @AliGauld, @dogsbody and @Hamden. Good afternoon Gents, I hope that you are all well. This afternoon I got out to the cave and continued with the Wimpey. I bit the bullet and went for fit out. I still have the turret bases to paint and fit + the walkway to the rear . I also cleaned up the blanking panels the best I can. Time for tea , Pizza. Simon.6 points
-
By the time a Marine pulled into a little town, every hotel room was taken. "You've got to have a room somewhere," he pleaded. "Or just a bed, I don't care where." "Well, I do have a double room with one occupant, a Navy guy," admitted the manager, "and he might be glad to split the cost. But to tell you the truth, he snores so loudly that people in adjoining rooms have complained in the past. I'm not sure it'd be worth it to you." "No problem," the tired Marine assured him. "I'll take it." The next morning the Marine came down to breakfast bright-eyed and bushy-tailed. "How'd you sleep?" Asked the manager. "Never better." The manager was impressed. "No problem with the other guy snoring, then?" "Nope, I shut him up in no time." Said the Marine. "How'd you manage that?" asked the manager. "He was already in bed, snoring away, when I came in the room," the Marine explained. "I went over, gave him a kiss on the cheek, said, 'Goodnight, beautiful,' and he sat up all night watching me." Simon.6 points
-
Turrets are done I'm going to add the bullet proof glass to the rear deck of the cockpit. I'm starting with a piece of cardboard cut to size, but I'll make this out of clear plastic once I've got the dimensions figured out. thanks for looking!6 points
-
The good old '163 Academy requires various interventions, both in the cockpit area… …and in the exterior of the fuselage, in the wings and finally in the complex undercarriage-skid. The specimen being built is the Me163 B V45, in charge of the Erprobungskommando 16, as it appeared in Bad Zwischenahn in July 1944. The following December it was used to test the SG500 rocket system, which caused irreparable damage to the airframe. The camouflage scheme, slightly different from that of most Komets, consists of RLM 81/82/76. The fuselage decals are Print Scale 72-303 and, as always, the model is painted entirely by brush with Humbrol Enamels color blends. View of the undersurfaces. Hope you like it. Thanks for your interest. Giampiero Piva6 points
-
Little progress with my build, to resolve the issue of the undercarriage mounting sequence, I removed the molded plastic wheel axles. I am replacing them with a brass tube 1.6 mm dia. as shown in the picture. Once trimmed in length, the new axles could be slid in place at the most convenient moment. Without the wheels in the way, I could assemble and finish the undercarriage structure properly and fit the brake lines made of lead wire. I also drilled lightening holes in the supports of the mud fenders. Here the completed undercarriages are posed within their locations on the lower wing halves which have been painted green. I read that to improve commonality of parts, the real undercarriages were not handed, but I left them as they are intended in the kit because their modification it would have been too complicated for me. Finally, the nacelles were glued in place and the half wings were completed. The undercarriages are now ready to be painted. That's all for now, thanks for following, best regards, Dan6 points
-
It's almost done. I have to add the props, wheel bay doors, fabricate a pitot tube and maybe some more small work. I also got a new camera set up with one of those photo tents, so I'm playing around with that a bit as well.6 points
-
I saw something interesting yesterday. The cat hid the little kittens in the woodshed. And she went somewhere on her cat business. At this time, the fox came and smelled the smell of kittens. See for yourself what happened next.6 points
-
Apologies for absence, Real Life keeps interfering with modelling and other Important Things! However, it's final assembly time and once I got started I didn't want to pause to post progress images until I had the full set, I may have to split this post as it'll be a bit image-intensive but I'll see how it pans out. Here goes... First the street rod's lower body/floorpan assembly was finally mounted on the chassis... Then it was time to glaze the truncated 2CV bodyshell and fit the wipers... Then the floor went on... ...followed by the seats... ...steering column assembly (including transmission selector)... ...and finally the bodyshell. The dash was fitted at some point prior to this but I can't remember exactly when, it's all a blur... The modified radiator was then finally installed... ...and the rear finally received some attention. A raid on the spares box yielded a set of ideal tail lights and a bumper assembly from a Jaguar E-Type which was dimensionally correct and just needed the ends shortening. Round at the sharp end the nosecone and struts were fitted and aligned. Finally the intended shape emerged... All that was need now were the headlights (from the street rod) and door handles. The car is now essentially complete bar a few bits of final fettling and detailing so this will be the final entry in this particular thread. Here's a few pics to tide you over until I can get round to creating an RFI thread... Huge thanks as always for your company, interest and comments during this slightly lunatic build. I've enjoyed it immensely and I hope you have too. However, you'll probably be relieved to hear that I'm sticking to OOB builds for a while (I know, I know, I've said it all before) until the next mental aberration hits! Cheers for now.5 points
-
a growing collection of sub-assemblies, and nothing really built yet5 points
-
I now have a rolling chassis! Replete (splendid word because I think of food) with white walled wheels as is the Gresley way I'm not sure at what point undercoat becomes primer etc. but still going for little and often with the layers on the main body. Some dabs of orange going on soon.5 points
-
Gloster Gauntlet Mk.II ‘Special Markings’ (AZ7868) 1:72 AZ Model by Kovozávody Prostějov The Gauntlet bears a family resemblance to the Gladiator from the same stable because it preceded it, entering service earlier after an extended development process that would be worthy of a modern defence project. Its development began as early as 1929, but it wasn’t until 1933 that it was given the name Gauntlet, and another two years before it started to enter service with the RAF in small numbers. It was intended as a replacement to the Bulldog, which it outpaced by 50mph thanks to its Bristol Mercury engine, with heavier armament that included two machine guns in troughs in the fuselage sides, firing through the cowling and propeller. Only twenty-four of the initial airframes were made before there were improvements made, which were give the designation Mk.II, resulting in the initial batch being retrospectively named Mk.I. The Mk.II made up the majority of production, with over 200 manufactured in the UK, plus more built overseas. At its peak there were fourteen squadrons equipped with Gauntlets, but as the storm clouds of war began to gather, it was already outdated. By the time war finally broke out, only one squadron was left in frontline service, the rest having transitioned to more modern fighters such as the Hurricane, which was created by Gloster’s new owners, Hawker, still carrying over some design traits from the Gauntlet through the Gladiator to the Hurricane, particularly in the rear fuselage and tail areas. Fortunately for the Hurricane pilots however, the speed and armament of their new aircraft was much improved and gave them a fighting chance against the enemy. The Gauntlet lingered on as a trainer in the UK and abroad for a while, with a single Mk.II preserved in airworthy condition in Finland, one of its former operators, although the engine has been replaced by something a little more modern for practical reasons. The Kit This is a reboxing of a 2008 tooling from AZ that has been re-released with new decals that depict special markings of the Gauntlet in RAF and Finnish service. It arrives in a small end-opening box with a painting of a Gauntlet over a battlefield engaging with a Soviet i16 on the front, and profiles for the decal options on the rear of the box. Inside are three sprues of grey styrene, a decal sheet, a small sheet of clear acrylic with two windscreens printed on it, plus the instruction booklet that is printed on a folded sheet of A4, with a series of rigging profiles on the rearmost page. Detail is good, with just a wisp of flash here and there, and a good representation of the fabric covered framework over the majority of the airframe. Construction begins with the simple cockpit that is based on a well-detailed flat section of floor, onto which the seat, control column and rudder pedals are fixed, applying four-point decal seatbelts to the pilot’s position for a little extra detail. There is cockpit sidewall detail moulded into the insides of the fuselage halves, and once these and the cockpit are painted and weathered, the fuselage halves can be joined together, adding a two-part instrument panel at the front of the cockpit cut-out. The engine is supplied as a single part with nine cylinders arranged around the core, which is surrounded by a three-part cowling due to the teardrop fairings around the perimeter, finishing the cowling off with a separate lip at the front. The tail fin is moulded into the fuselage halves, adding the individual elevator fins to the sides in small slots, and a tail-wheel with moulded-in strut underneath. The lower wing is a single part that is inserted into a slot under the fuselage, and once the seams have been dealt with, the landing gear can be built, made from two triangular struts that are linked by the axle that has wheels mounted on each end, positioning the assembly on the underside of the fuselage using the small recesses that are moulded into the model to locate them accurately. Four cabane struts are similarly fitted to the fuselage in front of the cockpit using more guide recesses, which supports the upper wing that is also moulded as a single part. Four interplane struts are fitted between the wings, and a scrap diagram gives details of the tensioner rods that are suspended in the rigging, which is dealt with over the page. A pair of exhausts are mounted under the cowling, cutting the windscreen from the acetate sheet and folding it to shape before gluing it to the front of the cockpit, then slotting the two machine gun barrels in the troughs on each side of the fuselage. The final task (if we ignore the rigging for now) is the three-blade propeller, with a moulded-in spinner to the front. Speaking of rigging, there are four diagrams on the rear of the booklet, detailing the location of the wiring, which should assist with the process along with the box art for a three-quarter view. Markings There are three options on the decal sheet, two RAF, and one in Finnish service, which comes with the reversed Swastikas they used at the time, confusing the uninitiated for many years. The British subjects are away from the usual silver dope, including desert and night fighter schemes From the box you can build one of the following: The decals are printed using a digital process and have good registration, sharpness, and colour density, with a thin gloss carrier film cut loosely around the printed areas. This means that the carrier film on their decals can be coaxed away from the printed part of the decal after they have been applied, effectively rendering them carrier film free, making the completed decals much thinner and more realistic, and obviating the need to apply successive coats of clear varnish to hide the edges of the carrier film. It’s a great step further in realism from my point of view, and saves a good quantity of precious modelling time into the bargain. Conclusion The Gauntlet was a well-used interwar fighter that in its day was an impressive improvement over those that it replaced, but was soon to be left in the wake of the next generation of fighters due to the speed of development at the time. The kit depicts its fabric covering well, with a detailed cockpit, and it comes with some interesting decal options. Highly recommended. Review sample courtesy of5 points
-
My latest effort - am quite happy how it turned out. I decided to do a little ekstra in the cockpit area and to dress up the turret a bit. The build was quite uneventfull, allthough the decals was a bit 'challenging'! Thick and demanded a lot of decalsoftener, but it looks alright now - as you would say - a good 3-footer! A couple of things: My reference (B-25 Mitchell in Action and Google) Didn't show any ventral turret on this one. I couldn't find any pictures of the top turret, and Google provided a lot of different types of B-25 turrets, so I went with the - to me - most interesting one, which wasn't painted. I hope you will like it anyway! Cheers Hans J5 points
-
Fellow Modelers, The 1966 American sci-fi adventure film Fantastic Voyage tells the story of a submarine crew who is shrunk to microscopic size and ventures into the body of an injured scientist to repair damage to his brain. The operation must be done in one-hour, as the shrinking process only last that long before an object returns to its original size. The main action of the movie deals with the submarine crew overcoming the challenges of reaching the brain, performing the experimental surgery and being able to leave the body before being destroyed by the body’s natural defenses. Fantastic Voyage is an outstanding movie that is entertaining and impressive even when viewed today. It received five nominations at the 39th Academy Awards mostly in technical departments, winning for Best Visual Effects and Best Art Direction in Color. One of the film’s most enduring stars is the Proteus submarine (a.k.a. U-91035), described as an experimental U.S. Navy vessel designed to research the spawning habits of deep sea marine life. This elegant and believable vehicle was designed by Harper Goff, who also designed the Nautilus submarine for the 1954 Disney movie 20,000 Leagues under the Sea. For decades many modelers (including myself) have been wishing for an accurate and detailed plastic model kit of the Proteus submarine to be produced. Those wishes were granted in 2016 when Moebius Models released their big 1/32 scale (16” length X 9” width) kit. After sitting on a closet shelf for eight years I have decided it is time to build mine. Welcome to my Progress Build of the Moebius Models Proteus submarine… Figures 001 through 004: Here are photos of the box art and of a manufacturer build-up from the instruction booklet. As you can see in the photos the kit comes with a complete interior. Figure 005: Here is the kit decal sheet. Two sets were included with my kit instead of one and I am very grateful for the bonus! Figure 006: The only aftermarket item I purchased for this kit is the ParaGrafix photo-etched set. That company makes an excellent product and everything I use should enhance the build. According to modeling experts on the internet, this kit has multiple minor inaccuracies (inside and out) but I am fine with not correcting many of those inaccuracies. My main goal is to make the build neat and attractive, like it comes across in the movie. Figure 007: As always, the first step was cutting, sanding, test fitting and cleaning up each part. This is never a fun process, but it always gets me familiar with the model’s fit up and possible issues down the road. Figure 008: This photo shows all of the kit parts, except for the interior floor tub and upper/lower hull halves. No modifications have been made yet. Figure 009: The kit supplied interior is really detailed but once it is sealed up inside the hull halves about 75% of it will not be seen. However, I want the best of both worlds-a completely viewable interior and a completely assembled exterior. To get this I decided to build the interior and exterior as two separate models, and when finished they will sit side-by-side in a display case arranged very much like seen in this photo. Therefore, this Progress Build will be divided into two sections consisting of PART 1-Interior and PART 2-Exterior. Figures 010 through 012 (PART 1-INTERIOR): Since all areas of the interior floor tub, walls and furniture will be visible, extra sanding was required to remove rough spots, injection pin marks, molding flaws and raised copyright wording that would be hidden in a standard build. These photos show the interior floor tub after the cleaning was complete. Figure 013: The pilot’s seat support part was modified by removing the plastic foot rests to be replaced with photo-etched foot rests later. Figures 014-015: These before and after photos show the removal of a control box and conduit piping from one of the walls. They were removed to make painting the parts easier and will be replaced later. Figure 016: The conduit piping from this wall has been sanded away as well, but holes have been drilled to mark their original location. Figure 017: A thin piece of Evergreen styrene was used to fill in the open backside of the wireless radio. Figures 018-019: The chart case front part used dimpling to represent open holes. It did not look very convincing so I very carefully opened them by drilling. This modification made a tremendous improvement in how the part looks. Figure 020: The chart case side part details were sanded away and replaced by a photo-etched part. The ParaGrafix photo-etched control panel parts were only used where the kit’s raised details were poorly molded. Figure 021: The assembled chart case is shown. Figure 022: The assembled chart table is shown with one photo-etched piece added. Figure 023: The laboratory sink base was improved by adding photo-etched doors and a scratch-built faucet. Tiny Evergreen styrene hot and cold water valves will be added later. In the movie there was actually two sink basins but I was content to live with one. Figures 024-025: The laboratory cabinet was the next part to be modified. On the front side, photo-etched doors were added and the molded-on dispenser knobs were cut off and holes drilled in their place. Small pieces of Evergreen round styrene will be added later where the molded-on knobs were. On the backside, various Evergreen pieces of thin sheet and 1/4” blocks were used to fill on the hollow areas and improve the overall appearance. Figures 026-027: The laboratory cabinet is shown being test fitted to the interior floor tub. Until next time… Phillip15 points
-
Thanks Simon, Thanks very much Keith, More below. Thanks so much Chris, most kind. Thanks Roger, I think it's done. I got the rigging and wing tip lights done and I am fairly chuffed with the final result. A sincere and grateful thanks to all the good folks who took the time to look, react and comment on this. You all kept me going. RFI Here Next Up WIP Here. Thanks for looking, Cheers, Alistair5 points
-
And yet more infelicities. Cleaning up the undercart while the gloss clearcoat dries. The undercarriage detail is actually quite good, with all of the relevant retraction jacks present. Trumpeter somewhat spoils an otherwise nice arrangement with the placement of the lower mounting pin for gluing the undercarriage leg to the door - would make for a nasty jolt on landing. So the lower pins and the corresponding socket on the door are coming off. The tailwheel assembly, on the other hand, is very nice, once you drill and hollow out the scissor legs after removing them from a lot of flash and thick attachment points. They even have the correct assymetric offsets top and bottom. I think I have solved my issue with the wheels. After looking at wheel and hub diameters, and looking for something that would be closer to the original four spoke, small hub style (the surviving Fulmar in the FAA museum has some later style of wheel and tyre - maybe Firefly?), I have ordered some Barracuda Studio Whirlwind wheels. These are within half an inch of the overall correct tyre circumference, and the hub looks the right size and style. It’s certainly better than the kit wheel. I ordered a second set, in case I ever get brave enough to try and replace the wheels on my old Cooper Details Whirlwind.5 points
-
Good morning, afternoon and evening, Today I would like to share my 1/48 Lindberg Gloster Gladiator Chinese Airforce, 2909. The plane 2909 was flown by American- Chinese ACE pilot John Poon- Yeung Wong, 29th squadron No.9. Picture below quoted from "Aces of the Republic of China Air Force" - by Raymond Cheung. The kit was bought from an aftermarket, the interior is all PE parts by AirWaves and the decal is made by Kora. Rigging was the hardest part of this plane as I needed to make turnbuckles myself. I did not take more pics of the interior this time. But I took some in-progress pics. If anyone is interested in the process of building, I would like to share them in the comments. Cheers, Tommy H Liu5 points
-
And closed. This thread is supposed to be about the likely or confirmed Italeri releases for 2024, not the merits of websites, YouTube influencers, or company quality. Ease off on the rants and sniping, it's not going to end in smiles.5 points
-
And another model completed and the photos go to the gallery, S.M. 79-II "Sparviero", 283 squadriglia, 130 gruppo autonoma, Mediterranean 1942. feel free to visit the gallery.5 points
-
Not sure technically if these are true spots, but I'll post them anyway. My Caterham had a cold starting issue, so I've been at a specialist getting it repaired today (it turned out that the rubber mount the throttle bodies attach to was slightly perished allowing air to be drawn in), but she's all fixed and better than ever 😀👍. I won't bore you with hundred of Caterham pics (but trust me I could 😀). However this lovely Renault Alpine was parked outside About 100 yards up the road there is another specialist, can you guess the Marque? Saving the best till last All in all a good day and it even stayed dry for the drive home - Andy5 points
-
Am a Brown Sauce on a Bacon Buty but chili sauce elsewhere. And the pen saved my sanity. Cheers Colin, I am impressed with the "Quilting effect" too. I tried that , leveled them off the best I could but still a lip sadly. Looks like a large sanding job coming up. Thanks @franky boy, @Hamden, @Retired Bob, @CH-53D, @elger, @dogsbody and @Stew Dapple. Well, how many shades of Black today ? Three.. Starting with Semi Gloss. Next NATO. Then Rubber. I have still to mask the tail wheel for the Aluminium. Wings and ailerons given a coat of primer. And the "Blanking Panels" added and filled, just a lot of sanding to do some when tomorrow. Sunshine .... Simon.5 points
-
Started stenciling. Still quite pristine-looking, will add some wee dirt later. Skipping stencils on the green tail, unsure if they’d put them back. Decided on olive drab warheads on the rockets, with dark grey or black fins. Haven’t found anything definite, so have to make a guess. The tanks look odd because they are hanging by a thread, literally. I always had problems getting tanks to stick on Airfix hardpoints.5 points
-
For such bravery, I gave the cat a double portion of meat and milk. 🙂5 points
-
I was inspired by the Hot Shots movie to build this Gnat. The model is more or less OOB. I put a cover over the rear cockpit and added canopy opening struts - both are features on film aircraft. The pilot is chopped together from various Hasegawa and Monogram figures, while the Garfield attached inside the canopy is made from Milliput. Nils5 points
-
Just found these photos from several years back when I took my lad and some of his friends go-karting. The two at the front are about to be lapped by the two at the back, but all is looking good I think the one in blue has finally got the hang of it However not sure number 14 really has got the right idea. oh dear Now he's got jt😆😅 I wouldn't mind, but he done the same thing virtually every lap! Fortunately this wasn't my boy otherwise I'd have had to disown him!4 points
-
I have made a start on the underside decs. From any distance the blue stencils are virtually invisible so here is a close up. On the camo version the blue stencils changed to black on the bottom and yellow on the top. So that is about half of the stencils under the wings done - more later. Pete4 points
-
Add the antenna assemblies, and the clear parts.. I guess it's (finally ) done! Cheers, Mario4 points
-
Thanks Pete, you are a very silly Earthling. But as one of the "Usual Suspects" you will doubtless wear that as a badge of honour. Thanks Gondor, I managed to get the doors out without damaging them so all I have to do is add a bead of plastic stock round the outside of them to return them to their original size. The second kit will definitely, err possibly, err maybe not be having its waist hatches opened. Doubtful of Mars 👽4 points
-
We've had enough of those in Lincolnshire in the last few months thank you. I hear that Skegness has been washed out to sea. (not a bad thing really). I've not been looking at your medical records, but I have to say that you have a lovely interior. More ribs than a Chinese takeaway. It's a shame this kit doesn't have one half of the hull in clear plastic. Hey! There's an idea for plunge moulding! (OOER!)4 points
-
Quick weathering job and I'll call it done. In the display cabinet now The two Airfix Dorniers together4 points


.thumb.jpg.d17ff607fc7e89ed057e63fcb6f2a888.jpg)


This leaderboard is set to London/GMT+01:00