
Leaderboard


Popular Content
Showing content with the highest reputation on 31/05/23 in all areas
-
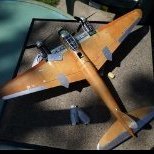
Typhoon Mk1b of 247 Squadron, 124 Wing, Advanced Landing Ground B6 Coulombs, Normandy June 1944. Aftermarket resin seat with belts, gunsight, cannon barrels. Tamiya acrylics.26 points
-
Hi friends. I have already posted those pics on Britmodellerbut they appear with a "Photobucket" banner which I dislike very much. So here is a new set of pics from the now defunct Alpha flight cie. All resin and after market, they are not easy to do but once finished give a real good representation of this beautiful Italian bomber. The camo was painted free hand with an old Aztec on the first CANT and with an H&S for the second one. Best regards and sorry for the numerous pics. FEED8950-B8FF-4374-9569-DD3F675A30D4 by jean Barby, sur Flickr 0B5BCF0A-EC94-44C5-A32A-13EDC7ABB383 by jean Barby, sur Flickr 10E8AC15-E233-467D-A730-37F42C759A5E by jean Barby, sur Flickr ED61BB6D-2402-43DE-9C86-1E5A9205B9DF by jean Barby, sur Flickr 1FCBA845-FCE4-42A2-9763-930C0822FBC3 by jean Barby, sur Flickr 3C29D6FF-5111-4B90-A85E-58BA8C3565BA by jean Barby, sur Flickr 3C29D6FF-5111-4B90-A85E-58BA8C3565BA by jean Barby, sur Flickr 5A597418-7704-4DEE-9307-64A1C87D75AA by jean Barby, sur Flickr D350B40E-C136-46E6-8A9E-82A05118FDB9_4_5005_c by jean Barby, sur Flickr 0F453D7D-C810-49D7-ACD0-E5FA3257B6C6 by jean Barby, sur Flickr 338CB6ED-C300-4411-9840-2FEF443272DA by jean Barby, sur Flickr 4FBE93A5-5ED9-4257-BF11-7B5BF4E544DB by jean Barby, sur Flickr 3580C32E-A2DA-489B-BB81-88611C73744C by jean Barby, sur Flickr 80D5F3C1-9774-4FD3-A17D-67F3C4D24827 by jean Barby, sur Flickr 71E5A365-07CA-449B-A66B-22ED4192984C by jean Barby, sur Flickr 5B5410C2-492F-43AD-A62F-677367E2C591 by jean Barby, sur Flickr 229900E8-9AD0-489B-B6E1-89CAFE7FB1FD by jean Barby, sur Flickr 86D9E158-7E44-4A57-B619-14331E9008B1 by jean Barby, sur Flickr 71A4A53C-0345-48F4-81A9-535D0C95889D by jean Barby, sur Flickr22 points
-
Howdy all, Thought you wouldn`t mind me bothering you with some photo`s of my latest creation My attempt at AMP`s 1/48 Huskie kit Finished to represent an early S.A.R. chopper operating from NKP over Laos and North Vietnam in the first year of the official war Mostly from the box but with a few tweaks, including...... .....deletion of the rear clam shell doors and replaced with webbing made from strips of manila envelope,..... and deleted the megaphone/speakers from the nose Patches of grey primer over the yellow and dayglow rescue markings and elsewhere, Had to replace some of the thin and tiny etched etched bits that my sausage fingers destroyed ( and also some I didn`t even attempt ) Decals were some from the kit and a few from the stash. Hope you enjoy, thanks for looking Cheers Russ20 points
-
Messerschmitt Bf-110E Hobby 2000 1:32 All I can say about the set is that it is not a good model, poor details and fit.19 points
-
Evening all, After a glorious weekend away walking in The Lakes... ...I thought I'd have a proper test-fit of the gear as well as take some piccies using the decent camera set up. The undercarriage isn't attached yet as there's lots of detail still to be made and added to the bays - not to mention the painting of both the bays and legs - but a set of metal pins inserted into the spars as mounting points and holes of the correct size drilled into the upper-most past of the gear legs means they are a snug push-fit and support the model without glue. I've also made the basic twin-rear wheel set up by utilising Beaufighter tail wheels and legs, which with some mods have done the job. Not perfect replicas, but once the bays and doors are finished off not much will be seen anyway. It all looks very gangly at the moment, but when the undercarriage doors are added as well as the bomb bay doors, it should look the part. What to tackle next? The bomb bays or engines? Decisions, decisions. Onwards and upwards, as the old saying goes... Until next time, Tom18 points
-
Originally I had planned to build a Martin Maryland but circumstances contrived to hide it from me, to resurface no doubt after this GB is finished ! So how about a SCW Vickers Vildebeest with a wicked paint job oh and if that isn't unusual enough, the kit isn't listed on Scalemates Here's the colour scheme Oh, and did I mention the kits resin ? So this should be no trouble at all, good luck everyone 👍 Cheers Pat16 points
-
This is Tamiya's new KV-2 built essentially from the box. I just replaced the nylon cables with braided led wire. I found this model incredibly challenging to paint and weather in an interesting way that was also pleasing to my eye. I stripped the paint twice, and honestly I don't remember all the steps I took, but there all lots of pigments suspended in a solution of heavily thinned oils. I also found this model very difficult to photograph effectively. I'm kind of glad its over and done with. I would do it very differently if I was doing it again, and someday I might. But for now I think I'm finally KV'ed out! I'm using an entirely different philosophy and approach for my next model. My lame attempt at the figure13 points
-
Hi. This is my first post here showing a finished model, I did do some scratch building. yes I know the port door should be opened but after doing so much inside the cockpit it seamed a shame to hide it all..12 points
-
Hi everybody, this is my first aircraft completion of 2023 - A 1/72 Modelsvit Mirage IIIO built in the Marcel Bloch/Dassault Aviation Group Build. The build thread is here: The finish is Model Master Metalizer brushed/polished on - the details of the technique are in the build thread. As usual, it's difficult to capture how a metal finish looks in photos, so I tried to take these RFI photos in many varying lighting setups. I really enjoyed the Modelsvit kit and have their Mirage 2000-5 and Mirage 4000 in the stash, so I think I may just keep building them!12 points
-
I see what you mean. Actually, I think it's mostly the visual effect of the photograph highlighting the contrasting textures/colours. I've given it a squirt of Tamiya white to even out the visuals: Where the nose joins the fuselage the panel line underneath is definitely a bit on the Airfix trench side and a bit wobbly - and that'll need a bit of filling; but there's no major contour mismatch/deficit. The rest is as Airfix intended - which I hope is vaguely Defiant like12 points
-
Last Sunday there was a classic car rally held within the walls of Lincoln Castle. Here are some of the many vehicles on display; RS2000 that belongs to an acquaintance of mine. Austin Metro. 1932 Riley Sprite. Alfa-Romeo SZ Ford Model T Volvo Amazon De Tomaso Pantera Notchback Ford Mustang 1961 Lotus Elite Porsche 911 Twin turbo Capri Austin Morris Ital Trevor11 points
-
Evening all, Rather have a thing for dayglo at the mo, which is awkward since both dayglo paint or decals are painful to work with- just the nature of the beast! Anyway pics of latest off the desk...Meteor F8(TT of 79 sqn, made oob from the Xtrakit model. I've used Xtradecals dayglo stripes more or less successfully (patience and list of micro sol!) with serials from the same source. 79 sqn bars came from the spares box. The Light Aircraft grey -always a difficult colour in my experience- has been represented by Tamiya XF80, which works very well to my eye at least.Aside from adding a couple of small bits of plastic card for the target banner bracket on the ventral fuel tank. Possibly outclassed by the new Airfix (not seen that kit yet) , it still has mileage I think. I've an MPM FR9 to do before I venture to the Airfix rendition. Anyhow, FWIW. Ralph10 points
-
Hi all, about time I put something up on here so here's a build I did for Airfix Model World in August of last year. Now, while I'm not really a huge chopper fan, I do like oddities (you may have noticed) and this contraption certainly falls into that category. It's the Italeri 1/72nd Piasecki H-21 Workhorse/Shawnee, also known as the 'Flying Banana' for obvious reasons, a fairly successful design used by several armed forces around the world. Back in the sixties US Forces agreed to provide CH-21Bs to support military operations of the Forces Aérienne Congolaises (FAC) during the ongoing Congo crisis between 1960 and 1965. All six aircraft were flown by Belgian crews, based at Kamina airbase in the south of the province. Interestingly a CIA front company, Ansalt WIGMO provided maintenance support to large parts of the FAC between 1964 and 1968. Sadly the CH-21Bs were found to be unreliable and underpowered in the harsh conditions and all six were lost to flying accidents during the first six months of 1965. Overall, I found Italeri's H-21 a decent little kit that provided a solid foundation for a CH-21B conversion. This was furthered by the Whirlybird resin set, which included all the components required for the conversion including an excellent decal sheet for each of the six aircraft operated by the FAC. While Eduard provided some excellent PE goodness, I found the kit parts detail to be a little too basic so quite a few of the details were scratchbuilt. Along with my own 3D printed barrels, ladders, and "cargo," which these machines may well have carried during the more covert CIA-backed missions. I also made a scenic base that represented the typical concrete platforms used by the aircraft when operating from the African tundra. At some point I may well add a few suitable figures, if I comes across them.... I'm quite tempted with its 1/48th big brother, maybe as an abandoned/crashed airframe, in a jungle setting. . Hope you like and thanks for looking. Cheers Melchie A few detail images. Basically I scratchbuilt the interior including missing fuselage ribbing, new doors and floor, roof centre conduit with lights, engine bay and missing upper prop-shaft structure which can be easily seen through the grill meshes. Also worked on the cockpit, adding scratch seats, seatbelts, anti torque pedals and various pieces of ancillary equipment including a fire extinguisher.9 points
-
Typical Special Hobby fare with this one. A fair bit of care, attention, dry fitting and sanding and it goes together well. WIP Here. Primed with. Tamiya Neutral Grey. Painted with. Colourcoats Interior Grey Green, Extra Dark Sea Grey, Sky S Type, FAA/RAF Red andFAA/RAF Yellow. Tamiya Flat Aluminium, Rubber Black, Nato Black, Khaki, Italian Red, Clear Red, Clear Green and Clear Yellow. Washed with Flory Dark Dirt, Citadel Nuln Oil, Seraphim Sepia and a mix of Windsor and Newton Burnt Umber and Burnt Sienna thinned with Lighter fluid. Finished with Windsor & Newton Galeria Satin and Gloss Varnishes. Thanks for looking, Cheers, Alistair9 points
-
Hello gents, here's my fifth completion of the year, Kotare's 1/32 Spitfire Ia (Mid). I had a momentary sag when I realised I was on the final stages of this kit, the same way that you might when you realise you're on the last few pages of a book you were really enjoying and you don't want it to end. It's an expensive kit, for sure, but it's beautifully moulded and engineered, not so complex that it's difficult to build, doesn't require weeks, days or even hours of sanding, filling, scratchbuilding etc. so depending on what you enjoy about modelling this may not be the kit for you I had a couple of minor irritations - I didn't like the look of the landing gear leg attachments at all so I ended up fitting the landing gear legs before adding the upper wing... I wasn't too keen on adding the fuselage spine light before fixing the fuselage spine in place, but in fairness that was a good solution and I only had a bit of resentment due to the fact it meant I had to mask it before painting. Finally I wasn't terribly happy at having to shave off part of the cockpit door opening in order to have the door closed as if it were me who was the freak here and not those oddballs who want to leave the door hanging open The paints used were Colourcoats of course - for the strange interior green colour noted in the instructions I used ACRA08 Verde Mimetico 53192 which is a close eyeball match for the Humbrol 120 recommended in the instructions (I needn't have bothered, you literally can't see anything except the pilot's seat and armour if you have the cockpit closed, and I had painted those in ACRN28 RAF Interior Grey-Green as this was one of the optional colours noted in the instructions). Upper surface camouflage was ACRN09 Dark Green over ACRN10 Dark Earth and the undersurface camouflage was done in ACRN01 - Sky "S" Type. I wasn't really taken with any of the kit's markings options; Al Deere has always been a hero to me but I just don't like to see a Mk.I with a Rotol prop and spinner, plus the proportions of the fuselage roundel look strange (though they are accurate); Richard Hardy's aircraft is basically famous for being captured more or less intact which doesn't strike me as a great claim to fame, and the 610 Squadron Spitfire has the fuselage codes on wonky... I tell you building this kit I learned quite a lot about Spitfires (and I thought I already knew a fair bit but I was overestimating quite a lot as it turned out) and one of the things I learned is that I can get quite uptight about some strange things Anyway I ordered some aftermarket decals and used the ones for one of the 92 Squadron Spitfires from August 1940; it too has a misproportioned fuselage roundel but for some reason I like that one. I almost managed to snatch defeat from the jaws of victory by picking the model up to test fit the underwing pitot while the decals on the starboard side were still wet with decal setting solution: the serial and squadron code on that side both disattached themselves from the model and stuck as little crumpled decorations on my fingertips. By a stroke of extreme good luck, our late forum-buddy Silver Fox had sent me some years ago the 1/32 transfers from the Kagero Battle of Britain Part II set which included the same aircraft as an option - the stroke of the serial is slightly thinner and the grey of the squadron code a little darker than the individual aircraft letter, but I was happy to accept the trade-off for the save. Well, sorry for the ramble, if you made it this far, thanks for your attention Cheers, Stew9 points
-
some detail9 points
-
This will be my entry, Airfix’s 1/72 Gladiator I in Hellenic Airforce markings from the Xtradecal sheet. Just to make things interesting, it has the shadow compensation camouflage scheme. I wont be starting until mid July as I am about to head bush for about a month, with a week in Perth to follow. AW8 points
-
Here's Part 1 of my 101st Airborne project. Hope the diorama section devotee's enjoy these snaps. Part 2 will be coming up in a few weeks time. Cheers8 points
-
Aircraft of the 422nd Test and Evaluation Squadron, 57th Fighter Weapons Wing, Tactical Fighter Weapons Center, Nellis AFB, April 1989. A-10A 79-0172 F-16B 82-1028 F-16B 82-1033 F-16D 86-0039 F-16D 86-0041 F-16C 87-0309 F-16C 87-0311 F-16C 87-0313 F-16C 87-0315 F-16C 87-0333 Thanks for looking, Sven Old Viper Tester8 points
-
what is the nearest8 points
-
Good morning I could not miss this Group Build dedicated to southern Europe, among other things I was born in the center of the Mediterranean Sicily). The chosen kit is a Macchi 202, most likely it will be of the 377^ Sq in Palermo (Sicily), but first I have to look for the decals among my things... here is the box with some extra accessories............Eventually, I change the version Ettore7 points
-
This was my first 3d printed project, I download the files for this and made the model smaller then the original printed version this is about 6" long.7 points
-
What I’d really like to be doing is fiddling about with the Stirling. What I’ve actually been doing (aside from a very delayed To Do List from August 2022) is dealing with this lot. Sixteen brass PE coaches, Great Eastern Railway, 1/76th scale, a commission build I have regretted taking on from the start! Happily, I’ve just finished fitting all the wire handrails and door tee-handles to the bodies. After a bit of solder tidying, these will all get a session in my ultrasonic bath to get rid of crud and flux residues, and to encourage anything not soldered properly to come adrift. The next big job will be working out how to fit the bodies to their underframes. The things I do for money!7 points
-
Thanks Warhawk, great tip. Soldering is in my toolbox G. Somewhere at the bottom! I'll have to think about transport. Thanks Alex. Sadly, again, I've done things before reading posts. I must change that! Actuators are, of course, also slightly too short which gives me a chance to use one of my favourite tools: 1mm circles punched and glued: And fitted: The nose gear was also fitted as were the PE bits for the dampers: They give you six of these even though you only need three. I broke one. Another fell off. One left7 points
-
NMCZ. It's a civilian vehicle and it is of a scale I do not normally build. But it's really cool. I'll skip the goofy decals and finish it in a typically well-loved, well-used fashion. I figure I will go for the very pale light blue color I remember seeing in Bulgaria back in the late 1990s. There's really good joke about the Trabant I heard back then... Rainy night at the bus stop. dark, cold, pouring down buckets. No shelter. Bus is late. A crowd waits--children, grandmas, bags of shopping, etc... A Trabant Combi pulls up at the curb. Driver opens up the door, says, "Anyone want a lift?" They all look at each other. They say 'No.' I might have to use some duct tape for this one... I'll get the rest of the photos up in the next few days. Consider this a place-holder. --John6 points
-
Good evening mates, I will join this GB with this little kit The machine I will try to represent is the one from Spanish Civil War - Republican Polikarpov I-15, but piloted by Serbian pilot Boško Petrović, one of ther most famous pilots of Republican Air Forces, with 7 air victories. Cheers, S.6 points
-
This kit was given to me as a birthday present by my girlfriend several years ago (she is a big fan of the GOT books & TV show). I typically build 1/35 amour though & have zero experience with painting figures, so it has been sitting at the back of the stash since. I'm in the mood for something quick & simple so I thought I'd finally give this kit a try & hopefully learn some new skills too. The kit is quite simple with just a single sprue & a base, I expect it will only take few a hours to build & then a few days to paint. So knowing me I should be finished some time next year... 😅6 points
-
Tamiya Quad Gun Tractor with IBG 75mm French Gun. Free French Brigade, 1st Artillery Regiment, Bir Hakim. Gazala Line, May 1942. The British Quad Gun has been the classic 25-pounder gun of the British artillery since the beginning of the conflict and would also be during the Desert Campaign. In terms of modeling, I'm tired of seeing this dynamic duo of Tamiya Quad Gun always with the 25 pounds. It reminds me of that annoying Batman and Robin series from the 60s. Looking to show a more interesting use for the Quad Gun, I decided to present an alternative weapon for this tractor. The cannon chosen is another classic, but this time, it's from French artillery. The kit selected was the IBG 35058 M1897 75mm French Field Gun. I found a good photo that helped develop my initial idea for the vehicle and gun... ...and in this other photo, it helped with the creativity for placing the figures. The flag in the photo is from the French Navy. Of course it couldn't be missing from my model. The 1st Artillery Regiment had the consecrated soixante-quinze, the efficient and rapid-firing 75mm cannon (QF). The cannons had been brought from Syria, reformed in the Beirut workshops and given wheels, some modified known as the “tropical type”. The wheels would make the cannons better suited to the mechanization of desert warfare. My model has wheels of the same type used on British 18 lbs guns. They were organized into 4 batteries each with 6 cannons. Despite being a safe and performing weapon, modern guns had already surpassed it. Figures are modified Tamiya. Painted in oil and acrylics. Also acrylics on the Quad and cannon and painted in the 2-tone camouflage, common to see in the vehicles of this unit. If the vehicle is going to carry the cannon to Bir Hakim, it will also serve as a ride for medical personnel. On the roof of the Quad I placed some accessories, highlighting the boxes with medical equipment. Decals are Archer Fine Transfers. Note the 2 British helmets with different red cross identification patterns. Cheers, Fábio.6 points
-
I dislike modelling with epoxy and metal. Not my cup of tea. If I have time for another in this GB I think I will build this... But without the goofy decals. It'll be like the well-used ones I saw in Bulgaria...and it's plastic. Not my comfort zone? 1/24th scale civilian vehicle. NMCZ for sure. Back to the Parrott Rifle... I sawed off some of the axles. I have attached the gun. The mounting brackets for the gun are awful. The fit stinks, even after opening up the holes a bit, etc...But I slathered on the epoxy and pray that it holds. This kit is already destined for the back of a shelf anyway. The chains are all on and I gave them some Jet Exhaust to darken the copper. I'm not concerned that it doesn't look perfect. I am not about to invest in a chemical that I will only use once to make them black. I figured, why not? Get those wheels on and glue those hubs. I'll let it sit for a while before I add the tools, etc. Wrapping it up tonight folks! --John6 points
-
Boo! You might be forgiven for thinking I'd abandoned this build or gone into witness protection, but I've just been very busy. However, I did inch forward with the RHD conversion and the dash is now completed. A weird quirk of the kit is the lack of a decal for the speedo. It's quite deep set on a Beetle so I came via another route, using my smallest hole punch to cut out a disc of clear plastic to replicate the speedo glass. This should catch the light nicely when it's all together. The centre boss of the steering wheel was impossible to paint neatly. In the end I found an old sheet of self adhesive 2mm white discs, which I painted one black and glued it in place. I can't remember where I got them from but it's proof that everything comes in handy if you keep it long enough. The dash is just balanced on the chassis here so the gap will close up once glued in place. In case you're wondering, the left-most little silver dot down below represents the ignition key hole, which is in fact in the correct position for RHD, they never changed it from the left hookers. More at some point.6 points
-
Thanks Cookie. Everyone needs a lounge. (With)drawing room not so much now we can't withdraw for cigars… Thanks Steve. Thanks Alex, a useful list that I'll work through. I've just glued the leg in one side so I'll just have to be careful. Checks. Leg lengths: Check. Outer frame doesn't fit flush to wing? Small pin so doesn't fit flush. Check. Need to shim the leg bottom, ensuring it's in the right position 'left to right': Glue it! Check that the nacelle still fits: Tight, but OK. Check. Then read Alex's notes. Ho hum, press on! Now I need to do the other side. Grunt.6 points
-
I wouldn't know, it's been years since I was able to dance.6 points
-
Released - ref. A06108 - de Havilland Vampire FB.5/FB.9 Sources: https://uk.airfix.com/products/de-havilland-vampire-fb5fb9-a06108?_br_psugg_q=de+havilland+vampire https://www.facebook.com/officialairfix/posts/pfbid0EAKZKiCFexFNfzrBmsRKEF5yoGcJXwDseQ5feCXQ7nH3M95mw45RDNeiCFwgosWWl V.P.6 points
-
and other "unmentionable" places (the thought of a modeller's swimsuit calendar almost made me lose my lunch! Oh the humanity - perhaps huge manatee, too!)6 points
-
Supermodel Cant Z.1007 bis There will never be a better time to build yours.... Go on you know you want to Cheers Pat6 points
-
Yep, doors to do at some stage then carpet tiles. Welcome dear chap, my postings can be sporadic at times but you are welcome. Thanks @AliGauld, @Jonners, @PeteH1969, @Memphis, @Lord Riot, @cobraleader, @Dr. Quack, @stevehnz, @GREG DESTEC, @Borisz, @Hamden and @Galligraphics. Time flies as they say and postings have been nil, until now LOL. Seats and cabin bits started painting. I.P. and console decaled. Seat belt production. Cabin seats painted. Started to fit the seat belts to the cabin seats, and it looked .... the paint was flaking off. So I reverted to old school and bare masking tape and paint later. The radar room seat done as well. Just the cabin seats to do... Enjoy the good weather. Stay safe. Simon.6 points
-
This was built from Revell`s "Technik" boxing of its huge 1/32 Ju88A-4. I converted it into a reconnaissance version using Profimodeller decals and scratchbuilt camera windows. I chose the subject because of its interesting camo scheme. Paints are mainly Gunze (RLM 78 and 79) and some Tamiya, camo was sprayed freehand. It was made for the "Reconnaissance and Scouting" GB. The installation of the lights and motors takes some time and effort and some of it looks good in the end. Unfortunately the cockpit lighting is very dim and I misplaced the right position light. So it is hardly visible. Well, better next time... Unfortunately the kit comes without a sound kit, so the engines run silently. The model has wing and rear position lights, landing lights, cockpit lights and two electric motors. A programmed circuit board starts the lights and motors and shuts them off in sequence. Landing light on: Thanks for looking Volker6 points
-
Hello All, Not really a ship builder so when a friend of mine gave me some ship kitswhich his late dad had built i did not really know what to do with them . Most were missing parts, broken pieces as well as some heavy paint so initial reaction was to throw everything away. But one stood out, Bismark, Decided to put it in a diorama with a twist... it was in a bad shape, so sunk her even further. This is the final result, all gaping holes and damage represent the actual vessel as it stands now. Only wish is to try and cast in blue coloured resin but it is way too expensiveand risky. as i said this is not really my line of builds so appreciate your comments to improve5 points
-
I'm calling this one finished. For the moment it is sitting here. Tomorrow I'll take better pictures and get it in the gallery. Despite my grumbling I am actually quite pleased with this. It looks very much like the memorial guns I have seen at Manassas and Gettysburg. I think I'll order a better base from the LHS for it and make it look halfway decent. I should probably build the Napoleon and the 3-inch ordnance rifle. I think this company makes them both. The Napoleon for sure. I built one about 20 years ago. --John5 points
-
Chrome trim on the side car using bare metal chrome, surprisingly Wallace needs some retouching and Gromits goggles need a little work, but otherwise the twosome are almost finished.5 points
-
There’s a fine line between a numerator and a denominator. Only a fraction of people will get this!5 points
-
Probably Leopard 2 is already a banal set for building, like a Tiger or a Sherman, or like a Spitfire for airplane lovers or a Bismarck for naval commanders. Therefore, there will be nothing new and surprising here. Moreover, I want to paint it in the classic three-color camouflage of the Bundeswehr. I want to have a tank on my shelf the way I remembered it as a child, from color photographs. The quality of the detailing is amazing! Looking at the microscopic welds, I realized how far modeling has gone over the years! Probably now it's already standard, but for me it's a miracle! Until my order with paints arrived, I began to slowly assembled the caterpillars. I, as a person who loves to do everything from scratch by myself, with my own hands, understand that it is impossible for me to make such caterpillars from scratch on such a scale. It is a great pleasure to assebled them, so accurate components. And most importantly – there are a lot of them! You can meditate all day. That's great! 🙂5 points
-
Well, I would say she's missing a trick there, Balders is a whizz with oily fluids and abrasive friction pads5 points
-
I would like to be able to say that Sarah-Jane is looking forward to it but we both know that would be an utter lie. Truthful of Mars 👽5 points
-
Damn, you noticed....that was specifically placed by Darling, in the en-suite for a purpose, along with the toaster next to the bath tub and the dodgy 1930s era electric blanket (with original wiring I might add) concealed within your bed....Bladrick has offered to check Sarah Jane's brake lines free of charge which I think is pretty damn decent of him after the last debacle......oh well, I suppose there's always the next time5 points
-
I’m still progressing on this, albeit slowly. I’ve decided to prioritise the TV kit as I feel trying to get both done in the GB timeframe might be a bit much, but I’ll still be working on the movie kit as well. Filling & sanding operations are ongoing on the skirt: It’s a gradual process to fill in all of the gaps, but I’m getting there. I’ve also assembled the shoulders now, another case of very flimsy feeling parts becoming far more rigid with the application of just a couple of strips of plastic behind the joints: As you can see, filling & sanding is happening to that as well. I’d recommend anyone else building this kit to kit a couple of strips to reinforce the joint on the underside of the shoulders as well as the sides & top as the kit recommends; I found that joint was opening up slightly while sanding the sides. The top cap will be removed for the version I want to build, but I’ll wait until the shoulders are close to completion for that as it’s adding quite a bit of rigidity at the moment. The scribed lines are apparently guides to get the collars aligned and the instructions claim these won’t be visible on the finished model. I’m sceptical about that and was planning on dry fitting the collars before paint anyway, so I’ll fill these lines once that’s done. The dimples are location marks for the blocks to space the collars out properly, so they’ll be hidden. James5 points
-
A kit.. That might turn into a Nascar race truck. And some decals.. And5 points
-
The first wash applied was brownish-black dark wash all going in a downward streaking Before it all dried, I dipped a cotton bud in the mineral spirits and lightly removed most with a downward cleaning motion. It's hard to see but I did do the same on the upper part of the conning tower on the areas that were light gray. Then finally, a light rust wash primarily where there were welds like on the upper railing, anything that over hung, or just stuck out. doing the same as the dark wash and then just a touch here and there with the rust streaks. areas that had a tendency to drain off longer than usual. Finally a salt wash on everything that salt water would have drained off especially the aerials and periscope shafts. I'll set this aside while I begin work on the guns. I'm replacing the 20mm Oerlikon barrel with a spare one from an old project and I've ordered a new 40mm bofors barrel but it won't arrive from the UK for a couple of more weeks. Almost there. but still plenty of action left in the build.5 points
-
It's about time for an update, and it's going to be a bit of a ramble on a pretty dull and esoteric subject I'm afraid. So hold on to your hats, and prepare to enter the fascinating world of bonnet latches. Yes, really, bonnet latches - bet you can hardly contain your excitement! Looking at reference pictures it would appear that there were (at least?) two different styles of bonnet latches on the L4500. The first was this style that looked kinda like stubby pick axes sitting parallel to the removable central bonnet panel: The second style looked more like mini claw hammers, these sitting perpendicular to the removable panel: I can only hazard a guess as to why there were two styles, one no doubt being an incremental improvement on the other. The 'claw hammer' style could possibly have appeared later (but I have no real evidence to support this). Whatever, Zvezda seemed to have a stab at the 'pick axe' style, which is an OK effort, but rather chunky and out of scale: Never fear, Voyager provide replacements in their update set - great, we can use these. Erm, perhaps not, as I'm not really sure what Voyager are attempting to replicate. I think they're aiming for the 'claw hammer' style, but the latch looks flat and weedy, and the bracket looks odd and bulky: Hmmm, so what to do? Well, we'll run with the etch, but make some modifications to try to approximate to the 'claw hammer' style. Firstly, we'll bulk up the latches by adding a brass tube sleeves in an attempt to make them appear less 2D. Here we see a production line with (from left to right); latches as they appear on the fret, slimming of the shafts to accept the sleeves, with the sleeves in place, and a kit latch for comparison, Next we need to do something about the bulky brackets, these being flipped upside-down, and trimmed to get rid of surplus structure. We end up with a compromise, but close enough to give an impression of a latch on the real thing: Looking at reference pictures, however, we see that the latches don't simply hang down when the bonnet panel is removed, but protrude at weird and wonderful angles and orientations. This was worrying, as attaching the latches at such angles would leave them very vulnerable, giving a life span measured in nanoseconds: Fortunately I noticed these pictures which show the latches hooked over the top of the lower bonnet panel. This seemed like a much better option, giving the latches a better chance of survival: OK, so what do we end up with? Well firstly let me apologise for the quality of the pictures, but my ability to photograph shiny brass on shiny brass is sadly lacking. Here we have the latches on the passenger side: ...and here we have the driver side. I rang the changes slightly by having one latch dropped down rather than hooked over the top. I may live to regret this decision: Once the latches were in place I noticed that the inner face of the lower bonnet panels were a tad featureless. The ends of etch tool clamps where therefore used to replicate some kind of internal fastening for the latch brackets. There is no evidence for this, it being a total fabrication on my part. It does add a bit of interest though: And finally, a quick picture to show the latches in context when the cab and bonnet roof are in place: And that brings things up to date. Somehow I've managed to waffle my way though a long post that could simply have said 'I added six bonnet latches'. 🤪 Cheers, and thanks for looking, Paul.5 points


.thumb.jpg.d17ff607fc7e89ed057e63fcb6f2a888.jpg)


Wedge-TailedEaglePortraitRaptorDomains.thumb.jpg.41a306d3445a68f0f2df773e01776ea6.jpg)


This leaderboard is set to London/GMT+01:00