
Leaderboard


Popular Content
Showing content with the highest reputation on 28/05/23 in all areas
-
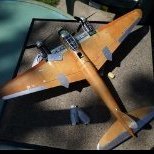
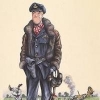
It was the first assault aircraft designed specifically for this role to enter the Luftwaffe inventory. Produced in about 270 units in 1936/38, it left an excellent memory and even in some tactical situations during the Polish and French campaigns, its intervention was decisive. The Fly model is overall discreet, but requires some modifications and additions in the cockpit area and others, more numerous and demanding, scattered throughout the rest of the aircraft. The final result is a Hs123 A-1 of 10.(Schl)/LG2, operating in the Smolensk area in the summer of 1941. The model, painted as always entirely by brush, is in RLM71/65, except for the upper surface of the upper wing, which is in the old scheme in RLM 61/62/63 (wing replacement ?), a feature that can also be seen in other specimens. The colors used are Vallejo, Gloy and blends of Humbrol Enamels; the decals are from Colibri sheet 72041. Hope you like. Thanks for viewing Giampiero Piva32 points
-
This was my first 3d printed project, I download the files for this and made the model smaller then the original printed version this is about 6" long.31 points
-
Hi all, about time I put something up on here so here's a build I did for Airfix Model World in August of last year. Now, while I'm not really a huge chopper fan, I do like oddities (you may have noticed) and this contraption certainly falls into that category. It's the Italeri 1/72nd Piasecki H-21 Workhorse/Shawnee, also known as the 'Flying Banana' for obvious reasons, a fairly successful design used by several armed forces around the world. Back in the sixties US Forces agreed to provide CH-21Bs to support military operations of the Forces Aérienne Congolaises (FAC) during the ongoing Congo crisis between 1960 and 1965. All six aircraft were flown by Belgian crews, based at Kamina airbase in the south of the province. Interestingly a CIA front company, Ansalt WIGMO provided maintenance support to large parts of the FAC between 1964 and 1968. Sadly the CH-21Bs were found to be unreliable and underpowered in the harsh conditions and all six were lost to flying accidents during the first six months of 1965. Overall, I found Italeri's H-21 a decent little kit that provided a solid foundation for a CH-21B conversion. This was furthered by the Whirlybird resin set, which included all the components required for the conversion including an excellent decal sheet for each of the six aircraft operated by the FAC. While Eduard provided some excellent PE goodness, I found the kit parts detail to be a little too basic so quite a few of the details were scratchbuilt. Along with my own 3D printed barrels, ladders, and "cargo," which these machines may well have carried during the more covert CIA-backed missions. I also made a scenic base that represented the typical concrete platforms used by the aircraft when operating from the African tundra. At some point I may well add a few suitable figures, if I comes across them.... I'm quite tempted with its 1/48th big brother, maybe as an abandoned/crashed airframe, in a jungle setting. . Hope you like and thanks for looking. Cheers Melchie A few detail images. Basically I scratchbuilt the interior including missing fuselage ribbing, new doors and floor, roof centre conduit with lights, engine bay and missing upper prop-shaft structure which can be easily seen through the grill meshes. Also worked on the cockpit, adding scratch seats, seatbelts, anti torque pedals and various pieces of ancillary equipment including a fire extinguisher.25 points
-
When I started building this model, I wanted it to tell a story. About a machine piloted by allied pilots bravely fought on the front of WWII. About a plane that, despite having more than fulfilled its task in the skies of Great Britain defending it in the Battle of Britain, when it came time to give way to others, was not put back in the hangar. Instead of a well-deserved retirement, this machine returned to the aircraft factory where it got a new life. Like a phoenix from the ashes, Hurricane was reborn as Sea Hurricane. The carrier-based fighter was born. A difficult task was set before the rebuilt aircraft - to face the Regia Aeronautica and Luftwaffe aviation over, among others, the waters of the North Sea and the Mediterranean. The conditions in which these machines operated left their mark. Airplanes, like people, bore the scars and traces of quick repairs made on aircraft carriers by their crew. This is the Sea Hurricane I wanted to show. An aircraft with a rich history, on which a long service has left visible traces, nevertheless being a deadly weapon in the hands of an experienced pilot. The machine I chose was, in my opinion, uniquely suited to this story. This aircraft served, among others, in the Polish 317th squadron where it was damaged. After repairs, it was converted to a Sea Hurricane and assigned to the aircraft carrier HMS Eagle. Unfortunately, it sank with the torpedoed ship during Operation Pedestal on August 11, 1942. You can watch whole build process on Youtube:24 points
-
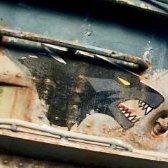
- I don't know wether it is a diorama or a saynette doubfully this is a resultof too many spare kits, Sukhoi Flagons and a Flogger in direlict visited by much more peacefull locals -Oddly the red stars remain almost prinstine condition.....may be the nostalgic shepperd maintain them........22 points
-
Hello, Here is my recently completed Tamiya 1/35 pink panther. I hope you will like it. Cheers. Thanks for looking.17 points
-
Hello everyone! Here is my latest kit, a Focke-Wulf Fw 190F-2 in 1:72 scale, converted from an old tool (1977) Airfix kit. It represents "White F" of SG1 in the eastern front in spring 1943. I have had this kit, an "Aircraft of the Aces" boxing, in my stash since the late 1980s. I intended to convert it to a G variant once I got more information on the type but I recently got a new-tool Airfix kit for that and finally built this kit as an early F model. For this conversion, I used an Airwaves early-type gun breech cover in resin. This was meant for the Revell kit but I managed to adapt it. This was the part of the conversion that gave me the most work. I replaced the wheels with Eduard Brassin early-type wheels. The main u/c doors were replaced by spare ones from an Eduard kit I am currently building, shortening them a bit at the top. The shorter type centreline ETC rack and the SC250 bomb were also taken from the Eduard kit. I made a new longer early-type probe from stretched sprue. Otherwise, the kit was built very much OOB. I included the pilot figure to hide the lack of cockpit details and I left the raised panel lines very much alone so it still has a vintage look! The kit was fully painted and varnished with brush. The decals came from a sheet Hasegawa released in the 1980s where it was marked as a G-3. It seems more of an F-2 to me (and SG1 had received many of these) although it could also be an A-5/U3 as both variants were very much the same. The decals still worked although they took longer to separate from the backing paper and needed plenty of decal solution to settle. I realised too late that the top crosses were wrong, being of the standard type, so I had to overpaint the black areas. The radio wire was also made from stretched sprue. Despite a couple of problems and the extra work with the gun breech part, it was a fun build and the old kit was one of the more decent ones by Airfix of its time with lots of interesting optional parts. I'm curious to compare building the new tool when I (hopefully) make my other planned conversions later this year. Thanks for looking and, as always, all comments are welcome. Miguel16 points
-
G'day people, This was my entry for the 2020 Vietnam GB. Unfortunately I did not finish in time but it is now done. The subject is one of the six Porters flown by 161 Independent Recce Flight (AAFC) while based at Nui Dat, Vietnam. I have added the scratchbuilt radio direction finding gear installed to detect and locate enemy transmitters, one of the many roles the unit were tasked with The kit cockpit seats were also modified as these did not represent what was installed The WIP is here cheers, Pappy16 points
-
Hi everyone, Well I never thought this day would come. I bought this kit in London in 2007, started it a few years later, pushed it through at least three KUTA.... All in all a rather abysmal performance. Not a shake and bake kit, for me anyway, despite the lineage. Hence the repetitive loss of mojo. But anyway, all this is now in the past. Although,,, this morning things almost turned to a Titanic re-enactment when I took the kit outside for a few photos. Six Vervet monkeys rushed towards my petrified P-51D, thinking it was something tasty. I had my hands full trying to chase them without smashing the model all by myself. All in all, it was a peaceful and relaxed photo shoot! I even forgot taking a photo of the port side, with all the victories' score board. Anyway, here are a few photos of this fantastic plane. Here you are. All in all I am happy with the result, and damn pleased to have finished it. I will use the Old Crow decals, also present in the Tamiya box, on my Academy P-51D, as it is another emblematic paint scheme. Thanks for watching and keep having fun! JR14 points
-
#12/2023 After the F3F-1, here´s my dad´s next little chubby yellow winged fighter. Accurate Miniatures kit, decals from this kit, the F3F-1 kit and the sparesbox, fuselage painted with Mr Paint White Aluminium, wings with AK RC Yellow and Aluminium. True Blue and Insignia Red are selfmixed. EZ Line used for the antenna wires, kit PE parts for the rigging. Like with the F3F-1, my dad didn´t apply a panel oilwash. These planes were usually mostly pristine. Build thread here https://www.britmodeller.com/forums/index.php?/topic/235124494-yellow-wings148-grumman-f3f-2-vf-6-fighting-six-usn/ Model shows the Section 1, first wingman aircraft of VF-6 in 1937, flying from NAS Floyd Bennet Field NY, NAS Norfolk, NAS Pensacola and later stationed on the 1938 comissioned USS Enterprise. Later on this aircraft was assigned to the USMC, VMF-2, where it was destryoed in a ground collision near Mooring Mast Field, Eva, T.H. on April 11th 1941. Grumman F3F book by Richard S. Dann, David Ginter series, used as reference. DSC_0001 by grimreaper110, auf Flickr DSC_0002 by grimreaper110, auf Flickr DSC_0003 by grimreaper110, auf Flickr DSC_0004 by grimreaper110, auf Flickr DSC_0005 by grimreaper110, auf Flickr DSC_0006 by grimreaper110, auf Flickr DSC_0007 by grimreaper110, auf Flickr DSC_0008 by grimreaper110, auf Flickr DSC_0001 by grimreaper110, auf Flickr DSC_0010 by grimreaper110, auf Flickr DSC_0011 by grimreaper110, auf Flickr DSC_0012 by grimreaper110, auf Flickr DSC_0013 by grimreaper110, auf Flickr DSC_0014 by grimreaper110, auf Flickr DSC_0016 by grimreaper110, auf Flickr DSC_0018 by grimreaper110, auf Flickr DSC_0019 by grimreaper110, auf Flickr DSC_0004 by grimreaper110, auf Flickr DSC_0021 by grimreaper110, auf Flickr DSC_0022 by grimreaper110, auf Flickr DSC_0023 by grimreaper110, auf Flickr DSC_0025 by grimreaper110, auf Flickr DSC_0002 by grimreaper110, auf Flickr DSC_0003 by grimreaper110, auf Flickr DSC_0027 by grimreaper110, auf Flickr DSC_0028 by grimreaper110, auf Flickr DSC_0029 by grimreaper110, auf Flickr DSC_0030 by grimreaper110, auf Flickr DSC_0031 by grimreaper110, auf Flickr DSC_0001 by grimreaper110, auf Flickr DSC_0003 by grimreaper110, auf Flickr12 points
-
The combination of the Horch 1a and Flak 38 has been very popular amongst AFV modellers. This is my interpretation of the combination. The Horch is the venerable old Tamiya kit. I adjusted the rear panel to correct the shape of the doors and covered the rear cargo hold with plastic card. The platform for the Flak gun was made using wooden drink stirrers. I improved details on the Horch with plastic card and wire. The Flak 38 is the Dragon kit which is a little gem! The basket to catch spent shell cases is etched brass which comes in the kit, as do brass replacement splinter shields, but to be honest, the plastic parts are better. The figures are from Tamiya, the ones come in the DAK issue of their Steyr Type 1500A/01. The stowage and personal equipment came from various sources. I used a mixture of Tmaiya acrylics, Humbrol & Xtracolor enamels to paint the model and figures. Weathering was achieved using filters, washes, chipping and pigments. Thanks for looking Angelo12 points
-
I would, as I think I probably mentioned back near the start of this megathread, have preferred the Italeri kit. When I realised I wanted a Stirling, though, the MkI was like rocking horse poop. I couldn’t find one for love nor money. I also read about the rather exaggerated panel lines and the efforts folk went to in order to minimise them. If I was going to have to do a lot of remedial work on an expensive modern kit - and, don’t forget, I hadn’t learned the version I really needed didn’t have the mid-upper turret and would have involved more surgery - it made more sense to spend a lesser amount on an older kit. So far, not counting time and research materials, I’ve spent around half the cost of the Italian plastic. Arguably, I’m having more fun, too, though that is debatable! I carried on with some work last night, chiefly tidying up the hinge plugs on the control surfaces. I also added some scrap styrene fillets to reshape the inner ends of the ailerons, and applied a couple of layers of filler to the wing bomb cells, First job this morning, then, was to see how it all looked in daylight. Even with my centre tabs, the doors sagged. Oh well. One more thin smear of filler, I think, followed by a good sanding and some very gentle scribing. The remedial work on the ailerons (and rudder and elevators) sadly meant the fine raised tape lines were lost. They weren’t exactly prominent on the real thing, so I’m not going to replace or scribe new ones. Perhaps a spot of preshading, or fine pencil lines after painting might happen. What am I saying? Of course it won’t happen! The tail feathers. I am going to mark up and drill holes for brass wire pegs to fix the control surfaces. I realise the leading edges of the various moving parts are probably more rounded than in reality, down to the toy-like moving parts. There are inevitable compromises with this kit bash and, like the thick trailing edges, I’m going to not worry about them. You can just make out I’ve scratched in locations for new fuselage windows. These will be drilled and filed out. You may wonder why I’ve matched the shape to the incorrect kit windows. Well, I ran a needle round the window from the opposite fuselage half laid over, if you see what I mean. The current plan to correct all the window shapes involves UV-setting clear epoxy resin and suitably shaped paint masks. Waiting on the delivery of the resin right now. Where the Italeri kit scores over the 1960s Airfix is internal detail. While there is a cockpit floor, instrument panel, navigator's station, and something along the bomb bay, it is very basic. I’ve bought in the Eduard PE upgrade set, designed for the Italeri model, plus the Falcon vac form glazing, and I’ve located a copy of the Italeri instructions. Between them, I hope to be able to scratch together a reasonable representation of the cockpit area. Channelling @AdrianMF and his preternatural skills at making something from nothing is also on the cards! Then there's grafting the modern Airfix engines on to the wings. In a brief investigation yesterday, I worked out the Lancaster B.MkII was fitted with different propellers to the Stirling, presumably to match later marks of the Bristol Hercules engines. So, while the new engines and cowlings should usable, plus the streamlined prop fairings, I will need to use the old Stirling propellers. I’ll also need to scratch four early straight pipe exhausts. Making a master and resin copies would be the right way, but I don’t have the skills or equipment for that. Making a 3D print would also be sensible, but again skills and equipment lacking. Brass tube and files will be the way forward, I think. It’s turning into a right old hodge-podge of a build, and I'm having quite a bit of fun! I hope those following the saga are having fun, too.10 points
-
Tiddly little knobs - fnaar! Thanks Steve. Thanks Giorgio. A lot indeed, and so tiny: Dunno Bill. I still want to do a Dove/Devon. Pretty planes. Start of close up. I/p in: Doesn't really fit but the gap won't be visible, fingers crossed. Throttle etc quadrant done: No, I'm not going to zoom in more. Have a heart. Bottom bits (snurf): Time to put the windows in. Give us a break: Very thick connectors around the window edges. I saw them off: …and glued them in, making sure the top window fitted the other fuselage half (hopefully):10 points
-
Out of the box build, fantastic kit from Trumpeter.9 points
-
Four F-4Es of the 20th Tac Fighter Training Squadron, 35th Tac Fighter Wing out of George AFB visiting Edwards AFB, February 1984. 66-0372 67-0327 75-0629 75-0636 Thanks for looking, Sven Old Viper Tester9 points
-
Evening All, The second subject for the Gordon Bennett racers of 1911 is the Bleriot XXIII. This is causing me a few problems because only two of the type were constructed, (they were built as racing aeroplanes), and apart from a handful of photographs, I have little information about them. There are no drawings that I am aware of. I have a dimension for the wingspan, (17 feet), which is incredibly narrow, and a wing area, so I think that I can calculate the chord. Sources state that the wings of the original design were longer but were reduced by approximately 1 metre before the Eastchurch race. I also know the length of the aircraft and that they were powered by 100 hp Gnome Double Omega engines. Photographs show that the original wingtips were rounded, but for the race they were square. The fuselage seems to have been developed from the earlier two seat XXI, although the latter had a much shallower fuselage, especially at the rear. Both types had a large horizontal tail surface and a rudder but no fin, although the shape of the rudders was different. I am therefore making my own drawings and writing the assembly instructions at the same time.... I make no claims to accuracy of these models - they will be the best that I can do given the source material available. However I am pretty certain that there is nobody who can challenge the overall shape even if some details are not 100% accurate. I am making two models to represent the two aircraft but as with the Nieuport IV I am only illustrating the build of one model: I will show photographs of both when they are complete. I have started as usual by cutting the wing blanks from 30 thou card bent in hot water in a pipe with 10 x 20 thou Evergreen strip for ribs. The strip was sanded almost flat and the Mr Surfacer added to smooth the edges. I have made the rudders in the same way from flat card. The fuselage sides, top and bottom were cut from 30 thou card and pieces of scrap plastic added to keep the joints square. I added some 10 x 20 thou strip to represent the frame in the cockpit area, I have cut a floor and painted it wood, and made a control yoke from 20 thou and 80 thou rod. The engines were made from thick sprue for the crankcase with 30 thou rod for the cylinders. I have painted this assembly but not added the push rods yet: The seats were made from scrap card for the base and 10 thou card with holes drilled for the back. I am carving the propellors from hardwood using plans from the DataFile no 108 of the Bleriot XI at War. I cut the wood into strips of suitable length, marked on the shape of the propellor and filed the shape that I wanted. I will add bosses later from thin card: I shall use the DataFile plans to make the undercarriage and to help with the shape of the fuselage as the XXIII was clearly derived from this earlier design. Thanks for looking: more to follow when I have made more progress. P8 points
-
With thanks to Threshold Aero and the RAF personnel who gave up their Saturday. Here are a few quick edits from RAF Brize Norton to commemorate the sterling service that the Hercules has given to the UK.... Thanks for dropping by, I hope you enjoyed my record of a great event!8 points
-
I've built a few of the Mikromir Royal Navy submarine kits and this one was by far the easiest to put together - although in over 50 years of modelling I don't recall having to glue on individual propeller blades. Still, it all went together nicely and produced a fine little kit of this Edwardian-era submersible. The figure on the deck in oilskins with his hands in his pockets was converted from a left-over Revell trawlerman.8 points
-
Superb kit from I Love Kit, very detailed and only issue was me putting something upside down and some foggy windows which I fixed by taking out a window and cleaning things up. Final pic with Trumpeter's 2S35-1 for comparison.8 points
-
Caught a tasty Ferrari at the lights today.... Hard to beat, isn't it?8 points
-
I'm pleased to present my most recent build, a dual-build of Great Wall Hobby's 1/48 T-33A (Early) Shooting Star, and ICM's 1/48 KDA-1 Ryan Firebee. The T-33 represents a TV-2D drone controller aircraft of the US Navy's GMGRU-1, circa 1959-1960, using a scheme from the Iliad Design T-33 decal sheet. Though GMGRU-1 is better known for its support of the Navy's Regulus guided missile program, I was able to find a source indicating that they also flew the TV-2D with the KDA-1 Ryan Firebee. As my resin skills aren't quite up to the challenge of Belcher Bits' fine-looking Regulus I, I opted for the very nice ICM drone kit for this dual display. I'm not certain if the two paint schemes were in service together at the same time, so I acknowledge that I've taken a bit of license here. Figures come from ICM's US Pilots & Ground Personnel (Vietnam War) set, and the base is a pre-made by Zoukei-Mura, which remains the best $20 I ever spent in this hobby. If, as is often said, the perfect is the enemy of the good, then I would add that sometimes the good is the enemy of the finished! This was one of those builds that fought me, broadly through my own errors as opposed to any issue with the kits. I would note for anyone working on the GWH T-33 that the nosecone is too narrow for a seamless fit with the rest of the fuselage, which necessitated a fair bit of filling and sanding and occasional swearing to get an acceptable taper. I might have been better off with a shim to push the join out a bit, but the top and bottom of the cone were exact fits, so I opted for brute force. Too, the interconnection between the wing spar, fuselage, and engine intakes proved tricky, with small imperfections in the sub-assembly builds multiplying when it all came together. Many panel lines were sacrificed in the process, and inevitably I missed a few when I made a rescribing pass. Several small parts became victims of the carpet monster, including the T-33 front gear scissor torque link and several small vanes on the bottom of the fuselage. I managed to break the front gear when installing it after painting, and I fear the aircraft rides a bit higher than it should as a result. I also left off several smaller gear struts on the front and main gear bay doors, which proved beyond my capability to wrangle into place neatly. The extent of the yellow paint scheme on the bottom of the aircraft is conjectural, as I could not find good reference photos. As for the ICM KDA-1 kit, it went together in a very tidy and simple manner. The plastic is quite soft, so care is needed in fitting and sanding, but there were no significant issues to speak of, though I did manage to snap off the very pointy tail end of the drone. Paints are a combination of Mr. Color and Hataka Orange Line lacquers, sprayed over Mr. Finishing Surfacer 1500 -- black for the fuselage, pink for the wings and tail. I've come to very much appreciate using pink primer for anything that will wind up white, red, yellow, or orange, but I still needed several coats for the yellow to get the depth of color I wanted. Subsequent rounds of overspray touch-up on the yellow surfaces wound up requiring additional coats of the pink primer going down first, which greatly increased the time this build took, with the knock-on effect that not all of the yellow has the same hue, particularly the horizontal stabilizers. For reference, the yellow on both models is Mr. Color C329 Insignia Yellow; the red on both models is Mr. Color C327 Insignia Red; the orange is Hataka C062 International Orange; and the main fuselage grey is Mr. Color C339 Engine Grey. Some light washes with oils followed, topped off by a final dull coat of Winsor & Newton Galeria Matt sealing it all in. The main marking decals for the T-33 come from Iliad Design's Naval T-Birds sheet, and they behaved quite nicely. They are thin, but they are also reasonably durable, as I proved when I managed to fold a few of them during placement. A bit of propitiation to the modeling gods, plus some gentle coaxing with a soft wet brush, saw them good. The decals reacted well to MicroSet and MicroSol and bedded down on a gloss surface without any silvering. Iliad has some interesting sheets in their lineup, and I'm looking forward to using them again. The GWH stenciling decals from the box were fine, if a bit on the thick side. The KDA-1 decals are out of the box from ICM, and as with the build, they were simple enough to use, with no adverse reactions to MicroSet or MicroSol. As for the ICM figures, they built nicely, with ICM putting joins along natural breaks. I'm really not much of a figure painter, and I fear the mechanic has a touch of the dreaded "flesh wrench," but they do add to the overall effect of the vignette, plus I managed to position them so that they hide some spots that need yet more paint touch-ups. As noted, this was a build that just kept fighting me, mostly because of the constant need for paint correction. I really thought I had sealed all the painted areas, but somehow I've developed the ability to cause airbrushed paint to transmigrate through multiple layers of tape. It's an odd and unwelcome talent. Still, the paint schemes are striking, of that there can be little doubt. On the whole, I'm sufficiently pleased with the final result, and so long as a respectful viewing distance is maintained, this dual build should look colorful enough on a shelf dominated by the broadly monotonous hues to which military aircraft are prone. Thank you for reading and for taking a look.8 points
-
 It seems I'm on a roll now with early Cold War Soviet aircraft. My M-50 Bounder project is coming along nicely, and I've just finished the Modelsvit MiG-21F to go along with it. Being in that state of mind, I saw this and couldn't resist: It's like the Bounder, but smaller! Here's what Wikipedia has to say about the Tsybin NM-1 test aircraft, planned predecessor to the supersonic RSR reconnaissance plane: In 1954, the design bureau headed by Pavel Tsybin started development of a ramjet-powered supersonic strategic bomber, the RS. This design proved impracticable, and a smaller derivative, the 2RS was proposed, which would achieve intercontinental range by being air-launched from a modified Tupolev Tu-95 bomber. This too was unsuccessful, with the aircraft unable to return to base if used on an intercontinental mission. The design was therefore revised again to a reconnaissance aircraft capable of operating from conventional runways, the RSR. As ramjets could not be used for take-off, they were replaced by turbofans. The RSR was planned to cruise at greater than Mach 2 at a height of 20,000 m (65,600 ft) giving a range of 3,760 km (2,340 mi). A simplified, full-sized aerodynamic prototype for the novel layout, the NM-1 was built in 1957. Intended for low-speed handling tests, the NM-1 had a steel-tube fuselage with duraluminium and plywood skinning. This aircraft, powered by two Mikulin AM-5 turbojets first flew on 7 April 1959. Based on the results of these trials, the RSR was redesigned to make it more manoeuvrable at high altitude. Additionally, more conventional Tumansky R-11 turbojets (the engine used in the MiG-21) replaced the unavailable Soloviev turbofans. Five airframes were virtually complete, only awaiting engines, when Soviet Premier Nikita Khrushchev cancelled the program in April 1961. A couple photos of the NM-1: And a video, too! (Unless you speak Russian, you may want to turn the volume down) I could build the A-model kit 'as is', but I was intrigued by the RSR aircraft and decided to convert the NM-1 to an RSR. Here are drawings of each for comparison: NM-1 RSR To help me along, I found an article where the author scratch built an RSR in 1/48 scale. I'll be stealing borrowing some of his ideas for this project: Link to article: http://hsfeatures.com/tsybinrsrpb_1.htm Mine will not be a super-authentic conversion, I plan to just hit some highlights: Add 'real' landing gear in place of the NM-1's trolly & skid arrangement (shades of Me-163!) Replace the engines with larger versions (B-58 as source?) Add underwing fuel tanks Change the aileron and flap arrangement Replace canopy with more streamlined one (this I may forego, as RSR drawings show various canopy types Let's get started! First up, this is what's in A-model's NM-1 kit: plus instructions and decals Molding is typical short-run. No locating pins; lots of butt joints; and large sprue gates & related anomalies due to the low pressure injection technology. For example, take a look at the pilot's ejection seat . . . it looks like it belongs in an outhouse! Note that the fuselage is split front and back. A-model would have you glue the front pieces together, then the rear pieces together, and finally join the front & rear sections. I chose instead to first glue the front & back of each side, using a flat plate of glass and a straight line drawn on tape to aid alignment: The cockpit is rather rudimentary, but that's not an issue as almost nothing will be visible through the tiny fuselage opening! I glued the cockpit in place . . . and noticed that the seat was much too low! Happily, I was able to pry the seat loose and reposition it to a better height: Before and After: I also noticed that the tail edge of the vertical stab was excessively thick. I used a scraper and sanding block to refine the trailing edge: Before and After: To get this to work, I had to separate the bottom-rear part of the vertical stab from the fuselage using a photoetch razor saw: My first step in the conversion process was to remove the fairing for the NM-1's main landing skid, which I'll replace with a proper nose gear bay. I'm committed now! Stay tuned for more fun and games!7 points
 -
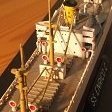
Just four days ago, Oslo had a celebrity visit from USA, USS Gerald R. Ford super carrier. It was the biggest warship to sail through the fjord ever. The second biggest warship to grace the Norwegian coast might have been HMS Albion in 1959. Very exciting, but I didn´t catch any glimpse of the super carrier last thursday from the top deck of the ferry, commuting to work. The carrier was moored four nautical miles from the docks and was probably camouflaged. Any way… Fun to know it was there. George Washington is not that much different from the Gerald R. Ford, but the flight deck on my model didn´t have as many aircrafts with only 12 units comprising; Tomcats, Intruders, Crusaders and one Seahawk and Haweye. But that´s alright, I´m not too keen on a busy flighthdeck. Armaments with 2 x CIWS and four Tomahawk batteries in the rear using Exocet missile launchers. The model was brush painted and weathered with oils and Pigma Micron pen.7 points
-
I visited the charming World War One aerodrome at Stow Maries this afternoon for their "Wings and Wheels" event. A lovely display of American and European cars and some wonderful flying on a gorgeous afternoon!7 points
-
28411 restaurants7 points
-
Mr Surfacer 1200, sprayed along the engine pylons' joins, revealed only minor touchups were needed, so I'm calling these done: The 'knuckle' where the top of the pylons meet the wing leading edge are also looking satisfactory: I next glued the missile pylons in place, again making sure they are vertical to the ground. These fit much better than the larger engine pylons, and needed just a smear of putty along the joins: Next, I'll paint the undersides of the wings & pylons, then look at adding the wingtip engines.7 points
-
My latest build covering the Spitfire defenders of Malta. This time the kit is again from Airfix, a Spitfire Vb 1/48 scale depicting machine X-D EP842 of 229 Squadron during the Seige of Malta. A rather special build inspired after posting a photo of an earlier build and receiveing a message and a photo of Spitfire X-D by a certain Patrick Griffith who had a relative, a certain Bernard Sheehan, fighting in Malta. Traced also another photo of a Spitfire bearing the same codes on Brian Cauchi's book and decided to give it a go especially since the weathering on the Spitfire was rather complicated. Later on when posted on Facebook a certain Clive Taylor replied to the photos stating that his late father Fly Sgt Leslie Taylor flew the aircraft for 10 min (08:40 - 08:55) on 08/05/1943, Scramble - Intercepted Baltimore. Later on also flew this aircraft on 15/12/1942, 1 hr practice flying, (formation etc).7 points
-
Welcome to my second RC build in so many years. 😀 The Frog 🐸 by Tamiya 1/10. Back in 2021 I built the Wild Williy2 my first RC car in thirty or so years. Here’s the build if you’re interested. It was great fun to make and I enjoy taking it out on fair weather days. (Just built a ramp as it happens) Definitely not a shelf queen. 😜 Last year I had a few drinks while I was on holiday in Dartmouth and ended up with this waiting for me when I came home. 🤦♂️ Fast forward about eight months and it’s still in the box accompanied by a friend. Another childhood dream I managed to snag for my birthday last month. 💙 Now fast forward to last night sitting in my warm back garden.. Two rums and a couple of halves of ale down I have a Subaru Brat in my basket. 😳…. I had a quiet word with myself 😂 and have told me that if I don’t build these I can’t have any more. So as I’m nearing the end of my NMCZ group build I find my bench clear. I know it’s not your regular thing to find on BritModeller but I had a great time with the first one so I invite you along for the ride with the Frog should you so wish. Pull up an 80s style bean bag, pop Prefab Sprout on the tape to tape and enjoy the fun! Johnny. 🐸6 points
-
Hi BM'ers. Just completed this for a GB over on ARC but I though some on here might like to see it as well. It is the Aeroplast 1/48 Pzl Mi-2 done in the markings of the Polish Border Guard. Scratch-built the FLIR and searchlight and added various enhancements. Hope you like it, Thanks for looking. Andrew P.6 points
-
All done. No weathering. Let's say it just emerged from the quonset hut after a fresh layer of canvas and paint, ready to take to the skies! I'm not sure what's next for 19 Sq. Spitfire? They had many...the Hornet? Another Dolphin? I have the decals for a second SPAD...Not sure about the marking for the BE.2c...I have a Gauntlet and the decals...Hmmm...I could go all the way back and build their very first training aircraft from 1915, the Farman MF.11 Shorthorn. They also trained on Avro 504 and Caudron G3...I have found no examples of any marking for those last three. Or, I could go ahead and build their Hunter. Haven't built one of those on a while and another jet might be needed for the shelf. And such a handsome aircraft too...Hmmm...So many options...such luxury problems. I'm taking requests. 😁 I'm leaning toward the Hunter... But I will wait until I finish my Mig-19 over at @JOCKNEY Japanese GB. One must try to finish what one begins, as my sainted mother would have said. --John6 points
-
A crusty old Sergeant Major found himself at a gala event, hosted by a local liberal arts college. There was no shortage of extremely young, idealistic ladies in attendance, one of whom approached the Sergeant Major for conversation. She said, "Excuse me, Sergeant Major, but you seem to be a very serious man. Is something bothering you?" "Negative, ma'am," the Sergeant Major said, "Just serious by nature." The young lady looked at his awards and decorations and said, "It looks like you have seen a lot of action." The Sergeant Major's short reply was, "Yes, ma'am, a lot of action." The young lady, tiring of trying to start up a conversation, said, "You know, you should lighten up a little. Relax and enjoy yourself." The Sergeant Major just stared at her in his serious manner. Finally the young lady said, "You know, I hope you don't take this the wrong way, but when is the last time you had sex?" The Sergeant Major looked at her and replied, "1955." She said, "Well, there you are. You really need to chill out and quit taking everything so seriously! I mean, no sex since 1955! Isn't that a little extreme?" The Sergeant Major, glancing at his watch, said in his matter-of-fact voice, "You think so? It's only 2130 now."6 points
-
Gidday guys, thanks for the comments. Here's another quick update, I've made the 20mm Oerlikon outfit for USS Mullany. The ship carried seven singles at the time that I'm making her, but as you can see I've also made a spare. They each comprise of seven pieces. I wanted to make them fitted with gyro gunsights but I think that's beyond me. The power unit mounted on the front face of the gunshield would have been quite simple I think but the gunsight itself mounted atop the gun, right at the rear would be pushing it, simply just too small for me to handle. But at least I've fitted each with a 60-round magazine drum and a spent cartridge collection bag. The overall length of the gun is 3.5mm and the pedestal is 2mm tall, including the base ring. As is my practice I'll leave the excess pedestal as you see it until they're painted, then trim them a little shorter. Well, that's it for now. Thanks again for your interest. Stay safe and keep on modeling. Regards, Jeff.6 points
-
Continuing the Gunze theme... I discovered the Austin Healey is missing the fire extinguisher and a switch on the dashboard unfortunately but should not be too difficult to scratch build if I can find good pictures. And now for something completely different.6 points
-
What happened to the carrots in the mathematician's vegetable patch? They developed square roots.6 points
-
Morning!!! 😍🤩 The weather in Britain at the moment is amazing so not too much modelling going on but there has been some progress. 🫶 First though this is what happens when your youngest blows a Dandelion clock over your front lawn. 🤣😩 Good for the bees. 🐝 Also Friday night we managed to snag some tickets to see Blur at the newly opened “Halls” in Wolverhampton. It’s a great venue and I’m glad we have it back. The gig was a warm up for their London stadium shows so only a few thousand and a real treat. we were so close. 😀 Very lucky and they put on a great show. ❤️ Any hoo enough of my not modelling escapades. Let’s get the skinny on Erik. Thanks to James @81-er I did a test with Tamiya gold and it looked spot on. Here on the left. It’s a close match but IRL you can see how the Tamiya gold is more warm compared to the Vallejo. Also (once again) don’t clean vallejo with anything other than their own products unless you want a soupy gunk. Might be just the metallic range but I always forget. The base has had some work. There were some slight swirls in the resin after curing so I brushed over the “wet effects” stuff and that sorted it. I did the same around the edge and that diminished the opacity. I added some little bits of detritus and some weedy tufts too. I’ll paint the main base black as suggested by my peers and as the plaque. I also added some mud splats here and there using this. (You can see the start of this on his shoes up there) I went at it a little more and added some wet spatter with an old tooth brush. Also a subtle amount on his cape. Now comes a contentious point. I moved onto the eyes for the final head. Now I know the “stare” worked on the test head but on the model he had that uncanny valley vibe. His head is tilted and slightly down so I have decided to place the pupils thus. It’s a bit Jack in the shining but trust me it’s a better fit when in place. Also I accidentally zoomed in on that pic up there and got a fright!!!😱 I love how you can see all the tiny layers. You can’t see them with regular eyes but wow!!! When it’s all dry I’ll mat coat and then gloss up the peepers like last time. So the plaque. It goes on here. I’m planning on gold with a black patina. I tried my new Army washed but they just aren’t designed for that look so here we are with a flory test. Just before I pop off for breakfast here’s a peek of the bell jar I’ll use to cover him. It’s riffy at the mo but I’ll give it a good polish before I pop in on. Thanks for dropping b by. Hope you’re having a splendid weekend and are enjoying my uncomfortableness. All comments welcomed. 😀 Johnny6 points
-
More progress. With reference to photo below: Nacelles and tailplane blended in nicely. A single application of Milliput and a bit of sanding did the trick. Also took the opportunity to drill some pilot holes for the undercarriage. The Drover has fixed undercarriage - so no need for pesky wheel wells and associated detail. Also scratchbuilt the seed spreader that is fitted to the cabin door (the a/c being modeled was used for aerial seeding). shape is a bit tricky, a basic box section at the top. Under this is a tapering chute follows the curvature of the fuselage (and helps give clearance to wing trailing edge when cabin door is open). Then an angled exit chute to feed the seed into the slipstream. basically 3 distinct components to this: i) a chunk of 3mm styrene up the top, then ii) some 0.5mm sheet bent to the fuse shape, edged with styrene. and iii) a 0.2mm sheet box section at the bottom. Should be fine after some primer and spot filling. So to the cockpit windows.... Simplistically, 4 sections of flat glass have to marry up with a compound curved fuselage. Just like in the photo. Hmmm! On the real thing - the transition is assisted by the window frames - which I'll be able to imitate with some judicious use of Milliput I'm using the Tommy Palmer technique for cutting the cockpit window ("if at first you don't succeed, try try again") Try 1: I started off with a strip of 0.5mm styrene which I scribed for the window centreline and then for the additional bends - then bent, cut, test fitted, bent, cut, test-fitted until it fell apart. Was on the right track though. Try 2: Traced where I'd got to onto 15 thou clear butyrate. Butyrate is more rubbery than styrene and doesn't mind being bent multiple times (annoying when you're try to scribe and snap a piece off, but handy for current purposes). Bent, cut, test-fitted, bent, cut, test-fitted until I'd worked out I'd cut too much off... At this point I identified that I'd need to trim back the fuselage in the area above the cockpit window. That was expected, as early on I'd intentionally left additional material there for this step. The 12V rotary tool came to the rescue again - with the fuse interior taped up and plugged with blue-tac to stop dust from the cutting getting into cockpit (successful). Anyway, you get the idea. 5th try lucky... I have the end product loosely taped in position in the photo below. There's a slight gap visible at the top and bottom. But that's what you get a flat pane meets a compound curve - and I'll be fixing that up with Milliput later. Note the window has been edged with black marking pen - which immediately eliminates the light refraction that you otherwise get from the edges. For comparison - my (numbered) 2nd and 3rd attempts have no marking pen, where attempt 4 & 5 do. The effect is much more lifelike? I've not yet glued this - as that's doing to require a little care to make sure the glue is invisible when peering inside, and that the putty doesn't squish through to the inside. I suspect I'll be using black Milliput for the puttying - haven't quite settled on glues yet. Any ideas anyone? It's butyrate cockpit glass, glueing to PETG clear fuse, glueing to styrene for rest of fuse. Next steps: - glue the cockpit windows and blend in. This'll take a while to get sorted. - fit the undercarriage - add detail bits - won't be long till we're painting!6 points
-
Prop and wheels are on and this one is finished...finally! To think I began this build in late October of last year. Now I get to look at yet another 19 Sq aircraft. Probably a Spitfire. They flew a few of them. I have a few kits to chose from. This was last night, so I will arrange a better photo shoot later today. --John6 points
-
I have put the cockpit parts together and have tried my best to make the most out of the kit I have at hand as I can't afford the expensive extras I see other modellers using. Ho-hum. 🤓 I have painted various shades of grey within the cockpit parts and added some panel liner to accentuate the detail that there is and added some aluminium and bronze with panel liner to the control panels and such. That's every technique currently in my locker. My hands (sadly) are not steady enough to paint the seat belts and my impromptu ejection pull handles are drying.... I will coil these and add them to the seat tomorrow after the layers of etching primer and paint and varnish have fully cured. These aren't mine incidentally, but it is an example of what I would like and have tried to push what I have near it.... And then of course the real thing..... Comment and suggestion welcome 🤓6 points
-
And now with a coat of paint and some weathering Humbrol satin black, and then brushed with Tamiya weathering powders - silver, gunmetal and a little rust. Never used them before but I have to say I'm quite pleased with the result. It's a bit more subtle than my usual dry brushing, knocks back the stain finish a bit and gives a nice lustre to the engine, without it looking as if it's been dragged across the hanger floor. Also got some aftermarket goodies - Barracuda replacement wheels and 108gal drop tank correction set which look fine, and Eduard's Look instrument panel - more of which later. Pete6 points
-
6 points
-
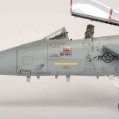
F-4D PHANTO II, 66-7751, 93rd TFS, 482nd TFW, USAF Reserve. Homestead AFB, Florida, March 1984. Kit Tamiya 1/32 Changes applied: -Elimination of incorrect relief panels and re-engraving of some details -Cabin interior with addition of details and improvement of the instrument panels, Aires seats, reconstruction of the internal part of the roofs (non-existent). -wings, worn out wing trailing edge and adding some riveting. -trolleys, improved trolley legs with the addition of details and cables, Aires wheels. -rebuilt pitot tubes, antennas and sensors. - modified air intakes, modified Aires engine exhausts. Hope you like it. Good vision and good life Pier Here you can find all the photos: https://www.blogger.com/blog/post/edit/5529188314213485356/84194844318214756215 points
-
So let's get started. These are the cockpit assemblies. The upper one is for the B.XVI with H2S radar. Freightdog provide a very nice resin instrument panel with the additional radar gear. I have added seat harnesses from Eduard. Ready to close up the fuselages. Canopies fitted and masked. The B.XVI has the nose glazing painted over with what looks like a camera installed poking through the glazing flat panel. Freightdog provide a resin part to represent this.5 points
-
There was a fair bit of cleanup to do around the rear quarters. And then visible once I'd added primer, this bulge (on both sides) caused by the mounting socket on the inside. Cleaned up the bulges Likewise there are sink marks all around the edge of the bonnet caused by the inside moulding. Eventually. Looks pretty good in matt black primer. I have only two sets of wheels big enough to not get lost in those arches. This (below) is wheel option A. And this (below) is wheel option B, which at least would allow a better view of the brakes.5 points
-
I got back from a few days away yesterday morning to find my son had put most of what had arrived over those days well out of sight of his mother. Good lad. I felt obliged to show a sample of what I'd got, so there was a couple of sheets of OldModels decals, a sheet of EAV-8B decals from Series Espanolas with the tails from Riat 2019 on them, an Academy F-86F over Korea boxing with decals for "The Huff" in it, I'd got a sudden need after seeing a 1/48 build on here, though mine is in 1/72, none of that big scale deviancy here you know. & lastly a Royal mail bag with the World Airpower Journals that cover the Mirage series of aircraft, a bit late for my Kfir build but hey, I've got more of various Mirage type kits in stock you know. Not disclosed were a couple of Brengun early Mustangs from Hobbyshop.cz, a couple of kits from Special Hobby, Indian Gnat F.1/Ajeet & Vampire FB.9 trop which includes RNZAF markings. Both these latter bought at very good prices from one of SH sales, even better, I'd decided I wanted the Gnat after I'd completed the Vampire sale so messaged SH. Not hearing anything after a coupe of days & the sale drawing to a close I bought it anyway & was delighted to receive a refund to my paypal account for the double postage. Well done Special Hobby. But wait, there was more. A Hobby Boss F/A-18B from MJW models & a HB F/A-18A from China via ebay, good for colour schemes but not big into detailing I reckon. But wait, there is more. an Aoshima Back to the Future flying De Lorean from episode 2, also influenced by a build on here. My son seems keen. These things were ordered over a space of about a month, thanks goodness we were away when they decided to arrive over two days. 😮 That's all folks. Steve.5 points
-
Hi Guys. Day 1 Lower hull Construction completed. 71 (ish) parts, and looks suitably busy. Wheels are Poly cap type and slide on and off as required. The suspension legs run all the way through the hull, and I've only glued the end inside the hull. This allows the arms to flex nicely, so the wheels are nice and level, or can flex if I build a dio base. Rear plates on, minimal clean up required and a pretty good fit. As I'm lucky enough to have rubber band tracks, I'll start on the paint today, and hopefully should have a update later Cheers for looking Paul5 points
-
a lightly poached egg (The trick see, is ya gotta knick 'em in the dead of night so's the gamekeepers don't getcha.)5 points
-
I've done a bit more on the Mustang. I started on the main gear bay. I was a bit surprised by the number of ejector pin marks. I filled them in with Mr Surfacer and will clean them up once it's dry. Here's a nice comparison of the Halberd fuselage with the kit one. Adding in the kit cockpit side panels show them to be a perfect fit to the resin fuselage. A dry fit with the replacement floor. The fit is truly exemplary. With just some tape holding things together. The kit tail fit is great too. Again, just some tape holding things together.5 points
-
Many thanks. Thank you Ritchie. And the roundels are on. Decals finished and setting and on this warm, dry night I anticipate the prop and wheels will go on too, and a bit of satin coat. --John5 points
-
The Flatulent Ferret near5 points
-
No bananas, but here is a 6" rule on the top of the main hull:5 points


.thumb.jpg.847c20c2e40e13e24e658988f9f312dd.jpg)


This leaderboard is set to London/GMT+01:00