
Leaderboard


Popular Content
Showing content with the highest reputation on 21/04/23 in all areas
-
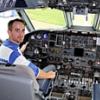
Hi, Built this pretty much straight out the box, I was originally going to do a camo F4, but after visiting the Norwich Aviation Museum, changed to do a Sharks teeth one, so it became XV470 of 56 Squadron, RAF Wattisham, circa 1992. Airbrushed with Mr Color paints and lightly weathered with Mig Ammo washes. A few mistakes as usual, and couldn't get the canopy straight, but itll do for me!! Revell 1-48 Phantom FGR2 XV470-4 by Jonathan Francis, on Flickr Revell 1-48 Phantom FGR2 XV470-2 by Jonathan Francis, on Flickr Revell 1-48 Phantom FGR2 XV470-5 by Jonathan Francis, on Flickr Revell 1-48 Phantom FGR2 XV470-6 by Jonathan Francis, on Flickr Revell 1-48 Phantom FGR2 XV470-1 by Jonathan Francis, on Flickr Thanks for looking Jon27 points
-
Finally finished this one but in the most boring livery that was provided in the box! The reason will become clear in a moment. the kit is a follow up of the AA Models Super King Air 200 with a new fuselage, engines and wings. Typical AV/Amodel/etc kit with no part numbers on the sprue or locator pins. and a lot of cleaning up to do. With some care and attention they build up into nice models of subjects not really covered by the mainstream model manufactures. Lot of detail including PE parts and paint masks for the windows. The decals provide options for 4 different Beech 350: a all yellow German ADAC aircraft, 2 Ukrainian variants and an all white American Beech, N6151N. The last one caught my attention as on the instruction sheet N6151N, Luxembourg Findel, July 2009 was mentioned. I live in Luxembourg and as a plane spotter/photographer I found this suspicious, as we don't have any local Beech 350s. A Google search of the registration resulted in one picture, taken by.... me! The all white Beech made a refueling stop back then en route from the USA on delivery to the Australian Air Force and it seems my photo is more or less the only available on the web. So I assume this decal version was based on my photo... Well so far about reference material! Anyway this made my decision to build the kit as the most boring one offered by AV. Here we go with my photo of the real thing: Part of the instruction, mentioning the location: And then two photos of the finished model. As said those kits require quite some work and I did not really manage to get the fit of the cockpit part seamless into the fuselage. I did not use the provided cabin windows but used Microscale Kristal Klear. The whites come from a "rattle can" and all the other paint is brush painted with Revell Aqua Color. As a General Aviation fan I am very happy with the kits we see the last year of business jets and props like the King Air. I have some more in my stash, lets see what comes next. - Peter26 points
-
Do-335 A-10 HK 1:32 Had it been used longer, it would probably have looked like this.24 points
-
Hi everybody UAVs are back!! After abandoning this type of models for three or four years, they're making a strong comeback with this unusual machine. Europe has been searching for its place in the world of drones for quite a few years now. In the early 2010s, numerous prototypes emerged in Europe, including the BAe Mantis, a machine that would later give rise to the Telemos in partnership with Dassault. It made its first appearance at the Farnborough Airshow in 2008 with a mockup. The version shown here is the one that flew flight tests in 2010 in the Australian desert. The model used is one that I searched for a long time. It is a pure resin model from the English brand Combat Kits. The molding is pretty good, but the engravings need some work, and all the assemblies need to be reworked to obtain a decent result. Nonetheless, the model is still very good and accurately represents the real thing. A lot of work is needed to engrave and refine the details of the nose. The painting was quite complicated. Most photos show it backlit and almost black. The few indoor photos show it more brownish. I decided to use this shade for my representation, with a hint of copper and a lot of weathering. The kit decals are of good quality. In the end, it's a machine that I really like, and it enhances my collection of drones. Photos : I hope you will like it. The complete WIP can be found there See you soon with a complete new project. Very different, still resin, and still a flying machine ! Alain.20 points
-
Good morning More than anything, this was a test fit of a Bf 109 in 72 from Special Hobby; it didn't go bad, you have to be very careful when assembling, the plastic is a bit rubbery and the pins connecting the casting shaft are thick, surface details worthy of note. Bf-109E-1 Condor Legion 3.J/88 Oblt. Hans Schmoeller-Haldy Barcienes, airfield, Toledo Spain march 1939 1/72 Special Hobby Ettore14 points
-
Thanks Jason. I'm feeling a bit better, but I still have chest and sinus congestion. But at least the chest x-ray shows no more fluid in my ancient lungs. I love it when Doc asks for samples for testing - "Here, cough up some phlegm into this container and while you're at it, blow your nose into this one." Can you imagine being a lab technician? 🤢 Being immunodeficient from all the chemo I've received over the years means I catch everything that's making the rounds. Sometimes I feel like a walking petri dish. Many moons ago I had Graves disease (hyperthyroidism - overactive) and had my thyroid nuked with radioactive iodine. Haven't had any issues as long as I took my Synthroid pill everyday. However, the routine blood work I get prior to my monthly infusions showed my TSH (thyroid stimulating hormone) way off the high side of the chart - which means hypothyroidism - under active. This is most likely why I'm so fatigued all the time. We've adjusted the Synthroid dose and we'll see how that goes - fingers crossed because I could use some more energy. I don't know what to think of this getting older nonsense. However, I found a positive correlation between my age and the size of my stash. They're both getting bigger. You're right about the short run kit builders of course. I've built more short run kits than mainstream, at least lately. Mostly because I like the subjects, I think. My next build will be mainstream - and out of the box! Ha, I'm so funny. ***** Here's Kikka-san prior to stickeration: Monotone paint jobs are so...singular. Ha! Get it? Never mind - I did some modulation but it seems to have mostly disappeared under the gloss coat. It should come back somewhat when the matte varnish goes on. I added the tail bumper and antenna from photoetch (as are all the gear doors and actuators). I will also add the venturi tube that's on the starboard side after the stickers go on. I figured if I added it now I would just knock it off. So there she is at the moment. Not much to look at, sorry. Cheers, Bill11 points
-
This little darling was spotted in the local mall car park the other day, a 1949 Series 1 Land Rover, certainly restored but very sympathetically & it had a very nice patina to it. A real treat was the PTO driven belt drive roller on the back, the first of these I've ever seen in the flesh. Talking to the driver, he said that he has a preproduction Series 2 that is unrestored & he has been told he mustn't ever. Steve.10 points
-
9 points
-
9 points
-
Thanks Giorgio. No! Remember the wine advent calendar? See below! Thanks Keith - get well soon! I've been obsessing too much about the nose and it's been stopping me progressing so afternoon I though "Enough is enough", finished it off and brushed all the glass with Aqua Gloss: Time to pack it up: Note the box of bits in the bottom. After some chopping: That should keep it safe. I hope. Finally. Back to the Hase.9 points
-
Morning All, So it's been quiet on the thread but not entirely quiescent on the bench - more of which below. But first: Not only of use but a cracking good read as well. I particularly liked the idea of the 'snatch' launch involving a Canberra with a hook flying at 15' across an airfield to 'snatch' a target cable from between a couple of poles. Think Wapitis picking up Army communications in the desert in the 20s/30s only at jet speeds. Sporty Canberra's get several mention and as I say, it's a good read. More of a use as information than a modelling reference - but well worth it. Thanks Troy. I did have a quick google to see if I could find a digital copy. But couldn't and anyway then decided I didn't want to see anymore plans in case they disagreed with the two sets I already have - which also disagree with each other... There has been gluing and this is still page 10. Just saying... Usual suspects... Ha. If I can get this far in a little over a year then I'm expecting rocket-like progress from you, Andy Actually I think one important factor is whether you find you enjoy the CAD foir its own sake. I've no background in it but have enjoyed learning - and that kept me plugging away. I think it's only one or two, Mark. Be fair... Ok so. I've been puzzling over the shape of the hole in the underside of the Defiant. As seen in photos and plans of the turret figther and so as moulded by Airfix it's a sort of pear shaped curved affair thus: But the internal photo that @AndyL posted earlier in the thread showed a straight sided 'launching hole' - which suggested it might have been modified for the TT, although the plans I have didn't reflect that. Anyways a bit of study of external photos seem to me to confirm that that hole is straight sided on the TT. And in this one you can see both a curved outline and a straight - suggesting that the hole outline has been altered. Both those photo's are consistent with the internal view - and good enough for me. Cue a bit of 'proper' modelling. Remove the kit hatch cover from where it's moulded in with the wing undersides. Cut in half and glue (see, G - gluing) into the fuselage. Draw and print a scribing template (from a diagram in one of my books that also shows a squareish hole) et voila - straight sides. A bit more thought and design and a little insert was produced to add detail to and tidy up the (w)hole area: The insert sticks out through the underneath of the hole thus: The idea being that once the fuselage is buttoned up and the insert securely glued in place, I'll sand the outside back to make a neat flush finish. Seemed like a good idea to finish off that section of the fuselage with some side-wall details. So there was now a target-stowage section sub assembly in the virtual world: That came into being in the real world thus: And which thankfully all fitted together as intended (please excuse the partially-primered thumbnail): Having seemingly had some success drawing fuselage side-wall detail - it then seemed like a good idea to finish off the operator's cockpit with some detail. The large flat square areas on each side are just mounting points for canvas bags that I plan to sculpt in the 'forms' environment of Fusion - once I've figured out how to do it that is. But they can wait a bit. The sidewall details also now exist in the real world: And that, with one or two exceptions such as the canvas bags and the swivel pulley for underneath the fuselage and anything I've forgottemn, completes the CAD work on the Fuselage for the TT conversion. On reflection it seemed a good idea to show as much of the internal work as possible and so I modified the Fuselage insert to have the operator's cockpit entry door open. As seen here with all the CAD on show: The door doesn't seem to be generally left open when the Defiant was parked. But it stands to reason it had to be open sometimes doesnt it... So I now had a whole bunch of bits: To further please Giorgio, I did some painting (albeit just some rattle can primer of the operator's cockpit area) and gluing (albeit just the sidewall details to the fuselage sides). Starboard details Port details And the target-stowage section sub assembly in position And at least some detail will be visible through the launching hole (with a torch ) And some of will also be visible from above, now that the cockpit door will be posed open. And that us all up to date.9 points
-
Hello to all of you guys and girls.I have finished this kit last week and I finally got the time to post it here and show it to you.The kit itself isnt bad at all.It has some fit issues but nothing major.The kit was painted in gunze and AK paints.Sealed in vallejo and ak varnishes.8 points
-
A while back took a grandaughter to see grease on stage at a local theatre. It came to the musical number hand jive. In a raised voice she said im learning this at school its called the "hand job", needless to say the people around us started laughing.8 points
-
Eduard 1/48 scale FW190 A-6 of 1/JG1 based at Deelen in Holland August 1943 Paints Mr Colour Flory wash Oils E41E1064-BCA9-47A6-8208-7B097B87CAC9 by James Halls, on Flickr 8029DA1B-EF28-4F5B-B1D3-7449D31C3BA2 by James Halls, on Flickr 5842B134-83C8-479B-9B1F-51BA1C0A69F2 by James Halls, on Flickr 43C91F5F-87AD-4111-957D-DC454627F01B by James Halls, on Flickr 409C84BE-337D-42F3-B3D1-4FBF2DA0B302 by James Halls, on Flickr8 points
-
Hello chaps All done. Sorry for the lack of updates recently. After the decals were sorted everything was spelled in with a flat coat and a Flory Models dark dirt wash applied and removed. This was followed by another flat coat and some weathering and streaks added with oils. Exhaust stains were also added. The UC, prop and spinner were all built up oob and weathered with washes oils and pastels. Anyway pics below. 409C84BE-337D-42F3-B3D1-4FBF2DA0B302 by James Halls, on Flickr E41E1064-BCA9-47A6-8208-7B097B87CAC9 by James Halls, on Flickr 8029DA1B-EF28-4F5B-B1D3-7449D31C3BA2 by James Halls, on Flickr 5842B134-83C8-479B-9B1F-51BA1C0A69F2 by James Halls, on Flickr 43C91F5F-87AD-4111-957D-DC454627F01B by James Halls, on Flickr Thanks for looking and thanks to everyone who followed along and contributed. James8 points
-
Hello fellows, Let me show you my last project, the 1,5 T Chevrolet G506 Flatbed truck. It's made by Mini Art, in 1/35. This is my first experience with this brand, and I have to say I'm very happy. This is the boxart: The quality of plastic is good, without flaws, and the instructions are clear. All in accordance with a modern kit. I liked this subject because is quite different. By the way, MiniArt provides the same kit in several versions (tow truck, military...). Here, the chasis once built: And here, after painting and weathering. I've tried to achieve a realistic look. Some pics of the engine. Despite being quite detailed, I added a couple of pipes: Here the chasis and the engine, and also the cabin (this just with a layer of prime). In the cabin I also added a couple of wires, in order to connect with the engine. The seat was weathered using pigments. The decals of the dashboard are so tiny, that two of them got damaged. Luckily, they will hardly be visible... Here the cabin already completed and painted: In this pic, the cabin put in the chasis, and the engine connected with the radiator: Supports and wires connected: And this is all for the moment... As you can see in the background, the driver is also waiting for more work. I hope you like it. Cheers, Josep7 points
-
I think that this was the first completed model that I posted on BM, back in 2016. Once again, the photos are gone thanks to Village Photos, but not only that, I don't have the originals anymore, so I've taken a few new ones, and touched up some of the weathering. So what is it? It's the Italeri kit of the Crusader Mk.lll, coupled with the Accurate Armour conversion, plus some extras. These consisted of Fruilmodel tracks, Eduard etched brass set for the Crusader and some alterations of my own, which were the removal of the stowage bin lids and replacing them with new ones cut from pewter foil sheet. The slats at the rear were rebuilt and an exhaust outlet added, again from pewter foil. The stowage came from various makers. And finally, mounted on it's base. Thanks for looking, and I hope that you like it. John.7 points
-
Hi folks, This is a kit that I've wanted to build for years, probably decades, having been thoroughly impressed by the faded example formerly on display at the Cornwall Aero Park (later Flambards theme park) during family holidays to Cornwall many years ago. I acquired it from a fellow BM'er, @jaw for a very fair price - thanks again, John! The Italeri kit is a straightforward rebox of the original ESCI plastic but with a big, comprehensive sheet of decals that perform beautifully. The plastic in the box is typically ESCI, in that it has overall raised panel lines, a very sparse cockpit, inaccurate seat, poor wheel wells, areas of poor fit and some inaccuracies. My first job was to sand away the raised panel lines and rescribe them; it is the first time that I've done this for a full kit and I'm quite pleased with the result. ESCI boxed both the single-seat A-1 Skyraider, with rear fuselage airbrakes, and the multi-crew AD-4 / AEW.1 with rear fuselage crew doors but used common fuselage parts for both variants. The differences were catered for by supplying inserts for the rear fuselage appropriate to the variant, but there are two snags with this: firstly the fuselage parts have a solid-backed depression rather than a cutout, which would be visible through the bubble windows on the crew doors, and secondly the inserts don't even come close to fitting. So, the second big job was to cut out the blanking pieces and then fill, sand, fill, sand etc until the enormous gaps were eliminated. The next problem was that the kit is moulded with raised panels representing armour plating on either side of the forward fuselage which, while representative of A-1 variants, was not present on the Royal Navy's AEW.1 aircraft. These were laboriously sanded away, which also necessitated removal of the exhaust flame glareshields before reinstating them using plastic card. (There is another armour panel under the fuselage, but I forgot about that one. Don't tell anyone.) In addition, the AEW.1 had a prominent rectangular air duct between the exhausts just aft of the cowling cooling gills which is not included in the kit, so these were plunge-moulded from carved basswood masters. They should really be a bit narrower, but I'm happy. Next up, the cockpit is typically ESCI in that it is spartan, with plain panels and decals, and the seat isn't particularly accurate. I scratchbuilt a basic representation of the side panels, drilled a piece of plastic to make an instrument panel in conjunction with the kit decal and scratched a seat which, while far from perfect, looks a bit more like the real thing than the kit's offering. The undercarriage bays really aren't accurate at all, especially as there is no representation of the pretty obvious wing spar. I boxed the wells in and started to do more scratchbuilding but quickly realised that spar detail would necessitate a full rebuild of the undercarriage legs. As a) I really didn't want to risk losing enthusiasm for the project, b) I don't display my models upside-down and c) life's too short, I left them as they were. The kit was airbrushed, with the assistance of my brand-new airbrush compressor (why oh why did I leave it so long???), using Tamiya acrylics. The kit decals behaved flawlessly with no silvering at all. I very seriously considered the Blackbird Models resin wing fold kit, as the result would be both impressive and reminiscent of how I saw the real machine when I was a youngster, but in the end I decided against the idea simply because it would have cost me rather more than the model did - Yorkshireman, see?! This build was a long way from my preferred subjects in terms of scale, era, operator and number of wings, but it was a fun challenge and, considering the starting materials, I'm quietly pleased with result. Jon7 points
-
Here is something I couldn't help building, after seeing the photo of this Tornado in Mach loop. I printed the "I'm with stupid" sign at home, and made my own decals too. The Revell kit is a pleasure to build, and fits really well. I weathered it with AK streaking fluids.7 points
-
I've reached my final opinion on this kit - it stinks. But in this case, you have to work with what you have. In the end, it will look something like a Kikka. I just discovered a glaring mistake in the moulding of the wings, but it's too late to do anything about it now. Perhaps. I just think they are masochists. ***** So, I take a few weeks off to enjoy pneumonia for the third time in the last year, and I come back to some very interesting thread drifts. Thanks mates! I've never heard some of those bands - always great to discover such stuff. Just to show that I'm not entirely wacko in my musical tastes, I'm currently enjoying the new Temples CD Exotico. Lots of talent in that band, and having Sean Ono Lennon onboard to produce is a great match. Anyway, the Kikka. Stickers should go on today, and then a matte varnish. If I get a chance, I'll post a photo of the model prior to stickering. First, though, wifey says mulch the flower gardens you lazy git. 🥀 Cheers, Bill7 points
-
cut off the strut and drilled and pinned it so I can assemble the main chasis then paint it and add the wheel after paint. First bit of assembly trying revel contacta cement, there’s a little bit of spring on the moldings hence the large clamps. Right now I need to walk the dog.7 points
-
Box art Source: https://www.facebook.com/darryl.legg/posts/pfbid02b8u3fynCbrAzztAoixJ1gP1xfGEwWjrSNtUW8yyCvdkhPhbHtx8FJgBjzSQG6Fezl V.P.7 points
-
I once knew someone who was a member of the Territorial Army. On one occasion, he called at the house of some mutual friends on his way to Parade Night in uniform whilst I was visiting. On hearing the door bell, my friends, who had a son, then aged six or so, sent him to answer the door. We heard the door open, then silence. Mum says "who is it?" A very excited six year old comes running down the hall and bursts into the kitchen eyes wide with amazement and exclaims "Mummy, mummy, it's Action Man!"7 points
-
End of the week wasn’t a promise btw7 points
-
LISTER: But why are they painting the color the same color it was before? RIMMER: They're changing it from Ocean Gray to Military Gray. Something that should've been done a long time ago. LISTER: Looks exactly the same to me. RIMMER: No. No, no, no. (pointing at one section of the wall) That's the new Military Grey bit there, and that's the dowdy, old, nasty Ocean Grey bit there... Or is it the other way around? Sorry, couldn't help myself.7 points
-
I was going to make some comment on how all that lovely detail, especially the winch, won't be seen once you've closed up but then I realised… Pot, kettle Still stunning.7 points
-
Good evening, An initial progress report is amply due. Question: do I feel uncomfortable? Answer: I swore a tad more than usual as it's now confirmed I don't like the plastic used. Tailplane strut broken in three just holding it in the tweezers but no problem to repair it (left one) with extra thin and a little bit of dissolved putty. Never had such a surprise! Lower wing part broken while sanding on a flat surface to thin the trailing edge. Some cockpit parts were glued and all sprayed with Stynylrez grey primer. Same with the wheels and the radiator subassembly (I decided to invert the front part, I'll explain why later in the build) . The PE seatbelts were a real pleasure to shape over the seats (not yet glued to) . The metal is very thin and flexible but not springy. It's like they had been annealed. Some painting is planned but not sooner than sunday thus I already wish you a pleasant weekend. Pat.7 points
-
An American-Indian walks into a saloon with a shotgun in one hand and a 10-litre bucket of manure in the other: The Indian says to the bartender, "Me want Lager!" The bartender says, "Sure, Chief, coming right up." He then serves the Indian a tall glass of Tennents Lager. The Indian drinks it down in one gulp, picks up the bucket, throws the manure into the air and blasts it with the shotgun. He then walks out. Five days later, the Indian returns: He has his shotgun in one hand and another bucket of manure in the other.He struts up to the bar and tells the bartender: “Me want beer!"The bartender says, "Whoa there Chief, we're still cleaning up from the last time you were here... What was that all about anyway?" he asked. The Indian explained, "Me training for job as politician. Drink beer, shoot the poo-poo, disappear for a few days come back and see if somebody else has cleaned up the mess me left behind....."7 points
-
Tamiya Tyrell P34 1/20 Thanks to @JOCKNEY and @JeroenS for the GB, and everyone elses for your looks, likes and comments Build thread is here7 points
-
I measured the full range of Vallejo Air paints using a spectrophotometer. I did this work because Vallejo is known for giving sometimes random labels to their paints - the label on their bottles are not always a good information about the color they are supposed to be, and sometimes they are misleading - there are better matches in their own paint range. With this data, it is possible to give a definite answer to the questions: "Which paint from the Vallejo Air range is the closest match to a given color." "Is Vallejo Air XYZ a good match for ABC" What other paint vendor color is equivalent for Vallejo XYZ (or the other way around) I will prepare some answers to the first question on separate threads focusing on given color range topics, like ANA, FS, RAF, or Luftwaffe. If you need other answers - feel free to ask. This post is just a snapshot of the raw data from this measurement task which I hope could be useful to someone. It is also quite technical. How to interpret the data: Name, for example 71.082 | Fluorescent Red | Rojo Fluorescente | FS38903 | RAL2005 | GU 2.5 | Fluorescent | Opacity 32.63% 71.082 it is a Vallejo AIR vendor code Fluorescent Red | Rojo Fluorescente | FS38903 | RAL2005 those are all names that appear on bottle, they are just separated with "|" GU 2.5 Gloss Unit measurement of color. It is a measurement from a Glossmeter device and represents how glossy the paint is. https://en.wikipedia.org/wiki/Glossmeter It is a very important factor for human color perception. Very glossy colors appear darker than they really are, and the difference in gloss is quite often more visible than the color difference. The number scale is not defined by any standard, but generally, you can think of them as <5 is very matt, <10 is matt, 10-25 is satin, 25-40 is semi-gloss, 40-80 is gloss, >80 is very glossy, >90 is mirror-like. The above example is 2.5 - which means the paint is very matt Fluorescent (or Metallic) optional note, meaning the paint is Fluorescent or Metallic. In the above example, the paint is Fluorescent. Opacity % optional note with a % number, it means the paint is only that many percent opaque at a 254-micron thickness (very thick). In the above example, the paint is only 1/3 opaque, which makes it very transparent. Don't expect good coverage with transparent paints. R,G,B RGB of the paint color Color simulation A color swatch with the above RGB L*a*b* Color coordinates in L*a*b* color space. https://en.wikipedia.org/wiki/CIELAB_color_space This color representation is much more precise than sRGB and takes into account human color sensitivity. The three coordinates of CIELAB represent the lightness of the color (L* = 0 yields black, and L* = 100 indicates diffuse white; specular white may be higher), its position between red and green (a*, where negative values indicate green and positive values indicate red) and its position between yellow and blue (b*, where negative values indicate blue and positive values indicate yellow). LRV Light reflectance value represents how much light is reflected from the paint surface - scale from 0 to 100 - https://en.wikipedia.org/wiki/Light_reflectance_value H V C (Munsell) Color coordinates on Munsell color chart. It is useful since some references use this notation to represent a color https://en.wikipedia.org/wiki/Munsell_color_system Light source and Test mode Those are spectrophotometer settings, If you are curious about what they mean, read the technical details below for more info. Even more technical details: Now the raw data:6 points
-
A few weeks ago I went to the stash with the intention of building another of the smaller scale Hawks from Space:1999 to sell on eBay. I've sold a couple before and they go well. However on opening the box I realised I'd bought the Paragraphics PE cockpit set at some point in the past, so started building it with that in mind. I had some coin battery holders I picked up from eBay and one of these fitted perfectly to provide the small amount of power needed for 4 tiny Surface Mount LEDs to light the instrument panels. I then tried to make pilots from some figures from the Airfix Astronaut set, but these didn't fit. So I was left with an open cockpit and no pilots so this must mean its at a landing pad somewhere. There has always been a debate about where the landing gear for this would be and some have suggested it is launched from a launch rail on some sort of carrier ship... cue lighbulbs going off... So a few weeks later we have this... WIP topic here: Photos: Yes, yes I know in the world of Gerry Anderson there is likely to be some sort of complex, hoist/list/moving platform/slide that delivers the pilots to the ship, but frankly, I couldn't be bothered with that, so its just a ladder This is partly scratch built with some kitbash parts left over from F-16s, Saab Viggens, Hawegawa diggers, Gloster Javelins and half a Kinder egg The main gantry was originally built for the 1:48 3D printed Babylon 5 Starfury space dock I built last year but was never used after I changed the design, so that was a useful starting point. The maintenance platform is intended to fold down out of the way when the Hawk has to launch or be recovered. The red grapple arm is supposed to hold the Hawk securely in place in case the carrier ship needs to manoeuvre, and also to help guide the ship in to land. Here is the landing pad without the Hawk This shows the red grapple arm well, made from left over pieces from a Hasegawa digger kit. The battery pack which incorporates an on/off switch The rear engine mounting is held on by a small magnet: I just have to be careful handling the engine to avoid damaging the thin support struts!6 points
-
F-4Es of the 336th Tac Fighter Squadron, 4th Tac Fighter Wing out of Seymour-Johnson AFB participating in Red Flag 81-2, February 1981. 66-0297 66-0301 68-0313 72-0160 72-0410, 334TFS squadron commander's aircraft operating with the 336TFS 74-1624 Thanks for looking, Sven Old Viper Tester6 points
-
Hello everyone! Here are my latest kits, a couple of Mark I Models 1:144 Focke-Wulf Fw 190As. These were reboxed Eduard kits with resin cockpits added and a new selection of decals for, in this case, A-6 and A-7 variants, of which I have built one of each. The kits built up well with minimum fuss, just cleaning up parts and mating surfaces being needed. The only major flaw, the overly long main undercarriage legs, was fixed by removing 1mm from the top of the doors and legs. Apart from that, I shortened the gun barrels a bit and replaced the tail mast as it was too flimsy. I added a few missing details, all from stretched sprue: the underside aerials, the wing probe, main u/c retraction arms, the ETC rack sway bars and the radio wires. In the case of the A-6, I modified the main doors to shorten them at the bottom and scratchbuilt inner doors from thin plastic (initially, the A-6 had two-part doors). The kits were fully painted and varnished with brush. I am very pleased with how they came out although the only let down was that the contrast between the Pollyscale RLM75 and Xtracrylix RLM74 became minimal under the matt varnish. First: Focke-Wulf Fw 190A-7 "Red 13", flown by Heinz Bär, II./JG1, Luftwaffe, Störmede, Germany, April 1944. Second: Focke-Wulf Fw 190A-6 "Green 1", flown by Hans-Joachim "Hajo" Herrmann, Stab/Versuchskommando Herrmann, Luftwaffe, Bonn-Hangelar, Germany, August 1943. Versuchskommando Herrmann was established in late June 1943 with Herrmann and several other retrained bomber pilots who had experience in blind flying to test the concept of what would become known as "Wilde Sau". Two months later, it was redesignated JG300, the first of the Wilde Sau units. Thanks for looking and all comments are welcome. Miguel6 points
-
Hi JR Thank you very much for your comments. Well, we really enjoy the final photos showing all the models together. It is easier for us to do this type of work to approach to achieve our goal. These are the final photos on the latest 3 Fulmar of our project. 20 Mk II N1925 RAE June 1943 21 Mk II N2015 (not confirmed) 7C 805 Squadron HMS Eagle Early 1941 22 Mk II N187 x (not confirmed) G 806 Naval Air Squadron North African airbase December 5, 1940 This is also a preview of the final photos. Cheers Santiago6 points
-
Ced, don’t like to mention it in public, but the wings have fallen off…6 points
-
Propeller shafts and rudder fitted. Red Anti foul on. Tomorrow the plan is to mask the red and spray the light grey of the camo. Jon6 points
-
With the say-so of our buddy Heather I have beganned Now this may never happen properly but its a 'scratch itch' build and the raw materials were just too damned raw Look how bad the transparencies are The tip of my Swann-Morton vanishes when brought in close to the front panel so the die is cast let us see if I can get this one anywhere huh Design work commences.6 points
-
yesterday i started working on one of the figures and after a painfull session i decided that i won't use the figures that came with the kit. The fit is poor, lot's of gaps to fill and the detail is very shallow. Also the construction of the tank caps was a pain. Instead i ordered some resin figures. I think these guys will add a bit more life to the model.6 points
-
Tis the way Pete. Whizzing along with this one. Makes a nice change. Got most of the base colours down and since Im going for a brand new without tags kind of thing, there won't be much weathering involved. Regretting not texturing the inside a bit, but I guess spall liners are a thing.6 points
-
I was about 15 or so and decided to answer back to my dad. Can't remember the debate, but I turned round to him and just came out with " what's that I can smell.. oh yes it's you talking out your backside ..." The look on his face was priceless, he just stopped speaking in shock! I could see my mum in the kitchen crying with laughter. And what did I do.... Ran as quick as I could up the stairs and beat a very hasty retreat to my room... I wasn't hanging around for the aftermath of that comment!!!😆🙂6 points
-
Undercarriage bits glued on and she's on her feet. A start has been made on the turret. The other bits and bobs have also had a splatter of paint. And a start has been made on the torpedo. Thanks for looking, Cheers, Alistair6 points
-
I see this car fairly regularly around Kidderminster; he seems confused, almost as if he has a foot in two camps !!6 points
-
I dug through my stash and found a stand that would work for my in-flight 1/72 Airfix F-8 (converted from A-6), and got her mounted last night. As the Revell above, she's wearing Hungarian markings from a Techmod decal sheet. Thanks everyone (especially the hosts) for a lovely GB! I learned a lot and had a blast and enjoyed perusing all the great models in the gallery.6 points
-
As the fifth instalment of my "Hawker Hurricanes around the world" project, this is Asia's representative, a Mk IIc/trop of the Imperial Iranian Air Force. Iran received Hawker Hurricanes during the war, but I understand that this (2-13) is one of the ones received in 1946 and used as a trainer (which makes sense given its lack of armament). I used the Legato Mk IIc kit, OOB, with decals from Kitsworld (actually the spinner and prop on this are from an Arma kit, but I'm using the Legato one on the Arma kit, so it was just a trade). Tamiya acrylics on top, Vallejo azure blue underneath, and a variety of minimal weathering techniques used (panel liner, acrylic wash, oil exhaust stains, etc.). Here are some group photos with representatives clockwise from top left: North America (USA, Airfix Mk XII); "civilian interlude" (Hawker's test plane G-AFKX, Airfix Mk I fabric wing); Europe (Poland, AZ Mk I fabric wing); Asia (Iran, Legato Mk IIc); South America (Argentina, AZ Mk IV); and Australia (Arma Mk I metal wing). I have to finish Egypt (Arma Mk IIc) and then phase one of the project, representing a Hawker Hurricane in markings from every continent, will be done!5 points
-
Thank you @Faraway and @Toryu comments very much appreciated! Also many thanks @Enzo the Magnificent for the extension, that's taken some of the pressure off for my two builds. Today managed to fit all the side railings and flight deck netting. Placed it all in the stowed position which answers @AlxBNE's question about having a helicopter on deck (no!) (I think the 16in gunfire had a very negative effect on any parked aircraft, so would be unlikely to see any parked while firing was going on? Discuss!) So - rigging complete bar the flags, railings and PE mostly applied and in need of a paint touch-up. All that's obviously missing now are the small boats and rig, anchors and refuelling post. Superstructure and turrets are just placed in position for now, will hopefully be able to glue them all down properly tomorrow. Looks pretty impressive now. One of the things I love about shipbuilding is the long time taken to build all the substructures, and then the whole thing just comes together in a rush and suddenly, you have a ship! The other conspicuous missing feature is the massive discone antenna on the forecastle. If anyone's interested in what that is, there's a great video here: This my favourite pic I've taken so far - can't believe that lumpy old Revell kit could build up into this! All the best, Alan5 points
-
Still pondering what to do, (without much help from you lot I note!) and looking at this Thinking Thinking Kinda familiar isnt it? Thinking, thinking... Looky here Still athinkin' but ideas are germinating Hmm?5 points
-
.......went to tow a glider; one man and his Cub went to tow a glider.... ( apologies to the writer of the original lyrics of the well known ditty} Finally finished a project started last summer. Not my usual scale, but seeing as the kits I used were/are only available in 1/32nd , I went for them. I have depicted an ASK-21 as G-CHLP of the Southdowns Gliding Club that I joined last Summer and have had a couple flights in this one so it was clear how I intended to finish the kit having picked one up for a tenner last year at a show. The decals were custom made for me and the same went for the Cub. All done on one sheet! The Piper Cub I got very cheaply from some one I know for nix!! I discovered that the Revell kit is the military version with extra glazing and different engine, wings and so on. So I needed to make appropriate amendments within my ability to make it as right to the original as I could. Work done to the kit was to alter the intake and odd filter under the nose, blank off the rear glazing and to the sides to replicate the curved shape as can be seen in the photos. Then there was the issue with the wings. The subject I was making has flaps and the fuel tank on the starboard wing as the kit lacks the tank and flaps. I scribed in the flap hinge line and made the upper being tank from plastic card cut to size matching the other side. Finally a beefy exhaust outlet had to be found or made as the real one I am familiar with has a big silencer fitted to appease the locals. I scrabbled through my bits box and found one that fitted the bill. Though not 100% accurate, it fit well and looks the biz. I since noted that the exhaust I used was from a wrecked 1/72 PZL Wilga! Then it came to final details, a cabin top whip aerial from stretch sprue, aileron and rudder control rods from fine florist wire cut rolled out and cut to length. And then the tail plane rigging from my usual rigging stuff. Having done most of the work before finishing, I found out that Revell do the right Cub labelled as 'Sports Plane' But I haven't been able to find one anywhere so I continued with my own mods as described and persevered with the end result you see here. The pics. First the ASK-21 The kit has provisions to allow the canopies to open. BUT.... they don't work to well and so I decided to fix them shut. In any case the real ones always have them closed to prevent any kind of damage!! And then the Piper Super Cub G-BEOI: Cheat lines are complet with the club titles. Check out the top line. One of the frame lines went squiffy as in this pic but has since been rectified. All I need is a scale length of tow rope. Anyone know how long they usually are. As they are quite big models and I don't have any space left to store them let alone display them, I intend to give them to the club.5 points
-
On one occasion I had done a larger than usual shop and the fridge was very well stocked. My daughter, who was quite young at the time, opened it looked at the contents for a while, then said 'Have we won the lottery?'5 points
-
How about these?5 points
-
Just this once, and just because it's you.... Nice cockpit, BTW Ciao5 points


_opt.thumb.jpg.be9c1e22e34c329b51268dfacc8614e0.jpg)


.thumb.JPG.3498f40362ff13ebfc4b2e45abbd545e.JPG)

This leaderboard is set to London/GMT+01:00