
Leaderboard


Popular Content
Showing content with the highest reputation on 23/03/23 in all areas
-
Hello, First build of the year (began in 22 , the Airfix , 1/48, Hurricane Mk.I in the markings of RAF 242 Sq. Gunze acrils paints and Aeromaster decals. Hope you'll like her, Best Stef (#6)30 points
-
Hi all, The latest Dambuster boxing from Airfix… Cheers Guy30 points
-
About the plane: Pemberton-Billing P.B. 25 was a development of P.B. 23 - not very successful reconnaissance aircraft from 1915. 20 pieces were made - 9001 had a two-blade propeller. 9002-9020 already had four blades. 9003-9020 were armed. I won't lie he wasn't good (it seems that the airmen used unrefined terms about him), but you have to admit: he's so ugly that he's pretty 😃 About the item: 9002 was the only one of the "four-blade nineteen" not equipped with weapons and that's what decided to make this copy 🙂 I couldn't find more about the history of his life and service 🙁 About the model: The basis was the AviS model in 1:72 scale. The rigging from the plans is slightly incomplete - I tried to recreate it based on a few photos I found on the web.29 points
-
Hello all, I finished Tanmodel's 1/48 Republic RF-84F Thunderflash (second boxing) at the end of February and I believe it will be featured in the May 2023 issue of Scale Aircraft Modelling. More photos are at https://jonbryon.com/tanmodel-1-48-republic-rf-84f-thunderflash/. Additions are CMK resin ailerons and flaps (not worth it IMO), refuelling probe from the spares box, anti-collision light cut out and replaced with UV resin, pitot from Albion Alloys brass tubing and decals (mostly) from Caracal. Paint is a mixture of Mr Color and Hataka airbrushed freehand (except on the wing LE). It's an ambitious effort from Tanmodel that requires a lot of work from the modeller. Comments very welcome and thanks for looking, Jon26 points
-
and the continuation ...26 points
-
Hi there! First finished for 2023, a Thunderbolt from Fuerza Aerea Mexicana, by Hasegawa in 1/48. A Lend-Lease machine from after the war, not an aircraft from the Mexican corps in the Pacific. Tamiya's Jug is bettern but this one is still a nice and simple kit. It's my second P-47 finished since restarting in late 2021 I've a third 70% finished, hopefully latter this year, and I believe I can add another before 2024. Up to you and your comments.25 points
-
Hello guys, Second build for this year, the Hasegawa 1/48 F-104G in the markings of the Belgian AF 349 Sq. Paints are Gunze and AK real colors acryls, while decals are from an Eduard reboxing of the Hasegawa kits. This build is a gift for a fellow belgian modeller. Post split as there's qui te a lot images Hope you'll like her.24 points
-
Hi all, I am pleased to finally roll out my latest build, in the form of a Republic F-84F-30-RE Thunderstreak. As those who have been patient with me and called by the WIP thread will know, she is depicting one of the earliest F-84Fs of the Aeronautico Militare Italiano (Italian Air Force), serial ‘11795’ of the 156th Gruppo/6th Aerobrigada the “Red Devils”, based at Ghedi AB in northern Italy. The first aircraft were delivered to Italy in 1956 and the Red Devils were the first operator. My subject: Other short finned machines: As I try to do, I wanted to build something different and that difference in this case is that ‘11795’ was a short-finned machine, as were many. Its a fact that isn’t often acknowledged. Apart from the fin these were standard build machines. The only other small visible difference was the fact that the pitot sat on the intake splitter whereas towards the end of production it was moved to the port wing tip. My reason to build this was to try to get a more realistic model from currently available kits. I dismissed the Italeri on shape and detail grounds and so was left with the Airfix F-84F offering to ‘play’ with. To support my quest, and having built a couple, I used the Sword RF-84F kit as a spares source. This already has a nice canopy and windscreen as well as other immediately obvious benefits. As I went along, though, Martin @Lightningboy2000, suggested further butchery in the form of inserting better main gear wheel wells. I took these from the RF too. Another laborious challenge was scribing the whole kit. I did do this with panel lining in mind, but more to get it looking more up to date. This took a while and progress can be seen in the WIP (below). In summary, the changes and tasks to get me to this were as follows: 1. Widened the forward fuselage 2. Scribed all over 3. Shortened the fin 4. Inserted Sword wheel wells etc 5. Improved the nose guns with brass tube and inserted blank plates in to these 6. Improved the cockpit with a selective use of Air Waves PE 7. Added PE brass speed brakes (Thanks Frank @bentwaters81stTFW) 8. Made up and fitted shackles for each pylon and fuel pipes for each belly tank 9. Used a set of Voodoo tanks for the inner wing pylons 10. Added 500kg bombs on the outer pylons (later removed) 11. Made modified 5” HVARs for the outer wing tips from Tamiya F-51D parts 12. Used Sword main gear and wheels, doors, etc 13. Used a resin seat 14. Built up the coaming area using card, rod and electrical wire 15. Improved the nose gear leg 16. Added latches and a mirror to the canopy, and made new struts from rod 17. Improved the rear canopy strut too 18. Improved the dorsal nav light by drilling out a "lamp" within the clear part and then filling than void with metal paint (aluminium). 19. used the windscreen and canopy from the Sword kit 20. Built the RATO cradle and bottles from card, sprue and brass tube (Thanks Rob @Rob de Bie) 21. Thinned the rear glazing I must also acknowledge the help of Giorgio @Giorgio N, who drew new codes and serials as well as cutting the mask for the fin, and Mika at Arctic Decals for tolerating my whims and occasional faux pas and produced excellent roundels and red tridents. I had intended to use the Tauro Models decal sets but I found their roundels to have white that was yellowed, their number and lettering is rough upon examination and their trident and badge is wrong. In fact, the only Tauro decal I used was the Red Devil badge but even that is slightly too large! Giorgio also drew and cut the mask for the fin flash for me. A number of other BMers helped me on the way too. The other addition to the build, and really at the prompting of Frank @bentwaters81tfw, was the build of a RATO cradle and bottles. What she needed, though, was more power for take off! I am indebted to Rob @Rob de Bie for his guidance for this. Finally, thanks for all the encouragement and input from Paolo Maglio of Modelismo Piu. Finally it has to be said that it was also one of those builds that seemed to spur a manufacturer in to producing a new mould kit (or at least I like to think so!). As you will all know, there has been a new release and now it looks like Special Hobby have started work on one :). What else did I do or use? 1. Kit - Airfix F-84F and Sword RF-84F in 1/72, of course! 2. Aftermarket – Airwaves PE and Valom F-101 belly tanks 3. Decals – a mix of Sword RF-84F and Icarus F-84F stencils, Giorgio- and Mika-drawn decals, and a couple of Tauro bits. 4. Paints – overall Humbrol 27002 Polish Aluminium, 27003 Steel and 191 Stainless Steel, Colourcoats Olive Green, Humbrol Insignia Yellow and others here and there. Finished with Humbrol Satincote. Primed with Mr Surfacer 1500 grey. 5. Weathering – no panel lining (my current way) but Flory wash to highlight large gaps and detail, Tamiya Weathering powders and a Prismacolor silver pencil. I hope you like her! Martin23 points
-
Super little kit, easy build so good stater kit if you want to get into WW 1 a/c. Minimal rigging. Aftermaked decals from Americal/Gryphon, wich unfortunately closed in 2007 Cheers Jes22 points
-
Kit - Airfix Paint - All lacquers Decals - Xtradecal 72 291 Extras - None Enough has been written about this wee gem, so I'm not going to try to add anything other than this: If you need a 'mojo restoration project' , you could a h*ll of a lot worse than buy this one. Honestly I was a little sad when it was done. Wonderful wee kit, more like this please Airfix. Cheers from a cool but very sunny NZ. Ian.21 points
-
The models portrays Piper Super Cub "Baltus Viking" as used by SAS Flyklubb from Fornebu/Norway around 1980. Kit is by Bandai, and decals by Lima November Decals. Regards, Ragnar20 points
-
Evening all Last of my shelf of doom completions.... Roden's nice AC-47 Spooky Gunship. From what I remember (it was started about 3 years ago!) it was a nice kit to put together, the only problems being the decals which were horrendous! I think most Roden kits suffer from this problem? As was my standard practice back then it was brush painted with vallejo paints, with weathering from Flory wash and Windsor and Newton satin varnish to finish. Not totally happy and probably could do much better these days but at least it looks like a Spooky! Hope you enjoy. Thanks for looking IMG_20230322_213531 by Binbrook 87, on Flickr IMG_20230322_213554 by Binbrook 87, on Flickr IMG_20230322_213644 by Binbrook 87, on Flickr IMG_20230322_213254 by Binbrook 87, on Flickr IMG_20230322_213228 by Binbrook 87, on Flickr IMG_20230322_213316 by Binbrook 87, on Flickr IMG_20230322_213458 by Binbrook 87, on Flickr18 points
-
Sea Harrier FRS.1 ZA175/004 801 Naval Air Squadron HMS Invincible 1982 I started this build last June during the Britmodeller Falklands War 40th Anniversary Group Build. The 1983 ESCI 1/72 Sea Harrier is still the best and most accurate 1/72 FRS.1 on the market, even after 40 years. Detail and panel lines are as good as anything being made now. But, like most kits, not without the odd challenge. Having completed the model during the 40th anniversary year I set out to give it a suitable display base, a small portion of the flight deck on HMS Invincible, and some of the deck equipment that would have been seen during the conflict. A brief summary of what I did, used and modified; The Sea Harrier; Scratch built cockpit, HUD etc Instrument panel - Kits World Martin Baker Mk.10, Ejection Seat - a modified PJ Productions resin seat. Pitot tube - Master Eduard AIM-9L Sidewinders and 1000LB Airburst Bomb Deck Equipment; Vickers Mk2 Deck Tractor - Air Graphic Models (heavily modified) Deck Crew - Air Graphic Models Pilot - Aerobonus Ladder, Intake FOD Guards, tool box, tie-down chains, chocks and tow bar - Scratch built The deck crew, 'Maintainers', wear different coloured tabbards that reflect their various trades; Yellow - Captain of the Flight Deck & Aircraft Director Green - Engineering Electrical Trades Blue - Aircraft Handlers Red - Ordnance Vickers Deck Tractor No.1, 81RN81, HMS Invincible, Falklands TEZ, 1982; As she's firmly attached to the deck, the underside is now hidden, but here's photo from the WIP and one of the cockpit; For anyone wanting more details about how this went together, the WIP is here; I owe a great deal to Nick Greenall and Richard of the IPMS SIG, and all the Britmodellers who encouraged me - Big Thanks! Cheers!17 points
-
Kit - Airfix Paint - Lacquers & Tamiya acrylics. Decals - Xtradecal 48 220 Extras - None. I've built it, I didn't enjoy it, at all ! There's an unintentional coincidence between Vampires being the subject of horror films and trying to get this kit to 'work'. Soft, poorly defined details, poor fit & engineering around the nose, simply an 'opportunity missed' in my opinion. Reminds me far too much of the old Hobbycraft kit from way back in the day - I actually gave-up on that one. What I find hard to get into my head is the lack of continuity across recent Airfix new releases; the wee JP, that I've also posted, the Blenheim, Dornier 17, B-25, 1:48 Hawk 81A and Mustang were all superb... the 1:48 Meteor, 1:72 Gnat and this... not even on the same page. Such a disappointment, honestly I couldn't wait to get it off the bench. Please feel free to make any comments at all. Cheers. Ian.15 points
-
Hello all, I finished yesterday my rare Verlinden Productions 120mm 3.7cm PAK36, an excellent resin kit, hard to find on the market today. I painted the gun using Humbrol enamels. First f,or those who have never seen it before, here's the box photo: And the kit:15 points
-
Here is my recently completed build of a Morris Mk. II Light Recon Car using the resin 1/72 Hauler kit that also had a little PE fret. It was being built in a GB but for whatever reason, it stalled and got forgotten about. Build log here: It was built OOB with a little underside scratch work to repair some damaged/ missing parts. The dude manning the Boys A/T is a Milicast figure with his feet amputated. The additional cans on the rear deck are from the spares bin. Finished in the colours and markings for the 11th Armoured Division, Antitank Regt after D-Day. Base is made from MDF, wall from an Italeri kit with a bit of grit and balsa added. Thanks for popping by. Stuart13 points
-
Hi All, please see pics of my finished F/A-18C of VFA-113 'Stingers'. The Academy kit is nice, Superscale decals a pain to work with, and the aftermarket resin radar, wheels, wheel bays, jet nozzles and cockpit added a lot. The wings were folded and flying surfaces positioned 'the old fashioned way'! All in all pleased with how it looks. It will be part of a hangar deck diorama which you can follow here.11 points
-
Moebius Martian warrior,fun kit with no major vices. Added a newspaper to the base The Metaluna mutant just turned up,expect more big brained malarkey soon10 points
-
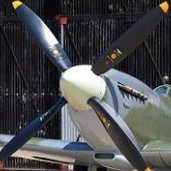
Here's my attempt at Airfix's recent release of the Phantom FG.1 in Royal Navy guise. I built it OOB and decided to have wings folded, no munitions and the nose cone open to reveal the radar bits and bobs. This really is a fantastic kit to build - awesome quality and a lovely subject too. Who doesn't love a Phantom! Mostly painted in Humbrol paints -enamel for the upper fuselage and acrylic for the underside. The number of decals was scary on the build sheet and took forever to do, so just plenty of cups of coffee and a couple of sessions were involved. Once again it's a 'clean' build. This kit forms part of my RN through the ages project and I have previously shown the Gannett and F35B here. Thanks for looking!10 points
-
As explained in the build thread I have a peculiar fondness for bubble-cars having owned one way back when I was 16, taking advantage of the UK laws existing at the time which decreed that I could drive one at 16 providing I held a full motorcycle licence. I had more fun in my Heinkel/Trojan 200 than in any car since and this kit is as close as I could get to it. As is repeated ad nauseam at various points throughout the build I was extremely impressed by the quality of this kit. Everything went together with a minimum of fettling, fitted first time and lined up perfectly wherever necessary. The steering linkage under the vehicle works smoothly, as does the peculiar steering column mount which twists through a wide arc on two axes, pivots and slides against the collar holding it to the door and the universal joint on the floor as the door opens and closes - fascinating to watch. There is a choice of open or closed sunroof and the engine hatch is removable. All parts are an incredibly close fit straight out of the box which made building it a real pleasure. The only thing I had to add to it was a windscreen washer bottle which I carved from sprue and fitted to the engine bulkhead to rectify the lack of one - mandatory in the UK at the time. Other wise it's purely OOB. Finally with the engine cover clipped in... ...and the optional closed sunroof. It doesn't sit that closely but I have no intention of leaving it there... ...and finally a peep underneath. Thanks to those of you who followed the build, I hope you like the result.9 points
-
Sorry, just for a moment I read "Act of Goat"! MP for the Outrageously Bonkers Party of Mars 👽9 points
-
Hi all. I'm from Ukraine. I love jet aircraft UK. Here is my latest project. Enjoy!8 points
-
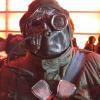
Heads or Tails Sooner or later there's going to have to be a bunch of work done on the 'head' of this model, notably around the cockpit and the canopy. Here I've made a start by cutting out and folding a piece of brass so that it fits into the cockpit to form a floor and rear wall. Since I was not exactly sure how to continue with this, I bought some time by moving back to the tail, which is where I will spend the rest of this post. As you can see I still have not represented the exhaust nozzle that sticks out behind the fuselage. I also have no nozzle shroud or parachute fairing. At times like this a good collection of surplus kit parts can be very valuable. Can anyone see the critical piece? Yes! Obviously what's required is a radial engine cover off a 1/48 Eduard Polikarpov I-16! YES! Perfect! Cut out the middle bit. Make a couple of ring shaped things and stick them on with Tamiya limonene cement. Which leaves this... a ring around the jet efflux onto which I can attach a jet nozzle and a terribly inaccurate representation of something that perhaps vaguely resembles an afterburner buried deep inside the aircraft. If you are too appalled by my dreadful lack of interest in accuracy please remember that, in the end, everything inside that hole will be painted black. There won't be much to see anyway. Now I cut a slot in the base of the tail. Mark up a sheet of brass. Cut it out and file it to shape. Check that it fits inside the slot as required. Now hit the brass with the flame from a creme-brulee burner. Get the brass red-hot to anneal it. (Note that despite the picture below, the actual burning part is done outside on bricks not inside on MDF!) Note how the brass has tarnished during the burn. Now that the metal is annealed it can be rolled nicely and fitted into it's little slot. And now all of this gets glued into place. Now glue about 20 little offcuts of plastic evenly positioned along the edge of this piece of gridded sheet plastic and cut little notches on every 5 mm mark along the edge. This plastic sheet is expensive but having a grid printed out in advance like this makes it an absolute pleasure to use. Scribe and then break off a strip of plastic at the 7 mm mark. You can see the scribe line if you look carefully. Break off a series of little lengths of the resulting strip (in this case four little 'blocks' worth) and glue each little length into position using the inner ring from the Polikarpov as a structural foundation and the guarantee of a circular shape. Continue until the nozzle is completely formed. Every scratch-builder should have access to a wide range of knitting needles of different sizes and materials; wood, plastic and metal. I don't own many but know a second-hand shop nearby where they have a good variety for sale for next to nothing. Chuck the knitting needle into an electric drill and use the drill as a lathe to both form the shape of the drogue housing and - as the photo below shows - to etch in the distinctive series of little notches where the head detaches. Now cut out another rebate at the base of the fin where this 4.5mm knitting needle will fit nice and snug. Glue the whole lot together. So here's the current state of play. Here's the 'head' and here's the 'tail'. There's still quite a bit more work to do at the rear of this jet, especially blending the knitting needle into the tail a bit more, but most of the structural stuff at the rear is now done. I can delay no longer; soon my attention will have to go either to the cockpit or the undercarriage. Both are frightening prospects. 😱 Perhaps I'll do something with the drop-tanks! Best Regards, Bandsaw Steve8 points
-
Please excuse me whilst I change my underwear!8 points
-
I'm not certain my insurance covers this. I can't remember if this counts as an 'Act of God' or an 'Act of War'. Best Regards, Jason (former MP from the Slightly Silly Party)8 points
-
After a fair bit of sanding, filling and so on it was time for some paint to be used. I've left the undercarriage doors unsliced for the moment to use them as masks for the main painting. They were given a coat of primer and then Grey Green. The canopy and gunners compartment got a coat as well and as I had paint in the cup I checked the seams. They all look pretty good but I won't be sure until daylight but the canopy still needs some blending. Thanks for looking, Cheers, Alistair8 points
-
I finished the Night shift this morning and am now on 7 days off. Plastic has finally been cut and primer flung towards it. After dinner I went back out to the garage ad laid down some Interior Grey Green I've got some goodies arriving tomorrow for this so I've left the IP part alone until then. Thanks for looking Cheers, Alistair8 points
-
I can only apologise for the lack of imagination in choosing this kit. I've wanted to build this for a while and dedicate it to my mate @jeanwho has caused me to expand the stash to include lots of French subjects ! The kit didn't come with decals so I'll be replicating a nice bright French naval version Good luck everyone Cheers Pat7 points
-
This is one of my favorite Airfix kits. It is just a very nice kit that builds up very nicely. I used a Microscale sheet for the decals but the blue nose stripes broke into many pieces and became unusable, so I just sighed and moved on without them. I used a Vellejo wash for the recessed lines but was not very happy with it. It stained and didn't want to come up in some places and it simply refused to settle in the way I wanted it on one panel line in the flaps. Still, I'm happy with it. The silver is Tamiya AS-12.7 points
-
1/72 Academy A-37B Dragonfly - Supertweet USAF, 8th SOS, 14th SOW, Bien Hoa AB, Vietnam 1970 The fantastic, yet tiny, A-37B from Academy is a cracking build. Loads of fine detail, ordnance options but let down by the lousy decals that Academy own brand are famous for.... Airbrushed using Tamiya colours, little bit of etch thrown in for good measure and some stretched sprue for the wiggly bits. From what I have read, troops in contact loved the Supertweet during CAS missions. Cheers all, Phil7 points
-
1/3 scale scale bust from the Batman v Dracula Red Rain comic. Produced in the 90's by Mysteria models and long out of production now. Batman v Dracula Red Rain was the first of what became a trilogy of graphic novels published in 1991, followed by Bloodstorm(1994) and Crimson Mist(1998) they were part of DC comics Elseworlds series. Set in a parallel universe where Dracula and his followers are feeding off Gothams homeless. Batman after investigating the murders has to become a vampire in order to gain the strength to eventually defeat Dracula. Batman is finished in a mix of acrylics, oils and pastels. Much of the shading was done with the airbrush and oil paint filters/ washes.7 points
-
Just finished this in the bomber Command GB after what seems like an eternity! L7463 started out with 97 Sqn based at Coningsby on 26th September 1941 in the markings of OF-P. It moved to 106 Sqn on 20th January '42 and changed its markings to ZN-S where it operated until it's fateful end on the morning of 24th April of that year. Taking off from Coningsby at 22.00 on the 23rd, it attacked the Heinkel works in Rostock. On the return, the port engine caught fire which was not uncommon for the Vulture, the Achilles heel of the Manchester. Losing altitude on one engine and slowly turning due to the asymmetrical power of a starboard engine trying to compensate, the pilot Harry Murdoch Stoffer ordered the crew to bail out to which all successfully did. Stoffer stayed with the aircraft, but unfortunately the fire burned through the port wing causing it to break away. Sadly he died in the subsequent crash in Visgaarde near Tinglev in Denmark: The build represents the aircraft as it was with 97Sqn when it started it's short career: The build uses the Revell fuselage mated to the Planet wings. The mid upper was from the Planet kit, the front from the Falcon set and the rear scratch built using the Falcon Sunderland rear turret part. All in all a fun build. Just hope we can get a 1/48 conversion set in the future with out re-mortgaging the house for a Paragon set! Hope you like it The build is here Thanks for looking Neil6 points
-
It took more than three months to finally complete the desert-painted A-6E belonging to the VA-65 team. The aircraft was deployed on the nuclear-powered aircraft carrier USS Theodore Roosevelt and wore a special desert two-tone livery during Operation Desert Storm in the Gulf War. The concept of camouflage painting was proposed in the Red Flag military exercise in 1990. Different from ordinary light gray low-visibility painting, desert painting is considered to be easier to integrate into the desert environment and reduce the possibility of being locked by optical tracking. (Please correct me if I am wrong.) However, in the later tests, it was found that the camouflage paint would prevent the deck landing commander from accurately and clearly guiding the aircraft to land. In addition, most of the missions of the A-6E were night operations, so camouflage painting was not widely used. It is worth mentioning that this A-6E was hit by an anti-aircraft missile during a ground attack mission two days after the desert paint was removed. Fortunately, the missile did not explode but penetrated the entire right wing. Because the impact was near the edge of the wing, far from the folded hinge part of the wing, no serious damage was caused. The crew finally managed to ditch the plane to the base in Bahrain. This A-6E was later repaired and continued to serve. In terms of model making, the overall kit combination is not bad, only the front landing gear, the guard plate of the engine nozzle and the connecting part of the wing-body use some filling to fill the gap. In the initial production, a lot of time was spent remaking the panel lines in order to preserve the details as much as possible. Now it seems that I have indeed added a lot of unnecessary burdens to myself... It is excellent to only deepen the line without being obsessed with textual research. The ammunition part uses reskit's 3D printing pylon and resin mk82 ammunition. I have to say that the details of the 3D-printed parts are amazing, and I am looking forward to the printed landing gear of the GWH Su family as well as the Tamiya F-14. The ultra-high-detailed ammunition and pylons can be said to be one of the highlights of this work, so a lot of effort has been spent to highlight this part. Another highlight of this work and the most difficult part should be the camouflage painting. Since the decals are also two-color stitching, there are very high requirements on the size and border of the camouflage paint blocks. It is necessary to repeat many times to adjust the boundary during the spraying process. So this time I did not use pre-shading but tried to use post-highlight, salt erosion mask, and filter to de-aging. Although I tried my best to do the aging well, but due to insufficient technology, I still couldn't faithfully express the heaviness of the real machine. I can only make persistent efforts in the future. It has been almost 20 years since I first came into contact with model making. I was accidentally brought into this miniature world and was deeply attracted by it. The development of the model industry is also accompanied by the development of modern industry, and more and more fine products are brought to the market. More and more model authors are involved in product development. Products are becoming more and more refined, but the difficulty of making them has rarely increased. 3D printing technology is an even more dimension-reducing blow to model making, which was unimaginable 10 years ago. Before this year, I have never systematically examined my technical reserves and found that I still have a lot of techniques and techniques to learn. I hope that I can continue to bring more satisfactory work from this year onwards. Thanks for watching!6 points
-
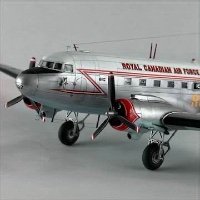
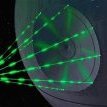
Fellow Modelers, Below are photos of Round2’s 1/350 scale (32" length) U.S.S. Enterprise-TOS model-1st Pilot configuration built in 2015. It required a total of 243 hours over a six-month period. About one-half of the time was spent on cleaning parts and sub-assembly work, and one-half on painting and decaling. The total number of parts I used was about 91, which is not many for such a large model. I believe Round2 did an excellent job on this kit. Their product is not perfect but it is very good, and more importantly it is EXTREMELY accurate! Certainly, they invested the required time, effort and expense to get it right, and fulfilled a wish voiced by Star Trek modelers for decades. In my opinion this kit holds up really well even under close inspection. The least fun part of the project was removing the recessed panel/grid lines from the saucer section. The most exciting part was adding the decals, since they transformed the model from something plain into the fantasy starship I grew up with. Nothing on this project was scratch built or required any special tools, I just had to stay committed to very tedious re-sanding/re-painting/re-decaling until the parts were as good as I could make them. The last few photos are of the actual 11ft. prop that does confirm the semi-gloss blue neck. Thanks for looking and I hope you enjoy the photos. Phillip16 points
-
Last robot i had from Bandai Star Wars series. This movable rubbish bin come with BB-8, if you like both characters, will be a reasonable model kit. Actually i painted to R2-D2 before last (blue) BB-8. The silver texture is done by drybrushing, weathering are washing several times with sepia & green, and use foam to dot rust after matt coating. not difficult, try it. 😁 1/12 R2-D2 Working Photos: Product Photos:6 points
-
Sprues & test model pics https://www.specialhobby.net/2023/03/prvni-prekvapeni-roku-2023-od-special.html - ref. SH72395 - Republic F-84F Thunderstreak V.P.6 points
-
Windscreen fitted (I unashamedly filched an idea from another member - sadly I can't remember their name but many thanks! - and ran a black indelible marker round the edge to represent the rubber seal). Headlamps added (beautifully made three-piece units which even offered a choice of "eyebrow" visors or not), door handle, wiper, badging, rear luggage rack, bumper and sunroof - again with the option of open or closed. I could even have added a suitcase strapped to the luggage rack but it looked a bit incongruous and hid some nice detail so it was cast aside. This model is now complete and I await your comments. I have to admit it gave me enormous pleasure building it and it's possibly the best quality kit I've built to date. I'll put a couple of pics below but the main bulk of the images will be in the RFI thread which can be found here. Thanks for your interest and comments, it really adds to the enjoyment to know others are watching the progress - even if they're laughing at it! 😆6 points
-
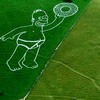
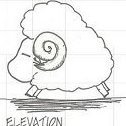
May I present LNER A4 Sir Nigel Gresley carved from parana pine with boxwood wheels, all hand carved. The drive wheels were the biggset challenge, having to carve 120 spokes with a scalpel in tough boxwood, I got through about 15 blades. Everything else was pretty straightforward. Theres no detail in the cab as at some point I plan to add a tender, which will obscure the view. Not made to any particular scale, its about 9" long as thats how big the plans were when printed out. Thanks for watching, all feedback gratefully received.6 points
-
Only one photo today. The interior bits and pieces are now more or less completed to the point where painting can begin. I was stuck for a little while because, while I could find the location of the pilot’s ‘sanitary’ bag, I couldn’t find the location for the observer’s. Happily, I found it on another diagram. What a relief! Most of what you see will simply end up as vague dark blurs in spaces that can only be seen from particular angles, so I think I have done enough for now. Once the fuselage is buttoned up I will need to work out how to mount the reflector gunsight to the canopy - it hangs off a small bracket to one side of the central armour glass pane - and the two cockpit lights that similarly hang off the frames of the side windows. I am thinking that some internal framing might be the answer rather than sticking them directly to the canopy interior. Time to tidy the workspace up a bit so some painting can happen.6 points
-
Time to stand up for yourselves kids. Although the outriggers haven't convinced me yet. New mirrored tri-partites on and heavy dose of Daco Strong applied And baby came too. The JP owns a few antennae which are as yet, in the various boxes but with them and XN470 serials which are as yet, on the decal sheet I can put baby aside.6 points
-
Probably the best idea, if you know something works for you it's worth sticking with it, and per year that's not a bad price My original intention was to get straight on with the RLM76 undersides/sides/tail but taking a leaf out of a few builds on here I thought it might be prudent to paint and mask the Reich Defence band before I did that, it's a rather fetching blue-white-blue on this aircraft. EagleCals know that as an experienced modeller you would not use a decal for this and so they don't supply one. That's fine as I can kid myself that I wouldn't have used the decal, but it would have been useful for colour- and size-matching. A quick google revealed the total band was 900mm in real life, so about 9,35mm in 1/32 for each of the three coloured bands... I sprayed the whole band area white first, then masked off the central white band in what I hope are the appropriate dimensions: I could not find an official colour designation for the blue, or indeed a description of it other than 'bright blue' so I mixed a bit of US Navy 'True Blue' with some pale powder blue that Jamie had mixed me up, to get a more-or-less match somewhere between the illustration on the EagleCal sheet and the JG300 band included as a decal in the Revell Bf109G-10 kit: Once that's fully cured I'll mask it off, and then I can get on as planned with the RLM76 painting Cheers, Stew6 points
-
I'm going to trying to build by section (main tower, chimney, secondary towers, armaments, hull etc). I'm torn on if I should get a wooden deck or not, or even if wooden decks are made for this version. The pack includes paint masks for the deck - which I haven't seen before. But about a third of the way through the chimney construction. It's going to be difficult to paint within the chimney, but nothing can be built on it without it being installed. Chicken or egg situation. The PE actually is well built and can be cut from the sprue easily, quite nice so far.6 points
-
There's a 1/48th Pilatus PC-7 kit in the pipe line. It is reported to be the first complete model project from Christoph Wolfsberger - Wolf 3D Resin Parts Parts https://www.facebook.com/groups/1197542940849474 Source: https://www.facebook.com/groups/215551215532252?multi_permalinks=1697732647314094&hoisted_section_header_type=recently_seen To be followed V.P.5 points
-
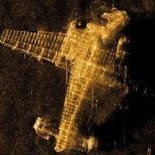
This is a model I got that was in a very bad way, lots of parts broken and missing, hull damaged etc etc. She is the old Matchbox version and time hadn't been kind to the plastic so, what to do? Yep, another rusty-crusty. One of my favorite war films is the 1953 'The Cruel Sea'. I have seen many of these boats made as statics or RC but never, to my knowledge, one of The Compass Rose's final resting place. Not done one this large before (some may remember my sunken subs) so, wasn't sure how it would turn out, lots of coating and many hours of painting with rattle cans, airbrush, sponges, dry brush and pigments. Finished and sealed in a satin/gloss finish to highlight the wet and slimy look being at the bottom of the ocean. Of course, damage etc is based on watching the film and trying to figure out what may have happened, she was supposed to go on a board but, the extra weight (she is heavy now with all the coatings) and the fact it would be just too unwieldy. I kept some of the superstructure just to make her look interesting, in reality most of the items would have been ripped off or rotted away. I suppose she is about 30 years submerged here. Stand was made, varnished and oiled to look old and a couple of plaques added with a quote from the film. Many thanks for looking. Si.5 points
-
This is the TRUMPETER 1/32 Tomcat, a lovely kit is so may ways, detail is fantastic, but you do need to take care on a few areas. I built this using the Aires engine nozzles and the Eduard cock pit detail set, and 2 x Aires ejection seats, all painted with MRP paints. 2003 was one of many milestones for the "Bounty Hunters." The path from work-ups to combat ops to Naval Air Station Lemoore was no easy journey. Accomplishing the tasks required the hard work and professionalism of all aircrew and personnel. In 2003, VF-2 was deployed aboard the USS CONSTELLATION with CVW-2 and participated in Operations ENDURING FREEDOM, SOUTHERN WATCH, and IRAQI FREEDOM, flying over 2000 combat hours and 483 sorties with over 320,000 pounds of ordnance expended. On 28 February 2003, during Operation SOUTHERN WATCH, Bullet 111, flown by CDR Dave "Burner" Burnham and LT Justin "Donger" Hsu, delivered the first F-14D JDAM in combat. VF-2's behind-the-scenes efforts were the driving force behind the early release of the Operational Flight Program (OFP) D04. The "Bounty Hunters" worked hand-in-hand with former Bullet LT Ken “Norm” Bates, VX-31, VX-9, Pax River, and the Class Desk to ensure that the F-14D community would have its badly needed JDAM capability in time for Operation IRAQI FREEDOM. Due to the foresight and persistent efforts of VF-2, all three deployed F-14D squadrons were ready for the war. After the long trip across the Pacific, VF-2's May fly-off ended 30 years of flying the F-14. However somber the moment was, the aircrew and maintainers were anxious to recharge from cruise and meet the new challenges that lay ahead. As the squadron made its way back across the states for its fly-in at NAS Oceana, Bullet 100 of VF-2, flown by LCDR Kurt "Webstur" Frankenberger and CDR Doug "Boog" Denenny, was met by Bullet 100 of VFA-2, one of the jets that they would be flying in a few short months. As the two jets joined up, the bright red, white, and blue Langley stripes painted on both aircraft made for a memorable photo op that marked the end of an era as well as an awesome preview of what was to come. On 1 July 2003, VF-2 was officially re-commissioned as VFA-2, thus beginning transition training to the F/A-18F Super Hornet.5 points
-
Last of the 55s- Russian T-55 So my Sakhalin Island T-55 , its a T-55 of the 39th Independent Motor Rifle Brigade, the last T-55s were withdrawn from the Russian army in 2014, with the Sakhalin Islands based ones being the last, there's a decent article here. https://topwar.ru/7752-poslednie-t-55-rossii.html I found the colours of this particular T-55 really striking and more visually interesting than the bog standard 4BO, I decided to slightly stretch the dio to make it more interesting, I want decided to the vehicle as if it was sitting in a a firing position on a range somewhere on the island, its been a heavy day of firing practice for the crew, hence the spent cases dumped over the side. the 3D printed barrels slowly rusting and leaking oil is a nod to the fact that this far from moscow, things are left to decay and rot, the only reason that the crew have fired so many tank rounds is so they can sell off the spent cases in town for a few extra rubles. The kit is a 1/72 Revell T-55AM/2 , with some 3D printed interior parts , some 3D printed barrels and tank shells I downloaded online for free, the tree was made with florist wire, latex and clump foliage. I have to say a thank you to Dmitriy1967 on here who was able to give me some good links to further information on these particular T-55s. Lessons, paint the tree wire brown before you start lol it will save you grief later! Any feedback is most welcome on how I can make the next diorama better. Regards Mark5 points
-
This popped through the letterbox today, so sign me up for #2! Regards, Adrian5 points
-
McDonnell Douglas F-4E Phantom II, Hasegawa 1/72 Build thread5 points
-
Worked on the masts, replaced the plastic ones with Infini metal ones, beautiful set and not so difficult to assemble. Main reason for replacing the plastic ones (which have an excellent appearance, thin, accurate) was due to the risk of bending them with the abundant rigging required on the Exeter. All the metal parts fit like heaven, and are engineered in a way that they fit securely the main arts, not relying only on glue for strength. Gluing and aligning the masts was quite stressing, but it ended up being easier than what I had expected. Disproportionately tall, they look good on the ship, they give a vintage profile to the Exeter! And worked on the second covered motor boat that is missing both from the Trumpeter kit and the Eduard PE set, a 30´or 32´ covered boat that is seen in all reference pictures. The kit provides only one very basic motorboat, which hast to be discarded according to Eduard instructions and replaced by PE added to a different boat hull. Net result is one boat. Anyway, I decided to modify the discarded boat and try to bring it up to a decent standard. I inserted an internal deck, halllowed the superstructure, opened some windows, added a square roof to the rear part, lowered the hull profile (in order to make it easier to fit under the hydroplane catapult), added propeller and shaft, and painted according to my best guess based on B&W pictures. Rear cabin windows were simulated with decals while the front cabin windows were hollowed open. I think it looks decent enough, will add some details like ropes, lifesavers and other details. And started adding final weathering. The HMS Exeter was an extremely neat-kept ship, wonder how often they painted it, but it is really hard to find any significant spot of rust or dirt accumulated on the hull. I applied gloss varnish to the hull and added some minor spots and tone variations using artist oils and pastels, nothing really beyond mild weathering specially around the anchors, what seem to be drainage pipes in the lower part of the hull (and even those look very clean in most reference pictures), areas around the boats positions and rings around the funnels. Will continue applying some minor weathering to the superstructure and to the deck. Oh and almost forgot to mention, we cracked the bottle of champagne, my HMS Exeter was officially christened! marco5 points
-
I did some finishing touches on the nose-to-fuselage join, then re-scribed a few panel lines. As you can see, I wasn't exaggerating when I said I'm not very good at scribing! A bit of Mr. Surfacer should hide my mistakes (I hope!) I next began work on the landing gear / bays. Here's what's involved with the forward main gear (the rear gear is similar): This kit keeps reminding me that it is a short-run product. Every part needs to be cleaned up before it can be used -- molding lines, nubs from the large sprue gates, and flash are the primary problems. Not to mention, a few malformed parts 😠 This is the core of the main nose gear, consisting of five individual parts. Care must be taken to ensure everything is straight and square, else the entire landing gear assembly will be misaligned: I've also done test fit of the forward landing gear bay. The instructions would have you install the landing gear while assembling the bay -- I intend to modify the attachment points so that I can add the gear much later in the build: It's not exactly a slip-fit into the fuselage, and I'll need to do some cutting & grinding on the fiberglass to make it fit. I'll definitely be using my face mask when I get to that point!5 points


This leaderboard is set to London/GMT+01:00