
Leaderboard


.thumb.jpg.d17ff607fc7e89ed057e63fcb6f2a888.jpg)
Popular Content
Showing content with the highest reputation on 31/01/23 in all areas
-
Hawker Sea Fury FB.11 VW.623 102/K of No. 805 Squadron, Royal Australian Navy. VW.623 was the first Warbird I ever worked on back in 1980 not long after my first posting to VC.724 Squadron. I soon woke up to myself and skidded off the the other side of the hangar where a certain twin tailed deHavilland lovely resided. Fisher Model & Pattern kit in 1/32 with added engine bay and wing fold WEM paint for the main colours, Humbrol 74 for the Hawker yellow and decals from the stash.44 points
-
Howdy All. Finally finished my RAAF Vultee Vengeance, so thought you wouldn`t mind if I subjected you to some pic`s Built from Dora Wings 1/48 kit In the markings of an aircraft of 24 Sqn RAAF Mostly from the box, just added ignition harness and brake pipes from bits of wire, antenna wires, also replaced the kit bombs with some from the spares box........ ......not because there`s any thing wrong with them, I just couldn`t be bothered with trying to assemble the etched fins and get them straight. Decals were the kits and behaved perfectly It`s a massive improvement on the old AZ kit which I built a long while ago and still have nightmares about........ .......but I still struggled with this one in places. Glad to have it on the shelves though 🙂 Hope you enjoy the pic`s Thanks for looking, cheers Russ37 points
-
This is the Revell of Germany 1/48 scale kit built completely out of the box.It represents an aircraft from Reparto volo Stato Maggiore,aeronautica militare Italiana based at Roma Ciampino in 1961.The decals come from a Tauro decals decal sheet. Saluti Giampiero25 points
-
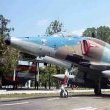
Hi all. AFV Club's F-5 is a wonderful kit with good details and fit. This is the second one l built and it won't be my last. For this build l used Red Fox 3d instrument panels and resin seat and auxiliary exhausts from Quickboost. I also added a few extra details to the canopy closing mechanism. The kit goes together quite well but a few panel lines had to be restored after assembly and sanding. The model was painted with MrHobby paints. I added a bit of white paint to all colours to make them look a bit faded. An oilpaint wash was used for weathering. The kit decals are not bad but needed some strong setting solution to make them sink in all recessed details. Thank you for watching. René.24 points
-
Lavochkin La-5 of 3 GvIAP, Kuban front, May 194318 points
-
There was a lot hiccups along the way with this one. It started off as "Berlin Express" and ended up this. Lots of lost and broken pieces along the way. Several sets of decals, exhausts, landing gear and landing light lenses later, I'm finally calling it done. I've spent enough in basic aftermarket stuff to buy three of these kits. Half I didn't use or threw out. In the end I used AMG Decals, Ultracast seat, Quickboost exhaust and Eduard's wheels. I scratch built the gun tubes and guns. The landing light is the Tamiya part glued in with not yet cured white glue. It doesn't fit well. It's a placeholder until I can scratch build a better lens. Here it is number one for 202318 points
-
This is made from the Tamiya 1:48 P-47M (Kit #61096*2800) offering which allows one to build any P-47 from the P-47D-25 to the P-47D-40 as well as the early P-47M. Lots of spare parts and if you have a Testors kit, you can almost build up an entire cockpit using spares. About the markings....."To clear test airspace of nonessential traffic - especially private aircraft with no radios (NORDO) - a late production P-47D (45-40329) acted as a flying billboard in the early post-war era." The P-47 (Pursuit) became the F-47 (Fighter) in 1948 and there are two photos of this aircraft, one saying that the shot was taken in "...late 1948..."18 points
-
Hi My father has started the 2023 building of three new captured models. In this case, a short series of the Dornier Do 217. Group photos AM 7, Dornier Do 217M-9 WkNr 0040 factory coded KF+JN Captured at Flensburg in 1945, Fitted with Dornier Do 317 style fins and rudders AM 107, Dornier Do 217M-1 W Nr 56158 AM 106, Dornier Do 217M-1 W Nr 56527 I hope you like them. Cheers Santiago16 points
-
Hello to all of you guys and girls.I want to present you my 1:72 Scale Hobbyboss Indian Air Force rafale E.The kit is built pretty much oob.The only thing added are a noseweight,home made seatbelts and the great caracal decals for the Indian version.I painted the kit in gunze acrylics and weathered it with oil colors. Enjoy the photos15 points
-
Hi all, I'd like to show a new addition to my Desert Storm collection: - AFV Club kit - bits of Aires & Kasl Hobby resin sets - DEF Model FOD covers - Master pitot tube - Eduard Sidewinders - CAM Persian Gulf Air Forces decal sheet Saudi recce Tigers flew a total of 118 reconnaissance missions along the Saudi-Kuwaiti border during the war. Regards from the Czech Rep. Andrew14 points
-
Trumpeters TU-26 OOB. Just done as it is in the box. This post is made as answer for @Bonehammer post about ESCI TU-26 accuracy. Yes it is possible, but is it worth it? This was made back at 2012.13 points
-
Hey. Please excuse the sporadic and long gaps between updates. Work has knocked it up a gear as has life. My old man is getting his knee op at last and I’m helping out and I’m trying to get fit so in between all that I get the odd bit of time at the bench. So mini update it is. 🤩🥳 The inside of the rear fuselage got painted. I think that’s a lot better than having that gaping hole. (You won’t see the bit at the back) Weathered and knocked back. Very subtle but it works for me. 🥸 I decided to add a bit more grit to the eyelet before fitting. I think that looks better. And now for glue. I know I didn’t paint the engine but really what would the point be. 👀 Looks good all in place with the home brewed bits. Now time to fit the outer skin. that sits really quite well now. I’ll have to do a bit of filling and sanding but not too much. Here she is side on. Should be easy to mask. I’m happy with that. 🤩 time for lunch. baked Miso aubergine with seared tofu and sriracha dip. 🤤 paint soon dear friends. Paint soon. Take care and have a splendid week. Johnny.13 points
-
Good evening, dears! This is my first model in this year.12 points
-
Evening peeps. So, the design was revisited. The fuselage insert taken rearwards to just in front of the fin and the design (believe it or not) simplified with fewer cross sections and the shape maintained in the loft by the use of a few strategic guide rails. Lofts ok. This is again just a test piece with simple solid lofts followed by use of the shell and extrude (cut) commands. Printed neatly enough with no thought to the best orientation beyond horizontal = quickest and with only short (2mm) supports and a 1mm raft. And I'm pleased to report that it fits neatly enough too (nb. the bottom edge of the print is a little rough where I was somewhat hasty/careless trimming the supports away) : The little bulges either side of the kit fuselage are where it flares out to meet the Mk I turret. They'll sand off easily enough later on. And with the pilot's canopy in the slid-back open position, the rather bizarre shape of the TT fuselage is seen. On reflection I don't know why I originally planned to have the join halfway along the fuselage when to do so always risked any slight change in contour being more visible. I think I still have a little more work to do on the contours of the fairing at the front of the insert: But it's close. Just a bit more rounded, I think. And tbh I could probably fix it with a few passes of a 1000 grit Tamiya sanding sponge. But that would feel like cheating a bit So, now need to sort out the contours of the very front of the Merlin XX nose and the rear fuselage fairing and I can move on.12 points
-
Hi All I've not posted this one here yet, so an update for an older build, I'm not quite sure how old, but it's pre-2015 as I have a picture of it on the shelf at that point. This was the first time I really tried to up my game on a ship build, I'd tinkered with a bit of railings before this, but no more than that. So this was the first ship I airbrushed, the first I added a wooden deck (I think I added it after construction which would have been interesting), and the first I built with railings from the outset. It's also the last time I used stretched sprue to do the rigging, I switched to EZ line after this one. Looking back on it now, it looks pretty good considering all that. It's one of four ships I have that remains on the "might redo it if I have time/money" list (with two others that I might decide to put on the list, three that have had that treatment already and three that I've binned the old version in disgust with the replacement in the stash awaiting construction). I think I can see in the detail where my skill has improved over the years, radar, AA, ships boats, all show the absence of photo-etch aftermarket kits, but for a mostly OOB build that this was, it's decent enough to not stand too much out alongside the later built ships in my fleet. Hope you enjoy And the little S-Boat that comes with that Trumpeter kit, could definitely use some detail on this - and some Tamitape tape for the waterline11 points
-
Kovozavody Prostejov issued a kit of the S-199 using AZ plastic a few years ago, and that makes a rather nice model. Eduard have issued their S-199 range of lovely kits more recently and I have their Erla canopy kit to build. Eduard's new decals have their fans and detractors, and I have never mixed paints to achieve a main colour, which Eduard show for their grey-green scheme. I bought the KP kit quite cheaply in 2013, looked at the plastic through the poly bag, and put it away in a dark corner of the stash. It's not good. I decided to use it as a practice piece for the Eduard kit, mixing Gunze Aqueous for the grey-green as per the Eduard suggestion and using the Czech roundels from the Eduard kit to try them out. The pale 'beige' is Tamiya Buff lacquer. I decided to try chipping and used Flory wash to dirty up the airframe as apparently it was very worn at the time of its crash. I overdid the Flory wash, more practice requred. The wing root chipping and the wear along the wing leading edges is OK, but the rest is awful; more practice required. This aircraft was in a training unit and didn't have the underwing cannons fitted, and I didn't go to the lengths of scratching an underwing aerial on a practice piece (the kit item was just an awful blob). The Eduard decals I used were dated 2022, and contrary to what I have read in some places they reacted well to Micro Set and Sol and settled beautifully over the raised detail on the kit; though I had given the model a very good gloss coat first. The carrier film all but disappeared and there was no way I could get a scalpel blade under the edge to try peeling it off. One YouTube video suggests lifting the carrier film with Tamiya Tape, but when I accidentally got some on the oil (?) triangle on the front of the fuselage it lifted the decal as well as the carrier film; not recommended. Sorry for the poor photos, the natural light is not good at the moment and I dont have any decent artificial lighting. Believe it or not the canopy has been polished and dipped in Klear and is much clearer that it was originally! What can I say; it is built and no longer lurking in the stash, and I have learned a few things which is a result.10 points
-
Hi fellow modelists! Didn't make it by the end of the year, but here we are by the end of the new years first month. Build Log is here: https://www.britmodeller.com/forums/index.php?/topic/235108547-panzer-iv-ausfb/ Cheers! Kristjan9 points
-
Thank you all, for the kind words. I'm beginning to think there's something @Fritagesque about my finding little jobs to do instead of the looming Big Jobs, like joining the wings to the fuselage and then the radar... Anyhoo, whether I am or am not channeling our friend the Great Thread Extender or not, I found something to play with last night. The exhaust covers are an oft neglected opportunity to while away some time, so I looked at a few reference pics and tried to make the 410's look somewhat realistic. Starting with a base of RLM76 I added a coat of Vallejo Burnt Iron at the rear end of each and then worked forward with differing shades of Burnt Sienna, brown and [almost] black to try and create the look of a progressive burning off of the paint and into burnt metal. When I was satisfied it was as good as I was going to be able to get it, I added a Tamiya Clear Blue to the back third of each to create a sort of bluing/tempering effect. Finally, I flattened it (but I might back to a semi-gloss sheen for the rear third as that's now representing bare metal that would have a sheen as opposed to the flat paint at the front third. I could also be overthinking that). This is what it looked like when I finished. Oh, and I also painted the spinners with a gloss black in preparation for the spiral decals. I'm going to use the kit decals instead of painting as the reference pics show the spirals to be perfect and I'd like to match that with the decals. The legitimate job that needed to be done before joining the wings was the black goop wash on panels and control surfaces. I did this with a combination of goop and pencil. Here's the before and after shots; the "after" fuselage is the lowermost in that pic, and [weirdly] the "after" is the uppermost in the wing pic. I'm running out of things to do before the Big Jobs. Cheers.9 points
-
Hello In the end I have finished this MACH 2 Dassault Mystère 20 from Escadre de Transport 65. I chose aircraft #EG as she could be seen in 1991 for the mission of calibrating radars or radio navigation systems. To say it is a difficult kit is an understatement as this is one of the first kits produced by MACH 2. I replaced the side windows with plexiglass which I covered with tape cut to shape (thanks to my Silhouette Portrait cutting machine). I sanded the front windows but after breaking the first one, and sadly a little too much as I opened the bottom part. Obviously that put much dust inside and to fix it I did a big hole on the roof to clean the windscreen from inside. The bottom of the fuselage was deeper than the wings and I sanded... with the same result as on the windscreen. I had to glue some plastic and sand again. I can add that I had to create nearly everything behind the pilots and finally there were big sinks on the wings, fuselage and tail. The APU intake and exhaust are home made as were many antennae. So here is the result and I am happy it is done. Patrick8 points
-
This is my first jet in quite a while. My 8 yr. old son wanted to go shopping and pick out a model for my birthday, and he chose this kit. The Thunderbirds scheme looked interesting and fun. This is the one of the old school kits with raised panel lines, but since I wasn’t planning to do any weathering it wasn’t a concern. This is the first natural metal finish I have attempted. Sadly, it didn’t turn out like I had hoped. I used Mission Models aluminum for the paint. I black based the model but it still looked dull. I managed to get a shine by spraying heavy with future. I had been having good luck with future, but on this build it melted away and the paint started to get messed up very quickly when applying the decals. Consequently, I had lots of touchups and for whatever reason the touchups weren’t same color as the base paint so they are obvious. I would avoid the metallic colors from MM (I really like their other colors). I’ve ordered some Vallejo metal colors for my next attempt. As for the decals, they set down to the texture fantastic. Large decals on curves surfaces are a big challenge and the nose decal was impossible to get applied wrinkle free. Consequently, there were areas that I had to cut and it left spots that needed touched up. When I applied future over the red touchup paint it changed color. Finally, the canopy seam looks pretty rough (I should have given it more attention before painting). On a more positive note, reference photos showed that sometimes the air brakes were high polished so I tried to simulate this by gluing some aluminum foil to the airbrakes. I think it turned out pretty well. Overall, I enjoyed the build other than the paint and decal issues and my son thinks it looks cool so I’m happy with that. Enjoy the photos.8 points
-
The model was offered to me as a "I'll never build this-you want it?" Some parts had been removed from the sheet backing, most had not. I've built 2 vac kits previously (2 Broplan 1/72 ATR's) This model has been realized with surplus parts from an HK Models B-17 E/F (props some seats and cowls) HK Models Lancaster instrument panel SAC P-38 gear legs Reskit P-38 resin wheels, loads of evergreen structural shapes and, Engines and Things Pratt & Whitney engines. (Engines and Things now closed down) A full interior was cobbled together (although not to any degree of accuracy it does add visual interest) A full build thread can be found (if interested) on "Large Scale Planes" under "work in progress" all marking are painted on except the serial, paint being Tamiya acrylics. I know it's not perfect but I do strive for mediocrity. The cowls are a friction fit to allow removal to display the engines Thanks for looking8 points
-
evening folks Thank you for your kind words - very much appreciated So, P40 progress... ..it was time to try skinning the undercarriage fairings - these are the attractive bulges at the leading edge - made of three parts, they may look nice but were probably among the most challenging metalwork I have ever done.. ..first up was getting a nice smooth surface and blending in any existing skinning as the surface must be absolutely smooth or any undulations will transfer to the surface.. ..so a spot of filler here & there, a quick prime to check.. ..in order to get the panel shape, the outline needs to be set out in tape so that the border can be seen as the litho is burnished onto it.. to do this, I punched a couple of tape discs so I could set them out equally.. ..soon had them both laid out... ..it's asking a lot of the metal to conform to these double curvatures so I started to make the middle panel first - usual tools, hardwood blocks and a ball pein hammer to start beating to shape.. after beating & fixing, the other panels were added both sides - no pics, but by this point the panels are down and need finishing - some creasing was inevitable and I am hoping they sand out.. ..then the panels were sanded, polished, wire woolled etc, there are still some scratches and creases visible here and there but this is as good as I can get it.. ..I also skinned the fairing behind the cowl flaps - more details need adding, but again more compound curves.... ..more skin panels were added at the lower wing root, fastnings along the fairings and the lower area is coming together.. ..upper wing fairings next.. TTFN Peter8 points
-
7 points
-
Here's a few of my favourites.7 points
-
Hello everyone, what a busy start to 2023. Here's my little project. Don't know how old this kit is I just cut the shrink wrap off. All raised details but it's very well detailed. No particular jagdgeschwader as it's intended use will be for a Mistell. But it will be presented here on its own.6 points
-
I was rummaging through the stash and found this old charabanc lurking at the bottom. It was a kit that I was desperate to get, wasn't that cheap, but one that I got fed up with, made a bit of a mess of and re-boxed and dumped about 5 or so years ago. I thought I'd now have the patience and better skills to finish off properly and clear out of the stash. (It is such a big box that clearing it will automatically make my stash look smaller too.😉) The interior has been done but I am going to seal it all up so you can't see it. I remembered that Meng gave rubber seatbelts which were awful to use and they are mostly sitting in the bottom of the box. There's still a bit to do, including lots of double glazed windows, which is going to need a bit of masking (another thing that put me off at the time.) Obligatory sprue shot.😀 This back plate finally pushed me over the edge. The fit was awful, leading to overuse of glue, breaking bits off and eventually spilling a load of CA glue over it. Poor modelling on my behalf. Although there are some very nice sagged wheel sets available I will stick with Meng's very nice offerings. That'll save £20 or so. I also have the following paint available but if anyone knows of a better alternative for modern US Sand do let me know. Cheers all.👍6 points
-
I built the Matchbox Swordfish in the '70's with my Dad, and IIRC also the Novo (Frog) floatplane version, and always had a soft spot for the type. I seem to gravitate towards re-making subjects that I built as a child, maybe from different manufacturers, but they still hold some fascination for some reason. This is another model that took me a long time to complete. The fuselage chevron decals were asymmetric, and I only noticed after applying them, so they needed correction afterwards. Also the upper wing has sink marks around the spar elements (where there's an abrupt section change around the spar pockets). Again, this only became apparent after painting and weathering, so it all had to be stripped, filled, and...you get the idea. I'm still not 100% happy with the pre-shading of the fuselage. Anyway, the judges were kind at Scale model World in 2021, and it won a Gold medal and the Jim Howard Trophy. Modifications included: Scratch-built cockpit details such as: Eduard p/e Plastic road and Milliput leather crash pads Brass tube compass mounts Paper maps Eduard p/e airframe set Brass tube tail aerial mount Brass tube torpedo sight rails Brass tube pitot tubes Brass tube fuel tank vents Brass tube grab handles Brass tube tail skid assembly Brass tube cockpit step Brass tube starting handle Lead wire engine de-icing ring (I think that's what it is) Lead wire upper wing details (dinghy lines) Resin engine Elastic thread rigging CAD modelled & 3D printed bombs CAD modelled & 3D printed contra-rotating torpedo screws Brass torpedo fuze/cover Twisted lead wire mooring ropes/lines & torpedo lashings Oil paint woodgrain and p/e screw heads on trestle Cheers!6 points
-
Hi All, My latest completion is Eduard's relatively new-tool Spitfire Mk.IIa, completed as P7840 of 340 (Free French) Sqn, based at RAF Turnhouse, Ayr in December 1941. P7840 was the thirteenth of seventeen Spitfires donated by the Belfast Evening Telegraph Spitfire Fund, and was titled 'Mountains o' Mourne'. Here's a couple of photos of the aircraft and the squadron (kindly provided by @Troy Smith - images for discussion only and will be removed on request). The scheme attracted me as it unusually has the aircraft in DFS with the earlier Rotol spinner and type A.1 roundels. In addition my Father-in-Law hails from Dromara which sits at the foot of the aforementioned mountains. 340 Sqn was formed in November 1941 as part of Le Groupe de Chasse IV/2 (Fighter Group 4-2) "Île-de-France", flying defensive patrols from Turnhouse until moving further south in 1942, at which point they re-equipped with Mk.Vbs. The scheme was therefore only applied to the aircraft for a relatively short time, and my light weathering of the model reflects this. Here's the WIP if anybody is interested: The model was completed mostly OOB (as it was Profipack that adds a few extras!), although with the national markings (mostly) with home-cut stencils. Like most Eduard kits the detail is superb, but with some unnecessarily fiddly elements - as an example the radiator assembly consists of 12 pieces including 2 PE radiator grills (a bit much for 1:48?). Anyway, on with the photos: Finally, a couple of group shots to show the evolution of the beast (from R-L Airfix Mk.Ia, Eduard Mk.IIa, Tamiya Mk.Vc, Airfix FR Mk.XIVe - all have their own WIPs and RFIs if anyone is interested, and still plenty of gaps to fill in the collection, although these have all been completed in the last year or so): I've very much enjoyed learning more about this interim mark of the Spitfire, and bringing this unusual scheme to life. Thanks for all who have added kind words and encouragement along the way - it has been much appreciated! Thanks for looking, Roger6 points
-
I know what you mean too, Terry: although I think you mean concave rather than convex. And I think you may have put your finger on summat. Redrawn with a concave curve at the level of the bottom of the canopy transitioning through neutral to convex at the top plus a few fillets as suggested by Alan A few photos in the design and render mopde sandwiching a similar angle photo of the 1:1 for comparison. I think that's rather more like it meself. And if so it's a combination of Ian + Terry on the visuals + Alan on the technique...6 points
-
I got the pilot painted before bed last night. Same sculpt as the one for the Bf109E-4, but with a bit cut out of the back, and the detail isn't nearly as good. This chap doesn't have much of a nose, for example! I'm going with the box art for this build, which makes this fellow Feldwebel Martin Ullman in Norway in May 1945. I went with a Polarflieger uniform, but with ordinary uniform trousers rather than the leather insulated over pants.6 points
-
Before continuing with the weathering it was time to add the engine… …cowl and exhausts (hidden by the cowl). Before I painted the wings I masked the edges to enable easier glueing/fixing to the fuselage… …and finally the horizontal stabilisers. Next I’ll be continuing with the weathering. until next time as always, any suggestions, criticisms or comments will be gratefully received. rgds John(shortCummins)6 points
-
Some more progress: Masks for the wings, freehand on the fuselage: The engine covers have already been painted, but I forgot to take photos. So that`s where I am now. I will have to think about the right sequence. Probably I will go on with a gloss coat, wash, decals and a matt coat. Thereafter I will do the detailing on the gun bay, the engine compartment and the landing gear.6 points
-
Would those Novas be GTE's sold as low-milage* with one lady owner** by any chance? James * Third time around ** And 15 blokes who drove like thier pants were constantly on fire6 points
-
I started this build way back in July and finished just before Christmas. That's a long time – even for me. Partly because of the challenges in the kit, then several mistakes that I managed to introduce and then, well just life really. I posted a WIP thread which is a little like a diary of minor calamity followed by minor calamity but I got there in the end and I'm mostly pleased with the result. If I built one again there's a few things I'd do differently but life's too short for madness like that. Here's that WIP thread for your entertainment: The majority of the detail is provided by plenty of resin: and Some of that resin was lovely and some needed a lot of cleaning up – the internal cockpit framing in particular. The framing for the roof was warped and oversized (or it was the way I built it) so I replaced that with plastic rod: After a fair amount of prevarication, about which scheme to model, I settled on a trainer - partly as my dad was an air gunner in Coastal Command and I'm fairly sure did some of his training in an Annie. That's enough of the waffle. I've just taken delivery of a light box so here's some strangely lit photos: That's it then. Next up something that doesn't make my brain hurt. all the best Mark6 points
-
Dave, I'm going to play the devils advocate here, just the once. I've followed this from the start & like most things, there are more than likely several issues interacting here, RM's non communication to begin with & then I'm guessing some obfuscation with respect to what it did eventually communicate to its clients. Whether or not Hannants is a big enough client to warrant direct communications from RM is something only they can know, but I can easily believe they may well have laboured under the belief that a couple of days & it'll all be jake. Oops, not so, RM's woes have lasted longer than they initially hoped they would & this has left a heap of clients, none the least Hannants, up the creek without a paddle. Stuck in the middle of all this is you, our dear friend e8n2, who understandably feels miffed to blazes & probably feels like Hannants have it in for him. Ok, I'm exaggerating now to make a point, but yes, RM could have done better by their clients & yes, maybe so could have Hannants for theirs. In the interim, you appear to have had a vendetta on Hannants & won't/can't be mollified. Ok, so be it, but surely it is time to move on, there's more to worry about, the floods in your home state & the floods in the north of my country strike me as a couple of things way more important. I'm confident your order from Hannants will arrive, I've had many from them & they have been incredibly reliable. They rely like most others in their situation on outside agencies & occasionally things go nipples up but I've had packages from across the world when the whole globe was in lock down, I've had packages from Ukraine as it fought for its existence. Maybe its time to give Hannants some slack & leave off flogging the deceased equine. Just saying. Steve.6 points
-
Mumble Mumble Mumble... I'm going to put the boomy aside for a while.... And recreating a scratched interior..... I surely did something wrong in here.... Sooooo, cooling a CC down and back at the Wirraway.... Sincerely. CC6 points
-
Next job is to complete the interior. I as I had printed my own decals for the harnesses the first task was to remove the existing sabelt logo. This was achieved with vallejo white primer as per the photo below. The harness are from eduard and are definitely the best I've found, they are very pliable and easy to thread with the various bits of furniture as they are non sticky. Once all 4 harnesses were completed they were attached to the boot cover using 0.4mm entomology pins. And then installed in the car. And to be honest they result is far better than I could have ever hoped for - Andy6 points
-
Evening all, here is your Day 24 roundup Two new WIP's today, both of which bring something fresh and new to the GB - yes, even with the huge number of builds of all shapes and sizes going on, it's possible! So, thank you to @flashlight with his deep-sea Shinkai sub (something like four different ones in the GB now), and welcome to @Mick Drover with his USMC Skyhawk. Meanwhile, two over the line and turning blue: @airfixpeter's folded up 1/48 Lynx, and @TEMPESTMK5's smart'n'shiny T6 - again, both fantastic subjects in their very different ways. I'm fighting the Build List on three fronts now - new WIPS, started WIPS and finished builds - none sunk yet, happily. If I've got my counting right (usually I don't go above two hands) today's numbers are: 156 builds 108 underway 15 finished Cheers Tony6 points
-
Following on from the suggestion from @rob Lyttle I had a go at making the floor in two halves lengthways, and not going all the way back. So I now have: I've had to do more than half the width to accommodate the seats, but I don't think the other side can be seen through the door anyway. Will do the floor by the door separately - there's going to be a sizeable step there, I think but so be it. Drew the console detail with posca pens. Looks a bit naff in the daylight, but hopefully when she's closed up it'll just add a bit of colour and interest.. 🤞 Got a bit of mojo back now I can see how it might go together.. Al.6 points
-
With the weather being reasonably kinder of late, I have ventured back to my shed and had ago at trying to get some modelling. But I am concentrating in finishing off a bunch of subjects that need ti be done and clear the bench for new builds(of which there won't be many from me this year). So to kick off, I have finally got this little gem finished that I started around 6 months ago. Its the Special Hobby 1/72nd kit and a very fine one at that plus its tiny!!! The build was fine and no real dramas. I opted for the Italian AIr Force scheme as I rather like it. The orange paint is Revell Aqua airbrushed. Decals from the kit plus some strips of black decal stripes to edge off the anti dazzle on the nose and tip tanks. Managed to squeeze in enough lead bits for the nose weight. I really should go back to it and tidy up the paint on the blade aerial and prop. Enjoy.6 points
-
Bristol Bulldog Mk.IIa, 29 Squadron, RAF, North Weald, 1932 This is one from just before Lockdown (remember that?). I remember building one as a child in the '80's, and even then thinking it went together well and looked good. Later, I noticed an example by Mike Grant in one of the Airfix books, and it looked even better with some tweaks. So I eventually picked one up from a show - an original bagged version with very crisp mouldings. Long story (which included using every set of Bulldog decals from Hannants!), but it turned out OK in the end. I did try re-skinning the wings using the scored plasticard method, but it didn't really work. Unfortunately I ended up sanding most of the rib detail off the lower wing, and not noticing until it was complete believe it or not. The upper wing gave a lot of issues with cracks appearing along the joint lines for some reason. I had to get another kit for a new wing, but they are so cheap it wasn't worth worrying about. It almost ended up in the bin on several occasions, but ended up being one of my best efforts overall. Here are the finished pictures: After all that I was very happy to win Best in Class with it at the IPMS Halifax show in 2020: And won the Airfix Trophy at Scale Model World in 2021, along with a Bronze medal: Here is a list of materials/modifications used: Bare metal foil for forward fuselage areas Aftermarket decals Oil paint woodgrain propeller Little Lens navigation lamps Lead wire navigation lamp wires Elastic thread for rigging and aerial wires Scratch-built cockpit, with Yahu instrument panel Acetate windscreen Plastic card generator propeller CAD Designed and 3D printed 20 lb bombs & refined bomb rack Separate oil cooler disc Hollowed exhaust pipes Brass tube propeller hub starter tube Brass tube boresight & bead Brass tube fuel lines Brass tube machine guns Brass tube pitots Scrap brass p/e oil tank cap Thanks for looking!5 points
-
Gentlemen! Academys M12 GMC at the Siegfried Line. Mines have been cleared and the way is open to Germany. But is the dragon really dead? The Raven knows the answer... 😁 MD Thank you!5 points
-
I seem to have found a way to turn six small blades into a tail rotor. Just a dry, proof of concept, run at the moment. I'll paint the rotors individually (those pesky stripes), before fixing them to the hubs. Cheers5 points
-
Having spent some time yesterday decalling her, I was fflicking through my references this morning and a penny dropped! The 6 Stormo/Aerobrigada "Red Devils" nose flash is too short, and by a lot! Drat! It is my fault because I was lulled in to an hour or two of pleasure and just didn't think to check. You can see the problem below: How it should be: and ..... For the future - dont accept what the manufacturers give you! So, a warning for other users of Tauro Models sheets! I seem to be hit from all sides by troublesome products recently! Well, the only thing I can do is order a new set from Pronto and modify to the rear tail of the flashes. It wil mean that for anyone out there who is also looking forward to the release of the Sword kit, that I will have spares! . It will mean yet another delay! Martin5 points
-
Fuselage halves are together: Did not get as far last night as I thought I would. Spent a lot of time ensuring panel fit was good. The fit is exemplary with one minor exception ... read on. The gun trough panel gave me a little trouble. I did a dry fit and all seemed good. Then, when I applied glue, I found the starboard edge had lifted ever so slightly. One of those problems where you think "Nah, it's OK" and then later wished you had fixed it. This I decided to do. I found I could not force it down without removing the stop lugs in the cowling. Here you can see the a remaining stop lug. The one on starboard side, top of the image has been removed. this allowed the panel to drop a fraction and engage better. Because the glue joint had been worked it then had little strength. The Tamiya Extra Thin melting too much of the plastic (as happens when you work the joint) so I stiffened the inside with a CA/Talc mix. The final result was good. A slight sand without loss of detail. This was the offending edge. On the next build, I will spend a little more time with preparation on this panel. Possibly shaving the lugs fractionally. The MG cover fit is excellent. This gave me an idea. I will paint it separately and fit it after the main colour painting. Simplifies the gun masking and eliminates post painting. Wing halves are together. I remembered, thankfully, to enclose the spent case chutes. The kit's wheels are also nice. Enjoy before they get dirty. Those MG 151/20 barrels are asking to be broken off. I ordered some Master barrels to replace them for when they do. I also prefer Master's assembly method. The barrels extending from the leading edge can be added at the end of the build. I ordered some for my other FW 190 builds. More to come. Ray5 points
-
"No donkeys were harmed in the making of this kit" I grasped at the nettle (@81-er please note not literally ) and cut the large tabs off the landing flaps; a little filing and fiddling and I got them fitted: You can see how big the tabs were from the indents in the lower wing that they slot into. It would certainly have provided a firm attachment, just not at the correct angle. I attached the flaps at a much less acute angle - is it 12 degrees? I don't know to be honest, I haven't got a protractor but I did google 12 degree angle' just to get an idea of what it looked like. In any case it no longer looks as if the flaps are just hanging off the wings, so that's an improvement. I would have appreciated the option for closed flaps, but there wasn't one and from what I read although this can be done by modifying the kit parts they don't fit closed and would need yet more filing and sanding and you know, work and stuff, so I discarded that idea The parts to be represented as unpainted metal got a coat of Alclad Black Primer (as an aside, this seems to be impossible to get hold of now, which is a shame): ... and in turn, a coat of Alclad Aluminium: As I had a loaded airbrush I took the opportunity to paint the bare-metal panels on the wing underside too, I applied the Alclad directly onto the unprimed plastic and it worked fine. I haven't done a NMF for a long time but my memory is that Alclad is robust enough to take this and remain maskable, so if nothing else it could prove a good test of how well my memory is holding up I'll give it a couple of days to fully cure anyway, in the meantime I can get back to the sequence of the instructions and assemble the tail unit (well, sort of, from the look of things I should be able to leave the tailwheel and tailplanes off for now to ease painting later) Cheers, Stew5 points
-
Spotted some spicy JDM cars last Sunday after a JDM festival event a day before This one's my pick of the bunch. R35 GT-R Nismo Special Version. Nissan Indonesia used to import GT-Rs back in 2013 up until 2016 but they didn't bother afterwards and their servicing was pretty abysmal so everyone bought grey imports instead and received help from specialist workshops. The SV was only available in Japan, USA and Australia, with only 300 units allocated if I remembered correctly. The difference with the 'normal' Nismo includes red details on wheels and clear lacquered carbon bonnet... and that's it. Does look amazing though. Especially in Stealth Grey. This one is a 2008 GT-R with full Varis body kit and a full HKS engine rebuilt, allegedly pumpung out 800hp. Same owner as the Nismo SV, he owned several rare JDM cars as well (NA1 NSX R comes to mind) as well as a C63 Black Series. Yes, another GT-R. This one is from my hometown, only recently finished another rounds of tuning. Now packs 1000hp from a rebuilt engine. A true JDM special, the FD2 Civic Type R. Many said this is a much better car then its EUDM/UKDM FN2 counterparts, thanks to its multi link rear suspension and a higher tune for the K20A engine here compared with FN2. The last of Mitsubishi's homologation special, the Evo VI Tommi Makinen Edition GSR. This one got the Zero Fighter livery rather than the usual Tommi Makinen livery from 2000 WRC car.5 points
-
... slacker! Your back end is looking rather fine Johnny, and great job with the alclad on the fork - it looks very realistic5 points
-
I'm getting there! Apart from the wheels and a few minor parts the assembly is now complete. I painted the trailer last week, and added some of the small bits and pieces. Onto the final stage now: weathering!5 points


.thumb.JPG.3498f40362ff13ebfc4b2e45abbd545e.JPG)


This leaderboard is set to London/GMT+01:00