
Leaderboard


Popular Content
Showing content with the highest reputation on 29/01/23 in all areas
-
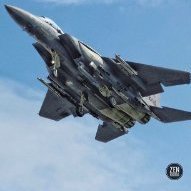
Here's my Fireflash trials Meteor NF.11, built using the Red Roo set which includes the Special Hobby 1/72 kit and everything you need to convert it to the Fireflash trials aircraft. These Meteors were used to test the Fireflash missile at Woomera in the mid fifties. Build thread is here. thanks for looking Julian35 points
-
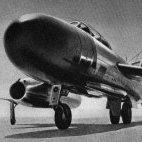
Good day, I finally check in with my first submission for 2023. This is the Mig-19S Farmer from KP. Here is a brief overview of the kit……… 1. Colors / paints used A. Airframe : Model Master Sand, Helicopter Green, Vallejo Air Light Blue B. Cockpit, gear wells, air intake : Vallejo Air Greyish-Blue ( AMT-7 ) C. Landing gear & pitot tube : Tamiya titanium silver ( X-32 ) D. Bombs : Mission Models Light Grey ( 36307 ) E. Missiles : Mission Models Flat White 2. Various washes of sand, brown, black, and light grey 3. 0.5mm brass pitot tube used to replace kit supplied tube. 4. Pastels & pencils for various weathering highlights 5. Plumbers Putty and lead fishing sinkers used for ballast. 6. Included photo etched seat belts. 7. Vallejo “Fuel Stains” for the wing tanks. I found this kit to be similar to the Airfix Mig-17 Fresco in construction and fit. The landing gear assembly was particularly troublesome however the overall fit to the airframe itself was good. I used the two bombs from the spares box. Unfortunately , the windscreen only comes in one piece. I had given thought to cutting it open but I did not have a spare kit to use. The supplied decals come in four rather colorful Egyptian and Syrian options and were very nice. The kit can be a bit tricky in certain locations mainly with the main landing gear and nose gear well. There are no shortage of tiny bumps, blisters, and antennas to place all over the fuselage. The wing fences are separate pieces. Due to the added complexity, I can only recommend this kit for more experienced modelers to construct. Thank you in advance!!!! With much respect, Mike And here is a picture of the 0.5mm brass tube before i painted it……….33 points
-
Hi all! Here's my latest build. Overall, nice little kit. Painted with MRP and kit decals used. Added PE seatbelts. Not 100% accurate but close enough for me 😃. Pictured with my other Emil (Tamiya). Thanks for looking!22 points
-
I finished this today. Lovely kit, glad it comes in a double boxing! The WIP thread is here if you are interested. Thanks for looking, Adrian21 points
-
Good evening, dears! This is my first model in this year.20 points
-
I built the Matchbox Swordfish in the '70's with my Dad, and IIRC also the Novo (Frog) floatplane version, and always had a soft spot for the type. I seem to gravitate towards re-making subjects that I built as a child, maybe from different manufacturers, but they still hold some fascination for some reason. This is another model that took me a long time to complete. The fuselage chevron decals were asymmetric, and I only noticed after applying them, so they needed correction afterwards. Also the upper wing has sink marks around the spar elements (where there's an abrupt section change around the spar pockets). Again, this only became apparent after painting and weathering, so it all had to be stripped, filled, and...you get the idea. I'm still not 100% happy with the pre-shading of the fuselage. Anyway, the judges were kind at Scale model World in 2021, and it won a Gold medal and the Jim Howard Trophy. Modifications included: Scratch-built cockpit details such as: Eduard p/e Plastic road and Milliput leather crash pads Brass tube compass mounts Paper maps Eduard p/e airframe set Brass tube tail aerial mount Brass tube torpedo sight rails Brass tube pitot tubes Brass tube fuel tank vents Brass tube grab handles Brass tube tail skid assembly Brass tube cockpit step Brass tube starting handle Lead wire engine de-icing ring (I think that's what it is) Lead wire upper wing details (dinghy lines) Resin engine Elastic thread rigging CAD modelled & 3D printed bombs CAD modelled & 3D printed contra-rotating torpedo screws Brass torpedo fuze/cover Twisted lead wire mooring ropes/lines & torpedo lashings Oil paint woodgrain and p/e screw heads on trestle Cheers!20 points
-
Dear fellow junkies... (who among us hasn't choose to by a model, when something other more serious was needed?). Since I received great reception from you folks for my ships, I've decided to share rest of my sins from 1994 till 2015.... I don't want to spam you (there are 250+ finished models), if you would like to take a closer look at any model, feel free to ask. And I do apologize for quality of the photos, I am ignoramus when it comes to taking shoots...18 points
-
Hello In the end I have finished this MACH 2 Dassault Mystère 20 from Escadre de Transport 65. I chose aircraft #EG as she could be seen in 1991 for the mission of calibrating radars or radio navigation systems. To say it is a difficult kit is an understatement as this is one of the first kits produced by MACH 2. I replaced the side windows with plexiglass which I covered with tape cut to shape (thanks to my Silhouette Portrait cutting machine). I sanded the front windows but after breaking the first one, and sadly a little too much as I opened the bottom part. Obviously that put much dust inside and to fix it I did a big hole on the roof to clean the windscreen from inside. The bottom of the fuselage was deeper than the wings and I sanded... with the same result as on the windscreen. I had to glue some plastic and sand again. I can add that I had to create nearly everything behind the pilots and finally there were big sinks on the wings, fuselage and tail. The APU intake and exhaust are home made as were many antennae. So here is the result and I am happy it is done. Patrick17 points
-
G-CPET in the retro Negus livery applied in late 2010 to mark the withdrawal from service of British Airways Boeing 757s: Zvezda kit with the usual Halfords Appliance White, Holts HL Grey01 and Humbrol HU15 for the main colours. Decals are mainly from S&M Models with a few from 26decals.17 points
-
Here's my Tiger Meet Mirage 2000C - Modelsvit kit, Syhart decals. Fun little build, very nicely detailed kit, short run but I don't think short run means what it used to mean any more! Build thread is here thanks for looking Julian17 points
-
16 points
-
Hi, Wonderful work here in this GB. Here's my Skyray. I hope to build more Skyrays and get better at them. Cheers, Stefan.16 points
-
Here is my second completed build, a Pilatus PC-6 in 1/72 from the old Classic Plane kit. It is a very special scheme applied by the Austrian Air Force in 2000 to use it as a recruitment tool. The plane was sold in 2012 and moved to the USA, apparently keeping this livery up to now. Build thread is here: Thanks for looking!16 points
-
This is the Chinese deep sea submersible research vehicle named Jiaolong (pronounced, very roughly, Jee-ow Loooong...the "long" is a similar sound to Oolong Tea). The name refers to a mythical "flood dragon" (the word long 龙 means dragon, and the wiki link I just gave has an interesting analysis of the jiao 蛟). The Jiaolong reached the then-record depth for a craft of this type - 7,000 meters - in 2012. Since then, China's newer Fendouzhe submersible made it to 10,909 meters in the Mariana Trench. This was essentially a snap-tight build which I did without glue (except maybe on one ill-fitting part) and without paint except for some silver on the floodlights. It was just fun putting it together, no muss no fuss. In the pic below you can see it in my "space and research" display at bottom left, next to the Hasegawa kit of Japan's Shinkai 6500, a similar snap-tight kit of a similar craft which once held a similar world record...at 6500 meters (the clue's in the name, Dad, as my kid would say). Fun build and there should be more kits of quirky things like this! Build thread:15 points
-
Hi dio builders, I started this project in mid 2021, a Covid lockdown was being enforced where I live, and work was fairly slow. What better time to build an admittedly weird project? I glued the last figures down last night and took pictures this morning! I have long been a fan of Ian McQue's conceptual art - it brings nautical/industrial imagery to an alternative future - I don't know why this future is, or if there is any intended message to go along. My sense is that it is not violent or apocalyptic (and this project is not a Mad Max zombie, fallout or violent scenario) - but it's clearly not what is going on today. Many of the craft are anti-gravity - that is, they float in air! All of this is conveyed with a distinctive graphic style that I like - it brings a professional tightness - with a whimsical attitude, but not cartoon like - there you go - perfect. As I am more of land based guy, I decided my McQue inspired project would be largely land based, but, not completely - South Station would be the home to 2 McQue designed Wasps - small anti gravity aircraft. The place would be populated with some pilots, mechanics, deck and recovery crews, and a group of others who manage the vast area the Wasps patrol. I'm guessing they would all live nearby, and the station essentially a home base - with communications and shops. It includes a mobile station and a remanent build from whoever was there beofre. I kept a few self imposed rules in place, first being not to let my thinking get too uptight and keep in mind the "spirit" of McQue's work, and - no new kits - all from the stash, or whatever I might have salvaged from other dios before I tossed them. I did allow myself to buy lots of evergreen. Ok, here we go: South Station was pretty remote - there was a mobile base - and long abandoned elevator tower. We took it over because it was in the shadow of the highest ridge in our sector, there was a spring and well, and it was pretty easy to get to. The tracked M1070 could pull anything anywhere! We brought solar panels for the powerpacks, and our microgrid, but it ran mostly on net zero hydrogen fuel cells. We had more power than common sense - this place was remote! The old man ran the place - which was pretty interesting and funny - he was a bit of a nut. Guess he had to be - kept us busy on missions, we had fun out there - lol - odd crew too all sorts on our team - We were always repairing the Wasps - and fixing other rides - and building all sort of stuff - it was non-stop which was pretty funny - this was a small post in the middle of nowhere with a big crew with plenty to do! The Wasps were almost completely silent - which was weird - never knew if they were coming or going - and that flight deck! I know - anti gravity is no big deal blah blah - but man watching the pilots drop them into those bays! Just weird - And the guy with the gun - Chet - we had two sentries. Him and Carol - She was perched on the tower with a .308. I don't recall either of them ever shooting at anything other than to pass the time! There's Carol - with that .308 - That's Val, on the perch - haha - he'd stand up there yelling at the recovery crew - he was always barking off orders! lol And there you have it - A special tip-o-the-Xacto to @Pete in Lincs and @silver911 - Pete and Ron, thanks for sticking with this project! Your keeping the ideas fresh is appreciated! Cheers Nick14 points
-
Roden's excellent 1/72 Albatros DII kit made up as Oswald Boelke's plane.13 points
-
1/144 Revell A-321 "Millenium" Austrian Airlines More pics and boring WIP:13 points
-
Have not posted for a wile, so here is latest. Tamiya 1/48 SEA HARRIER FRS.1 FAA No 801 HMS INVINCIBLE hope you like as always all comments welcome.12 points
-
The Salty Sea Dog GB, this time Tiger Hobby 1/72 Supermarine Spitfire V floatplane.12 points
-
Here is my latest - KP's Sopwith Triplane in 1/72. This proved to be one of the most difficult planes I have ever tried to Rig - it is very small and there are a lot of wires! Still not entirely happy with the result but every time I touched it a wire broke! The double wires were especially troublesome. The middle set of wings also proved to be quite difficult to fit - they needed quite a lot of adjustment to get the struts to line up vertically. AK's excellent World War 1 colours and Alclad Aluminium for the metal cowling. Made pretty much out of the box with a few extra details added. Any comments welcome.11 points
-
Bristol Bulldog Mk.IIa, 29 Squadron, RAF, North Weald, 1932 This is one from just before Lockdown (remember that?). I remember building one as a child in the '80's, and even then thinking it went together well and looked good. Later, I noticed an example by Mike Grant in one of the Airfix books, and it looked even better with some tweaks. So I eventually picked one up from a show - an original bagged version with very crisp mouldings. Long story (which included using every set of Bulldog decals from Hannants!), but it turned out OK in the end. I did try re-skinning the wings using the scored plasticard method, but it didn't really work. Unfortunately I ended up sanding most of the rib detail off the lower wing, and not noticing until it was complete believe it or not. The upper wing gave a lot of issues with cracks appearing along the joint lines for some reason. I had to get another kit for a new wing, but they are so cheap it wasn't worth worrying about. It almost ended up in the bin on several occasions, but ended up being one of my best efforts overall. Here are the finished pictures: After all that I was very happy to win Best in Class with it at the IPMS Halifax show in 2020: And won the Airfix Trophy at Scale Model World in 2021, along with a Bronze medal: Here is a list of materials/modifications used: Bare metal foil for forward fuselage areas Aftermarket decals Oil paint woodgrain propeller Little Lens navigation lamps Lead wire navigation lamp wires Elastic thread for rigging and aerial wires Scratch-built cockpit, with Yahu instrument panel Acetate windscreen Plastic card generator propeller CAD Designed and 3D printed 20 lb bombs & refined bomb rack Separate oil cooler disc Hollowed exhaust pipes Brass tube propeller hub starter tube Brass tube boresight & bead Brass tube fuel lines Brass tube machine guns Brass tube pitots Scrap brass p/e oil tank cap Thanks for looking!11 points
-
Hello, as promised over on the build thread HERE I am posting a few more pictures of this odd P-47B variant, the "Double Twister": Thanks for looking. Ed11 points
-
I felt much better yesterday and managed to get a good long stint in at the bench. The main objective was to get the wood veneer cut out and shaped the the Elizabethan style panelling. This was somewhat hairy as the stuff is almost paper thin and since the local craft shop that I used to get the stuff from closed down, I don't have a lot of the stuff left. As Captain Slackbladder would have put it, "I couldn't afford to be at hone to Mr Cockup"! It doesn't look much but it accounted for a good three hours of my day. I was thankful that my Father taught me how to do marquetry when I was a small Martian. I could have gone for a paint effect but I am of the opinion that. for a wood finish, nothing looks as good as real wood. The panels are not glued in place and some have slipped down in the pictures. Sorry about that. I was about to knock off for the day when I suddenly realised that the fuel tank had no bottom to it. I therefore sat back down and scratch built something that at least looks workable. While I was measuring up for the fuel tank it occurred to me that the shaft that held the rotary engine and carburettor must have protruded into the cabin. some stretched sprue and Albion Alloys action soon saw that taken care of. This is all a bit too sensible thus far so here is the latest news on the proposed diorama. Speckled Jim, anxious to help Melchie fulfill his Mile High Club ambition informs me that he has secured the services of a very special guest star to assist with this. He claims however, that he is not yet at liberty to disclose the identity of this individual. We wait with baited breath! Last night I commissioned a pair of General Melchett and Baldrick figures and I suspect that there may be some other special guest stars finding their way into the diorama in due course. I have already set the evil part of my brain to thinking of suitable candidates. Thanks for looking. Martian the Maniacal 👽11 points
-
Hi It's my last finished kit. - Color photo etch; - Resin pipes; - Steel needles (tube Pitot, tail wheel stem, film camera gun in the wing); - Sparkling wine foil ring antenna)) - The red color on the letters was painted with a brush over the decals; - Used Vallejo colors Grey Violet 71.259 (RLM75), USAF Light Gray 71.276, Red 70.926 Pictures... it's my permanent pain, but I tryed.10 points
-
Hi all, The last novelty from Dora Wings.10 points
-
Air Racer. Laird Super Solution 1/32. Williams Brothers10 points
-
Air Racer. Hall’s Bulldog 1/32. Williams Brothers10 points
-
Trumpeters TU-26 OOB. Just done as it is in the box. This post is made as answer for @Bonehammer post about ESCI TU-26 accuracy. Yes it is possible, but is it worth it? This was made back at 2012.9 points
-
Hi all. This is my first for 2023 though I started it a few years ago with the bulk of the work done last year. It's the venerable 1/48th Hasegawa F-16N. I eyed off the 72nd version when I was a kid but never built it so when this 48th version kit came up cheap on a swap and sell table I had to have it. Replacement decals were at hand to replace the old kit items in the way of the W&D Studio decals so the NFWS aka Topgun option was chosen. Sad to say they aren't all that great as heapings of decals softener barely moved them. The only other small enhancements are DXM pitot and AOA probe and fibre optic cable for the static dischargers. The pilot is from the kit and the base is courtesy of some offcuts from Bunnings. My wife recently bought herself a router so I added a 45 degree bevel to tidy up the base. The rod is some clear perspex that's sanded to frost it up. The F-16N was the true hotrod variant with its small mouth inlet and big engine exhaust so I had to put it in flight. I cracked the air brakes so the pilot could pull the nose over to get a gunshot on his blue adversary...who knows what happened next. Cheers, Mick9 points
-
I was gifted this kit for Christmas by an unexpected source, and wanted to finish it before that person left our shores for home (roughly 4 weeks). I failed to make that deadline, but did rush a few things in an effort to make it, so it's far from my best work. Here are some progress shots: That last photo is as far as I get before my self-imposed deadline. Using the large kit decals for the various panels was definitely a mistake! I thought it would be quicker and easier, but Bandai and Tamiya have more than outrageously good tooling and engineering in common: they also both have relatively poor decals, that in no way match the rest of the package. I never was able to fully deal with the 'tenting' on the wing panels. Anyway, here's the finished result: And now to a bit of a question-cum-complaint. You'll notice that there's only one photo of the model on its stand. That's because I couldn't get it to fit! It's exactly the same stand (apart from the colour) that came in the Snowspeeder I built last year, but the receptacle in the fuselage to accept the mount is a completely different size, shape, and depth! No matter what I did, it was never going to fit, but oddly, no one else has reported having this problem, so I'm stumped. I tried to take a couple of photos of the problem: Basically, the pin on the mount is too long for the hole it's meant to go into, and the larger barrel it sits on has nowhere to go at all. So you can't get the mounting plate into its receptacle, as it won't go in far enough. But even if it did, it's too large and too square to fit anyway. I'm completely stumped by this, and nothing in the instructions gives me any clue, other than Step 6-1, which if I look sideways at it, appears to be suggesting that I need to buy another part to make it fit: But the arrangement as shown just doesn't work. I managed to get it to sit comfortably on the pin of the mount in exactly one orientation, which you can see in the photo above. But if anybody can clue me in about what the heck is going on here, I'd appreciate it! Kev9 points
-
Airfix Trafalgar Class Submarine (HMS Trafalgar) 1/350 Build thread is here9 points
-
Fireflash trials NF.11, Special Hobby/Red Roo 1/72. Fun build, I can see myself building more of the SH night fighters. Build thread is here. thanks for looking Julian9 points
-
I actually cut "hand-painted roundel" masks first, thinking that would be the case. But, the more I looked at the photos the more it looked to me like these at least were applied with some precision so I went back to "proper" Type C/C1 roundel masks. Thank you gents. I've found a process that works for me and the paints I use. Alistair, you undersell yourself. Again. Thank you Allan, and everyone who commented on the mottling, much appreciated. It's certainly the best mottling I've ever achieved and I'm happy to have found a technique which worked for me. I have no idea. It seems to me that it would be logical to remove the weapons, but I can't explain why I think that. ... Some small progress on a rainy Sunday afternoon, I painted the wheels. I noticed a brightness to the wheel hub's rim and wanted to represent that. I painted the hub itself with semi-gloss black and then made a mask which covered it but exposed the rim. I painted that with Vallejo "Magnesium" and then masked that, and painted the tyre. It still needs a dark goop treatment and perhaps a little dry brush to pop some of the details but I like how that came out. In between coats on the wheels I applied the decals. These were printed by Cartograph and perfectly rendered. I thought they behaved a little differently to the norm though. The decals didn't react at all to MicroSet/Sol so I switched to using Mr. Decal Softener which also didn't dent them very much but did get them to stick. The decals themselves have a slightly matt finish which I expect hope will blend when I apply the sealing clear coat. Next up, texture and weathering. Cheers.9 points
-
Model: 1/48 Gloster Meteor F.1, Prototype No.1 Kit: Tamiya #61051 Modifications: None - built OOB. Homemade canopy masks. Paints: Tamiya acrylics throughout, over modulated black basing Weathering: Tamiya panel liner, pastels and oils Build thread is here: Thank you for looking, and see you at the Ju 88 GB! Icarus9 points
-
A classic kit. This is the 1/72 Matchbox kit which was re-issued by Revell. I got to build this as this brings back so much memory. Well not much to say other than its a very challenging build due to the age of this mould but hey its good to complete the build at the end. I have to improve the cockpit windshield and used some clear plastic from a "blister pack" I found lying around. I think it was from a knife sharpening stone I bought from Robert Dyas. Most of you can relate to this kit. This build is not aim for accuracy but more of a fun build and to improve it a little bit ( I did my best) . Happy of the out come. Hope you enjoy and maybe build your old Match box kit. Regards, Raphael8 points
-
Back to that second Spitfire FF-B. To my shame, having advised @Zephyr91 not to go over the top on details on kits with dodgy canopies, I failed to heed my own advice: I think I might look at options for open canopies. All the relevant Falcon canopies I have are too big (designed for the Fujimi kit), so I'm using the Airfix Spitfire IX canopy, which is pretty distorting. I have the option of cutting it up and plunge moulding the sliding bit to have it open, or I might raid my Eduard Spitfire IX box to see if there's a suitable spare in there (or I could leave the Eduard untouched until I sell it on or die, which is the likely fate of all the "nice" kits in my collection). Regards, Adrian8 points
-
My second contribution to this GB is finished. The WIP thread for anyone interested: Beriev Be-200ES 'Altair', 1/144 Zvezda8 points
-
Well I decided to do something other than tiny aerolanes for a bit, it was becoming a bit of an endurance test, so I intend to dip in and out of the air wing as I go along in future, still at least I have something now, but I will have to wait until I get the airbrush out of storage until I can get some paint on them. As a antidote to teeny Scimitars Ive started on the crane, officially it is the "11 and a quarter ton seaplane and boat crane" but I dont think it ever saw a seaplane, Im sure someone will correct me on this if it did !! Its difficult to find decent photos of it, I suspect when people were taking pictures of Victorious they managed to find much more glamorous bits than the crane, I have found some shots of a very similar one on Hermes which appears to be a partial mirror image, but a very similar overall design. And what a complicated little devil it is too, Im using the AotS drawings which seem to make sense after a bit of head scratching, but it is not an easy thing to fabricate, and there is stilla long way to go. I do have a jib frow the PE set for the Orel paper kit, but it doesnt match the drawings or photos, so it looks like I will be making that too....scary thought there !! Anyway, this is where I am at, still a bit rough so dont look too closely ! Anyway, I must admit that it is very pleasant to be making something proper again !! Thanks for looking, Cheers David8 points
-
Gloster Meteor F8 VZ547 74 Squadron Horsham St Faith 1952 Airfix 1/48 scale kit CMK resin bang seat Paint Tamiya LP-11 Roundels painted on and decals from Xtra Decal Flory models washes 73D07D22-9977-432C-AE95-C65E92C3296F by James Halls, on Flickr 4529D511-52C7-41B5-93C3-1E0C153D9D8C by James Halls, on Flickr D3C2050F-7AFA-4A3E-BB00-14996339C846 by James Halls, on Flickr 75F5B4B0-82D7-4AC7-B430-8E66D5264DBF by James Halls, on Flickr 69D70D44-1EE2-4504-A362-F005B1749A21 by James Halls, on Flickr 6595AC1B-1CA9-4039-B07C-C27CDD72C150 by James Halls, on Flickr Thanks for looking James8 points
-
South Africa is on her legs! She also has her pitot tube installed, some panel liner in her ejector slots, and some amber for her ID light.8 points
-
The model has been on the back burner again, but did put down a coat of Future to prep it for decalling last weekend. I have a copy of the Italeri decal sheet from their USCG HC-130J kit, but a lot of them aren’t applicable for my build. ( I do have a lot of assorted USCG decals in my collection.) It turns out I don’t have the proper-sized USCG letters for the top of the wing. So I made a mask on my Cameo4 cutting machine and just painted them today- I am very happy with how it turned out! (Making one large mask ensured the letters were evenly spaced and aligned properly.) EDIT: Tonight I discovered that the USCG lettering under the wing was a bit too tight for the decal I was planning on using there. (It is a little smaller, and has to fit between the nacelle and the start of the orange trim.). It was easy to re-draw the mask to fit, and cut a new one. It came out great!8 points
-
Back again, with more on the paint dilemma: Top view is, of course our subject aircraft. The bottom view (above) is a picture found on line that purports to be chrome yellow. Neither of these picture look like what they claim to be, a function of the weird color photography film at the time. At least, the two look somewhat similar. Researching in Dana Bell's masterwork Air Force Colors (Volumes 1-3), I decided that this color may have been Identification Yellow, which Dana states was like our modern Insignia Yellow (FS 33538), but a shade darker. The way I went was to first give the entire model a base coat of Alclad II grey primer, followed by a coat of True North Paints, Zinc Yellow Chromate. It just didn't look right, so I over-sprayed the entire model again, this time with a very thin coat of Model Master FS 33538 Insignia Yellow, and decided that this was about as close to the picture as more poor aged mind could manage. I added some Vallejo Grey acrylic wash here and these, more to simulate possible engine oil blow back more so than exhaust stains, and decided to quite while I wasn't too far behind. Someone with better artistic talent than I could probably do something a lot more convincing, but there you go... Below, a closer view of the Yellow Chromate wheel well vs the Insignia (or Identification) Yellow lower wing surface: Above right, some decals have been added. I do not believe that at least the left underside of the wing had a star, but I went ahead and added the common, for the time, stars above and below each wing, the time frame being late 1942. Anyway, I unmasked everything, added the kit pitot tube and landing gear, grabbed a rear view mirror (atop the Canopy) from a Tamiya 1/72 P-47D razorback kit, and scratched up the characteristic P-47B forward swept antenna from scrap card, and that was that. In the teaser picture below, I also painted the guns with steel color vs gunmetal, as in the photo, at least to me, they look took bright even for oiled gun metal. Also, the spinning prop in the photo gave no clue as to whether yellow prop tips any sort of propeller decals were present, so I left them off for now. In the very unlikely even that more data surfaces in the future, they could be added later. Alas, as I discovered when researching for my YF-105A Prototype build, all the records of Republic Aircraft were burned when Fairchild was bought out: sad story here. I believe that my little ploy of sanding down the main gear tire, and jacking up the rear gear strut worked out pretty well, as she seems to have a fairly decent "set". What do you think? Again, please remember that I am a far better "mechanic" than "artist"! I shall post up a few more pics over at RFI HERE Thanks for looking in, Ed8 points
-
After much adieu (I know it's ado), I finished off the cockpit and matted it down a little, then glued down the canopy with some GS-Hypo, taking care to get it centred on the fuselage. Wouldn't you know it? I found some more slightly rough sections when I looked at it again from an acute light source. Here she is with the props push-fitted into position: The props seem to fit pretty well, and the work I did on the backs of the spinners has paid off. The real thing has only a very slight line between them and the nose, as they were incredibly tightly spaced with minimal tolerances, true to the Bugatti way. I did have to shorten the prop shaft a little, but that might have something to do with me fixing the internal bulkheads ever-so-slightly out of position, I think? Maybe? Not sure if I mentioned it before, but I've also added the tiny fairing between the elevators, starting with a block of styrene that I sanded to match the contours of the skin, glued on, then sanded the upper surface down to match. Took a while, but my collection of tiny sanding tools came in very handy8 points
-
Ye olde Airfix Meteor III (that's what it sez on the box!) That was fun revisiting childhood builds and doing them somewhat more like they were intended Off to do some more recent versions now8 points
-
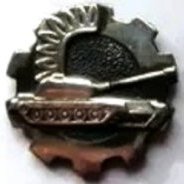
The model shows an early Panzerjäger I tank destroyer in a late version fighting in Panzerjäger Abteilung 605 in North Africa from 1942. I was loosely inspired by this visualization.7 points
-
Back to the Master for this weekend's session. I availed myself of an @AdrianMF style list. Whether it'll do any good remains to be seen. My usual method of working is to follow instructions, get sidetracked, forget something important and then move on and hope nobody notices. The Pavla kit provides for the propeller in self-assembly form. I'm not a fan of this method, and not owning the rather expensive (for the amount of use it'll get) aluminium jig that's available, I really wasn't looking forward to attempting to make it up. I decided, therefore, after hacking the vacuum-formed canopy from its carrier and not mangling it too seriously, to dive into my Bits Box to see what I could find. A surprising number of spare props turned up, mostly from scrapped models. One of those scrapped models just happened to be the Pegasus Master I built many years ago. I'd never been happy with it, and it had been built early in my short-run kit career. I have an odd feeling that kit prop was also substituted for something from an old Spitfire kit. Anyway, cutting a long story a bit shorter, I'd salvaged that prop in the Bits Box. Lo! It lives again - and I don't even need to paint it! While furtling in the spares department, some exhaust ejectors also turned up. The resin ones had been bothering me, like how was I supposed to ensure they aligned neatly for a start. I shan't worry about it now, because suitable injection moulded ones turned up. Overall, joining the fuselage parts had worked out fairly well. The seams all needed attention, of course, but it wasn't at all bad. The fin and rudder, though, were a bit thick. I decided to go for broke and get the SIHRC in action. For those not au fait with @perdu's acronym, it stands for Six Inch Half Round Coarse, and refers to a large file more suitable for heavy engineering than fine modelmaking. Be that as it may, and having taken the precaution of snapping this image so I may be able to reinstate the trim tab and sundry details, I set to with the SIHRC. Having studied various photos, it's not at all obvious I will need to reinstate the ribs under the rudder's fabric covering. I had set myself a goal of at least trying to install the wing assembly into the fuselage this weekend. It seemed achievable - when I started! One of my least favourite pastimes is thinning the trailing edges of kit model wings. I never seem to get it right. I spend ages carefully filing, sanding, scraping, accruing piles of styrene swarf, and seem to reach a point where the edges never seem to get any thinner. You can see my weapons of choice here, including my SIHRC. It's a great way to remove large amounts of material fairly swiftly, as well as ruining manicures. The undercarriage pans also needed work, since of course they interfered with fitting the upper wing halves. Why wouldn't they? At one point, I thought I was going to file away the entire flat top of the pans, since it would be replaced by the inside of the upper wing anyway, but I managed to leave the thinnest of films. Happy with the trailing edges for once, time to get gluing! It was painfully obvious, during the thinning exercises, that the wing parts were fairly warped in places. Helping clothes pegs with stronger spring clips is a tip I learned from one our fellow BMers. Forgive me if I don't recall who it might be. The spring clips usually fail to grip the shiny plastic and ping off into awkward and dusty places under the bench, while the clothes pegs do grip, thanks to rubbery jaws, but haven't enough strength to overcome the wayward plastic. Getting the trailing edge by the gull wing crank to meet up required my vice (my lack of appendages required it as a third hand), scrap wood and a G-clamp. It's about this time one begins to consider one's life choices again. Having wrestled the wing parts together into something approaching the right shape, I needed to cut the slot for the landing lights. It's supposed to be asymmetrical, with the upper edge further to the leading edge. As I intended to glue clear sprue in, I levelled the top and bottom edges. Then I found the sprue I had just wasn't big enough to fill the gap in one hit. I fiddled about a bit, wondered about laminating two pieces together, or whether that fancy UV-activated superglue would fill the gap and polish nicely. Suffice to say, I've left that problem to fester a while, but I did glue some sprue into the wingtip navigation lights. I might find it in me to tidy up the wingtip lights, if the glue has hardened nicely. After that, I think it's time to chuck it all back in the box for another week. By the way, did Dora Wings ever get round to producing the 1/72nd scale Master they promised?7 points
-
So the new AK Interactive 3G paints arrived Friday and I found some time yesterday to have a play. Very nice indeed. Sprayed neatly but need to pay around with the settings a bit more. Ended up with this. I hope I got the greens and the beige/grey the right way round 😉 Quite happy. Now for some varnish and decals. Dave7 points
-
Hello I added decals, made chipping, spot wash and made a dot filter. Now I'm going to protect it with satin varnish and get on with getting dirty.7 points
-
RNAS Model T Armoured Car & Crew. 1/35. ICM. Built OOB.7 points
-
Gloster Meteor F(TT).8 WE876, 1574 Flight RAF Tengah 1962 Kit: Airfix 1/72 AX04064 Decals: Xtradecal X72114, X72115 Build thread: https://www.britmodeller.com/forums/index.php?/topic/235116136-enzos-airfix-project/7 points


(510x640)-Copy(95x120).thumb.jpg.33073138e01aa81779639a845926753e.jpg)


This leaderboard is set to London/GMT+01:00