
Leaderboard


Popular Content
Showing content with the highest reputation on 13/11/22 in all areas
-
Hello all, Here's my just finished 1/72 Martin WH-2, in Royal Netherlands East Indies Army Air Force markings. This was an export version of the B-10, which served in the Dutch East Indies and other parts of SE Asia between 1938 and 1941. They were originally deliverd in a shiny blue and yellow scheme, but got a camouflage paint job when war seemed more and more likely. There were various variations, with "jongblad" (young leaf) and "oudblad" (old leaf), and like so many paints from back in the day, nobody is 100% sure what these looked like. It seems the general consensus these days they were pretty close to the 2 greens used the USAF South East Asia scheme, so I used Humbrol 116 and 117 for it. At least it looks nice. The underside of the wings was painted with a blueish grey color, similar to RAF Sky. The kit is not bad, with some parts having a pretty good fit, and other parts not so good. I don't think the propellers are accurate for this version, but they will have to do. The decals are from the kit, and they work fine. I used a Montex mask set for the clear parts. Thanks for looking, Pete23 points
-
Hi All This kit was finished back at the end of the summer. This is the first time I have managed to take a few snaps, not an easy task as its so big. Hope you like it.22 points
-
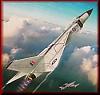
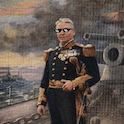
Hello Gents !! SMW.... and I'm not up there However, I'll show you my solidarity... In having a RFI today !! What about going in Germany... 1952... The 36 FBW was commended by a well known pilot.... And, his F-84E 10RE was painted accordingly.... As a kid, I read his book and in some way, I pay a tiny tribute to the Col Robert L. Scott jr.... Wooops, I said shiny and colorful.... Here we are... This time, I used AK extreme metal instead of the usual Alclad.... Not too bad but I still have to learn about.... There has been some conversion to do to turn the Tamiya F-84G into a model E.... I let it very clean since the plane was oftenly presented in airshows and competitions.... That's also the reason for the JATO bottles.... Jato take off was and still is a show stopper.... Note the airbrake padlle is a scratched one.... I don't feel eager to fill the original tamiya one.... The sunny day helped for the pics..... Not too bad.... Okay gents, comments are welcomed.... Bantering is mandatory !! Cheers to all my friend in Telford !! Be sure enough that I'll have a white Chimay with you all in my mind !! Special thank to @Brandy for the SMW pics !! It warms my heart !! Sincerely. CC, back in 2 minutes....21 points
-
Bombed up and ready for tonight's sortie. Built as per boxing with a couple of bits of interior photo etch and some Quickboost resin wheels.19 points
-
Afternoon all. Have finished this just in time for the close of the F-15 Group Build. It's the Hasegawa F-15DJ desert aggressor boxing with the addition of Aires Exhausts, a Finemold AAM5 acquisition round and an Eduard ALQ131. Great kit to build (and over 30 years old as a tooling-shows how far ahead of the game Hasegawa were!) and despite the tricky and finicky paint scheme (a lot of masking) a great set of markings. Ralph.19 points
-
As he got older, Pinocchio found that women wanted him to lie to them...15 points
-
Revell re-boxing of Monogram 1977 1/48 P-51D: Build thread:14 points
-
Hiya Here are some snaps of my latest wood fiddling, a 1/48 Supermarine S.6b. This one took a bit of doing, the fuselage took three goes and the wings four. Which is odd, as its not that complicated a shape. Anyway, I reckon about about 40 hours of work to produce this: Thanks for watching13 points
-
Revell B-17f, "Oh, what a surprise! It's the Memphis Belle" Revell B-17f with Master gun barrel set built as the "Memphis Belle" Build log is here The intention was to show her as she was at the end of the 25th mission, before any cosmetic upgrades for the US tour I wanted that really weathered and faded paint effect - and moderately pleased with the result… Many, many thanks to Steve and Corsair, and everyone who's commented or reacted!13 points
-
So, test mule! On the left side (the starboard wing, puzzle that one out in your minds), we have red, yellow, and blue "Oilbrushers", a product I've never gotten the hang of, blended together. On the right side/port wing, we have yellow, ochre, and a sort of pale blue-grey oils blended with a brush and light use of thinners. Verdicts from the judges? Anyway, the landing gear is on and weathered. "Why didn't you clean up the seam, Edward?" Well, life is difficult, and I feel I achieved quite a bit today merely by dint of getting the groceries, thank you very much. And actually, not to toot my own horn -- you'll go blind -- I was quite pleased with how the tires turned out. I also added the white patch the decal guide shows but in no way explains. I expect now that this is done, someone will turn up with a contradicting piece of photo evidence, but we come to this arena uncalled etc. At this point, the aircraft is pretty much done. I don't know if WDAF Kittyhawks carried bombs or drop tanks or nothing in Summer 1942, or which of the several drop tanks they'd use if they did. Any assistance is appreciated. That aside, all I have to do is the pitot, and for that... I have some pretty graphic, not to say explicit, suggestions as to what our pals at Special Hobby can do with an instruction like this.13 points
-
Revell's 1974 Ju-88C-6 , converted to an earlier FuG 202 (Lichtenstein BC) set. AML BC-1 antenna set (tiny!) and decals for one of Heinrich Prinz zu Sayn-Wittgenstein-Sayn's earlier aircraft.12 points
-
My second kit in this group build, Revell's UDT Boat with Frogmen. Originally from 1967, this is the 2012 reboxing, purchased by my wife in Home and Bargain in 2019 for £1.99! Love the box art! A fun build, and mostly went together nicely, considering it's age. Not entirely happy with the "rope", the arrangement I went for is a lot less complicated than the one in the instructions (which I just couldn't get my head round)! Finished in Tamiya Dark Sea Grey and Hull Red. Link to WIP:12 points
-
OK the chart, now too many comments as I'm a bit sunburnt from today.....need to have some lotion or butter rubbed on me! Basically 3 new member votes, but per yesterdays chart, changes are base on yesterday mornings chart. So by looking at last night's and this morning you'll see there have been lots of busy wee beavers gnawing away at GB's! Ok we can skip the bottom...sorry to say just further bloodshed, as usual, so nothing to report there... At the top, some fisty-cuffs between the leading two.......if you lot don't start behave it'll be off to the naughty corner for you both!! We are on the cusp of having 9 GB's ready for next year (I'd definitely call the top 7 as going through now) ...so it's really coming down to 5 GB's fighting for the last 2 slots! AS much as I'd like to say only 4 fighting for the last position, "Above the Karman Line" could still faultier! We are racing down to the last few hours of the bumfight....the carnage and tension will only grow....... ...and for those stressing out over their fav GB, this is for you!12 points
-
Here is my JB models Bedford 4 tonner in RAF Mountain rescue guise. This was my first kit in a good few years and I’m fairly pleased with the result. I wanted to make something with some relevance to me so I went for our old truck from my days at St Athan as per the first pic. On now to my group build Dingo!11 points
-
Airfix's Defiant - a really nice kit that goes together well. Lots of nice dockpit detail that is actually visible at the correct angle! So much better than the airfix kits I built as a kid. I tried to get some variation in the overall flat black - you can hopefully see it in some of the photos.11 points
-
What a weekend!!!! But there was modelling before Yelford so let’s go back a bit eh. Cue rewind noises. ‘Swiswisilliswizzzzwizzxwizzle. Scree. Kerplunk.’ The sponge masking come out to reveal ma wheel wells. by the way I can’t remember if I said that I’d fixed the roundels by removing and putting new ones on but I did. And now we’re havin have no yellow band. 🤗 The legs got assembled and glued using the well points as a jig. Lovely. ☺️ So here we are at this point again. we all know this point right kids. The last big bit that needed sticking wiv glue was the nose. I have never come across such a thing as this. To be fair it all fitted rather well. And then the pointy bit and a quick dry fit with some standard aeroplane whoosh noises. 😆 So for the final paint, silver bits first. legs. Wheels. I particularly like the little yellow end bits. The cannons have a tricky bit that needs painting yellow brown and green. The exhausts. This was where I called it a day because the time was coming. The time for my first ever Telford. 😃 There it is look. Just at the end of that yellow brick road. 🌈 why on earth have I never been here before? Lots of models to look and and even more stuff to buy!! Almost too much stuff, is there such a thing as “kit blind”? as well as stuff I meet up with a few of the Britmodellers. Thanks to Ian @Brandy for the pics. ❤️ we have @81-er @perdu @Fritag @Ex-FAAWAFU @CedB @Brandy @AdrianMF @Terry1954 @Heather Kay @Martian and Mrs Martian. Aaaand. Yours truly @woody37 @tomprobert @Fritag(again)😆 and @general melchett Blimey there was a lot of us! 🤗 some great models were looked at. And And I even managed a few bargains. it wasn’t £30. And this little beauty picked up on the recommendation of @AdrianMF for the princely sun of 50p wonderful time was had by all and everyone is as nice in person as they are on our wonderful site. 🤗 Today a bit more got completed. we have this painted. Tail wheel got masked and painted. I also have made a rear view mirror. More soon so I can start that spad maybe? 🤔 Take care you lot and as always happy modelling. Johnny11 points
-
It's been a busy weekend with the NEC Classic Car Show and IPMS Telford. I picked this up at the NEC. I'd have preferred a standard SEL but these kits are so rare I'll take what I can get. When I've seen them on eBay they're at least twice what the seller was asking. To give you an idea of what's in the box. My modest IPMS haul. They're not kidding about it being moulded in colour. I think Codger would have approved of this kit being a correct, narrow-body 289 with the correct suspension. I've wanted the British Pick Up kit for a while and decided it was time to get it. I'm looking forward to seeing what else people have picked up.11 points
-
Also, my second for this GB, cutting it fine Revell Northsea Fishing Trawler in 1:142 Build thread here11 points
-
...and with the final hours slowly ticking away.....here we stand.......what will the morning bring????10 points
-
Here's my White Scout car, Free French, 1944. It's seen some action and is heavily loaded courtesy of Black Dog Resin. I highly recommend this kit. Excellent detail, went together with no issues. One thing to keep in mind, the instructions are unclear as to where to attach the rear leaf springs. If they are attached where it seems correct, the rear end is jacked up like a hot rod. I had to perform corrective surgery at the last minute to make it sit properly. Other than that, no complaints. WiP is here... Thanks to the Mods! What's next? --John10 points
-
No, the P-63 banked pointing his belly at the B-17, he completely lost situational awareness doing this. He could no longer see the B-17. The P-63 already has terrible blind spots. An aircraft overtaking a slower aircraft is responsible to keep view of that aircraft. This was totally preventable, from the planning, controlling, and the flying. And yes, I trained and I am qualified in Human Factors facilitation in military aviation. There are far too many warbird owners who should not be in the cockpit. The aviation safety net is supposed to prevent these types of accidents.10 points
-
On December 29, 2021, I contacted a friend and fellow model builder Jack Geratic in Ontario, Canada regarding my desire to build a Consolidated PBY-5 Catalina. From experience on previous projects, I knew that Jack was very good at research and knew his way around scale modeling better than I did. At the time we found there were only a few Monogram #5609 and Revell #04520 kits in 1/48 scale on eBay. The kits were introduced in 1995 and had been out of production for some time. Then Revell reintroduced the PBY kit in 2014 but as a PBY-5A which is the amphibious version (with landing gear), otherwise the aircraft was the same as a PBY-5. My thinking at the time was if we use an amphibious version which was readily available it would require major body work to cover the retractable landing gear on the side of the hull. What we found out later in reviews is that both Monogram and Revell kits had a design issue called 'tail bloat', the tail section was not to scale. It was 9.5mm (3/8-inch) too wide at the root of the vertical stabilizer which negatively affected its overall appearance. Jack located a detailed cross-section drawing of the actual aircraft and we found that Monogram had a flatter cross-section which we believe is what caused the tail bloat issue. However, there was a good solution, Belcher Bits in Canada offered a resin tail conversion kit that required removing the entire tail of the model. When you see the finished tail conversion below, I think you will agree it looks right. In my opinion the Belcher Bits solution was a lot of work, but Mike Belcher captured in resin the graceful elegance of the Catalina tail. And by the way the name Catalina was given to the Consolidated PBY by RAF, RCAF and RAAF crews because the early versions were manufactured in California. The name was adopted by Consolidated and used for the remaining production years. Harold Reference Photographs: Modification Phase: Completed Model:9 points
-
Here is my build of the Kitty Hawk 1:48 Jas-39A/C Gripen. The kit wasn’t as bad as some of the reviews I’ve read however I decided to “stray” from what Kitty Hawk had designed how the finished model should be built, i.e. canopy open, air breaks open and refuelling probe deployed. The “fit” of these items “closed” wasn’t very good however they had not be designed that way so only a minor grumble from me. I’d seen a special scheme… …that had been used for the “E” variant demo aircraft?, and as I really liked that scheme I thought I give it a go. Paints used: Akan AK Real Colours Mr Hobby MRP Tamiya Vallejo You can view my build log here… until next time as always, any suggestions, criticisms or comments will be gratefully received. rgds John(shortCummins)9 points
-
After my (fairly successful) first foray into nautical modelling with my HMS Dreadnought last year, I have finally got round to starting a new kit (hopefully learning from my previous experiences). The WWI British battleship is a sadly under-represented category of mainstream kits, I have decided to go with Trumpeter's HMS Queen Elizabeth alongside Artist Hobby's PE upgrade set. My intention is to get the new Flyhawk Iron Duke afterwards and combine them both into a diorama perhaps. First port of all was the turrets (including the nicely turned brass barrels from the AH set) I elected against using the replacement photoetch turret top since the moulded details were sufficient for my tastes. I also folded up the brass aft superstructure Next was the mast construction - the PE replacement foretop was very fiddly, including separate pieces for the windows and stays. The supplied topmast was very brittle and not fine enough for my liking so I made my own out of thin polystyrene plastic sanded to create the tapers initial rigging done, I shall do the halyards for the signal flags at a later date. Dry fit as she stands currently.9 points
-
Source: https://www.facebook.com/SpencerPollardModels/posts/pfbid0218anEHqJfeDo6NjhJFvjU2Gu7CXEM9wKomUCrWz26WrqW44k7wKtN4FPx2wXUJffl V.P.9 points
-
ok you unwashed lot!!! No silly tails or stories......or the chart for a moment.....I've just come back from the "Wings over the Illawarra" airshow, about an hour south os Sydney. It's not a huge airshow like you lot get, but still very impressive, lots of static displays...but the flying one!!!! In no particular order, 2 Spitfire Mk.XIII's, P-51D, P-40E, Fw-190A (Replica absolutely perfect), F4U Corsair, TBF Avenger, Boomerang, Hudson, L-39 Albatross, Grumman Tracker, Super Constellation, P-3C Orion, F35A (god that thing was noisy....and have to admit I liked the display, so now guess I have to build one!), Harvard, Wirraway (Aussie Harvard), Winjeel Trainer, CT-4 Trainier, O-2 Skymaster, T-28 Trojan, plus more I've probably forgotten. First time I've been to this one, was really good. Got heaps of photos, though need to invest in a bit 300mm lens! Ok, now I've bored you the chart is about to follow!9 points
-
Finished! Mark Fit Strong made quick work of Tamiya's decals. Well, a little too quick work of the front colors and serial number as some repairs were needed. As on the Firefly, I used Mr.Color RLM 71 for the base color and Mr.Color OD Shadow and Highligthts for color modulation followed by Vallejo Olive Green wash. Mr.Color Tire Black was used on the tires and Alclad Exhaust Maniforld on the exhaust. AK Gun Metal is on the MG. WEM Colourcoats Bronze Green for the should-not-be-there fire extinguishers. A blend of The Army Painter Warpaints Shining Silver and AK Black was used for the pioneer tools. A blend of Army Painter Warpaint Corpse Pale and Oak Brown was used for the wooden handles. Molotow Liquid Chrome was used for the side mirrors and light. Finally, MSI Micro Flat was applied to even it all out.9 points
-
For the ones interested in my lunacies, here is the WiP Now..... What about some family pics.... USAFE, yet to be named USAFE.... These 2 might have been side by side in real life... Who knows ?? there are some years in between but.... Now I said shiny and colourful.... Let's go for it... I hope that you'll enjoy !! Have fun in Telford Friends !! I'm with you in mind !! Sincerely. CC9 points
-
This is my next project in this GB. According to Wikipedia: The box looks promising. Within are a rather thick sheet of PE (0.15 in), cast metal parts, and some brass rod; decals are not included. It looks like body is well detailed, but this is a curbside model. I'm not yet sure I'm going to do an interior or chassis. The body is primarily composed of part 1, which is quite a bit of origami.8 points
-
AML's 1/72 Fiat G50. Built straight from the box using the kit decals. Only tricky bit was working out what some of the PE parts were for and where they went - mostly inside the cockpit where you can't see them, although there are a few left over that I have no idea what they are, theye are not in the intsrcutions at all.... and of course the Italian camouflage....a combination of airbrush and brush painting leading to more of an interpretation of the style rather than the actual pattern...8 points
-
Hi & another progress8 points
-
8 points
-
Revell 1:28 Fokker DrI scratch built internals and a paper propellor finished in the colours of Bruno Loerzer. A kit I’ve built many times in the past but I think I’ve finally done justice to it8 points
-
Hello! I'm back with another FAA build... This one was difficult, the kit itself is fantastic but there are very few (good) references out there for early FAA corsairs. I digress, I'm very happy with how this turned out: Here she is with my FAA Martlet, they look good together!7 points
-
Here's my next one. The Reds used these vehicles well in to the 1950s, so I am not calling a year. This will be a fun kit I hope. Certainly not your usual half-track... According to the plans, I will only be using about 2/3 of the sprue. Many crossover vehicle kits I think. --John7 points
-
hello guys. here is my last ( painful ) work job. So many pieces to re built and replace. This kit is a mess...never buy it. It was a poisonous gift from my "best " friend... anyway i did it !. My reference pic : My model :7 points
-
Used a few extras on this so it's being displayed naked. Norick didn't shine in the four-stroke era, and you have to believe that him being Rossi's teammate in 04 was at Vale's insistence - his Rossifumi moniker was a homage to Norifumi. A poor season in WSBK really wasn't the way that this all-action 500 hooligan deserved to leave the international scene. His debut at 18 years of age in 94 (on a 500) is the stuff of legend. I'll be building one of his 500s in the future. A more fitting stead for this amazing rider. Tragically, Abe was killed in a senseless road accident caused by a truck performing a U-turn (echoes of the incident that befell Mike 'the bike'). (some pics are edited and others not, please let me know if this causes any display issues)7 points
-
It's time for a weekend update once again. It may not look like I've done much, but some of it was tricky. (cold fingers!) The interior is altogether now. I had to put a bend in the steering wheel column or it touched the seat. Tut! As this is a restomod car I thought the centre console needed a cup holder. (Bluetooth in the glovebox too. Honest). Detail painting done on the chassis. Hopefully the exhausts look like they are separate items. Meng nut/bolts on the bottom of the shockers. Sad to announce that the nerf bars had to go. After all that mucking about I decided they weren't right. Besides, I found I had this bumper, which fitted with a 'little' work and new mountings. It took some filing which removed the chrome. Luckily I have a Molotow chrome pen inbound from the bay. With the bumper in position I've had to drill holes in the rear valance for the exhausts to poke through. Hmmm, this was supposed to show the bumper in position. I seem to have almost missed the model. Doh! Though it does show that the bumper does curve around the corner so it's not all bad. I need to get the shell painted next. Airbrush or rattlecan? We'll see. In the meantime, thanks for looking. Have a good week. Pete7 points
-
Very nearly there now... sitting with her wheels up while the undercarriage glue cures, so I can set the flats of the wheels right. Just the various lights and the antenna wire to do. I noticed as I glued the rudder on that the little right-angled antenna on the top of the rudder had snapped off, so I had to scratch build one, which was a bit fiddly. Should look alright with a dab of paint. I've noticed a very slight fogging to the matt varnish finish in places, not so much it spoils the build but it's there. I wondered if it is a reaction between residual enamel wash and the acrylic varnish> Maybe a final coat of Klear before I reach for the rattlecan?7 points
-
Ok off to bed soon. Flicked some Mr Surfacer on before I go just to see how it looks, pretty happy with it. Night all.....7 points
-
F-15E 00-3001 'Jenny' 494th Fighter Squadron, Operation Inherent Resolve deployment 2018 Great Wall Hobby 1/72E F-15E Two Bobs decals, mostly AK Real lacquers, Hasegawa and Eduard Brassin weapon sets for the GBU-31 and -38s. Build thread here: Thanks for looking, the comments and the camaraderie! Gerard7 points
-
Time to start on the chassis. The problem with the Benz's chassis is that it's a real tractor chassis. It slopes at the rear, and it also tapers. There are supports for the fifth wheel which are not needed for the tanker. What is needed, is a straight chassis so the tanker unit, which has a chassis of its own, will be able to bolt onto the truck's chassis. I've been thinking about how I could make some cosmetic changes to the kit's chassis to make it look right, but... there's just no way and I would be running into trouble at some point. So, this is the plan... In fact, all of the above pics some from the "chassis truck" build, where I had to do the exact same thing. So, it's a repeat of that particular build, only with a shorter wheelbase. Luckily, I still have the jig, just have to move the rear axle support up a bit. The tractor's original wheelbase is about 3,15 meters. The shortest wheelbase I could find for a tanker such as this was 3,60 meters, so work on the chassis would have been needed no matter what. Best to just make one from scratch and circumvent a host of potential issues.7 points
-
The day I get back from a superb week's hols in Iceland, @AdrianMF gives us his Roll on Deodorant joke. I'm reminded of this oldie... An Englishman goes into an Icelandic pharmacy and asks for some deodorant (fortunately almost everyone speaks English in Iceland ). "Aerosol?" asks the assistant. "No, underarm please" says the Englishman.7 points
-
Humber Armoured Car Mk.IV Polish 1st Armoured Division Tamiya's 1/48 British 7ton Armored Car Mk.IV. Paint includes Mr.Color, Alclad, The Army Painter Warpaint, AK, and Vallejo. The build log7 points
-
1953 Revell Vought Cutlass, roughly 1/59 scale. Build thread here:6 points
-
Some good progress made with this one. Most of the chassis has been assembled and painted, a number of the smaller sub-assemblies have also been put together. They still have to be cleaned up and then I can start to paint those details before I fix them to the chassis. by John L, on Flickr And here are a couple shots with some of the sub-assemblies loosely placed in position. by John L, on Flickr by John L, on Flickr Back with more soon. John6 points
-
Possibly a live grenade.6 points
-
Hi All, Some strong progress on the Beaufort today! I'd actually got some of the interior assembled yesterday, so today was completion of that process, adding a harness from Tamiya tape, and giving the whole lot an oil wash: The fuselage assembly was a thing of beauty - the fit and engineering are faultless. Here's what's on view: Here's how the torpedo bay looks: Here's the wheels following an oil wash: Next the wings were assembled and mounted on the fuselage. Again the fit is amazing, but there is a rather noticeable sink mark at the starboard wing root: Soon fill that - no dramas! The glazing went together without incident: Next I turned my attention to the nacelles, which were given the standard treatment of a base coat of steel and then some heat staining: I then masked up everything but the front of the exhaust collectors in order to apply a coat of steel to represent a lack of heat staining: And here's the final effect: Not too bad? By now the glazing had set in position, and was duly masked: The empennage was duly added, along with the ailerons and flaps. I found out during some research that the circular plates were added to the flaps to improve roll stability, as early Beauforts were very unstable in this axis - not ideal for a torpedo bomber. And on that educational note I shall finish - taking shape very nicely! Thanks for looking, Roger6 points
-
Has it been a long week Adrian ?6 points


(510x640)-Copy(95x120).thumb.jpg.33073138e01aa81779639a845926753e.jpg)


This leaderboard is set to London/GMT+01:00