
Leaderboard


Popular Content
Showing content with the highest reputation on 30/10/22 in all areas
-
Howdy all, Finished this one and managed to get some photo`s between the showers yesterday My latest attempt at the Accurate Minature`s 1/48 Mitchell kit, this time from the Academy re-box Done as an Air Apaches Strafer based in New Guinea, 1944 Mostly out of the box but with a few tweaks The big one was to graft a Monogram forward glazing to improve the nose profile, which always looked a bit off to me in the A/M kit Replaced the nose guns with metal tube and added flash suppressors to the package guns Added guns and wind deflectors to the rear side windows, replaced the kits double machine gun with a single in the rear position and usual brake pipes, seat belts and headrest armour for pilot and co-pilot The decals were the kits and went on a lot better that usual Academy ones. ( I had an aftermarket set lined up just in case ) Hope you enjoy, thanks for looking Cheers Russ29 points
-
Hello all, Here is one that I finished last week that I finally got around to getting some photos of before it gets too dusty. It is the Airfix kit in the colours of a 31 Squadron R.A.A.F Mk X machine based at Coomalie Creek in the Northern Territory. This aircraft was lost on 24/09/44 after running out of fuel after it was unable to locate the airfield due to bushfire haze. The Navigator was found the following day but unfortunately the pilot was killed. According to the DK Decal sheet this aircraft is painted in TSS camouflage, however other sources state that the last batch of Mk Xs and XIs were painted all over EDSG on Sky so that's what I went with. I also painted the roundels and fin flashes which worked out better than I hoped, except when I painted the lower LH wing roundel too far inboard resulting in some stripping and re-painting. I thought about cutting masks for the SQN codes, but I'm not that handy with a scalpel and Tamiya tape. I've put a stencil cutter on the Christmas list. All photos were taken using my phone, so apologies for any blurriness. One of the pilots in 30 SQN played Australian Rules Football for the Richmond Football Club in the Victorian Football League (now Australian Football League). Richmond is also known as the Tigers and the pilot painted a Tigers head on the nose of his aircraft. The Tigers head and motto 'Eat 'em Alive' also found its way onto 31 SQN aircraft due to a keen Richmond supporter in the unit, with multiple aircraft displaying the Tigers heads. And here it is with another one I completed about 18 months ago. Thanks for looking.28 points
-
Hello to all of you.Here is my latest finished model kit.The awesome Tamiya F-84G.I had such fun building this one.The fit is perfect.No issues at all.The details are great for a kit this size and of this price.I only added the seatbelts and that is it.The painting was done with Tamiya acrylics and MM enamels.The decals came from Balkan Models.24 points
-
Hello everyone, I’d like to share my finished F-35B from Italeri/Tamiya in 1/72 scale. I built this for a friend as he said he didn’t have the time or skill and asked if I could do it for his young son… he gave me some after market decals so the plane could represent an aircraft from the 809 NAS. In hindsight and with a bit more research I could have made this plane slightly more accurate I.e. removed some radar tape etc… basically what I’m saying is, I cuffed it! I made a WIP post here. If you’d like to see more images then you can also find them here. And here she is on my bench while I have a coffee admiring her! Thanks for looking. I also made a build video for those that would like to see. Thanks for looking. Tom20 points
-
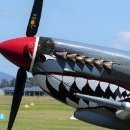
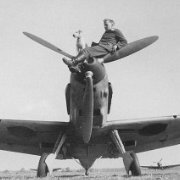
hi,every one!!😃 this is my Hasegawa 1/48 P-40N .. this kit is aged,but quite easy to build. I use P.E set for landing flap and add some rivets to this warbird. the oliver darb color is much harder than I expact.. not perfect..but I think the result is ok... hope you like it and here is the video build if you are interested🙂18 points
-
About 12 years ago, when my rebirth into this hobby was gathering momentum, I sorted through my previously squirrelled away oldish kits, Airfix, Matchbox, Frog, Heller & moved many of them on to support my rediscovered addiction hobby. Since then I've repurchased a surprising number of them, but one I didn't, until I saw this build by @AdrianMF & then later, this build by @Alan P & I knew I needed another one, which after patient viewing of ebay & trademe search results, I bought one earlier this year, just in time to build it for a Airfix Tribute Forum 16th Anniversary Group Build, of which my late to start & late to finish build thread is here. To say it was a more involved build than I'd expected would be an understatement, obviously not up with the masters yet, but that said, it was as much to do with life & the time of year slowing paint drying that any innate inability I reckon, my story anyhow. The end result was not too bad & made me happy. So, my version, painted in Hu 116 as representing RAF dark green as apparently that is what was used to re-camouflage these machines from their delivery natural metal finishes, the underside was done in Tamiya XF-16. Pretty much totally OOB, I think I replaced the tail wheel doors with thinner ones from card & the propeller shaft with a piece of sprue through a plastic block I cemented behind the nose, it will remove if I need to, the kit piece was ridiculousness wimpey. Why post this now, 'cause I've just got around to it. Steve.16 points
-
More images . . .16 points
-
I was originally going to build the Miniart Austin for the groupbuild but Ed beat me to it and although I was going to build a different version I felt most of it would be repeating what he was doing, and he is an excellent model maker so I doubt I would be able to add anything of note. So I have decided to go with the Meng Rolls Royce. I couldn't decide on which version I wanted to build out of these two options. So I thought why not do them both. I know that the kit doesn't exactly provide the correct parts for the 1914 version but I have ordered the early turret from Friendship Models and hopefully I can make any other corrections. Wayne14 points
-
Here's my representation of the Buchon HA-1112M-1L "Yellow 10", as currently operated by Aerial Collective out of IWM Duxford, portayed as she was (mostly) when used in the filming of the Battle of Britain film. 1/72 scale AZ Model kit, not a bad little kit for the money, typical of their quality. I used the new AK Interactive 3rd Generation Early Luftwaffe paint set, which went on nicely. The RLM71 wasn't quite the shade I needed, being more olive drab than the more green shade the real aircraft seems to be in, so I added just a drop or two of RAF Dark Green. The kit only comes with a four bladed prop, as most of the Buchons use. Yellow 10 however has a three blade prop, so I used a Quick Boost Rotol Spitfire mk.5 resin item. Decals are out of the box, along with the numbers kindly provided to me by @SafetyDad I used just a little weathering with pencils and powder, as she is kept pretty clean by AC.14 points
-
I present to you this 112 RAF squadron P-51C Mustang made from the box dedicated to the Mustang MK III (ref 70039). This is my first assembly of a model of this brand and I must tell you that I was particularly impressed by the general quality of this model. The surface and cockpit details in particular are beautiful and the assemblies very precise. As a result, the putty will remain most of the time in its box. Only the lower part of the fuselage with its characteristic air intake will require a little adjustment but nothing very complicated. It’s for me clearly one of the best kit WW2 aircraft kit in 72 scale and I warmly recommend it to you, especially because it allows a wide choice of versions and paint schemes each more attractive than the other. Besides, I intend to mount another one.13 points
-
Hello everyone… This is a very overdue build from the Japanese group build. It actually started out in the F-16 STGB from 2020 or 2021. Please feel free to ask questions, comment, or visit the build thread. Dennis13 points
-
Greetings! Just completed, this is the resin and photo etch Space Station V kit from Fantastic Plastic. The WIP can be seen here: One of the many impressive designs featured in the film 2001: A Space Odyssey by Stanley Kubrick, I believe this is the only kit in any scale of Space Station V currently available. It is easily one of the most challenging kits I have ever encountered. In general the kit is a well designed mixture of resin and photo etch, but perhaps overly complex in a few areas and lacking detail in some places. Unfortunately my kit suffered from some poorly formed resin parts which required scratch building of replacement parts. I added LED lighting to the docking bays in the hub sections which required carefully drilling holes to accommodate wiring and a brass tube. The station rim parts are solid resin and I could not think of a way to hollow them out for lighting. No stand is included in the kit, so I made a display base that will support the finished model on the brass tube with a 9 volt battery contained inside the base with a switch. The Orion is mounted on a length of music wire attached to the base. No decals included with the kit so I managed to find some very small spare Pan Am markings for the space clipper and a variety of other spare decals to detail the inside of both docking bays. Various small styrene bits and several small photo etch items from the spares bin were used to enhance the kit details The completed model measures about 8.5 inches in diameter and the scale is described as being either 1/1400, 1/2100 or 1/2800 depending upon the interpretation of the filming model and accordingly three scaled Orion space clippers are included. I decided upon the 1/1400 scale as that was the only Orion that was usable in my kit - the other two were very poorly formed and beyond repair. Many thanks for having a look. Questions and comments are always welcome. Bill11 points
-
Hi Guys. Not been around much, as RL has kept me busy. Anyway, when this build was proposed, the meat chopper was set for release, so was purchased, and has sat in my stash since then. As one of, in my mine, the most iconic WW2 vehicles, It just had to be built. Box contents, much plastic, and some interesting single piece Rubber band tracks (no joint). Looks to be very thinly moulded plastic. The Start. Step 1 is a transfer box type thing. 26 parts, and 2 bits of Photo etch gives you: Its sitting on a jar of Dissolved putty to give a Idea of size. Linkage detail is lovely, although will be totally hidden. Step 2 is the Chassis which is together but no pics until it fully sets up. Step 3 is Engine which I'll be working on today. Paul11 points
-
Shockingly I think this is my first completed Spitfire family kit in the 45 odd years since I started building kits!! This is from the Sword family of Seafire kits, and I think the XVII is the best looking mark of the Seafires, particularly in this colour scheme. Seafire Seafire One tip I picked up from this site is to insert the cockpit after the fuselage halves are joined - it can be inserted from below. Much easier to get it to fit that way. Make sure to do this before attaching the wings 😃. Seafire Otherwise this was a relatively straghtforward build - paints used were Gunze Aqueous Sky and Xtracrylix XDSG with decals coming from the Freighdog Brits At Sea II sheet. Pat Seafire Seafire11 points
-
The bodyshell moulding has always been a little wide over the sills, but due to the very thin roof and not least roof pillars I never dared using any heat to correct it. Instead I put a thin bead of epoxy on each sides recess where the sills meet the bodyshell for the final fitting and clamped the whole thing together while the epoxy cured. This looks way more dramatic than it was; I planned and carefully rehearsed this stage before the final move with glue applied and it didn't take that much force. With that step behind me and the two sections permanently joined I did the last fine tuning of the weighted tyre flats. The last details could then be added. Air intake trim, wipers and the short antenna stub. The aft exhaust sections where added underneath, then the rear bumper and license plate. The styling is quite special, but Robert Opron knew what he was doing! SM The rear view mirror. I decided early on that I would probably only fit the driver side mirror, so I filled the other side's locating point before painting, but still finished both mirrors in case I changed my mind. But I still think I will leave it like this. And at last the front end could be fitted. This is the current state of the underside. The paint is drying on the centre muffler as it had to be repainted after the two end section joints had been blended in. I might do some exhaust rust and light weathering, but I might also just leave it as it is and call it done. When real cars are turned upside down like this they don't have flattened tyres anyway 😎11 points
-
Hi. Well, I have received some "sweets" that I ordered for this kit and I have been able to move forward with the cockpit and the propeller. For the cockpit I have used a set of photo-etched parts and 3D decals. Well, the photoetched parts have behaved as expected, but the 3D decals have been a total disappointment, they have been the worst I have used to date. I find it incredible that being Eduard the manufacturer of the decals and made for one of his kits, the adjustment is so bad. I had to carefully cut each of the decals with the knife because they all had dimensions too large for the place where they should be placed. Well, some photos... Except for the base color used and shown in the previous entry, I have used Vallejo MC colors to paint belts, seat, floor and backrest (in the latter I think I have gone too far trying to show some dirt). I have also been able to make the propeller, for which I have refined the blades although they were already reproduced with little thickness. I have painted the propeller with AK extreme metal Aluminum and AK Realcolor yellow for the ends. For the hub I used a mix of orange and red. Varnished with Aqua gloss by Alclad. The engine is painted but it is somewhat useless as it will be completely hidden by a kind of grille that it will have on the front. Andrés.10 points
-
Hello everyone … Im presenting my 2nd build from the Prototypes, Racers, Research, Record breakers, Special schemes megaGB. It is the 1/72 Italeri F-6F-3 kit built as an F6F-3K drone from N.A.S. Atlantic city in 1946. Please feel free to comment or visit the build thread. Dennis9 points
-
This is the Special Hobby Bell X-1E. The X-1E was a rebuild of the second X-1 to test extremely thin airfoils, and an advance turbo pump for the rocket engine. It also had a completely redesigned cockpit and canopy. The Special hobby kit had 2 plastic sprues, resin cockpit seat, and main wheel wells, and photo etch seat belts and rudder pedals. There were no alignment pins and the wings and horizontal stabilizers where just butt jointed to the fuselage. The fit was generally very good with the exception of the main landing gear. For that the gear attaches to a bar that is supposed to span the width of the well and fit into 2 indentations. Unfortunately the bar did not come close to matching the width of the wheel wells and so was left hanging in mid air. The smart thing to have done would have been to replace it with styrene rod of the proper length, but I ended up gluing it to the bottom of the wheel well. The other problematic area was the horizontal stabilizer which was very thin and just butt jointed to the rudder. These kept breaking off and were too thing to put a pin in. The decals were very thin and for the most part worked very well, but they did want to roll into a ball if I wasn't very careful. There included a full set of stencils, but they were the ones that wanted to turn into ball and looking at pictures it did not look like the actual aircraft had that many. My impression is that it was repainted often and so many stencils got painted over. Total build time was 14 days. Next up the a North American T-2A buckeye using the Matchbox kit with the Esoteric Body Job fuselage. Enjoy9 points
-
more like are we over it yet! The Chart is at the ready.......liquid fuel is ready for the computer (booze! )...... unfortunately I'll be away with work for the first few days of the poll as such there will be large amounts of "computer fuel" consumedI So accuracy and timeliness of chart updates may be temporarily affected....don't worry this will be a small disruption of not so normal service! But worry not fellow Bunfight watches....abnormal service will resume as soon as I return home and once further large quantities of more "computer fuel" is fed into the machine/me!! ----------------------- A boss tells a blonde applicant, "I'll give you $8 an hour, starting today, and in three months I'll raise it to $10 an hour. So, when would you like to start?" Blonde: "In three months." What did the doughnut maker say to their boss? "I quit because I’m tired of the hole business." My boss says I have a preoccupation with vengeance. We’ll see about that. I called work this morning and whispered, "Sorry boss, I can't come in today. I have a wee cough." He exclaimed, "You have a wee cough!?" I said, "Really?! Thanks boss, see you next week!"9 points
-
The rest of the chassis components and engine were assembled and glued into place, ready for the main build on the bodywork. Confession time. I did make a start on this a couple of days ago, so that I could get the chassis out of the way and move onto the bodywork, but it was all within the 25% rule. The bodywork and the turret are the main build. All the drive shafts, exhaust and springs in place. Wheels just dry fitted as I'm trying to decide whether or not to turn the front wheels at an angle. Now onto the bodywork. John.9 points
-
Good evening everyone … I present my 2nd and final build for the group build. It is the 1/72 Italeri F6F-3 built to represent an F6F-3K Drone based at N.A.S. Atlantic city 1946. Please feel free to ask questions or post comments in my build thread. Dennis9 points
-
Been in a modelling slump as of late, but had the sudden idea of a build while thinking about the thread title and Race 80. Silver Girty! I have the Hasegawa/Revell Mk IX incoming by about mid-week, Despite the cover art, looking at reviews shows the pointed rudder and the round exhausts as alternate parts. That, along with Eduard masks and belts, Barracuda 4-spoke treaded wheels and the Draw decals. For paint, I'm going to try Green Stuff World's Chrome metal, as looking at reviews it should come up with a nice, shiny finish. (hopefully!) If that work good, I'll then use it when I redo Dottie Mae. As for work, it looks like I'll have to clean the wings up some, as there are too many lumps and bumps, but that'll be alright, esp as it already has the gear bulge, so that's one less thing to add. In the 'pit I'll see about making some little touch screens for the center panel, seeing as these were/are on the plane. I think just some tiny rectangles of clear plastic with their backs painted black should work alright. (looks like I'll have to see about padding that seat too...) Probably another week before I can get started, but them's the plans! Thom8 points
-
After completing my first ever Zoukei-Mura kit I can say that the company is... okay, not as great as I may have propped them up to be but still a good manufacturer. Their interior structural details are astounding but the fit (on this one at least) was not always great, especially in those damn gear legs. Despite some minor issues like that I did enjoy this one and I'll probably get other kits from them, but maybe not as many as I planned to. Also I have more photos of the Ta 152 on my Facebook @David Peckham8 points
-
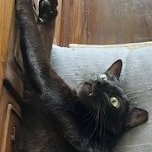
The correct use of a cat toybox as demonstrated by Smudge8 points
-
Filled and sanded, took almost an hour, phew. Still nearly there. A coat of paint to check the joints. Some small work still needed, but not a lot.8 points
-
Awwww thanks mate, I have used a few superlatives so far LOL! Really? I see all the imperfections still, so thank you!!! So I squeezed a bit of time in at the bench today and added some details to the centre cockpit/canopy section. I found the structure and front seals were a but off so I re-did them. Excuse the fit as it is only just dropped on top. I poked a bright light in there to But you get the idea Thanks for tuning in as always!! Cheers Anthony8 points
-
Thanks Chris. Today, I determined that the front part of the collector rings on the engines should be shorter in proportion to the rear section so it's meant filling the existing recessed lines in so I can rescribe new ones. Why do I do this to myself? 🤣 apart from that little step backwards, it's pretty much finished. got the props painted today that Stew kindly sent so intending to finish the nacelles off tomorrow along with the rest of the subtle weathering.8 points
-
Reinforcing the front suspension was very easy with my low ride height setting; just a little bit of epoxy on top of the tyres. The smaller details fitted to the interior parts, all ready to be installed. When the windows started to go in I could at last make up the photo etched wipers and get them painted. This is one of those rare occasions where the kit maker has supplied wiper blades that actually fit the curved windscreen. Plus points. The dash board was a little too tight a fit against the windscreen and needed a bit of sanding (followed with black paint touch up). All windows fitted as well as the sun visors. The small painted square for the rear view mirror attachment is drying. The seats have been glued in place. To get as tight fit as possible for the rear shelf I folded a piece of paper to act as some sort of a spring, pushing the shelf up against the once again temporarily fitted bodyshell while the epoxy cured. Here we have the finished interior, ready for the bodyshell to be permanently fitted. Ready for a thousand miles of high speed super comfortable cruising... A bit of dust cleaning needed before it's too late. Apart from that I'm quite happy.8 points
-
Good evening everyone. As it's Samhain eve, I must make you aware that Cthulhu has risen: Well, it's really a distressed victim of the Ash dieback that's rife here in Ireland but when you drive past it in the half-light, it does indeed appear to be waiting, dreaming.... I can not start tonight's post without marking the level of altruism that the Wasp seems brought out in so many people since I began this build/psychiatric condition - @Anthony in NZ's remarkably generous pilgrimage at the weekend is but the latest evidence that this little whirligig of a helicopter seems to enjoy such enduring affection. Blessings upon all who have contributed to what is rapidly becoming a community project...! 🙏 I'll type slower Keith. Great minds Pete - I'm thinking Rendezvous with Rama? One did not dare 'ope but one were mightily chuffed at that find Terry. 😁 I know what you mean. For me the sleek Leander has the same appeal, having made this on several occasions as a lad in the 70s: Wouldn't be at all put out to make one again either! No you're not. A comma after that 'more' and it would have been a whole different sentence...😁 Most kind G, though I have to say that new bits seem to appear on the Nimbus the longer you stare at it! 😆 Superb Bill. In fact both those references have found their way into my image boards now - my thanks. I read in The Royal Navy Wasp: An Operational & Retirement History that the rotor brake on the Wasp was one of several differences with the Scout, the Mk. 103/503 engine on the RN Wasp having a twin caliper brake (instead of a single one) to slow the blades more effectively in high winds at sea. You seem to have posted a lot of photos of something as well... 🤝 Aha! Think I know what to send you now... 😁 Those numbers are listed in the Buttock Management section of the PN for the Wasp iirc. My neighbour Martin put sheep out in the field next door last week: I might ask him if I can cut a couple of squares off one of them. Summed up perfectly Ian. I've a few pictures of a single component to show you this evening as spare time last week was utterly dominated by trying to build the exhaust fork ar the rear of the Nimbus. As both Bill and Alan can attest from their own Waspistry, these are the Devil's Own Nostrils when it comes to describing the way that shape and profile change,flow and bend along and around their extents. Also worth noting that there are two types of exhaust to consider with this subject- the stubbier, more barrel like (in side aspect) one of the kind that XT778 has in Ambuscade-era photographs, and the other type with a more conical side aspect. As these seem to have been common between both Wasp and Scout, I've no idea whether one might be an earlier or later variant, or why as to why one and not the other might be fitted. I'm learning that at 1/24, not only is a lot more detail visible (in terms of components) but that shape information is similarly visible in greater detail than the 1/72 I've been used to in the past. Obvious you might think and of course it is, but it has proven to be a good example over the course of the last week that such differences will sometimes require a change in methodology. Much of what I do is involves 'standard' drawing and lofting processes in Fusion and that was exactly how I began this time around for the exhaust: (Harking back to Pete's spacecraft mention earlier, that image has a certain Gemini-Agena rendezvous vibe...) The stubbier version of this item starts out circular in cross section at the rear before gradually narrowing at the sides to become more and more oblate as it moves forward to curve inward at a shoulder like feature and then blend into the circular rear of the turbine drum. Lest that be too easy there is a circular opening in the centre of it up front as welto proved a nest for the reduction gearbox and its asociated gubbins. Trying to draw and loft that set of profiles and cross sections in a convincing manner at this scale just didn't work for me: yes you could build the main exhaust tunnel and then the inward curve and the central opening as separate elements and combine them together, but then adding fillets to blend the sections together it just looked like, well, a series of discontinuous shapes filleted together. At 1/72 it wouldn't have mattered as a lot of that shape information would have been lost, but here, it's absence would be present for all to see. If you see what I mean. A classic case of tunnel vision when it comes to habitually using certain tools, so I had to have a rethink. Eventually I concluded that the only feasible method at this scale of creating the exhaust as a series of continuous surfaces was to move from the standard design workspace in Fusion, into the use of T-Splines in the 'Forms' work area (basically ditching drawing in favour of straightforward scultping). This was one of several initial trials to give you an idea of some of the formal problems involved up at the front where it starts to get really messy: The shape's still wrong there in several respects but it gives you the idea of the problems involved in trying to 'morph' a cylindrical feature through 90° into teo smaller cylinders split around an opening. Each version got slightly better as I tried eliminate detail down to the essence of the forms involved. By this morning I had this - a single continuous form incorporating exhaust tunnel, opening and turbine mounting: Mirrored and stitched: Further tweaking needed but it was getting there. Impossible to simply thicken that convoluted shape to give a wall thickness for printing of course, so the reliable workaround of patching and stitching separeate surfaces to produce a solid form was used (to be hollowed out later at the print stage): That 'shoulder' is too abrupt at this stage still, but a good view of where the work was needed belnding the return of the shoulder into the cylindrical form that mates withthe turbine drum. Not forgetting the tight tolerances necessary for tit to clear the lower cradle feature: As a compromise between strength and visual fidelity, the wal thickness of the exhuast forks is 0.7mm, withthe final 2-3mm bevelling down from that to give a 0.2mm thickness to the lip: Some final renders then of the finished result, ith shoulders calmed down to give a better 'flow' through 90° from exhaust to turbine, ribs and thermocouples added to rear of exhausts: From below, AKA: 'What the totor brake saw': Side aspects: Overhead/obliques: Ensemble: That reduction gearbox which sits inside the exhausts is up next - impossible to see the essential profile of the casing due to all the encroaching structure, but not for the first time the Great Wasp God of Karma has posted a spare part up on E'by as a quality reference: I've run out of pictures. Probably just as well.... Tony7 points
-
Good evening folks, Hope everyone has managed to make a start on their builds and get off the starting block. Not sure what it's been like for everyone else where you live, but for me up in Cumbria, it's been a wet and miserable week weather wise and this weekend has been no exception!!! However, that's been a perfect excuse (not that one's ever needed) to get some bench time in and get cracking with my BA-10 So, with that said, I've used the time wisely to work through the the first 4 steps in the instructions and get a fair amount of plastic glued together. This is what I've managed to achieve so far: The main chassis frame is together Then I got the axle/differentials together Then the axle/differentials were paired up with the leaf spring suspension and added to the chassis along with the linking rods and couple of other smaller pieces and then I worked away at getting all the many engine parts together to form the completed engine Phew..... and that's where the build stands at the moment. I'm absolutely amazed at the detail so far and the number of parts (especially the number of fine and delicate parts) which I'm amazed they have been able to render in plastic. You weren't wrong @Robert Stuart when you pointed it out about the delicate parts on the sprues!!! 🤯 I'm really enjoying the kit so far and if everything continues to go as well as it has up to now and with the same amount of detail, then I'm hoping I should have a nice little model for the gallery Best wishes Kris7 points
-
Hi everyone Hi Antonis what a pleasure to hear from you, how are you my friend? Good advice indeed - I do try primers, I have Mr Hobby and car etch primers and I find they are all pretty much the same - useless.. I will have to try VMS - I do have a good one from precision paints but its a faff to decant it and thin it, plus it needs about a week to cure / etch properly (and even that isn't bulletproof...) Anyways, not much of an update today, more just proof of life really ..still trying to get all the panels around the wing fillets done so I can start them, so I added the fuselage sides and upper wing skins.. no in progress pics, just a few to see where I am up to.. ..the port fuselage side has a hand hold and a hatch - this fuel filler hatch is only applicable for the very early versions before the B/C which my subject is. It also does not have the formation light each side that later ones have either.. ..the other side was also done.. ..and as can be seen in some of the pics above, the upper wing skins were also added.. ...and that means about 70% is skinned now.. ..still some very complex areas to go around the U/C fairings, wing fillets and windshield... See you at Telford hopefully - our airscale stand is in Hall 2 so please drop by and say hello TTFN Peter7 points
-
I then turned my attention to the dashboard which turned out to be marginally easier than expected, Molotow providing the brightwork and a judiciously wielded cocktail stick for the fine(ish!) detail. This completes the interior, now for the bodyshell. To those of you sticking with this comparatively mundane OOB build, thanks for looking.7 points
-
1/72 ABM Beriev MBR-7 WIP and more pics:7 points
-
Thanks Bob. As well as this 251/9, and a few in mid- or eastern-Europe the 'Captured Panzers' booklet (above) lists an Sd.KFZ 251/8 ambulance in US service, here: The Guards division took over several ex-German vehicles during the NW-Europe campaign: the Coldstream Guards had the Panther called 'Goodwood"; I think there was another Panther. The build, stage 1 Armour around the lower engine (and sump). Stage 3, lower hull Can you see where I broke the front axel brace while fitting? Including tow hook Part of the tow hook has been omitted, I plan attaching the trailer later.7 points
-
Applied weathering on both upper and lower airframe, masked the rest of the area near the exhaust ports. Wanted to have some metallic expression in this area - I have mixed the base light grey (GSI #338) with small portion of Gaia 1001 (silver) and Modo gun metal (MX-02). With the mask on, I cannot tell much of the difference of this "metallic" 338 compared to the actual 338. There will be a few more colors to be applied in the exhaust ports. Continued to mask and paint the little exhaust area. This time round the light grey area is masked, and applied Modo MX-02 on the rear "triangle" and Tamiya LP-18 Dull Red on the other end. Next and final - would be the gold, still yet to decide which gold to use - thinking of a light gold, definitely not the orange gold like Gaia Star Bright Gold. Wait for another 48 hours. The clean version after gold and dull red, which makes it looks like Ironman. Applied weathering (Modo M-041 clear smoke) on exhaust, with GSI 306 to soften the edge where it got too dark and dirty. Also use 306 as the surface color of the external fuel tank.7 points
-
Here's my entry, ticking the prototype, research & record breakers boxes Wasn't expecting to find resin in the box, so that's a bonus. Would have started sooner, but covid's really done a number on me. No Telford this year for me6 points
-
I'm still debating if to start this I bought the kit for the GB but not really had the urge to build for most of the year. Having had a look at the kit, it does look nice and I do recognise some parts from when I helped a friend restore one a good few years ago, I'll kick off with the box and spru pics. Dave6 points
-
Happy to reveal my first finished model and share my excitement with you. Accidentally saw this beatiful kit on a flea market and decided that it will be a nice starting point in my new hobby. My lack of skill made this kit less beautiful than it was when i first saw it in the box but at least i tried not to ruin it completely Here are some photos made in process: I know control stick is glued backwards here. Already fixed it 😀 And here is a finished model: And finally it is on my shelf. First but not last Lessons learned: More putty and sandpaper. I thought paint will cover all this small gaps and imperfections but no. Next time if i see something wrong when the model is primed i should definitely fix it. My brush and airbrush skills suck so much. Should practice more before making next model. Less is more when it comes to weathering. I see Emil like a workhorse and like it more weathered with scratches dirt stains etc and was afraid to make such a big plane too boring but saw here so many clean nice models so should try it next. And I don’t know if it is just me but i like to see Emils and Hurricanes really dirty working machines and some Spitfires or Mustangs associate more with polished clean sport cars. I can’t really see the cockpit. Made this fuel and oxygen pipes or hydraulics near rudder control but cant see it at all. Do you paint cockpits lighter or are there any other tricks? Or do you make this details knowing that they will be buried there and not visible at all? At least it was fun to make them and to know they are there. Anyway even with all the flaws and my poor skills I just love it and enjoyed the process. So that’s all I will be grateful for your critique and advices.6 points
-
I would like to present you the first of the three F4U-1D models. A few words of introduction, I received an order from one of the cultural institutions to make a series of models that were to show the influence of time on the appearance of the aircraft. So I will have to make a Corsair in a heavily worn-out version, the next one will have visible signs of use, and the last one will be as delivered from the factory. First, a heavily exploited version.6 points
-
Started work on the steering and suspension, the 8 drive shafts (B4) have pins that go into the hub units (D19). If the pin is removed and the steering linkages are left off, then the wheels can pivot on the suspension arms and be positioned in any steering position. One more pin to remove. Suspension and steering parts all assembled onto the lower frame and leaf springs added. These kits are really well engineered and go together without any problems. I have started assembling the wheels, 9 of them including the spare. There is a choice of 2 hub units with either 2 or 5 ventilation holes for the brakes. This kit is different to all the others in that it includes 3 radial tyres, not sure if I will add all of them to this build, I might mix them into my other 234 armoured cars. The unattached hub units are to add to the other side of the chassis, my clumsiness knocked off some of the pivot pins so I have drilled and replaced them, just letting the glue harden. Next, I will add the lower chassis to the lower hull half, then I can start adding the interior parts. Any comments or questions are always welcome.6 points
-
Revell BR01 Steam Loco and Tender, a 2021 rebox of a kit from 1982 It was a bit big for the photobooth Thanks for looking Build thread is here6 points
-
Early start this morning magnifier needed and straight in with the PE !. I'm glad I got the seat under frame done..... yes you can't see it now 😐. I'm not sure how much of the interior will be visible once the turrets on it'll depend on how neat I can get it or the turret will just stay put. Dave6 points
-
I made a small start on this prior to the GB start date. I'd finished my previous model a few weeks ago and tried to wait, but I couldn't resist. I'm nowhere near the 25% rule though. So far I have built the gearbox and engine I've also made a start on the chassis. There's a lot going on down below so I won't assemble the whole thing before painting as there'll be too many nooks and crannies to get into. Instead, I'll make some sub-assemblies and paint those plus some loose parts before putting it all together. Two sections completed so far6 points
-
Thanks Houston! "Splendiferous" love that word!🙂 This morning's progress. Interior is now fully assembled and waiting for the new handbrake which is in progress. I put a wash on the seats. Again the camera is distorting reality. It is no way near that pronounced. And big step the wheels are on! Yeah!😁 Thanks for looking, Nick6 points
-
Time to update on the progress. The cockpit is now buttoned up: A bit of a tricky operation without any positive location features, but taping it together bit by bit before applying glue worked nicely. The exhaust nozzles are now assembled and installed in the fuselage, and the process of fairing them in has begun: For anyone else thinking of building this kit, I’d very much recommend ignoring the kit sequence of works and installing the exhausts before closing up the fuselage. There was an awful lot of trimming & sanding needed to get them to fit, and I also found that having access from both sides assisted greatly in getting them positioned before applying the glue. That lot done meant the only thing stopping me closing the fuselage was the intake ducting. The kit provides this PE grille for the intake: That looked a little too flat for my liking. In reality these bars had an aerodynamic shape to them, but given how tiny they are I figured I could get away with round brass rod, going for 0.5mm for the thicker central bar and 0.3mm for the rest. Holes drilled, I did a dry fit to check it looked ok: Superglue was used to keep them in place before cutting the rod to length: And finally after primer and a coat of Alclad Duraluminium to match the rest of the ducting: Next steps now will be gluing that to the rear of the intake, and getting it all into the fuselage. James6 points
-
The 1:72 Hobbyboss MiG-15UTI built in Hungarian markings. Not much to these kits, so an easy build. I have run out of the lead weight I was using for nose weight, so resorted to blue tack. It's only just enough weight to stop it tail sitting. Painted overall SMS PMT01 silver. Very unforgiving of any seams that haven't been filled properly Had to do a bit of rubbing back and respraying. Decals used are from HAD model. Sheet No 72247. These went on without any real issues, Getting the green dot lined up properly in the middle of the star was a bit tricky. Build progress video5 points
-
Thanks cc. Always got time for another tempest! Stencils on (ye gods how many can they cram into a 72nd kit!?) and a bit of gloss to seal it in. I seem to have got worse at gloss cotes each time I try, so am experimenting with x-22 thinned with MLT. Seems much like GX100 to he honest! Got away without crazing anything for once, but I think it's all indicative of never achieving a smooth enough paint layer, and the gloss just reflecting that roughness. I suspect my tendency is to just keep battering the thing, which when combined with varnish overthinned with MLT is just a recipe for disaster or at best the thick glazed doughnut thing. you can see the texture arising from inexpert brush painting of the underside. In this case I've just left it there. My usual next step would be to apply a panel wash, dry and clean, then sand the layer down to remove decal bumps and generally even out the surface. This last step is predictably where problems tend to occur, and adds a certain worn-ish-ness to the whole thing, so I'm debating what other options I have. Anyway that's all for now, just a simple finish to try and improve on the basics. Andy5 points
-
Thanks Roger. Today I spent time painting the base colours on the stowage. It looks a bit stark now, but hopefully subsequent washes will tone it down. I also played around with where the stowage might go. I also experimented with “roughing” up the surface of the turret to better simulate a cast texture. I roughly dabbed on Mr Surfacer 500 and once dry I was pretty happy with the effect. I think it will look ok under paint. I was a bit anxious, as I have never tried this before. Also a first for me, I attempted to sculpt a semblance of the turret stowage that is very apparent in photos of “Bury”. I had some Milliput in my modelling desk, can’t even remember buying it! It’s a bit crude, but hopefully will look better once I’ve added straps and some washes. The photoetch fret has some footmen loops which I can add to the turret for it to “hang off”. And that’s it for today. Next task is to start on the wheels and suspension.5 points
-
Filling, sanding, primer to check, and loop. Installed the vertical stabilizers and also attempt the fill the gap with black glue. Sharpen the major panel lines with a 0.125 chisel and recovered the details which have been sanded down.5 points
-
Hallo Edward, Hate to put a crimp on the old plans but ZJ924 is a Tranche 1 airframe, which don't carry the Meteor. You can make up current meteor carrying typhoons but nearly all of them are unmarked-you'll need the white RAF fin serials from the xtradecal sheet noted earlier. By hacking about with Xtradecal squadron sheets you could get to a squadron marked ZK serialled machine (which do carry Meteor) -check your references but they won't have the pilots names. I am surprised that Xtradecal haven't done an update sheet for RAF machines/recent export aircraft...and a resin upgrade for the Tranche 3 CFT fuselage bulges from Quickboist or similar. Anyway, am about to finish a Hasegawa Typhoon done up as ZK344, ine of the Typhoons which conducted the first Storm Shadow mission a year ago. Its a top kit...hope you enjoy yours! I'll post pics in RFI in due course. HTH, Ralph5 points
.thumb.jpg.d17ff607fc7e89ed057e63fcb6f2a888.jpg)


This leaderboard is set to London/GMT+01:00