
Leaderboard


Popular Content
Showing content with the highest reputation on 18/10/22 in all areas
-
Here's my attempt at Revell's 1/72 Eurofighter Typhoon from the "British Legends" kit. I'd heard that the Revell kits don't have the full set of weapons pylons to accurately represent the RAF versions, so these were part of the modifications (new pylon set from Air-Graphics models), along with some Brassin weapons and Eduard etch set. Assorted other ground support bits were from Flightpath, LP, and ReedOak figures, for the 'night shoot' pics. Airbrushed in Hataka acrylics and weathered with oils. Decals were another aftermarket eBay buy (from an Airfix kit) to represent the Coningsby aircraft I wanted. I also modified the etch FOD covers (adding plasticard strengthening and guide vanes) so they could be added / removed as required. The whole thing isn't perfect but it's been fun [mostly!] and good photography practise too. Thanks for looking.24 points
-
On the evening of the 9th July 1941, while patrolling over Tripoli harbor, Buvoli spotted seven Blenheim at low level and gave chase to them out to sea. He was credited with four kills which match the reporting losses of the 110 sq. His plane had the yellow cowling of the 1941 period and at a point carried the three tones camo, of green and brown blotches, which in turn was oversprayed with a light sand color, possibly Giallo Mimetico 1. This is what I have tried to reproduce. Buvoli was flying with the 378° squadriglia, 155 Gr. DSC_0002 by jean Barby, sur Flickr DSC_0003 by jean Barby, sur Flickr DSC_0004 by jean Barby, sur Flickr DSC_0005 by jean Barby, sur Flickr DSC_0001 by jean Barby, sur Flickr DSC_0002-1 by jean Barby, sur Flickr DSC_0004-1 by jean Barby, sur Flickr DSC_0007 by jean Barby, sur Flickr20 points
-
Finished. WIP here if interested:20 points
-
I first saw the surviving Sopwith Triplane N5912 in 1968 when it was hanging from the ceiling in London’s Science Museum as part of an exhibition celebrating the RAF’s Golden Jubilee. It was subsequently moved to permanent display at the RAF Museum at Hendon which isn’t far from where I live. So when I made my first model for over 50 years I decided to make it as N5912. It’s the Roden 1/32 kit. Years ago I only ever made balsa wood models of First World War aircraft so this is my first attempt not only at a plastic kit and all the painting involved but at rigging as well. I didn’t use the Roden decals but made my own. I made some mistakes and there’s a few things I wouldn’t do the same way again but I learned a lot in the process. I think a Fokker DR1 would make a good companion piece.18 points
-
Tamiya hasn't released the B version yet, so I used the D version and parts from the A late version. The decals are also Fightertown this time. I added a couple of wires to the Wheel Bay. My F-1417 points
-
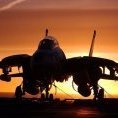
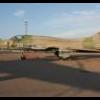
Hello all! I'm pleased to present my latest effort, the Revell 1/72 SR-71. The Blackbird is an awesome machine and I'm really pleased to have this one on the shelf, it's just such a cool looking aircraft. The kit is fairly simple, there aren't many parts, though I picked the Revell version because it came with a nicely detailed cockpit and pilots, even though you can't really see them! I made the kit without any extra scratch building, though sanded off the panel lines and rescribed the whole thing. It also needed a thorough filling and sanding job on the seams on the underside. I used an airbrush for most of the painting with a matt black preshade followed by very dark greys - Tamiya rubber black and nato black. The decals were interesting! They go down really well and didn't have any trouble with silvering but the instructions are all over the place - basically ignore the numbering - and a few are reversed; bonus points if you can spot these! Finally she was weathered with a thinned oil paint light grey panel line wash and some ground-up pastel pigment dry brushed on. It still needs a stand to finish off but thought I'd get the RFI up anyway, I'll add an extra photo when I finally get around to it. Thanks to everyone who had the patience to follow along (things did not move quickly on this build!) and who provided comments and encouragement along the way, the WIP is here: Anyway, enough from me, enjoy the snaps!15 points
-
Hello The last 2 years, I was busy with this quite demanding project. And now I am pretty happy to finally share the result . I built side by side two Kittyhawk boxings, both in French Markings: a Mirage 2000-5F during Operation Harmattan (Lybia) in 2011, and a 2000D from Operation Chammal (Iraq/Syria) in 2015. The builds were far from "From the box" so to say... Kittyhawk... well is Kittyhawk you know. Interesting subject, quite nice details, but mistakes, lacks, or incomplete intructions. So I had to provide a lot of work to bring the models to the higher standard they deserve. It was mainly done with the help of 3D printing. Non exhaustive list of addons: - Exhaust: Reskit - Cockpit -5: Renaissance - Cockpit 2000D: 3D+Quinta - Seats: Grandmodels - Wing Tanks RPL541 542: FFSMC - PE parts: Eduard - Wheels: 3D - RPL522 ventral tank: 3D - Missiles & Pylones: 3D - GUB24: 3D - Decals: Uprise et FFSMC - Figures: Reedoak The Mirage 2000-5F: And the Mirage 2000D: The full WIP is detailed in 80 pages of french Cocardes magazine, with English captions. You can order it on their website. Hope you like them! Regards Romain13 points
-
This is my latest finished project, this time completely out of the box, (except for the decals). The GWH kit is very nice, with good surface detail and an overall good fit. The only part of the assembly that required extra care was the engine's intake fuselage area, with some quirky steps, but in the end, it works OK. The big letdown, however, was the awful instructions. I'm not sure if I had an early copy but they were terrible, with unclear drawings not showing enough details, wrong callout etc. There were even 3 correction pages but with mistakes! I ended up downloading from scalemates the instruction of their 1/48th scale which were much more precise. I guess the challenge here was the decals. This is my first digital camo and it was all done through decals. At one point I thought to better paint everything but in the end, the DXM/Cartograf decals were of such good quality that it turned out pretty OK. It was however a long tedious process...First I painted the base two-tone camo, then I added the digital pattern and I finished by adding all the stencils...Based on the very few images I found online and on how new the camo is, I decided to do a very mild weathering, mostly with some airbrush overspray and a little OPR. All comments are welcome! Cheers Jorge11 points
-
Oops, this happened, dunno how anyway, have made a start on one, no plans for markings - yet SD10 points
-
Avro 652A Anson MkI, MK-V N9732, No 500 (County of Kent) Squadron, Royal Auxiliary Air Force, Coastal Command, RAF Detling, June 1940 Just to the north-east of Maidstone in Kent is the small village of Detling. A little further north and east, and some 600ft up on the ridge of chalk hills that run west-east from Surrey through to the English Channel, was RAF Detling. Opened in 1916 as a Royal Naval Air Service aerodrome, upon closure in 1919 it was used by Short Brothers of Rochester for testing aircraft. The site reopened in 1938, as an asset of the newly-formed RAF Coastal Command. Although prone to fog, Detling gave good coverage to the Medway towns with the important Royal Navy dockyards at Chatham and Sheerness. The main and longest runway was grassed at over 4,000ft, and a technical site with one hangar was developed to the north of the field. The first Coastal Command unit to move to Detling was No 500 (County of Kent) of the Royal Auxiliary Air Force, which moved from RAF Manston. No 500 Squadron was equipped with Avro Ansons. The low-wing monoplane was designed by Roy Chadwick, later to become famous for the Avro Lancaster. The 652A was a modification of a design Avro had produced for Imperial Airways that called for a small monoplane passenger plane to fly night mail services from Karachi via Bombay and Colombo. The Air Ministry was on the lookout for a coastal reconnaissance aircraft, and the Avro 652 seemed suited to the task. After some changes to the original design, the prototype 652A Anson flew in March 1935. The first squadron to receive the new type was No 48 Squadron, based at RAF Manston. The Anson GR (General Reconnaissance) MkI had a crew of up to four, generally pilot, navigator/bomb aimer, radio operator/gunner. The fuselage was of steel tube frame construction, covered with fabric, while the nose was magnesium alloy. The wings were wooden, with a box frame centre section covered in plywood. Control surfaces were fabric covered. The undercarriage - a first for an RAF aircraft - was retractable, but required 144 turns of a wheel by the pilot. It quickly became common practice to leave the wheels lowered for short flights. A pair of Armstrong Siddeley Cheetah IX 7-cylinder air-cooled radial piston engines, rated at 335 hp each, driving two-bladed metal fixed-pitch propellers, got the Anson to a stately 188mph at 7,000ft, with a service ceiling of 19,000ft. Armed with a single fixed forward-firing Vickers 0.303in machine gun under the pilot's control, mounted on the port side of the nose, plus a single Lewis 0.303 gun in a manually-operated Armstrong Whitworth turret in the dorsal position, the Anson could also carry up to 360lbs of bombs. No 500 Squadron added another pair of Vickers guns, on swivel mounts each side of the main cabin - something I only found out about too late to make the modification to the kit! Anson MK-V, serial N9732, was part of a formation of Ansons providing air cover over the Dunkirk evacuation on 1st June 1940. Crewed by Pilot Officer Philip Peters, Sergeant D Spencer and Leading Aircraftsman Pepper, MK-V shot down two Bf 109Es from l/JG.20 over the English Channel on 1st June 1940. I can't do better than to point you to the Airfix Workbench blog entry on their new 1/48th scale Anson kit, where you can read about this remarkable encounter. Although pretty much obsolete by the time war broke out in 1939, the Anson continued in front-line service until around 1942, when it was replaced in the coastal reconnaissance role by the Lockheed Hudson. Ansons were switched to training and liaison roles, being particularly favoured for training crews for the new four-engined heavy bombers, and continued in RAF service until June 1968. In all, between 1935 and 1952 11,020 Ansons were built. During the Battle of Britain, RAF Detling received particular attention from Luftwaffe bombers, apparently under the impression the field was a fighter station. Fighter Command planes did use the airfield, but Detling was always a Coastal Command asset. RAF Detling closed in the 1950s. Part of the technical site is now an industrial estate, and part of the Kent County Showground occupies the southern section of the field. The kit is from Special Hobby. While it is well-appointed with resin internal fittings and PE details, I decided to see if the Flightpath PE set intended for the Airfix kit could add anything. Most of the internal parts were updated using that set. I had intended on adding some further external details, too, which might happen one day. I'd like to see if I could actually make up and fit the PE windscreen wipers! I opted to brush paint using Humbrol and Revell acrylics, with a Montex vinyl masking set, and the markings came from the kit. Sadly, a lot of dust crept into the cabin which I was trying to make the cabin glazing fit smoothly, which is annoying as I had been desperately trying to avoid that! The WIP thread can be followed here:10 points
-
This started out as a lark. I had gotten a very early, if not the first, release of the Airfix Hawker Hawk kit in a job lot I bought. I had already done it before as a Hawk, so wanted to do something different. Well, here's what you get, Hawker's swept wing Hawk, the P1081. It's all just kit parts, some plastic sheet for assorted shims and a new canopy from the spare parts box. The decals were put together from spares as well. It's not completely accurate and is a little rough in person (photos can be flattering), but it generally looks the part and was a relatively simple fun build.10 points
-
Good evening guys and gals! Time for an update on the big Stirling. Over the last couple of weeks I have been continuing to devote my attention to the wings. The kit parts are not the most accurate in terms of aerofoil shape and the top surfaces are too flat and don't capture the real thing particularly well. Therefore, with cunning use of spars I have made an attempt to correct this and replicate the real wing shape more accurately. The spars were previously cut to the correct depth following plans, and then I added a large diameter Evergreen tube to the leading edges as this was the correct shape/diameter to capture the curvature of the leading edge. The leading edge was glued first, given 24 hours to dry, and then I glued the forward spar to the upper surface. Again, this was allowed to dry thoroughly before the rear-most spar was glued. This has allowed me to bend the plastic along the full length of the wing and capture the aerofoil shape much better. It's probably easier to see what I mean with a picture: The next problem I encountered was the fact that the nacelles were not deep enough and when the top and bottom halves were joined they were an oval shape rather than circular. This would cause major problems when it comes to adding the engines (plus it's totally inaccurate!) so I measured the diameter of the Beaufighter cooling gills and made four plastic card plates to be glued to the nacelle fronts. The area behind was then built up with P-38 and blended to shape, meaning I now have corrected and perfectly circular mounting points for the engines when the time comes: The Revell 1/32nd Hercules engines from the Beaufighter will now fit perfectly: Lots of blemishes still to be sorted in the above photos, but you get the idea. With the wing halves joined I thought I'd tackle the ailerons next - Cees had removed these previously as the molding is very soft and the shapes poorly defined. First it was case or prepping them by sanding and thinning the trailing edges: For some reason the upper surface of the port aileron was 4mm too short, so I lengthened this with some plastic card bent to the correct shape and blended in (red arrow). I next added some plastic strip to the rear of the wings (blue arrow) to ensure a nice and strong join: Finally, they were glued in position - the fit was almost perfect which was probably more luck than carefully planning on my part! The Stirling has very distinctive fuel cell covers in the upper wing surface - the Sunderland has the same and I made these from thin plastic card on that model and was very pleased with the effect. Although not strictly accurate, I liked the effect as it made the very large wing surface more three-dimensional and therefore I decided to do the same with the Stirling. First of all I made some card templates - these can then be drawn around and flipped over to do the reverse on the opposite wing, saving errors on expensive plastic card in the process: These were then transferred on to plastic card before being glued to the wing surfaces: A top tip for making wingtip lights - cut out the shape with a saw and line with plastic card: File and sand to shape and they're ready for some clear sprue: I've also added various other raised areas to keep things interesting and have tried to capture my scribing etc. in the light in this shot. It also shows off the effective aerofoil modification: The undersides still have a lot of work to do on them, but I need access to the spars when it comes to joining the wings to the fuselage so these will remain as is for the time being. The wheel bays and flap area will also be finished off when the fuselage and wings are joined to avoid damage to these areas: The uppers have really come to life with the tank covers, life raft hatch as well as various access panels: Having corrected the aerofoil shape highlights just how out the original kit's wing position is - Cees was already on the case with this as removed the raised section on his fuselage for good reason! And that brings you up to speed for now. Until next time, all the best, Tom10 points
-
Great news! The mod to the nacelle has worked well, so pleased with the result. Just another 3 to do now!10 points
-
My study/office is undergoing a bit of a renovation and for something to put on the shelves, I've dug out a couple of AMT trek kits I build at around 20 years ago, the Klingon Bird of Prey and Cardassian Galor class. The BOP is fully lit using 'grain of wheat' bulbs (LEDs weren't as ubiquitous as they are now) although I've lost the power brick so no lights for now. They are very much of their time, I like to think my modelling skills have imprevoed somewhat since they were built, but I think they stand up reasonably well although, if I was to build them again, the BOP would definitely get some more weathering. Despite once having a huge (40+ kits) stash of Trek ship kits, they remain the only two that ever got finished, I've never even built an Enterprise! John9 points
-
As a sequel to the F-35 Lightnings air to air feature, I bring you a selection of shots of RAF Typhoons captured doing AAR on the same sortie taken from Voyager KC.3 c/s 'Tartan 59' on October 7th 2022. Sadly most of the 9 aircraft photographed are without unit markings, but I hope the 1(F) and IX(B) Sqn jets add a little colour to this report. All shots were taken in either AARAs 4, 6 and 7 over the North Sea off England and Scotland. 4 x photos of ZK333 of II(AC) Sqn at RAF Lossiemouth seen before, during and after refueling over AARA 4 near the Aberdeen coast. A couple of views of Tranche 1 Typhoon FGR.4 ZJ939/WS-U named FS George Thomson VC and assigned to IX)B) Sqn, the Typhoon aggressor unit at RAF Lossiemouth. Although wearing 1(F) sqn markings, ZK320 was on loan to IX(B) sqn. FGR.4s ZK336 and ZK376 both assigned to 6 Sqn at RAF Lossiemouth also photographed in AARA 4. As we tracked back south towards AARA 6 we were met by this three-ship of FGR.4s from 3(F) Sqn at RAF Coningsby (ZJ949, ZK377 and ZK431). Hope these photos are of interest. Thanks for looking, c&c always welcome. Mark9 points
-
Hi Guys, Below my latest small project from Special Hobby. Model need some work but its really rear bird, so worth it. It was fun adventure about you can read here => https://www.kfs-miniatures.com/1-72-bugatti-100p-special-hobby-budowa/ BR Lukasz9 points
-
5 ants rented an apartment with another 5 ants. Now they're tenants9 points
-
I dunno why people are getting so bothered about it. Frankly men in our age group ought to regard the presence of something red and pulsating as a Good Thing...9 points
-
Marty, our older one just chilling, none of our previous domestics ever contorted themselves to this extent, what is it with these guys. Steve.9 points
-
Thank you gents. Welcome aboard @Rob K., you’re just in time for the finale. On the eve of another short road trip, I started fitting the bits and pieces. The most notable were the fuselage vents, carefully created from some spare PE. I attached them with PVA glue, and will build a little more profile in them with some more of it. Painting will be a bit tricky because they sit in the roundel on the edge of the blue - silly error - but they should look good when done. I offered up the wings and found they will fit just fine without fettling. They aren’t yet attached, in the pics they are only dry fitted. In order to get to that stage a painted in all of the nav and formation lights. I also painted the prop hub red as my interpretation of the colour 1842 NAS painted theirs. It’s a punt, call it a modeller”s choice as I believe it’s not known for sure what colour, like the squadron number, Anderson’s Corsair wore. Happy to be corrected by someone who knows more though. The final tasks will be the canopy and antenna wire. Does anyone know what the wire would have been? I’m assuming a line from fin to post and another from fin to mid dorsal fuselage. Any direction on that much appreciated. Thats it for now, this one will be done over the coming weekend. Cheers.8 points
-
Cracking pics Chris some lovely cars there, I wouldn't say no to any of them! Mine was - it was a Tiger In Wardance Red, like this beauty; Wish I still had it! Keith8 points
-
Another brilliant kit from WNW. The wings would have made it way to big, so I decided to display them without. The technician is gobbled together from CSM figures. Remove part of the side to display that beautiful interior. Found the nano led online, kinda makes it a bit different. Bit of scratch building here and there and a ton of rigging.7 points
-
A few of my early attempts since getting back into this modelling lark for your perusal and constructive criticism..... And it's not armour related, but who doesn't need a 3d printed pulse rifle on their wall? Al.7 points
-
Many thanks James and just in time for an update.All seams cleaned up lovely and sprayed in Humbrol primer. No filler used at all and on a kit this old too!7 points
-
three weeks and three days... I did make a sort of ultimatum t'other day didn't I? Well fortunately I can deliver, this is where the five basic elements of this build will always be. Together. Well barring tragic intercedence of the deities between then and now. All pieces of this part of the puzzle firmly affixed to the base in their final positions and the horses and the bus are now ready to visit the tack room. Later baby huh? I spent enough agonising time wondering if I would get this to this point, now to get this finished and check out my other builds for the competition table. Minor or major repairs to undertake, phew at least three weeks for that with the tack too, of course. three weeks and plenty of time...7 points
-
Hallo This is my finished model now. The kit is from Zvezda. I used resin sets from Black Dog and Reskit. For the rotor and engine. Beside I used Eduard etched parts. Masks from New Ware. The building was not easy, since the fitting and assembling of resin parts took my patience. Since the building started from a flat hill to a steep mountain after some days, I decided to drop my idea of Afghan camouflage. So I chose the dark grey version. Well at the final stage I lost one pitot tube. Well, so have a look. Happy modelling6 points
-
A limited WIP of a scratch built Armstrong 12pdr gun model. The model was made in 1983 as a college project for a museum showing Lord Armstrong's works in the North East Of England(I can't remember exactly where). This was the first breech loading rifled artillery piece adopted by the British army in the late 19th century. The gun was so accurate that the barrel was mounted on a traversable mount, centred on the elevating screw, for fine adjustment when aiming the weapon. Course adjustment was done by moving the trail. The model is made in 1/6th scale(I think, it was a long time ago!). The grey material is EMA 1/16th inch(1.5mm) ABS sheet, the white material is Plastikard. Details are also made from wire, Milliput and real screws(It is not easy buying screws based on the diameter of the heads!). The traversing and elevating mechanisms where built around 2 bolts of appropriate size of shaft(I can’t remember the diameters). The barrel was made from EMA plastic tubing. The yellow part on the breech handle was an EMA plastic sphere. The trail was made of a hollow box of ABS sheet, with laminated carved ABS sheet for the cheeks of the trail. I think the axle was reinforced with metal rod or tubing. The wheels were made from ABS sheet, with Plastikard spacers. I made 1 spoke from laminated and carved ABS sheet and took a silicon rubber mould, I cast half the spokes for each wheel in white metal and the others in resin to save weight. The gaps between the spokes were filled with Isopon P38 car body filler. The photo shows the second wheel under construction, resting on the first wheel to ensure they were identical. The hubs were made from ABS sheet discs and Milliput. The ram rod was made from dowel, detailed with Milliput. The trail arm(stowed under the trail) was carved from a piece of wood(I can't remember what type). The 2 photos of the finished model are prints from slides.6 points
-
Have not posted for a while so here is a new one, KP in 1/48 Irish Air Corps hope you like.6 points
-
This is the immaculate wing to fuselage join. The fuselage halves are dry fitted, as is the wing to fuselage. Very impressive SD6 points
-
As Oscar Wilde said ‘Talent borrows; genius steals’ I’d like to think I’m at least talented so some homemade decals for the inside of my engine nacelles. With thanks to @Ray_W6 points
-
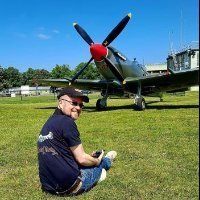
I did my fourth Darren Harbar photo shoot last Friday, at the Shuttleworth Collection. A first for me in several ways - first time shooting in RAW, for the added flexibility in editing, which was needed because it was my first low-light/night shoot, and consequently my first time using a tripod for the majority of the event. We used the Sea Hurricane, Avro 504K, and Dragon Rapide, with some of Darren's rep-crew of fantastic re-enactors, who really know their stuff and add an extra human element. For my first night shoot, I'm quite happy with some results, but I'm kicking myself for not getting a full wingspan front-on shot of the Hurricane during its engine run. Ah well, guess that's just a good excuse to do another one next year! And saving the best for last..........6 points
-
He looks as though he would be right at home on the parade ground at Catterick Camp. By the right, quiiiiick march! John.6 points
-
This is, so far, a beauty of a kit. And Wez, the canopies, touch wood, seem okay. Forgive me if I don’t post shots of sprues, but it’s already been done elsewhere Really like the way the wheel wells go together SD6 points
-
I drilled some generous holes in Lurch’s lower legs and glued them in place, fairing them in with a fair bit of superglue (ahh-choo!) to fill the gaps. I then attacked the collar cuffs using green-stuff. I would have taken Matti’s advice and mixed it with milliput, but as I discovered I’d left my milliput at my boat, had to use it neat, which worked fine. It sticks so much better than either milliput or Fimo, and smooths out really nicely with tools lubricated with Vaseline, so was a pleasure to work with. The long drying time is also really welcome as you can go back and tweak to your heart’s content. I’ve since added his buttons using good old nail caviar, superglued and pushed into holes drilled into his jerkin. My dodgy Ali-express figures arrived in the post – mixed reactions really. Firstly, I’m not proud of ordering these in the first place, but with Stalingrad being a Russian manufacturer, there didn’t seem to be much option at the moment. The detail on the figures is really sharp – perhaps too sharp? It’s strange really; the clothing folds are razor sharp and really deep – pretty exaggerated compared to reality, but I guess it conveys an enhanced realism that suits viewing small models. I can’t imagine armour model manufacturers exaggerating the size of hatches, handles and rivets and so on for the vehicles, but we have this situation with figures – odd really. Secondly, the casting is pretty ropey – there’s a lot of “noise”, with flash and fuzz. I guess the moulds aren’t of the highest quality and get used for longer than they should. Overall, they give the impression of a digital photo with the sharpness turned up too high. The faces are also rather stylised and are nowhere near as realistic or animated as the Hornet ones. I cleaned up one of the figures as best I could and fixed his head and hands on. He needed a bit of green-stuff repair to his short-cast collar. My own figures certainly aren’t from the “school of sharpness” and if anything are a bit too soft on the detail, so I’m not confident that I’ll be able to mix and match, but working on both options is an interesting exercise in itself and I can use the knock-offs to get guidance on pockets, badges, belt and so on. Using this figure as a reference, I started adding pockets and whatnot to my own sitting fella including an extension to his jacket. Early days yet; there’s a way to go and he won’t look remotely real until his head and hands are back on. He also seems quite a lot smaller than the Stalingrad(ish) figure, but people are different sizes right?6 points
-
Tank is finished-on to the display base.6 points
-
A mix of painted markings and home printed decals: The laser printer does a fine job for decals. After all , it’s not like some fool is going to come up and take a 6x picture of a 3mm high decal from really close range…6 points
-
Hi there, here is my recently completed Saladin figure. This is a 54mm (1/32) resin sculpt from Time Machine Miniatures. It depicts the victorious Sultan of Egypt, Syria and Jordan after destroying the Crusader army at the Horns of Hattin, which had sallied out to relieve the siege of Tiberias. This resounding defeat for the Crusaders led to the capture of many Christian settlements in the Holy Land as well as the fall of Jerusalem later on that year, and inspired calls for a Third Crusade. Thank you for looking and enjoy.5 points
-
Finally finished. The polycarbonate display cover was a struggle, gluing polycarbonate I find difficult. Initially I had the circular lid sitting on top and tried Araldite (fail), then added some CA (fail). Eventually I sanded down the lid so it fitted into the cylinder and used special water-thin acetate glue, then a few areas of CA. Then hid the glue mess with some vinyl cut on my Cricut Maker. I had to use 3 bolts/nuts in the back to hold the cylinder closed, too much tension for glue alone. Turns out our niece has won a scholarship to a Uni in Singapore, so not sure when I'll get it to her now as I had a plan for our daughter to deliver it to her in Melbourne.5 points
-
Gentlemen, my most tricky camouflage kit is done! Enclosed you can see the finished Henschel Hs 129B-2 of the 8.(Pz.)/Schl.G.2 based in north Africa 1943. Hope you will like it......5 points
-
I blame it on Quantum Physics. Since some aspects of Quantum Physics predict an infinite number of universes, there must be a number (an infinite number actually) of universes where I've bought these kits, so why not add this universe to the list? I mean, it's Science! On a more practical note, this kit does look very nice, and I could use another Meatbox or two for my Operation Musketeer collection (of unbuilt kits). Regards, Jason5 points
-
Chipping started. I used the Ammo mig OD highlight color mixed with 1 drop of cremeweis and a drop of retarder. All the basecolor chips are done with a 0/3 paintbrush. Next is the dark grey steel chips and the some rust stains here and there. When all that is done i can start with the dust and some stains.5 points
-
@Troy Smith thanks for all the comments/photos. This one in particular makes my Tamiya X3 look like a good match. But I thought @Courageous's P-63 looked closer to what was on G-AMAU with Humbrol 15, looking much lighter than Tamiya X3 on my Hurricane. Here is G-AMAU, now with exhaust stacks and upper cockpit painted. I think she's looking purty!5 points
-
Indeed Andreas. Today's progress on the design of the front superstructures and the second central deck, the bridge bunker.5 points
-
Cheers Chris, I hope Airfix decide to model a new Halifax. Although the Revell kit goes together beautifully, there's just too many shape issues. The Almera isn't my cup of tea, but as it was bought just for the trip, it was the nearest we could find that could be made to look Shermanish 🤣 Up until earlier, this is what we had. I'd started to detail the no.1 engine nacelle with raised fin guides. Then @Graham Boak got me thinking with his ideas. I dug an Airfix Lanc B.II out of the stash to see if I could mate the engines on but I think it would require too much work at this stage of the build because the engine would sit further backwards than the Revell ones. The main issue with the Revell nacelles apart from lack of detail is the leading edge being too bulbous so extending the leading edge and sharpening it up would at least give it that distinctive Hercules look. To do this, I decided to add a bit of plastic around the intake, but getting it fitted was a challenge so came up with a tool to help. Pictures speak a thousand words so this is what I mean: Here we have a strip of 0.5mm x 0.5mm card wrapped around the leading edge, definitely looking more herculean now! Next step is to build it up with Mr Surfacer 500 and let it cure over night before sanding. If this works, I'll do the other three. Whilst I could just ignore this, I want to do the aircraft justice. fingers crossed! I've since removed the exhausts to make the job easier.5 points
-
A woman walked into the kitchen and found her husband walking around with a fly swatter. “What are you doing?” the woman asked. “Hunting mosquitoes” He responded. “Oh, catching any?” She asked. “Yep, two males, two females” said the husband. Intrigued with this information the woman asked: “How can you tell?” Her husband quickly responded: “Two were on a beer can, two were on the phone.” Simon.5 points
-
I sense a new GB coming on... I have, and I might be. That's very confidence building, thank you. Thanks, Phil, much appreciated. Remember though, I use artist acrylic paints so the water works very well on them to soften them up, not so sure about other paints... The ghost seam turned out to be a maintenance panel 🙂 Thanks! 🤩 ...another GB idea comes to mind... 😆 The golfers among us (I'm not one, but bear with me...) will be familiar with the yips (https://en.wikipedia.org/wiki/Yips), but it seems modellers can be afflicted, too. Several decades ago I had the yips while a member of my pub's pool team. It manifested in an inability to play the cue ball without an inordinate hesitation and then a sudden, paroxysm-like strike which was almost invariably wayward and anyway much too hard. My affliction didn't last long, thankfully, but was the subject of great mirth around the table while it did. Now, fast forward to the past week and a new episode of the yips has had me hesitating on making progress in any meaningful way because I am/was not really sure of what I'm doing. That said, over the weekend I did finish the underside, albeit with a bit of a sudden release of activity, so to speak, and which wasn't a complete hit when it landed. By the way, I'm putting the wonky yellow stripe on the bomb down to faulty manufacturing. Anyway, the result... Again, the look I am aiming at is one of a used airframe, but freshly refurbished and returned to the squadron. It's not my best work but was all I could muster at the time. Tonight though, I had renewed confidence and tackled the fuselage weathering and some detailing on the engine. I actually finished painting the engine a long time ago, but having bought some lead wire recently so that I could wire things up, I thought I might have a go at wiring up Anderson's engine. I don't normally do this, even with kit PE, so new territory for me. I started with the easy wires... Then added some more for the other sides of the cylinder blocks. I didn't run them to their proper locations on the cylinders as the finer detail can't be seen inside the cowl; call it my representative rather than replication style... The wires needed a lick of paint, I chose Burnt Sienna as that's a reasonable choice to match the wires on KD431 as seen in the walk around on BM. I liked how using the water based acrylics allowed a little of the metallic to show through, it added a little realism I think. Then I had no choice but to work on the fuselage. I applied some pencil weathering and added a first finish coat. This is to check the depth of the chipping - it always fades a bit under the clear coats - and also to allow for a little bit of a wash in the control surfaces and maintenance panels. After the wash I added a little more chipping as it was a bit too faded and applied the final finish coat (probably; there might be cause to add a little more to blend in all the components when I do the final assembly). Same process as before, here's the result... It's subtle inasmuch that it cannot really be seen unless you look closely. The final pic taken further back shows an almost clean airframe whereas the close pics show quite a lot of chipping. This is consistent with the contemporary pics as well as the colour close ups in the walk arounds - the further away one steps back form the airframe, the cleaner it looks. The whole is now sitting to cure off properly and then I'll give it a little bit of a polish using Tony @TheBaron's trick of using pantyhose, tights (not mine, my wife generously donated some spare), as the polishing cloth. That's it for now. Cheers.5 points
-
evening folks in order for me to work on all the fairings under the fuselage, I need to skin the lower wings like the real one and the fairings sit over these. To finish skinning the wings I needed to make up the canvas wheelbay liners - for these I used very thin lead foil which was shaped over a small pot.. ..there is a small, box like bit of the cover that was made seperately and blended in with foil tape.. I took a pic with the label in case anyone wants to get some, it's great for this sort of thing.. ..these were primed with mr surfacer, but the adhesion is very weak.. ..I painted the canvas colour out of the model because I thought it would be eaiser to get in all the nooks & crannies, but a lot of paint flaked off when it came to getting them into the wheel bays so I had to mask up and paint them again.. ..after painting the many press lock tabs were added into the well and the wing skin panel added. This panel has double layers in places so no need to rivet it. Also this panel has a lip all the way around the aperture which was added before sticking it down.. ..they need blowing out as in the pics they still have lots of dust & wire wool bits from panel clean up.. ..then the doubler panels were added.. ..I am not especially happy about the painting - I see these figure modellers who make canvas and clothes look so realistic, but I just don't know how to do that anyways, it's done and it means I can carry on skinning... TTFN Peter5 points


.thumb.jpg.76f12b87ce9ca9929c9aabdcf8f9d2dd.jpg)


This leaderboard is set to London/GMT+01:00