
Leaderboard


Popular Content
Showing content with the highest reputation on 23/09/22 in Posts
-
So the 3rd of the classic BoB era German bombers. First Revell kit I've done, and on the whole it went together very nicely. Turns out the cockpit glazing didn't fit as nicely as I first thought, but not too obvious. Eduard Zoom set to gussy up the cockpit, otherwise OOB... Decals went down nicely, although the long red no-walk strips were a bit of an orifice, as was trying to make the ones on the dive flaps match up to the big crosses underneath. Paint mostly Vallejo Model Air. Thanks for looking! ...and with mates, ready for a jolly day out in that London...46 points
-
hi,every one!!🙂 this is my Eduard 1/48 bf-109 g6 .. this kit might be the best 1/48 bf-109 kit I have ever build. no fitting issue, and the decal is very good. I am happy with the result hope you like it😃 and here is the video build if you are interested😃32 points
-
Hi All, Just wanted to have a go at posting one of my latest builds here on BM. This is my first attempt both posting, sharing images. Probably got a lot to learn, but here's my toe in the water. The kit is the Airfix Beaufighter TFX in 1/72. I found this a great kit, and have built it more or less OOB. Did add a plastic sprue for heater tube in cockpit, some wine foil seatbelts, some EZ-line for the ariel, oh, and a small lense for the landing light. Kit decals used, which behaved impeccably with some gentle use of Microsol/Set. Also cheated on masking of cockpit with some peewit masks. Kit is painted mainly in Tamiya Acrylics, Flory panel wash, Oil dot filters and staining, Vallejo Matt/Satin varnish mix. Hope you approve of my first attempt. Welcome any feedback you could give for the next time. Thanks for looking, Kevin20 points
-
A work of some time ago; the RS kit is good, but, like all models of this type, it requires some modifications and a fair number of additions, particularly in the area of the engine and its radiator and in that of the wheel wells. The rather bare cockpit also needs numerous additions. The wheels in the kit are too small, so they have been replaced with those of a Bf109 F. The model represents a B-1 from Industrieschützstaffel, a squadron formed by the pilots of the company a protection of the Heinkel factory in Rostock-Marienehe in September 1939. The camo is in RLM02 (or RLM63) integral (mixture of Humbrol Enamels), entirely brushpainted; the decals are partly those of the RS, partly come from other sheets and the one relating to the indications of the flaps on the left wing was printed by me. Hope you like it. Thanks for your attention. Criticisms and suggestions welcome. Giampiero Piva18 points
-
Soooo! here it is! The new P-38J from Tamiya is certainly a thrill and the product is of very high quality! My best advice is to follow the building notice to avoid nasty surprises, and even doing this did not spare lonely moments! Thus said I riveted the whole kite taking a lot of care to avoid scratches as an aluminium finish is never tolerant with those tiny mistakes. Maj Pappy Cline P-38J wore this decoration as the page 246 of the beautiful book from John Stanaway "Possum, Clover &Hades" shows. It also shows an Olive drab anti glare panel and not black as on his latter P-38L. I have used AK Aluminium and Dark Aluminium and a very light weathering. I did not used any wash at all to keep the aluminium shine which pleased me. So thanks for watching, best regards. DSC_0011 by jean Barby, sur Flickr DSC_0009 by jean Barby, sur Flickr DSC_0008 by jean Barby, sur Flickr DSC_0007 by jean Barby, sur Flickr DSC_0006 by jean Barby, sur Flickr DSC_0004 by jean Barby, sur Flickr DSC_0003 by jean Barby, sur Flickr DSC_0002 by jean Barby, sur Flickr DSC_0005 by jean Barby, sur Flickr17 points
-
Just completed & an absolute pleasure by & large. The jet pipes were not a brilliant fit for me but the rest of it pretty much fell together. Lots of decals including for the 1000lb bombs which were massively too large for 1/72 scale so having struggled with one, I chickened out & forgot them!16 points
-
Hi all This is the Italeri (Dragon/Trimaster) 1/48 Ta152H, finished as 'Green 8' of Geschwaderstab JG 301, one of the aircraft identified in Axel Urbanke's recent JG301 research. No pics of Green 8 are known to exist, but it's depicted here without the familiar JG 301 red/yellow tail band, as it seems that some of these were painted over before the end of the war. If a pic ever emerges of it wearing the tail band, I'll paint it back on Markings applied using Montex masks, with the octane triangles from the kit decals. Anyway, hope you like the pics12 points
-
Here's number four in my obsession. I painted it as a bronze cast gun would have appeared in Royal Naval service. Strictly out of the box with the exception of closing in the backs of the wheels, which you can't see anyway, and adding a "bore" to the gun rather than the open maw the kit has.11 points
-
As well as stabling the horses I have been doing some of the final construction work on the buzz. Added the splash guard to the back nearside wheel and the hand rail for passengers coming aboard to the platform area. And the ceiling downstairs got its bell cord. Some of the weaker paint layers need beefing up below the individual stairs too, hope I remember to get on with that. 😰 This is just about all the rear end construction finished but the driver's end hasn't really been addressed yet, his mounting steps are next in line for construction. And the socket for his whip, mustn't forget that huh? Swingle trees next-ish too then the horses can be harnessed ready for work.11 points
-
Trumpeter kit. An extremely good kit that I highly recommend. I didn't weather this but I should probably go back and give it a little pin wash. Cheers, Arthur10 points
-
Yeah it's tiresome Don't like the price..... don't buy it. They're not a charity .10 points
-
Hi all Finsl coat of Dark Green now brushed on and post shaded with lighter shades, trying for a slight mottling but not too much . Also unmasked the yellow leading edge areas. The Prop and Spinner are done, you may notice that it's not yellow!!! There was another thread and a photo of the airframe was studied by the author and another and they have stated the spinner was a darker shade than the yellow tips, so they have surmised red and I have also gone with this. Quite happy with thus progress. Thanks for looking in. Chris10 points
-
This time the model Su-27 Flanker UAF Trumpeter 1:32 The model in Didgital camouflage of the Ukrainian Air Force about the model itself I think it makes no sense to write too much is not the best model but there is also no alternative in 1:32 scale I will try to add more photos in the near future, unfortunately I have technical problems with the memory card.8 points
-
Hello everybody … Id like to present to you my 1/48 Monogram F-84F Thunderstreak. This was built for the Classic Revellogram build down in the group build section. I have built in the South East Asian camouflage pattern worn by the USAF. The plane represents the final use by the Illinois’ 169th T.F.S.. They're still based out of Peoria Illinois but currently operate C-130 transports. I have given it an asymmetrical load-out of an Mk.117 and an BLU-27 napalm canister. Not a normal load but within operating tolerances. The small tanks usually carried outboard were 191.5 gallon tanks which equal 1245 lbs. Both the Mk.117 & BLU are 750 lbs. Please feel free to ask questions, post comments or visit my build thread. Dennis8 points
-
The -67 test car had the fuel filler cap through the bonnet. It's not included in the kit, so I scratched it from some sprue and Evergreen strip, then drilled and cut the recess in the resin. The frames for the door and side windows are another tricky issue that is meant to be polished and fitted after painting. The fit is less than perfect and it will be difficult to get a sharp finish this way. I decided to do the same as the rear end trim, fit them now and use BMF. After some adjustment of both the resin and white metal I glued the pieces little by little, checking the positions as I went on. With some sanding and small dots of filler to make everything come together I have some descent frames in place.8 points
-
horizontal stab fender from a different FW190 F8, it has a brown color, then hand brush strokes of 74 and over it winter white camo, also late yellowish 76 on the lower surfaces7 points
-
Source: https://www.facebook.com/kotaremodels/posts/pfbid029bEbatMrjsLQhG2NKmeiQZr5E2FRC8RGTFgkuzrEadSVk4mGCkQmnpnEVfeTVKHyl V.P.7 points
-
Indeed. When I was at work (as a University Lecturer in a science discipline) we used a 'Hierarchy of Evidence'. In other words, some evidence is strong and compelling, some less so. Applying that idea here we might get this hierarchy from strong to weak evidence 1 The actual airframe in 1945 (not likely) 2 A preserved airframe in original camo stored out of the light (I believe the Bankstown 109G in Australia is this) 3 Colours found during a controlled restoration (eg the NASM) 4 Artefacts from digs (these can be affected by ground water and soil chemistry) 5 Colour pictures (with all their problems as above) 6 Black and White pictures 7 Non-pictorial records (Squadron accounts and pilot logbooks) 8 Pilot recollections (Orange Ta152 anyone?) So applying this to the original post, the Australian preserved Bf 109G-6 has a whole plethora of hard-to-identify colours including an almost black, light grey on wing uppersurfaces and a blue on the cowl bulges that looks very like the colour you've posted above. These have been dismissed in the past as 'oh, it's been through a recycling centre'. Yes it had, but someone painted it - but with what? I know this aircraft is a little peripheral to the original post about Fw190Ds, but it offers a significant additional piece of evidence to our debate in my view - as a very rare airframe extensively photographed in its original paint, we struggle to account for the colours we find as they appear not to conform to our expectations. NASM examination of their Me262 produced the light grey originally under debate (not any photographic interpretation but real paint on a real airframe). The NASM restoration of their Fw190F-8 produced this array of unexplained colours: and Hitchcock recorded these chips Pictures from here I'm making two points here: Late war colours seem (from the airframes we have access to) to employ some colours that lie outside of our current understanding of 'the rules', even allowing for colour shift, aging etc. BTW, you judge how accurate the Monogram Painting Guide chips are compared to the artefacts posted above by @antonio argudo Applying this to the original post - (quite right @Jochen Barett to keep us on track) we cannot be certain of anything without the machine in front of us. Simple. I'm not suggesting that we abandon our current thinking and that 'anything goes' with late war colours. There is ample evidence of RLM guidance and colour application for these. However this guidance is ambiguous in places. I am suggesting that we have an open mind to more colour variations than we might have expected because these variations do exist. Second, I wholeheartedly agree that interpretation of photos (be they colour or B&W) is fraught with problems, and that too much is sometimes made of photos of poor or indeterminate quality. Nevertheless pictures are often all we have, so they have a place in the debate (just not as definitive as is sometimes claimed), especially where there appears to be a significant number of examples available on film, accumulating as a body of evidence. Or there is other corroborating evidence, such as artefacts. The picture of the Furth dump is both challenging and helpful because there are two Fw190Ds in the same exposure. One on the right conforms to our expectations (and 'the rules'). Black 4 on the left is apparently painted very differently, with the upperwings having a light grey colour applied together with dark green. Taking account of all of the issues around photo interpretation highlighted above by @Troy Smith, the right-hand machine provides an unusual and very useful and thought-provoking comparison in terms of colour shift, sunlight illumination and exposure. This picture deserves some measured consideration. And it's not just me that thinks so - that picture appears in publications by Hitchcock, Brown & Wadman and Crandall. All highlight the unusual grey on the upperwings. It's probably not 77, but I already said that primer was more likely than 77 in my earlier post. So digging up the golf course at Furth would be really helpful! Please feel free to challenge or contribute HTH SD7 points
-
Big and warm congratulations for @Procopius and the rest your family! Happy days for sure! On our recent competition i managed not to win anything at all, but I raided the Vendors instead and came out with a decent haul:7 points
-
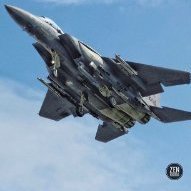
Dragon Warbirds diecast F-15c, canopy replaced seams cleaned up and repainted in the same scheme with accurate colours from Xtracrylix and decals from Hasegawa, finished with Winsor and Newton Matt f7 points
-
Hello again. Back this time with some finished pictures of a project I've been dragging along on for some time. Years ago, I bought this Anigrand XP-49 kit on-line, as a used kit. It had some problems. The boom halves were badly warped, the landing gear doors and nose gear leg were missing, as were the mass balancers for the elevator. So, I started slowly sawing, slicing, bending and scrounging replacements parts,in this case from the same old MPC P-38F kit that I scrounged other parts from for my XP-38 prototype build. Only the nose gear door had to be fashioned from an old fuel tank of the right diameter, as the one on the XP-49 was longer than on the P-38. This became one of those kits that were only worked on while paint or glue on other models in progress were being built, so I never shot pictures for a build thread. Other than the above-mentioned problems, this was just another simple resin kit, albeit, one of the older Anigrand offerings. Like most other resin vendors, Arnold has improved his techniques in later years, and are these days, his kits usually quite build-able. The Lockheed XP-49 was a later proposed variant of the P-38, with larger, more powerful engines and weapons, as well as a pressurized cockpit for higher altitude flight. The newer engines didn't pan out, and while the XP-49 was said to have "run circles" around the P-38's, the advent of the long-range P-51's made it not worth the effort, First flown in 1942, it was tested to destruction at Wright Field in 1946. In any event here are a few pics of the finished beast: And, for those interested, here is a shot of the Lockheed twin-boom brethren, from left to right, the XP-38, the XP-49, and the XP-58 "Chain Lightning", for comparison purposes. As always, I'm glad to add it to the collection. Thanks for looking, comments or questions always welcomed. Ed7 points
-
My third build in a week whilst getting over a spot of stupidity induced surgery. Hasegawa F14 Tomcat The box The bits I have a bit of history with the F14 as it was one of the first kits that I built when I got back into the hobby 5 years ago. Here is my Italeri version which I was pleased with, but it simultaneously makes my teeth itch.6 points
-
Well folks, I didn't believe that I will say this after about a year and a half but she is ready for inspection! OOB with Eduard Look IP and seatbelts. Painted with Tamiya, Gunze and Vallejo paints. Weathered with various filters, Tamiya, Ammo and Vallejo washes, Prismacolor silver pencil, AK weathering pencils and Vallejo and Revell pigments. I am very satisfied with the end result, with a couple of mistakes made which I can live with. I enjoyed the process very much and learned some valuable lessons for the future. Best, Nikola6 points
-
Hi, Busy afternoon masking! Not as bad as I thought it would be and quite enjoyed it 😀 A little overspray, but nothing that can’t be easily fixed… And the finished article, I do have masks for the roundels, but I may use something from the decal spares box if I have something similar. Quite satisfying! Guy6 points
-
The BC Aviation Museum is based in North Saanich on the Island adjacent to Victoria International Airport, some 40 minutes' drive from the provincial capital Victoria and 10-15 minutes' drive from the ferry terminal at Schwartz Bay. As per the name the museum's theme is aircraft associated with British Columbia and offers a selection of civil and military aircraft with associated displays and artefacts. Unfortunately, I only had an hour to look round as we needed to catch the ferry to the mainland but there is enough here to keep a visitor happy for a full morning or afternoon. The museum has its own Lancaster which is currently in large and small pieces. Built shortly before the war ended it never saw combat but instead operated in the maritime patrol role in Canada until retirement in 1963. It then sat on a pedestal in Toronto before being acquired by the museum in 2018. The aim was to restore it to flying condition although my understanding is that this is not feasible owing to structural issues in some of the aircraft's sections. The expectation was that it would take 10 years to reassemble and refurbish but this target is realistically a bit of a stretch. Opening hours are 10-4pm, Thursday through to Tuesday, closed on Wednesdays. The entry fee is a very reasonable CAD$15. The museum is staffed by friendly, enthusiastic and knowledgeable volunteers. More details of the museum and each of the airframes on display can be found here: British Columbia Aviation Museum (bcam.net) 1. The day after the Queen's death. It was noticeable that very shortly after the news broke flags on government and prominent private buildings moved to half-staff. 2. 3. 4. The refurbishment hangar with pieces of the Lancaster. 5. The Lancaster's centre section. 6. The wings sit behind the fuselage. 7. 8. 9. 10. 11. Viscount 12. Bell 47D 13. The child in each of us will be delighted that you sit in the cockpit of the Silver Star. 14. This Bolingbroke is a hybrid from two aircraft. 15. Anson Mk 2 16. A Harvard is to the right of the picture. 17. Tracker 18. A26 Invader converted to a fire bomber. That's it, thanks for looking.6 points
-
I built the second nacelle yesterday and applied some Dissolved Putty on the various seams that i thought required it. This afternoon, when I surfaced, there was some light sanding and some gluing. There is a little work required around the nose of the nacelle and I may get to that tomorrow, but I finish the night shift tomorrow morning and will be heading into Edinburgh for Scale Scotland. So, there may or may not be an update if I can summon the energy to mask up the clear pieces. Thanks for looking, Cheers, Alistair6 points
-
this is one of many photo taken at Neubiberg, when JG52 flew in to surrender to the west, from different angles, on different cameras at different times, (it was a popular backdrop for GI photos).... shame no-one was using color film but images keep creeping out from long forgotten albums.... Anyway, it's worth have a looking at mor to see how they appear. This was posted in discussion for the colour image of the Erla G-10 or 14/AS I posted above, by Michael Ullman, noted German researcher "RLM-Doktrin was always Never waste raw Material. Is obsolete Material like RLM 78 in 1943 (No longer a Need To produce Tropical Aircraft) available they Must used up the RLM 78 Stock before they can Order News paints. Documents That these deviations describes are Not discovered until now. The other 50% are the raw Material shortages. Everything what was available was used. To extend low Stocks I am realy shure that they Mixed paints To produce paints To fulfill there deliberiert obligations . Under this circumstances it is possible that the Color photo showing Parts of the Aircraft painted in 79." It's a private group about late war 109's, for those that are members, photo and discussion is here https://www.facebook.com/photo/?fbid=10158427792665687&set=g.2365011260188196 a good example of possible 'bitsa' subcontractor permutation is this Bf 109K4R3 9.JG3 White 8 WNr 332884 Gabi note the cowling is likely 75 and a light grey (maybe they unidentified primer, maybe using up 77) the main fuselage maybe 81/82, with the 'greeny' 76, the tail, subcontracted, 75/82 with a blue 76 just visible. These tail colours were confirmed in the Monogram monograph on the Bf109 K, which had a relic of the wrk nummer of a another JG 3 K-4 which had been cut out and kept. the page in the original book has a colour image of '334176' the scan is B/W, Yes, I am aware it's like counting angles dancing on a pinhead, but the sheer amount of information now widely available compared to when I was first interested as teenage school boy, 40 yeas back, note, the Monogram monographs, now available as scans, were pretty much the cutting edge of publically available research. Note also the image of the K-4 with what look to be a very light uppersurface, this is a plane in the background of another one of the Neubiberg photos. see here for a gallery of these see here to see how scarce K photos were back then https://boxartden.com/reference/gallery/index.php/Monogram-Close-up/Messerschmitt-Bf-109K If anyone reading this really wants to see how many changes there have been, this is a scan of the 1966 Aircraft in Profile Bf109G/K monograph https://boxartden.com/reference/gallery/index.php/Aircraft-Profiles/Germany/WWII/Messerschmitt-Bf109G-Gustav when there really was no idea what a 'refined cowl' G was, or what a K-4 looked like, or how to identify one. EG, the below, ANOTHER Neubiberg image, showing a G-14 as a K-4, and just visible by the lower prop tip... a K-4 quite possible the one in the blow up just to finish, a couple more late war 109s in colour this one? weird exposure, or wings in different colours, that starboard wing look pretty green in this....6 points
-
Dear Modellers, Here I like to present you my recent Fokker model. I build it in scratch, scale : 1/48. A bit of history : only 3 planes were build, two were sold to Malert in Hungry. The prototype was bought by Alpar in Switzerland. The F.XI still exists and can be seen in the Ansett Terminal of Sydney Airport. For the complete story have a look here: https://www.fokker-history.com/en-gb/f-xi How I build this model, please have a look at this WIP , complete with a major mishap....:-) https://modelbrouwers.nl/phpBB3/viewtopic.php?f=46&t=54286&sid=9e49432014515ad85ddb2d19d6fd0c28 I hope you like the pictures ! Greetings, JohnHaa6 points
-
I'm honestly quite puzzled by some of the replies here... really, has any of you participated in a discussion about accuracy of a kit ???? Has any of you properly read one such discussion ??? 0.00001 of a Micron ???? Thickness of the plastic ???? Do you realize that all kits that have sparked discussions over their accuracy have done so because of major shape and/or dimensional errors ?????? Because that's the reality of these discussions, every time they occur is because someone notices some major error, it's not a matter of microns, most times it's because of shape inaccuracies that can be seen just by comparing the model with photographs of the real thing. Want examples ? I can bring up many ! In most of them just one picture is enough to show the error, in a few the errors can be found just by comparing dimensions with proper measurements of the real thing. But in any case we're talking errors that go well beyond the limitation of the manufacturing process and are always due to one thing: the use of incorrect and/or insufficient references by the manufacturer. And more... accuracy Vs. buildability ? What's the correlation between the two ? There have been very complicated and hard to build kits that were also inaccurate and there are kits designed for easy assembly that are remarkably accurate. A kit can be easy or difficult to build regardless of how correct or not the cross sections are. An accurate kit does not have to be more complicated than an inaccurate one. Complex engineering is generally due to other requirements, for example the need to add more detail or to make different versions from a common set of moulds. Stuffing up accuracy while building ??? Why ? if my kit features accurate shapes and dimensions, how are my skills going to affect the final result ? Does it become shorter because I'm less skilled ? Sure, I may mess up the cross sections because I'm sanding the edges too much... but why should I sand the edges of a fuselage to the point of changin the cross sections (unless it's a vacuform )? The only way a modeller's skill can affect the accuracy of the complete model is by gluing the parts incorrectly for one reason or the other, but then such an error would equally affect a less accurate model (I should know, years ago I inverted the intakes on a Matchbox Harrier... made for some unusual looking model). But this has to do with basic skills, it's not much a matter of being a more or less experienced modeller. Not mentioned here but an often discussed issue... accuracy Vs. price ? Sure, more research can in theory result in higher development costs. Still there are plenty of examples of companies offering pretty accurate products at very reasonable prices so it can be done. Simply some companies try harder than others.... Accuracy of a kit is a result of the work of the manufacturer. Accuracy of the completed model can then benefit from the work of the modeller. It's then up to each modeller to decide how much work, if any, he/she is interested in putting in. Some may want to put more, some may just not care. As modellers each of us can clearly do what he likes. As customers of kit manufacturing companies we should however be entitled to ask from them as much as possible in every aspect, and accuracy is one of them.6 points
-
Airfix workbench Source: https://uk.airfix.com/community/blog-and-news/workbench/airfix-and-most-heavily-produced-avro-aircraft-type V.P.6 points
-
I bought this model some 15 years ago. It was damaged, some decals had yellowed and the Rothmans decals were missing. As usual, I forgot to take photos of my model before I started the disassembly, but this is how it looks when new : Photo from Carmodel.com, for reference purpose only The interior : Photo from Carmodel.com, for reference purpose only As with most 956 scale models, this one has a seat for the passenger : I started by enlarging the space for the driver's legs : And cut the passenger seat from the frame : I'm covering the interior with aluminium tape. But the result is to shiny. I used Commandant 4 polishing compound to make it more dull. This compound is used to polish, but if you use it with a cottonbud, you can make the alu tape less shiny : The beam in the middle of the floor was enlarged and covered with the alu tape : I still have to add 2 triangles to the beam, you can see the right one in this photo : This photo shows the new panel I made, the hole will receive the scratchbuild fuelpumps : The panel has not been treated with Commandant 4 and shows how shiny the alu tape is before treatment : Will be quite a job to make the fuelpumps, 1/1 scale reference photo : I did a lot of sanding to the bottom plate, removed some plastic and added some strips : Sincerely Pascal5 points
-
Hoping not to bore you all with some more Mustangs, these are the bulk of my 1/72 models of the type, again built over several years and from different manufacturers. Probably won't build any more in this scale, enjoy and can cope with the larger scales better these days (apologies to the gentlemen amongst you). P 51c by peter crossman, on Flickr Pattie Ann P51b/c by peter crossman, on Flickr Flying Scot P51 by peter crossman, on Flickr BBD P51b by peter crossman, on Flickr Checker Tail Little friends by peter crossman, on Flickr P51 by peter crossman, on Flickr Bengal Lancer P51 by peter crossman, on Flickr Jumpin jaques P51d by peter crossman, on Flickr Estrillita P51d by peter crossman, on Flickr Was that to fast Untitled by peter crossman, on Flickr5 points
-
After the Anglo-Maratha War of 1803, James Skinner was dismissed from service by Daulat Rao Sindhia and was recruited by Lord Lake, who asked him to raise a regiment of ‘Irregular Cavalry’. On February 23, 1803, the regiment was raised at Hansi, Hatyana in the service of the East India Company. The initial contingent consisted of 800 men of Perron’s Horse, all of whom were old Muslims comrades of James Skinner. Skinner was one of a certain group of officers who had become British leaders of irregular cavalry that preserved the traditions of cavalry of the Mughal empire, which had a political purpose because it absorbed pockets of cavalrymen who might otherwise become disaffected plunderers. A second regiment of Indian Cavalry was raised by Colonel James Skinner in 1814, which became the Third Skinner’s Horse.5 points
-
Hi all. Here is my latest finished model, the mighty F-111E in 1/48 scale from Hobbyboss. Just by coincident, Reskit from Ukraine released a beautiful resin cockpit set, complete with pe parts, 3d printed instrument decals and plastic clear parts. From the same brand a pair of resin exhausts and a set of weighted wheels were used. A metal pitot tube from Master and a decals set from Caracal were also used for this build. The weapons and and fuel tanks in the kit are useless and I only used the AN/ALQ-131 pod. Laser guided bombs from a Hasegawa weapon set were used instead. As usual, I primed all parts with Alclad black pimer and painted the model with MrHobby acrylics. A wash was made from Abteilung 502 oilpaint and AK white spirit. This was a very enjoyable build, especially with the good detail and fit of the resin parts. Thanks for watching.5 points
-
Having built a few of these over decades, and having one on the shelf, following my Porsche build series recently. I added a scratchbuilt rollcage and alloy exhaust pipes. I've canted the kit number decals at 45 degrees on the bonnet and engine lid, just to be different. Having had problems previously with fitting the engine lid I added it before the body chassis connection. A couple of previous ones, built leaving out various chassis, axle parts due to difficult builds of this kit. and a rat rod barn find daily driver!5 points
-
Hi folks. I was 12 when the 1/24 Spitfire MK.1a launched the new range in 1970. I built it with all the innocence and enthusiasm a pre-teen model nut could muster and it was a production that fairly stunned the hobby back in the day and made quite an impression on me as well. Now, some 50 odd years later, I've felt a growing wish to re-visit the kit and build another one in the same vein - simple, straightforward and with no additions. A 1993 boxing was snagged a couple of years ago and immediately took root in the loft, where it's stayed until yesterday. The catalyst for starting it was a certain other 1/24 Airfix Spitfire; a pre-production sample of the forthcoming IXc I completed on Sunday just gone for Airfix Model World (November issue, out Thursday 6 October). You'd maybe think that 200+ build stages of that brand new and epic kit would leave me 'all Spitfired out' but instead, it's prompted a soirée back into the grandaddy of the line. A Montex Mask set is the only concession to modernity as the 1993 decal sheet was water damaged when I received it. So it begins... The clear lenses of the IP were added in anticipation of finishing paint. The pilot was ruthlessly Berna Clamped and left overnight to contemplate his appalling lack of co-operation... At first I thought 'leave out the engine and just close it all up', until I remembered that the exhausts need something more tangible than air to cling too...doh! It's a shame to take the money... That big 'ole seat is...big! A session of clean up awaits before the lab grade isopropyl comes out to clean it all down prior to paint. That's it for the minute - time for some nosebag before heading back to the modelling bunker. TTFN Steve5 points
-
I do not quite see the point of issuing three different formulae, of which one results in a notably different colour, and giving it the same nomenclature. Please don't get me wrong, this is neither critical of you nor of the publication you quote - but it sounds strange, unless RLM recognised that raw material shortages were imminent and started thinking in "ranges" for each Farbton, setting outer boundaries within which a Farbton could be produced and still be up to specification. I wouldn't dare to guess whether that's 74/75 or 81/71, or a brown and a green 81 used together. Aber die stirbt doch zuletzt ... 🙂 I think the order to use up stocks of at least 71 has been reported by Smith/Creek on several occasions, e.g. in the various incarnations of their 335 book (even though they state that Dornier got it wrong in their camou diagram in calling both 81 and 82 "Dunkelgrün", if I'm not mistaken...). That this was a general doctrine in new to me (which doesn't mean anything) but makes sense, considering that everything oil based would be precious after losing access to the Romanian oil fields in particular and that the petrochemical complex was subject to constant strategic bombing as well as the railway lines on which most of the paints would have been distributed. I do not propose "anything goes", but I also think there is not much merit in being dogmatic about paints used in the final year of the war (not directed at you @Troy Smith, it's just here because you quoted MU). I am pretty sure no Luftwaffe final inspector would have rejected a batch of G-10s or D-9s because they were not painted in the correct shades; I am equally sure no assembly plant would have rejected a batch of paint (at least when out of stock on that colour) because, due to e.g. shortage of one pigment, it was out of specifications. And I am even more sure that no one responsible at a plant would withhold a batch of planes because the specified shade was temporarily unavailable while an acceptable substitute was, either for still believing in the Endsieg, or simply for not wanting to come to and quick and painful end after becoming accused of sabotage of the war effort. And just another tiny aspect: IIRC the average life expectancy of an airframe in 1944 was something like 20 to 25 flying hours. Most of them were lost before Allied intelligence could note that the Germans were not painting their aircraft to their own specs, which may have hinted to a certain amount of problems... In case anyone is interested, my own personal belief is that 82 is the rather light "grassy" green, that 81 in its brownish variations is similar to US OD and something like a "reverse Ford T" (in other words, anything apart from black), and that in many instances of 1944-built airframes the "green" dark green may well be from stocks of 71. In any event, I will paint my D-9 - soon to be seen in your neighbourhood theatre during the next decade - in what I think best matches what I see in the references I use.5 points
-
Somehow I received a package from Hannants with the 1:72 Italeri (ESCI) re-released F-5A Freedom Fighter, along with a bunch of aftermarket bits and bobs. How did that happen? Cheers, Bill5 points
-
B-1B Lancer 9th Bomb Squadron, USAF – Dyess, Texas, 2014 Panda 1/144 scale kit / Caracal decals With the release of the newish Academy B-1B in 1/144, the kit I used here is redundant, but I was already half way through it so decided to carry on. It was really the release of the Caracal decal sheet that encouraged me to retrieve it from the attic where it had been part started for many many years. There aren’t many kits that I would actually call bad. This is the exception – it’s a bad kit! To start with the whole fuselage around the cockpit area just looked wrong. I decided to forgo a clear windscreen and added Milliput all over the front fuselage to reshape it, then added the ‘transparent’ bits with paint, 1/144 airliner style. Then there are the exhausts. If you were doing and early B-1B with turkey feathers you could just about get away with filling and sanding the kit exhausts, but later aircraft had the naked nozzle workings on display so I had a go at scratch building that lot (there is a resin replacement available for lots of dosh but I didn’t think this kit was worth it). Wheels were the next thing – those provided in the kit were ridiculously small. I had actually built a Minicraft B-1A years ago, wheels up, so I could use the wheels on the B-1B. Nowadays there are resin wheels available which maybe I should have bought. What’s next – ah yes, the wing section! The outer wings have so much camber that they could have come from a Sopwith Camel. I actually left this untouched because it's not that visible from the top and the engraved detail was very nice. The decals – oh, the decals. They look so nice on the sheet and have lots of good detail, but they had that too good to be true glossiness about them. Sure enough, they took an age to release from the backing, then just fell apart when touched. I tried coating them with Klear but it made little difference. Anyway that was before Caracal came along with a brilliant sheet so thankyou Caracal. Despite all of the above, and I’m sure there are more tales of woe if I think about it, out the end came a passable B-1B as part of my US bombers project in 1/144. Next up are a couple of B-47s which should be less challenging. Or should I go for the B-36 – or maybe B-58? That’s the great thing about this hobby – there’s always the next one….5 points
-
this is from a FW190 F8, late 76 variation5 points
-
A small update to show that some progress has been made Both fuselage halves cut ready for the Hasegawa spine. The cuts were made along the panel line just below and ahead of the fin and continued to a point at the rear of the cockpit opening above the canopy rail slot. I filled the apertures for the camera hatches with Plasticard so that I could save the rather nice clear parts for any future PR projects. I installed the new frame into the cockpit tub then joined the fuselage halves temporarily and attached Plasticard tabs to the rear fuselage and also to the lower edges of the nose fuel tank aperture, as suggested in previous threads, to help achieve the difference in level between the tank and fuselage sides. It was at this point that I realised that as the Mk XIV fin extends further forward from the rudder post than that on the Mk IX, the Hasegawa spine in not too short at all, so anyone planning a similar conversion and having a redundant Hasegawa Mk IX fuselage take note. I have temporarily attached one of the Hasegawa spines to a fuselage half and am reasonably satisfied with the shape, but have yet to decide wether to glue each piece individually to the corresponding fuselage half or join the Airfix fuselage first . Decisions, decisions. The plastic box on the left is full of spare canopies, mostly from Spitfires, so I shouldn't have any problem finding something to fit. The next step will be to fill and sand the fuselage joins, always my favourite part of a build (NOT) and when that's done the main airframe should come together quite quickly and I should have something something resembling a Spitfire. That's it for now, all comments/criticism welcome. John.5 points
-
Yesterday’s work kicked off with getting primer on various bits, and then some top coats after it had dried. RLM 02 for the tail wheel well and interior of the front of the cowling: More RLM 02 on the rear of the engine housing and the middle ring between the two banks (which I later realised should have been aluminium, so was repainted to suit). Alclad aluminium on the engine parts: And some RLM 66 on the cockpit: From looking at other builds, I knew the kit seat wasn’t great looking, as well as being ergonomically suspect as the base is longer than the back: I bought a Quickboost resign Bf109 seat, which looked much better: A bit of work to slim down the sides, and it fitted beautifully: I’m going to get a few more as I can see them being useful for future Luft ’46 builds. A bit of detail painting later (the best I’ve ever managed to paint a seat) and I slotted it into place. Literally. I slid it in for a dry fit, but with the paint build up the fit is so tight it’s not coming out again and isn’t glued at all. Just as well it was a perfect fit! For scale: The rest of the cockpit also got some details picked out, and the whole lot had a wash of Citadel Nuln Oil (I really like that stuff): I reckon the cockpit will be glued up next session. Other things achieved yesterday (though not necessarily in chronological order) were detail painting and a wash on the tail wheel: Followed by a modification to the retention features for that to enable me to add it after painting: Which let me close up the main fuselage: The engine nose was given a coat of RLM 66 and then it all got a wash of Nuln Oil when that was dry. Not much point getting too detailed with this as it’s too poor to display with the cowling open, and almost nothing will be visible once it’s closed up: That was then hidden inside the cowlings, like so: I need to do some filling & sanding on the gaps there. The post sticking out of it is actually the peg the propeller mounts on, which I forgot to install before I glued the engine halves together. I’ve got around this by cutting the disk from the internal end off, and then gluing it in from the outside. I’ll trim to length when the prop goes on. I painted the exhausts with Alclad exhaust manifold after drilling the ends out a little. A bit of a wash and then this area will be done as well, again another that will be virtually invisible once the mode is assembled: That’s where things sit for now. Shouldn’t take too many more sessions to see this in paint. It’s proving to be a far faster build than I expected! James5 points
-
The chrome strips on the sills were a bit short and also different from side to side, so I added bits of Evergreen strips to correct this. It's time for a first coat of primer. And so the stage has been reached when the build looks like almost any other build, with everything pinned up for painting.5 points
-
Make me think when I was waiting in the doctors waiting room. An elderly man (accompanied by his daughter) was talking to an elderly woman, and I couldn't help overhearing their conversation. The man said: we have something new at home for my safety at night. If I open the toilet door the light goes on automatically and it goes out when I close the door again . By which the daughter gets a really red face and shouts: DAD!!! Did you take a leak in the fridge again???5 points
-
So this is the kit I've finally ended up with Just in case you think I've short changed you on the size of the build, here's the dimensions. I missed a trick here I could have built this one in the "Less than a tenner GB" a while back I do hope the kit is moulded in white plastic Cheers Pat5 points
-
The windscreen, as mentioned, is too short and the canopy isn't quite correct either with the angle of the rear frame being wrong. The ejector seat is around 1/100th scale and the cockpit carries over the lack of canopy opening mechanism from the Italeri kit. There's also no HUD glass. The pilot figure isn't human. The junction between the wingtips and missile rails are odd. The intakes are too thick and a poor fit. The horizontal tailplanes are way too thick. The nose undercarriage leg scissors link is the wrong way round. The airbrake petals have their hinges but no sockets to fit into nor operating rams. Many major panel lines are missing. All the decal options are for F-5N but the kit represents an E. Other than that it's fine.5 points
-
I once ended up as a member of a military reenactment forum and some of those guys could give lessons in "rivet counting". You would get stuff like "those are the wrong kind of bootlaces for the 5th SOG in Da Nang in June 1967"5 points
-
If I recall correctly...long before I began building models (at 3-4 years old) my father built them for me. I distinctly remember him building some of these little WW1 aircraft and hanging them out of reach on the ceiling of my bedroom. There was a SPAD 7 and Albatros DV and I am pretty sure he built this one too. It was available at the time (1968-69) and he was a fan of Eddie, so it makes sense. Lying in bed at night I believed there were actual pilots in those planes, waving down at me as they circled high above my head. He never rigged them and probably used that terrible old Testors enamel paint. Anyway... Let's get this one sorted and started... The plans say green legs. I'll use the boxtops as a guide. White they are! I will also drill out the air vents in the cowling. There is fair amount of flash which is to be expected. So cleaning is first. The struts broke, so I fixed them with CA... To honour that memory I'll put Eddie in the cockpit...so far just hairy brush painting for these parts. The struts will become more 'wooden' eventually. The guns and the motor will get a bit of dry-brushed aluminum. Nothing too fancy happening. Just some model making...😉 I gave the interior a bit of tone and the seat is just a brown colour. Eddie supervises... No CDL here. The plans say Light Blue undersides, so Light Blue it is. There's even a rigging diagram. Done for the night... --John5 points
-
Hi all Second thinned coat of DG brushed on. One more then the post shading John @Biggles87, with this second coat I am using a slightly larger flat brush and I don't go right up to the demarcation as the paint will creep towards it slightly but not all the way so means you don't have to rub the brudh along the line, this is only needed generally on the first coat. This means the painting speeds up quite a bit. Pleased with that. Thanks for looking Chris5 points


.thumb.jpg.2c282efcc138b7cf7f1e1586a9c534d2.jpg)


This leaderboard is set to London/GMT+01:00