
Leaderboard


Popular Content
Showing content with the highest reputation on 17/09/22 in all areas
-
As per my Sea Fury just posted this was finished only a couple of weeks ago. This is the 1/32 scale FGA.9 kit made up to be 601 in the proper colours in my view. This is how I remember it when working at BD and I never felt it wore the ripple paint scheme very well. So it was my intention to build it up as a TWCU aircraft with some nice shiney SNEBs, however soon as I started those voices said otherwise. The kit is as has been mentioned with the usual pit falls but mainly it a very underestimated kit and super value. The cockpit had the extra couple of instruments added and all along I intended to add a pilot (courtesy of PJ) and in this stance. I wanted to imagine that engine is running just prior to leaving the line. The Porton tanks were made using extensive references and I used my 3D printer for the flat noses. First time I’ve used it in anger and they were mated to the kit tanks. Then the very visual weld lines and the filling cap above the nose was added. The spray tube from round tube drilled out. I then added 10 thou plasticard wrapped around the body of the tank. I left a small join line on the sides and used decals to replicate the tightening braces on the sides. They were both then sprayed Gloss appliance white. The fuel tanks sprayed red and a little wear on the noses added by using the dabbing of a sponge method. Aircraft was then painted and some sun bleaching added to some panels of the red spine. The badge on the fin is of A squadron which they added on some of the fleet occasionally. The square non standard item under the cockpit in leu of the gun compartment is a TACAN system added some time ago, but over the years it had various colours added to it. Oh the worn white outline on the fin flash is on purpose!.27 points
-
Hi all. Here is my latest finished model, the mighty F-111E in 1/48 scale from Hobbyboss. Just by coincident, Reskit from Ukraine released a beautiful resin cockpit set, complete with pe parts, 3d printed instrument decals and plastic clear parts. From the same brand a pair of resin exhausts and a set of weighted wheels were used. A metal pitot tube from Master and a decals set from Caracal were also used for this build. The weapons and and fuel tanks in the kit are useless and I only used the AN/ALQ-131 pod. Laser guided bombs from a Hasegawa weapon set were used instead. As usual, I primed all parts with Alclad black pimer and painted the model with MrHobby acrylics. A wash was made from Abteilung 502 oilpaint and AK white spirit. This was a very enjoyable build, especially with the good detail and fit of the resin parts. Thanks for watching.26 points
-
Hi all, Here is my latest Spitfire Mk.Vc built as Eric Gibbs' BS164 personal aircraft. This is the Profipack edition of the Eduard kit in 1/48 with some 3d printed details added. The most important addition was De Havilland Hydromatic airscrew, which I couldn't find in any of Eduard's boxings. The entire undercarriage has also been printed. No colour photos of this aircraft have surfaced, so it is hard to say what camouflage was used on this Spitfire. I chose Foliage Green + Earth Brown over Sky Blue, because it seems to match the tonal differences seen on the black and white photos. I used exclusively Mr. Paint lacquers. If anyone has access to a 3d printer with 4K resolution or better (I used Phrozen Sonic Mini 8K), I have uploaded 3d models of all the parts I used in STL format. The link to the zip file with all STLs is at the end of the build article (unfortunately in Polish only), which can be found here: https://pme.org.pl/2022/08/27/spitfire-mk-vc-trop-54-sqn-darwin-eric-m-gibbs/ Cheers, Tomasz22 points
-
My latest model ist this 1:48 scale L-4 Grasshopper. It`s a new tooling kit by Special Hobby with some fine details. Add the CMK wheels, the rest is OOB.21 points
-
Hi all, I finally managed to take photos this morning of a build I finished a couple of months ago, having got a decent base which I received yesterday. The base is 45 x 45cm and is my generic base for Boscombe Down a/c in the 70/80’s. The colour is actually quite sandy and was sprayed with various shades of browns and some dirtying up. Equally of the period there are no follow me white line, just the white spots. I found a photo on the internet of the Swiss hunters parked up from the IAT, so took my join line references from that. I purchased this kit from a very good friend on mine that I’ve known for yonks and has always helped along the way. I built this as a therapy build having dislocated my knee cap whilst gardening. So whilst waiting for a operation this was to stop me going mad whilst mobility was restricted. it’s the Fisher Item and I’ve built his Hunter T7 conversion but this was my first full resin kit. Overall I enjoyed the kit with some fit issues but we got there in the end. Made up as the A&AEE aircraft (pre-crash) using reference photos from the internet and old colleagues from Boscombe Down with additional antenna on the upper wing and period RBF tags made up on a word document and scaled down. Not much else to say as others have already done so.20 points
-
This is one of those kits that never made it into my stash. I came across the new 1/24 scale resin (trans)kit from Airtrax at a show during the summer, it was impossible to resist buying it and I started playing with the parts as soon as I got back home. It's a very nice effort with well made parts, but they label it as a transkit as it needs tyres (Tamiya Mini suggested) and a number of smaller parts to be complete. I decided to draw up a set of most missing parts in my 3D cad and have them printed, and my friend Johan Brusefält drew the front and rear tyres. While we were at it he also drew new rear wheels as those supplied in the kit didn't quite match the Exacton or Dunlop D1 that were used. What is seen here are the Exacton wheels. The exhaust system, the small parts around the pedals and some hardly visible details on the engine have been scratch built. There was a sheet of decals supplied in the kit, but I decided to draw and print them all from scratch on my own using my OKI/Alps printer. I had a lot of thinking and some interesting discussions here on BM about a good choice of license plates. In the end the choice was done easily, when finally looking in the original Bond Bug sales brochure. Here are some photos of the finished model. It's a pain to photograph; or rather I am useless at handling the camera, as the orange paint comes out in all sorts of shades, mostly too dark, in all photos. The brighter are most like the rear model. The build thread can be found here. It was a joy to build it, and thanks for all support during the work, I hope you enjoy the photos.19 points
-
Well, I finally got around to weathering the Hurricane! To round out a Battle of Britain movie build, I just had to have a Hurricane. So, I modified an old 1/48 Hobbycraft Hurricane Mk IIc into a Canadian produced Mk IIb, with a lot of scratch building, detail parts from a scrapped Ark Hurricane Mk 1, and various parts from the spare parts bin. It is * F, H3418 flown by Squadron Leader Harvey (Christopher Plummer) in the opening airfield staffing scene. The Bob Diemert restored aircraft (CCF c/n 42012, registered as CF-SMI, C-GWPH, and G-AWLW) was in fact a CCF Hurricane Mk IIb. It had the 3 stack round exhaust (not fishtail), it did not have the Mk II style 'kinked' tail wheel, but the earlier Mk I style tail wheel, blanked off generator cooling pipes, no oil collection channel on the upper cowl behind the spinner, A Hamilton Standard prop, and the unique 'Canadian' spinner. Also, I've discovered that this Hurricane made its way eventually to Hamilton, Ontario, only to be destroyed in the same hangar fire that destroyed Spitfire Mk IXc MK297 (another BofB movie vet, marked as AI*A in the 'taka taka taka' scene), an Avenger, an Auster, and a Turb-Commander, Feb 15, 1993. Many thanks to all on this site that offered info, suggestions and critiques. WIP - WIP build posts I know, too many photo's already. well, just one more ... After the fire, the Hamilton aviation museum replaced (?) the lost Hurricane with this fibreglass mockup, a very realistic 1 to 1 scale kit! (I want one!) Thanks for looking, Colin19 points
-
Hi all, This is my first time posting on this forum, and I'm not sure I'm quite up to snuff yet to wow any of you seasoned old dogs, but here goes. I started this model in July 2022 and just finished. I like to write about the process in some depth, but understand this is not the place for that. If anyone is interested in reading more about how this model came together (probably only of interest to beginner types like me), please check out my blog: https://meatchicken.wordpress.com/ Thanks for looking and for any comments/suggestions! Cheers.19 points
-
I present you my latest finished model of a fully stealth fighter aircraft.The great hasegawa f-22.The kit itself is pretty good.No major issues during the construction.I have added a colored eduard PE set in the cockpti and I have tinted the canopy.The painting was done using hataka and gunze lacquers and I hope I have captured the look of the f-22 camo that has a metallic tint to it.18 points
-
Hello to all of you.I have built this one several months ago.The Art Model Mig-27M of the indian air force.Quite the challenging kit to work with.I built it mostly oob just added several cockpit details that i made from scratch. Enjoy the photos18 points
-
After about ten years since I started working on this model, I would like to present you this model in the RFI! I wouldn't say much about the model, it is already well known to everyone. A very good model of Revell, but the appearance of the new Eduard's 110 overshadowed it. As far as I remember, the fit is decent, but not great. The details are really beautiful, especially the cockpit. RevelL decals are standard excellent, but I must say that they are still a bit thicker. Gunze's chemistry failed to neutralize transparent film. From the some extra touches, here ad there the panels are overlapped and the exhaust pipes are hollowed in. Painting with Model Master enamel authentic colors (the first time for me) and I'm really pleasantly surprised by how easy they are to spray (for classic enamels)! And their colors are just to my taste! The weathering was done using a stencil for the effect of marbling (more precisely, granite ;D), wooden watercolor crayons, pigments, tamiya washes, silver pencil and small chipping done with a fine brush. Stencils for the marble effect are very practical, but it is still desirable to adjust them with your own hands, so to speak (which I did not do), because you often feel an unnaturally sharp border. My problems were caused by the Montex mask, which left horrible amounts of glue, so in the end the cabin frame was painted 3 times, and finally with a brush. I would like to thanks our colleagues from MAKETARSKI KUTAK (http://www.maketarskikutak.com/index.php) for their crucial help regarding this problem. Only after taking pictures I did notice that I forgot to paint the radiators... I took pictures in two sets because I still struggle with photography. On a white background, the images turned out to be too dark, but perhaps still closer to the real model, while with a dark gray background, the images are clearly visible, but the RLM75 and 76 are too bright and the weathering is overemphasized. In the end, despite a certain number of mistakes, I must say that I am satisfied with this fast and experimental (for me) work! All criticisms, suggestions and praises are more than welcome! And the pictures at the end: The details: And a few WIP pictures with unfortunately ruined finished paint job. I over-aggressively polished the model and ruined the finished paint job which I did not adequately correct...16 points
-
Hello Here is my last build with this 1/72 Airfix AVRO Vulcan B.2 in the early 1960s. XL321 was in front line service with No 617 Squadron which at the time was the first Vulcan squadron with the Blue Steel missile. If you remember some years ago I built the Vickers Valiant in overall white and I could not resist to do the same with this big bomber. The decals came from the previous Airfix Vulcan box. I added the wheels from Armory and used some scale masks from ASK. I can say the kit is easy but long to build even if I had to fix a part of the port leading edge which suffered from a lack of material. I showed this drawback on another subject here. I think later I will build the Victor in the same colours. Patrick14 points
-
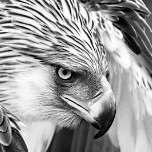
Converted the AZ model MD500E to the Philippine Airforce MG 520. This particular aircraft carries the number 512 which has a shark mouth painted in front. The front doors are removed, cockpit scratch built other than the floor and rear bulkhead, the cockpit console was corrected as its sitting very low. The main rotor base assembly is scratch built as this area is bare on the stock kit. The FN Gun pod and the LAU rocket launchers are also scratch built. Camo is painted using masking tape and airbrushed. The shark mouth is also airbrushed. Thanks for dropping by.13 points
-
Good day friends, Disappointed with my previous submission of the Tamiya P-47 Thunderbolt, I tried different techniques for a higher quality photograph. I still have some ways to go but here are the results. Please let me know your thoughts on this method compared to the previous photographs. Thank you, Mike12 points
-
I did this a while ago but never got round to sharing it. Lovely kit, the only issue to sort was the warped wing. I'm from a vintage where we used to fly these in Air Cadets like many others here so it would be rude not to add a few to the collection! Painted in MRP lacquers which go on beautifully, thanks for looking11 points
-
This HobbyBoss MiG 15 was entered in the FB Conflict100 Group Build. Captain Sergei Kramarenko flew this plane on June 17 1951 and engaged USAF ace Glenn Eagleston in his F-86. Cheers, Luka10 points
-
I’m blessed with a retentive memory. Actually I’m not - I took notes. Actually I didn’t - that’d be too anal. I’m making it up as I go along (again)… Well gents; these statement’s can’t both be correct now can they. Although my irony detector was set off by both… You would Terry, being a chap who I’m sure had confidence in me… Ta gents. ? Not even 8 years yet Bill… Me too Johnny; but the thing is so darned small that it’s quite fiddly enough doing it bit by bit; I just can’t imagine how I’d get all the blue-tack on, and manage to keep it in the correct place and masked in between, in one go. Plus I don’t like to leave blue-tack in situ for any longer than necessary. This way I get to do it in shortish bursts and keep the concentration levels high and the stress levels lowish…. It’s a comforting illusion of control.10 points
-
I completed this a few months back. Took me several months to complete but I also installed some electronics into the plane to light up the flight deck, the cargo bay and also some flashing lights on the wing tips. Had a bit of a nightmare with the wheels because the cat went and sat on it and they all pinged off but inside the cargo bay i have placed a World of Tanks model Panzer Tank.9 points
-
RFI here So here's the Close-down thread, Build Summary Trumpeter C Class Cruiser HMS Colombo - This iteration of the C-class cruiser follows on from the earlier HMS Calcutta but depicts a later 1943 variant configured specifically for anti-aircraft duties. As per my comments from the HMS Calcutta build, the basic kit has excellent fit and to my mind portrays the class admirably. Weapons and ship's boats are rather basic and will benefit enormously from 3D printed upgrading. I hope this kit sells well for Trumpeter depicting as it does a rather minor class of RN cruisers that were essentially designed and built for the earlier World War. Lets hope that the Dido-class ships long promoised by Trumpeter arrive soon. As it is this kit gets a Highly recommended from me. Micromaster 3D printed accessories - Well what is there to say - the detail is astonishing and no serious RN build in 1/350 can now be really done without using Micromaster parts extensively. "New" additions to this build (over Calcutta) were the deck lockers that add that further dollop of detail together with 20mm Ammunition lockers of which there are many given the 7 sets of Twin 20mm Oerlikons. Once again the 4" guns and there ammo lockers are indispensible as are the ships boats, most notably the 27ft whalers. The 32 ft motor boat on the port side is from a Shapeways "era" Micromaster set and has been truly superceeded by a recently released Micromaster "NZ" boat that came too late to make this build. The 16 foot "Skimming Dish" approaching HMS Colombo is a delightful model in it's own right. Superb all and now just about Essential! Black Cat Models 3D accessories - Follow swiftly behind Micromaster, and as I've said before are in many ways complimentary. The large Carley rafts, the Paravanes and the 40mm Bofors add that further detail that the basic model cries out for. Black Cat have moved into "Complete" larger resin/3D vessels unlike micromaster and share their offerings throughout US and IJN navies. Hopefully Ben will soon add Royal Navy figures to his range. North Star/Black Cat figures - For those of you who have read my comparative review of 1/350 figures, in this instance the proof of the pudding came down to the eating. After looking through all of my figures the ones that I came to, and that fitted the build in terms of actual scale size and useful poses were my North Star figures together with a smattering of Black Cat US Navy figures in caps (Set 3). when it came to placing them on the ship - the Holden figures are jsut too large and IMHO the ION figures just too small. The Starling figures also come out very small against the North Star offerings. I note their postal rate has dropped from £17 to £10. They just work, as do the Black Cat IMHO. Sovereign Colourcoats paints - Nuff said - why would you use anything else? Rigging - Infini 20 and 40 Gauge lycra thread together with Modelkasten "wire" which is just great but expensive and hard to get. Those of you who followed the thread will have picked up my tip re VMS Flexy CA glue - well worth getting. One other learnin point for me was doing "Insulators" on lycra thread. this occasion I used Canopy glue diluted with a drop of Vallejo airbrush cleaner - which seems to break the surface tension. Using an accupuncture needles I've found the trick is to touch once - wait then keep touching to "build-up" the "glob". Bob's Buckles - Indispensible for me and it's great to be able to support a fellow modeller who also posts Here (same as Jamie Duff). I use his 1/48 "Buckles" and "Tubes" which you'll see on the mast rigging. On this occasion I used some very fine "plaited" wire (chains) he supplied me for Paravane Chains and was utterly delighted. They really are just too small to portray using actual chain. I've tried plaiting wire but CANNOT get the fine result that Bob does. I'm sure that if you ask him nicely he'll continue to supply this very fine "chain". He gets my "Services to Modelling" award on this occasion! Base - Using Chris Flodberg's methods, simple and effective. However one mistake I made on this occasion was to use Liquitex "Gloss Gel" to fill the space between the styrofoam and hull, always an issue if you are posing the vessel in "calm" water. Despite "cleaning" it off, it still leaves a raised and shiney residue that took seveeal hours to physically "scrape" away Belatedly I remembered that I'd used Liquitex Modelling PASTE on Berwick which is much, much kinder in cleaning up Name plate - https://www.nameitplates.co.uk/ Who else? Instant service, couldn't be more helpful and I think great value. Addendum: as of 12th September 2023 - @Our Ned has I think, accurately highlighted 2 errors in my build which you might want to avoid in any future build of yours. These errors are propogated in the Trumpeter plans and the Profile Morskie booklet :- 1) The topmost rear twin oerlikon is likely spurious and in it's place there is likely a Mark III Gunnery director with Yagi areials 2) The forward davits abreast the Forward mast deploying the 27ft whalers are definitely NOT Radial (like Calcutta's) but are Quadrantal - an arrangement shared with Carlisle and Caledon I'm grateful to Ned for his input. So if you have't/don't go to RFI, here's the finished result And some pics of the "Sisters" together Thanks for looking It's a wrap. Rob9 points
-
Morning. Sorry for the lack of updates, work and life has ramped it up a notch. On a positive I have logs for the winter. And Chris. @bigbadbadge has sent me a little gift in the post. The generosity of the folks on BM knows no bounds. 😍 looks like I’ll get the decal part of this correct even if my ham fists make a mess of the rest.🤪 thanks Chris you’re a True Gent. I’ll continue some work over there later Part of the weekend. Thanks for sticking with it. Jont.9 points
-
A lot of lawyering had to be done this week which weren’t awfully compatible with finding time for the fiddlyness of Hawk camo in 1/72; but one has managed to make a start. Doing a mini (very mini) approximation of @TheBaron and studying photo’s of the subject made me notice a modeller-friendly feature of the wrap around camo. Every jet is different! Looking at this line up of 63 squadron jets you can see that whilst the essential pattern is the same the paint is obviously applied freehand in the paint shop cos the boundary edges of the patterns are all just a bit different. It’s particularly evident in the ‘S’ shaped curve under the cockpit on the starboard side. No two are the same! Which basically means that yer modeller doesn’t ‘ave to be too particular wiv the placing of ‘is blue tack sausages. Result! Anyroad up. We begin: These green patches have had a squirt of klear-cote as we go along to protect them from handling as things progress. Subtle variegation preserved so far… The rather clumsy Fritag technique Got lots of stick-it notes laying around seeing as it’s all paperless working these days. Another one done. Not klear-coted yet. It’s doomed to look a bit toy-like until the post paint oil work. And some bits and bobs whilst we’re at it. Proving to be quite time consuming. Enjoying painting again. But fed up with blue-tack already; and not looking forward to masking Valley Hawk Why do we do this?9 points
-
Hi everyone. Just finished this kit after a bit of a modelling hiatus over the summer. I've always liked the Gazelle particularly in the RAF training colours so I was quite pleased when AMP announced the release of a new tool kit. Not a bad kit, some nice extra details including a few 3d printed parts and a sheet of 3d decal control panels (although due to the transparencies being a bit unclear they are difficult to appreciate), plus a set of vinyl masks but they missed out the rear passenger window masks for some reason. Also the small nose P code is missing from the decal sheet. Painted mainly with MRP and Alclad lacquers and finished with Alclad semi gloss cote. Thanks for looking. gazza l8 points
-
Hi all! Here is my Blenheim, finished in Romanian colors. I used kit supplied decals and added PE seat belts, exhausts/intakes by Quickboost, and a Vickers K gun by Gas Patch (excellent by the way). Painted with MRP. Thanks for looking! Rich8 points
-
I'm delighted with this little model! My last attempt did not reach this stage. One of my more recent builds was the Curtiss Seamew; this was to be the aircraft that the crews progressed to after the Seagull but many reviled the Seamew so much that they went back to using the Seagull again! Intended to replace the Vought 03U Corsair series as the standard scout/observation biplane aboard Aircraft Carriers, Battleships and Cruisers of the US Navy. The Seagull prototype was formed in 1933 and became the leading observation/scout biplane along with the Grumman F2F and F3F. The seagull's long and distinguished operational career as "The Navy's Eye" is notable in the history of US Naval campaigns; it was to be succeeded by the Seamew but many reverted to flying the Seagull again until the role was handed to the Vought OS2U Kingfisher in service. Painted with Humbrol and Revell enamel paints. This was a very interesting little build because it had to be painted as I built it, instead of being painted afterwards. I used the decals that were in the box, they were still quite usable despite their age! They did need some patience though, they seemed to take a while to stick down to the surface of the model; I applied a decal or two onto the forward fuselage before fitting the upper wings simply because I would have had a problem fitting them to a finished model with the upper wings fitted and in the way and having my tree-trunk fingers! I also had to apply decals to the main float under the fuselage before I could attach it to the model but it worked out okay. The decals fitted to the waist and tail areas went on without a hitch but the ones on the wings took rather a long time to adhere to the surface despite using Microset and Microsol; but again they were fine once dry. I fitted wooden clothes-pegs to the lower wings so that I could turn the model over and fit the decals to the upper wings. This allowed to to carry on knowing that the underwing decals were not being damaged! I used the same idea after the decals were all fitted for when I had to turn the model over again to fit the floats! The tape was required to pull the main float over to one side because once attached it was sitting a bit off line, the tape is holding it central while the glue dries! The little wing floats were so easy to fit! I fitted the extra stays to the float first and then held each one upside down in a clothes peg allowing the stays to sink to the correct angle; when I fitted the float assemblies to the wings they popped straight into their mounting holes! They even supplied this nifty little stand for the model! Once I had the decals on and happy, I varnished the whole model with Klear, I had applied it before I applied the decals, but I always varnish over them to seal them before I varnish with anything else. Now all the decals are on and the floats are fitted, the model is now ready for pictures!😀 The chevron on the wing is actually dark blue; it just looks black. My next build is the Vought OS2U Kingfisher.8 points
-
The new tool kit, straight from the box. I used the paints supplied in the starter kit, put down with a brush.8 points
-
hi all, This is the 1/32 Italeri F-104G finished in the markings of JaBoG 33. The kit is very good but not perfect. Fit of parts was excellent in places and poor in others; some details were crisp, others not; the plastic was soft and accepted glue really well, but the nose undercarriage leg is very weak; and some areas were well detailed others not. On the whole it went together well, but i incorporated an Aires cockpit and seat (both superb), a Reskit exhaust and wheels (again superb), a Master pitot (excellent) and Peddinghaus decals (not so good). The decals conformed well and were very strong, but they were about 15% too small and slightly inaccurate. As a consequence, i used some of the decals from an old Revell kit which perfomed well. However their falcon's legs were too big by about 20%! In the end it was a bit of a mix and match plus some help from my friend Richard who provided masks for the black bird outlines, thanks. Hope you like it Andy8 points
-
Rumbled! Yes it was the distributor. I had copied the distributor from the Man from Uncle Piranha and just plopped it into the VW engine without thinking and it was only later while looking at the model more closely that I spotted (and remembered) the Corvair engine was six cylinders. A couple of mouse clicks and we were back to a four cylinder distributor. In full disclosure I should state here and not that that will not be my last mistake in this build Taking Pete's suggestion but with a twist, instead of making a scribing template out of metal I chose the easy route and just printed one for the fuel flap cover - much easier. With some drill, file, and scribing action I had this in about half an hour. It still needs a little tidy up but so far so good. Size wise I'm not 100% on it yet.I think I could have made it about 0.5mm larger but it's easier to remove material than it is to add it. The printed door is just a rough version at this point and by that I mean printed with a largish layer height for speed of printing. I'll drop the layer height to about 0.01 or 0.015mm for the final version. I did remember to include the little finger bump-out which looks more like a defect than a feature. First draft of the engine came out of the VAT and already looks way better than the kit offering. For this print out I really wasn't concerned with the actual detail as what I really needed was to confirm the overall shape and dimensions of the lump and to check if it's going to fit into the available space. It was a case of throwing it into Chitubox, picking an orientation and hit the magic auto-support button and let it rip. You show me yours and I'll show you mine... The largest uncertainty however, was answered. It sort of fits. Though not much will be seen (as always) It does raise more questions though. Two shots above you can see that there's a substantial lump of engine hanging below the bottom of the bus. I checked the kit version and it has around 5mm of engine below the bodyshell. My version has around 10mm. The question is: How is that going to look once the suspension and running gear is fitted? I'm 99% certain that my version isn't going to work but I'll test my theory out later today. During the week I continued working on the flat four trying to get it to a finishing point. I think I have managed to capture most of the detail or at least most of the major components. Although I have started modeling the transmission/gearbox I may opt not to use it and salvage some of the kit offering instead as it locates the wheel axles and the heatg exchangers. I'm less than impressed with their heat exchangers though so I think this is going to be bery much of a make it up as you go along build. I have a couple of options to get this all to fit together if there's too much engine below the bus. One option is simply to scale the entire engine down by a factor of X until it fits. Another, and probably the path I shall take if the need arises, is to slice the engine at the deck level and remove a portion at the top of the cylinders, effectively raising the bottom end of the engine closer to the body pan. Since you will never be able to see the engine in it's entirety and only view part of it form above, or part of it from below, I think that will work More printing needed I think. I'm going to slice the engine for printing in several different ways and try and test this all out this weekend.8 points
-
Hello:) Kit is OOB with addition of some scratchbuilt details(full cockpit, pilot seats). Painting was quite a challenge since this was the first time I decided not to use decals (blue and yellow Sweden national colours) but decided to paint them instead. Only issue I had was with small windows on the sides (they didn't fit well) but other then that very enjoyable build and lovely kit, something different for a change. Kit: 1/72 Special Hobby SH-89(CASA C-212-300 Aviocar) Decals: OOB, painted Paint: Ammo Mig primer and acrylics Weathering: Ammo Mig washes and Oilbrushers, AK Interactive weathering pencils 🙇♂️7 points
-
Greetings from Italy. Just finished the Hobby 2000 (Hasegawa) Henschel Hs 129, a nice and enjoyable kit. The built is basically OOB. I just cut away control surfaces and flaps plus a bit of Aftermarket using Eduard internals and seatbelts. Instead of the usual Tamiya colours, this time I decided to go for Gunze and I have to say they are excellent stuff. Enjoy pictures and please feel free to comment. Cheers Andy7 points
-
Just back from a week holiday in the UK, booked ages ago and it now coincided with HM's funeral arrangements. So not everything planned was possible - did get a glimpse of the procession to Westminster Hall. Duxford weekend, a trip around Woodbridge area ( via Boxted, Debenham, Fowlmere), then London for a visit to RAFM Hendon* & the rest, then back again through Suffolk with a stop at Lakenheath & Mildenhall, and old airfield spots like Yoxford, Bassingbourn, Martlesham Heath, Bottisham, Debach.... On the doorstep when I came home yesterday: *The Forgotten Pilots is a second-hand book from the Hendon store, written by ATA pilot Lettice Curtis. Turns out it's a little treasure-trove of information, well written and imo deserves a spot on the bookshelf!7 points
-
Thanks! It has stabilised at 4.5cm over the last few years, and my cardiologist says we'll need to fix it when it gets to 5cm. Yeah, I really feel lousy today. Slight fever, chills, sore joints, etc., just like a typical flu. I've had four jabs of the Pfizer vaccine (the last two being boosters) and I'm eligible for another booster due to my age and immunodeficiency. I gotta teach Carter that word, as it's more impressive than "decrepit." Luckily, the Paxvolid medication was free. I'll start that tomorrow as it interacts with diltiazem which I already took today. OK, time for another lie-down. Cheers, Bill PS. My daughter Tracy brought dinner over - homemade lasagna, fresh baked Tuscan garlic bread, etc. No wine though - I need to have a word with that girl.7 points
-
The latest one I have finished. I think this is one of the hardest models I have done to date, due to its small size and delicate nature. Gulf War Tornado next.6 points
-
Hello again I often visit Duxford on the day before a show in the hope of catching the arrivals and practice/validation displays. Here are some of my favourites from the Friday before the Battle of Britain Air Show. Thanks for looking.6 points
-
The Tamiya 1/48th scale kit I built earlier this year depicting A-1J 139608 "Blood, Sweat & Tears" of the 1st Special Operations Squadron in Vietnam. It initially started as a SOOTB build, but I became completely absorbed in this project and easily went beyond that. This was the photo that started it all: I added the metal cannon barrels, Quinta 3-D cockpit decals, Caracal Decals, Eduard SUU-14 ejectors and 250lb Phosphorous bombs. I also did scratch-built static wicks and the FM Antenna. Overall another great Tamiya kit. But, I was somewhat disappointed that Tamiya supplied the landing lights with no option to install them on the underside of the wingtips. Something I didn't discover until past the point of return and re-do. As a former USAF wrench-turner, I can relate to this aircraft's name, and if I could go back in time, there's a plane in my past that would've earned this moniker. In my stash is the Z-M 1/32 scale kit and I'll be re-doing this very airplane again sometime in the future.6 points
-
Kit after a layer of Mr. Surfacer 1500 ... by Rodolfo Masti, on Flickr by Rodolfo Masti, on Flickr by Rodolfo Masti, on Flickr by Rodolfo Masti, on Flickr by Rodolfo Masti, on Flickr6 points
-
I'm ready!6 points
-
letting my SIA 260 in one side of my table, I painted the scheme of my Meteor I need to repaint the upper grey zone at the place of fuselage junction. The paint was some reactions at this place because junction is not see in the green zone6 points
-
G'day people, Look what Col made me do Not really, it was always gunna happen. I am committed now. Removing these three panels was a little more involved but I eventually got there. This is the state of play at stumps today I cut exactly along the panel lines and found that the resin engine bay matched pretty closely but still needed some tweaking. Does anyone have any reference pics of the F-15s engine bays without the engines installed, I am not sure what colour these should be? cheers, Pappy6 points
-
Tracks done. Not the most detailed of metal tracks but the easiest and quickest to assemble. As to the kit it is rather nice. One part, the rear grill, didn't fit too well, and being Tamiya this was a shock.😀 There are some springs to go for the suspension. It looks like a good idea but isn't. It just makes four wheels sit weirdly so they were left off. Minor quibbles aside it goes together as you would expect. This should be a quick one to get to the paint booth. Although I have to move house in the next couple of weeks so that may put a spanner in the works.6 points
-
Thanks Chris. You’rea star. 🤩 Oh my gosh, what does that make 1/32 or heavens forbid. 1/24. Saying that I might have accidentally purchased this as a bit of a project over Christmas. 🤩 1/10 no less. all rulers hidden. 😍6 points
-
The kit sails looked pretty good overall, but there were some minor knock out pin marks on the concave sides and holes for tying on the rigging. Sanding away the pin marks was no problem, and I filled the holes with super glue. Interestingly, the portion of the sail I sanded shows how the surfaces of the 50 year old plastic kit parts have yellowed over time! After addressing these issues and and smoothing mold lines, I airbrushed the sails with Tamiya XF-25 Flat White tinted with XF-57 Buff and then shot the seams with a slightly lightened mix of the buff color. The sample cards on the left of the pic show the stark contrast between the two shades... ...but on the sails themselves these variations are more subtle.6 points
-
Say what you like about airfix but I really like their range of 1/48 kits Featuring the markings of Ken Taylor of the 47th Pursuit Squadron at Wheeler Field, Honolulu, Hawaii during the attack on Pearl Harbour. This was done with a mix of kit decals and masks made with a Cameo 4. I think these birds were fairly fresh and well maintained at the time of the attack so minimal weathering was done with washes and Ammo oil brushers, the only after market was a set of eduard belts. I'm also testing a new light setup so pictures are few but I'm trying a more 'moody' approach6 points
-
Bits and bobs are a good thing. But be careful with Bob - he's someone's uncle (as I read on this forum daily). Cheers, Bill6 points
-
I've been looking forward to this GB all year and now it's nearly upon us I can't wait to get started. I've got heaps of ideas for builds, but as I've got to get the Canadian GB finished (once that's done, all my modelling will be in this GB until it finishes) I'll start with something fairly straightforward - a French Mirage F1C in a Tiger Meet scheme, using the Special Hobby 1/72 kit and Syhart decals. I'll post a photo of the kit later, here's the scheme: cheers Julian5 points
-
Well folks, I didn't believe that I will say this after about a year and a half but she is ready for inspection! OOB with Eduard Look IP and seatbelts. Painted with Tamiya, Gunze and Vallejo paints. Weathered with various filters, Tamiya, Ammo and Vallejo washes, Prismacolor silver pencil, AK weathering pencils and Vallejo and Revell pigments. I am very satisfied with the end result, with a couple of mistakes made which I can live with. I enjoyed the process very much and learned some valuable lessons for the future. Best, Nikola5 points
-
Hawker Hurricane IIC LF363 RAF Battle of Britain Memorial Flight Through the ages Kit: Heller 1/72 Build thread: https://www.britmodeller.com/forums/index.php?/topic/235110894-project-lf363/5 points
-
Hello fellows, Let me show some pics of my last model, the Tamiya King Tiger (Porsche Turret). I've tried to reproduce the camo scheme that is shown in the Tankmuseum... Here the real thing: All the build was easy, as is usual in Tamiya, and the only problem I had were with the zimmerit. But that was my fault...🤫 Apart from this, I'm pretty glad with the whole result, I hope you like it! I left out the right front fender. As you can see, I put and extra chain in the left side of the turret. And one slight layer of mud in wheels ans fenders. Your comments will be welcomed. And thanks for watching!! Josep5 points
-
My £15 (plus postage) “spares or repair” Airfix Valiant arrived today. I have had a look through the box and the only missing parts are the cockpit parts. As I already have a Valiant in the stash, I can copy those parts. I can scratch the larger parts with plasticard. The seats I’ll try to do with Oyumaru and epo putty. I bet little will be seen through the windows anyway. I’m very happy with what I got for the money.5 points
-
I painted the engine details today relying on pure whimsy for the colours. Once I've dusted it up and grimed it down it won't look quite so much like a 1970 drag racing engine. With a bit of luck it will just be enough of a contrast with desert yellow, desert brown, desert dust etc. I painted the brass and copper components yellow ochre rather than metallics because I think it's more realistic. Not that that matters on a blue meanie engine! I think adding a few stencils really brings life to a vehicle. This large fuel tank also goes into the engine bay. I've picked out few components and painted them in slightly different shades, slightly different sheens. They were painted by different sub-contractors and I think it's reasonable to imagine some variations. It will make the vehicle look like it has been built from many different components. While I was in a detail painting mood, I revisited the crew cab and picked out some components. I added decals here too. I tried a wet blend on the driver's seat. It wasn't as bad as it looks here and now that it's had a coat of satin varnish I think it will pass. Next up will be some chipping prior to the engine fit.5 points
-
Most remarkable. Better G? I’ll probably have to resign from the Honourable Society of Lincoln’s Inn now I’ve been out-pedanted in English by an Italian5 points


.thumb.jpg.b4a5069fd2c2dd5708ce1694345c5b11.jpg)


(510x640)-Copy(95x120).thumb.jpg.33073138e01aa81779639a845926753e.jpg)


_opt.thumb.jpg.be9c1e22e34c329b51268dfacc8614e0.jpg)
This leaderboard is set to London/GMT+01:00