
Leaderboard


Popular Content
Showing content with the highest reputation on 30/08/22 in all areas
-
You never have enough Hurricanes! This one depicts a SAAF No. 2 squadron machine from Mombasa (Kenya), October 1941. Airfix from the box, Eduard exhausts and gunsight, Arma Hobby tropical filter. The wheels are from the kit but the hubs were drilled using a 4mm drill and replaced with Eduard Spitfire parts. Gunze and AK Real paints (sky blue), Gunze varnishes, Xtradecal decals. Thanks for looking!30 points
-
Being a MiG-21 fanatic, I have so far only built them in European and Chinese colours. So this is my first Middle-East attempt. It was far from easy to find references, but I hope that this is at least close to the real thing. It shows an Egyptian AF MF in the mid-70s. I used a Weekend edition boxing, so I had to add some scratch-built details, and therefore, I also kept the canopy closed. I painted it with Mr Paint colours and sprayed the camouflage freehand. I weathered it with dry pastels and AK Interactive pencils. Decals are from my decal spares box, most of them from RV Aircraft's MiG-21MF sheet. Another one will follow soon, Trumpy's MiG-21F-13. Stay tuned and thanks for watching!27 points
-
Greetings everyone! I present to your attention a “Hasegawa” kit F-15C in 1/72 scale. For my building I chose an aircraft with the board number 79-036 as of 1984, when this aircraft was based at Bitsburg Air Base in Germany. The kit was built in 2016. During the build process, I used the following aftermarket: 1. Photo-etched “Eduard” № 72398 2. Photo-etched “Airwawes” № 7209 3. Exhaust nozzles “Aires” № 7170 4. Ejection seat “Quickboost” ACES II № QB72022 5. Cockpit light “BobTaurus” № RT72041 6. “TwoBobs” decal № 72-099 7. AIM-9M/L Sidewinder “Brassin” № 672 037 8. Angle attack sensors “Master Model” № AM-72-008 9. The “Academy” F-15C kit was used as a donor for some details. Below I want to show some of the building steps in more detail. Air intake channels “Hasegawa” does not provide air intake channels, so I integrated it from the “Akademy” kit. Wing Fins Cockpit Front wheel bay Pylons and armament Main landing gear and wheel bays The main landing gear were almost self-made from metal needles, different kinds of plastic, some PE parts, tin and wire. Nose landing gear As the main landing gear, the nose landing gear were almost self-made. Other elements As you can see, all elements of the model have been subjected to great improvements. Building took about two years. I hope the viewing was interesting. Best wishes Dmytro aka DimaADA23 points
-
Adrian’s KP 1/72 Sopwith Swallow, distinctly not super heroic… Build is here. Thanks for a super group build! Regards, Adrian22 points
-
I have had the Trumpeter 1/48 Focke Wulf Fw200 'Condor' in my stash since it was released in 2005. After purchasing this kit I was somewhat disappointed to find a kit that was going to need a fair amount of work to get a reasonably accurate rendition of the Condor and it ended up on the top shelf of my stash. In the intervening 17 years it has been taken off the top shelf looked at then put back. Finding myself (sadly) with time on my hands and a need to keep my mind occupied, I took the Fw200 off the dusty top shelf and threw myself into its building. I wont list all the inaccuracies with this kit, but I feel Trumpeter could have served us better by cutting down on the interior detail put into it and improved on the accuracy of the kit. All the interior detail is lost once the fuselage is joined!! I used a set of A.L. Bentley's plans published in a magazine some years ago, they were 1/144 scale so I upped them to 1/48 to give me something accurate to work from. I decided to 'convert' the model to a C-3 variant by replacing the incorrect HDL turret with a home made MG131 turret. The machine represented is an Fw200C-3 Wrk. No 0034 of IV./KG40 & KGzbV 200 Gumrak, Russia, Jan.1943. This machine was captured by the Soviets whilst it was being used to help in the supply of materials to Stalingrad. The end result was as follows :- The following changes were made:- Some interior detail was added i.e. ribs, stringers (waste of time can't be seen!). Cockpit detailed with Eduard P/E set. Vertical tail surfaces, rudder reshaped. Horizontal tail surfaces moved back to match plans. Tail wheel replaced with one of correct size and extended to correct length. Bay added for tailwheel. All engines replaced with Vector resin ones. Cowling front opening reduced. Spinners replaced with resin ones, prop blades reshaped. Wheel wells detailed, wheels replaced with Brassin Ju88 items. Front turret replaced with home made item. Rear ventral gun turret replaced with ICM He111, correct size Undercarriage detailed, airframe re-scribed, rivets removed from fabric areas of wing. All oversized detail removed from control surfaces. Nautilus set of wooden spars used. Below are some pics of work done:- Thanks for looking, cheers, Andy18 points
-
One of Airfix's re-releases, and this one is a great kit. Didn't get time to do the figures, but will get to them later. Bond Bug re-release next please, Mr. Airfix. Build thread here,18 points
-
Hello all, Here is my recently completed AFV Club 1/48 F-5E, marked as an F-5N of VFC-13 'Saints' based at NAS Fallon in Nevada. The build thread is below: Extras used included a Quickboost seat, DEF models FOD covers, Eduard mask and Two Bobs decals. The dummy AIM-9 is from a Tamiya F-16 and the ACMI pod is from Hasegawa Weapons set D. Paint is MRP black with minimal weathering and a high gloss, just like the real thing! Thanks for looking Dave16 points
-
Good afternoon, dear colleagues! Today I present you my next model.16 points
-
ColonelKrypton's Blitz Build 2022 attempt - 1915 Tracteur Blinde Filtz scratchbuild - Finis! Complete, total time from start to class photos just a bit under 16 hours. Cheers, Graham16 points
-
Since my return from East Anglia, I have been working on the second of the R Class Zeppelins for my display. I have decided to push the boundaries with this model in order to see how far I can can get extra detail into these Mark1 Models 1/720 scale ships.. I began by dispensing with the kit decals for the window frames on the gondolas and have instead built them up from 0.10 x 0.10mm plastic strip. the frames were quite pronounced on the actual ships and painted up this should do the job. they don't look great in macro but they look fine to the naked eye, they look fine. I would have preferred to use smaller plastic strip but there isn't any so I have sanded back the 0.10mm stuff. I just have to keep reminding myself that the largest of these gondolas is well under an inch long. I have also fitted grab rails from Albion Alloys 0.2mm brass rod. I might try some 010rod the next time round but I do have the feeling that 0.2mm is as good as it is going to get if I want retain any strength in the rails. I have been unhappy with Mark1's depiction of the gunners' platform on the top of the hull, so this time round, I reduced the height of the windshield and added a representation of the detail on the decking. I have dropped down from 0.4mm to0.3mm for the outriggers and I think that this is paying off despite the rather tricky soldering involved. Thanks for looking. Martian 👽14 points
-
After the 1/32nd kits (link) Hong Kong (HK) Models is to release 1/48th North American B-25 Mitchell kits. First - ref. 01F008 - North American B-25J Mitchell Another large scale beauty transfered to the quarter scale! Source: https://www.facebook.com/worldhobbyminiatures/posts/pfbid023dMSKWePj68HzJaSg5oDEfFSwERNCFCaokysdsETDo483nTWhex6UzTVpeSow1Ybl V.P.13 points
-
Hello Welcome to the training ground. This is my first model on wheels alone without tracks but another Soviet development in NATO colours in the service of the Polish Army. Of the extras there are DEF weighted wheels, road priority signs and decals from TORO and URAL lettering from a colleague on another forum. I also did some modifications on my own to get closer to the version used in the Polish Army from unused parts from other models. I hope you will like it And two more photos in the atmosphere of the training ground. And if it had taken place for example in the 1960s, it would have looked like this *All photos with the landscape in the background are after graphic processing. The actual condition of the model is best represented by photos with a white background.13 points
-
#19/2022 So, here´s my dad´s fourth and last Texan for this year. Italeri Harvard boxing, the molding is worse than the previous Italeri T-6G boxing. Canopy parts had fit problems, cockpit sidewalls were molded in different thickness, landing light covers were too small and unusable. Took clear tape to simulate the covers. Sanded off the molded on seatbelts and used Eduard ones instead. EZ Line used for brake lines. Decals are from the kit, but the Swedish wing roundels were way too small, so my dad used all roundels from the Armycast sheet which he also used before for the Uruguay T-6. Painted with Gunze H418 RLM78 slightly oversprayed with a darker tone and Gunze H309 FS34079. Build thread here https://www.britmodeller.com/forums/index.php?/topic/235111019-nordic-cowboy148-noorduyn-sk16a-harvard-mkiib-svenska-flygvapnet/ The Swedes used a large number of different Texan types, Ts, SNJs and Harvards. This scheme shows an aircraft of Flygflottilj 10 "Angelhom" at Helsingborg Airbase around 1970. DSC_0001 by grimreaper110, auf Flickr DSC_0002 by grimreaper110, auf Flickr DSC_0002 by grimreaper110, auf Flickr DSC_0004 by grimreaper110, auf Flickr DSC_0005 by grimreaper110, auf Flickr DSC_0006 by grimreaper110, auf Flickr DSC_0007 by grimreaper110, auf Flickr DSC_0008 by grimreaper110, auf Flickr DSC_0009 by grimreaper110, auf Flickr DSC_0010 by grimreaper110, auf Flickr DSC_0011 by grimreaper110, auf Flickr DSC_0012 by grimreaper110, auf Flickr DSC_0013 by grimreaper110, auf Flickr DSC_0014 by grimreaper110, auf Flickr DSC_0004 by grimreaper110, auf Flickr DSC_0007 by grimreaper110, auf Flickr DSC_0017 by grimreaper110, auf Flickr DSC_0018 by grimreaper110, auf Flickr DSC_0019 by grimreaper110, auf Flickr DSC_0020 by grimreaper110, auf Flickr DSC_0021 by grimreaper110, auf Flickr DSC_0024 by grimreaper110, auf Flickr DSC_0026 by grimreaper110, auf Flickr DSC_0002 by grimreaper110, auf Flickr13 points
-
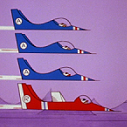
Airfix 1/72 Folland Gnat - RAF Red Arrows Nice kit, a lot going for it, but not the easiest kit I've built. Here's the build if you want the gory details. Thanks ENZO, another great Blitzbuild.13 points
-
Quarter to midnight? What, me? Panic? Here we go: 16hr 10 min The PC10 is nothing like that green IRL. I blame Apple. More pics (still green!) in the gallery here. The alignment issue sorted itself out when I put the top wing on one time and the port cabane struts decided not to go in the holes but just sat on top of them. The wing was level and aligned perfectly! Pretty sure that was a kit problem not me because I spent a lot of time on initial alignment of those pieces. So I’ve done a lot of whining while building this kit. Is it worth it? On reflection, yes. It’s got very nice bits and some gotchas, and would reward some time and care. It won’t be my last KP build, but it’s not the ideal subject for a Blitzbuild! Thanks for a super group build! Regards, Adrian12 points
-
Aoshima "Shiun", first time I've built an Aoshima kit, this one is very basic but fitted together well. The colour scheme on the box is very arty as is the number of props I the picture ! Build thread below Thanks for the encouragement I hope you like it. It comes with a clear stand Which isn't too stable 🤣12 points
-
Here are the final photos of my 1/32 scale model of Spitfire PR.IV AA783 flown by Alistair McDonald on March 13th, 1942. It was one of the earliest PR.IVs, the first factory built photo-reconnaissance type of the Spitfire, and was not yet equipped with the outer wing vents. The model is based on the Hobbyboss kit, with significant alterations and additions. Quickboost spinner and propeller Tamiya Mosquito engine (a generic single-stage Merlin; augmented with spare parts and scratch built items) Quickboost Spitfire Mk.I/II exhausts The engine firewall was moved forward about 1 mm The shape of the fuel tank was rounded to improve the profile The windscreen is from the Grey Matter Figures PR Spitfire conversion set for Hasegawa, as are the side blisters on the canopy The cockpit is based on the Eduard Brassin set for the Revell Mk.II; changed substantially to fit the Hobbyboss fuselage and to change to PR specification The cockpit features an adapted Yahu instruments panel (added gauges for the additional fuel tanks, for example) The cockpit door is from Barracuda The oblique camera port came from an Alley Cat PR.XI set Tail units replaced by Quickboost items Wings were converted to type D specification; this involved removing bulges and gun hatches; adding new bulges and filler caps Added the mechanical landing gear indicators Boxed in the rectangular sections of the wheel bays Wheels/tires from Eduard The model was painted mostly with Mig Ammo acrylics; decals were from various sources. Build thread here: Anyway, on to the pictures! Thanks for looking, comments and criticism is always welcome!11 points
-
Have we had a bank holiday? It doesn't feel like it! I did manage a couple more hours on the Tranny though. If you build an Italeri Transit OOB it'll have a dragster stance, hence I reset the rear leaf springs earlier in the build. After adding wheel nuts to each wheel I got all four fitted and checked the stance. That'll do. I've also finished the doors by fitting the trims inside and adding quarterlights. The kit OOB has full glazing that clicks into place but the tabs are too obvious and I wanted open windows so I made my own. I had a crack at making a partially wound down window on the passenger side. Moderately successful, but it's a good job I'm not going for showroom fresh. I squandered a few minutes of my day off cutting the kit gearstick into three pieces and replacing the shaft with thinner rod that nobody will ever see or notice. Apart from now. And the rear floor is now in place. This'll all be covered with camper stuff, when I figure out how... I like stuff like this, scratchbuilding off-piste. It's a 3D puzzle really. Now, where to start...? ANTEATER11 points
-
Build topic:10 points
-
KLM 737-800 PH-BCA (Flamingo) Zvezda 1:144 scale model. Decals from Zvezda's original (UTair) + 26decal for KLM livery. I write with some trepidation as this was not the happiest of journeys for me. A kit was good but things didn't pan out as they were supposed to. This model was completed in over 6 months due to a number of complications, including time constraints as well as a crash ( the model fell from its storage cupboard) and broke a winglet and lost- broken into 3 pieces) its beautiful front undercarriage struts. I was distraught. Attempt to reconstruct failed the structure and I had to continue it in wheels up/ retracted position. Additionally, another disaster that I could not do much about as the warping due to adhesive. I had glued in a small battery in the inside (as a counterweight) which became unstuck after the crash. I had to saw off the cockpit section to re-glue the battery. I must have been overzealous with the glue (Revell Contacta) as over the next couple of days i observed a warped front fuselage (did not experience with my earlier two Revell models). The model is brush painted with Revell Aqua Colours (acrylic). For the fuselage, Light Blue 50 (closest match i could find in acrylic) and Light Grey Silk 371 (which seemed to me to be a closer match for the fuselage belly instead of white). I wanted to do some weathering but fear of another disaster took over, and I decided that this project needs to end some where! Decals were quite delicate at times for me (this is my third model) but managed not to destroy (most of) them. A little annoying issue for me was that for both the original Zvezda decals and 26Decals there were some stickers that were numbers on the decal sheet but I could not find on the diagram provided. Flying over PIA A320.9 points
-
Just a small update this time. First off are the paravanes. There are not many options for aftermarket paravanes, and I couldn’t find any for the Royal Navy. I ended up getting the medium USN ones from North Star Models. The ship carries four paravanes all sat next to each other just behind the forward breakwater. The space on the model is about 19mm wide, however the North Star items are each around 6mm wide, so four of them won’t fit. I saw the plans that @foeth made for his build on his website and those give a width of about 1.5m, or just over 4mm in 1/350 scale. This fits in the space and seemed to match the photos, so I modified the north star parts to match. I replaced the PE “wing” with some 0.13mm styrene sheet and adjusted the other parts to fit this. Here they are painted And installed, along with the forward Oerlikons I also painted and installed the rear Oerlikon in the old UP launcher shield That’s all for now Cheers Peter9 points
-
Hi all, I built this trailer for last weekend's Blitz Build which was a fun event as usual. A kit such as this is actually ideal for Blitzing because the parts count is relatively low and also, some of the parts are quite large 🙂 The Hanomag trailer comes from a series of truck kits which Revell started in the late '90's and yielded a Büssing 8000 and a Krupp Titan before the idea was abandoned. I would have liked to see more of these kits! Anway, the trailer matches both of the trucks but can also be built separately of course. Which is what I did, and maybe it will help getting one of the truck kits out for building. Some day! This is the kit, I bought this used but unopened. I chose not to build the cover. The trailer is already quite large and I felt that painting the cover convincingly would not work within the 24 hour Blitz Build timeframe. As it was, I used up about 15 hours to complete it, with a couple of hours left before the deadline. The kit goes together really well, Revell clearly made the effort for these kits. I'm hoping the trucks will build just as nicely. The tyres on this thing are huge, they're at least 5mm higher than the standard Italeri tyres. Also, they're solid items, and there are nine of them on the trailer so the model has some real weight to it! I took some pics outside this morning while the light was still nice and soft. Here goes! Thanks for watching!8 points
-
Finished this kit yesterday. The model came with bonus resin tyres from Hasegawa, which also came with the regular plastic ones. I used Revell Aqua colours and several brushes to complete this aircraft. The original kit decals were completely unsuable, cracked beyond redemption. Luckily I was able to count from my spares box to complete this paint job.8 points
-
Mirage F.1. Dassault somehow have a habit of designing a bit of style into their jets. Whether it is intentional or not, I don't know, but their fighters are often very easy on the eye. None more so, in my opinion, than the Mirage F.1. Even the name is evocative. For me, perhaps because of the generation I am, very few designs visually capture the performance, athleticism and lethality of a supersonic jet fighter with as much grace as a Mirage F.1 manages. There are very few options for an F.1 in 1/48 and the aged Esci one is generally acknowledged as the one to have. It has some inaccuracies but for its age it actually goes together rather well. I bought the Italeri "Bye Bye" boxing of this kit simply because, with it being the youngest boxing of the anciend Esci kit available, it seemed the one least likely to have any warping or damage on it. I was originally going to do a SAAF CZ but when my I saw the desert camo option available in the boxing, I knew I had to do that. It's a change from the usual green / brown / grey camo I usually have and the tail treatment is particularly striking with the black flashes on the vertical fin echoes in the twin dorsal fins beneath the tail. The build is completely OOB with the exception of the scratch built, removable intake covers which I made primarily to mask off the intakes while painting the model. I'll reuse these on the next F.1 I build. Paints are mostly Vallejo Model Air with a few exceptions: The aluminium underside is an old and dull tin of Humbrol 11 (Silver) which also serves as the primer coat for the camo colours, the nosecone is Tamiya acrylics (flat black and dark iron mixed), and the ECM pod thingy on the port wing (station 2?) Is Revell steel enamel because I wanted to give that paint a try (It looks nice enough but was an absolute pain to clean the airbrush... and it stinks) . All other metals are Vallejo Metal Color. Panel lines and (minimal) weathering is all a pastel wash. Varnish was Vallejo spray gloss before decals, and Windsor & Newton Galeria matt varnish final top coat to set the finish and seal everything in. There are a few mistakes I've made which I could have avoided with more research or forward planning. One was the navigation lights on the wings, which aren't called out in the kit's painting instructions. There are two little teardrop shaped bumps, one under each wingtip, which are kind of shaped like navigation lights sometimes are, so I painted those red and green. Turns out those bumps should be body colour and the actual nav lights are two little rectangular sections on the front section of each wingtip. I know better for next time. The other is two quite prominent decals that should go on either side of the ejection seat headrest. These are not marked in the instructions when the seat is assembled, but only called out with the rest of the exterior decals. By the time I had gotten to them the cockpit was all sealed up and I wasn't going to crack it open to add them. Overall, a very pleasant build especially considering the kits age. So much so that I've bought aftermarket decals for two more. Build thread is here: And now for the pictures. Not sure why this one displays sideways.. Thanks for looking!8 points
-
Revell 1/24 Hanomag trailer. Build thread here: This was a fun build, and something that would otherwise probably have stayed in the stash for a long time. It may not look it like this, but the wheels on this thing are huge, at least 5 mm higher than a standard 1/24 Italeri tyre. And since the tyres are solid the whole thing has some serious weight to it with 9 of them on. Paints are Mr Surfacer black primer, Tamiya XF-1 Flat Black and Tamiya XF-18 Medium Blue (to remind me, in case I'd like to build a matching Krupp Titan or Büssing 8000 🙂) Weathered with thinly sprayed XF-52 Flat Earth and Vallejo washes and pigments.8 points
-
This past weekend for a challenge I jumped into the Blitz Group Build Part 2 and scratchbuilt a 1/35 Tracteur Blinde Filtz - the WIP link is above. Total time for the build from start to class photos was just shy of 16 hours between Saturday morning and Mondary Afternoon. It was a challenge but was also a lot of fun; can't wait for the next one. The Tracteur Blinde Blitz was a French army armoured tractor design of 1915. There is a good resin kit available ( Yellow House Models I think ) but I like the challenge of scratchbuilding these odd vehicles. Alexandar Bondar from Ukraine has designed many paper card models and there are a number freely available on the Landship forum for download. I used his nice paper card model design as the basis for my model. There were only 10 developmental vehicles built and all varied somewhat. I have only be able to find a handful of reference photos. Mr Bondar paper card model is somewhat simplified and as I followed his design without making too making changes my model reflects his work. On a scale of 1 to 10 and after having spent much time reviewing what few reference photos I could find, and with respect to scale fidelity I would give my model about a 7. cheers, Graham7 points
-
7 points
-
It wasn’t until I returned home from the Silverstone Classic that I realised the event had marked what must be the first time that all three of the 1985 TWR Jaguar XJR-6s (the first three TWR Jaguar prototypes built) for probably 35 years or more. The green ‘No.51’ is Chassis 185, one of two cars which debuted at Mosport in August 1985. Its final race, and best result was a 2nd place at Shah Alam in Malaysia on 1 December 1985. Green ‘52’ is Chassis 285, which also debuted at Mosport, gaining Jaguar’s first WSC points with a third there. It also ended its career at the December 1985 race in Malaysia. And finally, the ‘53’ car (arguably the first Silk Cut Jaguar) – Chassis 385 – was a T-car in 1986 and only took part in one race – the 1986 Le Mans 24 Hours. That race ended in a ‘did not finish’. I think this is the only XJR remaining in 'long tail' form. Not exactly a stellar start, but the dawn of a golden age for TWR Jaguar. And the roll call of drivers who piloted these three is like a Who’s Who of sportscar racing: Gianfranco Brancatelli 2nd, 1989 Le Mans Martin Brundle 1988 WSC Champion; double Le Mans winner Eddie Cheever ten WSC wins Hurley Haywood three-time Le Mans winner; six-time Daytona winner Hans Heyer record 14 DNFs at Le Mans from 14 starts! Alan Jones champion, 1978 Can-Am Jan Lammers winner, 1988 Le Mans & double Daytona winner John Nielsen winner, 1990 Le Mans, Daytona and 1995 Global GT Champion Win Percy eight British GT wins Mike Thackwell winner, 1986 Nurburgring 1000 Jean-Louis Schlesser WSC champion, 1989 & 1990; 1989 Le Mans class winner 1981 Steve Soper multiple GT and ALMS winner Derek Warwick 1992 Le Mans winner; ten WEC/WSC wins7 points
-
What can I say. It's an Arma Hobby Hurricane and a joy to build. Primed with UMP Grey Primer Painted with ColourCoats Interior Grey Green, Dark Earth, Middle Stone, Azure Blue, Buff and RAF/FAA Yellow Tamiya Nato Black, Rubber Black, Clear Red, Clear Green and Clear Orange Xtreme Metals Aluminium. Washed at various times with Flory Dark Dirt and Citadel Nuln Oil Fuselage finished with Windsor & Newton Matt Varnish Prop, Spinner and Bombs finished with Windsor & Newton Satin Varnish WIP Here Thanks for looking, Cheers, Alistair7 points
-
Finished 1/32 Tamiya F-15E Israeli Air Force I used the reskin engines on this one, along with the reskin cockpit, and also my trusty Reedoak Figures. This was all painted with MRP paints which I have to say are lovely to use, they dry very quick, and your able to use them in hot weather. I have also used small magnets on the pylons and Python 5, just to make it easier to transport Mike7 points
-
Hi all I came across this site the other day - thought members might find it interesting (not sure it's been posted here before). A fascinating and fairly in-depth analysis of the RAF's captured Ta152 and an attempt to establish its precise colours (before the RAF painted over at least some of it). A lot of the information is probably applicable to most other late-war Luftwaffe colour schemes, not just the Ta. https://verde9.com/en/painting-of-green-9-ta-152-h-1-w-nr-150168/7 points
-
So, color me frustrated... I was excited to get the base tan (ish) coat on the top surfaces yesterday. But, the family function we had planned started earlier than I thought. Doh! I first painted white for the white stripe on the fuselage. I generally don't do decals for things like wide stripes because, frankly, painting is easier. Unless its a weird color I can't match, of course. After the white was applied, I masked the stripe and re-painted the black primer around it. Then I remembered to take a picture. 🙄 Then I painted the gray on the bottom, which is as far as I got yesterday I was all excited to paint the top surfaces tonight... then I remembered the masking that needs to take place. Masking the world's smallest canopy. 😕 It took a long time. I also masked the leading edge where the top color wraps around... ...and that's as far as I got! So hopefully, tomorrow I'll be able to paint the top color. 🤞7 points
-
Here's my haul from the Stoke show yesterday .7 points
-
1/48 AFV Club F-5E (modified to N) VFC-13 'Saints' NAS Fallon, Nevada Build thread Cheers Dave7 points
-
Pegasus hobbies 1/48 V2 oob except for an alternative paint scheme. Very straightforward build except for the masking which was surprisingly complex. Apologies for the very tall photos. And I now have the problem that it’s too tall for my display shelves…7 points
-
Well, a bit of a momentous occasion this weekend after a near disaster. To say that I struggled with the port "tail to cheatline" masking and painting, would be an understatement ! Let's just say that at one point, I had to sand portions of the coloured stripes back to the white base before re-masking and repainting - Not nice. Three days later, the symmetry was there, or thereabouts : I also blended in the tops of the engines into the wings, applied the wing tip lights after drilling them out and painting green and red, and painted a couple of door frames using my homemade masks : I think I can put the green, yellow and red paints away now 👍 mike7 points
-
SS John W Brown Liberty Ship 1/700 Trumpeter.7 points
-
Hi folk's here's PM's Flagon.7 points
-
I've opted to build the new Airfix Austin K2/Y Ambulance in her Ice Cold In Alex markings. Painted with Vallejo and Humbrol paints with a Mig filter. With four figures added. A1375 Katy (17) I'd build another. Thanks for looking.6 points
-
Hello fellows, Let me show some pics of my last model, the Tamiya King Tiger (Porsche Turret). I've tried to reproduce the camo scheme that is shown in the Tankmuseum... Here, the real thing: All the build was easy, as is usual in Tamiya, and the only problem I had were with the zimmerit. Applying it was a mess...; but, honestly, it was my fault...🤫 Apart from this, I'm pretty glad with the whole result, I hope you like it! I left out the right front fender. As you can see, I put and extra chain in the left side of the turret. ...and one slight layer of mud in wheels ans fenders. Your comments will be welcomed. And thanks for watching!! Josep6 points
-
This is my new Airfix model in 1/72 scale Curtiss P-40B 19th Pursuit Squadron / 18th Pursuit Group, Wheeler Field, Hawaii If you want to see the full build video click here https://www.youtube.com/watch?v=xIzP0om11V0 I invite you to watch Below are photos of the finished model https://images91.fotosik.pl/614/d51de4dffb3453a6.jpg[/img6 points
-
The aircraft depicted was a Camel used/provided by Lt Kenneth Murray in the Kosciuszko Sq in 1920. This is the Eduard older Sopwith, not sure why they needed a newer one ! O-well Painted with Gunze Color and Alclad for Natural metal cowling. Slight weathering with Tamiya weathering powders for a bit of dirt and dust to break-up green and show some wear. Decals were from Model Master in Poland and were really nice. I did not take any chances, so I used an undercoat of white decal on each of the checkerboard insignia and Kosciuszko Sq insignia.No feedthrough. Rigging was a combination of Ceramic wires and Usci Thread. Bobs Buckles from UK were used for attachment points (Love those items). Wood finishes were Brown oils over Gunze sail color and coated with Future . Thanks for Looking Comments Always Welcome Bill D.6 points
-
Well after a nice Greek break away and some other stuff now sorted I can try and get MO and JO back to work on some stuff I have lying around. Two options here people I want to show the sea wolf as just launching so for the tail would cotton wool look better or the fibre stuffing material do you think. 🤔 Cotton wool first this is just dry fit so looks a bit limp at the tail end going to use a translucent tube to support either one And the fibre stuffing from the conservatory cushion the missus suspects nothing yet. Cheers beefy6 points
-
Monogram 1/48 P47 from Kingkits scrapyard so missing a few parts. Very pleased with the end result.6 points
-
OK guys calling it a day for this one. I fixed the wings in place getting a reasonable fit after a bit of fettling, then fixed the radiators in position and after assembling the oil cooler I glued that in place. It was always going to be a tall order to complete this one and with the light fading outside there was little chance of me getting any paint on today. It was good to see how far I could get with the plastic welding in the time available though, and it's all experience for future Blitzbuilds. I'll try to get this one finished tomorrow if Mrs N isn't cracking the whip too much. Anyway, this is as far as I have got. by John L, on Flickr by John L, on Flickr Thanks for tagging along. John6 points
-
Calling this one done! A lovely little kit that looks just right in gloss black! More pictures in RFI: As always, thanks to all who commented/followed the build. Cheers and stay safe Dave6 points
-
Airfix 1:72 Gnat6 points
-
CAC CA-17 Mustang Mk.20, A68-1. The first locally assembled Mustang here in Australia. Built from the Airfix 1/72 kit with aftermarket decals.5 points


.thumb.jpg.cfc129272ffec824439b15e6013d5952.jpg)


_opt.thumb.jpg.be9c1e22e34c329b51268dfacc8614e0.jpg)


This leaderboard is set to London/GMT+01:00