
Leaderboard


Popular Content
Showing content with the highest reputation on 23/08/22 in Posts
-
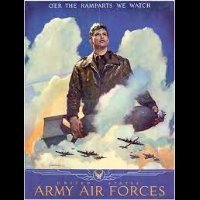
Hello, Here is a construction that I did for a group build about Midway. I have done the minimum to furnish this empty model which was designed in 1963: I used a dry point to engrave the structural panels of the model, and sanded the surfaces studded with oversized rivets. I interpreted the Aichi green with Gunze H302, and took the interior of the panels (wings and fuselage) with the colour added with yellow. Not obvious in the photos, but the effect is there. All markings are done with paint and covers, only the drift codes are painted decals. Here is the Airfix crude engine: I took the profile of the engine cover, as it looked very similar to that of an A6M2; The type 92 machine gun is made from scratch: I redid the fork of the bomb thrower: It is better this way, although the lower radiator should have been open in the middle. I added the gonio frame to the underside, too. On June 4, 1942, around noon, eighteen Val of the Koku Sentai of the IJN Hiryu attacked the aircraft carrier USS Yorktown. Will this Kanbaku escape the flak of the Yorktown and its battle group? 😋 Regards, Eric-Snafu3521 points
-
#18/2022 After a longer 109 pause, here´s my dad´s newest one. Good old Tamiya kit with decals from the Kagero Topdrawings Bf109E booklet. Painted with RLM65 Gunze H67, RLM02 using Tamiya XF-22 and AK Real Color RLM71, field camo on the fuselage with AK Real Color RLM70 and AMT-11 Gray. Antenna wires done with EZ Line, rearview mirror taken from a Hasegawa Spitfire kit. Build thread here https://www.britmodeller.com/forums/index.php?/topic/235112547-balkans-theatre148-messerschmitt-bf109e-7-iiijg77/ This aircraft initially served with 5./JG54, received a spare cowl from 8./JG54 and was then put into service with III./JG77 in May 1941, Balkans, still wearing the JG54 emblems. DSC_0001 by grimreaper110, auf Flickr DSC_0002 by grimreaper110, auf Flickr DSC_0003 by grimreaper110, auf Flickr DSC_0004 by grimreaper110, auf Flickr DSC_0005 by grimreaper110, auf Flickr DSC_0006 by grimreaper110, auf Flickr DSC_0007 by grimreaper110, auf Flickr DSC_0008 by grimreaper110, auf Flickr DSC_0009 by grimreaper110, auf Flickr DSC_0010 by grimreaper110, auf Flickr DSC_0011 by grimreaper110, auf Flickr DSC_0012 by grimreaper110, auf Flickr DSC_0013 by grimreaper110, auf Flickr DSC_0014 by grimreaper110, auf Flickr DSC_0015 by grimreaper110, auf Flickr DSC_0016 by grimreaper110, auf Flickr DSC_0017 by grimreaper110, auf Flickr DSC_0018 by grimreaper110, auf Flickr DSC_0019 by grimreaper110, auf Flickr DSC_0020 by grimreaper110, auf Flickr DSC_0021 by grimreaper110, auf Flickr DSC_0022 by grimreaper110, auf Flickr DSC_0023 by grimreaper110, auf Flickr DSC_0024 by grimreaper110, auf Flickr21 points
-
Latest off the bench is the ICM O-2A Skymaster, from VFA-125 Rough Riders, Nevada, 1985. Yet another brilliant kit from ICM. Ok not Tamiya quality but not far off. Takes a little time to get sorted due to the markings BUT it makes a change from the modern grey jets. Only thing that was a niggle is the undercarriage as it's legs seem to have had too many gallons of high octane and decided to splay out to the point where the fuselage bum touched the floor. (We've all been there at some point ) The answer a small length of ally rod super glued in. (To the model that is ) Hope you like something a bit different. Please feel free to comment etc. Thanks for looking. Dick19 points
-
And finally, here she is... McDonnell F-101A Voodoo 54-1475 81st TFW Bentwaters Suffolk 1965 Basically I had Microscale decals & this airframe appears in a couple of books 54-1475 shown as taken in March 31st 1966 by Norman taylor as seen in the Osprey book & the Detail & Scale book. The photos show it parked up after being returned back to Shaw AFB & in the photo's there's a fire extinguisher & ladders placed on the side of the aircraft. Microscale provide decals for the undercarriage doors for 54-1475 as well, plus I may have used artistic licence with the wing tip tricolors. It's possible these markings were removed before it was transferred to Shaw AFB after being at Bentwaters. Valom kit - 1/72 - used the "Nuclear Bomber" boxing along with leftover parts from a previous attempt that mostly went in the bin. Pavla 1/72 ejection seat. Hasegawa front windsceen as it's more representative of the real thing than the Valom part. A few other adjustments with the help & advice of bentwaters81tfw Microscale 72-223 decal sheet plus a few stencils from the kit sheet. Also scratch built a fire extinguisher (used main wheels from a very old charity shop 1/72 Starfighter) & built up the Flightpath etch flight ladder, to echo the photos in the book. Mustn't forget the paint - in order of application; Mig One Shot grey. Ammo MiG Zinc Chromate Green FS34151 for the wheel bays. Vallejo Metal Color White metal 77.706 all over the airframe. Masked the white metal for the darker areas & the exhaust shielding. Vallejo Metal Color Jet Exhaust 77.713 Jet Exhaust with some matt black misted over. Vallejo Metal Color Duralumin 77.702 various panels around the rear fuselage. 77.701 Aluminium for the forward fuselage. 77.703 Dark Aluminium misted on for the wing centre sections. Wing tips mixed up the blue to match the decal colour & used Ammo Mig for the yellow & red. Glossed over with Klear. Here's the build thread in the Century Fighters group build... Credit to Norman taylor Thanks for looking Martin16 points
-
Hello, Here's my 1/48 Tamiya F-14A. Great kit, but I'm sure that's well known by now. I used FCM decals to do it as Tarbox 210 from VF-33 in 1986. I did use nationality markings from a Furball sheet, as FCM gives you full colour ones, which isn't right. Other aftermarket includes chin pod and gun vents from Phasehangar, tail stiffeners from Crossdelta and missile markings from TwoBobs. Painted with MRP, Tamiya, Vallejo and Alclad. Thanks for looking. Pete15 points
-
Hello ! Something finished from my bench, right from the shelf of doom. Its Eduards Siemens Schuckert D.III kit ( the new tool ) as a Weekend Edition kit, started some three years ago before i lost the interest in WWI aviation. It is completely out of the box including the lozenge decals and the rip tapes for the wings. The only addition were turn buckles from Gaspatch and two cross hairs for the Spandau machine guns stolen from other kits pe sets. The seat belts are simply made from tape. It was build just to see if these massive decal work which took a whole week and the rigging is fun. After all it was but needs some more perfection. Markings are for a Jasta 15 aircraft, Chery-les-Pouily, July 1918 No weathering. I have tried to show a factory fresh aircraft. A resin engine would have been the better solution. It has still not the flare signal holder on the starboard side and i have no idea about the aileron control. Maybe something to add at some time. Eduards "Flugzeugstoff" known as lozenge looks in their SSW D.III Weekend kit much better as in the Profi Pack Edition but its still regarded as inaccurate. Application is very good. Turnbuckles are from Gaspatch. The rigging material is Ez Line. Fiddly ! A picture taken during final assembly. The propeller is still primed in a dark brown shade. Photos were taken on a piece of cardboard in the garden. Thanks for watching Bernd14 points
-
Greetings everyone! The test assembly of the Clear Prop Models kit of Mig-23ML is over. Enjoy watching! Some options for Mig-23MLD version: We want to clarify that according to the results of the test assembly, some details will be added and improved. This applies especially to PE elements - there will be more of them and they will be more detailed.13 points
-
Hello During the "special operation" in Algeria, the Amée de l'air needed a lot of planes to support the ground armed forces against the FLN rebels. From 1956 to 1959 they used the N.A. T-6G but this one had a very noisy and underpowered engine for close air support in the mountains. The Air Force HQ was therefore looking for another two-seater aircraft and chose the N.A T-28B as it was used in the US Navy at the time. But these were not being available, France bought 146 T-28A airframes from the US Air Force, 1300HP P&W R1820-56S engines (excess of B-17) and three-bladed propellers like the T-28B. The Fennec as it was called was assembled by Sud Aviation and equipped 4 units in Algeria from 1959 to 1962. These units were sister squadrons of units in France and the pilots were temporarily assigned to Algeria. The four points under the wings enabled to carry any combination of 2 elements among the following : - containers of 2 machine guns of 12.7 mm; - T10 shaped charge rockets; - a 7 x 68 mm rocket launcher; - a 36 x 37 mm rocket launcher; - 120 kg bombs. Here is one with this Heller kit of T-28 with some parts in resin given by a friend of mine (machine guns, rockets and cockpit parts). This is Fennec N°7 from EALA 3/9 Numidie in 1961. (Escadron d'Aviation Légère d'Appui) Patrick12 points
-
Afternoon All, This is my latest build, a 1/48 McDonnell Douglas F15C Eagle. An older kit from Tamiya but nonetheless the good quality we are used to. Built OOB and it went together without any significant issues. It was primed with XF-24 Dark Grey and pre-shaded with XF-1 black. The two camo colours are fairly light greys which were probably Dark & Light Ghost Grey. I followed the Tamiya instructions and used XF-66 Light Grey and XF-2 White mixed 1:3 and XF-19 Sky Grey and XF-2 White mixed 1:2 respectively. Tamiya X-32 Titanium Silver was used for the heat shield areas. Not too much weathering. Flory dark dirt wash to highlight panel lines and Abteilung oils. A very enjoyable build and I'm quite pleased with the result. Cheers, Steve12 points
-
I present you Roden's model of the OV-1A Mohawk. The plane represents a machine of the 23rd special warfare aviation detachment of the US Army from 1963 in Vietnam. The basic task of this unit was intelligence and reconnaissance. In its first variant (presented here), the Mohawk also had certain offensive (self-defense) capabilities, which in further use of exploitation was a stumbling rock in the bureaucratic circles of the Army and Air Force. How much this machine was valued and hated by members of the National Front for the Liberation of the South (better known as the NLF or VietCog) is also shown by the fact that a special financial stimulus was paid for its shootig down. I don't have much to say about the model except that it is already well known and the only one in this scale. The fit is very good and the detailing is at a very solid level! As a minor problem, I would mention the unpolished plastic surface as well as the shallow panel lines, which can be a significant problem if the plastic surface is polished. What is absolutely reprehensible are Roden's decals, which already have a bad reputation. Rigid, semi-transparent, poorly reacting to decal setting solutions, prone to cracking... In one word, BAAAD! I used the Eduad Zoom PE set (FE320), which is designed for the OV-1B, but with the modification of the control panel works just fine. I also used the Eeduard`s PE set for air brakes (from the second set for the OV-1D), which significantly enriches the area of the air brakes. The rest of the cockpit is self-built, which includes the floor of the cabin, the back wall of the cabin, as well as hoses, cables and other small things... The painting was done so that you can feel the level of employment of these machines! The model is Hi-Vis semi gloss painted and has a glossy finish. I played a little bit with the degree of brightness of certain zones/panels on the model, and hence the non-uniformity of the brightness. Little due is from some old monogram model and the base is halved Eduard`s PSP base. Gunza colors with weathering effects in painter's oils, tamiya washes, dry pygmies, wooden crayons... In the end, I must say that I am very satisfied with how the model turned out! All criticisms and suggestions (as well as contributions in money, plastic, meat and sweets...) are more than welcome! P.S. I would like to apologize for the large number of photos! And details:11 points
-
There have been a lot of Swordfish builds on BM recently, which has prompted me to reactivate an old endeavour of building Swordfish in three scales that I started in 2016: 1/72 new mold Airfix, 1/48 Tamiya and 1/32 Trumpeter. I decided to build all of them as floatplanes, which in the case of the Trumpeter kit required scratch-building the floats /struts/float wheels. Previously I have built 4 Tamiya Mk I Swordfish, 1 Model Design Construction Mk ll and a couple of Trumpeter Mk 1, but never in float plane configuration. I finished the 1/32 Trumpeter floatplane conversion, but the Tamiya floatplane fell off the shelf of doom in a fairly early stage of construction and smashed the floatplane struts. The Airfix kit hasn't progressed past fuselage construction. It's my intention to salvage the Tamiya kit and complete the Airfix float plane. To start off with here is a comparison of the three cockpits. I've used the available Eduard photo-etch sets on all three: 1/72 Airfix I/48 Tamiya I/32 Trumpeter And side by side: And zipped up in their fuselages:10 points
-
After completing the recent Sywell Clubhouse build it was time to go back to proper things with wings! I saw this release and was tempted by one of these wee machines at a third of the price of an SBS equivalent...read on! A64EFC86-2AC3-43B2-8515-6F9E1D66CA7B by Ben Brown, on Flickr So, first things first, its been pretty well established online that the model isnt the most accurate - the wings are too thin and the fuselage forward of the cockpits is not 'chunky' enough also there is some suggestion its too short. 251D3CAD-B535-4EC7-A0AD-B32390428295 by Ben Brown, on Flickr The elephant in the room is the cockpit openings. Now for a Hawk Major they are much smaller than say a Maggie or Hawk Trainer - the thinking being that egress with a parachute would have been made easier.B4DC3921-EF13-4CDD-9978-273DC0B85005 by Ben Brown, on Flickr As such your KP offering isnt an awfully accurate Hawk Major. Its not an awfully accurate Hawk Trainer either but it resembles the latter more with the larger cockpit 1A535A72-4AB4-46D3-912F-B95AA994DFFB by Ben Brown, on Flickr Then the decals. Well you have three versions. I can't comment on the accuracy of the NZ one K5054NZ might be the man for that but the Shell one MIGHT be in the correct colours but the registration is just in the wrong font not the 'civvy' font we all know. The other option is for a preserved example in a South American Museum and is accurate to their restoration and an attractive scheme but the font on the restored example is wrong as well! So time for a rethink - I pumped for airworthy Hawk Trainer G-ADWT which occasionally graces the hallowed turf at OW and is in a lovely (and immaculate) silver and red scheme. I dug out some of my dwindling supply of Aeroclub registration letters which match Humbrol 60 and we were on. OK they are a bit thicker than the restored machine but beggars can't be choosers. Usual KP fit ie not great with lots of PPP - but builds up ok - primed with Rustoleum white plastic primer. Then hit with Humbrol acrylic Metalcote polished ally - my 'doped silver' aint of choice thinking I could polish the cowling. For the first time ever it didnt adhere too well to the primer, perhaps I should have used it on bare plastic - I never normally have any issues - their sprays are superb. Red was brush painted 2 coats of H60 - then one coat of klear for decals - the Aeroclub decals must be 30 years old and are still superb. I use Mr Mark Setter as my go to for all decals which I think is watered down PVA - anyway it eliminates all silvering. Then a second coat of klear to seal. Note I tend to paint in matt and two coats, ONLY of klear gives an accurate semi matt sheen for doped aeroplanes IMHO. A third would make it too shiny and toy like (even if the full size shines like a new pin!) Masking tape seatbelts were the only addition - the Miles Hawk logos from KP went down fine though I think they should be handed and weren't printed that well. And that was that! The acetate windscreens cut out fine and i edged them in Moltow Chrome pen. KP, AZ, Avis produce kits of machines I really want to build. I'm not THAT much of a stickler fo accuracy as long as it builds up ok. I've lobbed together a fair few. all are a bit crude and need filler but thats half the fun - but just 10% more effort and they would be gems from the box.. I do applaud them for their subject choices, their decal chap needs to do a bit more homework and if he had drawn up a standard British civvy font on his PC he would only need to scale and colour it for each new kit.......dont be lazy and use a MS font! A64EFC86-2AC3-43B2-8515-6F9E1D66CA7B by Ben Brown, on Flickr Vickers Valletta with a twist next! TT Photo of full size by David MacCready from Flickr Miles M2W Hawk Trainer G-ADWT / Serial No: 215 / Built: 1935 by Dave Macready, on Flickr10 points
-
Hi all, finished this one some time ago. It is the Hobbyboss kit with Quinta Studio set, Foxbat decals and masks and MRP paint,10 points
-
After completing the F4F-4/IJN B5N2 Kate linked below, I decided I was still into building Pacific theater aircraft. I thus decided to turn my attention to the USN's Ace Maker--the F6F Hellcat. For this build, I am building Eduard's F6F-3 as an early Hellcat, Academy's F6F-3/5 as mid-war Hellcat and finally Eduard's F6F-5 as late war Hellcat. Inspiration for this particular build from came@CraigH 1/24 Airfix build, @Dermo245 early Hellcat, @Corsairfoxfouruncle's USS Essex builds and numerous visits looking at the shear size of the actual aircraft. Additionally, @opus999's Bearcat build got me energized to think about a USN dark blue F6F-5 that his aircraft was designed to replace. My primary resources beyond the bench of knowledge here are the following books Valiant Wings F6F in Airfame and Miniature, F6F in Action, F6F Walk Around, F6F in Detail and Scale, F6F Hellcat at War, F6F Hellcat vs Zero-Sen, and the Grumman F6F Hellcat (Kit Build) by Skalbania/Wasik. For a primer on colors, I used @Jamie @ Sovereign Hobbies color coats website and I purchased a complete set of his USN WW2 colors--the painted lids are a nice touch, @Dana Bell's Corsair book for general USN color info and the AK Real Color's or WW2 book (though I understand this is a bit controversial to some, it does at least have good info to at least start thinking of issues). Hopefully with this research might feel better when someone notes a color error and then I can point to Johnny's @The Spadgent advice to just move on with it and enjoy 🙂 I truly do learn from these points outs, so please dont hesitate to point out an issue--AMS is beginning to creep up on my model building walk and G's @giemme's miniature replicas are keeping it alive in a good way:-). As a scene setter here are links to the RFI and build threads--all the folks who helped me here I greatly thank Its almost a months old, but I would like to thank Mike @72modeler and @Jackson Duvalier for looking into some of my F6F-3 mid-Hellcat questions. Due to their help, I decided to tackle the Academy kit first as I thought it would be the hardest build as it needed the most scratch work to accomplish to bring up to today's standard. I decided to use the Academy kit as the basis for my mid-F6F-3 based on the points outs in the Valiant Wings book. I will use the Techmod decals for VF-1's White K-21 while assigned to the "new" USS Yorktwon, CV-10 to replace the Academy decals. I was attracted to this build based on my recently completed F4F-4 assigned to USS Yorktown, CV-5. Here is the link to the questions on this aircraft as well as a picture https://www.asisbiz.com/il2/Hellcat/VF1/pages/Grumman-F6F-3-Hellcat-VF-1-White-K21-aboard-CV-10-USS-Yorktown-II-1944-01.html I plan on using Eduard Photo Etch and Quickboost resin on all these engines. I am also going to use the Eduard Photo Etch exterior PE meant for the Cyber Hobby kit on the Academy build. Here is the pre-production shot of everything for the "-3s" together before production really heated up A major well earned crtique of the Academy kit is the prominent sink marks on wings and in the cockpit. I also filled in the holes for the rockets as the -3 did not carry these operationally int the time period I am replicating, I used Squadron White putty to fill these issues. Next up will be creating the bulkhead behind the rear windows, recreating the rear plumbing with paper clips and basic faming inspired by @billn53's recent small aircraft build. For what its worth, I also have an F6F-5 request for information if anyone has knowledge they would like to share. Thank you all for looking and all comments are appreciated Best, Erwin9 points
-
Bless my soul it’s a Fairey Firefly in 1/48 by Trumpeter Hello and welcome to my next aeroplane build. This kit Was sat at Ian Allen in Birmingham city Center since it’s release in 2018. Collecting dust. She was just out of reach price wise but When the 75% off closing down sale occurred I snapped it up along with a few other choice kits. ( Double edged sword of joy and sadness. 😃😔 I was excited to have it and looked forward to making her. As she wriggled her way to the top of the stash I began to look for builds on line. Lots of “special hobby” Fireflys but no Trumpeter. Then I start reading the reviews. 🤦♂️ It seems there is a lot of hate for this kit. The more I read the more disappointed I got. The more disappointed I got the more I read and the more I looked at the kit. She looks like a firefly, smells like a firefly, heck it even has firefly written on the box. I was well on the side of the under Dog. Yes there seem to be some issues and I’m not looking to build this under the eye of Sauron or anyone for that matter. I’m just here to have a good time. 🤘The issues that are most relevant to me I think I can fix with some old school modelling work / 3D printing and a rather lovely big dollop of enthusiasm. I’ve opened the box now so there’s no going back. 🫣🫠😜 Join me if you will in another adventure, I’d be glad for the support. 😍 Pawing through the various bashings this poor kit has had I have picked out a few things I’ll definitely be fixing along the way. And probably more as the build unfolds. They are: A new tail rudder. Cloth instead of metal. New wheels. Deeper and more details New wheel wells. Squared and detailed. Detailed cockpit. Just a little more. Nose vent things. You know if you know. Cockpit mirror. Yeah that. 🪩🪞 That’ll do for starters. I’m confident I’ll get a lovely looking firefly at the end of this but one can never tell. I might just spoon it. 😱 Regardless if you’ve ever wanted to build this or ever wondered who on earth would then now’s your chance. Tag along and watch what happens after I open the box. Welcome friends. Johnny.9 points
-
It looks like I've lot motivation here but t'ain't so fiends friends. A daily increase in the brain-fog of late (Mrs B has had to ask me to stop putting the kettle back in the fridge after making tea...) and hospital tests for sleeping disorder haven't left much over mentally to push this thread forward in any meaningful way since the last posting - to my sincere regret given the interest shown here. I'm just sorry there's not more to report at present Mark. Too late sir. I am taking you steadfastly at your word! N.B. It's all Albert's fault guys.... ⬆️ The drawings in: are likewise the only ones I've come across that seem accurate but as with the Vixen previously , photos will be my primary cross-references whilst working in Fusion. It will be soon, I promise! A from you is all the encouragement I need Steve. 😁 Another bloody comedian! (in Italian). I have the beginnings of a plan Terry.... 😅 S'truth and Betty Martin - at that scale Heather we'd be talking about having it rise from a lake of resin like Excalibur! I can see a logical contradiction here.... I got this Pete.... This wheel will do grand for them old rotor blade lads and....Jesus Mary & Joseph: what in God's name are you doing back there Greville? That's the theory Chris - it'll face its greatest test as a set of physical objects of course! I apologize for the other clientele in advance Johnny. Do not offer them rides. 😁 Better than a kick in the Booleans on a cold night anyway Alan.... Granted, with pleasure. A plan is forming Bill, fear not. It may not be practicable, or achievable. But it's worth a try. 😁 Thanks for that info and the low-angle photo Mike, extermely useful: I reckon if I combine hubris with naive overconfidence then it might prove possible to create a removable sight unit and replacment 'grommety thing'. That reminds me, this'll need ground crew as well.... Only just remembered the factory in that was called 'Missiles Ltd.'..... I hate to mention this Pete but that book has been thoroughly debunked by the RSPB. Most ornithologists consider it more likely to have been a bald sheep temporarily airborne after a being hit by a Benny in a Land Rover. So where do matters Waspish stand then? As of today I'ver gathered a set of general dimensions for the airframe and blades/undercarriage. These need to be translated into 1/24 scale as the first step in Fusion (learned early on with the Vixen) is that when doing an entire aircraft, it's advisable create a set of linear extents in three dimensions to act as a virtual 'cage' defining the size of all subsequent work. Also in hand are the required level of photographic references. I've amassed about 300+ representative shots from various sources, which should provide a reasonable baseline for accurate cross-referencing of viewing angles regading areas large and small. As well as the excellent forum walkarounds referenced by Mike above, one of the most comprehensive sets for shape and detail is this one from SkippyBing. Before starting any design drawings in Fusion then, I need to break the job down firstly into regions, then into layers of detail, so that I can put together image mosaics for each in Pureref that will provide the required level of visual cues (seen from multiple viewing angles) to refer to whilst bloocking out and filling in the airframe on various planes. Hopefully I should have something more visual in nature to show you in a few days but off for an afternoon sleep now. If only I was joking.... Tony9 points
-
Howdy Everyone, Thought I`d subject you to some photo`s of my latest effort My attempt at making a `Farmgate` Douglas Invader from ICM`s 1/48 B-26B Korea boxing Had to make a few changes: the obvious being deletion of the upper and lower turrets....... ....others were deletion of the wing guns, jump seat for radio operator ( ex gunners ) compartment and scratch built some wing pylons to ( loosely ) resemble the type fitted. Improvements and additions include: seat belts, ignition harness`s, brake pipes, metal tube for nose gun barrels....... ... and replaced the propellers with some Monogram ones from the spares box as the kit ones just didn`t look right ( to me ) I originally fitted the nose as per the kit but wasn`t happy with it, I held the model at various angles against photo`s but it looked ( to me ) to be short. So I sawed it off, shimmed it by about 2mm and moved the canopy back about 1mm. I believe these were painted in aluminium paint as per F-100`s and F-105`s in the theatre so didn`t so mad on various coloured panels. Hope you enjoy, thanks for looking Cheers Russ9 points
-
Cockpit assembled and painted without aftermarket, I hope it turned out well ... by Rodolfo Masti, on Flickr by Rodolfo Masti, on Flickr by Rodolfo Masti, on Flickr by Rodolfo Masti, on Flickr9 points
-
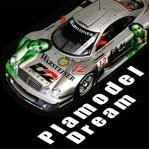
Hello, I completed the F189, a Ferrari F1 car of the era that had a V12 engine. (The sound of the engine at this time was awesome.) Even though it was a Tamya kit, it was difficult to fit the upper and lower cowls. Except for that part, I had a lot of fun working on it. The line of this car is so cool, and Italian Red's Ferrari is always beautiful, whether it's a real car or a model car. The decals in the kit were old and unusable, so I used decals released by MSM. You can check the revised and added parts through the video. I hope you like it. Thank you. Full build video is here. 😅8 points
-
Oh, Bronze surely, Windy...... ‼️😇 Another little survivor parked up today, like it's not a big deal.... Not even sure if it's a Pride 'nJoy collector's prize possession - could just be a run around that has kept going. J reg suffix, now let me think..... My old Triumph T100S was F reg....... 68 or 69??🤔8 points
-
There have been some very nice renditions of Revell's 1/72 Razor Crest posted recently. Let me add my own attempt, which includes a fair amount of internal & external lighting, plus some aftermarket detailing items. Here is the kit: and, here are the aftermarket items I added: Instrument & control console, by 308 Bits. This came pre-drilled for fiber-optics: Mando and his little green companion, also from 308 Bits: Resin and photoetch cannons, by Green Strawberry: LED mounts for the engine, by 308 Bits: More refined engine exhaust nozzles, from Scale Mark Models: and, last & least, more detailed landing gear hydraulics, also from Scale Mark Models: The 308 Bits and Scale Mark Models items are 3D-printed and available on Shapeways. The Green Strawberry cannon (plus a lot of other Razor Crest & science fiction aftermarket) were bought from their website, greenstrawberry.cz . As mentioned in the title, my focus for this build was to add internal and external lighting to the Razor Crest. This was my lighting plan: LEDs, photo-optics, and associated items came from Evan Designs ( https://evandesigns.com/ ) and Lighthouse LEDs ( https://lighthouseleds.com/ ). This is the control console with approx. 50 fiber-optics in place: The fiber-optics were routed under the flight deck and behind the cockpit, where I attached their LED light source: Each engine pod has two synchronized, flashing LEDs for the red strobe (top and bottom), plus seven 5mm LEDs for the exhaust. In the center is a steady yellow LED. This is surrounded by six "flicker" type orange LEDs. The result is a nice, subtle effect suggestive of the engines being at idle, which is appropriate since my Razor Crest will be sitting on the ground. My build approach was to treat the Razor Crest as three separate assemblies: 1) the lower fuselage, including the cockpit, 2) the upper fuselage, and 3) the engine pods. This allowed me to install the lighting and paint & weather each assembly individually. To facilitate this, I added electrical connectors to each assembly and the power button & switch (in the lower fuselage cargo bay): The above is a quick overview of my build progress, for more details, see my WIP here: https://www.britmodeller.com/forums/index.php?/topic/235113049-lighting-revells-razor-crest/ Enough with the preliminaries! Let me show you how she turned out! Overall finish is Alclad Duraluminum with a clear coat of Alclad "Light Sheen". Weathering of the main body consists of a dark gray panel line wash, plus an overall coat of Flory "grime". The engine pods also got a fairly extensive weathering with oil paints: Now for some detail shots: I modified/detailed the side cargo doors as described in Andy Moore 's most excellent build ( https://www.britmodeller.com/forums/index.php?/topic/235103157-mandalorian-razor-crest/ ) : I also added cabling to the landing gear. The arrow in the second photo points to the 3D-printed hydraulic assembly from Scale Mark Models. It is well hidden beneath the bay door and you have to search to find it! You've probably noticed this guy in my pics! It's a 3D-printed Tusken raider, with Bantha, that I found on ETSY. Normally, it comes in 1/47 scale for Star Wars Legions. Happily, the seller (Jan Kowalski from GetOfFenris) agreed to downscale it to 1/72, and it turned out nicely after some detail painting! Next, let me show you my lighting effects! Cockpit and instruments/control console: "Chin" lights and landing lights (looking up into the nose gear bay) Engine pod strobes and exhaust nozzle: Finally, links to a few short videos (~10 seconds) showing the lighting in action (click on photos to view videos): That's all, folks!!! Thanks for viewing, and please feel free to post comments and/or to ask questions. - Bill7 points
-
Ok so intro done and Zero snuggled under the trusty work bench. It’s Time for some pics. 😍 The quite frankly lovely box art. sprue shots. Clear parts look good. The instructions look rather basic I must admit, but that’s ok. There are some nice colour call outs to have. Decals look good and there’s a PE fret too. I also invested in this. 😍😍😍 Right then let’s begin! 🤤 cockpit it is then. The bits look good and no flash to speak of. They dry fit rather nicely. I can possibly add some pedals and maybe some boxes levers and wires but it’s rather cramped in there. With the ip in place and the other side on you can see how much you really can’t see. I Think a little detailing here and there and we will be good to go. Belts. I must make belts. 🤩 That’s it for now. I just wanted to set this one going. Looking forward to more of this. Happy modelling chums. Johnny. 🥸🤩7 points
-
Another Strange Day. Went to an Art Exhibiton, which was held in a barn on a farm in the darkest depths of Essex. Sitting having a coffee and stroking their dog when there was a loud noise outside, and itwas this... By the registration, first reg'd in Scotland, although the new owner (only just got it) reckons it's always been Essex based. Right hand drive which apparently makes it rare. Note the two stop watches - methinks he does a bit of rallying in it. He said it doesn't like poodling, needs to be legging it to stop it flooding. Shortly after this, he opened the passenger door and there, sat on the passenger seat was...a bunch of bananas!!! Don't think that exhaust is original!!7 points
-
Full text for the Marineflieger rear cockpit warning stencil:- Achtung! Alles Lookenspeepers! Das computermaschine ist nicht für gefingerpoken und mittengrabben. Ist easy schnappen der springenwerk, blowenfusen und poppencorken mit spitzensparken. Ist nicht für gewerken bei das dummkopfen. Das rubbernecken sightseeren keepen das cottenpickenen hans in das pockets muss; relaxen und watchen das blinkenlichten.7 points
-
Ok, I have most of the paint work done at this point, and will probably call it complete for this work in progress thread. I'll base it, and do a little finishing work, dust, a little metallic dry-brushing, etc, and post the results to ready for inspection. Thanks to all who followed along. Edited to add....it's not quite as yellow as the photos make it look. I need to work on my lighting, I guess.7 points
-
You shouldn't need to scratch build something from a mainstream manufacturer, especially if the kit is 60£ and the mold was short shot. Airfix has to provide OP with a new part.7 points
-
Afternoon everyone. I’m not one for posting WIP’s or RFI’s on here as I don’t build very often (In fact it’s mainly July and August when I get time) with other things taking up any free time and there’s never a guarantee I’ll finish something or it be good enough to share. However my confidence got a slight boost when Airfix put my K2Y up on their social media pages so I figured what the hell. Let’s get one done on here for a change. I’ve had a little Academy A6M5c Zero in the cupboard for a few years and having just built the first of the Eduard “Tora Tora Tora” set, and having a bit of a Pacific War thing going on this summer, now is as good a time as any to do this. As you can see there’s not massive amount to do and as this will be strictly OOB It’s easily doable within the timeframe. The plan is to start one morning and just work through. I brush paint everything (The big scale stuff is F.U.N) so the plan is to use AK’s 3rd Generation IJN Paint set. I’m slowly swapping out all my old Tamiya acrylics with AK’s as they’re just beautiful to paint with6 points
-
#17/2022 My dad´s next completion. It´s a long way to Mukumbura... Used the old Academy kit from 1997. It has its flaws and issues but overall not that bad. Wings to fuselage joints and air intakes needed some more filler and work. The cockpit is rather basic and the seat too small. Used cockpt sidewalls and seat from a True Details cockpit set. The landing gear and covers (and their mounts) are a bit fragile. The frontal front cover broke off twice. Although the Hawker main landing gear has a bit of an "O leg" character, Academy´s legs look a bit too much inwards, my dad didn´t change that. The Academy kit only includes the 100mm rocket pods which the Rhodesian Airforce didn´t use. Took some suiting 68mm pods from the Airfix Hunter F.6 kit. Had an Xtradecal sheet and one from Fundekals. Used the Xtradecal ones because their size of the roundels did fit better to the Academy kit. Model shows an aircraft of the RhAF in the early 70ies when all their aircraft still wore all ID and national markings which were all removed later on in the war. This aircraft had its number "1821" applied on the frontal front gear cover. Xtradecal provided no number, Fundekals only "821", so kept it off. The Rhodesian and later Zimbabwe Hunters had distinctive yellow stencils on each fuselage side of the cockpit, which aren´t provided by neither of the two sheets. Painted with Tamiya XF-52 Flat Earth and XF-81 Dark Green (RAF). The sliding canopy is too thick and narrow to display it open, so you should use a vacform one if you wanna do it open. Maybe gonna build a new Rhodesian Hunter someday with the Airfix kit. Build thread here https://www.britmodeller.com/forums/index.php?/topic/235109869-bush-war148-hawker-hunter-fga9-rhodesian-airforce/ DSC_0001 by grimreaper110, auf Flickr DSC_0002 by grimreaper110, auf Flickr DSC_0001 by grimreaper110, auf Flickr DSC_0001 by grimreaper110, auf Flickr DSC_0005 by grimreaper110, auf Flickr DSC_0006 by grimreaper110, auf Flickr DSC_0007 by grimreaper110, auf Flickr DSC_0008 by grimreaper110, auf Flickr DSC_0009 by grimreaper110, auf Flickr DSC_0010 by grimreaper110, auf Flickr DSC_0011 by grimreaper110, auf Flickr DSC_0012 by grimreaper110, auf Flickr DSC_0013 by grimreaper110, auf Flickr DSC_0014 by grimreaper110, auf Flickr DSC_0015 by grimreaper110, auf Flickr DSC_0016 by grimreaper110, auf Flickr DSC_0017 by grimreaper110, auf Flickr DSC_0018 by grimreaper110, auf Flickr DSC_0019 by grimreaper110, auf Flickr DSC_0020 by grimreaper110, auf Flickr DSC_0021 by grimreaper110, auf Flickr6 points
-
Evening, guys Thanks to those who worried about my build or gave wise advices 👍 My new build with the second kit progresses slowly...but surely ( @rob Lyttle 😉 ) At the moment, I've cut the trunk lid off. The underside of the trunk lid has also been improved, with the addition, as on the real, of a peripheral frame and the housing of closing/opening system (not functional). Furthermore, I dug a groove on the edges of the lid, to reducing its thickness and allowing the installation of a trunk lid seal on the body. The jaws of the trunk closing system were shaped with files from 0.3 mm aluminium plate, after making and testing a temporary styrene template, and they will be glued later. I've redone the underside of the trunk, which is now waiting for the delivery of styrene stuff to be finished. I've also done the interior of the trunk with the fabrication and installation of the side partitions, those delimiting the spare wheel storage space and the fuel tank, the fuel line from the filler neck to the tank, as well as the removable trunk floor in 2 parts. These last plates will be carpeted later The almost vertical front bulkhead of the trunk has been fabricated, and installed on the underside of the body. I dug a groove on the underside of the horizontal portion of the reinforcement bar, in which I had planned to glue later the alu part of the hinges I made and installed the trunk lid hinges Initially, I thought I would install the hinges in the groove I dug previously on the horizontal portion of the reinforcement bar in front of the front bulkhead of the trunk But it appeared that in this position, it was impossible to open the trunk because its front edge hit quickly the body when lifting it, so, I placed it in front of the reinforcement bar, and trapped it in this position with a second plastic bar stuck on the first one by its underside . At last, I've done the new fuel flap and its hinges. [ All that remains to be done is to 3D print a new chute and glue it in place to complete this part of the assembly. And, especially for @rob Lyttle, I have to say that the only portion of the first bodywork that never broke while handling, the tail, under the trunk opening, had broken on the second body a few days ago during a test fit...of course, I hadn't reinforced it previously since it never broke before. 😏 This is already fixed, obviously Stay tuned if you like 😎6 points
-
My aim is to get mine below 47. It's been at 57-58-59 for about 3 years now as every time I complete a build, something I want ends up coming on ebay. And if/when Japan opens again and I can get there on holiday, that'll add 10-12 more and if so, I'll be back to 57-58-59 again. If Belkits ever release that RS200 and Maxi-Megane, that's two more. And if the NuNu BTCC Audi emerges (who knows what's the delay there), that's another. Not to mention that Hasegawa Pulsar is very tempting. And the Ivory Coast Rally Galant. Most recently these have added to my stash. The first of which (McLaren short-tail) - is the first one I've seen on ebay for a very long time.6 points
-
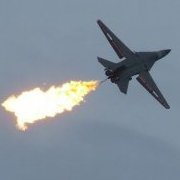
If you can’t feel the ground any more, keep running and don’t look down!6 points
-
Thanks gents. Some bits and pieces this evening and a step forward. I finished the gunsight with a little decal I found to represent the range dial. The gunsight would have been exponentially easier to install had I remembered to do it before attaching the windshield. I weathered the prop. Some light chipping (which strangely doesn’t show up very well in the pic but is quite visible IRL) and some staining on the blades. The kit blades are a nice shape but a little over thick; a bit like the rest of it, actually. Then I added the undercarriage and pitot tube and finished the underside. I used pastels for the staining, some of it I wiped backwards with a damp cotton bud to create more liquid-like stains. These aircraft saw no action so I didn’t stain the ejector chutes at all. I used the kit stencil decals and found they had a propensity to silver, I more or less controlled it but will need to be careful on the uppers. I posed the radiator doors open but I know that wasn’t usual on the ground, when parked up. But, I like its dynamism so that’s how it stays :). Finally, I just couldn’t resist a mock-up finished pic… …nor could I resist a dry fit assembled comparison shot. That’s all for now. Cheers.6 points
-
Hi all Further progress on the Swordfish with the windscreen aon and faired in a bit, still some work to do there and also the main upper wing mount in and fettled. The square area on top needed reducing slightly Rearing mount added, just want to tidy a bit on the upper surface Now fits like a dream on a dryfit. Upper wings ready for some sanding between the stats and lower wing joined . I am not worried re the holes for bomb racks as will drill out the front ones and then ascertain where the rears go when I construct the brass bomb racks, as they are space slightly differently to the kit ones. Thanks for looking in Chris6 points
-
Thanks for the encouragement guys... Finally all parts are fitted, canopy dipped in future and dried.... she's done. Full pictures will be posted soon in the gallery section. Cheers, Mario6 points
-
This kit and judging by comments many, many others is not fit for purpose and should be returned to retailer. No matter how skilled we modellers are, we should no be expected to right the wrongs of a manufacturer, especially at £60 per shot.............it might be just a kit but imagine buying an item of clothing and finding imperfect stitching or buttons falling off...................would you stand for it? Seller may well say that when you get it home a needle and cotton will soon sort that out...............the item is Not fit for purpose - end of story...............................sorry if your a seller of kits, but it also brings the item to your attention and could ovoid confrontation with other customers later on.6 points
-
The supports for the floats have finally been painted and the floats themselves have had a little weathering to match the hull. Turrets unmasked. The final decals have been put on the fuselage after the pva masking was taken out of the portholes and the engines and cowlings were glued into place. They will need softening tonight to get the carrier film to wrap around. The turret cover has also been placed in the nose. And I just had to..... Getting closer, even if I don't want to think about it and jinx it again. Thanks for looking, Cheers, Alistair6 points
-
Morning folk's,built for the F-5 family GB is my attempt at the Tiger Hobbies F-5,my son Luke and I both built/building this kit so we invested in their AM sheet giving me the Iranian option much inspired by @Barzin and his posting of Iranian hardware,It's not a shake n bake kit but if I managed it it's managable for most! The kit comes with three large fuel tank's the photo's I saw of Iranian aircraft did not show the underwing tanks in use so I scrounged a couple of suitable looking bombs from my other son, paint's mixed from Tamiya sprayed the sand and brush painted the rest,many thank's for looking and please check out the GB.5 points
-
G'day all. The last one finished before QMHE. This is the ubiquitous 1/48 Tamiya FB.VI Mosquito built as a 464 Squadron (RAAF) aircraft flown by F/O Jack Palmer and his navigator F/O Jack Rayner operating out of RAF Thorney Island while attached to 2TAF in October 1944. There's not much to say about the kit that hasn't already been said but the additions were a True Details cockpit, Quickboost exhausts, Master gun barrels and a new pitot from brass tube. The codes, serial and over wing roundels are painted using masks that I made and all paints were Mr Color with numerous oils and weathering products used to achieve the final appearance. First time building the Tamiya Mozzie so another one off the bucket list. Cheers, Mick.5 points
-
I recently finished the old Airfix 'Four-Stroke Engine'. This model requires quite a bit of work if you want to build it properly. The parts really show their age, but with careful work, a nice model results. The model gives the impression that the kit designers or the mould makers did not always know what they were trying to portray; some details do not make sense. I'm happy that I made a careful study of the colours that would suit the model, I'm really happy with the end result. More here: https://robdebie.home.xs4all.nl/models/fourstroke.htm Rob5 points
-
Greeting to the community! Want to demonstrate my recently built model of I-16. Actually, I had a desire to have aircrafts of Spanish Civil war in collection long ago. But it required type 5 or 10 for I-16 and there were no decent model at the time. Of course, I couldn't resist the most attractive prototype with cartoon Popeye the Sailor at the tail, belonged to Republicans, 4 Esquadrille de Mosca pilots Morales and Zarauza (1937-38). I started this model in April (after a month of the war beginnig) and have building it for three months. I didn't even try to make any additions - wanted to relax, to be distracted from heavy thoughts and make this model fast. That's why it's mainly out of the box. Even the machine guns and pitot tube I left from the kit. Worked with it only by weekends. I'd like to show the pictures of the ready model first and then show a little bit of the construction. Sorry, if the pictures are too many. I also tried to show the model at different background.5 points
-
I finished reading 'Spearhead' by Adam Makos not too long ago. Really incredible book, and I thought about dipping my toe into model tanks. It's not really my usual thing, and I have enough big models sitting around not being built, so I wanted something easy. Thankfully, GaleForce9 makes some wonderful little tank Miniatures for the World of Tanks: Miniatures game. I wanted a Pershing, but the store didn't have one, but they did have the Panther, the co-star of the book. This was a fantastic experience for me. I needed something simple, and fun to break me out of my modeling rut, and this did just the trick. No building, very little cleanup, and straight to painting and effects. I did a little diorama for it and stuck it in a baseball display case. :}5 points
-
Alright, time for the tiny serials: They really are at the edge of the cutter's abilities and I went through several stencils before finding two that would work. Herb, cleanup on Aisle P! And look at the roundel while you're at it. And the fin flash on the other side. I forgot one of my hard earned lessons; always paint white last. OK, lots of places need a little clean up, but the main painting is done.5 points
-
My second F-104 build ever.... Hasegawa's beautiful kit in 1/72, but sadly with yellowing decal which cause more problem than building the kit itself. Not my best, but still looks ok as long you don't zoom in the pictures 😉 Yeah.. I know I should've invest on some kind of dark background... 😋 Cheers, Mario5 points
-
A couple of months ago I did a scratchbuild tug. It certainly had some character but ended up looking pretty cartoonish and while I like it it doesn't fit the diorama I'm doing. So I decided to do one from some plans. Built originally in 1907 I'm not building this particular boat but using the plans to get something that looks more accurate than my "by eye" earlier attempt. She will be up alongside the much larger Sunderland Steamer from my other build log - which in turn will up against HMS Prince of Wales. I'm not even sure if a tug this small would have the grunt to move a 10,000 merchant ship but for the sake of artistic license she will emphasise the size of the other two ships in the diorama. In 1/350 she's not very big, just 47mm bow to stern. But here goes. The scaled hull formers from the plans, these are just in thick printer friendly paper. Hull form assembled I stuffed the hull form with foam core to bulk it out, then trimmed down to fit. More so the putty would be thinner and not require as much curing time as anything else. roughly covered in Milliput, finger prints and all. Sanded down and with a deck made of scored card glued in place.5 points
-
Little h and myself are in for a joint Blitzbuild this time round……. details to follow. Egg it up!!5 points
-
Hi all Some further progress, fuel tank cover thinned out either side above the tans and the tabs thinned out asper the Paul Budzik videos Troy kindly linked and Tail Dragon also showed. Fuselage joins were quite good but needed sprue goo filler. This hives the overhang required, lower wing fitted I think this could be my fault as i glued the fuselage sides to the cockpit and i should have left those loose until the lower wing was on although the lower wing fillet to fuselage joins are perfect so not sure if me or the kit, but there is a gap between the upper wing halves and the fuselage, oh well a bit of plastic and and sprue goo will sort. I clamped the wing in the undercarriage bay areas, cannons and front external corners. Thanks for looking in Chris5 points
-
Did some digging around. I probably won't decide on what for certain until day of, but for now it's likely narrowed down to one of these. Eggplanes are always solid entries for Blitzbuilds...but getting rid of one of the bagged kits would be nice for storage.5 points
-
Thanks gents, yes I like it this morning too, it’s staying as is now. I agree! There’s something more aggressive with them compared to the rather more delicate looking Merlin Spitfires. Thanks David. The prop is mostly completed, I am going to weather the blades some but otherwise done. Stencil decals are next. There’s not too many to go on so that’ll be a simple task. Then it’s the final stages to complete by week’s end I expect. Cheers.5 points
-
Base coat done5 points


.thumb.jpeg.512869d47e412449d69d30d0295c1ae8.jpeg)


.thumb.jpg.d17ff607fc7e89ed057e63fcb6f2a888.jpg)


This leaderboard is set to London/GMT+01:00