
Leaderboard


Popular Content
Showing content with the highest reputation on 19/08/22 in all areas
-
Hello During the "special operation" in Algeria, the Amée de l'air needed a lot of planes to support the ground armed forces against the FLN rebels. From 1956 to 1959 they used the N.A. T-6G but this one had a very noisy and underpowered engine for close air support in the mountains. The Air Force HQ was therefore looking for another two-seater aircraft and chose the N.A T-28B as it was used in the US Navy at the time. But these were not being available, France bought 146 T-28A airframes from the US Air Force, 1300HP P&W R1820-56S engines (excess of B-17) and three-bladed propellers like the T-28B. The Fennec as it was called was assembled by Sud Aviation and equipped 4 units in Algeria from 1959 to 1962. These units were sister squadrons of units in France and the pilots were temporarily assigned to Algeria. The four points under the wings enabled to carry any combination of 2 elements among the following : - containers of 2 machine guns of 12.7 mm; - T10 shaped charge rockets; - a 7 x 68 mm rocket launcher; - a 36 x 37 mm rocket launcher; - 120 kg bombs. Here is one with this Heller kit of T-28 with some parts in resin given by a friend of mine (machine guns, rockets and cockpit parts). This is Fennec N°7 from EALA 3/9 Numidie in 1961. (Escadron d'Aviation Légère d'Appui) Patrick31 points
-
Hello Gents !! Here's the Sea Harrier RFI at least..... I would have finished it on the 14th of June... But.... Blaaah blaaaaah..... As I told it in the WiP, I use to call the Falklands as "My Islands" since It is my family name.... I would have shared this thread with our friend Tony O'T since we got some good infos from him..... Well, the kit.... A lot of you guys have built it, Oftenly on a better way than I did.... Good detailling but imprecise if not clearly wrong destructions.... Here's my rendition.... XZ457 took her first flight in December 1979 with test pilot John Farley at the helm.... (What ?? She's a sailor's bird after all....) Then assigned to 700A NAS in Yeovilton.... (A mecca for me) The 700A turned to 899 NAS.... and 457 has been assigned to HMS Hermes.... Aircrafts, pilots and maintenance crew were attached to 800 NAS for operation Corporate.... While on their way for south Atlantic the SHar were prepâred for war, fin markings, codes and white bellies were painted Extra Dark sea Grey.... 457 sport 3 kill marks but deserve to have 4..... on the 21st of May 1982, HMS Ardent was under attack A-4Q Skyhawks Lt Clive Morrell shot down an A-4 with a Sidewinder and damaged a second one with 30mm guns..... The second A-4 has been scored as probable..... And as been confirmed as a kill later since the A-4 tried to land on Stanley but due to the damages, has to eject..... 3 days later, Lt Cdr Andy Auld shot down 2 Daggers of Grupo 6 over Pebbles Island..... As usual, I used Xtracrylics paint 190 gallons fuel tanks were not used in combat, as I did'nt finish the kit in time.... i felt free to use it.... More pics will follow, I must jump in my van and go to work..... Sincerely. CC30 points
-
Hello! Today's kit has an history as it is a survivor of my trash bin: I started to build the Tamiya excellent F-84G but, to improve a little bit it, I had the silly idea to adapt an old French resin aftermarket product (for the Heller kit). The result was disastrous and catastrophic, as it didn't fit at all and as a result, I finally broke in two parts the fuselage. Rage rage rage! I threw the whole stuff in the bin but, after calming down, considering the price and not wanting to invest in another one (shipping cost is a killer) I decided to rebuild it. I just dropped the flaps and ailerons, add a vacform canopy and enhanced the wheel wells. Painting was done using various shades of ALCLAD II. I faced another problem with the Aeromaster sheet CH 72-02, the decals have badly reacted to the decal set softener. So I finally painted the fin yellow and added black stripes. Curiously I didn't find any photos of FS-460 even is Osprey Frontline Color 3 so I can't tell about the accuracy of the Aeromaster sheet. By looking to pictures of aircraft of the 49th FBG, I didn't find any evidence of aircraft wearing stripes on the horizontal stabilizers so I didn't put them, as indicated in the Aeromaster instructions. If anybody has some photos of FS-460, I will be very happy to see them to enhance my kit! Photos: ...and, as usual, the little diorama: That's it! Thank you for looking, critics most welcomed!25 points
-
Gloster Meteor FR MK.9 MPM 1/72 (2002 edition). 117 Sqn. First Jet Israeli Defence Forces Air Force Ramat David 1955. At 1.9.55 Capt. Aharon Yoeli intercepted and shoot down two Egyptian DH Vampire. I started this build ca. 2002 with CMK resin parts, was disappointed from the quality and put it back to storage. Some weeks ago, I decided to finish it. Alfred Riedel helped me with decals from the new Special Hobby edition of this kit, so we are... Aftermarket parts from CMK: engine set :pleur4: cockpit, undercarriage set :rougefaché: pitot from MASTER :shock: .23 points
-
Another Phantom from me, a Hasegawa 1/72 F-4S Phantom II, Eduard etched brass used in the cockpit but otherwise finished OOB and using the kit decals which were quite thick and didn't want to settle, weapons came from the spares box, finished with MRP and Tamiya paints. 1/72 McDonnell Douglas F-4S Phantom II by Phillip Wilmshurst, on Flickr 1/72 McDonnell Douglas F-4S Phantom II by Phillip Wilmshurst, on Flickr 1/72 McDonnell Douglas F-4S Phantom II by Phillip Wilmshurst, on Flickr 1/72 McDonnell Douglas F-4S Phantom II by Phillip Wilmshurst, on Flickr 1/72 McDonnell Douglas F-4S Phantom II by Phillip Wilmshurst, on Flickr Enjoy.18 points
-
Dobrý den všem. Toto je můj model číslo 3. Základem je stavebnice Academy 1/35. Eva Česká republika.17 points
-
After enjoying building the 1/24 Spitfire Vb recently I decided to extend the masochism by tackling the Hurricane. This one went together ok generally, although the cowlings weren't a good enough fit to be removable. The redundant Spit Mk1 propeller and spinner were used instead of the Hurri's oversized bulbous one, which I never liked. The glaring errors were all my own; once I'd decided to replace the spinner I searched on line for more suitable markings, and I came across the Science Museum's L1592. Unfortunately I'd stencilled these on before I realised the original is a rag wing, so 0pts for research. My other error was to place the fuselage roundels too far to the rear, meaning there wasn't enough space on the starboard side to fit the KW-Z squadron code. The only solution was to apply it in Z-KW format, but as few others are going to see it other than me and the BM bretheren it's a compromise I can live with, it was never going to be an IPMS Nationals contender anyway: And to finish with, some shots with its 1/24 cousins: Thanks for looking J.A.17 points
-
I present the latest model completed this year. Lockheed F-104G Starfighter in 1/48 scale built from the Revell Monogram kit. The model received a modified MB GQ-7A seat and made elements of the cab cover frame. Model Maker decals, 25th Anniversary of JaboG 34 and 50 Memminerberg Bases, May 5, 1984.14 points
-
Another 1:72 offering, this time the Airfix 1/72 Warhawk. Built straight out of the box using Humbrol enamels and the colour call out in the instructions. Made a bit of a botch when doing the decals, a) surface not smooth enough to avoid silvering and b) didn't put a thick enough protective coat when doing some post decal masking (tape peel of some decal) and maybe a bit more care on the transparencies. More lessons learnt. Neat little kit, and I enjoyed the build on the whole.12 points
-
The new tool Airfix Buccaneer finished as S.2D XN981 ,809 NAS, HMS Ark Royal . Built straight from the box using Hataka and Tamiya paints. a fantastic kit to work on ,the only fit problem was ejection pin marks on the inner tailplane surfaces. Having helped with the development of this kit since the original scanning of XV361 at the Ulster Aviation Society it has been a brilliant feeling getting one completed. IMG_20220817_191852 by Tony Osborne, on Flickr IMG_20220817_191907 by Tony Osborne, on Flickr IMG_20220817_191632 by Tony Osborne, on Flickr IMG_20220817_191727 by Tony Osborne, on Flickr IMG_20220817_191602 by Tony Osborne, on Flickr IMG_20220817_191523 by Tony Osborne, on Flickr IMG_20220817_191506 by Tony Osborne, on Flickr 2022-08-17_09-29-06 by Tony Osborne, on Flickr12 points
-
This is a 1/72 Tamiya Corsair I built for my uncle - hopefully it survives the journey to Los Angeles to give it to him intact. It's supposed to represent an F4U-1A that Greg Boyington flew - he was known for choosing the most beat up airframe available in order for the less experienced pilots to have more reliable rides, and this one appears to fit the bill as the ref pics seem to show that the left wing is a replacement from an old 'birdcage' model painted in light blue grey. Thanks for Looking!10 points
-
Hi all, just completed Eduards new F4F-3 Wildcat in 1:48. Add some Brassin parts (cockpit, gun barrels, wheels and exhausts) and the Bronzin legs. It is just a fun-kit - hope you like it!10 points
-
Douglas DC-5 1/144 KLM, Dutch East Indies (now Indonesia), 1940 (Still can't work out how to centralise photos!) I realised a while ago that amongst the stash and completed models I had the potential to do all the Douglas Commercials in 1/144 scale except for that elusive DC-5 (and perhaps the DC-1 but I’m hoping that’s near enough to a DC-2). FRsin do a kit, but my last experience of their resins (a Handley Page Hermes) was such that I don’t want to go there again. However, having bought the Roden DC-3 and realised it was much better than the Minicraft kit that was in the stash, I wondered whether I could use the Minicraft DC-3 as a basis for a DC-5. Initially I thought I would just use the engines and props and scratch the rest, but then I started to look at chopping up the wings and using them, and eventually the fuselage as well. I cut the wing fairings out and filled the huge gaps with strips of sprue covered with Milliput. I drilled a hole through the top of the fuselage and put a wing spar in place from aluminium tubing, then attached the chopped up wings, etc etc. Huge amounts of Milliput and sanding later I had something that was just about usable. The fin and tailplane were from plasticard (it’s a pity nobody does a 1/144 scale A-20 because the back end of the DC-5 looks just like a Havoc) Undercarriage was from aluminium tube and brass wire with wheels from the spares box. My plan was to hand paint the markings but in the end I cheated and used decals from the FRsin kit. In the end it looked something like a DC-5. I think the fuselage should be a bit fatter and it’s all a bit of an approximation in places but it should look OK from a distance between the DC-4 and DC-6 in the line up. Still got the 1,2 and 3 to build before that though. Chris10 points
-
Good afternoon everybody … I am presenting you with a 1/72 Revell F-101B Voodoo. It is in the Markings of the 123rd F.I.S. Oregon ANG mid 1970’s. Please feel free to ask questions, post comments or visit the build thread in the Century series group build. https://www.britmodeller.com/forums/index.php?/topic/235110766-123rd-fis-oregon-air-national-guard-mid-1970’s/ Dennis10 points
-
When I started making 1/48 scale kits I started with a Canberra PR.9 and painted her in grey / green camo. A Hunter and Lightning followed, also in grey/green. This theme developed until I had a Tornado, Jaguar, Harrier, Hawk and a Phantom. That only left a Buccaneer todo but they were difficult to get hold of and expensive. Then I realised that Italeri did a Hercules - wrap around grey/green it had to be! I couldn’t do the trainers in camo, so red and white for a second Hawk, Jet Provost and a scratch built Dominie. Then this year produced the new Chipmunk kit which quickly got added. Leaving just the Buccaneer to do which I finished a few weeks back. Now I can’t think of any further regular kits of RAF aircraft from this period with the exception of the Tarangus Bulldog. I could do with a Jet Provost T5 but that’s about it. I could, with unlimited funds that I don’t have, get a 3D printed Vulcan, Victor and Andover. But that’s not likely. I do, however, have a Sanger a form Shackelton to build. The quality of them is, er, variable! I was learning along the way! Some have bits of after market, most are out of the box. Some have lights and two have motorised props. Anyway, this is how they look I couldn’t leave the non-grey/green ones out though. So added in a Tornado F3, couple of grey Phantoms, a grey Jaguar and a green Harrier GR.5 So there we have it. I still have another FGR2 to build, plus the Shack. And must get a Bulldog. But that’s my 80s RAF10 points
-
Box art - ref. CP72030 - Mikoyan Gurevitch MiG-23MLA (izdelie 23-12/23-12A) "Flogger-G" Source: https://www.facebook.com/Clearpropmodels/posts/pfbid02C9XJrCeWUr79cntRFafEC11G3MAzEi9vTkuP3FaEtfpJ1RvhXJG5PwEtTqqLhTVvl V.P.10 points
-
The DO-17z was trimmed with a moveable horizontal stab - pivoted at the aft spar, and had a sliding 'elephant ear' type panel below to fair with the fuselage. What appeared to be trim tabs on the elevator was actually balance tabs to assist elevator movement. They move in the opposite direction to elevator movement and function almost as a 'power assist' to elevator inputs.10 points
-
and under poccorn ....10 points
-
Having built an Airfix Centurion and a resin Conqueror for a recent GB on UAMF, I continued on to the Airfix Chieftain. Sorry but I didn't take many pictures. The kit seems an accurate representation of an early Mk2 with a nice level of detail. I did add a few extra bits: lifting eyes on the turret, a couple of extinguishers, the ranging gun protruding above the main gun barrel, tow hooks at the rear, fatter exhausts, a stowage cage and tow cables. The cage is made from staples and some slivers of plastic card. It’s inaccurate being slightly too small and simplified but improves the overall look. The only problem I had was the upper hull part was slightly warped upwards at the front and too rigid to fix. You can see it left a gap at the front end above the lower hull side pieces. In the end I had to live with it and needed to do some fine shaping of the top edges of the side skirts to make them fit. The vinyl(?) tracks provided were very warped from decades of being twisted amongst the other sprues in the tightly packed box. I used a few expletives during the fitting of the tracks but in the end they look OK because I could glue them tightly to the roadwheels and hide the poor join behind the tank's side skirts! I wanted to do the green/black camo but didn't have suitable decals. Therefore my combination of that scheme, the kit registration numbers and the regimental markings is fictitious. In hindsight, I wish I hadn't applied the white squares to the turret. The acrylic matt clear I brushed on didn't dry as matt as I wanted either. I am modelling this at our holiday cottage. I'll squirt it with matt clear from the airbrush when I take it home.. So, not an accurate replica. Just a "representation" of a Mk2 Chieftain in service. This lineup of my 3 small scale tanks (Conqueror, Centurion and Chieftain) resembles a photo I found somewhere on the web but can't recall where so I can't give credit to the owners. David9 points
-
So, this one is definitely not historically accurate, but I wanted to do up an all-metal B-17, and this is the kit and the decal set I had on hand, and I saw this paint scheme and loved it. My apologies if I offend anyone with incorrect decals, paint scheme, etc. In any case, I had fun building and painting up this beast. The metal colours are all enamels, with Tamiya acrylics for the other colours and details. Weathering was Abteilung oils. I learned a lot on this one, and if I ever do another, I think I'll go with a camouflage B-17G, and find a decal set that fits with the paint scheme I plan to do. Enjoy!8 points
-
I entered this HobbyBoss Morane Saulnier 406C-1 in the FB Conflict100 Group Build. Porucznik (Lieutenant) Kazimierz Bursztyn flew this plane on May 13th 1940 from Moerbeke (BE) and was damaged somewhere near Etten-Leur (NL). Cheers, Luka8 points
-
Recently completed She now takes her place in my little nest of Zeppelins. Build thread and silliness here: https://www.britmodeller.com/forums/index.php?/topic/235101938-zeppelin/page/38/#comment-44763758 points
-
The decals are now finished and hopefully bedded down. Any signs of silvering will be severely dealt with by the offending area being painted. The Flying Colours decals went on well and were a complete contrast to the ESCI ones. Going to start adding the undercarriage etc. tonight. Hopefully the photo shows the green and grey camouflage a bit better.8 points
-
It’s amazing the difference that even a couple of decals make. After a couple of evening mixing modelling time with watching the athletics I am calling this finished. Nice kit, goes together well. Enjoyed the build.8 points
-
Greetings Folks, This is one kit I always wanted to build for some time, however, C-119 Boxcar was out of production, However, a friend managed to get it for me. I did like to build in Mumbai, but I didn't just have the space to keep it, here in Imphal with some free space and with some motivation started it. The Italeri 1/72 kit is a bit dated and it is raised lines but it fits well, construction was straightforward. For painting, I used Mr.color silver and Tamiya and local paint for the rest of it. After talking to a few people the aircraft I painted was an orange nose and white top, I attached the b/w picture. If erroneous my apologies but I like the color combination. But the biggest challenge to the kit was the old decals, which would just crack, it took some time to make the black lines on the wings it was a daunting task. Reference picture which I used for my project. Thank you watching, cheers8 points
-
Wash and matt varnish added.8 points
-
Hello guys, It's my debut on this forum. I'm making airplane models since 2016 and now I have around 105 planes in my collection. Mostly WWII aircraft. But I like the passenger planes the most. So, for my debut I have chosen an Airbus A300B4. It's made as a tribute to the victims of biggest airplane disaster in Indonesia. 26.09.1997 the PK-GAI airbus crashed in the mountains near city of Medan. All 234 people on board were killed. May they rest in peace. The model is 1:144 Daco Skyline model on old 1975 Airfix moulds. I made some changes, like adding a part of fwd interior, adding Packs on the belly, and relocalizing the tail bumper into the correct position. Hobby folks from the Polish forum helped me by explaining some things and correcting my mistakes. Building time: 26.07-11.08.2022 Hope You like it, Patryk7 points
-
1/700 Matchbox HMS Kelly/Kipling done as the Kipling. I started this kit to kill some time while glue/paint dried on another and just got sucked into it. For some reason known only to the modeling gods, it went together with absolutely no problems. I did have to make a replacement torpedo unit as the one in the kit had a huge sink mark right in the middle of the top that was impossible to fix, but I chose a simple paint scheme so as not to tempt the fates further and used minimal PE and rigging. Turned out pretty nice for a very old kit.7 points
-
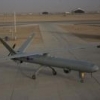
Hello! After a refreshing summer holiday I'm back on the workbench! This build took 5 days in total. WIP thread: Anyway, without further ado, here she is, ZD257: So small it fits in my palm! Hopefully more builds soon!7 points
-
Some meaningful progress on this one over the last few days. Firstly, the AIM-9 CATM (Captive Air Training Missile) was painted in the distinctive blue, with decals added to the fins from the Two Bobs sheet. The Hasegawa ACMI (Air Combat Manoeuvring Instrumentation) pod was then sprayed in the even more distinctive orange (I think current pods are grey but orange will contrast nicely with the black airframe). Exhausts and FOD covers: And so, without further ado, the airframe itself: Three coats of MRP black did the job nicely. Once dry, I sprayed the rear metallic area and added the colours to the nav lights. Pretty happy with how it has turned out as I've found that spraying black sometimes can give a bit of a 'patchy look. I'm fairly busy with work for the next week but I'll aim to get a couple of coats of gloss and and hopefully get an hour or so after work on a few days to get the decals on. More soon and stay safe Dave7 points
-
Having made the decision on the individual car to build, FRE 517K, one from the original Bond Bug brochure, I had to make small adjustments to the "700ES", and then I could finish off the last decals and finally make the prints. This time the black ribbon behaved perfectly.7 points
-
the polish ambassador has been convocated for protesting against the anxiety state in the world modeller community provoked by ArmaHobby policy ......7 points
-
How come you never read the headline Psychic Wins Lottery?7 points
-
Canopies. Oh joy. The canopy for this kit is considerably smaller than the ‘ole for the cockpit. Before I started building up the cockpit walls to meet the canopy I decided to review my options. I have the Airfix Mk IX ( the recent one not the 1958 one), which comes with two canopies and I have the Falcon RAF WWII Pt 4 that includes a Spit XIV canopy for the Fujimi kit (sadly, not the FROG kit). They all seem to be late model canopies with internal armoured glass, so they should all be the same, right? L-R Falcon, FROG, Airfix: All very different. Falcon is the clearest and could probably do with a bit more trimming, but is much larger than the other two. FROG is a bit blobby and a bit rough and ready but would work with a bit of shimming. Airfix is much finer and probably the only one to capture the fineness of the cross section where the rear fixed part joins the fuselage (the kit is too broad there). Would need a bit more shimming and fuselage spine sanding. So, the Falcon is out (disappointingly) and it’s a moderately straight fight between FROG and Airfix for the canopy spot. Haven’t decided yet…7 points
-
Hi all A bit of progress on the Spitfire Components painted and oil washed and dry brushed. Additional hydraulic pipes added And painted Cockpit together, also added the Aileron actuator rod from the control stick, just got to psont and add the camera and a throttle quadrant and the cockpit is done. Thanks for looking in Chris7 points
-
Fresh off the production line one thats taken me a little longer then normal (I blame the humbrol red 19 paint) Airfix 1:48 Canberra B(I)6 WT309 of A&AEE Boscombe Down as she was in about 1985. Unfortunately only the nose of the aircraft survice now preserved at Farnborough FAST museum. My thanks to @canberra kid for some help and insights with his vast canberra knowledge. A few homemade additions to the kit in the form of wing tip camera pods, pylons adjusted for position, size, and markings, upper and lower fuselage whip antenna, brake lines, wing pitot tube, ejector seat handles and harness. Tips for anybody making this kit in the future: The plastic is really thick and subsequently the bomb bay doors really dont fit well plenty of material to remove! The raspberry ripple box scheme dosen't show any of the standard markings so an hour+ looking at pics matching what can be seen on pics with whats on the standard scheme is required. And the pilot is very undersized! As always any comments, questions and tips greatfully received. And now the pics.6 points
-
Hurri's done now. Nice understated little model, well done Airfix.6 points
-
We leave the decision to buy products from Russian model companies up to the individual, and suggest they keep their own counsel on the matter. We don't get many review samples from Russian based companies, but the few we do we know to be decent honest people. The only real effect we can have with sanctions will be with the oligarchs and the super-rich, as they're the only Russians with any modicum of influence on their deranged leader. I'm gonna shut this down before some knee-jerk reaction gets people into trouble.6 points
-
Latest addition to my collection: Avia S-199, 1/72, Eduard kit. Only deviation from OOB are the painted markings. Comments are welcome. GX9A5457_03 by Iulian Macovei, on Flickr GX9A5459_03 by Iulian Macovei, on Flickr GX9A5461_03 by Iulian Macovei, on Flickr GX9A5472_03 by Iulian Macovei, on Flickr6 points
-
I see what you did there… 👏 Thanks for noticing, John. I always paint white markings on top of the base paint, it gives more leeway in modulating the finish, in addition to the pre-shade. Also, I usually don’t clean the pot perfectly before painting white so it becomes a little dirty white instead of pristine. Thank you gents, very kind comments. I worked on the uppers tonight. Standard process previously described. Started with a darker version of the base colour on top of a pre-shade. Then the mayhem begins with varying shades to get to this… The slightly exaggerated post-shade effect will ameliorate under subsequent treatments. For now I’ve protected that finish with a limit Future mixed in the last misted coat. Tomorrow I’ll mask for the green with tape this time, the reference photo shows the camo with a hard edge. Cheers.6 points
-
Thanks everyone, appreciate all your comments ! I'm painting the markings on this one so first up is some Tamiya White. AZ_Martinsyde_F4_WIP_5 by Dermot Moriarty, on Flickr Then masking for the national flags. The profile in Joe Maxwell's book "The Irish Air Corps: An Illustrated Guide" was really helpful for this. While the later Buzzard's were finished in silver dope, the early ones were in standard RAF Khaki Green scheme. AZ_Martinsyde_F4_WIP_6 by Dermot Moriarty, on Flickr Mostly happy with that! AZ_Martinsyde_F4_WIP_7 by Dermot Moriarty, on Flickr Cheers, Dermot6 points
-
Morning all Some progress to report. Has been a bit slow recently but I had to go on holiday with the wife and kids!😋 I've been busy masking parts to get all the areas that require chrome painted up. Work is also progressing on the chassis The next step is to fit the engine but I need to start adding the ignition wires. Issue with that is that the wires go over a couple of bits that are added later down the line so I need to work out how I'm going to do all that. Thanks for looking Nick6 points
-
Is it straight or isn't it? Is straighter now... Some external frame definitely helps sharpen it up, as viewed in extreme close up. Yes, the cargo door window is a bit smaller than the windows on the other side, because all factory cargo door windows are the same size whereas third-party camper windows tended to be bigger. Is my story. I needed some small diameter rod and some hex rod for wheel nuts. A large box arrived... That'll be the rod then. ANTEATER6 points
-
1/72nd Canadair CT 133 Silver Star, 21463, of 400, City of Toronto, Sqn, 1955-6 Platz/ Italeri Kit. The Lockheed T33 Shooting Star was chosen by Canada to provide a jet trainer to met training needs for the RCAF and eventually for the RAF. The aircraft were built under licence as the CT133 Sliver Star, and the major difference from the Lockheed aircraft was the replacement of the original J33 engine with a licence built Rolls-Royce Nene unit. This was a little heavier than the J33, but was more powerful, giving the Silver Star a better performance than the T33. Some aircraft were later sold abroad, some ending up in France. External changes to the Nene powered aircraft were minimal. An exhaust port on the port rear fuselage and different inlets on the nose are the most visible. The model uses the very Platz kit, mine was the Italeri re-boxing. The kit goes together well and is nicely detailed. The WIP for it is here Thanks to Zebra for hosting this GB and encouraging me to look in the stash and decal bank, and to Enzo for keeping us on the straight and narrow.6 points
-
F4F-3 Wildcat ProfiPACK (82201) 1:48 Eduard Grumman began development work on a new carrier-based fighter in the mid-30s, starting with the F2F, which was a biplane, but it and the successor F3F led to the basic shape of the Wildcat, minus two of the wings. Initially, the new aircraft was outpaced by the Brewster Buffalo and Grumman resigned their aircraft to carry a supercharged version of the Pratt & Whitney R-1830 "Twin Wasp" radial engine, and later new flying surfaces that gave it the needed improvement, receiving orders from the US Navy as a backup-plan in case the Buffalo was a let-down. Initial orders from France were delivered to the British Royal Navy after France fell before delivery, and was designated as the Marlet. The US Navy would adopt the type in late 1941 after the Buffalo turned out to be a disappointment, although it was quite a manoeuvrable little aircraft that saw some service elsewhere. Originally armed with 4 x 0.50 cal machine guns, the F4F-4 was introduced in 1941 with an increased 6 guns to increase the aircraft's weight of fire. Although the armament was increased to 6 guns, the ammunition capacity was not, giving pilots less time with their fingers on the trigger, which was generally disliked by the pilots for obvious reasons. The extra weight from the guns and wing fold gear also reduced performance. It was the primary US Carrier fighter during the early years of America’s war, with production continuing until 1943 when they switched over to building the replacement Hellcat, but one factory continued to make Wildcats for the British Fleet Air Arm (FAA). The Wildcat’s smaller size and slower landing speed was a boon on a smaller carrier that the British Navy operated in large numbers as escort carriers. The Kit This is a much-anticipated brand-new tooling from Eduard, and it seems that they have created yet another highly detailed and well-engineered kit, from which a wide range of variants can be produced for us, the modelling public. It arrives in Eduard’s modern gold themed top-opening box, and inside are five sprues in a dark grey styrene, a clear sprue, a nickel-plated pre-painted fret of Photo-Etch (PE), a sheet of pre-cut kabuki masking tape, a large and a small decal sheet, and the glossy instruction booklet with colour profiles in the rear pages. Detail is exceptional, as we’ve come to expect from Eduard’s engineers, right up there with, if not the best examples of plastic models as of today. There is some judicious use of sliding moulds to improve detail without increasing the part count unduly, the most notable being the rudder, which is hollow and ready for an insert during the build process. Construction begins in the cockpit, which takes over a page of the instructions and starts with the pilot’s foot boards that fit onto a Z-shaped bulkhead, and has the frame that holds the head cushion plus a pressurised bottle and two small PE parts that are only fitted to the later options. The two seat mounts are added to the frame before fitting the seat, which is prepared by adding a small PE strip diagonally across the rear of the seating area, plus a lap-belt for the early versions and four-point belts for wartime versions. The instrument panel is integrated in another frame that encompasses a tank, which is bulked out by adding another part to the other side, then you have a choice of applying a decal to the moulded-in dials, or a two-layer PE instrument panel that is applied in three sections, complete with a fully pre-painted set of dials and surrounds, plus the shiny curved dial glazing finishing. The side consoles are made up from a large number of parts, some of which are PE and pre-painted, with a part choice for early and later versions, then they are slotted into the rear frame and the instrument panel frame to create the cockpit’s tub. The rudder pedals are based on a single styrene part that is decorated by adding PE parts to the centre section, plus tiny little PE parts on each pedal, removing a little of the centre section before adding them. This slips in behind the instrument panel and is joined by a long rectangular lattice panel that mates to the front end of the foot boards. The cockpit is left to one side for a while so that the engine mount assembly can made. This is based upon the firewall, from which a tapered spar projects from each side. The engine mounts, a set of chains and the rear ancillary block of the engine are assembled to the front of the bulkhead, then a boxy assembly with two legs is added to the underside for the first decal option only, a strange clamshell-shaped assembly sits in the top of the mounts, and for most of the decal options there’s a C-shaped assembly that latches onto the sides of the mounts. If you are building the second decal option, the small location tabs should be removed and the part left in the box. The insides of the fuselage have fine ribbing moulded into them, and this is augmented by a number of PE parts, plus the removal of a moulded-in document folder that straddles one to the vertical ribs. Take care when removing this to ensure that the rib is still present once you’re done. There are also small rectangular windows with radiused corners in both sides of the fuselage, which are inserted from outside during closure of the two halves around the cockpit and engine mount. A tiny pip of styrene in front of the leading edge of the wing should be removed for one decal option, but it’s easy to miss as it’s right at the bottom of the page. Unusually for an Eduard kit, the landing gear is built next, even before the wings are considered, and that’s because the struts and retraction jacks are buried deep inside the fuselage, so would be difficult to leave until the end. Each leg is made of three parts with scrap diagrams showing how they are arranged, and once the glue is dry, they are inserted deep into the fuselage, the cylindrical top ends mating with cups that are moulded into the firewall. They are then buttressed by more styrene parts, and the front of the fuselage is able to be closed up by fitting a small insert into the bottom. The diminutive fixed tail strut is made up of two halves that trap a choice of two styles of wheel, and the main wheels are each made of a single tyre and two hubs that slip over the axles at the bottom of the main gear legs, with a pair of small inner doors added to the centreline while the fuselage is inverted. At the same time, the twin exhausts are slid into their troughs under the nose. The wings are next, and as they’re mounted mid-fuselage, they’re totally separate from each other. Each one is made from upper and lower halves, with a small insert with PE mesh parts wedged inside the bulged fairings on the underside before the two halves are closed, and the ailerons added to their position near the tips of the wings. The elevator fins are simple two-part assemblies each, and they’re attached to the tail via the usual tab and slot method, at the same time the wings are slid over their spars. The elevators are moulded as one piece, and clip into the rear of the fins either side of rudder fin, and are then locked in place by adding the rudder panel, which has a slide-moulded triangular hole inside, which is filled by adding an insert before gluing it in place. The very rear of the arrestor hook is slipped inside the fuselage with a clear light above it, and a clear light is inserted into the leading edge of the port wing and outlined by a PE strip. The engine is built up before adding the wings, and we get two banks of the Twin Wasp engine as separate parts, plus push rods and the bell housing that has the drive-shaft projecting from it. All it needs is some wiring for the spark plugs unless you’re going to get yourself some aftermarket for it. The cowling marks another choice for the modeller, with three choices of cowling lip, and a choice of two of the cylindrical sections depending on which decal option you select. One marking option has a panel line filled, a new line scribed and a pair of PE clasps added on both sides of the cowling. The final page finishes off the build with the canopy, starting with a tube sight pushed through the canopy for the first decal option. The other decal choices have a more usual early reflective gunsight inserted into the front of the cockpit before the glazing is started. The rest of the decal options have an alternative screen with no hole in it, and there are two canopy parts depending on whether you want to depict the canopy slid back over the spine or not. There are masks for all the included canopies included on the kabuki tape sheet, but only for the exterior. The model is then finished off with a number of clear lights at the wingtips; twin barrels in each wing leading edge; forward raked antenna on the spine with a clear light just behind it; pitot probe in the port wing leading edge; the single-part prop that has stencil decals supplied with an additional spinner; two bomb shackles for under the wing, and three PE aerials under the fuselage depending on which decal option you have chosen. There is another panel line on the lower cowling to fill for the first decal option here too, and again it’s easy to miss. Markings There are six decal options in the box, spread between one large sheet and another smaller one. The options are from the Wildcat’s earlier service, going back as far as the yellow-wing days before the US joined the war. From the box you can build one of the following: BuNo.1850, Lt. Charles Shields, VF-41, USS Ranger (CV-4), Dec 1940 VMF-111, Army-Navy Manoeuvres, Louisiana, United States, No 1941 Lt. Edward H O’Hara, VF-3, USS Lexington (CV-2), Hawaiian Islands, Apr 1942 BuNo.4019, Capt. Henry T Elrod, VMF-211, Wake Island, Dec 1941 BuNo.2531, Lt. Elbert S McCucskey, VF-42, USS Yorktown (CV-5), May 1942 BuNo.4006 (4008), Capt. John F Carey, VMF-221, Midway Island, Jun 1942 The decals are printed by Eduard and are in good registration, sharpness and colour density, with a thin gloss carrier film cut close to the printed areas. It’s worth remembering that as of 2021, the carrier film from Eduard decals can be coaxed away from the printed part of the decal after they have been applied, effectively rendering them carrier-free, making the decals much thinner and more realistic, and obviating the need to apply successive coats of clear varnish to hide the edges of the film. It’s a great step further in realism from my point of view. It builds up pretty nicely too, and you can see the rest of the pics on the RIF area here. Conclusion Blimey this looks like a nice kit. It’s incredibly well detailed out of the box, but if you have an even larger appetite for detail, there are tons of additional sets that Eduard have made available in time for the release of the kit. Very highly recommended. Review sample courtesy of5 points
-
Hello friends. This model is the last one which was sitting on the stock shelf for years, which means that NOW, I have no more stock, and that from now on , I will buy only what I want to built! This said, I had forgotten how bad the Dragon kit's fit was , and this one was no exceptions! I reworked wings panel lines and hatches as they are dead wrong. Same process went for the fuselage. All weapons received Master barrels, the MG 151 is a brass tube, and I also used the old Eduard's set for the plane. Eduard's masks are a must with all the glasses, save time, and prevent bad words! I also used Montex masks for the markings of an KG6 bomber during the little Blitz in 1944. So here the Ju 188, quite a sexy craft! Cheers to you all. D282AFDF-0429-4F4E-8C1E-F5D6722A2839_1_201_a by jean Barby, sur Flickr 77F87D1A-81BC-4957-B334-2434D7AB7102_1_201_a by jean Barby, sur Flickr 3D358222-B2B4-468D-AB76-E3A02C2852E6_1_201_a by jean Barby, sur Flickr F8248659-AF15-492E-AA0E-9F1991184858_1_201_a by jean Barby, sur Flickr 21579603-98A1-48F4-B7FF-204B8691D98F_1_201_a by jean Barby, sur Flickr 0D89E871-3BEE-41B9-8ABE-4D1DAD8F3522_1_201_a by jean Barby, sur Flickr ED009DB9-7017-483D-9C67-627555CE7ED6_1_201_a by jean Barby, sur Flickr 4E20FF1F-BC5C-48DD-AA57-A92018C3AA5D_1_201_a by jean Barby, sur Flickr B34EE0AC-2DB0-45D5-A320-2E0EA4102560_1_201_a by jean Barby, sur Flickr5 points
-
Bf 109G-2/R6, WNr. 13633, Hptm. Wolf-Dieter Huy, 7./JG 77, Tanyet Harun, Egypt, October 1942 Ettore5 points
-
Allrighty The precautions paid off A quick gloss coat has also been sprayed Decal applicaiton will start tomorrow, hopefully in the gallery by Sunday More soon(ish) /P5 points
-
Oh do tell! 😉 Not too fussed if it was a Vb, but if it turned out to be a Mk XIV, I'd be all over it.5 points
-
Hi all More progress on the Swordfish, the Fuselage is together, control cables holes drilled and tail feathers started. Mark was correct about the silver ring not being present so I removed this and now just need to add the two additional struts to the three cowling supports and the engine will be finished Quite pleased Thanks for looking in Chris5 points


This leaderboard is set to London/GMT+01:00