
Leaderboard


Popular Content
Showing content with the highest reputation on 26/06/22 in Posts
-
I believe this is the largest aircraft model I have ever attempted (and probably the last one this size that I'll ever do!). It's a Canadian RAF "Sub Killer" that I built using the Monogram/ Revell PBY/ OA-10A 1/48 kit along with an Eduards "Big Ed" photoetch and mask set, white metal landing gear, resin wheels and engines and a set of excellent decals and reference materials from Aviaeology ("RCAF Canso A (PBY-5A) Collection 1: The Sub-Killers Of 162 (BR) Squadron"). Tamiya acrylic paints were airbrushed throughout except for Tamiya rattle can fine white primer and bare metal undercoat and a little Alclad on the prop centers and my favorite semi-gloss clear coat, Vallejo Satin. I attempted some chipping on the undersides of the "hull" using the hairspray technique but I think it came out a little too understated than I had hoped. This particular aircraft #9816 was based in Iceland and had the following amazing history: - 11 March 1944: ferried to Reykjavík, F/L Leadbetter and crew as 162 Sqn maintenance rotation replacement aircraft. - 3 June 1944: F/L MacBride and crew attack and sink U-477. 4x D/Cs used. Nose guns used. - 13 June 1944: W/C Chapman (co-captain & 1st pilot F/O McRae) and crew attack and sink U-715. 4x D/Cs used. Nose guns used. 9816 was shot down (3 killed) in 2nd (guns only) attack as damaged sub was sinking. Thoughts and "things learned" from this build: - I used a 1" wide x 5/16" thick hollow rectangular aluminum channel to act as an internal wing strut support based on other builds that recommended adding something inside the wing assembly to prevent sagging and cracking. I found this aluminum material at a home improvement store, I believe it is sold for use for screen door frames. Its was pretty easy to install and made the wind assembly rock solid. - I decided to skip adding weight to the nose to address the tail dragger issue and glad I did. I've read that one must use a A LOT of nose weights and this model is "structurally challenge" as it is due too it's size. I'm ok with the temporary support dowel shown in the photos and will remove it once I hang this beast over my work bench. - I also did not address the tail width issue that many do by splicing in the resin correction and applaud those that do this mod to this kit. I can see how the fuselage looks a little too wide just in front of the tail from the top view but from the side profile, it look's like a PBY to be so I'm happy with it "as is" out of the box. - I used a white metal aftermarket landing gear set and still had problems with the main gear on the right breaking several times after both epoxy and CA bonding as well as bending. I can't imagine building this kit with the kit supplied styrene landing gear. - The biggest assembly issue I had was getting the four wing struts to fully seat into the mating notches in the fuselage and underside of the wing. All four appeared to be too short by about 1/2 mm which I suspect was because the wing didn't "sag" due to the aluminum spar that I added (Anyone else happen to have this issue on this kit after adding wing reinforcement?). If I built this kit again, I would pre-bond the struts to the fuselage and remove the bumps on the wing ends of each strut and just bond the struts flat to the wing undersides and fill any exposed notches on the wing later. Conclusions: Next time I build a large aircraft like this, I think I"ll stick to 1/72 or smaller! This one was just too awkward for me to handle during painting and assembly, required a ton of paint and when completed is much too big to put anywhere in our house! I would also highly recommend Aviaeology.com for decals, I have never had such excellent reference materials supplied with a set of decals before (a beautifully illustrated color booklet pdf with amazing details and history on a multitude of aircraft cane be downloaded and printed after you receive the decals). Despite the kit size and structural challenges, this one was a lot of fun. Never get tired of PBY's! Hope you like it! Cheers, John34 points
-
Here is one of my latest builds from the Academy F-86F Sabre, the QF-86E drone aircraft. As one of the founding members of the IPMS Target facilities SIG, I thought I should set cracking and build some aircraft that were appropriate to this SIG. After all, we will have a table to fill at Telford going forward! Other BM members include @Martian, @corsaircorp, @Corsairfoxfouruncle and @general melchett. Others always welcome! Apart from the internet, one of the most useful reference sources for the build was the excellent book by Duncan Curtis , Naval Fighters No 58 on the QF-86E/F/H/Sabre. These aircraft were full scale aerial targets converted from numerous different marks and origins of Sabre. Thanks to @Sabrejet for an excellent reference publication. The Academy kit is an F with the later ‘6-3’ root chord extension wing which was also fitted to the RCAF Canadair Sabre 5, from which this conversion originally came, becoming the QF-86E. So this was a reasonable choice for this model. All QF-86E drones seem to have been acquired for US Army use, and the serial I chose 23215 was eventually to meet a gruesome end from a US Army Patriot missile, during 1979! The main driver for choosing this aircraft was that amongst my stash of Microscale decals, I had sheet 72-288 with markings for two F-86’s and a QF-86 23215. The Academy kit went together well and seems to be reasonably good on surface detail. I usually use Alclad for NMF finishes like this but I tried out the AK Extreme metallics for the first time, and they seem to be very good. After airbrushing their gloss black primer, a combination of various colour metallic shades were airbrushed onto various different panels to try and achieve a realistic pure metallic look. The orange tail and wing marking were applied using MRP’s excellent International Orange Lacquer, over a white undercoat. MRP’s gloss varnish was applied prior to decals, and after decals, followed by some very light oil washes. A final coat of MRP’s semi-gloss varnish sealed everything in. These MRP varnishes have become one of my favourite solutions for finishing coats. Some initial pictures during construction And onto the completed model I daresay there will be future builds of a US Naval QF-86F and a USAF QF-86H. Comments/questions welcome Thanks for looking. T33 points
-
Dear fellow Britmodellers, this is the new 1/72 Spitfire PR Mk.XI kit, presented at Moson Model Show in Hungary, at the end of April. Built from the box, painted with Mr.Hobby acrylics. Photos by Wolfgang Rabel. This kit is an all-new tooling and comes in various boxings with different marking options. I chose the "USAF" version because I didn't have a Spitfire with "stars and bars"! Markings are from the box, representing an aircraft from 14th Photographic Squadron, 7th Photographic Group, at Mount Farm airbase in 1944. Some PR Spitfires were painted in "PRU Blue". To represent this color shade I used Mr.Hobby H42 Grey Blue (which I found to be the best match). Exhaust stains were applied with my airbrush. The quality of surfaces and fit of parts is very good, the build was smooth and free of trouble. The only thing I wasn't happy with are the stencils, which come on a seperate sheet. The walkways are a bit heavy, inscriptions are oversized and fuzzy, so I replaced them with markings from an Eduard stencil sheet (designed for the Mk.IX). The camera lenses are represented as shallow depressions on the lower fuselage. I painted the lenses gloss black to simulate glass. Thanks you very much for your interest, best greetings from Vienna! Roman29 points
-
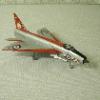
This F11F was entered in the Artwork Group Build with the sharkmouth decoration. This model was more or less built OOB, with a full rescribe and some extra detail added. Cheers, Luka21 points
-
Howdy All, Me again, come to bother you all with some photo`s of my recently completed Tenzan ( Jill ) My second attempt at Hasegawa`s 1/48 kit, from the `with folded wings boxing` Built as usual 99.9% OOB With just aerial wires, brake pipes and some seat belts added I realise the flaps and underside gun position probably wouldn`t have been deployed on the ground but I like them....... ....so just pretend it`s having some last minute maintenance 🙂 The paint guide suggested that the undersides of Jill`s later in the war were painted silver, so I went with that.... and mixed the Metallic Blue for the wheel wells and wing folds from odd paints until it looked close enough Hope you enjoy the pic`s, thanks for looking Cheers Russ20 points
-
After a long time, I also upload pictures of the finished model. Model is Special Hobby 1/48 Aeromacchi C.200 serie I. It is a model that represents the plane of the famous Italian ace Maresciallo GianLino 'Giri' Baschirotto (more about him on the following LINK). The model is decent for the shortrun of that period, but it cannot be compared with Italeri C.200 (newer and already outdated in terms of quality). The painting was done with acrylic and weathering with pigments, Tamiya panel liner products, oil paints, wooden watercolor paints and a silver ink pen. Critics and suggestions are more than welcome.20 points
-
A few years back, I built Academy's 1/72 SR-71 Blackbird, which turned out very nicely and has even won a couple of awards in shows I've taken it to. At the time, I bought a set of photoetched brass crew access steps, made by Aircraft in Miniature (AIM) Ltd. Unhappily, Salvadore Dali could have done a better job than me of bending the photoetch, which ended up being trashed. Recently, AIM released a 3D printed set of Blackbird steps to replace their photoetched version, which I wasted no time in buying. Inside the box I found a nearly-complete set of steps -- the only assembly needed is to add the "bumper" that runs along the edge of the platform and protects the Blackbird's fuselage. The biggest job was in removing the steps/platform from its forest of supporting resin. Here's what it looked like when I was finished: Basically, all I had to do was add the bumper strip, and paint the bugger. Oh yes, I forgot to mention, no decals are provided so I printed up a set of my own based on photos I found on the web. I've not much else to say, so let's see how it looks when done: And yes, I think I may have gone a bit overboard on the weathering: That's it! A rewarding afternoon spent at the bench. p.s. If anyone's interested, here's the RFI to my Blackbird build from nearly 5-years ago:15 points
-
Here is my representation of HMS Courageous, a Churchill Class submarine of the Royal Navy using the recently released Mikro Mir kit of HMS Conqueror in 1/350. Built half OOB as I like the waterline look of my maritime. The only extra work done was adding the side vents and correcting the white draught marks to red, oh and adding an extra set of draught marks to the forward edge of the rudder. Depicting the boat as 'crossing the line' in 1981(ish). Short build log here: Stuart15 points
-
First and last - Supermarine Spitfire -1:48 Eduard Mk. 1 & Airfix Mk. 22 Not my usual area of subjects but I just could not resist Eduards 'First of the Few' dual combo boxing of the Spitfire. It did not disappoint, being an absolute joy to build. Naturally this led to me wanting a late mark spitfire to compare it with, so the Airfix 22/24 was purchased to go with it. I'm not into excessive weathering, preferring a lighter and more subtle approach with 'less is more!' No more intro is really needed, so on with the photos. Spitfire Mk.1 19 Squadron RAF Duxford 1938 Spitfire F. Mk.22 No. 607 (County of Durham) Squadron And because the Eduard kit is such a lovely model to build, I've started on a few more! 19 Squadron RAF Fowlmere 1940. F/Sgt George Unwin. Shades of the old Airfix 1:24 kit, 54 Squadron RAF Hornchurch May 1940. P/O Al Deere RNZAF. Now, time to get on with the Eduard Vb and IX in the stash! Thanks for looking, John13 points
-
Argentine Skyhawk 3-A-305 returns to ARA Veinticinco de Mayo following a reconnaissance mission over the South Atlantic in 1982. The 1/72 Airfix Douglas A-4B/Q Skyhawk kit finished in the markings of the 3o Escuadrilla Aeronaval de Caza y Ataque. I added a replacement pilot, a couple of aerials, dropped the flaps and the tail hook, but otherwise it's out of the box. Mounted on a base from Coastal kits with an arrestor cable made from 0.4mm brass wire - Job done! The real aircraft was lost in an accident over BACE on 22 May 1986, but the pilot managed to eject safely. Thanks for looking. mike12 points
-
Here is my build of Eduard's BF109 G-6 in 1/48 scale, not much to comment really on this kit, everything went together really well and no issues at all I can really mention. Any critique and comments more than welcome.12 points
-
Here is the Moynet LM 75 that took an unexpected 2 litre class win at Le Mans 24h 1975 in the hands of Marianne Hoepfner, Christine Dacremont and Michèle Mouton. The kit is 1/24 scale resin by Profil 24. Apart from some added details, mainly in the engine compartment, it's more or less built OOB in around two enjoyable weeks without much trouble. I hope you enjoy. The WIP-thread with more info can be found here.9 points
-
Hi, I just finished my TUI Germany 737-8 Max. Was definitely one of my quickest builds ever as I think I did the whole plane within 4 weeks from start to finish. Upon holidays in beautiful Madeira where we actually took Tuifly on our way towards there I saw a TUI 737-8 Max there and realised how cool it actually looks in that livery, IMO the livery is rather underrated. So I spontaneously had the idea of building one for the time after the holidays with a Max that was previously destined to be an Icelandair in my collection. Also had the beautiful TUI 757 of Ian Woodard as an inspiration that I once saw here. The decals are from DRAW decals for the livery and they are excellent, really opaque and the carrier film basically disappears once they are dried. Windows and details are from Authentic Airliners. All blues are painted. The light blue was kind of tricky, as all light blue I could find were rather too cyan, so I ended up mixing Mr. Hobby 45 with quite some red (to make it less cyan) and also some white. For the tail colour and winglets the same mix + even more white. The dark blue is Tamiya X-3. There's acutally a decal for the dark blue part, but it would be against my personal modelling values to not paint it and I guess it would never look really good as the area is too large and complex for a decal. I imagined the painting tricky with its curves and getting both sides look the same, but with a small "trick" (that others used before) it was much easier than I thought. I took a real photo that was mroe or less exactly side on. I then resized the shot to the same size as the model on Photoshop and printed it twice (mirrored it for the other side). I cut the light blue part out on paper and put it on the plane with masking tape. I used certain reference points above or under the doors and then drew lines with a pencil on both sides upon the white plane and then its about using flexible masking tape. For the dark blue part one already has this as a reference so this isnt hard anymore. Overall I am really satisfied. The kit is excellent and easy to build. The only downpoint is that a Max has 4 distinctive features compared to a normal 737NG. The larger engines, the different winglets, the APU-section that is 787 style AND the much higher front gear. Yet the Zvezda only has the normal front gear of 737 NG, where I feel that already on the rregula -700 or -800 kit it sits a bit too low (or likely the nose door gears are just too large). Personally I felt the front didnt look like a proper Max anymore. So I used some spares that I had to make it 2mm higher. But yeah with knowing that (I wasnt aware) one can easily make it higher, in the end some polysterene would also do the trick. For the pitots on front I used some Microdisin photoetched parts. Generally these sets arent really worth buying for me as I always end up only using veeery few parts of it, but I thought it was a cool feature. The finish was done done with Tamyia X-22 and then a pass of Mr Hobby's GX-112 to protect it from UV light (although of course other than for those photos it wont see the sun) and some Tamyia polishing compound. Enough said (likely even too much ;-), here are the photos. Thanks for looking, appreciate any comments. Julien9 points
-
Here is my build of kinetics F-16D, unfortunately this kit is simply atrocious, every aspect of the build I had issues with and the amount of filling and sanding needed to get the kit to a decent standard was simply laughable. Anyhow I pressed on and this is the final result, on a more positive note I used Quinta Studios Interior set which really lifted the interior to the next level. I will be using them again for some of my better kits. As always critique and comments more than welcome.9 points
-
Holiday in Norfolk last week. First ones with no photo as I was driving. Pale Blue Lambo in Chelmsford - no idea which model, but it was shaped like a wedge of cheese and I'm pretty sure it was a Lambo badge on the front. Near Cromer - a bright yellow Lambo, similar to the above. On the way home, two Austin Seven's, one being driven, one on the back of a trailer. Further south, another Austin, same era as Seven, but looked bigger. And now the photos: Two Morris Estates Spotted these, at first there was a Metal bumpered MGB beside them, but I caught them on the way back, two Armstrong Siddleys and an Alvis, parked outside Cromer Car Restoration. And then this, in a garden in East Runton. Amazingly, if you look up its MOT history - is hasn't got one, it's never been MoTd!! And then, because I know some people on here model such vehicles: These live in the West Runton Shire Horse Sanctuary.9 points
-
Hello everyone, I wanted to share my build progress of the Eduard ProfiPACK 1/48 BF109F4. The model comes in a lovely box, with two large sprue’s, two smaller ones and a clear parts sprue. There is a little bit of flash but nothing that cannot be cleaned up. I was drawn to this kit because of the supplied canopy masks and complimentary photo etch. The instructions are really well produced in a glossy booklet. Overall the kit screams quality. I began with the cockpit and added the relevant PE. This was then primed with Vallejo black surface primer. Afterwards I gave it a coat of XF63 German Gray, then added a drop of XF2 White to the XF63 to highlight certain areas. Once those coats were cured, I dry brushed silver chips into the footwell and on the seat. The highlights look quite strong, but that is only through the lens of the camera. It is nice a subtle to the eye. At one point I lost the fuel hose which I subsequently found when I went to use the extra thin cement! Once the paints had dried, I clear coated the cockpit and side walls, added a panel line wash and painted in some small extra details. The cockpit has gone together quite nicely. The PE seatbelts are a nice touch, as is the control panel. The fuselage went together ok, there was a small gap forward of the cockpit that needed filling. With the wings finally on, she’s starting to resemble a plane. I’m fairly content so far. Thanks for reading if you’ve stuck with the build progress, I’ll post some more in a few weeks. Tom8 points
-
As I've said many times, I think my painting is a real weak area, I need to build some kits to practice more. Because of this, I hate showing work in progress during painting as all I can see are flaws. Still in the interest of keeping the thread up to date, here are the progress shots on the main hull assembly Finished blocking out the primer And first couple of final colour coats, some edging to clean up still I'm using Vallejo acrylic paint with my own mixture for 507C/G45 and B15. This is a base coat, the 507C will darken with weathering, hence I've made it light at this stage. The pictures all show very white looking boats but the builders drawing reproduction has G45 specified for vertical surfaces, not White as the coastal craft history book indicates. In the end, I opted for a pale grey which will weather darker and hopefully look OK (kind of sitting on two stools). The B15 is intense to say the least, as it was with the MTB, again that will weather softer and become more washed out looking. The colours in picture are a bit weird, in the flesh it looks a better colour match but of course is blocky and powerful at this stage lacking shading effects and washes The windows are a bit of a disaster at this point. I didn't have any liquid mask, tried masking tape but gave up the struggle and just let the primer spray over to be cleaned off. That of course removed the paint from the brass frames which now need fine touching up after a second round of clean-up. As I said, this is all work in progress, it will be OK, I have done worse... Paint, I hate it, please no arguments over colour on this thread, wait until its finished BTW, getting that waterline straight took 4 attempts, the hard chine protruding moulding really confuses your eye Cheers Steve8 points
-
The subject is supposed to be easy, the smallest jet in the world, but it can be made difficult. On the basis of two Airfixes I built a serial T.1 and converted the second one into HAL Ajeet. I used some extras: cockpit and control surfaces from CMK, PE Eduard, whells SBS, pitot Master, decals from Aeropoxy (Ajeet). HAL Ajeet - reworked wings with different mechanization and controls (different wingspan and string), reworked fins, reworked intakes with gun, reworked cockpit section with radar, riveting two models Anyway, the photos show it all, invite8 points
-
A lot of rattlecan grey primer got sprayed about yesterday. Having left it all overnight, I gave everything a look over for remedial work. For a change, I couldn’t see anything obvious. I set up the airbrush for the first camo colour. As I was airbrushing the T.V underside in chocolate brown, I noticed the port engine was definitely wonky. This is a real problem where things don’t have a positive location, and something that bugs me. I managed to prise it off without further damage and continued spraying. By the time the fourth day of the England vs New Zealand Third Test started I had got to here. Things will be left to dry for a while before I begin to consider the camo patterns. I’m tempted to try masking and airbrushing, but I fear I may well end up with the good old hairy stick. We shall see.8 points
-
Background: I like the look of the BMW M1 Procar but I could not find a single real-life livery I wished to model so I decided to make one up with the help of some custom-printed decals and a bit of inspiration from the Williams FW08 from the late 1970s - the right time period at least. I thought the car could use with a little more modernisation too, brakes and wheels. Pros: There's an engine. The decals are nicely printed. Little else. Cons: A lot of work is needed to make this kit fit together properly - so many parts have no mounting points and need improvisation. Scruffy looking mouldings that seem like they were not even that great back when this kit was first released by ESCI in 1979. No side windows. Instructions are not clear in parts, not well illustrated and include at least one part shown mounted 180 degrees from what would be correct. Verdict: Mostly garbage. Despite both Revell and Italeri re-releasing this kit even in 2015-2020, the moulding need to be retired permanently. I'm an experienced modeller and I found it a slog to build at times. It'd put a relative newcomer off entirely. It is a scruffy, untidy model kit. Build notes: Built over the space of about 6 weeks in May-June 2022. Custom decals created by myself in Adobe Illustrator, and printed by Indycals - following the colour scheme (somewhat) of the Williams FW08 and some other decals I thought fitted with it. The front brakes are Tamiya, as are the replaced wheels and tyres. There's wiring added to the engine and seatbelts added in the interior, plus P/E bonnet pins and an electrical shut-off lever near the windscreen. It is a damn cool looking car in this livery and with these wheels, even though I say it myself. Aside from the problems building it, it's turned out exactly as I'd imagined.7 points
-
1913 Speedster 1914 Firetruck 1912 Light Delivery Truck7 points
-
Well calling it done just leaves me to hand this little thing over to the gentleman on Thursday night Forgot the link sorry https://www.britmodeller.com/forums/index.php?/topic/235111935-byms-2168-churchills-pirates/ Stay Safe beefy7 points
-
My 6th build. Out of the box, I was excited to have a pilot figure. The kit was easy to build, but still took me 3 weeks, although I blame work for the past week. I decided early on that I will be doing the original early 80s RMAF silver scheme, and I completed the paint job after just 4 days. The majority of the rest of the time was spent googling and looking at pictures. The kit itself costs less than 5 euros. For me, the panel lines were satisfactorily sufficient at this price. The fit was good until the pylons, which took several tries and I still have the starboard wing bomb slightly off. I decided to include a full load of 3 fuel tanks, 2 mk 82 bombs and 2 sidewinders. I saw a rare photo that this RMAF plane, in this scheme, had 3 external fuel tanks. In reality, because it was mostly doing recon and bombing missions on the communist hideout over the malaysian/thai border jungles, it probably does not carry the sidewinders and the two fuel tanks on the wings. otherwise, there was also a gap on wings (towards the end) to the fuselage, but it was symmetrical. The other problem is that the front canopy is too short. The decals were by Salmonball. They were unbelievably great. moves well, sticks well, comforms well. The good thing about the decals is you actually get two sets instead of one, because newer gunship grey paint schemes had completely different markings, even the shapes. And the decal had all of them. I was pleased to be able to finish it in an open canopy, although the mechanism detail was non existent. The landing gear bays had some nice details in it, i might still add some colors to them. I am also pleased that the overall paint job took only 7 thin coats and look as good as the F86 (thicker coats) I did before, and maintained most of the panel lines. Finally, this was a patriotic project, I wanted a model from my own country's air force. And that the plane in this scheme (during around 1983) actually carried out missions means even more. I'll be doing a F/A-18D hornet which participated in the 2013 Lahad Datu Stand Off next. Its a subject that I had very little knowledge prior. so any comments would be greatly appreciated. Probably not as accurate as some other kits but it was dirt cheap (both the kit and decals).7 points
-
You can see them in this cropped image, there on the wheel hubs. On the deck, they’re always aligned with the ground plane, but I suppose they then become vertical when the wheels are retracted. They’re an odd feature I’ve not seen on other planes of the period. Well, that was a fun couple of hours. I think a bit of refining of edges here and there, and I’ll call that satisfactory. I noted a fairly soft edge to the three-colour patterns in some period photos. While these soft edges might better suit a larger scale, I’m fairly happy. They say practice makes perfect. Looking back to the D.XXI build in this thread, I was getting very frustrated with the airbrush. Since then, I’ve replaced that model with one that has a screw stop for the needle. I still need to perfect the MAC valve and screw stop combinations, and getting just the right mixture of paint and thinners, but I feel pretty confident doing freehand stuff like this now.7 points
-
This New family sized cave... Pooches like it And I've already started knocking it about - Robbed some space from the shed end to give me some more modelling space. First fix lighting completed, now working on the power circuits. It'll be insulated and plastered inside. IanJ7 points
-
Afternoon gentlemen I'm realizing that I forgot to explain you how I made the air intake grill frame: - The frame hasn't be glued on the grill, but fabricated in the aperture - And the grill has been put upon the frame, glued with some droplets of Micro Kristal Clear (transparent once dried) - The frame below the grill prevent it to drop through the aperture The surrounding ha been made with a square rod of styrene 0.6 mm x 0.6 mm, that I've bended progressively and carefully after having put it in very hot water. To get the right shape, I used my spare bonnet, in order not to damage the right one. Once in place, the surrounding has been glued from its underside with Tamiya extra thin cement. Once dried, I've drille 0.3 mm holes through this plastic rod, 3 on the rear and 3 on the front Then I've fabricated the vertical and horizontal bars with 0.3 mm steel rod sections: - The vertical ones are slightly longer than needed, and are inserted in the holes I drilled previously. The excessive length is used to bend them upward, following the bonnet curvature - The horizontal ones have been glued on the plastic surrounding from the inside (Yes, I cheated !) and keep straight Today, the bonnet has been placed on the bodywork, and its hinge trapped with the kit's part. The hinge works well. I'm just a bit disappointed because, due to the kit's engineering, the bonnet can't open as much as I expected (Much more however than on the photo above) Indeed the thickness of the hinge molded on the bonnet is a bit excessive and prevent the movement to go completely forward. And this can't be fixed, unfortunately. The decorative chromed lateral strips have been placed The front lights are finished Now, it remains the most difficult tasks: - Install and fix the headrests/trunk set hinges using the parts I fabricated several months ago. - Glue my new windshield glass on its frame. One day at a time is enough6 points
-
In response to a request I posted, the German marine forum has just thrown up a link to an archive of high quality shipyard photographs covering R25 class boats. Incredibly useful stuff, of which at least 40 photographs are applicable to my little venture, amazing... However, it has sent me back to the drawing board on a number of details I'd got wrong, the venture continuers Meanwhile a further sneak preview of my work in progress, hopefully to illustrate the detail work involved. This is an extract from the GA sheet showing the stern deck layout with suggested locations for the minesweeping gear together with a scratch view showing the layout for mine-laying. All equipment shown is separately drawn on an equipment sheet with multiple views. It is soaking up hours and hours but I'm having so much fun with the project... BTW, the mine rails are a simple lazy mirror copy, I'll amend that on the final version When I've had time to absorb the new information, I'll post some examples of the new pictures, they are seriously cool Cheers Steve6 points
-
Airfix Chi-Ha Type 97 Medium Tank. A 1:76 kit that was in the stash for a while. Built OOB and brush painted with Tamiya Dark Yellow, Xtracrylix British Khaki and Lifecolour French Brown. Assembled fine and good fit but I had challenges with one of the tracks which was badly bent and also broke. Quite diminutive but looks nice.6 points
-
Since this version of the kit does not have a boiler, the first issue of the kit had one, it was removed from the molds when the motorized kit was released and has not made its way back into the model since. I will scratch build one and hopefully it will look the part once it is in the kit. The wheel needed some clean up, if was rather flashed over. Smokestacks, I might still attempt to make the supports in the middle from wire. Paddle wheels, the big part of the kit that makes the ship what it is. I removed the original paddles as they were overly thick and ugly, I have replaced them with 40 boards 18mm long and 5 mm wide. Cotton bales, steamer trunks, anchor stocks, and piles of wood for the boilers painted. Not to mention all the exposed decking.6 points
-
Until I saw Enzo's F-105 entry for this GB I had not realised that the first Monogram kit I ever built was the one in the middle of this photo. Like the following photos, my old manual camera has resulted in less than perfect focus! What I thought was my first but is apparently my second is the B-52D which I believe dates back to 1970, though I bought it one Saturday in about 1984 from my local newsagents - I think it cost £10! About 3 years later I bought the B-36 which I believed was released in 1980 - it was mail order from Tony at HJ Walker's in Hackney and his first attempt was apparently mis-delivered to a bank in London where he told me it was blown up as a suspected bomb! The second parcel arrived safely and here it is. I put the perspex shelf up over the stairs specifically to display the B-52, but in the end SWMBO complained about dusting them and so the shelf has gone and the kits are on top of a wardrobe gathering dust! Since then I may have built a P-51 and I definitely built a Tigercat for the "In the Navy" GB but cannot find any photos - must be there somewhere! Later, Found it. AFAIK that is my entire involvement with Monogram - Revell is a different matter but most of the kits are long gone, but here are a few. The CR42 and MC 200 are old Revell kits from the 1960's This Ki-45 Nick is from Revell Japan a few years later as is the J1N Irving on the left below and finally this Frances. Pete6 points
-
Greetings from Ukraine! Let me introduce a novelty of the Ukrainian company Clear Prop Models - kit CP72023 Soviet fighter I-16 type 5 of the 30s in the 1/72 scale. First of all I would like to show sprues. Sprue A. Details: Sprue B. Details: Sprues C. Represent a late type of wing. Sprue E. Represents an early type of wing. Sprue Z. As a test build, I chose a variant with Spanish markings: Model assembly. Assembling does not cause any difficulties. Everything fits together very well. Here are some images during the build process: Result: Hope you like this model!5 points
-
This model was begun as part of the 2021 F6F Hellcat STGB. Finally, it is finished. Another abandoned project done. Construction details in the link below. I hope that you enjoy these images of the completed model. Don5 points
-
The following Sturmtiger is something I've been working on for a while, based on photos from the excellent Panzerwrecks book, trying out new modelling and painting techniques, with a lot more etched than I was used to and some scratchbuilding. I used the excellent Tamiya kit as a base and added some Voyager and Aber extras, with some RFM tracks. I learned a lot, using influences from posters on here and youtubers, and although there is room for improvement, I am heading in the right direction modelling wise. Tamiya and Mr Hobby paints, acrylic and lacquer used. I also used a lot of different mud enamel paints and had fun with pastels for low and highlights. Thanks all for viewing and good luck with all your projects.👍5 points
-
The P-40 is one of my all-time favourite modelling subjects. I originally planned to build this kit as an Aleutian Tiger a few years ago, but I didn't really make any progress, Seems like a good time to pull it out of storage and build it alongside it's P-51D brother. The P-40 is, for my money, the best of the 4 1970s Revell single-engined fighters. There's no box, because it has been dehydrated for storage but it was one of these: https://www.scalemates.com/kits/pro-modeler-5921-p-40e-warhawk--178688 I have this Aeromaster sheet: ...but I'm thinking about finishing it as a Desert Air Force Kittyhawk MkIa. We'll see. John5 points
-
I've always liked the F-111 especially since seeing it, as an Aussie kid, doing the infamous "dump and burn" manouevre. To the non-Aussies I am sure this sounds like something we do when caught without a loo at a friend's barbecue...but no, it's releasing jet fuel straight out the back of the plane while the afterburner is on, leaving a huge crackling plume of raw flame behind the plane. When I was about, well I don't know, very early 20s, my grandfather (an ex-RAAF pilot from WW2) was very ill. He and I had been to the Avalon Air Show a few years prior, and he was too unwell to come to this one. It was to end with a night display of the dump and burn by the F-111. I am pretty sure by this time Australia had the -G as well as the -C, but either way the plane that did it was a dark grey one. So I called him up on a cellphone as the display was beginning (cells were not that common in those days, I think I had bought it so I could be in constant touch with family as his condition deteriorated). He was in and out in those days, just a few weeks before he died, but he was awake enough to realize who I was and what I was doing and I basically said, with about three seconds to spare, "hey, listen to this". The F-111 ripped past at what seemed like basically no height at all, then as it pulled back and raced skywards it did the dump-and-burn. The night sky lit up like day, you could feel the heat on your face, and that thing went up like a rocket - I mean the night launch of Apollo 17 was kind of boring compared to this, you know? The whole time I held the phone out towards it and then I said "DID YOU HEAR THAT?!?" and all I could hear was him laughing happily down the phone. That was in 1995. So fast-forward to September 2020. I had just managed to get my family back to Australia from the US where we'd been having a pretty rough time of things in Washington DC. As I am sure many of you will agree, something about those long days of lockdown pre-vaccines in 2020 with all the uncertainty just prompted a huge wave of nostalgia, and this F-111 dump-and-burn episode came back to me one late despairing night after our flights had been cancelled and my then 5 year old daughter was inconsolable because she thought she would never see her grandparents again (for those wondering what that's about, it was then and almost until the end of 2021 incredibly difficult and insanely expensive to get back to Australia due to COVID border closures and their associated impact on flight capacity and ticket prices). So once we were back here after 15 years away I just decided to pay the absolutely outrageous price they wanted for it at the LHS and go ahead and build the kit. Conveniently not long after that there was the ANZAC Group Build so I joined that and made some decent progress. But because of the back story (and the insane price of this kit) I wanted to try really hard to do a good job. So I missed the end of the GB and just kept plugging away. I finished it this April just gone. My now 7 year old daughter asked to help when i was taking photos yesterday in the sun, so of course I found a way to let her help. She took a few snaps and then told me in no uncertain terms that the set up "didn't look like an airport". "Let me get my chalk Dad, you need to make some lines on the ground so it looks realistic. And we need some more planes too". Here she is after drawing her concept of an airport apron trying to plant a weed as a realistic tree in the back corner. This represents a little known RAAF bare bones base up north, where the F-111 and F-18 refuel during their missions on Exercise Bright White. This exercise is the similarly little known off-year activity between the biennial Exercise Pitch Black. This was the scene by the time she was satisfied. She even pinged me for placing that piece of equipment with the yellow hose in front of the plane - Dad! It's going to run over that hose when it drives out if you put it there! Um, good point kiddo. Anyway, while it's not without its flaws (most notably a distinct lean to one side due to the u/c being slightly out of alignment, something I have tried to hide in this images), I am pretty happy with this one. I like the personal association I have with it, and it's really one of the better models I have ever built. The very dragged out build thread is here: Thanks for looking!5 points
-
Hello all, this is the last of the three builds I’ve had on the go over the last few weeks (F-86D, TF-104G, Su-17). The aircraft was designed in the 1960’s to be an improvement on the earlier SU-7. In fact the early Su-17 was pretty well an Su-7 with swing wings fitted to it. The kit is short run and took quite a bit of cleaning up before the parts would fit well. It’s straight out of the box and is finished using my usual metallic paints of choice, Humbrol 27002 and 27003.with a sealing coat of satin Xtracolor varnish, Without further ado, here are some pics. Thanks for looking Pete5 points
-
Many years ago - as a kid - I built a Frog Marauder: As I didn’t have the paints required I had to do the French version - but in fact it was the SAAF Marauder I preferred. So 45 years later here it is: I used the Hasegawa B-26C kit with Eduard PE interior set and resin wheels. The serial and "L" are Frog decals, the insignias are from an Xtradecal sheet. All paints are Gunze, weathered with Tamiya weathering sets, a Karisma color silver pencil and AK washes.5 points
-
It's been a fairly busy day on the workbench with the Aston Martin. Test fitting the bonnet again, it hinges on curved tracks in the inner wing panels and with these (dry) fitted the bonnet fit is pretty appalling. The hinge pins were filed and thinned down but things still weren't right. You can see that with the bonnet where it needs to be the hinge on the left of the pictre actually sits below the track in which it should move. Out with the razor saw, banking on the thickness of the cut being just enough to reduce the length of the hinge, so it was cut off and immediately glued it back in place. Re-fitting with a little bit of styrene strip added to the leading edge of the bonnet and it's looking more like something made by the artisans at Newport Pagnell. While studying the instructions I noticed that part 127 is designed to hold the boot hinge. I eventually found the appropriate part and attached it to the floor/interior tub. Checking the fit of the chassis parts, it looks like my plan to insert the rear section of the chassis as a separate part should work. So I can paint the body with the valances fixed in place. More test fitting, I'm not sure about the boot, it's not practical to add material as that would foul the opening. I might see if I can tweak the hinge a little but it might still end up being glued shut. Interior trim panels were glued in place, to ensure they fit properly into the body. I've also installed the pedals and fixed the front and centre parts of the chassis together. The engine was part assembled and there were a few loose pieces rattling around the box, to these were attached before they got lost. I must admit I've not seen any real DB4s with a belt driven device (looks like it might be a water pump) in that location. I wonder if Aurora's example car was non-standard in some way. I've also noticed that a lot of Series IV DB4s (which this one is) have three SU carburettors, I'm not sure if I've seen one with twin SUs even though earlier DB4s used this arrangement. It would be rude not to add plug wires, so I did. More plumbing added to the outside of the engine. Other side of the engine, lots of painting needed.5 points
-
Good evening Today I made some progress on the painting job Best regards Patrice5 points
-
Seen at The Motorist this morning Ford Taunus GXL 2 door Escort mk1 RS1600 and Twin Cam , both immaculate And an appetite whetter for Hasegawas upcoming kit , Nissan Sunny GTiR Thanks for looking Gary .5 points
-
Done https://weibo.com/1498916251/Lzk4i1VPc?pagetype=profilefeed V.P.5 points
-
The engine and chassis weathering is done and is now ready to mate with the body, don't tell David Attenborough! It's a pity the engine won't see the light of day again but it's been a good practice exercise. Thanks for looking in.5 points
-
You see @Brandy and @keefr22, it just goes to show such things are never just black and white ......... 🤭 T5 points
-
I wasn't going to start this until the Glitter Bug was finished but you know how it is so I made a start on the engine and got it painted in an approximation of Pontiac engine blue. DSCF3346 by timothy jones, on Flickr5 points
-
Primer has been applied. It's all looking pretty good in the seam areas. Next I'll do the little rescribing that needs to be done and then on with the Sky S Type Thanks for looking, Cheers, Alistair5 points
-
Mmmmm mm....... Even today, it still looks like science fiction fantasy, doesn't it ⁉️⚠️😍 Plus, a venetian blind in the rear window..... Come ON 😎5 points
-
So close to being ready for paint, so I spent today slowly adding final fittings here and there to both models. Wing landing light transparencies were glued in. I painted the slot black, and drilled a dimple that had a spot of silver paint applied to represent the lamp. They’ve since been sanded and polished up. I also made a pair of wireless aerial masts from brass wire. The tail wheel was glued in place under the tail. Another brass fabrication was made up for under the rear fuselage. I don’t know what it was, but I will assume it’s a pitot tube. Brass fabs replace PE parts where the latter will vulnerable to handling damage. The main undercarriage doors have been fitted, plus intakes and PE cooling gills. A feature common to both these aircraft is a part of the undercarriage that seems to have no obvious function. Bars are attached to the main wheel axle ends and sit aligned with the ground when the plane is sat on it. No idea what these features are, and because they’re very likely to be damaged they will be left until all the painting is done. The propellers were fitted with brass rod pins for a nice positive fit in the engines. Meanwhile, more PE gills on the T.V cowlings, plus exhausts and intakes. Another brass aerial mast. Since this photo, I decided to fit the nacelle plugs and attached the engines. I’m not bothering with extra detailing, so apologies if you’re expecting it. I really feel I need to push these models on and finish them. The engines need to be painted before I fit the cowlings, though I’m tempted to leave the latter off and paint them separately, which would mean I could paint the engines much later in the process. A pair of tiny clear lamps are provided for the landing lights, which I have glued in the wings. I’m going to try and use the resin clear parts for the covers. I still need to make the T.V tail wheel, which is an awkward assembly of two plastic parts and a PE parts, and still confuses me. I think it’ll be fitted after painting. Progress, then, has been made. The smell of rattlecan primer can’t be far away.5 points
-
Calling this one done. Great little kit, if not a little fiddly. I decided on a light load of a CBLS and some fueltanks. Thanks for the kind words everyone. More pics in the gallery.5 points
-
Well this got finished in the end. Nice little kit, recommended. It's been sitting about 97% complete on my desk for months, just one too many annoying little things needed finishing that I couldn't quite be bothered to get around to. In the end, the canopy mask was so well varnished and set, it was a nightmare to get off. Of course what did I find when it was removed? A big piece of tissue filling the cockpit that I'd left in there for unknown reasons. Cue 15 minutes poking and shaking it out through the observer bubble. Anyway it's a little side thing and rather roughly finished in the end, so not worth an RFI, but here are some photos in case anyone else is interested in making one. It's been a nice lesson for me in quite how much you can bugger things up and still salvage something out of it. Cheers, Andy5 points
-
I did get this finished on Sunday but my laptop decided it wouldn't connect to the internet until after midnight so I missed out on a slot in the Gallery. ☹️ I decided not to finish it as the Mille Miglia winner and instead it's just an SSKL waiting to be picked up by its new owner. DSCF3277 by timothy jones, on Flickr DSCF3279 by timothy jones, on Flickr DSCF3281 by timothy jones, on Flickr DSCF3283 by timothy jones, on Flickr5 points

.thumb.jpg.d17ff607fc7e89ed057e63fcb6f2a888.jpg)


This leaderboard is set to London/GMT+01:00