
Leaderboard


Popular Content
Showing content with the highest reputation on 23/06/22 in all areas
-
I'm calling this one done. It's the Revell boxing of the Hasegawa Phantom F-4M, or FGR.2, in 1/48th. It represents XV434 "J" when it flew with 23 Squadron in the mid 1970's. I have always admired the green/gray RAF camo and thought my first FGR should honor the "classic" RAF camo. Of course there are a few "oops" moments with the kit. No fault of Hasegawa, but some blame to Revell for the decals. A few of the stencils silvered. I used the kit wheels (incorrect for the RAF) but I hated the rubber tires that came with either this kit or the Hasegawa kit that I also have. I have one set of Aires RAF Phantom wheels that I plan to use on my next build. Please forgive me for using the American wheels. I don't get to uptight over wheels anyway. Also I waited to install the canopy sections until the very end because I wanted to add the Eduard photoetch canopy details. I should have at least put on the windscreen and center section so I could get them set and blended in before painting. There is a Work in Progress entry but it quickly moves down in the pages. I just don't know how to link it. If interested you can search for this: Phantom FGR.2 Hasevell 1/48 (britmodeller.com) If you have any questions please ask. The weapons load is what I read was typical for UK based air defense, 4x4 AIM-7/9 with 3 bags for extra range.33 points
-
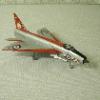
"Mad City Modelers", my local club, is having a group build with the theme "The Year You Were Born". Having just finished my Red Baron F-104, I decided to stay with the century series and build a F-100 Super Sabre, which I'm claiming qualifies because it's first flight was on May 25, 1953. There are quite a few 1/72 kits of the "Hun", all of which have faults. Unsure which way to go, I posed the question to fellow BM'ers in this thread: https://www.britmodeller.com/forums/index.php?/topic/235110863-help-me-decide-172-f-100d-—-trumpeter-italeri-or-other/ and received a lot of very helpful advice. My first inclination was to use the Trumpeter kit, but given the amount of work that is needed to correct its inaccuracies (poor nose shape, and too narrow in the fuselage around the cockpit) and the fact that I was under a deadline to finish (July 16), I decided instead to go with the old ESCI kit. ESCI's Hun is an excellent kit -- correct shape; fine, recessed panel lines, and generally nice detail. Key improvements I wanted to include were: Open the nose inlet and add an intake trunk; replace the kit's rudimentary cockpit with Aires resin; add an Aires afterburner can & engine nozzle; and drop the wing's leading edge flaps. For markings, I wanted to model an aircraft of the 79th Tactical Fighter Squadron (the "Tigers"), as my former father-in-law flew F-100s with the Tigers in the late-1950s (based at Woodbridge, England): My original plan was to use aftermarket items for the intake trunk and wing slats, namely, XMM's resin intake and Blackbird Models wings: However, I found that the nose of the XMM inlet is undersized, and Blackbird Models's slatted wings are simply resin copies of the Trumpeter kit's too-thin wings -- but less detailed -- plus an added center section cloned from the ESCI kit. Thus I took a different approach. I stole the intake trunk from Trumpeter's kit, and enlarged the front opening to match the correctly-sized ESCI inlet: I also removed Trumpeter's slatted wing sections and transplanted them to the ESCI wings: After that, it was simply a matter of cramming everything together! Those, plus adding the Aires resin cockpit and engine nozzle, were my major improvements to ESCI's F-100. For more details, my WIP can be found here: https://www.britmodeller.com/forums/index.php?/topic/235111088-the-year-i-was-born-f-100d-super-sabre/ On to the photos! And, some detail shots: The F-100's underside is pretty busy, and the wheel bays in particular are ripe for super-detailing. I decided to forego that pleasure! I did, however, back-date ESCI's speed brake for a late-1950s aircraft. You might also be able to make out the retractable landing lights I added to either side of the nose gear bay: The nose probe / pitot tube is turned-brass from Master Models: The Aires cockpit is a must-have, but just barely fit after a lot of thinning of both the fuselage sides and the Aires tub: Here you can see the Trumpeter forward wing section and slats, grafted on to the ESCI wings. Also visible is some Eduard PE on the front of the wings, beneath the slats: I used Trumpeter's 275-gallon wing tanks, as the larger 335-gal tanks in the ESCI kit first entered service in the mid-1960s. too late for the aircraft I'm representing: The kit wheels are just "okay", and not nearly as nice as the Reskit wheels seen here. You can also see the brake lines that I added to the main gear: I used SMS Metallic paints to represent the silver lacquer finish of the actual aircraft, with a clear coat of Alclad Light Sheen. This was my first experience with SMS Metallics, and I'm now hooked on them. For the heat-stressed metal in the engine area, I used various shades of AK Interactive XTreme Metal enamel: Here's the business end of the Aires afterburner can & nozzle: Finally, I couldn't resist adding a few tiny little lights found on the actual aircraft: My "get off the stage" shots: Just sixteen days, start-to-finish! I'm amazed at how much I was able to get done in that short time . . . . and I'm unlikely to repeat that rate of building anytime soon.31 points
-
Well everyone it's been a truly amazing group build. Dave ( @Rabbit Leader) and I have been completely overwhelmed by the level of enthusiasm this GB has generated. I believe its the first time ever that every single kit offered by a manufacturer has been included in a single GB ( @Enzo Matrixwill correct me if I've boobed here) The number and diversity of builds has surpassed anything we have achieved in a GB before, and as for completions..... Well your completions have been so successful (10 pages worth) that the forum software can't manage a poll. I'm afraid it can only handle a maximum of 75 choices (72 with a "none of the above" option). There are 226 entries in the gallery so to quote our illustrious GB Leader "we don't have a catinell's chance... " Dave is currently slaving over his PC to get the final completion stats together, please be patient it's a herculean task In the meantime can I congratulate you all on making this GB so special, it has been both an honour and privilege for Dave and I to have been your hosts. However it's also been blooming knackering so I hope you don't mind but we will be giving the hosting duties a rest for a while and actually trying to build something ourselves ! For those of you still to complete their builds I promise to stay with this GB and encourage completion aren't you lucky ! Kindest regards Pat & Dave23 points
-
Direct from the 'Big and British' Group Build I thought I woud share my finished HK Models Avro Lancaster. Almost straight from the box, this is a superbly engineered kit requiring little additional work. I modelled one engine exposed which required some work as athough the kit includes 4 merlins, the supporting engine bearers are not included, requiring a bit of scratch building to make them look realistic. Decals are from Xtradecal depicting a plane from 625 Sqn RAF Kelstern Lincs, April 1945 with 93 missions and 7 from "Op manna food to occupied Holland in 1945."=100 Ops. Enjoy. Interestingly the Lancaster is the smallest model in my 1/48 Avro collection! Build Thread here Colin21 points
-
Here's my Trumpeter 1/35 Dolphin HH65C. It was a mixed bag with the build parts that didnt fit included all of the glazing around the front and the engines, engine covers, landing gear, nose and tail rotor. Nothing major in terms of fit that wasn't easy enough to fix just a bit tedious and with large parts which are windows it certainly made me question on occasion whether or not this was even going to get completed. I added my own detail inside and out which was milliput for all of the internal equipment in the back. Spare photoetch and electrical tape for straps and lead wire for internal comms connections. On the outside I added stretched sprue for the wire which is attached to an antenna to a point under the tail rotor. The wires around the search light and also the engine that is visible plus all of the door handles. At a few points along the build I really did think it was going in the bin but in the end I think it tirned out well. I never would have guessed a shiny orange helicopter wouldhave used up all my masking tape which was almost 2 rolls! But it did. The model was painted with tamiya red and orange about 1:5 parts orange to 8:5 parts red this mix to my eye looks like international orange. The clear coat was Tamiya clear and the decals are from Caracal which give you all of the squadrons so the best looking one to me was Texas so it has Houston written on it. The kit comes with photo etch sprue and in areas the detail isreally good and others non existent. It's as if two people worked on it, one who wanted to make a great kit and the other couldn't be bothered. I drilled out the APU exhaust as it's just a circular indent but the front has a photo etch grill with full length intake so that's the sort of thing I am on about. Anyway enough of my complaining it adds a splash a very bright one at that to my collection and I hope you all like it.20 points
-
#13/2022 After the French Skyraider, my dad decided to build another one, this time an AD-4NA during the Korean War. He used the Italeri boxing of the old ESCI kit which was first released in 1979. Most Korean War naval schemes are rather boring, but I had a Cutting Edge sheet with a more colourful scheme in the stash. Like it happened several times before with Cutting Edge decals, they disintegrated in the water. So my dad secured them with Microscale Liquid Decal Film, which luckily worked out. Because of that, the decal carrier film looks a bit thicker. Painted the model with an older selfmixed navy blue. The kit is a modular one for AD-4 (N, NA), AD-6. There are fuselage side inserts for either the dive brakes or the doors. My dad had to fill some lines and engrave new ones in that area, in the end he dicided to remove all the raised panel lies and rescribe the model. Kept the ventral dive brake. It´s slightly raised and to sand it away completely and get a smooth even surface, hardly impossible. When the model stands you don´t see it anyway. The prop plades are molded the wong way around, to say the rear side faces forward. So my dad cut them off und glued them on again in the correct position. The pitot tube under the right wing was taken from a Tamiya Skyraider kit, the Esci one has only a tube for the fin. The two napalm canisters are leftovers from an unfinished Hobby Boss F-80 kit. They have no engravings for the filler caps, so my dad used some decals and added fuses with plastic rods. The 2000lb bomb is from the sparesbox, added some scratchbuilt strap-on and mount. Real center racks came later with the AD-5. Little fin mast was done with plastic rod, antenna wire with EZ Line. Build thread here https://www.britmodeller.com/forums/index.php?/topic/235109348-korean-war148-douglas-ad-4na-skyraider-vf-194-us-navy/ Model shows a VF-194 Skyraider onboard the USS Boxer in 1953. DSC_0001 by grimreaper110, auf Flickr DSC_0002 by grimreaper110, auf Flickr DSC_0003 by grimreaper110, auf Flickr DSC_0004 by grimreaper110, auf Flickr DSC_0005 by grimreaper110, auf Flickr DSC_0006 by grimreaper110, auf Flickr DSC_0007 by grimreaper110, auf Flickr DSC_0008 by grimreaper110, auf Flickr DSC_0009 by grimreaper110, auf Flickr DSC_0010 by grimreaper110, auf Flickr DSC_0002 by grimreaper110, auf Flickr DSC_0012 by grimreaper110, auf Flickr DSC_0013 by grimreaper110, auf Flickr DSC_0014 by grimreaper110, auf Flickr DSC_0015 by grimreaper110, auf Flickr DSC_0016 by grimreaper110, auf Flickr DSC_0017 by grimreaper110, auf Flickr DSC_0018 by grimreaper110, auf Flickr DSC_0019 by grimreaper110, auf Flickr DSC_0020 by grimreaper110, auf Flickr DSC_0021 by grimreaper110, auf Flickr DSC_0022 by grimreaper110, auf Flickr DSC_0023 by grimreaper110, auf Flickr DSC_0024 by grimreaper110, auf Flickr DSC_0026 by grimreaper110, auf Flickr DSC_0027 by grimreaper110, auf Flickr19 points
-
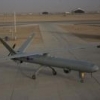
Hi all, so this is my first post here and first go at a 1/48 scale model. It's the Trumpeter JF-17 Thunder/FC-1 Xiaolong kit in the Pakistan Air Force scheme (no way I was trying the green/red scheme 😅). It's carrying 3 fuel tanks, 2 x PL-12s and 2 x PL-5s. Pretty good kit, no major issues- though I'm never a fan of creating my own holes for hardpoints and I'm still not completely used to using the photoetched parts. But nevertheless happy with the result and my 7th model complete. Thanks!18 points
-
The following Sturmtiger is something I've been working on for a while, based on photos from the excellent Panzerwrecks book, trying out new modelling and painting techniques, with a lot more etched than I was used to and some scratchbuilding. I used the excellent Tamiya kit as a base and added some Voyager and Aber extras, with some RFM tracks. I learned a lot, using influences from posters on here and youtubers, and although there is room for improvement, I am heading in the right direction modelling wise. Tamiya and Mr Hobby paints, acrylic and lacquer used. I also used a lot of different mud enamel paints and had fun with pastels for low and highlights. Thanks all for viewing and good luck with all your projects.👍13 points
-
I was stunned to see this traction avant in the Stourport on Severn Tesco carpark today; For a car at least 67 years old, it looked in great condition.11 points
-
The only upside of having covid (quite mild thankfully) recently and staying out of everyone's way was getting some aircraft modelling done. There's been plenty written about these kits so no point repeating things my only comment being I found them a bit fiddly in places but otherwise a nice kit. As for the plane itself always thought the PF/PFM sharper than the slightly bloated looking MF. The Bulgarian PF is one of the few attempts at NMF I've done recently and is a mix of Tamiya and Mr Hobby and while it's far from comprehensive I'm content with the result. The MF is my interpretation of the Egyptian "Nile" scheme which I've always liked which was also Tamiya and Mr Hobby with a home brewed light green. Used a MIG wash for the first time on both and was very impressed. Apologies for the iffy photography. Thanks for looking, Stu10 points
-
The oil cooler and exhaust with heat shield ready to be fitted to the body shell. I have added the locking wires to the heat shield from two twisted 0,1 mm wires. Better details high up in the simple engine compartment draws attention from the lack of other things lower down is my thought. Here the parts are fitted. The rear view mirror is also fitted. The few parts of the interior are also finished and installed. The ignition wiring has been routed a little better and a fuel line with connections is made from pieces of Detail Master braided hose, copper wire in the core and couplings made from Bare Metal foil strips, painted with clear blue and red. The engine and oil tank is then fitted to the chassis. And then this detail to finish it off. Simca was not officially involved in the Moynet/Esso effort for Le Mans, so the team was asked/allowed (depending on source) to cover up the Simca name on the engine for the race weekend, and an aluminium plate was screwed on top. P24 has faithfully reproduced this with a separate photo etched part.10 points
-
77 years ago 22 June 1945, my dad flew his first combat mission. It was only his second flight in Burma with 79 Sqn. 1/48 Tamiya P.47D. Extract from my dad’s log book and the 79 Sqn. ORB. ‘a ridge at QA 030670 was the uninspiring target for this sortie. Glide bombing attacks were made and all bombs fell in the area. Four (?) strafing runs were made by each aircraft on the area and along a track (?). No results or movements were seen. Bombs: 12 x 500lb Mk IV GP 11 Sec delay Ammo: 9,510 x .5 API’ John9 points
-
Being born in the 1950s I have always been attracted to the Century Series of aircraft. It was a difficult choice which aircraft and in which scale to build for this GB. Having made the decision to build a 1/72nd F-106 I then had the task of which markings to apply, so many colourful and attractive schemes, all of of them on an overall ADC grey scheme. First the kit, I bought a couple of Meng Delta Darts when the kit was released in 2016 and they have remained in the stash ever since. The only other Meng kits that I had bought prior were the 1/48th P-51 Mustang and the 1/72 F-102 Delta Dagger, both of those were disappointing because of the overdone surface detailing of large rivet divots and the F-102 also had deep panel lines and random, overdone panels. The F-106 doesn't, thankfully suffer from these problems, surface detail is very fine and they have detailed the missile bay, undercarriage bays and have provided full length intake ducts and the exhaust/afterburner tube. The kit is so complete that apart from a Master brass pitot tube and some Reskit resin wheels I couldn't find any other AM available for it. Everything still bagged up in the box and the Master brass pitot tube. For decals I will be using the excellent Caracal set, their part two for the F-106, the 318th FIS is the middle scheme on the cover sheet, I also have a set of Fundekal stencils and national markings to use. I wanted to have a start made on the kit so I didn't just have the kit photo on my thread with no progress to look at for a couple of days. So my first update, I have painted the intake ducts and compressor face ready to be assembled into the fuselage, same with the exhaust pipe and I have painted the ejection seat and cockpit parts dark Gull grey, detailed them up as best as I can and added some seat belts from Tamiya masking tape. I just need to paint the instrument panel then I can fit it all inside the fuselage and join the two halves together. Thanks for looking, any comments or questions are always welcome.9 points
-
Good afternoon all, here is my latest completion. The upper surfaces paints are from the AK Real Colors set for the Luftwaffe 1960s and 1970s and the underside is Vallejo Metal Color Aluminium. The stencil decals are from the Revell boxing and the main decals are from APC Decals via hobbyshop.cz. hobbyshop.cz have a number of decal sheets replicating many of the old Matchbox and Heller/Smer kit decals. They are printed on extremely thin continuous film decal paper and the colours are very opaque. They adhere beautifully on a gloss surface and react perfectly to Micro Set and Sol. Because the film is so thin they do not respond kindly to handling on the model and need to be floated into just about the right position and very gently floated if adjustments are needed, but don't try big adjustments or they'll stretch or fold in to themselves. I found out the hard way and had to purchase a second set, but they're relatively inexpensive (even with postage), definitely worth it and delivery is quicker than from some UK suppliers. The windscreen fit is appalling and lots of filling, sanding and polishing was required. Additional interior detail is limited to front seatbelts from foil and the Revell instrument panel decal; nothing can be seen of the cabin. Steps and fin aerials are from copper wire and the pitot is brass tube with NiSi wire inside. The wire aerial is Ezline Fine. There is no landing light cut-out on the kit so this was added with a little-lenses 'light' and clear tape for the cover. The forward blade aerial is a piece of plasticard and the anti-col light is from stretched clear sprue with Tamiya clear-red to give colour. Here's the model...9 points
-
Good evening, dears. It's my next model.9 points
-
Thank's for kicking things off Tony,heres what survives of mine in Photo form. Monogram Panther(my favourite MG kit). The ancient Hien in 1/72. The equally ancient Corsair in 1/32 scale. North sea Trawler. The 1/28 Fokker Dr1. And we are done!9 points
-
Looking forward to it Mark. I’ve been to various places in Canada in British Columbia, Alberta, Ontario and Quebec and had a great time back in the RAF days doing a Maple Flag from Cold Lake, but I’ve never yet been to Atlantic Canada (Goose Bay excepted). I do like Toronto and I like Niagara on the Lake, and the Canadian Heritage Museum at Hamilton (obvs.) but the town of Niagara Falls itself leaves me cold. Envy you living in the region though. I’d happily of settled in Canada. Interesting, CT (don’t mean the bit about being cheapskate (although noted for next we meet an the question of who’s buying coffee or beer arises)). My attempts at web research into wavelength and/or power requirements for resin curing didn’t get very far. Yep. Wish I could claim it as mine own; but simply standing in the footsteps of giants If memory serves me Serkan, I got a small bottle of the Elegoo ABS-Like Photopolymer Resin because you’d had good results with it. I thought it printed very nicely, but for the stuff I’m doing I’ve not noticed any definitive difference between it and the Elegoo water washable resin - and I prefer the convenience of being able to do an initial rinse in water before using IPA in the Elegoo Mercury for final cleaning. Extends the life of the IPA in the Mercury considerably. Likwise! Tiny step forward on the Hawks, in amongst the chaos of getting up to speed with work pre-hols and sorting out all the admin for going on hols (it’s nigh on impossible to hire a car in Newfoundland unless you book months in advance - but thankfully there’s a thriving ‘car sharing’ market - sort of like Airbnb for cars), in that I’ve prepped and primed the printed pylons and CBLS bits. The priming has brought out the printed detail quite pleasingly. As an aside - I’ve been following and thinking about the various discussions on BM over the merits of priming (or not) and primers various (esp. given @hendie and other’s recent travails with Alclad) and I’ve sort of decided not to bother so much with purpose designed primers; so I just gave these bits a light first coat of Tamiya flat white well thinned with Mr Colour Levelling thinner. Piccies: Pylon: CBLS Bomblets Bomblets fitted to the CBLS. That’ll do me in 1/72 scale. Final dryfitting/check of the pylons. I think the pylons are in dark green and wouldn’t involve any tricky masking if I fix them in place now. Subject to double checking that point the next step is to glue them in place. The Tamiya flat white ‘bit’ very nicely and seems durable enough - best of all it’s nice and thin and smooth. No good as a filler-primer of course but I was trying to avoid the whole ‘filler’ aspect of priming anyways. Sooo running out of jobs to do pre-painting.9 points
-
Frank Bellamy illustrated TV21 Talons of the Eagle story using the RTL2 featured in the Thunderbirds episide The Cham Cham. Bellamy's dynamic style well illustrated the RTL2 a favourite guest vehicle of mine. Many, many years ago I scratchbuilt it, based around two Ariane V boosters. So no scale in mind. With the re-released Aoshima TB kits, it occurred to me that the 1/350 scale TB2 might be compatible with the RTL2. Suprisingly they matched the Bellamy artwork virtually exactly. So adapted a pod and scratchbuilt the Bellamy grab. Here are the photos.8 points
-
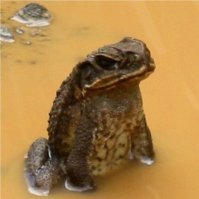
I have been experimenting with different types of methods lately. This time is with mud. Yep! Good old natural mud. I used mud collected from a neighboring farmer's dirt road. Really fine dirt, I must add. All I did in this diorama, was add PVA glue, and a little water, and Voila! The muddy puddles you see were done using a mixture of Liquitex gloss medium & varnish, and their Transparent Raw Sienna ink for the muddy look. I also tried a little mixture of MIG wet effects and Liquitex Raw Sienna. I think the end result looks pretty convincing. I am still fine tuning the surrounding areas by doing some dry-brushing on the mud, to bring out the different texture. But so far, it appeals to me. The model itself is from AMT 350 Pay hauler. I had this kit for a while and did not know what to do with it. The big bucket was cut down to fit. So there is no chassi just the big bucket and front end of the pay hauler. I did much on the interior with some additions and some minor scratch built parts. This scenes inspiration was taken from many photos of collapse mines or sink holes that dumpers and machines alike, have fallen victims. As always, I like to always do some different and try to go one-step further.8 points
-
This venture started as a little something to do whilst I was caravanning earlier this month. My intention was to complete an OOB model using the paints in the start set, nothing fancy, just something to occupy myself for the odd hour on an evening. Unfortunately when it came to painting no fewer than 3 of the 6 supplied paints were dry as a bone so I couldn't complete it. Gutted as I was I finished it off at home. I chose to use the colours called for in the instructions, (although it's quite obviously now that the green is too bright) as I wanted it to represent what it might have looked like had the paints not been dry. It was looking pretty good until I tried some homemade weathering washes. Anyway, here it is. Let's just called it battle hardened.8 points
-
And I even get first post! Monograms Hurst Hairy Oldsmobile 442. The Little T. Monograms first all plastic car kit, the Midget Racer 1969 Dodge SuperBee And a whole load of early Monogram car kits... And a couple of Roth Finks...8 points
-
Find the cat! Dolly's favourite outside spot at the moment.8 points
-
Hi folks 🥳 Now that the M3/4 GB is finished, I would like to continue with my work here. As you can read in the title, it's about the M12 GMC from Academy, which I finished building after a lot of work, but I couldn't paint it in time. As usual, I had also planned a vignette, so I still have a long way to go. Some of you already know my model from the GB, for all those interested I would like to present a few pictures with the most important milestones of the project. In the coming months I will be painting figures, pouring water, creating decals and weathering the M12. I would be happy if you join me in this process. MD The figures were more expensive than the kit😁 The wall to the engine compartment was revised The bogies have been reworked to show the weight The drive housing has been improved The air filters were redesigned and printed The spade was also redesigned and printed The details of the bogies have been improved The gun socket was improved... also the fuel filler caps The complete rear section was rebuilt... and provided with missing rivets and weld seams Missing details of the gun were attached The drive for the height adjustment was added The trackguards were ground thinner The front trackguards were rebuilt Adding new details to the hatches The gun support revised and made movable The ammunition rack newly created Missing weld seams and holes added Casting markings applied The protective shield improved The drive wheels modified... for new AFV Club tracks (here you can see the weight distribution well) new seats The complete new winch is a model in itself The finished model with some accessories is ready for the last steps before painting When I look at the pictures again, I realise why I didn't finish them completely 😁 See you!7 points
-
Latest project done. Key takeaways... - I had high expectations for the fit based on reviews I have read elsewhere. This was true with the Exception of the fuselage, which had a step, gaps and was a bit of a dog! - Love the decal sheet, lots of detail for an OOB build. If you use the BA tail decals, have the red paint on standby to fill the gaps. - This was my first go at using the clear windscreen instead of the decals from AA. Not perfect but happy as a first try. I used the one piece stencil rather than the individual window stencils from AA, as these seemed to small on the Revell' windscreen (might be better for Zvezda?) Painted with a mix of Humbrol and Plastikote spray cans and Humbrol acrylics. Decals OOB and windows by Authentic Airliners. Feedback and tips welcome Chris I7 points
-
Here are some of mine, starting with the Monogram stuff. Bad Medicine DSCF8495 (640x479) by timothy jones, on Flickr T'rantula DSCF6936 (640x480) by timothy jones, on Flickr Rat Vega DSCF9181 by timothy jones, on Flickr Black Widow DSCF1387 by timothy jones, on Flickr '37 Ford Street Rod DSCF1703 by timothy jones, on Flickr '70 Ford Mustang Boss 429 DSCF2114 by timothy jones, on Flickr '70 Chevelle SS 454 DSCF2136 by timothy jones, on Flickr On to the Revell section. Go-Mad Nomad DSCF7367 (640x482) by timothy jones, on Flickr Rat Fink DSCF2851 by timothy jones, on Flickr 1/48 Messerschmitt Bf 109G-10 DSCF0077(1) by timothy jones, on Flickr 1/72 Messerschmitt Bf 109E DSCF2844 by timothy jones, on Flickr7 points
-
The Glastonbury of Group Builds! No need for a poll really, taking part was the important thing. That, and watching everyone else's builds come together. We certainly did Matchbox proud between ourselves. Thanks again Pat and Dave, you made things easy for the rest of us.7 points
-
Evening guys Only a little bit of progress today : I've printed an army of inscriptions "300 SLR" for the trunk, in different heights and thickness and have compared the prints with the inscription that I've left on my spare bodywork and on the references photos, in order to see if the 3D print could be convenient or not, and to choose eventually the one that is closed to the reality/ And I finally concluded that there was no need to invest in photoengraving equipment, because 3D printing, even of such small and thin parts, is perfectly suitable So, I've painted chrome and clear coated about twenty inscriptions (they are so fragile that they break at the slightest breath and it was so better to have a reserve) I've also designed and 3D printed some Mercedes Benz emblems (the 3 points star), for the trunk as well, and after 2 tries, got a rather good result : The part is 6.16 mm diameter, and 0.35 mm maximum thickness ! I've 18 usable emblems and I've primed 6 of them tonight. They will be painted chrome tomorrow if weather allows. At last, I've painted Alclad polished aluminium the windshield frame: And I've also painted a second set of different parts such knock-off wheel nuts, licence plate, because I've had an issue with the first ones (the chrome paint chipped off the black base, and even after cleaning with IPA, I couldn't get them as clean as I needed) It doesn't look like it, but it takes a lot of time to make all those little exterior details that are so important to the final result 🙄 Thanks for watching Stay tuned if you like 😎7 points
-
My, someone's feeling bold! Fresh from the Matchbox GB, and straight in with TWO build threads in this one! Prior to 2019, I had never seen this kit before. My wife saw it in Home and Bargain for £1.99 and bought it knowing it would be up my street (or down my river in this case). Worth £1.99 just for that awesome retro box art! 20220622_202321 by Dan Hardy, on Flickr A few more bits with this one, than with the USS Lionfish, including the all important frogmen! 20220622_202602 by Dan Hardy, on Flickr Yep, definitely eligible for this Group Build! 20220622_202620 by Dan Hardy, on Flickr Decent looking, clear instructions; 20220622_202833 by Dan Hardy, on Flickr Decals look OK too (all 3 of them!). 20220622_202856 by Dan Hardy, on Flickr Again, I am aware that this kit may not be entirely accurate, and has its issues, but its got to be worth a go! Will be finished on its stand, so my first thoughts are how I can incorporate the frogmen. After all, it would be wrong to consign them to the spares box!6 points
-
Hi men here's my attempt at Italeri's 1/32 Tornado. A great kit in my opinion and very nice build with no issues on my build. Thank you for looking6 points
-
Many years ago - as a kid - I built a Frog Marauder: As I didn’t have the paints required I had to do the French version - but in fact it was the SAAF Marauder I preferred. So 45 years later here it is: I used the Hasegawa B-26C kit with Eduard PE interior set and resin wheels. The serial and "L" are Frog decals, the insignias are from an Xtradecal sheet. All paints are Gunze, weathered with Tamiya weathering sets, a Karisma color silver pencil and AK washes.6 points
-
I attach here photos of my recently completed Privateer, built out of the box (+ some home made improvisations) from an original Matchbox kit that has sat in the box for 40 years. The problems with this kit are well known, and as expected this was a troublesome build (if you want to know details, visit my personal webpage; link in my signature panel). Still, I really wanted to build a Privateer, the idea of converting a B-24 kit was just too daunting, and I found it for a bargain in eBay (currently these kits are going for more than $200 AUD - more than 3 times my investment...). Surprisingly, the decals performed like champs, even I opened the box though they were all warped, yellowed and stuck to the flimsy paper that was supposed to "protect" them. In fact, it was nothing that 8 weeks of exposure to sunlight could not cure. I also stuck with the original engine cowlings, even though sampling the internet would make you think these are gross abominations that misrepresent the original (I honestly could not see what the fuss was all about; pretty OK for 1/72 scale). Whereas the propellers did look wrong, I did my best to make this less visible using the time-honoured technique of sanding. One irritating aspect of this build was that Tamiya cement (both the normal and the quick-setting) did not work well with the plastic: seams that I thought were long sealed tended to pop up again days later. This created multiple cycles of re-sanding, re-gluing, re-masking and re-painting, particularly along the joint between halves of the fuselage, and half-wings. I am not sure what the solution is, but if you are lucky enough to find one of these to build (they have been out of production for a while), it may be useful to try a different type of cement. Anyway, this seems to be the only kit of the PB4Y-2 around, so if you (like me) really like this plane, it is worth investing the time and effort. There were a few things I would do differently if given another chance, but I think it makes a fine addition to my collection.6 points
-
First I decided what the plausible size of the cut in the screen would be and marked it out with tape. Then I moved the screen to a suitable support surface and started with the cut. After the first light pass I removed the tape and then worked through a few more passes. A piece of 0,2 mm aluminium was folded into a U-shape fitting the cut, then I cut material off until I had this part. A square from the screen cut was also removed. The aluminium piece was then sprayed semi gloss black. When the paint had dried the piece was inserted into the screen with the floor sloping downward and glued with thin lines of Kristal Klear. When this has dried I hope some additional semi gloss black detail painting will complete the look. While messing around with that the wheels have also come together.6 points
-
] I opened the sealed bag this morning as I'm starting to get a bit twitchy here. I'm like a kid before Xmas. I think it's fair to say that this one will build up quickly... [/url6 points
-
Beautiful work there on the pylons CBLS and its contents Steve! I'm also liking this proven trend to move away from constant use of dedicated primers. Seems to be the fashion! Yes, I believe that is the case Bill, and I'm sure Steve wont mind me sharing a pic I shared with him a while back, all hanging off a good old Buccaneer...... Don't you just love fast jets! Well, I do 😁 T6 points
-
Heading into town yesterday, a Morris 1300 traveller going the other way, couldn't get the rego but looked like a Mk II from photos of them. These hold a soft spot for me, as a 14 year old, a mates Grandad took us down to a sometimes tidal sand flat (only on king tides) nearby in his one & taught us the rudiments of driving, stared without pig jumping, stopping in a controlled manner & basic vehicle control, lessons that stayed with me as I sat my license a year or so later. Steve.6 points
-
A little update on this one. This weekend we just had the first Australian Model Expo since the beginning of the pandemic. This was my first opportunity to show my models in public and compete. And the news is..."Redwing" got first prize in the small scale/ propeller planes (Out of the Box) category!6 points
-
Right, time to drag this kit from the murky depths of my stash, where it has lain for almost 25 years! I started to get interested in the US submarine war in the late 90s after reading "Submarine Diary". I subsequently picked up a copy of "Silent Victory" by Clay Blair, in all its 1000+ page glory. When I saw this kit in my now long gone LMS, I snapped it up, but I don't think I was ever really sure how to tackle it, as its quite large, and still to this day the most nautical kit I've done is an Airfix 1/76 DUKW! Still, looking at it now, it does seem a fairly simple kit, but it certainly hasn't shrunk at all! I am aware, having read a few reviews, that it is far from the most accurate kit (being based on a Gato, when Lionfish itself was a Balao), but I think it will still look good (hopefully!). So, here it is; 20220622_201911 by Dan Hardy, on Flickr Not a huge amount of parts! 20220622_202101 by Dan Hardy, on Flickr Not the largest set of instructions I've ever seen either! 20220622_202125 by Dan Hardy, on Flickr And just a handful of decals; 20220622_202200 by Dan Hardy, on Flickr The painting instructions (if you can even call them that!) just mention painting the lower hull red, leaving the grey plastic as is, and just painting the propellers, stand and a light on the bridge. I want to do a bit more than that, and am thinking of finishing it in the grey vertical surfaces/black horizontal surfaces scheme from later in the war (from when Lionfish would have been in service). Got this to help me along the way; 20220622_203011 by Dan Hardy, on Flickr OK, clear the bridge and lets get started!!5 points
-
This model was begun as part of the 2021 F6F Hellcat STGB. Finally, it is finished. Another abandoned project done. Construction details in the link below. I hope that you enjoy these images of the completed model. Don5 points
-
Good evening all, Tonight I have for inspection the well known Airfix Mustang. I won't run through the build process as everyone should be aware of it by now. As usual, I wanted to pick a less common scheme - this often proves to be the most fun part of model building (the research and gathering of pics). Accordingly, I used an Xtradecal sheet to build an Italian Mustang from shortly following the war, while Italy was awaiting Vampires. They also used P47s, Spitfire Vs, P39s, and heavily modified P38s in this time. In a break from tradition, this one was brush painted instead of spray painted. I think the results are slightly better, as the finish looks a little tired, but in the future I may stick with the rattle cans for the sake of expedience. Right, the pics - Next up will be a Gladiator or 3, the PRU Hurricane (Honest! I just need varnish.) and a 109G. A Defiant may sneak in as well if I get around to finding a spare roundel. Thanks all, Best, Tweener5 points
-
This kit shows its age, but builds up into a decent model. I believe its an Heinkel based in Norway, carrying Torpedoes for the Murmansk convoys. The fit was pretty good, but I had a problem with the fit of the Greenhouse nose. I handpainted the extensive glassware, and while not the best of my creations, I think I captured the spirit of a 60s model - Rattle cans, etc. It came with a Frog Display base which can be hung on a wall.....so it now adorns a wall in my study.....5 points
-
Hello all, Here is my recently completed 1/48 Tamiya F-14D, in the markings of VF-2 'Bounty Hunters' during Operation Iraqi Freedom in early 2003. The build thread is below: BuNo 164350 was delivered to the Navy in early 1992 and served with VF-11, VF-2 and finally VF-31, with whom it served up until retirement in late 2006. It currently resides at the Joe Davies Heritage Airpark at Palmdale Plant 42, Palmdale, California. During OIF, this jet was one of several jets that were capable of carrying the Tactical Airborne Reconnaissance Pod System (TARPS). The F-14 required a modification to allow the ECS (environmental control system) to pressurise the pod in flight. Because of this and the high tempo of operations, VF-2 had one 'designated' TARPS jet and two 'good' TARPS jets which were wired for either the LANTIRN system or TARPS (both could not be carried operationally at the same time, although they could both be carried for transit). 164350 was one such jet. On 17th March 2003, 164350 was one of a pair of F-14s on a TARPS mission over Southern Iraq, but due to the demands for Close Air Support (CAS) the jets were each loaded with a pair of MK.82 bombs. The aircrew of 164350, Lt(jg) Pat Baker and Lt Sean Mathieson, were talked onto a target by a British Army FAC/JTAC near Basra. The target was Saddam Hussein's presidential yacht, Al Mansur, which was moored close to Umm Qasr. The yacht was struck by the four Mk.82 bombs dropped by the pair of F-14s, which, although didn't sink the vessel, rendered it permanently useless. Extras used included Quickboost seats, Quinta cockpit set, DEF model resin wheels, Tamiya update set for canopy mirrors and pitot tube, Fightertown decals and New Ware mask sets. The MK.82 bombs are from Tamiya's latest F-14 release. Paint is mostly MRP with the weathering being a mixture of post shading, Flory wash, Abteilung oils and various Tamiya sets. Thanks for looking. Dave5 points
-
Here's one that I had two goes at. I one of the lights action sound kits I think it could be 1/32 scale but it definitely a huey chopper.5 points
-
Tks Ian! 😂 A bar too.. I started painting the main teak deck with the Vallejo Set. I went back to the drawing board to finish the bar elements. Bar, back bar, club chairs.5 points
-
That one's a reissue of Monograms PB48 from 1959. Listed as Frogmen and LCP(R) boat. It got renumbered as PB182 in '67. I'm not sure of the Revell boxes. Sold as a one piece floating hull with frogmen figures who float just under the surface. I get the feeling this ones a bath time kit! You could do a lot worse than copy the store display for the original kit...5 points
-
second upper camo colour done with Gunze H303 FS34102 DSC_0001 by grimreaper110, auf Flickr DSC_0002 by grimreaper110, auf Flickr5 points
-
Wrestling the Hind kicking and screaming into shape Bill I intended it to mean the Hind was metaphorically kicking and screaming (obvs.) - but decided to leave it ambiguously unpunctuated just in case there’s been the odd bit of Bill k & s along the way5 points
-
im dumb. Sorry for posting pics of my dagger in youor dart5 points
-
Back to the Voodoo. Started off this afternoon with inserting the resin "handed" intakes. These have the injection plastic engine compressor faces attached. Will blast some paint down the orifices once everything is fixed together. Even shining a lamp down it & even I can't see them. Both of the etched intake splitter plates are the same size, but for some reason the left hand one wasn't tall enough to touch the ceiling of the intake so I cut out another from thin sheet plasticard. Cockpit isn't quite wide enough to fit, so added some plasticard to help it touch the fuselage side. I found that this helped perfectly with the wing topsides butting up to the fuselage. 32.5mm wooden spreader bar superglued in. I actually lined it up with the double panel lines that go across the top of the fuselage fuselage strengthening panel? Also added a length of sprue to strengthen the spine joint. Had to be extra careful to line the fuselage top halves together so as not to get a step. Note, with spreader bar in place, the tops of the wings touch the fuselage. Probably the trickiest part of the kit. Taped wrapped & beaten into submission! The plate plasticard inside the front fuselage was essential to both hold each half level & for the wing section to sit against. That's the first major stage of Valom Voodoo madness completed, next stage will be cleaning up & loads of filling to make that spine joint invisible! I've had enough of that for one day!5 points
-
This afternoon I saw a Vauxhall Calibra 2.0 on Sainsbury's car park. Last Sunday this late 40's Plymouth was at the Midland Air Museum, Coventry. DSCF3273 by timothy jones, on Flickr5 points
-
Assembly has started with the rear end and engine. I cut pieces of 0,3 mm lead wire and glued them in the distributor posts. Although I had already drilled all posts I still had to clear a hole from paint or something. With the cables reasonably routed (always trying to observe ignition order) and fitted to the head they were painted. When fully dry they will be packaged much tighter and touched up. My choice of yellow ignition wiring is a chance, but not without support. Such wiring was around in 1975, and the car was never raced again, it just sat around stored in museum locations until 2010 when it was pulled out and later sold to be restored and returned to historic racing. In photos of the somewhat neglected museum car being pulled out, yellow ignition wiring is very notable, so that's what I did. And it looks so good... And yes, the Simca text on the valve cover will be attended to later on. Seats, extinguisher and rear brake air ducts are glued with epoxy. The car was fitted with an internal rear view mirror, but none is supplied in the kit. I sourced one from a spares box, painted it and will adapt it for installation.5 points


.thumb.jpg.a15df237fd8d56e4265c64c5f8f26d75.jpg)


.thumb.jpg.158e2e086d45b8f96b7d93b8bee8dc21.jpg)


.thumb.jpg.3d6eff3e2f6cc042679bca864bcb2b1a.jpg)


This leaderboard is set to London/GMT+01:00