
Leaderboard


Popular Content
Showing content with the highest reputation on 11/06/22 in all areas
-
Hi all; Just finished this one a couple of days ago in time for the anniversary of the event it commemorates. The WIP is here: ...and I am much indebted to all who encouraged and guided me on this one. The Coles Notes version is I didn't know what I didn't know about the short comings of the kit and several whose expertise and knowledge is far greater than mine helped me produce a much better result than otherwise would have been the case. I used the Eduard External PE Set, though I must admit that I didn't use all of it. I thoroughly enjoyed this one and plan another in the not-too-distant future. The pics... Cheers.29 points
-
I have been building RAF grey / green jets for a while now and one kits continually eluded me. The Airfix Buccaneer. The kit is getting on & has been out of production for some time. I has a reputation for warped body parts and poor fit - a banana kit to got with the Buccaneer nickname of the Banana jet. I finally got a decent condition kit from eBay and then promptly added it to the stash and left it. Finally dug it out a few weeks ago and got started. The cockpit was a bit bare so added the Airwaves etch but stuck with the kit seats. Other than that I decided to light her up, adding wing tip navigation lights, tail light, nose wheel taxi light and top & bottom flashing anti collision lights. I left the bomb bay removable with ‘penny’ 3v lithium batteries and switches inside. The ladder is a very fine 3D print from eBay. She is finished as XW530 of 12 Sqn RAF Lossiemouth. She has the later short wingtips, so dates from around 88 to 92 although I am sure others can be more accurate on that. If I am honest I wanted to do a Honnington jet, but couldn’t seem to find the right decals. I live not that far from Honnington and sometimes see the last remaining Bucc there on gate guard duties. Anyway, here she is And here she is in the HAS And with lights on How she looks Thanks for looking25 points
-
Hi, everyone! It's my next model from Italeri.19 points
-
Hello all I’ve been working on several projects in the shed which have all come to completion around the same time. This one first. The kit is from the box and was a nice change from the short run style kits I usually make. Nice crisp parts that fit with the minimum of fuss. The F86D first flew on the 22nd of Dec 1949 and North American delivered around 2500 before production ended. The USAF phased out the last F-86Ds in 1961 but allied countries continued to use them until the 1980s. The aircraft incorporated two notable new concepts in interceptor/fighter design, the removal of a second crewman in favour of a sophisticated electronic Fire Control System FCS (ah well, that’s progress for you!) and the use of air-to-air missiles instead of a gun. The ‘Mighty Mouse’ FFAR missiles (Folding Fin Aircraft Rockets) were contained in a retractable tray, shown lowered on my model. The aircraft depicted is from the 86th FIS based at Youngstown in Ohio around 1955, tasked with air defence of the Midwestern United States. It’s finished with Humbrol enamel aluminium 27002 and decorated using Wolfpack decals with stencelling from Hasegawa. Minimal weathering was applied as in photos the aircraft looked very clean. Hope you like it, here’s a few pics. Thanks for looking Pete17 points
-
F-86F Sabre | HobbyBoss | 1/72 West German Air Force, 3. / JG71, 1963 I finished this on May 30th, 2022. I originally bought this kit for my Norwegian Sabre build because it was the only one that I knew for sure had the extended wing. When I got it I found that the wing's chord was way too narrow and luckily I was given the number of the Fujimi kit that I needed to do my project. This kit was destined to be a paint mule, but I needed to clear out some stash space in a hurry, so I elected to build it, thinking that maybe it wouldn't look so bad if I kept it apart from the more accurate Sabres. As I built it I found more and more wrong with it. I considered fixing things, but figured it was a waste of time if I couldn't fix the wing chord. This kit may be more accurate for the secondary scheme they provide which is the Blue Impulse aerobatic team from Japan. For the West German scheme it is very inaccurate: The West German Sabres didn't have extended wings, the German seats were Martin Bakers (I used a resin MB seat), the drop tanks are the wrong style, There should be a white stripe between the yellow on the nose and the tulip petals, there should also be a white stripe between the yellow on the tail and the tulip petals. The tulip petals are too narrow and too close together. Ugh... that's a lot! And to top it all off, the landing gears are 3 or 4 millimeters too tall, making it look somewhat stork-like. That could've been an easy fix, but I would've had to cut down the gear doors too and at that point I just didn't care anymore. Another frustration of this kit was the nose decal. I thought about painting the nose, but I've always liked the performance of HobbyBoss decals so I decided not to worry about it. Well, this is the one kit where the decals stink. The nose decal ripped twice and never conformed despite all of the solvent I put on it. I finally gave up and took it off and painted the nose instead. That was a bit of a challenge, because HB decals tend to have washed out primary colors. So the yellow was lighter than a normal insignia yellow. I painted the nose white first, and then sprayed on a highly diluted yellow, comparing often with the decal sheet, until the yellows matched. I'm not happy that the kit is so inaccurate for this subject, but I am pretty happy with how the finished turned out. Still, though, the wings look really spindly and that's a big distraction. Paints were Mr. Color C330 dark green, C333 dark gray, and C306 light gray. The only aftermarket was the resin seat. Here's a picture of the Hobby Boss wing against the Fujumi wing to show the inaccuracy of the wing chord. Well, I hope you like it. Comments, questions and constructive criticism welcome.16 points
-
Morning BMs Find below the Instrument Panel for a BF109E-4 I made some years ago now. This one is made from card (picture framing card), paper and clear plastic from old coke bottles. For the full build you can find it at this link BF109E So, this is a Paper Card build only! The Macchi C202 was a hybrid - Card and Resin The Spitfire and Hampden were 3D printed and MDF. Enjoy15 points
-
Extras:Aires resin cockpit and wheel bays,Quikboost exhausts,CMK wheels,Squadron vacuform canopies,scratchbuild radar antennas, AML resin no-dihedral tail,painted codes,Xtradecal serial numbers.Painted with Xtracolor. RAF 89 Squadron,Abu Seir Egypt 1942.14 points
-
Another one left on the bench I’ve now finished this is a revell snap fit kit Lidl were selling for £10 last December13 points
-
Finish no3 for the year is Meng's F102A Delta Dagger (case xx). Been working on this one in the back round while doing the shiny Black Widow. Built OOB as an aircraft operated by 509th FIS from Adorn RTAFB in 1969, using my usual mix of Tamiya and Mr Hobby Colour acylics. Went together fairly well but I found that the colours that Meng recommend (only Vallejo) didn't look like the photos of the aircraft so I substituted Tamiya XF11 for the dark green instead of H304 and used the H304 as the light green instead of H464. The decals went down well except the large fuselage band which needed a lot of Mirocsol to conform to the shape and ripped in one of the corners.Light weathering with Flory Dark Dirt wash. The instructions also have the main undercarriage door actuator upside down in step 8 and the canopy doesn't fit well in the closed position. Otherwise straight forward build less the masking of the canopy for the sealant tape, not had to do this before. Now this one is done I can get back to the P61A, as usual all comment welcome.12 points
-
P-51B Mustang | HobbyBoss | 1/72 Capt. John "Pappy" Medieros, 364th FS, 357th F.G.. USAAC 1944 Finished this on May 20th, 2022. I've seen a lot of terrific Arma Hobby P-51B builds lately, so its a little embarrassing to trot this one out... I bought this kit only for the gears and gear doors for my "Geronimo" project since the gears and doors disappeared a long time ago. I didn't plan on making this kit since my recent HobbyBoss experiences were really bad. When I started playing around with it, though, I found that the fit was surprisingly very good and surface detail was pretty nice. So, in an effort to make some room in the stash closet, I decided i'd whip this one together. The decal sheet I used for "Geronimo" had several different schemes on it, so I chose this one because it was the only one that was British dark green and medium sea gray. I had an extra Eduard photo etch cockpit set so I used it to dress up the otherwise spartan interior. HobbyBoss filled in the area behind the seat, and I couldn't find a way to cut it out, so I got creative with painting and making radio from scratch (Pictures follow). And this time I have a pilot @Jackson Duvalier ! -- I found him in a fold of the Monogram box when I was cleaning up after making "Geronimo". My experience with "Geronimo" was that the checkerboard decals were a hair pulling experience, so I elected to paint the checkerboard. My measurements were slightly off, so tolerance stackup resulted in one of the checks being narrower than the rest, but I'm not telling which one. I also painted the yellow stripe on the nose for the same reason. As with every HobbyBoss easy assembly kit, there were some issues. They always goof up the canopy, and this was no exception -- the scalloped windows behind the seat are too small. I probably shouldn't have painted the frame on them, and they would've looked better, but I didn't think of it until I was done. Nobody gets the wing kink right, so I won't even mention it. The intake on the bottom seems too small. The corners on the top of the tail were a little too sharp, so I rounded them. The fit was surprisingly good except for one step on the bottom part of the left cowl, but that was an easy fix. The only other major problem is the propeller: the way they cast it, it looks like the blades are cupped or bent forward. They're not. I wish I had a propeller in the spares box when I was building this because it is really distracting! I painted this with Hataka RAF dark green, medium sea gray and insignia yellow. The red was Mr. Color insignia red. The wheel wells were pretty ridiculous; they were too shallow and the detail wasn't accurate or realistic. I just filled them in with epoxy putty Here's my scratch built radio installed: My Monogram pilot: And here's when the cockpit was finished. The effort in the cockpit was worth it because you can see pretty well into the cockpit through the malcolm hood. Another ridiculous thing... HB only provided one of each style of drop tank. I rummaged around and found exactly one of the style of drop tank I wanted from a Hasagawa P-40. I had to add some details to make it match: Hope you like it! it was not the best kit, but it turned out much better than I thought it would. Comments, questions and constructive criticism welcome.12 points
-
Hi all, I have just finished FineMolds Kayaba Ka-1 1/72 kit. You can see some construction details on the following link (https://www.britmodeller.com/forums/index.php?/topic/235099874-kayaba-ka-go-finemolds/#comment-4203818). I would like to thank the following people for there invaluable information about the Kayaba autogiro: - George Eleftheriou (Arawasi); - Hideto Araki; - James Noriega (Yanks Air Museum). Best regards, Octávio _MG_1269 by ZlinXII, no Flickr _MG_1283 by ZlinXII, no Flickr _MG_1277 by ZlinXII, no Flickr _MG_1279 by ZlinXII, no Flickr _MG_1281 by ZlinXII, no Flickr12 points
-
Hi, Finally came round to taking some photo's of my completed B-17 G. Since all of the extensive interior detail is all hidden, I decided to play around with photoshop for the first time in order to make it "re appear". Still some practice needed in that area. Please find the WIP below: Hope you like it That's all, thanks for watching, Rgds, Rob11 points
-
Hello everyone here on the forum. This is my model number 2. The basis is the ACADEMY 1/35 kit. Eva, Czech Republic.10 points
-
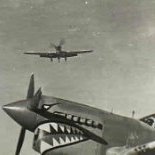
Beurling was recognized as "Canada's most famous hero of the Second World War", as "The Falcon of Malta" and the "Knight of Malta", having been credited with shooting down 27 Axis aircraft in just 14 days over the besieged Mediterranean island. In this aircraft he destroyed 5 enemy aircraft and damaged 2 more, in just 2 days. On 27.7.42, flying BR301 over Malta, destroyed 2 Mc202's, a Bf 109, with a Bf 109 damaged, and 3 miles South of Grand Harbour, a Bf 109 destroyed, and a Bf 109 damaged, and on 29.7.42 flying BR301,8 miles SW of Malta destroyed a Bf 109 . BR301 was originally finished in the standard 'Tropical land scheme' of sand, dark earth and azure blue, but was oversprayed with a thinned blue-grey (most likely USN upper surface blue-grey) while on the USS Wasp for the 'Calendar' delivery. This is the second of my triple Malta builds, a Special Hobbies Spitfire Vc 'Malta Defender'. It also required the fuselage lengthened, the tail assembly repositioned, and the wings moved forward. Build logs here: Part 1 Part 2 Painted with Tamiya acrylics in the TLS, decals applied, then oversprayed with the blue-grey, weathered with oils and pastels. Decals from the IPMS Canada Canadian Aces sheet. Hope you like, Colin10 points
-
Flat Aluminium sprayed. And then flaps fitted. Then I straightened the small actuator legs back out as they shouldn't be in danger any more. Next episode ---- Weathering. Thanks for looking, Cheers, Alistair10 points
-
Hi All, Some Porcupine Progress today! First order of business was assembling the floats, then priming and spraying them and all the other fiddly gubbins in white. That wasn't exciting enough to warrant a photo, so here's masking up for the leading edge de-icer boots: These were then gingerly sprayed with Nato Black - I carefully angled the airbrush to minimise the risk of overspray. Here's with the black completed: And with the considerable amount of masking tape carefully removed: Cr*p photo - soz! Here's the empennage: Nice & crisp - I'll take that! Now, the reason for the earlier white spraying was in order to allow the undersides of the fuselage and the floats to spray a light grey simulating the lanolin coating applied to these surfaces. I started out with a drop of yellow in the mix too, but it looked bleeding awful so I soon dispensed with that 💩. Here's the fuselage masked up and sprayed. The colour is a 60:40 mix of white and Sky Grey, as I wanted quite a subtle effect: And here's the masking removed: Maybe a bit TOO subtle, but I'm going to leave it - it actually contrasts a little more to the naked eye. Next up was a gloss coat in preparation for decals: Looking rather splendid! Once again, the temptation became too much to pop the Perseus' on *just for a look*: Once the gloss coat settled down I got the decals on, which passed without incident: The decals are Cartograph, and are absolutely gorgeous. I do also love the DSG code and serial - very aesthetically pleasing against the white! Finally, here's a shot of the sole decals on the undersides - the signalling lights! That does also show the lanolin coat a bit better. I'm now off to put a gloss coat down over the decals, and that'll probably be it for the day as we're off round to see some friends a little later. Wish me luck! Thanks for looking, Roger10 points
-
Hi all, My third completion of the year so far is the Academy F86-30 Sabre of 39 FIS/51 FIW. This Is Capt. Charles McSwain’s machine based at Suwon (K13) in 1953 and was option one on the kit’s decal sheet. I wanted to build this one as it is just so colourful, with fantastic nose art on the port side. Also I thought it would be a good way to get over my fear of natural metal finishes. I’ve never built one before and I really want to build the B47 I have in my stash so I need some practice! This was mostly built from the box, the only additions being some PE which added cockpit details and replaced the seat. I used Vallejo Metal colours (steel, Alu, white alu, dark alu and silver) for various panels on the airframe then weathered with clay washes and oils to try to replicate the duller finish visible in the colour pictures in Ospreys Front Line Colour No2. All in it was a reasonably straight forward build with only a few small fit issues. The decals however were a different story. The carrier film was a bit resistant to Sol and Set needing work to settle down nicely. The yellow tactical bands were a total fail being brittle, poor fit and refusing to conform. I ended up masking and painting the yellow and black bands instead. I also painted the checker boards on the tail as well. Other than that you can judge the results for yourself. Feel free to comment and give tips, as I said this was my first nmf so it’s not perfect and next time I would spend a bit more time on the prep as there are a few areas where I can see some faint scratches. Happy modelling.9 points
-
Hello friend, some photos of the finished Brennus9 points
-
I decided that I should dry fit the flaps just to make sure they looked ok before I went too much further. Aye that'll do. Thanks for looking, Cheers, Alistair9 points
-
Aiyee if I could paint as well as you I also would never mask anything ever again! I didn't even consider thinking like this, but that would've been sensible! is 12" a 'standard' kind of specification in RAF/FAA markings? could it be 10" perhaps? You're right, thinking a more historically (or just plain thinking in my case!) can take a huge amount of guesswork out of the situation! I thought 4mm would be an easy 'standard for me to work with, of course it wasn't until I got around to masking that I realised that I didn't actually have any 4mm masking tape and spent most of the session labouriously cutting some! I do kinda still think in imperial (somewhat of a necessity if you work in engineering in the UK), but am definitiely of the age that I'm metric at heart. But yeah a good 72nd rule will be invaluable! I'll definitely grab one, thanks, and for the pointers. It's been a good learning experience, and as you say, the more you look ahead and test fit, the happier you are! Okay so quite the masking job today, but I did get around to the EDSG, and indeed some NATO black! Pre EDSG. I ran out of paint whe mixing, so the amount in the bottle is marginal. I was 50/50 about using H333 gunze aqueous to avoid the problem, but we've gone mix this time around. Masked up for NATO black: And end of day: A little untidy in places, and I asked a little more of the EDSG than was sensible, so it suffered from the masking tape here and there. So a little touching up to do, but generally pretty chuffed with how few catastrophies unfolded. The canopy got a coat too, so I could potentially try some chipping... but even money I'll just leave it to be honest! I'm now debating whether the paint can take decals directly; whether to sand just in decal areas before, or whether to do the usual gloss cote. Anyway a good day this one! Cheers all for the help, entertainment and simply looking in. Andy9 points
-
Hi chaps, Just finished this, and it will appear in Scale Aircraft Modelling in the next issue. This is Eduard's Mk V kit converted to the F.6 version using their Mk II Overtrees kit. Decals are from the Mk V kit, plus Aeromaster's old Storms in the Sky part VI sheet. It's NX204 of 6 Sqn, based at RAF Deversoir, Egypt 1949, flown by Sqn. Ldr. Denis Crowley-Milling ( Air Marshal Sir Denis Crowley-Milling, KCB, CBE, DSO, DFC & Bar, AE to give him his full final title!). MRP and Mr Color paints on the main, and 90 gallon ferry tanks from an Airfix Sea Fury. Hope you like her! Cheers Jonners8 points
-
Messerschmitt Bf109 E1 - Wingsykit 1/48 Nice kit, no problems built early Messerschmitt. You can see WIP https://www.britmodeller.com/forums/index.php?/topic/235096960-messerschmitt-bf-109-e1-148-wingsy-k/ cya8 points
-
The front panel glued, but only at the two locating points. Don't forget to fit the cover over the sliding driver's door, if that door option is used. I wasn't happy with the fit of the spare wheel until I cut two notches in its hub like this. So now the more nerve cracking work starts, first fitting the body sides. I can't tell anyone how to do this work best I'm afraid. The parts do fit very well together, but as in my case they are painted so if using anything styrene cement like glue the paint would have to be scraped. I'm a confident CA-user so that was my choice, after some deliberation. Left side done. I'm applying CA with a pointed knife blade from the underside in strategic places slowly working front to back. Whatever you do here; dry fit several times so you know how it goes together and then rehearse what you are planning to do before you do it with glue. Not to worry about fine glue joints visible or traces of other paint, it will be touched up later. With the side permanently fitted the spare wheel was glued. Then followed the same operation for the right side. The really critical work I felt would be fitting the roof. Again I'm using CA as my choice of glue. Also as I'm going to use my 3D-printed high roofs on other versions I will build I will then have to rely on CA anyway, so I might just as well use it now. What I said before about dry fitting and rehearsing the work to be done applies here too, but twice as much. And don't forget to also check the fit of the various doors as you go on. I held the roof in the correct position concentrating on the back and front corners and applied a little CA there. With that set the front section was glued at three small spots from inside, then the sides where pushed to their correct position against the roof and small amounts of CA was applied from the inside. You can also see that I opted to fit the driver's protection bars later. I cut down the top and bottom mounting pegs on the protection bars to a minimum, then it could be pushed in place and secured with tiny amounts of CA. To finish that session off I touched up the glue joints on the underside with paint.8 points
-
More masking and paint flinging. Dark Green Yellow Zinc Chromate Nato Black I also got to work on the exhausts. And unmasked, I'm waiting for the green to dry on the flaps then I'll mask up for some aluminium. Thanks for looking, Cheers, Alistair8 points
-
Here we have the finished look of sliding side door. Final assembly can start!8 points
-
Hello, I have finished this little beauty. I haven't seen one of these built up yet except for the Airfix pubey promo pics and I can say it is a lovely well detailed kit. Being so small it's difficult to keep it clean, so I'll let Airfix off on their hairy examples. Paints are Humbrol Enamels and Alclad Chrome. Cheers 🍻 Andy.7 points
-
Evening all, I took advantage of my time away from the classroom last week and finally finished this two-and-a-bit year project: Tigger Models' (the old ID Models' vac kit) of the Short Sunderland in 1/32nd scale. This has been a really rewarding project, and despite a setback when I knocked the completed fuselage with its interior off the table, making a rather messy contact with the kitchen floor, it's been great fun and relatively straightforward - despite its size. Pic 1 by Thomas Probert, on Flickr Kits like this come as a blank canvass for the builder to work his/her magic - 'bumps in plastic' is quite apt, but the shapes are reasonably accurate if not a bit primitive (picture borrowed from Tigger's webpage): Pic 2 by Thomas Probert, on Flickr The kit provides a the correct hull shape for a MkI or MkII, but with some mods the more adventurous builder could easily convert it to a MkIII/V, etc. All panel lines and surface details need to be added and the parts are devoid of any real detail, but the plastic is lovely to work with and scribes/sands beautifully. Due to the size of the parts, home-made interior bulkheads are needed, and any visible parts of the interior need to be made from scratch: Pic 3 by Thomas Probert, on Flickr Strong wing spars are also essential to keep the structure of the model sound - thick plastic card spars were made and added: Pic 6 by Thomas Probert, on Flickr The flightdeck interior, bomb room and nose section were all made from scratch and detailed with some aftermarket seatbelts: Pic 7 by Thomas Probert, on Flickr All the aerials were made from sprue and thin wire - markings were mix of home-made masks and decals: Pic 8 by Thomas Probert, on Flickr The engines were made from spare HK Models' B-17 cylinders coupled with Revell Beaufighter parts to make a reasonable representation of the Bristol Pegasus. The early-style exhausts were made from Evergreen tube bent slowly over the toaster! Pic 10 by Thomas Probert, on Flickr Landing lights were home made from some of my daughter's diamante play/craft jewellery (for the lights) and the covers were clear acetate once again heated over the toaster. Rigging for the floats came for EasyLine and reminded me why I'll never build a biplane! Pic 11 by Thomas Probert, on Flickr The kit's transparencies were used throughout - all turret interiors were scratch built. Beaching gear was also made from scratch with a friend helping out with some 3D printed wheels: Pic 12 by Thomas Probert, on Flickr Pic 13 by Thomas Probert, on Flickr Bomb racks were again made from scratch with some rather lovely depth charges coming from Tim Perry - thanks, Tim! Pic 14 by Thomas Probert, on Flickr Pic 15 by Thomas Probert, on Flickr I used Xtracolor enamels throughout the build - 6 tins were used in total! Pic 16 by Thomas Probert, on Flickr I don't like to go too mad with weathering on my models so kept it relatively clean - however you can't build a Sunderland without the distinctive water marks on the hull: Pic 17 by Thomas Probert, on Flickr A bit of exhaust staining and some fading with post-shading completed the upper surfaces: Pic 18 by Thomas Probert, on Flickr And for some generic pictures: Pic 19 by Thomas Probert, on Flickr Pic 20 by Thomas Probert, on Flickr Pic 21 by Thomas Probert, on Flickr Pic 22 by Thomas Probert, on Flickr Pic 23 by Thomas Probert, on Flickr Pic 24 by Thomas Probert, on Flickr Pic 25 by Thomas Probert, on Flickr I'm often asked how big a 1/32nd Sunderland is. I'm sorry to inflict my ugly mug on you but you can see that it is a massive model with yours truly holding it! Pic 26 by Thomas Probert, on Flickr My model represents a Sunderland MkII of 201 Squadron during 1942 in the lovely temperate sea scheme. Painting white gives me nightmares (especially something of this size) so I took the easier option. W4001 (ZM-V) was only on strength between February to October 1942, before hitting an underwater rock and being written off, thankfully with no loss of life. Thanks for those who took an interest along the way - I'm off for a long lay down in a darkened room to contemplate the next project! Best wishes to all, Tom7 points
-
Afternoon BMs I was tasked early last year to build a Handley Page Hampden Bomber Instrument Panel for the RAF Coningsby Heritage Centre. It was the anniversary of the first aircraft to have flown out of the base when it began operations in 1941. Here's pictures of the final build: It's made from MDF (panel), clear plastic sheet (gauge glass), PLA (all gauges, switches, instruments, covers and info plates) for the 3D printed items. Nuts bolts and screws. It is scale 1:1, full size. It took approx 6 months to research, design, print, paint and assemble. The boxed Panel was unveiled by Lancaster Navigator, Arthur Spencer DFC who served at RAF Coningsby in WWII. RAF Con Facebook Page7 points
-
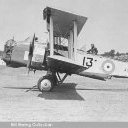
Pretty much out of the box build but with Eduard (external pe set) The kits rigging was replaced with steel wire as I couldn't get the kits rigging to work...but that was probably due to my lack off patience! A straightforward, enjoyable build. Submitted foe your perusal, cheers!7 points
-
Well, that's a wrap. RFI posted: A finishing pic. I will take my leave of you all - and my comfort zone - for a week or three as I begin work on this... HMS Wren, a V & W Class Destroyer was sunk on 26th July 1940 while protecting minesweepers off Harwich. My Grandfather, CPO Jack Beckwith was, fortunately, one of the survivors. Cheers.7 points
-
Here's my WIP for the 1/24 Heller Renault Estafette. As you may notice it's more or less together and painted as I'm juggling several projects and time is precious and so I post when I have a spare minute. After a slightly heavy handed coat of rattle can lacquer [note to self don't used that again] I rubbed it down then went through the colour coat in a couple of places and so today it has been resprayed, a mix of Gravity Olde English White and Tamiya LP Flat Earth. I'm also convertimg it to a high roof using an aftermarket resin product from... oh I'm not allowed to say! This along with the wheels and bumpers have been sprayed Halford's Italian Racing Red, about the fastest thing on a 45PS powered van 😃. However, the real thing has white bumpers but they looked a bit anaemic and so I've used artistic licence. This will be finished in another alcohol themed livery to add to my collection. I'm not sure how quickly this will progress from here as it's back onto something else this afternoon.6 points
-
Out of my comfort zone to say the least... I'm building the Showcase model and as you may ascertain from the date on this initial enquiry it's taken me a while to start it... As mentioned in the thread linked above, I'm building this one as the Royal Navy's HMS Wren, sunk by German dive bombers off Harwich on 27th July 1940. My grandfather was her Chief Stoker and fortunately survived. Over thirty of her crew did not. I have gathered the recommended additions from Shapeways; the bridge, range finder and the also the turned gun barrels. I don't intend to make any of the other changes indicated in the thread above as the scale is too small for me and I doubt I would be able to do them justice. I expect to make mistakes as I go, particularly as the order of things seems quite different for ships; please don't be shy if you see me headed down a blind alley or towards a modelling precipice. I will be grateful for the advice. It seems safe to start with the hull as I don't want to be handling it once it has some decking and structure on it. Painting is one of my favourite elements of our hobby: getting to paint on day one seems like a huge advantage in ship modelling! Cheers.6 points
-
Hello britmodellers, Here is - finally - my interpretation of Saab's J 29F Tunnan based Pilot Replica's 1/48 kit. OOB and airbrushed (PE seatbelts were part of the boxing) except I didn't add the PE cockpit mirrors (nice but I kept marring the clear parts with gloss clear to fix them) and replaced the rear wingtip lights (nothing wrong with these) with a blob of clear paint and gloss to try that method for self-made lights. I didn't use the decals for the dayglo and yellow, they were painted. The build starded as part of the Nordic II 2021 GB. I'd like to thank Rich @trickyrich for the abovesaid GB, as well as Enzo @Enzo Matrix and Mike @Mike for repeatedly moving the build thread over the very long time it took me to finish it. Also, my thanks to @pilot-replicas for the relacement parts (guess who is clumsy enough to overturn the CA bottle on a subassembly when placing nose weights....). This was a pleasurable build of a very good kit. The NMF and weathering were a different experience. Not disappointed, even rather pleased with the result, considering it was my first sludge wash to do panel lines and weathering. I learned some lessons for next time. Here is the build thread: Many sincere thanks to all those who gave support during the build, for the build itself and some dire life circumstances that interfered. I wanted something not too shiny and finally it came out with maybe a quite too scruffy look. Well, pics better tell the truth: Thanks for watching. I hope you'll like it. Have fun yourselves and a nice day (modelling or doing whatever else you enjoy). Cheers. Pat.6 points
-
Simply the BEST Flanker kit in any scale: Great Wall Hobby GWH Flanker family, with adequate detail level by easy+straightforward building experience. I simply hate those over-engineered mode kits(if you still call them model kits) because it's simply waste of my precious time and energy. Afterall the final effect is up to your skill, not the so called "details" from kit part number!! Will definitely build more of GWH Flanker kits. Have a nice weekend~6 points
-
Inspired by my visit at Hendon I decided to built five British Thunderbolts. The two Mk I kits are Academy whereas the Mk IIs are built from an Academy, a Hasegawa and a Hobby Boss Kit. I just took every Thunderbolt that I still had in my stash and made good use of the XRTADECAL Thunderbolt sheet. Some of the drop tanks were sourced from Hasegawa P-38 kits. Each of the planes was brush painted. Thunderbolt Mk I HB492 D 135 Squadron based at Chittagong, India 1944 Thunderbolt Mk I HD648 NA C 146 Squadron based at Kumbhirgram, India 1944 Thunderbolt Mk II HD196 GQ B 134 Squadron, Burma 1945 Thunderbolt Mk II HD295 NA F 146 Squadron flown by Squadron Leader Weir based at Kumbhirgram, India 1944 Thunderbolt Mk II KL339 FL O 81 Squadron based at Kemajoram, Java 1946 CI MG2538 by Martin Pelz, on Flickr CIMG2537 by Martin Pelz, on Flickr CIMG2542 by Martin Pelz, on Flickr CIMG2539 by Martin Pelz, on Flickr CIMG2562 by Martin Pelz, on Flickr CIMG2551 by Martin Pelz, on Flickr CIMG2543 by Martin Pelz, on Flickr CIMG2576 by Martin Pelz, on Flickr CIMG2546 by Martin Pelz, on Flickr6 points
-
Small up date getting close to the finish line now base has had a coat of paint over the textured water which when dry will get another coat of clear water and then to add the cotton wool bow waves And the Name it nameplates have arrived for my current builds great service again from this company. Stay Safe beefy6 points
-
First the engine/gearbox and related parts has to go into the frame. It's a very tight fit to squeeze the parts into place the way I chose to build this up, be warned, but it is possible. Next is the interior. Heller wants you to glue the dashboard to the front panel, where there really are no definite locating points, and install that unit later on. There is however a definite locating point for the heater box to the floor section and then for the dashboard to the heater box. I opted to glue the heater box, tape the front section in place, then glue the dash board to the heater box, aligning it with the windscreen. We'll see if this decision comes back to haunt me later on. The steering column finishes off this part of the interior. The hand brake lever, which is hard to see here, ends up far too close to the floor if just glued as the locating point suggests, it also looks too short. I have angled it upwards here. On the next build I will cut it apart and make it perhaps 5 mm longer and angle it a bit higher still. Interior handles installed. Chassis and floor sections joined. Everything fits together really nice. It's worth noting that the Estafette doesn't have a separate chassis frame, as the parts layout might suggest in the kit. There's a sub frame for the front suspension and engine/gearbox (that can be removed and rolled out from under the car fairly easy) and a separate rear axle cradle that are both bolted up to the body unit. It seemed easier to install some exterior parts before fitting the body panels together. The 1973-on Renault diamond I have used is a left over thin photo etched piece from my scrap box that fitted quite well. And yes, the earlier front end is so much better looking than this one. I have used some different license plates from my scrap collection (the number belong to a works Alpine A110 and I forget now exactly which one) as the way I have built and painted my version differ on several points from the restored car that is represented on the decal sheet's license plates.6 points
-
Some progress to report - more than I thought. The fuselage was cleaned up - quite a few coats of Milliput and plenty of sanding. included filling in the rear turret included inserting strips of 30 thou clear styrene where the cabin windows go, puttying in, then sanding, fine sanding, finer sanding, even finer sanding, polishing to produce a seamless transition from clear to not clear. Rather than using a spar for the wings... I've cut out the wing root internals. And cut a 'wing profile' out of 80 thou (2mm) styrene and glued that inside the wings, just outboard of the wing root. I've cut out a corresponding 'wing profile' also in 80 thou and glued that to the mating surface of the fuselage. This combo serves to provide quite a decent surface area for glueing the wings on - and helps preserve the wing form and give a decent foundation for the inevitable putty. The vacformed wings have a skin thickness of under 20 thou (0.5mm) so I needed to do something like this regardless of spar. The fuse and wings were set in my customary lego jig. Trickier than usual as the fuselage is all curvy, and the wings taper at leading and trailing edge AND have dihedral. Lego provided the flexibility to set this all up with some precision as shown below. I used Revell Contacta for glueing - my favourite for meatier joints (vs the Tamiya Extra Thin). and a different angle... This was allowed to set for a few days. Then elected to get the tail feathers on - the reason being the vacformed nacelles are a bit 'blobby' and are going to require some careful alignment - not only getting them 'square' but also making sure they're not lopsided above/below the wing. the vacform kit provides no indication of the position of the horizontal stabiliser. So with much cross-referencing to plans - I cut a 'slot' for it in the rear of the fuselage using a 12v engraving tool, a file and a sharp scalpel, not necessarily in that order. Likewise the vertical stabs have no indication of position - and no cutouts (or even markings for cutouts). So back to the plans. I decided to do what in woodworking is called a 'half-lap joint'. I didn't know that was what it was called - but google told me that's what I did. Basically a horizontal slot in the front half of the fin. And a corresponding vertical slot in the back half of the horizontal stab. Then slot them together and voila? Wish I'd taken a photo of that pre-glueing. Just google it if unclear. Anyway - it worked a treat to the point that it won't need putty (maybe just a tiny bit). For setting this up - I did some mods to the existing jig - opening out the tail end of the jig to accommodate some scaffolding for the tail. This is where lego comes into it's own - I already knew I had the main wings and fuse properly set up, which meant I just had to get the horizontal stabiliser, well, horizontal? And the vertical stabiliser vertical. Most of what you see in lego here is giving me sight lines to confirm everything is aligned. [Maverick providing advice in foreground] And another angle. Note the 'persuader' in the background - not required on this occasion. So here's what she looks like out of the jig. With the nacelles loosely taper into rough position (you can see they're a bit blobby) and another angle showing the underside. I have applied a code of Milliput to the wing root in these two shots. It's actually coming together better than I expected. Next steps: Nacelles - cut out wheel wells and detail (very fiddly job - not expecting I'll be going overboard as I don't plan to look at the underside very often) Fit nacelles and blend in Resolve the front glass - do I vacform the entire front nose section in clear - or take some shortcuts with Krystal Klear (or modern equivalent).6 points
-
6 points
-
6 points
-
6 points
-
Build thread is here:5 points
-
I've got this kit for birthday last year and wanted to do some special livery. Searching through the net, i found some interesting aggressor schemes and decided to do the "Arctic Splinter Aggressor". The kit ist the Revell / Italeri rebox - not the best F-35 but a good base. I've added some Eduard PE for the cockpit, a pilot vom PJ Production and a mix of TwoBob and kit decals. The "Ground Blur" for the base is from Coastal Kits. 22 by Falk Röllig, auf Flickr 19 by Falk Röllig, auf Flickr 20 by Falk Röllig, auf Flickr 13 by Falk Röllig, auf Flickr 15 by Falk Röllig, auf Flickr 12 by Falk Röllig, auf Flickr 21 by Falk Röllig, auf Flickr 14 by Falk Röllig, auf Flickr complete gallery: https://flic.kr/s/aHBqjzTzqR5 points
-
Eduard Mirage IICJ built from the Shachak boxing. Certainly no shake and bake kit but not as bad as I'd heard. Overall I'm happy with how it turned out. Anyway full details at my blog . There is a build thread here if interested. Onto some images5 points
-
EA-18G Growler (LS-014) 1:48 Meng via Creative Models Ltd The original Hornet design lost the Lightweight Fighter battle with what became the F-16, but after some re-designing and tweaking, it won the contract for the US Navy’s do-it-all fighter to replace the Tomcats, Corsairs et al, becoming the multi-role F/A-18 Hornet. When more capabilities were required, a further re-design that was more of a total do-over but retained the same general shape and designation, only about a third larger for reasons best left unsaid, but probably budget related, and a way to get around possible restrictions or pitfalls barring a new type. This much larger aircraft became the Super Hornet, with the two-seater designated F/A-18F, and the single-seat variant E, both of which began production in the late 90s, entering service just before the new millennium. With the withdrawal of the F-14 Tomcat in 2006 they became the primary carrier-borne fighter of the US Navy and Marines, serving alongside the original Hornet for a while, but all of the “legacy” Hornets have now left US service, although they remain on the books of some foreign operators. You can easily tell them apart without a size reference by checking the intakes. Oval = Hornet, Rectangular = Super Hornet. The enlargement of the wing area, lengthening on the fuselage and installation of more powerful GE engines changed the characteristics of the airframe markedly, giving it more speed, weapons capability and range, with even more tankage hung from the wings, and buddy-pods allowing same-type refuelling operations without having a vulnerable dedicated tanker on station. There have been various upgrades over the years, and the Super Hornet has a wide range of munitions to choose from, making it a capable all-round war-fighter that is still nowhere near the end of its service life, although trials with pilotless carrier-based aircraft are underway. In addition to the E and F variants, the G, or Growler is a heavily modified two-seater with a huge quantity of Electronic Warfare equipment carried both internally and externally on pylons. It retains some weapons for self-defence such as the AGM-88 or AIM-120C, although the stations on the wingtips are filled by a pair of ALQ-218 jamming pods carried over from the EA-6B Prowler that the Growler replaced. The Kit This is brand-new kit from Meng that has been retooled from their recent two-seat F/A-18F, but with new parts to portray the electronic warfare pods and weapons suitable for the Growler’s role. We have come to expect great things from Meng, as they have impressive technical skills and a penchant for high levels of detail in their kits. It arrives in one of their standard satin-sheened deep boxes with a painting of the aircraft on the front, and a host of goodies inside. Opening the box reveals fourteen sprues of various sizes in grey styrene plus two fuselage halves in the same plastic, a small sprue in clear, plus the canopy (all wrapped in protective self-cling plastic), three styles of small poly-caps, a Ziplok bag containing ten flat-headed pins, a small sheet of Photo-Etch (PE) metal, two sheets of decals, a clear plastic sheet with pre-cut kabuki tape masks, the instruction booklet with colour profiles in the rear, three sheets of card with information about the EA-18G in four languages, and a similarly multi-lingual competition flyer to win cash prizes, apparently. Everything is separately bagged with mildly annoying staples closing some of them up, and once you have found your way past these you see the high quality of the parts within. Detail is right up there with the best, and has finely engraved panel lines, with raised detail where appropriate and slide-moulding used to improve quality further without creating more parts that make some people panic unduly. Construction begins with the cockpit, with the twin-seat tub having the sidewalls installed next to the detailed side consoles, a large control column part in the front and a smaller one in the rear, chunky HOTAS-style throttles, and a pair of well-appointed instrument panels, which have a number of individual decals supplied for both it and the side consoles, the numbers for which are called out in scrap diagrams. The rudder pedals are moulded into the floor and could do with some more detail if you intend to shine a light in there, and you can see them in the shadows of the detail photos above. The nose gear bay is made up from a roof, shallow sides, front bulkhead and some thick trunking/hoses snaking through the bay. Those two subassemblies are mated then trapped between the forward lower fuselage halves, with the top half moulded-into the rest of the new upper fuselage, to be brought together later. In the meantime, the upper fuselage is prepared by fitting the wing lowers with a choice of folded or straight wing-hinge supports, and ECS ram air exhaust inserts of the multi-tubular type that have some impressive moulding. The F-18 runs two GE F414 turbofans, with long intakes to keep the rapidly rotating fans away from the prying eyes of enemy radars. The trunking is made from two halves, and has a few ejector-pin marks inside, but cleaning those up before joining the halves should make the task easier. The rear is covered by a representation of the engine front, then the completed trunks are attached to the appropriate main gear bay boxes, which are made from three parts, and have more highly impressive detail moulded-in, as shown above. The two subassemblies are inserted into the lower fuselage from within, and splitter plates are attached to the sides of the fuselage on two slots, with some fine detail moulded-in. The rectangular sides of the intake trunking and lower fuselage sides fit around the assembly, then a pair of pivots are slotted into the rear fuselage with poly-caps allowing them to rotate without suffering from modeller’s droop. The lower nose clips into the lower fuselage, then the upper fuselage is lowered over it, mating snugly even without glue from a quick test fit I made. She’s looking like an aircraft now, but the cockpit is unfinished and she’s got no nose. The coaming is first, and has the HUD sides added and a circular projector lens in the bottom. The two clear panels are inserted between the supports one over the other, with a scrap diagram showing the correct position, then it can be glued in place and the windscreen fixed over the top. The coaming between the pilots is also inserted, and a shortened turtle-deck behind the rear seat is made up from two detailed parts, followed by the nose cone and insert with the muzzle cover for the M61A2 Vulcan cannon at the top, joined to the fuselage with a stepped ridge helping to improve fit. The Hornet’s upper wings are moulded into the fuselage, but the slats and flaps are separate paired parts, the slats capable of being modelled deployed, or by cutting off the nubs in the leading edge, retracted. The flaps can also be depicted cleaned-up with one set of straight actuator fairings, or fully deployed by using a separate cranked set, with the gap between the sections filled by the upper surface inserts. If you chose the unfolded wing joint earlier, it’s simply a matter of applying the top and bottom sections to the link, adding the spacer, then fitting the appropriate flap actuator fairings for the flaps, and the slats in extended or retracted positions, again by removing the nubs on the leading edge. The folded wingtips are made up with retracted flaps and slats plus straight fairings before they are inserted into the L-shaped fold with a different set of spacers. The two vertical fins have a T-shaped pivot point inserted under a small separate section of the rudder, then the completed rudder is trapped between the two halves of the fin without glue so it can pivot later. A nav light is inserted into the outer side, and the other fin is a near mirror image. The fins fit into slots in the rear fuselage, and the elevators push into the poly-caps hidden within the fuselage sides later on. The twin exhausts start with a cylinder that has the rear of the engine moulded-in, a PE afterburner ring, then a two-part length of trunking with a corrugated interior. A choice of exhaust petal types finishes off the rear, one set having straight petals, the other with cranked rear sections, and after painting they’re inserted into the two apertures in the rear of the fuselage. The rugged nose gear of the Super Hornet has to be sturdy to withstand repeated carrier launches followed by spirited arrestor-hook landings, and you have a choice of setting the catapult bar in the up position for parked, or down for an aircraft ready to launch. A landing light and a number of stencil placards are applied to the leg after painting it white, and the twin wheels fit either side of the transverse axle. Additional parts are fitted in and around the nose gear bay when inserting the gear leg, then gear bay doors are fixed around the bay, causing much perspiration when you have to add the red edges to each one. The main gear legs also have a number of placards added after painting, and the wheels are made up from two parts each. These too have additional parts added during fitting into the bays, closely followed by the red-rimmed bay doors and their actuators. Just in case you wanted to catch an arrestor wire, the hook nestles between the two exhaust fairings on a long lug. The instructions have you making up the munitions and pods for a break before completing the model, but we’ll cover that later. The ejection seat is made up from a series of very well detailed parts, and although it doesn’t have seatbelts for absent pilots, there are stencils for the headbox sides and rear. They are installed in the cockpit, optionally along with the individually posed pilot figures that come on the sprues, who have separate arms, a wrap-around flotation vest and separate helmeted head with O2 hose. The long canopy part is crystal clear with an external seam over the top that you can either leave there (it’s really fine), or sand flush and polish back to clarity. There is a frame insert to fit within the canopy, and a choice of two canopy openers, depending on whether you wish to pose the canopy open or closed. A pair of blade antennae in the centre of spine finishes off the top of your model. Under the port Leading Edge Root Extension (LERX), the integral crew ladder is stored (on the real thing), and it can be posed open by adding the ladder with its two supports and the open door to the bay, or if you want to pose it closed, put the long narrow part over the shallow recess to represent one edge of the ladder. Back to the weapons and pods. This is where the rest of the pins and tiny poly-caps come into play, allowing you to switch and change your load-out whenever you want on some of the pylons. Most of the pylon types have the pins trapped between them, four of type-A, two of type-B, and one of type-C. Type-B also has an adapter rail fitted instead of pins, and these fit on the outer wing stations, while the four identical pylons fit on the two inner stations per wing, and the solitary Type-C attaches to the centreline. The wingtip rails are filled with identical ALQ-218 jamming pods, which are made up from six parts each, and are handed for each wingtip. For self-defence there are two AIM-120Cs are each moulded complete, with a slim adapter rail, and another pair of AGM-88s with chunkier rail adapter and separate perpendicular fins for extra detail. Scrap diagrams show the correct location of the missiles on their rails, pods and he two external fuel tanks, which also have polycaps inside them. The AIM-120Cs have anti-sway braces to locate them on their semi-conformal mounts above the main gear bay apertures. It’s always best to look at some real-world photos for examples for demonstrable and practical load-outs, but it’s entirely up to you. Markings There are three decal options on the sheets, and you also get a set of canopy masks that are pre-cut from kabuki tape. From the box you can build one of the following: VAQ-132 ‘Scorpions’ Electronic Attack Sqn., Operation Odyssey Dawn, 2011 VAQ-132 ‘Scorpions’ Electronic Attack Sqn., Misawa Air Base, 2014 VAQ-139 ‘Cougars’ Electronic Attack Sqn., USS Carl Vinson, 2014 Decals are by Cartograf, which is a guarantee of good registration, sharpness and colour density, with a thin gloss carrier film cut close to the printed areas. The main sheet includes all the markings for the airframe, while the smaller sheet contains the stencils for the pylons and the weapons, of which there are many on a modern jet. The colours are called out in Meng/AK codes, as well as Gunze’s recent water-based Acrysion paints, which don’t seem to be prominently available in the UK. The masks on the clear sheet have been pre-weeded so you only get the masks, without all the surrounding tape. There are masks for all the wheels and the landing light, and frame-hugging masks for the canopy and windscreen. You are advised to fill in the highly curved centres of the canopy and screen with liquid mask or small sections of tape cut to length with some angles cut where necessary. Conclusion Meng have brought their own particular set of skills to the party with both the E and F variants, and now an EA-18G Growler, which I’ve been waiting for the most. They have produced a highly detailed model of this two-seat electronic warfare variant, with some excellent moulding and markings to create a model that is excellent out of the box, without the necessity of aftermarket. Extremely highly recommended. Review sample courtesy of5 points
-
To be honest, and why not be, the Hornet I built in the STGB last winter is the only Finnish jet I have finished. Actually it's the only jet I have finished! There are six F-16:s, an F-15 and two Hawks still on my shelf of shame Everything else has a prop or props! g a t h e r i n g c o u r a g e t o c o n f e s s: I have never, not even as a kid, built a Draken... A Matchbox Saab Viggen and a Tunnan, but not the prettiest Saab of them all, ever. So come on my friends, let's correct my mistake with making this Draken STGB happen. V-P5 points
-
This is the bulkhead between cockpit and rear area. In some reference pics I've seen this has electrical boxes and wires visible, and since this is visible through the rear window, it seemed worth adding some more details. The big silver W brace is entire invisible once the dashboard is fitted. Another example of this kit having an excess of detail in some places, balanced with none at all elsewhere. The scaffolding required quite a bit of clamping to hold it together whilst drying. The white areas highlighted in green are what I had to grind off to make the body sit correctly. Final engine bay. I added a couple of extra details - the hose at the bottom being one of them. I drilled two holes in the roof - through the roof and the transparent part, to hold the aerials, which are made from one U shaped piece of wire, led in place with electrical tape on the inside. Nice big CORVETTE Decal. The box is holding the rear wing in place whilst it dries. This kit is done now. RFI photos to follow later.5 points
-
All decals went on without problems. They are very thin and easy to wrinkle, but carefully applied to a wetted surface they could be well positioned and settled down. I used a little Microsol softener to help them confirm around edges nicely. I'm happy with this. Next was the touching up around the sliding side door where I cut up the main decal. With a little mixing I had some reasonably matching paint, certainly better in real life than this picture suggest. Then I tend to find that for small work like this (most of it tucks in under the door) you don't need to be super perfect in matching.5 points
-
Thanks Simon, I decided that I'd better remove the digit and get some of the ancillaries covered with paint as I'm heading out for the pictures tonight. So various bits were clipped off, cleaned up , primed and partly or fully painted. I think that will be it for today, Thanks for looking, Cheers, Alistair5 points
-
Hi fellow modelers, time to update the mighty Mriya project. It's been a while since I did some scale modelling, and now the Mriya is suddenly world wide known since she's lost due to the war I decided to honour her and finish this project. Also, the World Model Expo 2022 in Veldhoven (the same expo as where I was with my Anigrand C-5 Galaxy) is this year in the Netherlands from 1-3rd of July, and I want to show the Mriya there. So, hold on to your ..., grab some popcorn and enjoy this last episode! April 13th. I bought the only aftermarket set for this kit, a set of resin wheels: Nice detailed, crisp and high quality resin wheels. Much better than the original plastic 'discs'. So I started to remove all the wheels and parts from the sprues, sand them and I drilled holes to fit the gear axles: A metallic spray for the rims: A basic black coat for the tires: .. and ready for later weathering and assembly: April 16th. Next project: the everlasting problem of the transparent window part on the nose section. Tried several methods, nothing was really satisfying.. Now it's time for the final decision. I'm going to use the spare transparent part, and fit that without adjustments on to the nose section. That's a radical decision, as I need to adjust the nose section for fitting. I drilled little holes to remove some material: After that, some sanding and test fitting, and sanding again.. A test fit with the cockpit section in the nose: ..and it fits. So I glued the part to the nose section, filled the gaps and sanded smooth. I made a big mistake later, you will see. April 20th. Colors of the Antonov. I tried to find the correct color for the underside of the Mriya, it looks like blue or grey. Or bluegrey. Whatever. I've seen models with bright blue undersides, I just don't think that's correct. So I first thought of Humbrol 127: No, no. not correct. The kit manual says this: It says Ghost Grey... maybe this color? As I need to spray a fuselage length of 1.17m, I'm thinking in Tamiya spray colors. So maybe this one: Dark Ghost Grey.. Too dark. During my Internet search, I thought: the only one who can tell me for sure what the correct color is, is Mr. Dmitry Antonov, the captain of the Mriya. He has a daily vlog on YouTube about the (former) Mriya, so after a complicated search I found his personal e-mail an I mailed him with the color question. And what do you know... he answered! And 2 days later anothe mail: LOL!! But I found out that the DuPont color code is a color code from Chevrolet cars in the eighties.. And after translation the color of the underside says dark grey, so not exact what I was looking for. But he answered, a nice addition to this project! I searched again and finally decided to use this color: Tamiya AS-26 Light Ghost Grey. I'm happy with it, otherwise I can never make a decision and time is running out. April 21st. I did a test fit fuselage-wings. What a difference in height, and what a gap.... This is not done. After some thinking I decided to make a correction from Plasticard 1mm sheet which will be placed onto the fuselage. Some experimenting with cut-outs for the bulbs on the fuselage: ..and attached it to the fuselage with superglue, added filler and let dry. April 27th. The transparent window part was scratched and not shiny enough, so I decided to give it a layer of clear gloss. The horror.... After 2 minutes it looked like this: Nooooo!!! Panic!! So after contacting some fellow modelers for hints and tips how to solve this problem, nothing worked by the way, I decided to give it one last try with different nail files. The last file was a polishing file, and luckily enough the windows became transparent again.. After a final treatment with soft cloth everything looked ok again. Important lesson learned for me: never treat clear parts with clear lacquer without testing! As I was working on the window part, I kept thinking about my former idea of an open side window with the Ukrainian flag hanging out.. Very actual at this moment, so I decided to give it a try. First removing the little side window with a fine drill: Looks good, later comes the finetuning. April 30th. Test fit of the fuselage-wing gap with the added sheet, after sanding: The upper fuselage still needed 3 more 'bulbs' to be attached: At first glance still a visible seam, but in the end result you will see that after a few layers of lacquer it will become seamless. May 2nd. The gear construction. That never ending multiple parts headache project. The wheel bays are Russian Green, so I started with that: While the paint was drying I thought about how to fabricate a 1:72 scale Ukrainian flag. May I introduce a friend of mine, Perry, who is a master modeler of WWII 1:35 scale dioramas. Nothing impossible for him, so he said he can fix a waving flag for me. Great!! Later that evening he sent me this picture of this self made basic flag: You will see the perfect end result later! May 6th. Ailerons and leading edges. The Mighty Mriya has quite an area of ailerons and leading edges, so I decided to spray these metallic areas first and tape them before the master white paintjob of this behemoth. I started with the tail first: Nice job, I will do the the wing areas later. May 7th. Project open side window. The side windows slide backwards into the cockpit, so I made a new side window from transparent Plasticard: ..with an extra strip for attachment on the inner side of the cockpit: I'm satisfied! May 8th. The big day!! Why? Time to attach the nose to the fuselage.. forever. This means: -the cockpit will be out of reach -no more adding nose weight possible -the nose gear is out of reach for adjustments -everything must be tightly secured in the complete nose section. So did a checklist twice, and then the big moment.. Tight fit, another milestone in this project reached. May 9th. Time to sand and fill the gaps in the nose-fuselage part. Sanding, filling, sanding, filling again, etc. After that more Russian Green paint on more gear parts, and weathering of the gear: ..and weathering the resin wheels. Meanwhile i made a copy of the decal sheets, because I want to test fit the correct position of the curved stripe on the fuselage as I have no reference points. This way I can experiment with positioning the decals before I go 'live'. The stripe on each side consists of 6 parts(!), so a challenge to make a perfectly curved single stripe... And Perry sends me a picture of the end result of the Ukrainian flag: Great work Perry, thanks!! This will look great. May 11th. Back to the landing gear. The gear housing consists of several hatches for each gear. So if you Google for pictures, you will see that each hatch has its own position. So not a straight line, as the 1 kit part shows.. So I cut every hatch loose and repositioned them to each other, now it looks more realistic: Looks great in the end result, you will see. Now a test fit of the gear construction in the fuselage: Everything still fits. May 13th. Adding wing navigation lights. I used some Bare Metal Foil for the lighting housings: ..and attached the transparent parts: Afterwards filled and sanded the gaps. Back to the gear. Time to attach the resin wheels to the gear... but, this needs to be done in 1 straight line! Problem is that all the resin wheels were like 'dangling' to the axles due to their weight and ill fit. So... time to think about how to solve this. I took some sanding paper (anti-slip), took aluminum 90' corner profiles as a guiding rail, and added each wheel in this construction: Next I added a droplet of superglue with a fine steel wire end to each axle-wheel connection: Not a nice job, but the end result is a straight and level row of gear and wheels! May 14th. Another big day! Because the white paint job has to be done. We are talking about a 1.22m x 1.17m big area of white fuselage, tail and wings. So I emptied the garden shed and turned it into a spray-booth (with permission of my wife..) for a few days. Nice room, dry and clean. Ideal for spraying big kit parts. I started with the tail: ..later on the fuselage.. ..and thanks to the nice temperature and weather it dried perfectly. Took everything inside for an overnight dry. May 15th. Again a big day! Why? Time to glue the tail to the fuselage. This means: -From no on very careful with turning and twisting the fuselage -the fuselage is more difficult to handle during the decal process. But it needs to be done, so took the industrial superglue and added the tail to the fuselage: Adding filler to the seams and sanding : The engines need to be prepared for spraying, so I made covers for the exhaust areas from Plasticard: So the engines can now be sprayed gloss white after primer: During drying I prepared the fuselage for spraying: Enough for today, I'm satisfied. May 16th. Today the wings get their gloss white jacket. During drying I tested the gear with the resin wheels. Looks good! The engines are sprayed gloss white and ready for further painting and decals. Never noticed how huge this engines must be in real life, compared to this picture with the 1:72 figure.. May 17th. Removing the covers and masking tape from the sprayed engines. May 20th. Adding the gear hatches to the gear construction: I think it's a great improvement those 'irregular' placed hatches, looks more realistic. May 21st. Sprayed gun metal plates above the exhausts and sprayed bare metal engine intakes on the engines: And finally the wings got their gloss aluminum ailerons: ..and the red wingtips. Much improvement these days, feels good and the Mighty Mriya starts to look better and better. May 22nd. I changed my hobby room into a decal-workspace. I made a table with a soft foam mat to protect the paintwork during the decal process. (and yes I know, my tv is dying): In 2015 I made a 1:72 scale foam An-225 from which I still had my self made full scale drawings. I used this drawings to determine and pre-position the copied stripe decals onto the fuselage: I added the copied stripe decals on the fuselage: As the curved stripe decals consists of 6 separate parts, it's nice to exercise with these copies so I know what to expect later. I also did this because this way I can determine the exact outer line of the grey area I need to spray. I don't want to risk spraying too high or too low with grey, that will be hard to correct with the fragile decals already placed on the fuselage.. The manual gives little info on a very little picture about placing the stripe: I taped the copied decal with little pieces of masking tape onto the fuselage: Don't forget the tail; I need to cut that stripe decal for the in- and outwards positioned rudders: Now the other side: Okay, so now the part where to determine the grey spray line. I placed masking tape half under the copied decal and traced the underside-line of the decal on the tape, and cut that line and removed the tape. Now I have the exact position of the stripe decal in tape on the fuselage: Now I only have to wrap the rest of the fuselage in plastic and the underside is ready for it's coat of grey! May 24th. Back to the shed / spray booth for the coat of ghost grey. Finally another color, I already sprayed about 5 cans of white.. Tail heavily protected in plastic bags: ..and we have a grey underside of the fuselage. May 25th. A big day; decal day! Let's start with the most difficult decal, the stripe part on the nose with all it's curves. It took me about 20 minutes to get this decal in the correct position, and during this time it wrinkled, cracked, I needed to cut it, repositioning with added water, added lots of Microsol setting solution etc. A nightmare but I succeeded! Still some little wrinkles but it's fine. Now the rest of the stripes. 5 pieces, and this was quite easy on a flat side of the fuselage: After that the tail decals: Ok, enough for today. May 26th. Today I applied the other decals on the fuselage: After drying I applied a layer of clear lacquer for protection and sealing the decals: May 27th. Time to do the other side of the fuselage, same exercise: Don't forget the underside: May 28th. The other side get's its layer of clear lacquer: ...and after drying I took the Mriya inside for a complete test fit: Looks great! I applied the stripe decals on the engines: And now the boring part. There is a lot of data stenciling decals on the wings and engines. A lot!! For some decals the manual says '45 times' or '33 times'... This is the data decal sheet: So it begins... Starting with engine data decals: May 29th. Now the data decals on both wings. I think about 250+ decals for each wing. And finally the decal sheet is almost empty. Took me 2 days. May 31st. Test fit of the waving Ukrainian flag: Nice, just how I thought it to be! Thanks Perry, this is a great addition and it's in honor of the Mriya. June 1st. Time for constructing the nosewheels. And for the first time Mriya rests on its complete gear! Okay. (drumroll). The moment of moments. It's time to test the complete Mriya on it's gear... @Flankerman: This is the moment of truth.. will it stand without added supports on it's own wheels?? (drumroll intensifies) Yessss!!!! This was my most feared moment. But my calculated nose weight and balance seem to be ok! Yess!! Very satisfied. June 5th. I made a wooden transport case for the Antonov, so it is safely protected during transport to the expo. It only needs foam on the inside to secure the fuselage + wings, this will be made later. I glued the flag in the hands of the co-pilot: I know, the outside of the window is not perfect but the lacquer is very hard so I don't want to risk to do something stupid during repair or removal. Glued the nosewheel in left steering position, as the tail rudders are also turned to the left. And added the extended nosewheel lights. June 7th. The finishing touch: weathering. As this is a huge plane, Perry helped me with some parts of the plane. June 8th. Did the rest of the plane myself the last evening. Ladies and gentlemen. After 2 years of hard labor. sweating. thinking. Inventing. sanding. keeping the faith. and crying. May I present to you: The mighty Antonov An-225 Mriya, how she was. And still is in our mind. In het last worn jacket. The pride of Ukraine! And the inevitable Piper Cub and figure for scale: And for the ultimate scale comparison: Me holding the Mriya model.. So, this is it. I hope you enjoyed this sometimes dull, sometimes exciting project. I would like to thank all the great fellow modelers on this forum for your kind messages, support and the tips and tricks. Much appreciated, thank you! For those interested: This model will participate in the WME2022 contest in Veldhoven, The Netherlands from July 1-3.5 points


This leaderboard is set to London/GMT+01:00