
Leaderboard


Popular Content
Showing content with the highest reputation on 02/06/22 in all areas
-
Tu-128 'Fiddler' Kit: Trumpeter Tu-128M Fiddler (#01687) Scale: 1/72 Paints: Vallejo Model Air, Metal Color & Model Color Aftermarket: Eduard PE- parts, CMK figure, DIY base with Noch & Vallejo basing materials Weathering: Oil paints, Flory Models, Vallejo, Tamiya & Ammo Mig Trumpeters huge Tu-128 'Fiddler' had a little accident - it didn't like the enamel thinner I used to remove Tamiya panel liner. I've found out that Ammo Mig enamel thinner is much more gentle, Revell makes the paint surface all flat and has a risk of removing paint. And of course I picked up the wrong bottle. But it was a happy accident as it goes - I decided not to waste all the hard work I've made with the model - I had a moment of inspiration to go all in with the weathering and tell a s tory of a neglected museum bird. The guy with the bucket and cloth seems to be woefully unprepared for the cleaning task at hand! Tu-128, the largest and heaviest fighter ever in service was purpose built by Soviets to defend the 5000km long northern air front. Huge size meant it could fit huge fuel tanks which led to over 3 hour endurance and 1500km range. Armed with four heavy R-4 missiles, usually a mix of radar guided and IR versions. Tu-128 was a two seater plane, radar operator sitting in the back. Despite being a 'fighter' - or interceptor to be more precise - 'Fiddler' flew like a bomber. It was certainly not meant for manouvering but to engage targets at a distance and turn away. Maximum G-limit while loaded with missiles was only 2.5G's. Tu-128 came operational in the late 60's and remained in service until 1990. I'm not quite sure where one draws a line between a display base and a diorama - but I hope this is in the right place. If not, moderators feel free to pop this in the right place Anyway, here's the model with the base - hope you like it!54 points
-
Sorry for not posting for a loooong time! Had to post this beastie up though! My first flight in a Chipmunk was in WB627 at 5AEF in Cambridge, a must do build! Eduard Space panels and belts, MRP paints.34 points
-
Hi all! Here's my completed Hunter. I used Eduard's PE and masks and made intake/exhaust plugs out of sheet plastic and masking tape. Finished with MRP paint. These jets have a glossy finish and seem to be really clean. Thanks for looking! Rich24 points
-
Hi all, I post some pics of one of my Covid builds: it is one of the options in a limited release by Eduard ' Jabo', featuring Fw190 A5 operating in the Jabo role over England in 1942/43. It is a FW19045/U8 who landed by error on Manston airport during a night raid in July 43. All the lower surfaces and parts of the sides were overpainted in black to adapt to their night raider use. Here are a few pictures of the completed kit. The paints are Gunze. I tried to replicate some chipping of the black overpainting showing the RLM 76 underneath, using Mig Ammo chipping fluid. I used several techniques for the final weathering: oil paints, chipping with foam, CMK and Mig pigments, and Tamiya weathering sets to replicate the exhaust stains. The small building in the background was done with blue (Forex) foam, painfully carved to represent the brick walls. Have a nice day, Christian.19 points
-
Hi Folks, Well, finally finished the Spitfire and had a lovely time doing so. See pictures below. Thanks to all involved in giving sound instruction and advice, particularly, @Troy Smith with all his accurate information and @Ngantek with his marvellous encouragement, a true wordsmith 👍19 points
-
Hey everyone, here's a dual build of recently finished Scooters that I have built for my friends who used to fly these jets back in the 80s out of Cubi Point, Philippines in order to provide dissimilar air combat training to carrier air wing fighter jets passing by aboard US aircraft carrier. One of them, Lt. Pagenkopf, almost paid the highest price when he was forced to eject from his Skyhawk at high speed, which resulted in a severe legs injury. Facing almost certain amputation, he was rushed to naval hospital in San Diego, where he spent another year recovering from his wounds. His naval aviator career was over, but he learned to walk again, picked up on medical studies and became a renowned orthopedic trauma surgeon which enabled him to save hundreds of lives in Afghanistan and Iraq. The build itself consists of the classic Hasegawa kit where I removed the leading edge step, which doesn't exist on the real airplane. I have added Aires seats, Eduard wheels and instrument panels. Mr. Paint provided all the paint, most of the markings were done via custom masks from Miryoku and Eduard retail. I have used Furball and AOA decals for small stencils too. Refuelling probe by Master was just a cherry on top along with the oils and pencils for wear and tear. Lt. Eric “Pagan” Pagenkopf, Modex 04, BuNo 150056 Lt. Bill “Sly” Seidel, Modex 10, BuNo 15109617 points
-
This is a superb kit with decent engraved detail, large collection decal and plenty of payload. I just did some pinning works for change the weapons, painted with acrylic paint. Here is my work: Payload from left to right: sky shadow ECM pod、 2250 Ltr. tank、 AIM-9L、laser guided bomb、BOZ101 EC pod. Replaced laser guided bomb with ALARM. 1500 Ltr. tank and 1000 lb bomb. Maximum sweep: Thanks for watching!16 points
-
Hello everyone, This is my take on Border Model's Crusader Mk. III tank. Mark III was the first version of Crusader (and maybe even the first version of cruiser tanks) that crews actually liked. Beside the 6 pdr as a great improvement over 2 pdr mounted on all previous tanks, most of the reliability issues that plagued previous cruiser tanks were finally sorted out. However, it came too little to late, and after brief use at the late stages in NA theater (El Alamein and after and Operation Torch) it was retired and used only as specialized vehicles. This model should represent 3rd County of London Yeomanry tank, as seen on a reference photos from the beginning of 1943. 3rd CLY arrived in North Africa in September 1941. They were taking part in Operation Crusader, Gazala Battles and battle of Alam Halfa, where they fought as a composite regiment together with 4th CLY. They suffered great casualties during these engagements and did not take part in the Battle of Alamein, as they were out of the line, retraining and re-fitting, near Cairo. The training continued until early 1943, and during this time they received a number of 6 pdr Crusader and Sherman tanks. First Crusader Mk. III tanks were received on January 19th and soon participated in trials. They were compared with the Sherman III's that the unit received at the same time. Here are some comments about it's performance from the was diaries: The 6pdr was fired by 50 all ranks and proved very accurate at ranges from 1500 yards. Little mechanical trouble was experienced with Crusader 6pdr tanks - possibly the new Crusaders are more reliable. C Squadron went to ranges ref Cairo Black Hill 610809 and carried out an AP shoot from 6pdr Crusaders. The 6pdr was found to be extremely accurate weapon but difficulty was experienced in observation of fire owing to the flash and blast of the gun. However, at the end, Sherman Mk. III was selected, and all received Crusaders were sent away to be replaced by Shermans. Not sure where these Crusaders ended up, probably as replacements in other units. After North Africa, 3rd CLY was sent to Sicily, where they landed on July 10th July as part of 4th Armoured Brigade. It's not certain how these tanks were painted. However, high contrast on black and white photos suggests that it was probably Desert Pink ZI/Dark Olive Green PFI combination, which was the than actual scheme for newly issued tanks, so I decided to go with that one. Model was painted with MRP lacquers and some Gunze and Vallejo for detail painting, and weathered with MIG's nature effects and VMS pigments. Model was mostly built OOB. The only additions are tow cables (not sure why Border Model haven't included them?), aerials, and some wiring. Decals were also changed with Archer Fine Transfers decals, because Border's squadron markings provided are not correct. In General, Border Model is a great, well balanced kit. The only issues worth mentioning are missing tow cables, wrong markings and tracks. Tracks actually look quite nice, except awful pin marks. Also, once assembled, they are very fragile, I managed to break them few times. And here are the reference photos. There are few more shots online of the same tank. Thanks for looking, and thanks for feedback! Cheers, Nenad14 points
-
Some of you may be following my 1/72 Glider thread, which is currently stalled awaiting some additional glider mojo to get onto the next build, a couple of Grunau Baby’s. In parallel with that build, I have also been working on a several other 1/72 aircraft (no WIP for these). One of those builds was this one....... So here is my rendition of the RS Models F-51H. First, the box art which is pretty striking and a scheme I seriously considered doing, but in the end opted for the all red (topside) aircraft. And the rear shows the options available from this kit, all decals supplied within. The decals themselves were superb quality. In my experience, RS kits are quite a challenge to build but, IMHO they carry very subtle surface detail and seem to compare very well in accuracy and shape, when finally knocked into shape......... oh and I do quite like them! This one was no less of a challenge, and certainly very basic when compared with the recent Arma Hobby P-51’s built on here by both @Procopius and @Cookenbacher. Those builds have inspired me to build a further mustang, from an Arma Hobby kit of course! So there you are Edward and Cookie, I've actually finished it! As there was no WIP, here are a few shots in progress for those who like to see bare plastic......... And just to prove there is something inside the cockpit. A bit close and cruel this one! After two coats of Tamiya LP-7 Red I used quite a cocktail of paints, having now got over my dread of mixing different types of acrylics, lacquers and enamels. Care and consideration in application is key of course, but mixing paint types does work if you are careful! The whole model received a primer coat of Mig Ammo One Shot grey primer. This paint goes on beautifully straight from the bottle, airbrushed of course. The undersides were painted with AK Xtreme Metal Aluminium, and the topsides are Tamiya Lacquer LP-7 Pure Red. The grey undercoat helped to slightly dull the brightness of the red, which is what I was after. The wingtip black bands were masked and airbrushed using Tamiya semi-gloss black Acrylic. MRP’s gloss varnish was applied prior to decals, and after decals, followed by some very light oil washes. A final coat of MRP’s semi-gloss varnish sealed everything in. These MRP varnishes have become one of my favourite solutions for finishing coats. I tried to keep weathering very subtle mostly using very light panel washes in slightly darker red brown on top, and grey undersides, as this aircraft was kept pristine for the 1954 gunnery meet. Learning my paint and weathering skills through watching Giorgio's @giemme builds! So, to the completed model. Shots are from my phone and the red seems to have come out very intense. In normal daylight it is slightly less so, and all of the very fine surface detail does indeed show up well! Some extra shots as @Winenut had quite rightly pointed out the panel washes were hard to see in the pictures. I think at certain distances, my mobile gets blinded by the red! And finally a couple of shots with her older stablemates. Comments/questions welcome Thanks for looking and watch out for a QF-86E coming soon in RFI! Terry14 points
-
Next Dora Wings project is 1/48th (and later in 1/72nd) de Havilland Canada DHC-2/L-20A/U-6A Beaver kits. 👍 At last a post-WWII aircraft kit from Dora Wings ! Don't forget: https://www.caracalmodels.com/cd48107.html Source: https://www.facebook.com/dorawingsofficial/posts/pfbid01U3HoSAWtXQKgh5fMyoPn9HmSZVSBJwGSEjAKBJMSbiNbuhLGLQXD2mPA6BJTGkYl V.P.13 points
-
I managed to get the cowlings on with some wiggling: Worth the practice; the rod thingies at the front foul on the inside of the cowling so, once on, they won't come off again. You can see one was springy and had to be taped. It's not clear where the contact points are so I blobbed some TET around the back of the cowlings AND inside the front. Fingers crossed. To avoid this on Jim's kit I cleaned up the ends these bits: There's PE to go on (ggnnnghhh): …including some tiny bits. #50 appear to be name plates and there's a spare. Uh oh: Rolled with the mandrel: …then, with a drop of Gator's Thin on the casing, placed on with a pick up pencil. Of course I dropped one. The HT cables have been painted ready for the big struggle: Grey cables from the IPMS Netherlands walk around. Once that's dry I'll gird my loins and try to fix them on. Looking forward to it. Not.12 points
-
One of the nicest kits I've ever built. The detail is great and the fit the same. Lots of options and spares in the box, ammo included.10 points
-
Hello all, I wanted to share my most recent project, Meng's 1/48 EA-18G Growler. This is my first big project in a while just due to uni taking up much of my time, but I was able to dive deep into this kit and I hope it shows. I have always thought the Super Hornet family looks stunning in the air, especially the Growler when fully loaded, so I have modeled it as such. The kit goes together very nicely with great surface detailing and construction, there were a few gaps to fill such as under the LEX and in the rear by the elevators but other than that very nice kit. I tried to emulate some the grime that deployed Super Hornets get when out at sea, in order to achieve this I painted the model in these following steps: Black basing, mottling with primary colors, primary colors, dark rings of grime using liquid masks, "touchups" in a lighter shade, "touchups" in a darker shade, salt weathering with a slightly lighter base coat, oil wash for grey navy jets, and finally subtle oil painting streaks. I think all these steps help to break up the grey scheme and provide a lot of depth and detail. The model is supported by a 1/4" acrylic rod, which has been edited out of these photos, I hope to take another set of photos outside with the sky or terrain as a backdrop but until then I hope you enjoy.10 points
-
Thanks Ian Ramen noodles? Must look those up… Thanks Terry I forgot to tell you that yesterday I went Microlighting: First time for me and the smallest thing I've flown in. JUST about big enough for me but the fuselage was about the same width as me so when I looked down and right - nothing! The rate of climb on this was impressive and we had a nice fly about. Although I remembered to wear warm clothes the 65mph wind up me trouser legs was, er, chilling! The field's not far from us so I may go back. Anyway, this PE turned out to be a right pain. Look at the 'tops' of the PE here: There's actually two pieces there which got me, but the main thing was the bending. I stuck one end to the part first: …then, when that was dry, tried to bend the thing to shape and 'attach' the HT leads: Hopeless. The leads seem to be far too long and trying to cut them to length resulted in the whole thing popping off. Again. Sorry Jim, to retain my sanity I think those bits will have to be 'omitted'.10 points
-
Hello everyone! Today I'm glad to introduce once more of my models, and to finish the "parade" of 737-family. The last one is most popular today type 737-800. Zvezda kit is neat, easy to build and needs only few putty, especially compared to previous EE 737-100. I've thought about livery choose for last one 737 for a long time. First I really wanted to build it in NOK-air bird livery, but later decided that it's too complicated for my skill till that days. Another one idea was Aeroflot classic old livery, but I am not a fan of "whatif" liveries. Finally I stopped choosing and purchased another one high quality and easy-to buy in RF livery from PAS. OK, it's another one standard and not eye-catching design. But first, I was a passenger on Nordwind couple of times (though flights were operated on 321) and the second and main reason that I've sent to trip this plane for great number of times as a handling-supervisor. Nordwind is one of Russian companies, far not the biggest but well-known inside the country. They operate park of different aircrafts (737's, A-321, 777-200 and -300). Mainly they perform domestic flights, and flights to Antalya (AYT) during high-season as well. In addition, I have warm feelings for this carrier for their easy-to-communicate and not arrogant flight attendants. Serving their flights, you will never be denied a cup of hot coffee in the cold season, a bottle of Cola in the hot, or some food if you feel hungry. So, enough lyrics, let's talk about painting 😁 First I've used ZIP-maket primer (that time I usually used it, but later replaced it with Decorix from a can). Grey colour of fuselage was mixed by eye from mr. Hobby #1 + Tamiya XF-24 Dark grey. Wings are painted by eye as well, the difference is in quantity of grey paint. Then I've chosen correct colour for engines, but finally stopped on Mr. Hobby H-18 steel. As I think, it's not far from real colour. Wheels, undercarriage and gear-flaps painted with zvexzda #30 light gray. Tyres covered with XF-85 Tamiya Rubber black. Wing-edges ant other heated areas painted with X-11 Chrome silver. Pledge future before and prior decals, as usual. And final layuer is mixed Future with 5% of X-21 Flat base. Decals from PAS are wery high-quality as usual. Technical inscriptions and others - from the included decal-sheet. (Basically it's Utair livery out-of box) Also I've added beacon on the top of fuselage (on the bottom there are a hole for the rack), and red and green lights on the wing-tips. Though highest quality, the decal has few minor disadvantages. For example, instead of "www.nordwindairlines.ru" on real plane, this inscription without WWW on decal-sheet. And what was pointed later by colleagues, I've applied some inscriptions not enough straight, and destroyed little red N logos on the engines. It's all on the side of my crooked hands 🙄 Model was finished in last days of 2021. The last two fotos is for compare with prototype of the model. Respects, tMikha.9 points
-
SAd to see this coming to and End, Really shows there is life in these old kits and there has been an amazing array of input as weill as some fine examples of Matchbox kits on show. Congrats to the organisers and all that contributed over the past while, Got me Stating modelling again really! Here is my last contribution, Revell boxing of the Beaufighter! 😕9 points
-
After an evening of touch ups I’ve got to this: I sanded off the six balls from the fin and found some sixes from an Xtradecal Pacific theatre sheet. I’m calling that end done now, exhausts, canopy, pitot, under-aerial and weathering to go.9 points
-
Hello, Below is the photos of my recently completed MFH 1/12 Mercedes-Benz C11 Le Mans 1991. If you are interested in the progress of its construction, please refer to the following link for the major steps. Thanks for watching. Kenneth8 points
-
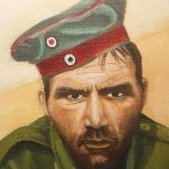
Hello to you all, Many years ago when I was very young, the elderly widow who then lived next door gifted me her husband's cigarette cards , collected in period at the expense of his lungs. Turned up in a rummage so I thought you guys might be interested. cards1 by Matt Farmer, on Flickr cards2 by Matt Farmer, on Flickr cards3 by Matt Farmer, on Flickr cards4 by Matt Farmer, on Flickr Sadly not the full set, but probably unique now in having passed through so few hands. Regards, Matt8 points
-
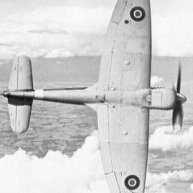
Hi again every one! Time for another update on the old Spit! It was time to work on the cockpit that I thought would be....and was..... a challenge!...My normal scale I scratch build in is no smaller than 1:48 scale so as I said before this is a real challenge! I used the kits pilots seat and made a harness out of paper and attached the seat to its frame...... I also decided to just use the I.P provided with the kit including a decal for the instruments. It was just too small to scratch build! This next photo shows the scratch built detail on the starboard side wall........ .....and here is the Port side wall. I used tiny pieces of plastic and fuse wire to make all the parts.... Here is a view of the starboard side with the I.P and seat/frame in position.... ....and the port side... These next set of photos were difficult to take due to the size and of course the tightness of the cockpit on a Spitfire..... The cockpit door was built from a small piece of plastic.... .....and in the open position. ....and so far so good! That's it for this post. Now I could just now close it all up and finish it all off...........but I might go crazy and open up the rear of the fuselage as a cutaway and have a go at what I did years ago with a 1:24 scale Spitfire.........don't know yet...I'll sleep on it! Till then guys.....thanks for looking in Fozzy8 points
-
Just had to share this, out on the Kent and East Sussex Railway today and this was outside the office by the entrance It's a 1984 3500SE in black, ex foreign office car with 41000 miles from New and in immaculate condition. Beautiful Chtis8 points
-
PK-39 Northrop F-5B Klu Hello all. My first gallery entry for this GB. It was a very basic kit but went together in a flash. Decals were slightly out of register but went down quite nicely. Got to say thanks to @JOCKNEY and @Rabbit Leader for both hosting and providing encouragement and feedback to us all! Link to WIP; Cheers Erik8 points
-
Here is my entry in the GB Well, not really, but I am using the box having ditched the Revell end opening flimsy. Kept the box art. Let's say we have started to upgrade the kit already. A few things added such as an Aries cockpit and Master pitot tube. The Revell kit decal sheet looks very nice. Hopefully they're still OK. The weasel mouth schemes are very popular with modellers. I wanted something a little different, if possible without the mouth. A subject preferably weathered/faded with some photo evidence if I could be so lucky. Vietnam era early non-wrap around scheme. 'SAM FIGHTER' ticks all the boxes. 1. I have the decals 2. It has no mouth 3. Weathered/faded 4. A good colour photo. 5. Earlier non-wrap around scheme And to add that nice additional touch it's an "F". Now we are excited. I purchased the AK Real Colors USAF TAC SEA set: It will be a re-scribe job even though the raised panel lines are very fine. Thankfully we have till end of September to complete this and get it into the gallery. With work and travel commitments this build is definitely "pushing the envelope". Ray7 points
-
This build of the 1/72nd Revell kit is rather unique in so far as it is my first ever try at a civvie airliner and the first attempt in forty years at a 72nd model.................... (my eyes are not the same any more!) The build of this well engineered kit went well with a lot of interior parts omitted, as they are invisible from the outside anyway.. Kitchen and Bare Metal foil were applied overall except for the painted top fuselage and blue of the livery. The South African Airways decals that came from Transport Wings are laser printed and special care had to be taken during application. Finally the whole lot was covered in two coats of Future. It was a most enjoyable project but I doubt if I shall tackle a 72 scale again........🤔 Cheers, Etienne.7 points
-
As promised here are some photos of my Tamiya F-4B. Absolutely amazing kit, stupidly complicated, super-detailed, and the best fitting thing I ever saw - glorious. I have admittedly become addicted to 3D printed cockpit decals now, as they are so good, so they make an appearance as do some rather nice nozzles. Otherwise OOTB. here goes:- just test fitting this thing is an experience, it kind of locks itself together in an very precise and satisfying way, you probably won’t understand that until you build one, but I know what I mean! here’s me chimneys spent a while looking at refs and painting these, but fairly happy with the look now. here’s the office It’s not so long ago I would have been happy with this in 1/32nd but this is 1/48th! very little to do with me, it’s the 3D stuff, it’s just so good now. Back to the kit, this is the moulded-in engine detail barely visible when the air-bleed doors are open, as they are in the kit love it! stay tuned for the next bit. thanks for looking. Nick7 points
-
There's definitely a theme to my latest purcheses. This one will lose the gold bling for a more standard look. I might have to try and find some replacement tyres for this as the kit items look way too small. This will probably be done out of the box, although I don't know if I can replicate the funky upholstery but there are some interesting colour and trim options for this kit.7 points
-
I think ours is planning to be a customs inspector7 points
-
I stopped in Helsinki old shop named Tietonikkari, shop that have been there from my childhood. Of course I made some purchases. Old Tamiya Fiat 131 that was again taken in production. Audi Quattro from Italeri that is also from old molds. We definitely need need kit for early Quattro. And classic Heller Alpine A110. I know Tamiya is better in details, but I have my doubts related Tamiya shape.7 points
-
Thanks Bill Thanks Terry. It turns out I've got the 4FTS decal for a Hawk on Modeldecal set no 86 (1/72) so I'm sorted for that I reminded myself that I'm doing: (1) XX176 in the Valley (4 FTS) scheme (1983) and (2) XX263 in the Chivenor 63 Squadron scheme (1984). When I say reminded myself I backtracked to page 1 of the thread and checked . Delving into the cupboard of neglected Hawk stuff I see that I've got: Modeldecal set no 86 (1/72) - which has a 4FTS Hawk XX172 complete with the 4FTS badge for the tail. Xtradecal X72169 (1/72) which is a Hawk Multi Pack which has a 4FTS Hawk XX 164 and various wrap around camouflage Hawks including some from 63 squadron although not XX263. The closest is XX283. So I can steal the 6 from XX164 (Xtradecal) to add to XX172 (Modeldecal) to make XX176. And I can find 2s and 3s and the 63 squadron markings from the Xtradecal set for XX263. But annoyingly XX164 is the only serial in the 2 sets that has a 6 in it. So I'm short some 6s in the right colour/size combination for XX263. That said, I'll very probably be able to find some black and white 6's in the corrects sizes from other 1/72 decals I've got such as Xtradecal X72158 - which is a set of white numbers and letters and various 1/72 Jet Provost and Chipmunk sheets left over from those builds. So should be good to go. Quickly (with a cup of coffee in Pret in Harrogate as it happens) modified the front coaming in Fusion from this: To this: I just cut off the front of the coaming at the line seen in the photos and created a new pointier front section by sketching a new and smaller front cross section and doing a new 'loft'. It has to start tapering at that point and not further back as the coaming has to fit over the instrument panel. There's a print run of a few copies in progress as I type.7 points
-
or it's nasty corn (reference to oriental people and selling 'knock-offs and sex' puts me in mind of an occasion when I was working in a print shop in Ayrshire and this wee Oriental chap comes into the shop trying to sell pirate DVD movies which we weren't really interested in but suddenly his face went into this 'naughty schoolkid' expression that only Chinese people seem to do with aplomb and he asked 'You wan any prawn?' which confused us somewhat until he opened another compartment in the bag he was carrying to reveal a variety of blue movies). I have to admit that on a few occasions in subsequent years when I was tasked with designing Chinese takeaway menu's it always reminded me of that little fellow selling his 'naughty prawn')7 points
-
I was tickled to see the new HMS Kent from Trumpeter in 1/700 uses box cover art that adopts the scheme portrayed throughout this blog and final result Well done @dickrd and @Jamie @ Sovereign Hobbies Rob7 points
-
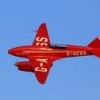
PK.37 Sea Harrier FRS.17 points
-
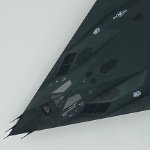
OOB P-47D-306 points
-
Hi All, This is a great idea from @Enzo Matrix so I decided to jump in a join. Lots of potential kits in the stash but I decided to avoid the Royal reviews of the RAF type thing so found a picture of the Queen as 'Princess Elizabeth' showing her as a 2nd Subaltern in the ATS being reviewed by King George and The Queen. She is leaning against the bonnet of M1136086 which makes the choice easy. I'll be using the 1/48 scape Tamiya Tilley which will make a useful diorama accessory later. I have a lot of these Tamiya kits in the stash but have never built one so this will be interesting. Here's the box. still wrapped in film There's not much inside the box to justify the price but it should be a straightforward build. I might not get started until atfer the Jubilee weekend though! Colin6 points
-
Hi guys, this is my latest project and also my first attempt at scratch building an entire model. It is a 1/72 what-if of Convair's Model 200 V/STOL proposal from the 1970s for a Sea Control Fighter in fictional VF-151 markings. It was difficult finding plans that matched; it seems Convair kept modifying their proposal throughout the years. Built from plastic card, loads of Milliput, and a smash-moulded canopy and main landing gear doors. The exhaust comes from a Crayola marker tip. 😁 Construction was based on the profiles and framing method I saw on the excellent French Maquette72 website, with a lot of sanding, cursing and more sanding. Everything is scratch built except for the instrument panel (Oyumaru/Milliput cast of a Mirage F1 panel), the wheels, ordnance (Hasegawa) and the ESCAPAC seat from an Airfix A-4B. Decals are from the spares box and Print Scale and I added some left over PE belts to the seat. A word of warning with regard to Print Scale decals: They are VERY fragile and prone to folding, but they are exceptionally thin and look great once applied. Painted with Tamiya and Vallejo acrylics. If you've never tried scratch building before, give it a shot! It is a great learning experience that forced me to learn all sorts of cool techniques. I love these unbuilt projects and I hope to try building more of them. Forgive the poor IPhone pictures, I'm hoping to borrow a real camera and learn some better photography soon. Cheers! Some WIP shots:6 points
-
Not the best photos and my first attempt at a whitewash paint job , happy with how it ended up , also happy for suggestions for next time 👍6 points
-
These are the nice Fujimi Skyhawks, recently reboxed by Hobby2000. I added a bit of sidewall detail to the pretty good cockpit interiors, spare PE seatbelts in the A-4E and a couple of Pavla resin seats in the TA-4F. The aft canopy bulkhead of the TA-4F was scratched, as were the straight IFR probes. Armament consists of Verlinden Mk.82 bombs and a couple of Eduard Zuni's: although the rocket heads on Fujimi's Zuni's are actually quite nicely molded, dimensions and detail of the launchers are way off, so I used resin types instead. Paints are Gunze/Tamiya acrylics mainly. Weathering consists of a bit of pre- and postshading as well as oil washes. As reference pictures from Chu Lai AB showed particularly weary aircraft, I went a bit heavier on the A-4E. Decals are from two very old Microscale sheets, with the red/yellow bands on fuselage and tail fins painted on. The A-4E portrays an aircraft operating at Chu Lai AB: in 1965, the USMC constructed a SATS (Short Airfield for Tactical Support) on the shores of the Quang Nam Province, South Vietnam. Both the runway and flightline were built from interlocking metal AM-2 matting, with revetments constructed from oil drums. Interestingly, this runway was equipped with catapult and carrier deck type arresting gear. A-4's also used JATO (Jet-Assisted Takeoff) rockets, providing a short extra thrust on takeoff thus shortening the takeoff distance. As of 1966, a paved runway was constructed, followed by hardened shelters and related buildings. When looking for reference material on Chu Lai AB, I came across a blog by fellow Britmodeller Gary @Oldsarge : https://oldsargesaircraft.blogspot.com/search/label/Chu Lai RVN A lot of interesting pictures on this subject/era can be found here (but also on other aircraft-related topics) and Gary was kind enough to grant me permission to use one of his pictures. The aircraft shown in this photo are A-4C type Skyhawks, but it's a good example of the typical Chu Lai flightline layout. Thanks again mate!! Credits background picture: designed by Freepik, photo by jannoon028: https://www.freepik.com/free-photo/clouds-sunset-mountains_986559.htm The second build shows a TA-4F operating from Da Nang AB in a Forward Air Controller (FAC) role, using rocket pods to mark targets for incoming strike aircraft. I had as much fun building up the accessories as I did constructing both aircraft: revetment consists of Brengun oil drums and putty sandbags. Access ladder, loose PSP plates and nitrogen cart are also Brengun items. The bomb lorry, fire extinghuisher and generator set are from Hasegawa, with some spare PE added. I also used some Valuegear blobs and the tie-down chains are from Infini models. For the fun of it, here is a final pic with Hasegawa's 1/48 A-4E that I built a few years ago. Hope you enjoy the pictures, thanks for looking!! Patrick6 points
-
This is my build of the Kokusai Ta-Go by Brengun in 1/144 It's a resin kit of an unusual little aircraft. It was a prototype designed near the end of the war for use as a kamikaze plane. It was mainly constructed from wood and fabric, powered by a Hitachi radial engine, and carried a single bomb which couldn't be released. Here are the pics Link to the build thread Thanks for looking Thanks also to @trickyrich and @helios16v for hosting /P6 points
-
Here we go, some pretty pictures of my build of Tamiya's Toyota Celsior. It's mostly out-of-the-box but I had some chrome Lexus badges and thought it would be fun to use these as the car is basically the same as the Lexus LS400. I also used some self-adhesive felt for the carpet, which I'll probably use more of in future car builds. The paint is a mix of Tamiya acrylic as per the kit instructions, it's a two-tone with very dark metallic green on top and a slightly lighter green below. I used some decals to make the number plates, the characters are from a 1:35 scale set but they seem to fit the Japanese outline plates better than 1:24 scale letters. As you'd expect of a Tamiya kit, it goes together really well, with no fit issues or poor moulding. It was a great mojo restorer after some kits that put up a bit of a fight. Build thread here if you've missed it.6 points
-
Hi all. I just finished the 1/48 Eduard offering of the Hasegawa 1/48 F-104G starfighter kit. This is the basic Hasegawa kit with some of Eduard's goodies included in the box. I added the CMK avionics bay set, resin underwing fuel tanks, and Eduard resin wheels. The model was painted with Mission Models paints and weathered with AK grey wash and some pastel powders. Thanks for watching. René6 points
-
I promised to share this already some time ago, This project got a new home.6 points
-
Screenshot below from BBC spotters guide. Made me smile.6 points
-
I was not totally satisfied with the way I printed the rib, the supports were not easy to cut without damaging some elements. And the paint would not have been easy to apply. I split this rib in 11 pieces, the cushions are usually of a different color than the seat block etc.. This is much better.6 points
-
An early attempt at pre-shading? they didn't have time to get the top coat on? I'll get mine6 points
-
Thanks Ced I may have been inadvertently misleading in describing the engine-masks as 'Post-It notes' because although they are Post-It notes, that was simply the nearest paper I had to hand and any rolled-up piece of paper would probably have done equally well, the adhesive qualities (or lack thereof) of the Post-Its were not called upon Anyway: (Im)Patience is a virtue... some last minute small small things were fitted. I broke the tip off the pitot tube, and replaced it with a bit of .5mm Albion Alloys brass tube: ... and fitted the pitot to the wing: The gunner's position was masked, again with a piece of Post-It note (and again any bit of paper would have probably done just as well) and the rearmost canopy part fitted: The rudder actuators were fitted to the tailfin: I don't know why that turned out looking such a blue shade, it's the same plastic as the bulk of the kit Finally the ventral cannon barrel was fitted: Hasegawa actually provides two muzzle tips for this, an 'early' version and a 'late' version - both are noticeably smaller than a pin-head and will in all likelihood rarely if ever be seen on the underside of the model, but I applaud the attention to detail ... aaaaaaand... I sprayed the Hairyokushoku overall: My pictures don't show the colour very well, it has a green component as noticeable as that of RAF Sky although less saturated and a little darker; it might be the fluorescent lights leaching out the colour or it may be my camera (or, in fairness, the fact that I don't know how to use my camera properly but either way it does seem to struggle with subtleties of colour), Anyway, that will have a few days to set and then I'll be back for the transfers and the topside mottling... Cheers, Stew6 points
-
Thanks for the praise! Continuing the resinmodeller theme... I have few pictures of the gearbox bracket as it's well hidden. Here's the best view... The bracket is the black bit in the middle of the picture. Supported by 1'' by 1/4" steel bar, as is everything else! I positioned the gearbox at what I hope is the correct position (measuring from photos) in Fusion360. This is how I interpreted the bracket For trial purposes I've printed the bracket and gearbox as one piece - for the final version I'll print them separately to make painting easier. The spring and suspension arm mount to the back axle looks like this... I drew it up to match the width of my rear spring, which is the same width as the chassis. It's obviously too wide. I'm wondering if the spring tongue that slots into the bracket has been narrowed. Something to try next... I also had a go at the steering wheel It needs some more work in terms of detail. More importantly, it won't print. I had drawn the spokes at 4mm thick (which seemed reasonable) but printed in 1/8 scale they are only 0.5mm thick, and can't support the rim. I'll try double the thickness....6 points
-
Hallo This Japanese Emil is an Airfix kit. I used Eduard etched parts and masks for the canopy. The decals are Japanese ones, an unknown company. But the color matched much better as from the kit. This aircraft was stationed in Gifu, close to Nagoya and Kakamigahara. My painting may not be correct, but it is an assumption. Happy modelling5 points
-
Hello everyone voting is closed and results are in. In a three way tie for most popular we have. @Ray_W, @Lightningboy2000, & @Hewy. With @modelling minion, @bianfuxia, @Jb65rams, @DaveJL, @Romeo Alpha Yankee, @Marklo all taking honorable mention. Many thanks to my co host and all that participated. Hope to see you in a few years when we get another crack at the Mig-21. Dennis5 points
-
I generally don't mess with those PE bits for that reason. I suspect lead wire might answer better in the scale, if anyone can even see them at all.5 points
-
I’ve put the Airfix aside to concentrate on finishing the MB kit by the deadline. Think I’ll get there - just! Painting is now complete, but after more masking than I’d anticipated, the three tone grey scheme more complex than I’d originally appreciated. But painting, including some touch ups and details like the black at the top of the fin, is now all done. Think it looks alright. It’ll be a high speed landing right on the cusp of the deadline, but I think I can bring it home! Gerard5 points


.thumb.JPG.761f7f0f11b1272b11a79005d3e368c4.JPG)


.thumb.jpg.b4a5069fd2c2dd5708ce1694345c5b11.jpg)


This leaderboard is set to London/GMT+01:00