
Leaderboard


Popular Content
Showing content with the highest reputation on 27/05/22 in all areas
-
Hello everyone. I just rolled another one, thought I’d share it. Without further ado, here is HK models rendition of the Dornier DO-335 B-6 night fighter. The model itself was decent enough and quite capable of turning out a great build. The detail of rivets and panel lines are superb. I did have a few issues with panels lining up though as the model does give you the option of open access panels all over it, using the same parts. Fitting the top of fuselage over the cockpit bulkheads and engines was a nightmare. Luckily I didn’t want to show off engine (interesting enough subject without all that), because I ground the hell out of it/ didn’t add pieces to make it fit. Another problem I encountered was the instructions really needed proof reading before they were published. It had me drilling holes that I had to fill in because they shouldn’t have been there, a few things like that, but all in all a good kit compared to some others I’ve slogged through. Now for the colour scheme choice. Because this aircraft didn’t actually go into production, it gave me the freedom to do what I wanted with the scheme. I do every time really, but no one can say it’s inaccurate. For this I chose the standard night fighter scheme seen on the 262s at the time. They left the factory with all 76 underneath, with 75 upper. Ground crews then squiggled 76 all over the upper sides and blacked out the underside for night operations. So that’s exactly what I did. But like all models, I start with the black base. Then I used rlm75 to fill in panels. Then proceeded with the rest of the scheme. Decals were from the kit and a few added from the Aims sheet I used for my 109k a while back. for the underside, I also used the grey to pre shade. A little unorthodox to black base black, and the result was a bit bold for my liking to be honest, but my oil paint weathering over it dialled it all back a bit, and tones sat nicely in the end… another thing I discovered while building this kit was the use of aluminium tape (from electrical shop for insulation) for the chrome on landing gear. So much better than silver paint. Insanely easy to use. Anyway like I said it was a mongrel of a kit some places, but still turned out a good result. I intend on entering it in next comp just to see how well it does being such an unusual piece. We’ll see how it does…24 points
-
The Tupolev Tu-104 (NATO code Camel) was an airliner developed on the basis of the Tu-16 bomber. The Tu-104 was also the second commercial jet airliner after de Havilland Comet. In the Soviet Union the plane type was widely used until the late1970’s. The Tu-104 A version was an improvement of the original prototype. The capacity of the plane grew to 70 seats, and a total of 80 of that particular model were built. The Czechoslovakian state airline, ČSA, acquired six aircraft in its fleet in 1957, and ČSA was also the only foreign airline to operate the Tu-104 in addition to Aeroflot. I built my model from an Amodel 1/144 scale, limited-run kit. Despite my doubts, it was surprisingly good in quality and detail, although I had to do quite a bit of puttying and sanding. The smallest parts, such as the antennas and pitot tubes were quite thick and ill molded and that’s why I ordered an NH Details photoetch set to replace them. I decided to build the CSA Tu-104A with the registration number OK-LDA (Praha). Since I had chosen to fill the cockpit and cabin windows, I had to get new decals and windows from the aftermarket. The BOA Decals sheet was very nice and detailed and they also had a very stylish livery to choose from. That was the scheme to commemorate the airline's 40th anniversary with the coat of arms of the city of Prague and the 40 years of the airlines' operation. There were also antenna wires that ran from the tail of the plane to the front of the fuselage. I modelled them from a 0.08 millimeter fishing line. I painted the white areas of the model with Tamiya's Fine Surface primer, which I then coated with Tamiya’s gloss varnish rattle can spray TS-13. The metal coloured areas I painted with Alclad Aluminum and I also used several Vallejo and Humbrol shades for the smaller details. This an interesting photo I took with my crappy camera from the observation deck of the Stockholm Arlanda airport in the summer of 1969. I was at that time an active 14 years old plane spotter. After a close scrutiny of the picture (where the register code is not visible) I found out that the plane, despite its similar livery to my model is not a Tu-104 but a shortened version i.e. Tu-12419 points
-
So far as I am aware, this is the only Arii kit I have ever built. Scalemates tells me that it was first issued in 1966 by LS, but despite this antiquity it remains a very high quality moulding, albeit with very limited detail. Parts fit is superb and the interestingly recessed surface rivet detail works well, being reminiscent of modern Trumpeter kits. Detail on specific items such as the torpedo and bombs is good. I have no way of knowing if the surface detail and lines are in the correct places, but nevertheless, it leaves a good looking effect. Given the basic cockpit, I added a little sidewall and floor detail, a bulkhead, several pressure cylinders, a radio and a chart table. Three rather malnourished looking crew members are provided, with good representation of the signature Imperial Japanese Navy Kapok life vests. The instructions suggest they all fit in the cockpit (where there are 3 seats), but one of the figures is actually too tall for this (he is perhaps intended for the gun turret). I cropped his legs so he could sit at my added chart table ! The distinctive outward splayed engines look slightly overdone to me; the plan drawing in my copy of Francillon's "Japanese Aircraft of the Pacific War" has a noticeable splay, but not as much as the kit. There are also a few spare solid and clear parts in the box, probably for the early G3M1 and L3M1 transport variants. The kit is advertised as a G3M3 Model 23, which would make it a later Nakajima-built upgraded aircraft. There are no dates on the instructions although the 3 options provided, Genzan, Kanoya and Mihoro air groups, the last two of which are in brown-green camouflage, include units that took part in the sinking of HM Ships PRINCE OF WALES and REPULSE (Force Z) in 1941. Although I suspect that it represents the aircraft later in the war, I chose the dark green Genzan option, hand brushed, as always, using Humbrol 75 and an acrylic Windsor & Newton matt topcoat. This is a vintage kit and clearly so, but its original high quality is obvious and it is pleasant and straightforward to build, with plenty of opportunity for the modeller to add their own detail. FredT :)19 points
-
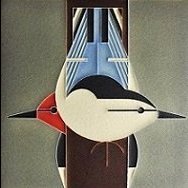
This time I present the He-177 A-5 model captured by the English and French resistance. The aircraft was equipped with French markings during the flight to England. A little more information from Wingleader Magazine. "RAF Air Intelligence had been aware that the main location for the repair and servicing of He177s was at the airfield of Toulouse-Blagnac in the south of France. As soon as practicable after the invasion of France a plan was put in place to ‘capture’ a He177 and fly it to Farnborough. Troops parachuted into the Toulouse area on 17th August 1944, as the region came under the control of the French Resistance. With the help of the Special Operations Executive one was secured from the French engineers working for Ateliers Industriel de l’Air, who had been sub-contracted by Heinkel to maintain KG40’s He177s based at Bordeaux Mérignac. At this time it carried the fuselage code F8+AP of 6/KG40 and had the number 60 painted on its fin in yellow. Its radio call-sign was KM+UK. To get the He177 to the UK, Group Captain Hards - Commanding Officer of Farnborough, flew a Hudson carrying RAE Chief Test Pilot Wing Commander R J ‘Roly’ Falk, who would fly it back assisted by Squadron Leader Pearce. On 2nd September the Hudson with a fighter escort provided by two Beaufighters set off, but both fighter pilots lost their bearings and came down in France. The Hudson, however, made it to Blagnac and eight days later, on 10th September 1944, Falk and Pearce flew to Farnborough in just 2 hours and 45 minutes. By this time the Luftwaffe markings had been over-painted with French Armée de l’Air markings and the words ‘Prise de Guerre’ (Prize of War) had been painted in small letters on the rear fuselage. Upon arrival at RAE Farnborough the French markings were over-painted with full RAF markings and the aircraft was given the RAF serial number TS439. It made its first test flight from Farnborough on 20th September with Squadron Leader A F Martindale at its controls. Over the next five months it made 18 more test flights, totalling 17 hours 55 minutes flying time, to assess many design features including the bombsight and heating system. Among its pilots was Captain Eric ‘Winkle’ Brown who remarked that the cockpit was ‘like an outsized goldfish bowl’." Plane. Model.16 points
-
*** New photos added June 8, 2020. See bottom of this post *** 2020 is almost half-way over, and I had built only one kit this year (compared with a dozen in 2021). So, as soon as my University finals were over, I got back to the bench. Here's the result. In fall and winter of 1976-77 I was a freshly-minted Ensign attending the US Navy's Nuclear Power Training Unit, deep in the desert west of Idaho Falls, Idaho. At the same time, former Lockheed test pilot Darryl Greenamyer of the Red Baron Flying Service, also in Idaho Falls, was attempting to beat the low altitude speed record with a souped-up F-104 Starfighter he had built out of scrounged parts. On October 24, 1977, Greenamyer set a FAI Class C-1 Group III low-altitude, 3-km speed record of 1,590.45 kilometers per hour (988.26 mph), which still stands to this day. Hasegawa has produced two versions of the Red Baron Starfighter -- one in 1/72 and another in 1/48 scale. For this project, I used the 1/72 Hasegawa kit, almost entirely out-of-the-box. Hasegawa provides decals for the colorful Red Baron scheme. I didn't trust my 15-year old decals, so instead used them to create masks with my Silhouette Cameo 4 cutter: Paints used are Tamiya TS-26 "Pure White" (decanted from the rattlecan) and Mr. Color no. 3 Red. The WIP can be found here: https://www.britmodeller.com/forums/index.php?/topic/235108525-the-red-barons-zipper/ On to the pics! And, a few detail shots: My biggest issue with the build involved the canopy. Instead of the Hasegawa 3-piece item, I elected to use a single-part canopy from the Monogram F-104 kit, which was (almost) an exact fit. Unfortunately, after I had epoxied it in place, I discovered it had shifted in position and the rear was no longer along the aircraft centerline. I wasn't able to remove the canopy without fear of breaking it, so instead I sanded down the overhang on the right-hand side and sanded/filled in the ledge on the opposite side. This, of course, severely marred the clarity of the canopy, and I had to sand and polish out my self-inflicted damage: The pilot figure, by the way, is from PJ Productions, which I had to modify ever-so-slightly to fit in the cramped cockpit: Hasegawa provides about a half dozen tiny clear lenses for lights and inspection windows on the fuselage. Instead of trying to install those fiddly things (my carpet monster would have been happy if I had!), I filled the holes with clear UV resin, and used transparent paint for the colors: Nose pitot probe is from Master-Model: The kit's exhaust nozzle and afterburner can are just fine as they are -- no aftermarket needed: That about wraps it up. I'm really pleased about how the paint scheme turned out, and look forward to adding more zippers to my collection. If nothing else, my Red Baron Starfighter adds a bit of much-needed color to my display case: Thanks for viewing! ******************************************************* New photos posted June 8, 2022. Enjoy!14 points
-
Hi all, my latest model is this Kinetic Mirage 2000D with dual GBU in 1:48. Not a "Gold Series Kit" but nevertheless a nice one. Used the Eduard PE`s, Quinta 3D cockpit decals, Aries nozzle und FCM decals.13 points
-
Hello! This is my most recent project, an israeli Mirage IIIC Shachak, the Eduard 1/48 profipack kit. Have to say that, at least for me, Mirages III, in 1/48 scale, seem to be cursed. In the past, I built a Kinetic kit, a truly nightmare. Really bad engineering, even worse fitting and almost useless instructions. So, after some reviewing of other brands, all of them still looked not great. But, since Eduard has a good reputation and I’ve built some of their other kits fine, I’ve decided to give it a shot. Big disappointment, because this one is also not good. Flashes all over the places, the fuselage halves are too flexible and a lit bit warped. There are no location points for the cockpit tub, and you have to hold the 2 halves and the cockpit together and try to glue them in the right position. If you succeed in this, you’ll find out the windshield panel is too high for the front canopy to sit properly. I’ve managed to minimize this by a lot of dry fit and clipping the base of the PE for the instruments panel and gunsight. Not to mention the plastic part in front of the gunsight also had to be very sanded, otherwise the front canopy would not be flushed with the fuselage. I just don’t get it, the guys at Eduard have to know this, still… Main landing gears engineering is also bad. No positive locations and/or fixing points for most of the many pieces. And for the plastic parts, all of them have their issues. Front canopy slightly too narrow, rear part too wide (better keep it open); lights lenses all too big for their respective spots. Decals are Cartograph, so no problems here. Nevertheless, all the yellow triangles and red stripes on the wings were masked and painted. Way better! Well, I know these are a lot of complaining for my part, sorry for that, but probably because I had good expectations from an Eduard kit. Anyway, I’m happy with the results now it’s finished. Hope you enjoy! Cheers!12 points
-
This is the Squadron/Roden "Merian C Cooper" kit - depicting the Austrian built (OEFFAG) Albatros flown by future "King Kong " film director Merian C. Cooper (Earlier posted on this site). I decided to make another one, flying in the same squadron. Different colors - Natural wood and a Blue Nose. I depicted the number "7" - the only one I had of the right size...from a HobbyBoss Morane. The figure is from Dark Angel.. For those having difficulty accessing the pics ...reported by some.....apparently one must Right click on link and open picture in a new page. Village photos had previously not been a problem...but with hundreds of pics loaded there, its too late to change....11 points
-
Your mere presence embiggens the day, and, I daresay, the world. I am not alone! Brothers, let us rise up from our chairs, carrying the better part of an expensive aftermarket sheet on one thumb, and march on Cartograph HQ! Shafted again! Speaking of, I have experienced a decalsaster. The solvaset was a poor choice for the thin Exito decals, melting them and distorting several, and actually eating through the clear coat to disrupt the finish. I was despondent for several days, but decided I could at least do some weathering, since I'd come this far. Blorp. Zoop. Overweathered, perhaps. Who among you is man enough to stop me, however? Oil wash followed by a flat coat (AK's dreadful acrylic one), and some pigments, green and reddish brown, for the uppersurfaces. Ah well, nearly done.9 points
-
Tamiya P 47 D Thunderbolt Groupe de Chasse 1/5 Champagne French Air Force April 1945 Pavla résin seat Yahuu models Instrument panel Quickboost Conversion set Humbrol Metalcote brush painted Build Thread here https://www.britmodeller.com/forums/index.php?/topic/235109737-tamiya-172-republic-p47-d-thunderbolt-french-air-force-gc-15-champagne-1945/#comment-4412461 Patrice9 points
-
Howdy Everyone, just finished another Skyraider so I thought you wouldn`t mind too much if I shared a few photo`s This time a US Navy single seater as I realised I was missing one in the collection after I had a `cull` a while back Built from Tamiya`s 1/48 A-1H boxing Finished to represent an A-1J of VA-165, `The Boomers`, US Navy, circa 1965 As usual, mostly from the box but with a few tweaks. Decals from Caracal Models set CD48196, Zuni Rocket pods on inboard pylons from ICM`s Bronco kit Brake pipes, ignition harness and static wicks from bits of wire, dodgy paper seatbelts and a rear view mirror from thick foil Resisted the temptation to fill every weapon station and gave it a typical load for a Navy RESCAP mission at the time Hope you enjoy the pic`s, thanks for looking Cheers Russ8 points
-
Made it with 1 day to spare! Took me 4 months, but got it done, and it's a beast of a kit, but I found a place on the shelf that it can just about squeeze in to! The scheme is a real stand-out one, even if it took ages to paint. Kit: Eduard (Zvezda) Hind D Scale: 1:48 Paint & Weathering: Airbrushed with Mr. Paint and Tamiya, Weathered with Oils. Extras: DN Models Mask Set Build Log: Here7 points
-
Airfix's 1/48 Bf 109E-4/7. A kit that went together quite nicely but the soft plastic wasn't much fun to work with and the details are a bit ill-defined. I didn't fancy the North Africa or Russian Front marking options, and I definitely wanted to avoid the usual aces or Hardy Kruger's much reproduced aircraft, so I used some decals from the spares to recreate one from I/JG 27 in August 1940. Main paints were a bit of a mixture - Sovereign Colourcoats ACLW12 RLM 02, Mr Hobby H67 RLM 65, Tamiya XF-61 for the RLM 71 and XF-3 for the yellow. My Airfix Rotte - in formation with the 1/72 version: Cheers and thanks for looking! Ian7 points
-
Thank ee Tony man. It shall be as ye say, later this day. Mark the test is at the end but since multiple builds get multiple choice I'm sure you'll breeze through. Maybe I hope Probably Sun looks as if potentially its to stay out all day and I have tasks awaiting sun time... Laters chums I hope but meantime the T7 got her first coat of discloser The sun, as previously mentioned being strong overcame the Olympus's pixcel counter so we get dull but no overwhelming illumination, it has to do. At least this one is in focus, others, ominously were not. I believe I may have mentioned my inability to get a decent looking Hunter from this Matchbox model, on track for a similar result in the twenty first century. Fiddlesticks. However I can declare myself happier with Norman's hump than previously, gentle, very light sanding and that'll do for me. The Hunter work will be spaced behind the Hind. I thank yoo!7 points
-
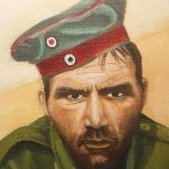
Hi y'all! Here's the latest! A figure with great personality I think. Parts with a lead figure don't fit as well as with resin ones but has the benefit of coming in several parts to ease the painting process. Something you can't always have with the new 3d printed figures... I've tried not to give too much texture to the tunic, in order to contrast with the much worn shield. Painted with acrylics only. Hope you'll like it! Ciao IWik6 points
-
Hello all, I just posted in the presentation/new member. Stopped the hobby at 16 and back at 39/40 Here is my last build, a 1/48 Tamiya Panzer 4H. All critics are more than wanted to improve.6 points
-
Grumman OV-1A Mohawk 63-1325, 73rd Aviation Company Nha Trang, Vietnam, 1967 Kit: Hasegawa C4 Decals: spares from Clear Prop CP72016 Build thread: https://www.britmodeller.com/forums/index.php?/topic/235107624-ov-1-mohawk-redux/6 points
-
Grumman OV-1A Mohawk 59-2617, 23rd Special Warfare Aviation Detachment Nha Trang, Vietnam, 1963 Kit: Clear Prop CP72016 Build thread: https://www.britmodeller.com/forums/index.php?/topic/235106933-ov-1-mohawk-the-devil-in-disguise/6 points
-
Blackburn Firebrand TF5 EK729/125, 827 NAS HMS Eagle, 1952 Kit: Valom 72141 Build thread: https://www.britmodeller.com/forums/index.php?/topic/235106318-blackburn-firebrand/6 points
-
Vickers Wellington Mk II W5461 EP-R, 104 Sqn RAF Driffield, 1941 Kit: Airfix 1/72 08021 Build thread: https://www.britmodeller.com/forums/index.php?/topic/235105615-wellington-mk-ii/6 points
-
I accidentally handed my wife a glue stick instead of a chapstick. She still isn’t talking to me.6 points
-
Wasn't that the party we had at @Martian's place whilst he was on hols? Lovely paintwork though Giorgio, very nice indeed! Ian6 points
-
Hello everybody! this build is progressing slowly but I try to keep a regular pace in updating. I added part 5, the front cowling ring, and the fit is quite disappointing. Don't know if this could be avoided with some actions on the the front fuselage, anyway it's a pity because in fairing the joint you loose most of the delicate details engraved on the cowling (panel lines and fasteners). Will see what can I do to restore them later. Back to the internal details, I found an excellent reference in this build: https://www.hyperscale.com/2008/galleries/tbm3s272aj_1.htm Far from trying to reach the same heights, I could grab some inspiration for the rear seats. Unfortunately I had already installed the rearmost one and could not rotate it backwards without risking major damages, anyway I reckon it should be a swivelling seat since there are instruments both in front and behind it. And finally a blurred close-up of the engine exhausts: they are provided as solid blocks and I drilled out the internals as best as I could. Thanks for looking!6 points
-
My first post on Britmodeller! Here is my finished Lightning F2a XN776 (Charlie) serving with 19 Squadron, RAF Gutersloh, posed pre-flight on Friday 15 February 1974. The model is a 1/32 scale Trumpeter Lightning with extensive modifications. These modifications include stretching the fuselage by 5mm, correcting the profile and extending the length of the fuel tank, correcting the profile of the dorsal spine, correcting the ‘pinched’ area to the rear of the fuselage, correcting the stance by modifying the undercarriage, modifying the fuselage sides around the cockpit area and extending the canopy framing, scratch building an in-flight refuelling probe and modifying the fins on the fuel tank. There are numerous additions to the cockpit but you should be able to spot these in the photos. The modifications required considerable ‘surgery’ on the original kit and took me around two years to complete (on and off build!) The aircraft was lucky to survive and end up in a museum...This is the story of how it happened from Steve Gyles the pilot who was flying Charlie that day: This is the story of my traumatic sortie in Charlie. She almost ended up in the North Sea that day - with or without me. A plagiarised cringing version appears in Lightning Boys. I wish authors would refrain from turning stories on their head and adding incorrect detail. "At the time of this incident, the Lightning Mk2/2A force had been suffering 'rising arch' stoppages in its Aden cannons. Modifications had been carried out and the squadrons were flying a series of sorties firing the guns under high positive G. On this occasion on 15 February 1974 I led the Friday morning 4-ship in XN776. The plan was to fire the 2 upper guns at about 3G from 250 ft in the North Sea ranges. In the event cloud forced us up to 20,000 ft. With the 4-ship in echelon starboard I commenced a hard port turn, firing as I went. The guns suddenly went silent and the aircraft dropped its nose into a steep spiral and entered cloud. I discovered that the ailerons were jammed hard left, as was the rudder. I put out a mayday call, advising of imminent ejection. With both hands pulling hard on the control column, the ailerons centralised and I was able to pull the aircraft out of the dive at 12,000ft – How fortunate that I did not start firing at 250ft as planned! With two hands still required to operate the ailerons in jerks, I climbed back to 20,000ft out of the solid cloud bank and had an inspection from my number 2 (Sqn Ldr May - my flight commander). No external damage was apparent, although he had trouble formating on my 'crabbing' aircraft which still had its rudder jammed fully left. The other 3 aircraft returned to base first to let me have time to think about how I was going to land. After some discussion with base, I had ATC remove the approach end barrier and rig the approach end cable. This would give me about a 1,300ft ground run before engaging the cable, reducing the likelihood of hook structural failure. All went well initially. I lined the aircraft up about 12 miles from touchdown and was able to keep reasonable directional control. Touch down was in the asphalt undershoot as planned, the hook was deployed and the engines stop-cocked. Very quickly I realised that I was not stopping. Witnesses would later say that the hook skipped over the cable. With few ideas left, I deployed the brake-chute and just hoped - with the rudder jammed left, I could only apply left brake. At this stage good old 'mother nature' came to my aid. The light cross-wind was from the right. Because of the drag-chute, the aircraft began to weather-cock to the right. I was then able to dab the left brake to maintain a straight line until I entered the upwind cable at about 30 knots. Like a lot of incidents that I incurred or watched during my career the full impact was reserved until I walked away. I sat down in JENGO’s minivan and had a moment of shakes etc. The cause of the problem was traced to the starboard gun link chute. This chute was attached to the gun to direct the cartridge cases and links into a bag in the lower fuselage. The pip pins, holding the chute in place, had not been pushed fully home. Gun vibration caused the pins to fall out and the chute was pushed outwards onto a fibreglass shroud that covered all 3 control rods in this area. Build up of spent cartridges and links forced the chute harder against the shroud, distorting it and forcing it onto the control rods like a calliper brake. The shroud totally jammed the top (rudder) control rod and bent it, restricted the 2nd (aileron) and bent that too, but fortunately made no contact on the lower (elevator) rod. My thanks go to Steve who was a unbelievebly helpful in the modelling of 'Charlie"6 points
-
Source: https://www.facebook.com/permalink.php?story_fbid=pfbid02PmQoQXUTRKqLPrp94UFSNQh89NBR4hYDdRMsjaB8vEFxsvD5en8QVrXFBqRdFGGel&id=236571760139543 Black Dog - ref. A48155 - de Havilland Vampire F.3 engine V.P.6 points
-
This was certainly one part that took a bit more effort, it was sliced off, reshaped & repositioned, all pretty much by eye but it looks the part in the end I think. I did have the rather nice drawings that came with the Aeroclub conversion & they were a big help. The prop blades are probably a bit too wide, being Seafire ones. next time. Steve.6 points
-
Work continues slowly. Now got a couple of coats of white on all the major components though it it still looks somewhat patchy and thin so will need a couple more coats. I think my paint mix was too thin. Also added the bulwarks to the fo'c'sle and 1 deck port and starboard and started to cut out the decks from 30 thou plasticard. Some dry fit photos below. As you can see from these, still more remedial work needed on the hull join. [ In the background have also drawn all (hopefully) of the other minor components - motor whaler, cutter, davits, vents, lockers, bollards, fairleads and so on. They'll be going to the printer later today. Thanks for watching6 points
-
Good morning everyone … Decals what few there are are on the plane. I opted to do B-396 which according to the two photo’s I have don't have the Orange triangular roundels on top. Please feel free to ask questions or post comments. Dennis6 points
-
the Kilmarnock flatulence club? (Recent bean supply problems have knocked the wind out of their meetings)6 points
-
A little post-prandial work. The tail wheel and the actuator legs were fitted and then some dissolved putty work on the wings. And finally we have a complete fuselage. Thanks for looking, Cheers, Alistair6 points
-
Hasegawa Jaguar Gr.1/A as an A of EC.4/11 'Jura' during the Gulf War Wip thread here. A build i enjoyed up to the end when I felt that some of the short comings, iffy fit & poor load out selection conspired to suck some of the fun out of the finishing stages, some life issues rounded that off some more but never the less, here it is & I'm reasonably happy with it, I like the over all effect much more the the detail bits. My fav shot, reminiscent of some of the reference photos I had, the weathering on the air brake is unintentional, only noticed after editing the shot. The rest. Thanks to @Col. for proposing & supporting this GB & everyone else who gave encouragement along the way. Thanks guys, it makes a difference. Steve.6 points
-
This was a lovely kit to build, although challenging due to the petite delicacy of the parts and the surprisingly mis-registered decals. I had to build the dragon version, even though that meant touching up the off-centred white edges. Pictures: WIP is in the last two or three pages of this thread, the rest being taken up with SPADs. Regards, Adrian5 points
-
Hello all! Some pics of my TA 152 done sometimes ago. Base is the Dragon kit with some Eduard photo etch. Green 9 W Nr 150168 was flown by Willi Resche on te 24th of April 45 and carries the red/yellow band of the Stab of the JG/301. The 4+ book on the subject was of great help. Best regards. DSC_0001-1 by jean Barby, sur Flickr DSC_0002-1 by jean Barby, sur Flickr DSC_0003-1 by jean Barby, sur Flickr DSC_0004 by jean Barby, sur Flickr DSC_0005-1 by jean Barby, sur Flickr DSC_0006-2 by jean Barby, sur Flickr DSC_0007-1 by jean Barby, sur Flickr DSC_0001 by jean Barby, sur Flickr DSC_0003 by jean Barby, sur Flickr DSC_0005 by jean Barby, sur Flickr DSC_0006-1 by jean Barby, sur Flickr DSC_0007 by jean Barby, sur Flickr5 points
-
A little mojo restoration. Thanks to @Col. for letting me indulge in some eggyness Mengs J-15, brush painted.5 points
-
Test sprues pics Source: https://uk.airfix.com/community/blog-and-news/workbench/new-spitfire-test-frame-exclusive V.P.5 points
-
I have opened the bag today and had a closer look at the four hundred and ninety-six parts on the sprues and I'm delighted with what I found. First out were the tyre treads. They have been very cleverly moulded in 120 degree sections resulting in deep, crisp treads with a minimum of clean up required. When the treads are combined with the deep dish hubs, they are going to be sensational. The wheels must have been four or five feet in diameter, like tractor wheels and will look spectacular. I think the tread sections might have been made from a different plastic to the rest of the model. It has this strange grain which I've seen before on heavy duty plastic items like knife handles. I guess it has to be extra strong to be pulled free of the moulds without leaving bits behind? There's a lot of deep moulding all over this kit. It's very good and reduces the parts count significantly while making assembly much easier than their earlier kits when everything had a zillion tiny pieces. There's a parting line to clean up but no flash and no misalignment! My Lee tank was awful for that but MiniArt seem to have sorted that issue. The two halves of the mould are perfectly lined up. There are still multiple attachment points but that's not as serious as round parts that were never going to be round. That Bren gun is a beauty. I found only one breakage. This crisp plastic might be a little brittle so I was expecting more damage but no. Again, this is tons better than my Australian Lee. (I'll replace that track rod with guitar string.) MiniArt have provided a few impossible parts. Impossible for me anyway, and easy enough for those with good eyesight and more nimble fingers. The outside of the vehicle has just enough texture to make painting fun. Finally, remember the PE part #11 from the instruction sheet? It turs out to be quite large so I think I have a reasonable chance of beating it into shape. To summarize, this looks like a really good kit and a vast improvement on their Lee. BUT. But I just looked at the dates of the two kits and the Lee was first released in 2019 while the AEC was a 2013 moulding. So I shouldn't be congratulating the people at MiniArt but asking them what has happened to lower the quality of their kits since 2013. That doesn't detract from the fun I'll have with this one though.5 points
-
Black Dog detailing sets - ref. A72112 - Lockheed C-130H Hercules - wing flaps - ref. A72113 - Lockheed C-130H Hercules - hydraulics - ref. A72114 - Lockheed C-130H Hercules - radar+front door - ref. A72115 - Lockheed C-130H Hercules - engine V.P.5 points
-
I just watched an advert for Pure Cremations: it really made me think. I thought, "It's time I got the barbecue out of the garage." Hat, coat.....5 points
-
And now the Vally exploration goes off up a wadi. The next build in the series will be this one. NOT a tank. NOT even tracked. NOT made by Vickers. BUT the turret is pure Valentine so that will do. Let's face it, I built an Austin Tilly here so we aren't too particular. 😁 Interesting desert camouflage. Syria for a change from N Africa. Dust, not mud. MiniArt full interior build. Like the dear departed Lee. How to display all that? Maintenance? Wrecked? Cutaway? Lift off roof? Sliced open by aliens with energy beams? Good old MiniArt. Simple, fall together construction. 😱 And some astonishing moulding from Ukraine. This is some sort of glove box (photographed through the as yet unopened single plastic bag). This will provide me with plastic pleasures until the Canadian GB starts in July. I will also be continuing to work the wooden boat in parallel, so neither build will be particularly fast, but I hope they will both provide interesting reading for you all and a refreshing contrast for me.5 points
-
03219 Morris Truck , 17 Pdr Gun & Jeep ( Revell repop of PK-172) Here's my 5th and final contribution to this fantastic group build , the Revell reissue of the Morris truck, 17-pounder and Jeep combo . I'm happy with the finished product, but the kit was somewhat lacking in detail - both the Morris and Jeep were missing transfer case , propshafts and exhaust. Looks OK so long as you don't look underneath !! Anyway, it all assembled with no filler and the only sanding was on the 17-pounder's spades . Paint was a mix of Humbrol , Revell , Colourcoats , Phoenix Precision and Mr Color . Decals were from the kit. Here's a link to the WIP thread. My thanks to PeterB for explaining how to do the link.5 points
-
1/72 Airfix Il-28 Beagle Finnish Air Force5 points
-
Having finish my “naked” Hurricane which had a very “clean” finish (zero weathering), I’ve decided to go to the other extreme and build a “well used” war weary aircraft. My victim will be a Tamiya 1:48 Vought F4U-1D Corsair… After seeing @Dansk Corsair build, I am in awe of his weathering skills, I thought I could have a bash at the same sort of thing, salmon, zinc chromate, aluminium chipping, faded blues and very dirty surfaces, right up my strasse. As far as I’m concerned Tamiya has only one problem, their decals, so I’ve plump’d for some aftermarket “wet transfer” ones from HGW… I’ve not used these before and it’ll be interesting to see how they perform as I think they’re a half-way house between “decals” and “painted” masks?, you peal off the “carrier layer” once cured leaving behind "painted look" markings. Other aftermarket includes some Montex glazing masks, anything for an easier life… …an Ultracast seat and harness, sometime ago I build a FAA Corsair and I purchased this, the set came with two of these so I had this one in my “spares”, any excuse to build another Corsair. I’ve also ordered a Quickboost engine… …and some Brengun resin wheels. Next I’ll be making a start on the cockpit. until next time as always, any suggestions, criticisms or comments will be gratefully received. rgds John(shortCummins)4 points
-
Here we are, I think this has been one of my fastest builds. I was worried that the rising sun decal would not conform to the body, but brushing on MicroSol and leaving it overnight seems to have done the trick. The wing mirrors were added and the heat shield was primed and painted. Engine cover in place. I thought I'd take some pictures of the Honda next to my Tamiya Toyota Celsior. It shows how delicate these Grand Prix cars were. A proper photo shoot will take place in the next couple of days.4 points
-
of zombie phone addicts4 points
-
I ran out of useful jobs to do on the Ar 555 last night, so got some more time to work on this. The very first task was to go over the bits I’d tidied up at my parents’ the last week. That really emphasised the importance of good lighting, as what I thought looked ok there really wasn’t. It is now! At the end of the session, I had this selection of bits cleaned up, plus the first of the PE folded up: I’ve decided to not use the PE rudder pedals, purely because there’s no chance of them being seen. The kit parts are more than good enough. One thing I do have to make a decision over is the side console. The kit part has 3d areas for the various levers, but Eduard have designed the PE replacement to be flat, as you can see from the photos below: I may just use the end of the Eduard part for the slanted front of the console, then just paint & detail the kit part for the rest. I don’t envisage having a bit of flat PE over a 3d console looking very good. Another area where I’ll need to make a call over the PE is the port cockpit wall. There’s some reasonable detail on the kit part, but some of the PE will definitely help improve things, but I’m not sure about all of it: I think some detail painting and sensible use of PE should make that look rather nice. Lastly, I did a size comparison between one of the fuselage sides for this against the Ar 555. Admittedly the Ar 555 is 1/72, but the comparison is rather comical: Until next time James4 points
-
It's not a bad look, is it? Whack a couple of low-vis Bat symbols on it, and I could see it cruising the skies of Gotham looking to thwart the Joker's latest plot... Here’s the update from last night. I had a good look over the whole model for any defects I could find, which were many. The worst of the specs of dirt were removed with a scalpel, then the remainder were sanded off. The split seam was reglued, sanded once dry, and then given an application of filler. As an aside, some of the weights I put in have been loose for some time now, and it’s only got worse since I dropped it. With how I packed them in they’re limited in their movement, but it’s still annoying hearing them clunk every time I move it. I’ll not rely on the sticky pads in future, I’ll always glue the weights down. Coming back to the paint, the whole model was given a good sand with progressively finer grits until I got to 1500 grit. After that, I stuck some filler over any areas that needed it, then called it a night: I’m hoping to start getting the colour on it over the weekend, but there’s no way in hell this’ll make the deadline. I’ll keep going until it’s done though, it’s so close now. Until next time James4 points
-
I often wear my underpants over my trousers. 🦸4 points
-
Put on some more detail: Not much, but every little bit helps! Cheers Hans J4 points
-
Goodness! I hope not, that’s Gold and one of the reasons WIP threads are such a great resource. Thanks. Agree 100% with you both. I don’t have a printer though. Some of the stencils I may be able to paint - my silhouette can cut masks pretty small. However, there will be some that it cannot. If my search through the spare decals doesn’t bear fruit I may just start talking to my boss about the need for a printer in my home office… 😂 First stage painting is complete. After a little pre-shade on only the access panels (because the contemporary photos show it to have been quite clean on 8 June) I applied the Olive Green and then a sealing coat of diluted Future. The white balance is waaay off in these pics and there’s too much yellow but you get the idea I think. I need to check the colour in better light tomorrow and adjust if necessary. A wise man up thread said all those little details would look better under paint. The sealing coat is so that I can handle the model while making any adjustments; there might be one or two. Then, I’ll cut my masks and paint the major markings before adding a proper clear coat for decals. Sorry for the crappy colour balance in the pics, it really does look a bit right-er in the flesh. Cheers.4 points

.thumb.jpg.d3635a7ef6507d35f372dd09671fe96f.jpg)


.thumb.jpg.d17ff607fc7e89ed057e63fcb6f2a888.jpg)


.thumb.JPG.ebe7bd09037c033b484e59e59a925a45.JPG)


This leaderboard is set to London/GMT+01:00