
Leaderboard


Popular Content
Showing content with the highest reputation on 23/05/22 in all areas
-
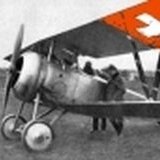
Here is my build of Airfix’s 1:48 Hawker Hurricane MkI I wanted to build a “naked” version, showing the materials that were used to build the aircraft, I fully understand that the aircraft would never have looked like this, “dope” would have been used to stretch/tighten the linen material over its wooden frame and that paint/camo’ would have been applied in the manufacturing process. Also I’ve used the spinner from the Sea Hurricane as I managed to mess-up painting the “normal” spinner. Xtreme Metals were used for the NMF MRP for the linen Uschi van der Rosen decals were used for the woodgrain effect. Eduard seat harness was the only “after market” used in the build. Here are some photos… You can find my build log here… until next time as always, any suggestions, criticisms or comments will be gratefully received. rgds John(shortCummins)30 points
-
Hello People ! This is my last little work: Fiat Cr.42 377^ Sq. Palermo-Boccadifalco Italy 1942 Italeri kit 1/72 The next?.................I don't know.... Ettore28 points
-
Hello fellow modellers. this is the latest Arma Hobby kit which came as a little suprise after many Allied types or planes connected with Polish aviation. This kit is kind a "shake and bake" kit as no real issues were encountered during the course of the build, and eventually, instead of solving any build troubles I could I focus on mixing proper camouflage colors (of course to my eyes) from the Gunze Aqueous stock. The markings comes from the kit and the decals went on nicely too, being printed by Techmod. I only airbrushed the hinomarus with my own mask (a simple affair using Olfa cutter). Cheers, Libor24 points
-
A bit of modelling of 1960's civilian general aviation... The Piper PA24 Comanche has it seems been ignored by kit manufacturers - but was (is) a far more svelte machine than the PA28 Comanche (which has seen a number of kit options). Rather than wait for another decade or two - I thought I'd tempt fate by pushing ahead with a scratchbuild. But had TWO equally tasty schemes to choose from - both Australian. One was a PA24-180 (VH-RSX) operated by RAC NSW in the early 1960's (and flown/enjoyed by my father) and another PA24-250 (VH-SME) operated by the Snowy Mountains Authority in the mid 1960's for comms & VIP duties. So to avoid procrastinating, I decided to make twin Comanches! (Pssst. VH-SME isn't 100% finished - I have some tip-tank decals to print/apply, thence nav lights, and some white VH-SME markings needed on the fuse side. But I'm calling it done anyway in the interests of having twin Comanches!) The build started in Dec 2021 and has had slow and steady progress since. Here is the link to the work-in-progress thread if you wanted to back track on the methods employed: https://www.britmodeller.com/forums/index.php?/topic/235103075-piper-pa24-comanche-148-scratchbuild/ Below is one of my fathers pix of VH-RSX at Canberra (Australia) circa 1961 on an 'outing' And here's a Greg Banfield shot (via Ed Coates collection) of VH-SME in 1963 http://www.edcoatescollection.com/ac1/austmz/VH-SME2.jpg http://www.edcoatescollection.com/ac1/austmz/VH-SME.html22 points
-
hi, attached some photos of the venerable Heller Fouga Magister in the powerfull 1/72 scale finished. the upper colours used were Humbrol 94 Brown Yellow Matt, dark green FS34079 & light green FS34227 and underside Light Ghost Grey FS 36375. all aplied free hand. some extra part like rocket lauchers and pilons and front antennas taken from extra parts present in the new Special Hobby kit. Decals from the spares box. The version represented is one the last 3 Fougas obtained from France late 70's to complement the previous 6 obtained from Israel already in service in the Fuerza Aerea Salvadoreña. Their missions were from basic trainer to COIN missions in the irregular war in the 80's. critics and questions are welcomed. cheers Carlos E.22 points
-
I got on a bit of a Japanese kick after starting Eduard's awesome new Zero, so along with the Vengeance I began this Ukrainian made kit, just as things kicked off in their country, and have been making steady progress, despite finding out I'd broken the windscreen part in two somewhere along the line. In fact, I only discovered the two halves on my workshop floor because I was hunting something else, and though "that looks familiar", putting the two parts on my bench for later. The kit is really nicely done, and apart from a very weak tail-wheel part, it went together very quickly, and needed very little in the way of filler to obliterate the lines. The decals were a bit brittle however, so I ended up doing the fuselage band by hand after it fell apart in use. This was a first time using MRP metallics for me too, and they're really good, covering well and looking like metal, although they're not quite as tough as Alclad, although all my stocks of Alclad have "gone off", and need straining before use. Happy with the MRP stuff, so they're my new metallics of choice The rest of the paint was Gunze Aqueous Mr Color, and their red matched the decals perfectly, so touch ups were a doddle. This is my first completed model for the year, after a dismal tally of nothing last year, and I'm hoping to get the rest of my current projects, then maybe pick off a few of the stalled ones, but don't hold me to that onto the pictures. Note to self, next time you post a finished model, dust the damn thing first! Mistakes were made of course, but recovering from them is part of the process, so I don't mind that I broke the windscreen, knocked off the tail-wheel and broke the supports for the drop-tank several times It's finishing that matters Thanks for watching, I've been Mike Williams, and you haven't21 points
-
James @81-er and John @Biggles87 suggest some “family photos” with my previous “naked” builds, so here are some pickies… My first attempt, a “wooden” mossy… the wood effect was made using a PE mask My most recent, a Polikarpov i-16 these wood decals were from AK A 1:32 Ju EF-126/127 these wood decals were a model specific set from Uschi until next time as always, any suggestions, criticisms or comments will be gratefully received. rgds John(shortCummins)21 points
-
Thanks are due to @longshanks for all his tuition, guidance and support. WIP here: Thanks for looking Rob19 points
-
Hi everyone. I've just joined the site and as this is my first Ready for Inspection post, I thought I better make it an RAF subject. It's an Airfix 1:72 Typhoon 1B from No.266 Squadron, 2nd Tactical Airforce, RAF, April/May 1944. The build is out of the box and brush painted with Tamiya acrylics, finished with a Flory wash. Thanks for looking!18 points
-
God day to all, Im glad to share with you some pics of the now finished Bü133 scenette. The Bücker was in service with the "Troupes d'aviation suisses" betwen 1937 and 1968. You can find some informations about the Bücker familly in Switzerland on this page Bücker in Switzerland I put a link to the Wip->here. Thanks for looking and any comment Bests Cedric Find the cat 😁16 points
-
printed to nose cone alone 7 times) it seemed to be working for the most part! there is some fit and finish issues, some of the printed parts are a but rough, but overall its a pretty good attempt at an MH-47. it looks amazing from about 3 feet away. As always the fun is the journey, Sad its done.16 points
-
Thanks Giorgio Thanks Simon Cheers matey! Almost done now. Enjoy PC, enjoy! Better than you Bill? They must be great! Masked nacelles. I remember you're supposed to paint Klear on the tape edges. I have some of that: However, I don't think you're supposed to be able to do this: In the bin then and put out some more from the big bottle. Done now: Just need to mask the front and rear fuselage anti-glares. More masking. Ugh.13 points
-
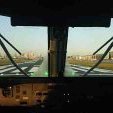
Hello there! This is my first model on this resource, so i apologise if I have made some mistakes. So... all of us well know about A-320 plane - it's one of the most popular in the world. Model produced by Zvezda is very good about assembly and copyability. Some info about prototype: EX-32007 serves now in Kyrgyz republic Avia-Traffic Company. This is one of the oldest A-320 flying till our days - this plane in service since 1993. First operator was Sri Lanka airways. During that time plane was damaged in Colombo airport by terrorist attack. Later it was repaired and served in Danish air transport. At least in 2016 it was delivered to ATC - Avia-Traffic (ATC) based in Manas airport, Bishkek. In early march 2022 I've bought tickets for Aeroflot from Moscow to Bishkek (my parents live there). But for well known reasons, Aeroflot had temporary stopped flights to any foreign countries. And the only way to travel was ATC. So after good vacation with family, I had no doubt about livery for my new model. Materials: Zvezda kit 1/144 Decorix primer first Mr. Hobby H-1 for basic white Master-Acryl "royal blue" (Zvezda MAKR) paint for engines Also used some mr Hobby and MAKR (grey, aluminium) paints for wings, hot part of engines, undercarriage. Painted with airbrush. Decals ordered from avia-decal (Belarus) Pledge Future as basic lacquer and as well as a cover for decals. Final lacquer is Pledge Future mixed with 5% of Tamiya X-21 flat base. It's something near gloss lacquer, but helps to prevent excessive shine while photosession. PS Hope you will enjoy viewing this model. With respects, tMikha.12 points
-
Thanks Giorgio Getting there, getting there… Thanks Martian - good idea Finally some OD: Spraying Humbrol. No, I didn't like it. Even with their thinner the AB clogged. Ho hum. On 'my' fuselage I masked using tape, then realised I'll have to re-mask before the NMF so on the other I just free-handed it: Getting there.12 points
-
Keeping with the Luftwaffe vibe. From Adrians desert scene, we now move to the cold Atlantic with my Dornier flying boat now finished. Another unplanned build, and another one that went together very smoothly. I felt a bit guilty for painting the cockpit interior black, but once the canopy was fitted nothing at all could be seen inside, so that turned out fine! No undercarriage and the Matchbox stand would be under a bit of strain given the shape of the keel, so I fitted a tube into the fuselage and a paper spike slots into that to give me a secure base. This shot has a bit of Photoshop addition to the background and the overall look of the picture. Cheating a bit, but I quite like it. The model is unaltered. Build thread here:12 points
-
Trying desperately to erase the thought of this thread approaching anything like sensible,I shall endeavour to bring you all up to date as to where things currently stand with the two Takom builds. Having returned from a quick trip to Oxford over the weekend to find complete carnage on the thread, I first had to tidy things up. This included evicting an entire troop of Bunny Girls from the Martian wardrobe, removing a very hungover Pete-in-Lincs from the recycling bin and freeing General Melchett's regimental goat from the U bend of the toilet I knew things had got really out of hand when I found @perdu, an MG driver, snoring away in my TR! Some semblance of order having been restored, (as this is Martian Towers we are talking about, I use the term order in its loosest possible sense.) I took up my paint pens and slowly completed drawing in the bracing wires and structure on the tail surfaces of both models, so now we have a pair of fishnets! I shall give the Zepps 24 hours for the paint to cure. I shall then go over both models with a white paint pen to tidy up any areas that I am not happy with and hopefully by Wednesday, we should see the first coats of linen being applied to the models. Once the base colour is on the models, progress should become a bit easier as I will then be on to masking and spraying relatively small areas of the builds. Thanks for looking. Martian 👽 PS: Will whoever left a dayglo, pink codpiece in Mrs Martian's underwear draw please come and remove it; she is not a happy bunny!12 points
-
Spotted this a few weeks ago. Made me smile Trevor12 points
-
Well, the Barracuda stencils have arrived, and are quite a bit nicer than IBG's, as well as slightly more comprehensive. Wing walk stencils are on, then. Still waiting for the Exito decals to escape Miami, though. If only a pair of cops on the edge in neon-tinged business casual were on the case.12 points
-
Good evening, ladies and gentlemen. Let me introduce you my next model. This is a Tamiya set. I added only the riveting, wheel bay from Aires and the etched set from Eduard. The prototype was chosen from Montex, from which a set of stencils was used. There are no decals on this model.11 points
-
Hi guys, I liked how the first sunken with interior came out so decided to do another. I use these as a exercise in colours and have done this one more darker in colour as I wanted this one to be more at depth. I have also added the other sunken version for comparison.11 points
-
Hi folk's,couple of weeks ago I heard the words we all dread,"Dad you got a model I could build"? My youngest with most of his Uni work done wanted something to do so out came the Hobbyboss F-5 for his first effort and not a bad one for a novice brush painted too,he ordered more kits and is working on Special Hobbies Mystere at the moment but Trumpeters Nanchang A-5 turned out a beauty and an aircraft i had not seen much of again brush painted probably a passing phase but nice to see new modellers having a go.11 points
-
Spotted yesterday at Cadwell Park. I had a chat with the owner, and he has a 1600 Pinto under the bonnet with a 5 speed 'box, Mk2 Escort struts, etc. and RS Alloys. Trevor11 points
-
This was a lovely kit to build, although challenging due to the petite delicacy of the parts and the surprisingly mis-registered decals. I had to build the dragon version, even though that meant touching up the off-centred white edges. Pictures: WIP is in the last two or three pages of this thread, the rest being taken up with SPADs. Regards, Adrian10 points
-
Hi everyone, This is diorama #3 related to Nachrichten Fern Aufklarung Kompanie 621 (NFAK 621) as you can see from the references below of the Sd.Kfz 251 likely attached to HQ of 90. leichte Afrika Division which inspired the diorama. The Kfz. 21 is a further conversion of a Plus Model Horch conversion to represent one of the vehicles used by Rommel and Bayerlein which is now owned in Germany. The Sd.kfz. 232 shown in the rear of the first reference photo is likely from Kampfgruppe Kiehl which was attached to Rommel. Other two armoured vehicles are modified AFV Club and the figures are modified and unmodified Dragon and ICM (Dragon's Bayerlein figure is an exact copy of the pose for him in Rommel's Kfz. 21 and the diorama). North African dioramas can obviously be challenging in terms of the scene going beyond just a palm tree and sand, so I decided to try some things to recreate a dried-up riverbed in Libya using crackle and still water products from AK. The tree is supposed to be an acacia. Anyway, hope you enjoy looking at it as much as I enjoyed creating all the components. References Here it is for comment... Thanks for looking, Jeremy Detailed Sd.Kfz. 251 interior before adding the top half... one figure later swapped out for the standing officer.10 points
-
After a few weeks, I thought I ought to post a RFI topic to sum up the final result of my 9 month build that I documented in the WIP thread below. The build did require some effort and concentration, and the kit is quite complex for the scale, but the end result is, I think, worthwhile. There are issues, but they're resolvable... and it'd probably my best Tomcat so far. So, lets just add some photos: This is probably a good one to start with, as a summary of what's what: GWH F-14A Tomcat detailed by Jonathan Hughes, on Flickr Then some general ones... you may notice in some further down, the refueling probe is positioned a bit low. I had to remove it and reposition it higher, which is shown in the later photos that appear first... below. Tomcat upper rear view by Jonathan Hughes, on Flickr Nose details and refuelling probe angle correction by Jonathan Hughes, on Flickr Reflections by Jonathan Hughes, on Flickr Electricals test by Jonathan Hughes, on Flickr Tomcat by Jonathan Hughes, on Flickr Electricians' check by Jonathan Hughes, on Flickr Tomcat tailfeathers open by Jonathan Hughes, on Flickr Servicing Bandwagon 202 by Jonathan Hughes, on Flickr Bandwagon 202; admired by Jonathan Hughes, on Flickr Bandwagon 202 Port front quarter (Wings dirty) by Jonathan Hughes, on Flickr Bandwagon 202 Port rear quarter (Wings dirty) by Jonathan Hughes, on Flickr Bandwagon 202 Rear Starboard quarter by Jonathan Hughes, on Flickr Bandwagon 202 Port nose quarter (wings clean, parked in oversweep) by Jonathan Hughes, on Flickr Bandwagon 202 Starboard elevation by Jonathan Hughes, on Flickr I'm happy with the final result... just pondering the next one now Jonathan10 points
-
On the 50 th anniversary of the World Rally Championship it’s appropriate that I finish this Group B car from the 1985 Portuguese Rally . Walter Rohrl finished 3rd in this , the short wheelbase version of Audis previously all dominate , game changing Quattro . With 450bhp on and off like a switch , Rohrl was beaten by the Peugeot 205 T16 ,which took over from Audi as the car to beat in rallying . This kit started off like this But an aftermarket purchase of Reji decals turned it into this . These Nunu / Beemax / Aoshima kits really have stolen Tamiya and Hasegawas thunder and , having built a few already , they are easy to build and I highly recommend them . Reasonable prices too . Anyway , more photos There’s full build progress on the WIP section of the forum for anyone interested . Thanks for looking Gary .9 points
-
Hi Guys ! I come back with this model, to follow my first post of the re 2000, first of the line, here is my Re 2005. end of line. I always loved this plane, for me one of the most elegant fighter of WW II. If not the most elegant one !!. just my opinion 😉 . At that time, Italians fighters pilots discovered these excellents series 5 fighters , Re 2005, MC 205 and fiat G55. They combined fine airframe design with powerful engines and strong armement. but as said ; too few too late.. So, Re 2005 was built in very few numbers, mainly used by 362 squadrigila in defence of Napoli area. the did their job mostly against B-24's , and despite some tail attachement weakness they did well. I choose to represent a rather "clean" aircraft, as they have seen little use on a short period of time . So a shiny livery as they came out of factory, and also because that put in good advantage the nice lines of the Re 2005. I had several kits of RE 2005 in 1:72 scale and for me the Sword one is the best, main thing is to drill the breda safat guns muzzles on the nose. Missing are the white stencils on nose and wings, witch were not provided on the sword decal sheet . and it's really sad, because they add more to the accuracy of the model.. but anyway.. now the pictures ; there is a story behind the story with this model , first I did it this way.. but, taking into account , the pertinent remarks made by " Zigomar" ( but I understood , first name is Jean ..😉) on the fact that a remarquable point of Reggiane family fighters, was the lowering down of tail flaps when grounded, I've decided to do some surgery on this already built model.. it's not as clean as I would like, but . After leaving the operation room 😁, it went out that way.. hope you will like it, and of course all your comments are very welcome !! cheers !!9 points
-
Hello Here is my recently finished 1/32 Trumpeter P-47D 22 with the markings of “Belle of Belmont” from 63rd FS / 56th FG in Boxted. Note that this Thunderbolt has Curtiss Electric propeller though it is D22. Cockpit enhanced with Yahu instrument panel and Eduard seatbelt I have used Barracudacast main wheels and Eduard tail Wheel. Paints are Gunze Sangyo acrylics Decals are from “Kagero P-47 Thunderbolt with the USAAF- European Theatre of Operations” book. Happy Modelling9 points
-
Good evening. Hope you’ve all had a splendid weekend? Not a lot of time at the bench for me as I’ve had to go shopping for a new car. The Landy is alas no more. 🥺 The beast has pushed the garage fix it budget into triple figures which is more than he’s worth so…🫣🥹 I’ll be sad to see him go but with 221,000 miles on the clock it’s time to stop throwing money at him. As much as I hate looking for second hand cars we seemed to have found one at the first garage we visited. ☺️ Certainly not “The Beast” but exactly what we need for the next few years until Electric becomes a little more affordable. We exchange on Thursday. 🚙❤️ Back to the moths! Thanks for all the help regarding the walk ways. Looking at the red Xs on the Camo moth in the ref shots I decided to use the decals. One of each. So the red No Step on here. And your simple black strip on here. I’ll pop a flory wash over them before the top coat just to bring them in line. Hopefully I’ll get more done during next week. Right, time for bed. Happy modelling you lot. Johnny9 points
-
Hi All, After completing a couple of stalled aircraft builds, it's time to get back to the maritime builds, not the Fushimi Maru as expected but this most recent arrival of a Churchill Class Submarine in 1/350 by Mikro Mir...FANTASTIC! The mandatory stuff... The box art. Hull sprue and base. The other sprue with the upper casing, sail, planes and masts. Also a PE propeller and some decals. Instructions As you can see, like most submarine kits, it has very few parts, so that means it'll be a quick build right... The box art and decal option is for HMS Conqueror, sister to HMS Courageous but seeing that I served on Courageous, it'll be her that I shall be doing, not that there is any difference except the flying of the 'Jolly Roger'. I have to thank @maarten.schonfeld for helping Mikro Mir and @Terry1954 for also helping to bring it to my attention. Stuart8 points
-
Finished......for now. Im going to add more environmental weathering, leaves soil etc when i get the diorama base sorted out. Part two up now.8 points
-
Hi Adrian, for whatever reason the longerons don't show up in most photographs but the frames either show as dark lines or light ones if the gap between the sheets of fabric covering has been doped over. What we are really seeing when we see the dark lines is not really the frames but where the sheets of linen were laced to the frames. Most of the P and Q Class ships were in plain linen, although the colour of said linen varied widely with age and weathering. I am going for at least three tones of linen on my models. My 1/720 builds will be more varied as to colours as later classes of ships did have camouflage. L.31 was destroyed very soon after entering service and was in plain linen. Fellow R Class L.33 is a bit of a conundrum. Most pictures show her in linen but I have found a picture of her wreck which clearly shows one of her gondolas painted in a dark colour. There is also a nagging feeling at the back of my mind that I have seen a picture of her in black/dark grey with a large light grey and/or linen area on her upper surfaces. Trouble is that since I embarked on this project,my Zeppelin library has grown to about forty books, which adds up to an awful lot of pictures to trawl through, never mind all the pictures I have found on line! It would be great to hear from anyone who can help with sorting this one out. L.48 Was a U Class ship and we are on much firmer ground here. We have pictures of her in the Black/dark grey scheme and there is an excellent painting by Ray Rimmel on the cover of his book "Last Flight of the L.48". Depending on how fed up I get with churning out Zeppelins, I may well do L.25 which was transferred to the German Navy from the German Army when they decided to get out of Zeppelin operations and was subsequently upgraded to Q Class standard. This ship had black undersides, a large mottled panel on her sides with the rest of her hull being in linen. Mark 1 Models give this ship as an option in one of their P Class kits but she could equally be modelled from their Q Class boxing or, and this really appeals to me, modelled from the Takom Q Class kit by dint of converting the kit's gondolas back to P Class standard. The choice will probably boil down to whether I can lay my tentacles on some white rub down transfers in the correct size and font. What I am looking forward to is building another Takom kit incorporating all that I have learned thus far about building Zeppelins and passing on some tips as to how to make building the kits easier. Since starting the Takom kits I have thought of a few things I could have done more simply. Just show how wide the lengths of covering on these aircraft were, this picture gives a good idea: There you go Adrian paragraphs of modelling related "wisdom" for you. Enjoy as I suspect it won't last for long. Sorry, should have said that with most of the "Usual Suspects" taking part in this thread, there is absolutely NO chance of it lasting for long. In other and comradely news, congratulations @Chief Cohiba, in view of your contributions to this thread. we (That is the Martian we BTW) are graciously pleased to promote you to the rank of "Usual Suspect". This is considered a great honour, one that is coveted by many, and you are expected to keep up a stream of insane banter. Martian 👽8 points
-
Reading a history of the Luftwaffe from its inception to its collapse, Matthew Cooper's The German Air Force 1933-1945: An Anatomy of Failure right now. One of the Luftwaffe's most important officers, Walter Wever, died before the war in an air crash; two more, the WWI ace Ernst Udet, in charge of procurement, and the ardent Nazi wunderkind Hans Jeschonnek, chief of staff, died by suicide during the war; Göring the same, but afterwards. Incredibly, none of the senior officers who survived to be interviewed or write memoirs between the 1950s and 1970s made any of the bad decisions or mistakes, and always argued against them but were overruled. Amazing! What are the odds?8 points
-
Hi all, Following on from my 1970's carrier builds, I'd like to present my latest offering. Quite a quick build, having been completed over 3 days and a straight forward kit to assemble. The model is Revell's rebox of the Italeri H-19B Chickasaw, very hard to find, other than cockpit masks and a set of resin wheels, it's entirely out of the box which goes onto my next topic... I wanted to build a realistic representation of a Whirlwind HAS.7, but couldn't find a boxing or decal sheet for the variant (other than Whirlybirds resin kits) - therefore it is not especially accurate, the decals for example have been cobbled from the spares box and mainly from past Wessex builds, including the registration. The folding blades were just created from kit parts alone. On the whole a really nice build with some good details and recognisable as a Whirlwind. Many thanks for looking, I look forward to seeing you next time!7 points
-
Take care, Steven7 points
-
Evening everyone - a Monday update before the week gavottes away again. Either will do for me on a good day Bill. 😄 It's the thought that counts. Thanks CJ. Amazing how much more you still find there is to do at this stage of proceedings... Only recently discovered the existence of Saxony Handsteine as a form of modelling Terry and feel compelled to make you aware of this now as well! Wind-up merchant.... Hat doffed to a kindred spirit Chris. 🤝 Afraid I pong a bit tonight as Mrs B. has recently switched over to making natural plant fertilizer from nettles fermented in buckets of water. After about two weeks, to say these mixtures niff a bit when stirred is an understatement... 😁 There used to be a superb one at the top of the High Street in Guildford back in the 80s (called Thorpe's iirc) which used to be like entering an enchanted forest of the early 20th C as much of the stock appeared to have been cleared from country house libraries in the area. To this day I still have many of the books I picked up there on visits, like this volume of Durer's etchings and woodcuts published in Ansbach in 1910, complete with Gothic typeface: No-one will mourn Amazon warehouses when they're gone, but I mourn the loss of such places as that.... That is, and I have to say it Pete, a most timely find for which I'm most grateful. Amazing what grubby fingers can do Giorgio! 😁 The bench had become so chaotic even by my standards so it got tidied recently. Can you see the brass wing fences there? No. Me neither. 🥴 They'd been there when I started and i spent a whole hour scouring shelves and flooring to no avail. Guess where they where? Yeah, that's right. I'd dry fitted them to the wings previously and forgotten about it... Is this how senility starts? Anyways, before any further stupidity could occur they were promptly tucked away into the dwindling box of bits that are waiting their turn to be added to the ensemble: In keeping with my usual modus operandi, I'd made sure to break off the locating lugs ffrom both the Microcell containers so had to drill out and add replacements from brass tubing, which along with the cable trays, got a final coat of LAG and some Aqua Klear to seal: Followed by some graphite treatment on the front to match the grimy/smoke-stained look that appears in a couple of reference photos I have showing this fetaure in enough detail: Whilst the LAG and Aqua Klear were in the airbrush I also finished painting up the RAT sub-assembly: The view below showing the minimum effective print resolution of the Mars 2 as the turbine blades visible here are 0.02mm thick: Then before they could cause any further mayhem, he fences got GG'd into position: I'll come back to them next time and wick a little more diluted GG along the rear portion of them for extra bonding strength: Wingfold colour. Period colour photography of operational FAW.1s is not exactly abundant regarding such matters (and you can safely ignore contemporary museum/static display items beyond the basic grey) but nonetheless I have been able to collate a bunch of characteristic views of the protective lubricant used in service: James has previously commented on the nature of such colour variations here: -whilst some additional hands-on information about the wingfold is provided by the third comment here (ignore the racist gobshite posting after it) to whit: 'the Wing Fold mechanism had to be cleaned and lubricated regularly otherwise it would corrode and the Latch Pins wouldn't lock the wings down unless you jumped up and down on the outer Wings.' (!) Playing around in Photoshop by turning some of those colour shots into grayscales to compare with the original Pathe bw film stock provided a stunningly ambiguous tonal comparison: I did read recently that some very early production FAW.1 wingfolds did receive a coating of zinc chromate (and at least one photo seems to clearly show this) so the labelling above adds a question as to whether the gold/green hue seen sometimes (allowing for fading dyes in period colour photographic film) on this feature may be a weathered version of that. It's a possibility of course, but not conclusive. I'm going to go with the red though. I doing so I freely acknowledge I've no exact reference to show XN708 did use this colour of protective application - and conversely that she didn't - so this is one of those circumstances where you just sometimes have to go on the balance of probabilities from what visual information you do have. I think the red will look lovely and pretty and nice. Last of the parts to get its visuals finalized in this session were tthe two 150 gall. tanks: Since doing these for XJ481 I'd noticed that in many shots the rivets holding the sections together would often gain individual grime streaks of their own so added these here along with other representative levels of griming. That's it this time around. Slowly facing the reality that I have to work out what sequence to start sticking all this stuff onto the airframe in a way that minimizes my capacity to break things off at a rate faster than I'm adding them... Hope your weeks got off to a good start and speak soon, Tony7 points
-
Some masking done and Flat Aluminium and Chromate Yellow sprayed. When I got up this morning I did some brush work and some gluing. Some more work with the hairy stick to come and if I get time some stickers. Thanks for looking, Cheers, Alistair7 points
-
This. This Hurricane is one of the finest Airfix models I have ever had the pleasure of putting together. I cannot remember where I bought it but as it is a subject so far out of my present modelling stream I think I picked it out at a Middle of Lidl or a centre aisle special at Aldi for just a few quid. Wherever it has raised my admiration for newer subject Airfixery I thought you'd like a last chance to see it before Giorgio @giemme gets his paintwork done. I'm not sure the Hurricane deserves being labelled dainty but it is certainly refined, top'n'bottom Superb, this time tomorrow I expect the undersides to be Sky Type S and possibly a start made on the top surfaces. I will not be hunting for markings outside the kit box either, the ones in there look fine to me. The Hind however A bundle of laughs it aint! The metal front looks horrid So much of that front looks like wobbly plastic chrome that I want to bring it all back to bare Airfix... Time to think...7 points
-
I don't think anyone would relish drilling all those holes in the speed brakes. It would have been nice, however, if Airwaves had properly centred the pattern - they have it shifted upward, almost to the top edge of the brake. Also, the arrangement and number of holes have a couple of very minor errors - no big deal on that one. Nevertheless, far superior to what's in the kit box. What I'm not looking forward to, since I plan on posing the speed brakes open, is building the structural details on the inside of the speed brake petal. There is a lot there, and I'm not sure how successfully I can duplicate it. I'm sure I will make compromises. Meanwhile, having a go at the wing fences. The large wing fence, which was moulded onto the wings, was too thick and sanded off. I replaced it with sheet styrene, although I still need to do some final shaping now that it's in place. The smaller fences were put into the razor saw slots and then reshaped. Doing the reshaping in situ is a lot easier as the tiny and/or flimsy bits are supported nicely. Not happy with everything just yet, but it's getting there. These in-progress shots are always so ugly - I need to get some paint on this baby pretty soon. But that won't be real soon, as I'm heading out on Wednesday to drive to Maryland, pick up my son, and then drive on Thursday to Indianapolis for the 500 next weekend. After the race, I'll be driving the golf cart for a couple of days while he actually hits the ball, and then we drive back. I won't be back home here in Rottenchester until the evening of June 1st. Cheers, Bill7 points
-
Hello! Well, I managed to finish the Vimy trilogy. The model represents one of the first passenger aircraft and was Vickers Commercial around 1922. The model is made by MSD and is a very old casting from Frog with a new fuselage and some additional parts. There is almost nothing left of the set in the box, but the one used is completely reworked, all other parts are scratch-built. I had to extend the fuselage by 11 mm so that I could make the cabin door or the plane the right length. Once again, I show the construction from start to finish so that at least a part of the work invested in the model can be seen. The scale model is 1/72. I used Windsock Datafile Special - Vickers Vimy (J M Bruce) and internet resources. Greetings7 points
-
It is never going to be a good time to mention this but for those with an interest in the colour of the lower hull of the KGV Class battleship HMS Prince of Wales, I have consulted the Ships’ Covers for the KGV Class held by the NMM. A note states that MacArthur’s composition was designated to be used on the bottom of HMS Prince of Wales. MacArthur’s anti fouling composition came in black or grey. The lower hull of HMS Prince of Wales is visible in photos of her in drydock after the Bismarck action and when sinking. These show that her lower hull was lighter than (the black of) her boot topping indicating that her bottom was grey. The shades of grey (and red) anti fouling compositions used by the RN in WW2 varied according to the different manufacturers. Photos seem to show that MacArthur’s grey anti fouling might have been very slightly lighter than Home Fleet grey.7 points
-
Hello Dears, OD applied, and AMT green overpainting the U.S markings... Now some touch up and then transfers !! Sincerely. CC7 points
-
Holes for the lights needed to be drilled out for some reason. Then the clear parts were installed and I painted them with clear paint on the other side, creating these nice coloured lights. Then onto the cockpit. I picked out the panels and some other details with black. Then some drybrushing, with couple different greys, concentrating on the edges and details. Then picked out the details with a fine brush - like all the buttons and such. Some minor chipping also applied with dark grey and little bit shading on the recesses with Tamiya Panel liner. And this is how it looks now. It's done - but of course it's missing all the most detailed stuff like the ejection seat and instrument panel. There are also some PE parts for the canopy railing and such but I think I will add all those at a later stage. Summer GB wouldn't be the same without some BBQ, right @Marlin ? I made some south korean style bulgogi beef. Served with rice & kimchi and wrapped in pak choi.7 points
-
Yup, water based; in this case it better have been fully cured--the Dark Earth sat for a month+! About halfway through this project I began using Tamiya's Fine Surface Primer--not especially cheap, but I think pretty good? Is Halfords something like this: https://www.canadiantire.ca/en/pdp/dupli-color-perfect-match-scratch-filler-grey-primer-0472673p.html#plp? That wouldn't be any cheaper than Tamiya's though. That's interesting and I'm tempted to try it because now I am curious, but I hate mixing paint (which is partly what I like about the Mission Models--I can brush straight from the bottle!) so I don't feel that's a long term solution for me (I'd rather moan on Britmodeller about my struggles than spend time mixing paint 😉). Anyway, thanks for all the suggestions, Troy; always appreciate your comments. Wow, if you have to run a heater even in the summer your AC must be pretty good! I'm jealous! I like sleeping in ~17 C as well, so I struggle in the summer, especially last year. Maybe need to invest in some good AC too... Thanks, @opus999! I flipped India (Smer Mk IIc) over to install the pitot tube, stirrup, UC (wheels and doors borrowed from Airfix Mk I kit), and bombs (borrowed from Arma Mk IIb kit). I dirtied up the wheel wells a little, but otherwise haven't bothered with weathering.7 points
-
Has a couple of these knocking about, So decided to build up the un-boxed one, a bit "Dino old school" but at least it doesn't have teeth(And yes I'm looking at you Jurassic Park 3) Box Art tribute6 points
-
Years ago, I started a “Family model” (two-seater) Scooter project. Got halfway through it then life showed up. And not in a good way. Lost my job, apartment and had to move out of state. Along with my passion to build eroded to nothing. Fortunately, after some time things changed for the better and it was time to get back to my scooter build. And like my life, my build idea changed too. It was going to be based on a theoretical Royal Australia Air Force Scheme from Richard Chafer, but now she will be flying for the Hellenic Air Force. And because I enjoy building in pairs, I added another scooter to this project. An A-4M, she’s the “Single Girl”. Flown by Natasha Drakos callsign “Chiana”. “Family model” is flown by Zander “Boomer” Leos6 points
-
Hi folk's second 109 finished and that's me done now for this excellent GB.6 points
-
So just one more thread, long after the RFI was presented It's taken me this long to getting around to digging out a better sized anchor and painting it. Several commented that the anchor that came withthe kit was too large and i think they were right - so this Micromaster offering replaced the original Summary Starling models HMR Rhyl Bangor Class Mine Sweeper: A beautiful kit that needed only alittle adaptation to represent HMS Poole, namely in the extra Carley racks and the "flying bridge" canvas. The hull is moulded without any flaws. Black Cat Model 3D printed parts are supplied, which really do justice to the whole model. I regret not having used etch portholes. The ships boats were replaced by Micromaster offerigns that are unsurpassed. The etch railings and detailing are well moulded and fitted flawlessly. What a marvellous kit Painting: Sovereign colourcoats over Mig Ammo "One Shot" primer - that did lift, and I may use Alclad fro future resin hulls. The Colourcoats covered effortlessly as usual. The B55 colour is a first for me, though in the future I may well "lighten" it. i was particularly pleases with the worn teak deck Rigging: Using Bob's Buckles and Infini 40 Gauge mnofilament. The Boat line on the starboard side is Modelkasten metal wire 0.3mm and whilst expensive is just Fab as it will curve and "hang" unlike monofilament Base: As per my usual method using styrofoam, on this occasion "indented" with a padlock hasp to simulate the chop. Nameplate: Nametiplates.co.uk and it's good to see others using their products on the site So it's a very belated close Thanks for all your support Rob6 points
-
Darling was questioning the whereabouts of this 'article of clothing', only this morning. Unbeknown to me he took a trip, with fellow regimental pigeon fanciers, down to Poole to visit his uncle Bertie in Parkstone which ended, somewhat predictably, in a night of rank debauchery, involving buckets of homemade Cabbage and toadstool wine and the ingestion of vast quantities of white 'pick-me-up' powder and blue 'happy camper' pills. This was followed by bouts of fevered table stacking, napkin folding, safety pin arranging and some pretty violent chair arranging. At one point they managed to stagger out on a pub crawl and somewhere along the line, following several alleged break-ins, he managed to lose said dayglo garment. He would very much appreciate you returning it, poste haste (1st class) with apologies to the Martianess for any distress/over excitement it may have caused. However tempting it may be, kindly don't shoot the messenger...6 points
-
A while later… Just coming off my third and last Matchbox 50th GB build and back to the Nieuport. Ah, rigging, my favourite: The contrast between Eduard and Matchbox is quite shocking, really. Matchbox kits are simple, robust and engineered to assemble well (in the main), and, if you want, you can add more detail if you feel so inclined. Eduard kits, on the other hand, require massive amounts of precision just to assemble the kit out of the box. I’ve spent more time sweating over the basic wing assembly and all the teeny-tiny struts than I did over all three of my Matchbox builds, including all the extra detailing and figures! Still, the end result looks good (if you have very sharp eyesight: I guess it’s horses for courses, and at 17 quid for two each one is under a tenner! Just the prop and rudder (and its rigging) to go and this one’s done.6 points


.thumb.jpg.b4a5069fd2c2dd5708ce1694345c5b11.jpg)


This leaderboard is set to London/GMT+01:00