
Leaderboard


Popular Content
Showing content with the highest reputation on 19/05/22 in all areas
-
I'm on a roll, #6 for the year with a late start after moving house in January. This one has been on my to-do list for years and I finally got around to building it. My first Tamiya 262, and as expected it was just as good of a kit as I've always heard. Just added a seat, instrument panel, and wheels. 1/48 Tamiya Me262A-1a "Green 4" of Stab JG7 Major Theodor Weissenberger Brandenburg-Briest, Germany, Feb-Mar 1945 Ultracast seat Yahu instrument panel CMK wheels Montex masks EagleCals decals AK Real Colors paints Anyway, on to the pics! Thanks for looking!23 points
-
Here are some pictures from one of my detail constructions, an RF-104G in Hellenic Air Force duty. It’s a Kit from Hasegawa in scale 1/48. This model is the F-104G of Hasegawa and converted to RF-104G. The cockpit, ejection seat ΜΒ GQ-7 and exhaust are replaced with ones from Aires detail set. CMK detail set for avionics boxes, fuses, electronic bay and Radar is included as well. Conversion RF-104G detail set coming from Victory Production. I scratch-building the photo bay with the right inside camera and the centerline pylon with a trainer R.B.D. The model is painted in “Vietnam” camo, using colors provided by the Model Master and it finished with extensive weathering. Decal sets are from Icarus Decals, representing an RF-104G in the last years of Hellenic Air Force duty. I hope you enjoy my model. Happy modeling! Giannis Doxas21 points
-
Hello everyone, Here is my 1/32 GWH Curtiss Hawk 81 with the markings of Flying Tigers AVG from 1st Pursuit. Built by OOB except for the Eduard seat belts, Barracudacast main wheels and Cutting Edge national insignias Paints are Gunze& Tamiya acrylics. Happy modelling20 points
-
I built this one last summer, and I finally got around to taking some photos of it. It was an Academy kit, if I recall correctly, with some Italeri decals I had saved up from years ago. I always wanted to be a fighter pilot in the CF, but by the time I was fifteen, I had sprouted to 6'8" and almost 200 lbs, so that dream died quickly. I played around with the weathering a bit, but in real life, these things look beaten half to death, and I probably could have done even more to it. Most of the Canadian CF-18s are older than my wife, and my children keep telling her she's ancient! Then they run away quickly.16 points
-
After a long wait for decals, I have finally put the finishing touches on my Ukrainian airlines Embraer 190. I like this little kit. It's an easyish one to turn around, plus I had some spare AA decals left over from my BA 190 made at the end of last year. (See it here: https://bit.ly/3PwnIlj ) I have included some pre-decal shots too. - Kit went together okay, though needs filler in places. - Made a custom nose landing light from a transparent sprue - Decals from Authentic airliners and Polish eBay user 'bigt1972'. Decals quite thick and fragile but look good when in place. My narrowbody shelf is now full! Feedback welcome. Slava Ukraini! 🇺🇦 Chris16 points
-
Hi there, After close to a decade of gap since my last post here and making scale models, I would be a brave enough to share my latest built I just finished. I hope this is okay here. 🙂 There is nothing with politics, it's all about this beautiful livery and my fav. a/c type ever. Due to there is no any Tu-134 on the busy lines were flown without ruined and dirty coat, I added a hint of weathering as I always seen them in the real life... 🙂 Airline: GazpromAvia Type: Tu-134AK-3, Reg.: RA-65045 Kit: Zvezda 1/144 Decals: Ascensio and Revaro Flaps: laci-ltd.uk by Ladislav Hancar There are some Tu-134A from the Czech AZmodel also stands in the line, which contains less details than Zvezda kit, however the entire nose section's shape is more much more accurate and correct than the Zvezda potatoe. Especially if someone plans to build the radom-nose version.15 points
-
This was my project in the M3/M4 Medium Tank, Single Type Group Build. It really was a lovely kit to work on and I added a few extras from the Hauler PE set for this kit, as well as using a metal barrel and some resin stowage from the Black Dog set, also designed for this kit. While I was working on this build, Bertie started his thread for a possible Entropy GB, which gave me the idea for the burnt out turret scene. Luckily I had the parts for a Sherman turret in the spares box. It was originally from a HobbyBoss 1/48 Sherman. The figures and telegraph pole are from Tamiya and most of the green, scenic materials are from Woodland Scenics and Army Painter. As usual everything, with regards the painting and weathering, was done with acrylic paints, all applied by brushes. The mud texture is the only exception, which is from Vallejo. Kit: 1/48 Tamiya Sherman British IC Firefly Paints: Humbrol, Revell, Citadel, Railmatch, Vallejo acrylics, all applied with brushes Extras: Hauler PE set, metal barrel, Black Dog Stowage set, Tamiya figures and telegraph pole, spares box turret and various parts from a 1/48 HobbyBoss Sherman kit, MDF, expanded polystyrene packing, household filler, Vallejo European Mud texture, Woodland Scenics Blended Turf, Army Painter Grass and Flowers Tufts, thread and Lead wire WIP thread: HERE More vignette photos can be found: HERE Scenes from the vignette: Tank only: The full vignette against a white background: Thank you to everyone who commented in my build thread. Comments and suggestions welcome. Kind regards, Stix14 points
-
Thanks for the kind words and well wishes everyone! I spent a little while just sort of cleaning up the Dark green with a brush, adding some wing root chipping with a toothpick and Vallejo Metal Color Duraluminum, and playing with the rivet wheel: Ooof, zoomed in shows there's more work to be done! The rivets are nearly impossible to see, but that also means there's no pressure if I screw up.12 points
-
Late night catch up. 🌛 I did the old pop and roll but I still wasn’t happy with the bubbles on that tail decal. So I threw caution to the wind and hit it with a light sanding stick. This got the little blighters. I had some matching paint so that was the next step. A bit of hairy stick action and we’re away. You can zoom in and see some little errors but in real life it’s loads better. 😇 I’ll gloss tomorrow. While I was getting the bits ready for final construction I realised that the engine cover was missing. 😖😖😖 Not anywhere. I checked the thread to see where last it was. But I couldn’t find it. Then a few pages in I saw this just after painting the internal green. look in that right hand corner. It was in a little tin. 🤩 Now! Where’s the bloody tin? It’s like one of those find the item games. 😖😵 Can you see me? yes eventually I found it. Next to the fisherman. 😀 Phew! Not painted so I really must have totally forgotten about it for a while. At lest I have it. I had visions of having to make and print one for a minute. Ok moving on. The Navy moth got gloss coated today with no decal issues to speak of which is good. Soo it looks like gentle mustang works with TS-13 😇 this evening after it had dried I got the Flory out. only a light pass. I don’t want these super grubby so I’ll knock it right back but this does look over the top at this stage. After a good thirty minutes or so I hit it with a light cloth and cotton buds. Much more like it. Just enough subtle marks to make it worth while. The panels on the camo came out nicely too. I always worry about big serial decals as you can sometimes see the carrier film if you don’t cut around it but I think these ones worked out well. 😇 and top side. Just enough Flory in the lines and around the panels. Now some help from the hive mind. 🐝🤖 While doing this I thought that maybe there should be black panels (walk lines) on the lower wings. The scheme on the decal sheet doesn’t have them but they are there on the civilian offerings that come with the box. ideas? Any hoo that’s it for today. I is Pooped. Thanks for dropping in. Hope you’re all having a splendid week. Happy modelling chums. Johnny. 💛12 points
-
Hi all, Following on from my 1970's carrier builds, I'd like to present my latest offering. Quite a quick build, having been completed over 3 days and a straight forward kit to assemble. The model is Revell's rebox of the Italeri H-19B Chickasaw, very hard to find, other than cockpit masks and a set of resin wheels, it's entirely out of the box which goes onto my next topic... I wanted to build a realistic representation of a Whirlwind HAS.7, but couldn't find a boxing or decal sheet for the variant (other than Whirlybirds resin kits) - therefore it is not especially accurate, the decals for example have been cobbled from the spares box and mainly from past Wessex builds, including the registration. The folding blades were just created from kit parts alone. On the whole a really nice build with some good details and recognisable as a Whirlwind. Many thanks for looking, I look forward to seeing you next time!11 points
-
This is an out of the box Tamiya F4U-1D in 1/48. The decals are from Aztec, Salvadorian air force 1969.11 points
-
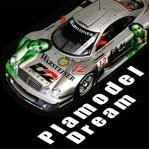
Finally arrived 🥳 I'd been after one of these for ages, but the price of the originals was always way too high, then I considered the Italeri version, but I try and steer clear of Italeri kits as I've had some poor experiences in the past, they may have got better, but I'm still sceptical. So when Tamiya said they were going to rerelease it I knew I'd have to have one as it was the first big F1 car I built as a teenager and I never did it justice then, I remember watching the turbo era and the Renaults always come to my memory10 points
-
The aforementioned neighbour's cat Jasper just arrived on the windowsill. Not noticing that our JJ is lurking on the lawn; Now he's spotted him. Oh oh, I'm in trouble.... Removing Jasper from his territory is the most exercise JJ gets these days...!! 🤣 Keith10 points
-
Me too PC, me too… Thanks Tony I'll be more careful in the future, for sure. Thanks Simon, very kind and a good tip Thanks John BBT? Of course it's the witty dialogue and 'nerd appeal'. ALL episodes are streaming on All4 now (if you can take the ads or £3.99 per month). I may have it running on my other screen. Apologies for the bursts of laughter… Penny? Ah, well, looking at episode 1 again I think I can say we've grown older together! I did watch a few Flight Attendant episodes but it's not the same IMHO. Still gorgeous but the script? One option Rob, but, er… Thanks Phil Option 2 is my go to: …but when you don't have the matching Revell paint it's a bit harder. I need to sort out this lot: The red and grey are easy; the rest are options for Olive Drab (OD) and, well, we all know the problems with that. Time for iModelKit and it looks like it's now available on Android too: See? Even the FS guys can't decide. So what does the scheme say? 'U' for the body, 'F' for the wing panel and anti-glare. 'F' is 46 Nato Olive so that's done. 'U' is a 3:1 mix of 46 and Yellow 15 (which I don't have). Can I mix it from stock? Ha. I think I'll go for the 'by eye' option: I need to mask up, a lot, then I think I'll try spraying some bits. Spraying Humbrol? I know…9 points
-
Neptunes of the Brazilian Air Force used to fly low over the beaches of Salvador, in Northeastern Brazil, where I spent a few years as a child, and I still remember how loud they were. Attached are the first pictures my just completed rendition of the Hasegawa P2V-7 Neptune kit, of 1987 vintage. This model represents a plane that served with VP-11 in the mid-60's, undertaking long and lonely patrols of the North Atlantic in the search for Soviet submarines. The Hasegawa kit has raised panels, little interior detail, and no detail at all in the wheel bays. However the shape is accurate, the fit is fine, and there is almost no flash. It does have some annoying features, like the canopy that comes in two halves to be joined along the midline, and propellers in which each blade comes separately. These require a lot of test fitting and tweaking to look good (best to use slow setting cement). This second-hand kit came bundled with an Eduard internal detail set, which was OK, but to be honest did not add much. In addition, the decals that came with the kit disintegrated upon testing, so I purchased a set from PrintScale (cat. no. 72-106). Alas, this aftermarket set was incomplete, and somewhat inaccurate, requiring some improvisation using bits and pieces from the spares box, and even rescuing some bits from the Hasegawa set (piecing them together like a mosaic). I also show here a couple of pictures of the Neptune next to the PB4Y-2 Privateer, the previous generation of US Navy patrol bombers (both 1/72). This is just to make the point that the Neptunes are about the same size as a Privateer (itself a stretched B-24 Liberator), which was a bit surprising to me. I think the Neptunes look smaller than they are, mostly on account of the large canopy (which reflects it being designed for the ocean patrol job) and huge engines. For more pictures and details about the build, check this model in my web page (address in the signature panel).8 points
-
Hello to all. This is my latest finished model.The Zvezda MiG-31.I have installed the Extratech Pe in the cockpit and added a pair of Resin K-36 seats.The rest is oob.I painted the kit in gunze and tamiya acryclis.The decals came from the spares box. Regards,Dragan8 points
-
Hello! I'm working on a 1/20 scale F1 vehicle for the first time. This is the most beautiful F1 vehicle I personally think. When I was young, I saw this car for the first time in the Tamiya catalog I remember watching for a long time with the F40, NSX. NSX is the only real thing I've ever seen in my life. Haha;; I thought it would be easier to work with fewer parts and simpler than the F1 kits released these days. But it wasn't as easy as I thought. As shown in the picture, the top and bottom cowls are detachable, so they can be opened and displayed even after completion, but they are just placed on top. When I assembled it, it didn't fit perfectly, so I tried to put it together several times. In the case of fine steps, I tried to match them as much as possible while grinding. Additionally, I applied it to fit well using a 2mm circular magnet. I think it's my first time to repeat the fit so many times while making Tamya products.;; The body colors are moderately blended with finisher's mica red and pure red. When painting the red color, I made a slight gap and painted it all at once, just in case the tone changed. The line is very pretty and the red color goes really well with it. I chose the Nigel Mansell car. I put on a clear coat once. I think it will be the hardest part of this kit to match the top cowl and the front part of the top cowl. I thought a lot about what to do because I thought there would be a connection line that's not in the real car If I go through construction to solve this part, I think I could ruin the left and right balance of the front arm, so I'm just going to make it as small as possible.7 points
-
I had a little fun with this one, especially with the weathering and paint chipping. The model kit itself was quite simple with decent fit, and I finished the entire thing in about a week of spare time. Enjoy!7 points
-
This was my project in the M3/M4 Medium Tank Single Type Group Build. The kit itself was lovely to work on and I added a few extras from the Hauler PE set for this kit, as well as using a metal barrel and some resin stowage from the Black Dog set, also designed for this kit. While I was working on this build, Bertie started his thread for a possible Entropy GB, which gave me the idea for the burnt out turret scene. Luckily, I had the parts for a Sherman turret in the spares box. It was originally from a HobbyBoss 1/48 Sherman. The figures and telegraph pole are from Tamiya and most of the green, scenic materials are from Woodland Scenics and Army Painter. The base is a thin sheet of MDF with expanded polystyrene packing material on top, to form the landscape. Over this I applied some household filler to help create the look of the hill. More details about the base can be found in my WIP thread. As usual everything, with regards the painting and weathering, is done with acrylic paints, all applied by brushes. The mud texture is the only exception, which is from Vallejo. Kit: 1/48 Tamiya Sherman British IC Firefly Paints: Humbrol, Revell, Citadel, Railmatch, Vallejo acrylics, all applied with brushes Extras: Hauler PE set, metal barrel, Black Dog Stowage set, Tamiya figures and telegraph pole, spares box turret and various parts from a 1/48 HobbyBoss Sherman kit, MDF, expanded polystyrene packing, household filler, Vallejo European Mud texture, Woodland Scenics Blended Turf, Army Painter Grass and Flowers Tufts, thread and Lead wire WIP thread: HERE Photos of the tank on its own can be found: HERE These photos were taken with my usual sky photo backdrop behind: ] This next set were taken without the photo backdrop so I could take some slightly different angles: The following photos show what it all looks like as a whole: Thank you to everyone who commented in my build thread. Comments and suggestions welcome. Kind regards, Stix7 points
-
My thoughts too Tony, thought I'd seen that somewhere before, The inspiration is obviously a result of the melding of his twin obsessions of gasbag modelling and deeply routed personal habits....an unholy alliance, even for a Martian...hold up, I'll get Gag Halfront on the line, he needs the money. (public domain image, not Lady M, sadly)7 points
-
Good morning everyone … I was able to get the first color of paint on. The grey took 3 heavy coats to cover the red plastic. I still have the two greens to do but will let this cure for a day or two. Please feel free to ask questions, post comments or add thoughts. Dennis7 points
-
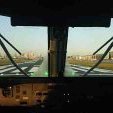
Whilst the Scottish National Scale Model Show we're just back from was bad use of our time in a business sense, I can find a positive slant on it if I consider that we paid £200 to find out that the public seemed to quite like my little motorised aeroplane and helicopter. The moving parts seemed to catch peoples' eyes from some distance and they'd come over to look and talk about it. Notwithstanding that I have no real idea where I may go that would allow anyone to see it, I have decided I'd like to pluck the Revell 1/48 Chinook that I bought in Devon with my then fiancee (we've been married 17 years now) out of the stash and build it as one of British Airways Helicopters' BV234s which I still have some childhood memories of. I did ask my dad @skyscooter if he had a favourite out of the fleet, and the response was that G-BISP and G-BISR were the best ones. From an engineering point of view, I interpret that to mean those two worked fairly well more than the rest of them did. I'm consciously avoiding G-BWFC which was a bad time for dad, although by way of showing it's a small world indeed, @Duncan B is friends with the captain who survived the fairly horrific crash's son. What the show at Perth did demonstrate was that the HH-3E and HC-130P models aren't actually very good. They were unreliable over the weekend and needed a fairly bit of impromtu repair. I told various people that I hadn't really thought them through properly and failed to make sufficient effort because I honestly wasn't confident it was all going to work. In the interests of not repeating avoidable mistakes, this time I'm trying to be a bit more methodical and plan out the whirly bits. I've started by attempting a scale drawing of the Chinook HC1 as kitted, from which I will adapt. I have a Cricut Maker which does cut plasticard well, so will cut new fuselage side inserts with the cabin windows using that in due course. Next I studied various photographs of the BV-234 and marked up the differences. There are more detail differences yet to capture, but for now I'm concentrating on big chunks of plastic in need of carving up. Which upon removing the original layer leaves me with something close to a BV 234 civil Chinook. I had some discussion with dad about the differences, and the relocated undercarriage was a new one, despite him knowing the civil machines literally inside out. It seems the MH-47E which first flew in 1991 is pretty much a BV 234 with military gadgets added and indeed it looks very similar in most respects except the cabin windows. The wheels are in a different place on the MH-47E compared to the CH-47A/D too, I discovered just today. As the Chinook has counter rotating and intermeshing rotors, just having two motors won't be good enough for this. They need to be properly geared together, so I've spent a bit of time on RS Components' website choosing mitre gears, spur gears and ball bearings to suit the required purpose. I've ordered a 300rpm geared motor from eBay, but can't confirm the precise dimensions until it arrives. It'll fit inside though - there's plenty space. The transmission will be 3mm diameter steel shafts. I will design a cradle structure to hold the ball bearings in place, and plan to insert the whole thing in through the floor. I won't use most of the Revell interior hence - the BV 234 was completely different inside anyhow and the small windows won't permit much viewing of the interior. I have two options for the drive layout, and will probably go for Option B as it's simpler and cheaper, needing 2 fewer spur gears and 2 fewer ball bearings. It took me until I saw Option A to realise I could just flip round one of the mitre gears and still achieve the correct rotational direction on each rotor mast. Option A Option B I'll sleep on this and will try to order the gears and bearings tomorrow Power will be external again. I have superimposed D cell batteries on the above layout and they're both too tight and will probably squash the undercarriage. Thanks for reading.6 points
-
I've completed four builds for this Group Build and have definitely fulfilled my contractual obligations, so I thought I'd risk something a bit more complex: the Hasegawa 1/48 Kawasaki Ki-45 Kai Koh Toryu. First to unburden myself with a couple of confessions. First, I have this kit because I really wanted to build the Isuzu TX fuel bowser that is rarer than hen's teeth and getting it in this dual-kit set was the only way I was able to do it. Don't judge. Second... I have, unfortunately, what they refer to as 'form' with regards to the Ki-45. It's a lovely looking aircraft and I really wanted to build one, but so far I have failed with both the 1/72 Hasegawa version and the Zoukei Mura 1/32 kit. So this could either be third time lucky or otherwise I should just take a hint. Anyway here's the box: ... and here's what's in it, apart from the aforementioned fuel truck: I don't know if you can see it from this photo, but the carrier film for the kit's decals has taken on a brownish-yellow tinge. It's most apparent here between the thin red stripes and in fact looks worse in real life than it does here: So I shelled out on a couple of extras: The Rising Decals transfers look really nice: It only includes markings for one Koh variant, but it's an interesting scheme for a very early model from the Dokuritsu Hiko 84th Chutai who carried out combat trials with the Ki-45 in China in May-June 1942: I'll have to approximate that mottle as best as I can; I haven't been able to find any photo's online of the actual unit's aircraft. I've made a start and swallowed the first frog: Cheers, Stew6 points
-
'There's no place like home, we're not in Kansas any more, Toto'.....Baldrick tells me that, other than the incongruous name tags draped around his neck, he thinks he/she/it (insert preferred pronouns or expletives) scrubs up rather well. If I were to tell you that this was one of his more modest costumes you'd begin to see the trouble we're in. If I recall this was on his way to the BBC studios for his stint on the panel of Question Time, Marsxit with fellow crosstumier Eddie Izzard and a somewhat perplexed Nigel Farage.6 points
-
All sounds Like one of @general melchett's schemes to me. Many a true word spoke in jest as you will see below.... Very sensible of you. Deviation? In my threads? Surely not! Right, you lot have asked for this: hitherto I have been avoiding posting it on line for the collective sanity of your planet. Let me introduce you to one of my alter egos; Dr Martian Furter! Are we all sorry now? There are more pictures in a similar vein. They can be posted here; or not, depending on the level and amount of bribes received. Martian (Extorting the Galaxy since forever.) 👽6 points
-
1/48 Tamiya Sherman British IC Firefly Europe 1944 Kit: 1/48 Tamiya Sherman British IC Firefly Paints: Humbrol, Revell, Citadel, Railmatch, Vallejo acrylics, all applied with brushes Extras: Hauler PE set, metal barrel, Black Dog Stowage set, Tamiya figures and telegraph pole, spares box turret and various parts from a 1/48 HobbyBoss Sherman kit, MDF, expanded polystyrene packing, household filler, Vallejo European Mud texture, Woodland Scenics Blended Turf, Army Painter Grass and Flowers Tufts, thread and Lead wire WIP thread: HERE Firefly RFI: HERE Vignette RFI: HERE6 points
-
Some cursing was involved... Varnished applied and decals went on. The decals were lovely and thin, went on and formed beautifully. A couple of decals were a pain, the starboard wing walk line decided to wrap itself the break apart with my 'faffing' and the port fuselage stripe took and age to look right. Fortunately I have a couple more of these kits and raided its decal sheet for the wing walk line decal as I'll be using the other decal option for that kit. A quick varnish coat, then we'll start putting things together. Stuart6 points
-
That was enough motivation to move onto the topside. Yesterday I shuffled for 23km on a trail. The journey took 3 hrs and 15 minutes. I can hardly move today, but still managed a little modelling. Masked off the underside Then I mixed four parts XF-49 and one part XF-72 and sprayed the Spitfire. Tomorrow I will start masking the camo pattern.6 points
-
Sorry Pete. Er, fnaar! (Bit out of practice)6 points
-
After finishing the 2 Matchbox cars and the Castrol Celica I thought I'd have a go at something different, but still on wheels Bit off topic for me TBH, but I'm going to have a bash in the Big and British GB with this one Never built a lorry before, so there may be questions along the way, looks like once the chassis is painted I can build it up using it as a base Kit seems to be going together quite well with good locations and minimal flash up to yet, so any tips or hints from you truck guys out there welcomed Ian5 points
-
OK, the original post was bed enough, but do you all need to keep copy/pasting it so we have to see it again....and AGAIN???? That was obviously taken just after the infamous "fall through the roof and straddle the beam" episode. No sympathy any more. None. Sorry. Ian5 points
-
Interesting aircraft cockpit 3D renders announced as a new project in the Amusing Hobby Models Group Facebook page. Sources: https://www.facebook.com/groups/3165843010182459/posts/4573359412764138/ https://www.facebook.com/groups/3165843010182459/user/100004271373549/ Looks like a Yakovlev Yak-141 Freestyle cockpit to me. And as Amusing Hobby aircraft kits are up until now (Luft46 fantasies) all in 1/48th scale... 🤞 (http://www.amusinghobby.com/goods_cat_14.html). Scale now confirmed: 1/48th ! V.P.5 points
-
…and finished: I will get some photos up in the gallery soon. Unfortunately, I don’t have a desert base and there’s no sand in the house! I will have to check out a local building site… Thanks to our hosts @JOCKNEY and @Rabbit Leader, and everyone who participated in a wonderful GB! Matchbox kits passed me by the first time around, so I’m glad to catch the multicolour goodness the second time! Regards, Adrian5 points
-
Hi @Bertie Psmith, @Retired Bob, @edjbartos, @Corsairfoxfouruncle, @Calum, @Muchmirth, @Hewy, @THEscaleSHOW, @Ray_W, @Jasper dog and @mullac2001. Thank you all for all your comments. You are all far too kind. And thank you to those who have been commenting throughout my build. Over last weekend I managed to get this to. what I decided, was its finished state. I have, as usual, taken lots of photos and they can be found spread between the Armour RFI section, the Diorama/Vignette RFI section and the Gallery. After my last post above, with the ground works basically sorted, I added the figures, a few extra, scattered tank parts and the cut telephone wires, which I made from 0.2mm lead wire. A few photos here to show the finished project: Thank you again to everyone who took the time to comment or make suggestions in this thread. I have thoroughly enjoyed this build. Comments and suggestions welcome. Kind regards, Stix5 points
-
A well overdue update. Have been plodding on with the detail painting, but not getting much time at the bench unfortunately. Have also done the pin wash. I didn't find it too bad painting the stowage in situ, but realise it would have been much easier if i had left the rope off. I am not very happy with my overpainted star on the turret. Why oh why, did i not use the blacked out one Tamiya provided! Oh well hopefully it will look better when it has a coat of Matt varnish. Have also given the other decals a coat of very thin OD to tone them down. Next job is to add a bit of mud/dust to the lower hull/running gear then get the wheels and tracks on. Then final weathering. Oh and then the base and the figures. George5 points
-
Under The Pressure Are you bored with rust yet? You got to be bored with it, even I'm a little fed up with it, and I'm the one having lots of fun doing it, but still, there is light at the end of the tunnel, most of the model is now painted a vaguely rusty and dusty colour, so hopefully things can move on to the more colourful and fun side of things soon, like the graffiti and,.. stuff, but first I need to perfect the fine art of baked on sandy patches, which are proving to be more problematic than anticipated, I sorta thought that they would be very easy to do, and probably would be if I did them the right way, but me being me, I'm making a meal of it, but anyway, I've made a start, mostly on the turret, and I need to do a lot more on the upper and lower hull to make everything blend together better, it's all still work in progress, and a lot of fun, mostly just chilled out stuff painting (badly) with oils. The mortar and pestle in the picture on the right is simply for creating a very fine pastel dust, when you run very fine builders sand (sharp sand) through a beige coloured mortar and pestle you get a very good sandy coloured dust, which is damn handy for a build like this, but anyway, the upper hull and turret got hit with the same stippled coats of Daler-Rowney (heavy body) burnt umber acrylic mixed with a medium rust coloured pastel chalk, It needs two or three coats to get a good base coverage, which takes some time, but not too bad to be honest as it's fast drying stuff, then I just left it for a day or so, ready for some pastel and oil washes. And talking of washes, the picture on the left shows a medium rust pastel wash using Tamiya X-20A thinner as a kind of fixing agent, applied mostly all over, but in a varied way so as to create a faded patchy look, then it got zapped with a hair dryer for a few mins to dry it all, and then another wash, this time with oils, mostly Windsor and Newton Cadmium Orange (water mixable) this was applied very sparingly and only in certain areas, not an all over wash like the first one, this wash was done quite a few times to try and build up some colour, and because it's a lot of fun. Pictures above and below, now my terrible attempts at sandy patches can be seen, though It does have to said that the camera is showing these as almost bright white, which they are not, they are a very light sandy brown colour, and were done with Naples Yellow, but It is fair to say that they need quite a lot more work, they need the high spots picking out with a much darker colour, and a lot more blending in work, It's all still very much work in progress, and about the only thing I'm happy with at the moment is the sandy patch around the gun barrel. But anyway, the main reason for chucking some paint on it was to check the surface texture, to get a rough idea of whether it's in the right ball park or not, and in that regard I'm fairly happy with how the texturing turned out to be honest, there is a certain element of complete random chaos going on, and I'm very happy with how the turret turned out, plus the lower hull turned out reasonably well, and the upper hull maybe not so much, It maybe needed more chaos corrosion on the front plate, but then the front plate will hopefully be getting a layer of seaweed/slime/algae nonsense at some point, so it probably doesn't matter that much. Picture below, the whole thing now badly needs a coat of varnish and then a dark wash needs to be applied to darken it all down a bit, all the weathering effects have lightened it up quite a lot, and as can be seen in the picture the engine bay badly needs to be sorted out, it's a focal point, a very big focal point to be honest, and therefore needs some work, It badly needs some interest adding in the form of old junk metal, some more detail adding maybe, engine mounts, that sorta stuff, and a big pile of sand for the crabs to play in, this might be the next job I think, but not sure, I keep mentioning the wheels and suspension but then never get round to doing them, so that might be next... I'm 60/40 now to almost liking it, so that's progress right, and I have to be honest, It's a lot of fun to work on, It's fun to just keep making little changes that make it worse, and then make little changes that make it better again, trial and error, work in progress and not even vaguely close to being finished, and I find it funny that about 95% of the model is painted but I haven't used an airbrush yet, and I'm not sure whether that's a good thing, or a bad thing... Matt5 points
-
The two last pieces - a folding seat and a scratched MG15, to replace the kit part:5 points
-
Much, thank you! Grant, who was too young for vaccination, was the hardest hit, and aside from some lingering issues with Grant South, is pretty much all recovered. He is, unfortunately, still home with me while I try to work, but I just found a distraction for him: PXL_20220518_183335433 by Edward IX, on Flickr PXL_20220518_184705743 by Edward IX, on Flickr5 points
-
Hi everyone, Finally, it's time to start gluing some plastic! But before that, this is what I'll be using throughout this build: Firstly, the base kit- a 1:72 Airfix Lancaster courtesy of their BBMF boxing. A myriad of aftermarket pieces. The "Cookie" and assorted diorama pieces should come in very handy! As well as this tremendous book, which was very kindly suggested by @Troy Smith. To get back into the swing of things, and to refresh myself in working with PE and scratchbuilding, I decided to have a go at the FN-5 nose turret first. The kit parts make a good rendition of the turret but it's crying out for some extra scratchbuilding to make it more lively. Also note the resin gun barrels courtesy of QuickBoost. The result of a few hours working with Tamiya tape, plasticard, Eduard photo-etch parts, cut sections of wiring, and a lot of superglue! (A 2p coin for reference) There is plenty more detailing work that needs to be done prior to painting, yet it seems to be coming on nicely. I should add that some of the detailing is not 100% accurate (for example, there should be a raised inner "step" towards the inside of the turret base, however I felt this would have been slightly beyond my reach). I have yet to find many images of the rear of an FN-5 turret- that is, images looking from within towards the inside of the rear turret casing. However, I shall keep trying! Thanks again for dropping by, Sam5 points
-
Thanks Hendie, getting there Much better: What's that you say? Be careful when you pull the mask off the B that the decal doesn't come off too? Too late: I'm going to say, with a little touching up (snurf), that I like that effect. So there5 points
-
5 points
-
Going cross eyed? You bet all twenty four of them! Over the last few days I have been drawing in the locations of the wire bracing that shows through the linen covering of the P an Q Class ships; a sort of pre-shading if you will. I still have to decide how far forward and aft this effect needs to go so it's back to the books on that one. Also, still to be done is the structural effects on the tail surfaces. A word of advice here, do not try and draw in the wires in one session. It takes a long time to do and as you tire, mistakes will start to creep in. I spent a good hour this morning correcting the ones I made when I should have put the model down and rested. My advice is to do this part of the build in half hour sessions. I have made a start on the Q Class but this one is a bit behind as I discovered a few flaws around the tail that I had missed and had to sand them down and re-apply Mr Surfacer in the areas affected. Thanks for looking and I hand back control of this thread to the Usual Suspects. Martian 👽5 points
-
Well, sometimes you just get on a roll: Tamiya NATO black for 'primer', and some Tamiya flat white for the stripes. Ugh, too much overspray. Underside Medium Sea grey painted with Mission Models. Then back to trusty Vallejo for the Ocean grey on the topsides. Just letting my luck roll now, and see if I can freehand the Dark green as well. I'll take it, but don't look too close! Masking off: Plenty of cleanup to do, but I'm happy to have something that looks like a Mustang!5 points
-
Please forgive the delay on this build, my Mom had some health issues, and I had to make a trip to New Mexico and Los Angeles to help out as best I could. She's made a remarkable turnaround, and is back home safe and sound! Inspired by the Mighty @Procopius and his fantastic rendition of the Arma P-51B, I decided to continue with that kit first. I say this every thread, but I'm just not a cockpit guy, but this kit has some amazing detail out of the box. I'm steadfast in my refusal to add PE or decals to a cockpit, and despite my best efforts at keeping it simple, the Arma cockpit includes throttles and knobs and switches of every sort in just the molded plastic. The downside is that the cockpit takes up quite a bit of time to build, and I have three more of these (and let's face it, I'm buying another when the F-6C boxing arrives) to build! Getting the fuselage halves together is pretty complex, but it all goes together beautifully - I was truly impressed how the top of the seat perfectly meets the tip of the fuselage overhang when all is said and done: Maybe building four more won't be so difficult after all. I painted the yellow Zinc Chromate stringers using a variation of the paint poorly then scrape off the excess with a toothpick canopy painting technique. The metallic base is Model Master Metalizer, and the YZC is Lifecolor acrylic. The metalizer bonds strongly to the plastic and the Lifecolor was easy to scrape off without harming the metal underneath. Now for a little bit of seam work. Thanks for stopping by everybody!5 points
-
4 points
-
It's really a pleasure to show you my work... It seems you like it, thanks guys ! Today, a new deal with Mr Guiloy and his handlebar. His pieces: A radical approach... Why? Die-cast pieces are not really precise! And a minimum is needed for that: And the result: It's not the end folks! Dan.4 points
-
Before committing to plastic, I'm trying paper print-outs of planned inserts to check how they fit and to convince myself that my planned cut lines make some sense!4 points
-
After polishing the front hood I wanted to try how it goes with the rest and I really like it4 points
-
English stencils but don’t have many one the aircraft Su-25 note the blue stencils4 points
-
Thanks so very much chaps, @Corsairfoxfouruncle, @Ray_W, @edjbartos, @Longbow, @THEscaleSHOW. Decision made, so glad I spent the 5 minutes this morning taking advice rather than rashly re-priming the Sherman. Progress....? Perhaps a predecessor to the Caernarvon, the Bangor!4 points


.thumb.jpg.76f12b87ce9ca9929c9aabdcf8f9d2dd.jpg)


This leaderboard is set to London/GMT+01:00