
Leaderboard


Popular Content
Showing content with the highest reputation on 14/05/22 in all areas
-
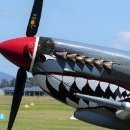
One of my favorite topics. F-4E Phantom II Hellenic Air Force Tamiya 1:32 F-4E Phantom II HAF 1:32 scale33 points
-
Hello all, here is the latest from the shed. I really like the Revell MiG-21 F-13 kit, it goes together well and looks right when its built. The model depicts a Czech built Syrian Air Force aircraft of the 10th fighter Squadron in 1969, the decals coming from Begemot. I chose the camouflaged scheme, not silver, as I wanted to have another go with Colour Coats paints. It’s weathered with Flory washes and Tamiya powders. I’ve also posted a few shots of another F-13 I built last year. It’s a Cuban marked Soviet aircraft at the time of the Cuban Missile Crisis. The red stars were overpainted with white discs and Cuban markings were then applied. Hope you like them. Pete And the Cuban Thanks for looking Pete23 points
-
Hello, Here is an FW-190 that I built at the same time as my Me-109. I figured while I have the paints out, I'd knock over 2 birds with the 1 airbrush. This one is an Eduard Fw-190A8/R-2 Profipack painted up as an aircraft from 5/JG300 in Dec 1944. The red stripe sold it for me. The kit is typical Eduard with all the extras, a little fiddly throughout but I'm pretty happy with how it turned out. Painted RLM 74, 75 & 76 with Vallejo Model Air paints. I thought I better get these photos on quick as I snapped off the small straight aerial off the lower fuselage about 3 times, before I lost it completely and had to replace it with stretched runner. On with the pics. Hope you enjoy.21 points
-
#11/2022 So, my dad´s French at war theme is almost at the end now, this is the second last model.....for now. The new Airfix kit is neither really good nor really bad. The detail in some areas is nice, so are the open flaps options. A major issue is the fit problem of upper and lower fuselage half. Had to do sand and cut away some pieces of the bulkhead behind the seat and the cockpit side instruments to join the halves together. Don´t know if my dad did something wrong but the gunsight was too large, so he used one from the sparesbox. The model is a tailsitter. The instructions call for 17g noseweight, my dad added about 30g to be on the safe side. Sadly there´s hardly any space to add weight, used airgun ammo and filled the nose, foot space and the forward areas of the wing tanks. Painted with older selfmixed green and blue-grey paints, Berna Decals used. Build thread here https://www.britmodeller.com/forums/index.php?/topic/235108250-guerre-dalgérie148-de-havilland-vampire-mk5-armée-de-l’air/ In the early fifties, France received a bunch of completed and also still to build up Vampires, used by the Airforce and the Navy. Soon France developed a more powerful license version, the Mk.53, also called Mistral. Best to distinguish by diffently shaped air intakes. During the Algerian War, mostly Mistrals saw combat, but also some original Vampires were used. The Model shows one of these from EC 1/7 "Provence", stationed in Bizerte/Tunisia in 1956. DSC_0001 by grimreaper110, auf Flickr DSC_0002 by grimreaper110, auf Flickr DSC_0003 by grimreaper110, auf Flickr DSC_0004 by grimreaper110, auf Flickr DSC_0005 by grimreaper110, auf Flickr DSC_0006 by grimreaper110, auf Flickr DSC_0002 by grimreaper110, auf Flickr DSC_0009 by grimreaper110, auf Flickr DSC_0001 by grimreaper110, auf Flickr DSC_0011 by grimreaper110, auf Flickr DSC_0012 by grimreaper110, auf Flickr DSC_0013 by grimreaper110, auf Flickr DSC_0014 by grimreaper110, auf Flickr DSC_0015 by grimreaper110, auf Flickr DSC_0016 by grimreaper110, auf Flickr DSC_0002 by grimreaper110, auf Flickr DSC_0019 by grimreaper110, auf Flickr DSC_0002 by grimreaper110, auf Flickr DSC_0020 by grimreaper110, auf Flickr DSC_0023 by grimreaper110, auf Flickr DSC_0003 by grimreaper110, auf Flickr DSC_0001 by grimreaper110, auf Flickr19 points
-
Hello all, Here is one of my latest models, the Tamiya Me-109G6 straight out of the box (apart from EZ line for the antennae wire) and painted with Vallejo Model Air paints, in one of the colour options from the kit 9/JG54. The kit went together brilliantly. The only issue I had was working with the Vallejo paints when trying to spray the Luftwaffe mottle. I usually use enamels and have been moving into acrylic lacquers, so I found these a little temperamental. What I did like was the 3 part decal for the spinner spiral. When I stuffed up my Eduard Fw-190 spinner decal, I ended up cutting another one in three which made it a lot easier. Anyway on with the photos.19 points
-
Here is F-RSIN’s Viscount 700 finished as I-LIFT of Alitalia circa 1959 before application of the “flag tail”. I-LIFT was built in 1957 and delivered to LAI which merged with Alitalia a few months later. She stayed with Alitalia until withdrawn in 1969. She was broken up in 1971 after spares recovery. F-RSIN’s Viscounts are among their best kits although as always with short run mouldings the end result depends on the amount of work the modeller is prepared to do. The 700 gives a choice of radar or non-radar noses and straight or bulged engine nacelles. The bulged nacelles (necessary for the V.785D) are a little too bulged but I didn’t fancy trying to sand them down and get all four identical so I decided to live with the minor inaccuracy. The panel lines on the fuselage are very poor. I gave up trying to fix them and just filled them in. The props are supplied as separate hubs and blades. They are unusable and I replaced them with a set of Aeroclub metal props salvaged from a deceased S&M model. Paint is Halfords Appliance Gloss White and some original Humbrol Metalcote exhumed during an audit of my paint stash. Original Metalcote was a good product and having found it I decided I might as well use it. Despite being about twenty years old it performed pretty well but it did show how paint technology has moved on and I ended up wishing I had stuck to my usual AK Interactive. The kit came with Alitalia decals but these are inaccurate around the nose. They also include the door outlines which were only carried at the very end of the Viscount’s Alitalia service. I used the Classic Airlines sheet instead. The cheatlines went on beautifully but the “flag tail” fin decal was obviously designed for another kit and nothing I did would make it fit. The F-RSIN tail decal wasn’t a lot better and eventually I decided to swap to the original livery. I made up small Italian flags from spare decal and sourced registrations from the spares box. I don’t think the “Servizio Postale” logo was carried on the earlier livery but I had applied the cheatlines before I found the problem with the fin decal so it stays the way it is! I also used some items from the very handy 26 Viscount details sheet. Thanks for looking and as always constructive criticism is welcome. Dave G16 points
-
Another rotten day, starting at 3 AM when Grant started vomiting with a high temperature. His temperature persisted through the day, hitting 102.4 F this evening before we could finally agree that whether or not he "wanted" kiddie tylenol to bring it down, he definitely needed it. I'm thoroughly exhausted. I made it down to the grotto tonight and masked off the flaps and fuselage on the 190D, then sprayed AK aluminum. PXL_20220514_000551051 by Edward IX, on Flickr Honestly fairly pleased with that masking job. Then I began to lay down the RLM81 layer on the upper fuselage freehand with my 0.18 Mr Airbrush Custom (which is far more capable than I am, but using it makes me feel like a Big Man). I didn't realize, however, being a bit weak on my German colours, that I'd reversed the colours for the fuselage, putting down RLM81 all along the front two thirds or so of the fuse rather than RLM82. At about this juncture, I was joined by a remarkably chipper Winston, who after being an incredible, amazing pill all day, was suddenly quite chatty and delightful. I sometimes worry he's just a night owl and we're missing out on the best parts of him by making him go to bed at 7. Winston puttered around while I corrected my mistake and sprayed the RLM82 on the fuse and wings. (I need to redo the RLM81 fuselage parts tomorrow.) This is, incidentally, what AK calls "version 2" of RLM81 in their book, which is basically the green version of RLM81, the other two being brownish colours. PXL_20220514_004947560 by Edward IX, on Flickr After this, I cleaned up the airbrushes, explained that paint consists of a carrier and a pigment to Win, then carted him upstairs and off to bed. Which is where I'm going now myself.15 points
-
This didn't go together particularly well, but happy with the result. Made wheels up for a desk piece, using a Corgi stand. I flew to Toronto on this aircraft in 2014 in this livery, so always fancied recreating it. My first widebody! Next up is a Ukrainian Embraer 190. Colour: Plastikote 'Satin Baby Blue' spray paint Decals: Authentic Airliners windows, livery from a private seller on eBay Chris12 points
-
PK-103 Bristol Beaufighter Mk X Aircraft building is a novelty for me, so I couldn't resist adding an Aires cockpit to an otherwise straight build. Vallejo paint, original 1970s decals. This has been a brilliant GB, a real return to childhood for me and many others.12 points
-
SdKfz 251/1 (PK-83, 1976, Revell re-box 2009): The vehicle is built with the merest hint of extra detailing for the driver’s position. The vignette is inspired by this picture from Alamy. I browsed “Soviet rural road 1930s” to get a feel for what would be at a roadside and quickly sequed into YouTube urban explorer videos of present-day abandoned villages for the details. The base is scratchbuilt and the figure is modified from Zvezda Soviet ground crew set. FWIW the WIP is here. Regards, Adrian12 points
-
This one gave me bit of a kickin'. The main decals cracked and I was unsure if I would actually get it finished so I'm happy enough to get a reasonable finish in the end. Special mention to @Mumbly for his assistance decal wise. 👍 Used the ST27 PE kit and a few Top Studio bits and bobs. The pioneering spirit of Honda was certainly on show to herald the new age of the MotoGP class for 02. A five cylinder V engine was what they rolled out. Rossi wasn't keen initially and wanted to use the 500 again... until he tested it. He absolutely smashed the championship in 02 and 03.11 points
-
A half of the Hurristory kit (the 2nd half is waiting for Royal Yugoslav decals). This Hurricane Mk.I was flown by a SAAF ace John Frost, No. 3. squadron in Abyssinia, spring 1941. Built straight from the box including the tiny photo etched parts, painted with Gunze paints and varnishes. The aerial is Uschi "Fine" thread.10 points
-
last time was Russia APC, this time is Soviet Artillery Tractor: Voroshilovets in snow region. AFV - Voroshilovets Tractor Working Photos: Product Photos:10 points
-
This is Profil24's 1/24 Porsche 911 RSR from the 2018 Le Mans 24 Hours (that's quite a lot of "24s"). Two of the Manthey/factory 911 RSRs that year were given heritage colour schemes: one in Rothmans-type colours and the other (this one) replicating the infamous 'Pink Pig' 917/20. It's a lovely resin kit with a nice weight to it. Paint is Zero Paints' 911 Pink Pig colour and the rest is OOB.10 points
-
My second Halifax for the GB was finished this afternoon. Built straight out the box, using the Coastal Command version parts provided by Matchbox. Yet another basic build, but it displays nicely, even if the paintjob relegates it to the back of the cabinet. Matt white is a very unforgiving finish. Lesson learned. Here's the finished model. And the build thread is here...10 points
-
Build box stock. Painting various parts in yellow to highlight those area's. Unusually various decals came apart ,like the rear number plate, partly rescued and the front sun strip using an old Airfix strip from the decals box and Pirelli P7 tyre decals. I also made, as they aren't supplied, three clear sprue heat stretched aerials. Here are my others including a Heller 1/43rd kit.9 points
-
Hi all This is Tamiya's rather nice 1/48 He 219 - my first Tamiya kit for a while, and what a pleasure it was to build. No fit issues anywhere, and no problems that weren't of my own making. The decals were the only headache, being nowhere near as co-operative as the rest of the kit. Built OOB and finished in the markings of 'G9+TH' of 1./NJG 1, discovered at Westerland Sylt in April 1945. The majority of He219s were finished in various types of 'wellenmuster' camo pattern, typically of RLM76 or '84' over a base of RLM75. The pics of G9+TH show quite a lot of reflection, so do not show any detail of the upper surface pattern, so my pattern here is a guess. I'll let others judge whether it works or not This particular 219 was found with props removed, so again, I'm guessing with the colours here. Previous builds have finished the spinners in either RLM70, or black with a spiral - so I did mine in white with a spiral just to be different.. Anyway, on to the pics...9 points
-
Thanks Hendie - useful advice Cheers Strickers I am very lucky; I commandeered the largest bedroom in the house when I ran the company from here and the servers and filing cabinets just sort of got replaced… Tyres I guess. Or is it tires? Tony I need all the help I can get! It is, in fact, my beloved Dyson CSYS Desk light. Love it. Apparently it has 'space age' technology that means it will last 60 years. Looks like it's on the heirloom list then… I like the up/down/in/out movement, very smooth (fnaar). I don't think orgies on the heath are an option for me nowadays - too chilly! No, not advised! Oy oy! Fnaar Awww thanks Pete. Sadly I think the bar's too high but we shall see. Oh wait, adding to the crucifix comment, got it Me too Johnny, me too So, one of the kits is nicely injected, the other not so much. They got cleaned up and used for my model, the better one for Jim's. The cowlings are all the same but the vents are different for the outer nacelles. They have small, almost invisible lugs on them that fit into almost invisible slots inside the cowlings. Must get some new glasses - I broke my last pair Outers done for both wings / models and stuck on with latex glue: Inners next.9 points
-
This is an Eastern Express/Toko Sopwith 1 1/2 Strutter in French Colors. The Directions did not include the name/number of the French Squadron (Does anyone know?) - but I really like the Logos on the Aircraft. This was in the making for over a year - decided to finish it, and very glad I did...a Very Attractive Aircraft. The French actually produced 4000 of the aircraft on license - the British, less than 1800. There is of course a two person bomber version - and also a Zeppelin Interceptor single seater with a "Jazz Music" type Oblique Double Lewis Gun pointed upwards....Halfway done with this version - will post soon! The figure is from an ancient Revell biplane....9 points
-
Hi All, Some good progress on the Sunderland today! I've been umming and arring all week about the bombs after @dogsbody pointed out that they should have a red nose stripe, when I chanced upon this in a dark corner of t'internet: Look ma - no stripe! I'll leave them be, but may pick out the nose detail a little more. Today was engine day (as opposed to leg day 🤣). I decided to do these as another pleasing 'mini-project' which will get me another step towards the finish line. First job was assembly of the cowlings (usual SH fare - no location tabs). One was also either damaged, or a short shot: For whatever reason there is a fifth cowling included on the sprue, so that was substituted, and no-one will ever know! Next up was the now well-established Dunny Bristol treatment, albeit applied to the mighty Perseus this time around. First a base coat of steel, including to the lovely resin exhausts: I then masked the front of the exhaust collector with liquid mask as this was not subject to the discolouration caused by hot exhaust gases. A mix of steel & brass was then applied to the rear section of the collector (forgot to take a photo), and then heavily thinned brown was applied, which got us here: The exhausts were only blutac'd in place - these were then removed so the cowlings could be masked to spray some Coastal Command loveliness. Here's before: Appalling photo - sorry! In between White, DSG and EDSG I got on with the propellers and engines: And here's the final result of a day's work: Pretty happy with those! I realised after the fact that I haven't unmasked the front section, which I'll do another time. Very happy with progress to date though - I'm very much enjoying this build, which is not always easy to say with SH kits! Thanks for looking, Roger9 points
-
Hello all, here on this fine Forum, we are running an epic Group Build celebrating Matchbox models. There have been amazing builds shown on there, and this was my contribution, with the exception of the 'amazing' part. I used the Revell boxing of Matchbox's PK-127 Twin Otter. I have a bit of a love-affair with the DHC-6 Twin Otter, having flown in them numerous times, and have been patiently building them for quite a long time in the hope that my exertions would prompt someone like Airfix or Special Hobby to dip their toes in the water and give us a modern tooling of one. This time, I thought I would try AeroCraft's cockpit upgrade set. This comes as an upper and lower set of resin parts, along with a replacement bulkhead, and that means a major piece of surgery to the front of the fuselage. I had a reasonable result, but I think that the result in the hands of someone who was really good at repairing joins would be exceptional. I am very glad I used the part, it really makes a difference to how the Twin Otter looks, by correcting the lower profile of the front windscreen to give the characteristic downward sweep for the glazing. There is a thread to look at if you would like to see what went on during the build: This is what I ended up with: To see the difference with the windscreen, here is the upgraded one: And compared to an unmodified on from a previous build of mine, of a Yeti Airlines Twin Otter: And back to the Air Taxi again: The black and red parts of the paintwork were Humbrol enamels, brush-painted (three coats of Humbrol 60 Scarlet as undercoats and three of 220 Italian Red as topcoats), the white was Tamiya White Primer. Propellers were masked and painted rather than using the transfers, and the prop warning lines on the floats, and the cheatlines on the engine nacelles were again masked and painted rather than using the transfers. The scheme markings came from a ModelCraft sheet which was originally included in their re-issue if the Matchbox kit. I had a photograph of my own to act as a reference, and also as a reminder: Ideally, I would like to find a way of doing this as a diorama and give this model an appropriate setting. All in all I thoroughly enjoyed the build, especially as it was a type I had flown in on our honeymoon, although not this registration. Thanks for looking, Ray8 points
-
I finished something. See here for build thread: Naturally there have been other tasks which have fallen casualty to my wasting time on toy planes. I find it very difficult to find motivation for models when there's an extensive backlog of more pressing tasks I must complete. As such, this modest pair have been on the go for around 2 years. The Spitfire is Eduard's 1/48 Mk.IXe boxing, with a few bits adjusted to portray IXc MH434 in one of the several identities worn in the film. AI-H appears to have worn the serial "N3317", all of which I understand were stick-on lettering for the film, and is the aircraft flown by the inexperienced pilot "Simon" at the start of the film who tries to land wheels-up and is subjected to the Squadron CO's "dagga dagga dagga" one-to-one training. The Buchon is a combination of Hobbycraft/Academy's utterly terrible HA-1112 Buchon nose on Eduard's very nice 1/48 Bf-109G2 with bulges added to the wings, dummy struts added to the tailplanes, squared off wing tips and a disproportionate amount of correction to the small amount of the ghastly Hobbycraft nose. Naturally all paints are Colourcoats and the only decals used are the shields either side of the Buchon's cockpit. The Buchon markings were painted on using Top Notch Masks' set. For the Spitfire I drew and cut my own masks. Weathering on the Buchon is chalk pastel and Tamiya weathering powder, whilst on the Spitfire it was all done using Windsor and Newton oil paints.7 points
-
The Italeri 1/48 Hurricane Mk1 has been the subject of much discussion on the various forums, this one included, so I am aware of the various issues with this kit, this didn't however, prevent me from enjoying completing this replica of the famous Battle of Britain fighter. Finished in the colours of No 43 (Fighter) Squadron, RAF, (undoubtedly the finest Fighter Squadron that has ever, or shall ever, exist in any Air Force in the world ) the brutish lines of Sir Sidney's gun truck are captured well. P3386 was the first Rotol Spinner equipped Mk1 delivered to the Squadron, and was, by all accounts, a particularly successful Machine, being credited with the destruction of several enemy aircraft. No problems were encountered during the build, I was particularily impressed with the clear sprue which were very thin and distortion free. Decals are a mix of kit and spares box. Finished in Humbrol Duck Egg Blue, Tamiya RAF Dk Green and Mr Color Dark Earth, with a Flory wash to finish. Thanks for looking! Cheers, Troffa7 points
-
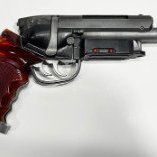
Hello Dears, While I'm still sanding.... Like Sir Elton.... Huuuh No, not that way.... There's a lot of adjustments issues but, the beast will be primed soon... Sooo, I spent some time to prepare the bits and pieces.... Kaboooom once again.... Sidewiners are ready for decalling now.... I upgrade the Aden guns too.... More to come soon on the SHAR..... Must be finished for the 14th of June.... On the double CC !! CC7 points
-
All done! I’m grateful to @IanC for showing off the kit base and figures in his build, which meant that I was free to pursue this vignette idea. More and better pics in the gallery. Now, where did I put my second Henschel? Regards, Adrian7 points
-
My latest finished build is the Il-14 from Eastern Express. This was part of a Dutch group build, started at the beginning of last year. You can't talk about the IL-14 without talking about the IL-12 first. As far as passenger transport in the Soviet Union is concerned, from 1930 onwards, the Li-2 (a DC-3 under license) was mainly relied upon. From 1944 (around the end of the war) the need for aircraft from their own manufacturers grew again and it was decided to develop the IL-12. In particular, being able to take off and land from unpaved runways was a hard requirement. The prototype flew in 1946 and the first flight with Aeroflot was in 1947. The first production variants of the IL-12 had room for 27 passengers (later expanded to 32 passengers). Approximately 250 civilian aircraft and 2750 military variants of the Il-12 were made). The IL-12 was replaced by the IL-14 in the early 1950s. The IL-14 is very similar to the IL-12, but has a number of important differences, notably a wider vertical stabilizer and new type wings, as well as different engines. The IL-14M had room for 37 passengers (although in practice there were usually only 30). The IL-14 was produced in the Soviet Union, but also in the GDR and Czechoslovakia. A total of 1348 aircraft were made and flew with the Russian Air Force until 2005. I used the kit from Eastern express (there is also a kit from Amodel, but I heard the Eastern Express kit is better). Although this is the IL-14T, it is practically the same as the IL-14M. I did use the Amodel decals though (apart from the cockpit and window decals that I once again made myself). The kit is indeed very nice, apart from the engines: But of course, nothing a lot of putty and sanding can’t solve. I used Tamiya White for the upper part of the fuselage and Inspire Chrome for the metal parts. I used a different technique to create slight colour variants, where I first airbrushed gloss black, then masked the various panels, sprayed the first layer of Inspire, removed the masking and then sprayed the model again with a lower pressure. The results are slight colour variations across the model that I’m pleased about. At any rate the pictures of the final result: Next up is the Authentic Airliners DH-106 Comet 4C in Mexicana colours. She is already airbrushed, so most of the work is already done, so it shouldn't take too long to finish. Thanks for reading and see you next time! Martijn6 points
-
I make no claims to accuracy, this is an impressionist build.6 points
-
seems not many interested in gunpla model kit in here? 3rd MS of this long series: DIJEH 1/144 MSK-008 DIJEH Working Photos: Product Photos:6 points
-
I managed to complete this one a couple of weeks ago but just realised I never post it up as complete on here This aircraft is quite a controversial one because of it's paint scheme. The aircraft in question was flown by the 5th Sentai out of Kiyoshu Airfield and belonged to Maj Yoshiaki Yamashita. It was stripped of it's factory night paint scheme on the upper surfaces but retained the paint on it's underside, control surfaces and the engine cowls & faring's. This was done to try and raise the performance of high altitude interception of B-29's but was not approve by higher command. There are a only 3 photo's of the machine that I know of but the main one you will mostly see is this one (Credit to the owner of the original photo) In the Hasagawa boxing of the Kai Tei of the 5th flight regiment this paint scheme is supplied but they show the upper wings being brown, the rudder as red as well as the nosecap. After speaking to Nick Millman we both agree that this was not the case. I have painted the model in the best interpretation we could come up with. The model is painted using SMS paints, the metallic's being a mix of Super Silver & Stainless Steel with Steel being applied on the darker upper areas. The underside is a custom colour to make the Japanese night black brown colour. All markings were painted on accept for the tail insignia & text as well as the odd stencil here and there. Weathering was done with Tamiya panel liner & some pigments. I was also lucky enough to take home Gold in the 1/72 Out of Box category with this one at the recent local model show which I was pretty happy about Hope you like it!6 points
-
hello everyone I am an civil aircraft engineer. but a new modeller. The models I ever seen without any details. so I want to develop a kind of model with details as much as possible. Especially some parts are movable! These parts are movable: landing gears(3), flaps(leading edge, trailing edge,Krueger), aileron, rudder, horizontal stabilizer, elevator, cabine doors, thrust reverser. I am good at 3D modeling and aircraft structure. so there is no problem just time. It tooks me almost 1 year to make 3D model. I use pictures and real aircraft as reference. After 3D modeling, I spend 6 months to make it come true. I use 3D printer to make all parts. As a new guy, this model is not perfect. I will keep going.6 points
-
Win and I went down to the grotto today after a squirtgun fight as part of my tasking to keep him from waking Grant and Mrs P -- the former has been intermittently feverish and vomiting still. I fixed up the camo and cleaned up the painting on Black 8. The AK paint dries quickly and beautifully using Mr Color self-levelling thinner, but I found it tended to spatter more than Colourcoats does for me, possibly due to my unfamiliarity with it. More later.6 points
-
Monogram 1/48 A-26A/B converted to A-26K Counter Strike My final Build. Monogram's 1/48 A-26A/B converted to a Vietnam Era A-26K Counter Strike aircraft. OZ Mod Conversion set,, Eduard Cockpit and External P/E sets, and additional parts 3D Printed. Paint AK, MIg-Ammo, and Model Master. Decal set AeroMaster Air War over Vietnam Pt VII A/B-26K Invaders 2 You can find the WIP here: Thanks for stopping by and having a look around.6 points
-
Revell Westland Sea King. The boxing with German decals but bits for the larger radar dome, now I can do one of the colourful Belgian ones. I have since bought the older tool Airfix one with the AEW radar setup, also with the bigger Radar, so with the later tool Airfix giftset I already had, there'll be the Belgian one, an orange & grey rescue one & a dark blue one from HMS Eagle in 1971. One day. Steve.6 points
-
First post in here folks. Still getting my techniques down and experimenting with the panel line/varnish/oils weathering etc. Just got back into modeling in the last 3 years or so, very much still learning. I will put up some of my work of the last few years for feedback.6 points
-
70's Tamiya SAS "Pink Panther" Base kit -Tamiya Heavy Scratch building done to achieve details Stowage: basic set by Legend Production Masters: 7.62mm cartridge5 points
-
Hallo This is my Rescue-Hetzer from Thundermodels. The build is not so easy as it may look. The instruction and the design and quality of parts are a challange. The name Hetzer for this tank is an after war invention as it looks. Since in German it has a meaning, which is absurd in the German terminology at this time. As many other such names even in aviation, are after war inventions which never was spoken so in this time. In military or civilian circles. So, have a look: Happy modelling5 points
-
Hello All, Another update, progress has been dramatically slowed by my recent Coronavirus infection but picked up again the last couple of days. As you can see only 2/4 vision ports will be open in the turret Some further details added to the interior Thanks for looking5 points
-
Base progressing... green was mix of NATO green and light green kahki (best I had) and earth base was equal parts desert sand, khaki and then a touch of dunkelgelb. Next stop is the enamel wash earth tones and some detail painting.... Wespe still needs to be weathered but thats how it will look (in hindsight more grass where the oil drums/boxes will go may have been better...5 points
-
Hello all The decals are in place. They are super thin so I had to be careful but overall it went smooth, I used decal micro set and micro sol to get them to follow the panel lines. some photos ...5 points
-
Another gap in the F1 collection filled with thanks to @matto21 Also had notification that the Tamiya 1/12 RE20 Renault is in the post as well5 points
-
This - the best 1/72 model of the best looking Spit wearing a nice blue paint scheme. Three other excellent marking choices are included. And all for under a tenner! Which is about all I can afford right now.5 points
-
Hi all Martlet is now finished, what a cracking kit. Sea Venom progress too, Wings and fuselage together, just in the process of sprue gooing the joints and sanding And just for fun a dry fit of the tail booms It's quite a big model!!! Thanks for looking Chris5 points
-
I have put the wing together and popped in a spar as suggested to discourage any wing droop Dave5 points
-
after Metal Gear Ray (i only built once), let continue this long series of Rex. the color scheme came from a walking tank in 3D anime of appleseed. this time i chose set it in dock mode. 2nd 1/100 Metal Gear Rex Working Photos: Product Photos:5 points
-
before Bandai try to earn money from modellers who enjoy DIY, modify, Koto has already published its model series: Frame Arms (FA). up to now, i still feel the mechanical design of FA is much better than Bandai's 30MM. but its price can't compare with big company (Bandai)... In FA, i only like two designs, one is this model kits, another one from MGS's designer ... [Frame Arms] 1/100 Kagutsuchi-Otsu Fencer & Sniper Working Photos: Product Photos:5 points
-
Hi Chris, Yes, initially they were puttied. Later testing showed that the new putty increased the speed by several mph. However, the wing would flex in flight and squeeze the putty out of seams creating ridges instead of smoothness; the expanded putty cost more in speed than the smoothed putty saved and the putty was abandoned altogether. While I've got the report, I'm not sure where I have the info on deleting the putty, but it certainly happened during WWII. Cheers, Dana5 points
-
Calling the engine cowling seam done. Where the front of the canopy meets the fuselage looks horrible. Pretty sure this was caused by me removing it from the sprue like a butcher. I will try to clean this up… Also behind the cockpit needs some attention. How do you ever finish a model ?5 points
-
Unexpected break in the weather meant I was able to get a short spray session in.5 points
-
Thanks Ian - obviously my humour muscles need some exercise! Strange times. I'm having to relearn things like this: Why won't it connect? Bluetooth connection forgotten. Hah. Where's my Oramask? Big roll on the cupboard. Idiot. Why won't the sheet feed? You have to stick it to a mat. Duh. Masks cut now. Finally. Next problem is getting used to this again: Tools. Lots of tools. I just have to remember where they are and how to use them… Right, glue the cowlings and stick them, temporarily, to the nacelles. Vents open on the ground right? Right? Lunch now and then daughter's arriving with the grandson. More later.5 points
-
Messerschmitt 109E PK-017 Some details added which were missing on the basic kit The kit is an E3/E4 . I converted it to an E1 As used by the Condor Legion in the Spanish Civil War and the build is here;5 points


.thumb.jpg.cfc129272ffec824439b15e6013d5952.jpg)


.thumb.jpg.ba34a9f6ddce411193946dbdcc7b5fe8.jpg)


This leaderboard is set to London/GMT+01:00