
Leaderboard


Popular Content
Showing content with the highest reputation on 19/03/22 in all areas
-
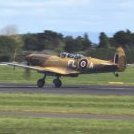
Well hi all, I finished my Spitfire the some weeks ago. The eduard kit is really nice , except the construction of the wheelbay. Totally overconstructed…. Too many parts for a simple thing, without any sense. Same as on P-51 and all the others. But nevertheless I had much fun with the paintjob and the weathering! But enough waffling, please enjoy the pictures! Have a nice weekend Andy27 points
-
Spitfire Mk. Vc | Airfix | 1/72 307th Fighter Squadron, Twelfth Air Force, USAAF, La Senia, Algeria, November/December 1942 I finished this on 3/13/2022. I pre-ordered this kit a little over a year ago and it never arrived. I thought I'd never get to build it, but then found it at an online hobby store I frequent. I bought two because I couldn't choose between the two profiles they offered! I really like the shark (?) mouth on this one -- it's a little goofy. For someone who doesn't normally do shark mouths I did two in a couple months. hmmm... never say never. This kit was everything that other folks said it was. It was a well-fitting, easy build with nice detail. The only issue I had was that one of the two kits had a sizable wing root gap. But that was easily and quickly fixed. The only other gripe I have is that the canopy is not a consistent thickness, so the cockpit is distorted when you look through it. The bulkheads in the cockpit are a bit thick, but the detail is nice. The plastic is harder than previous Airfix kits, which I like and the panel line engraving was just about right. There really wasn't any seam work to speak of. The only addition I made was to add Eduard steel seatbelts, which are visible despite the warped canopy. I made this Spitfire dustier and more worn than its companion South Africa build. I couldn't find pictures of MX-P, but did find other Algerian based US Spitfires to go from and tried to match those as best as I could. WIP is here Aftermarket: Eduard Steel Seatbelts Paint: Mr. Surfacer 1500 black primer / Hataka Lacquer Dark Earth / Mr. Color Middlestone / Mr. Color Azure blue / Mr color white and insignia red (spinner) Here it is with its companion build: And here they are with an Eduard Mk. IX I finished a couple years ago. Hope you like it! Questions, comments and constructive criticism always welcome!26 points
-
Spitfire Mk. Vc | Airfix | 1/72 No. 2 Squadron, South African Air Force, Gioia del Colle, Italy, October 1943 I finished this on 3/12/2022. I pre-ordered this kit a little over a year ago and it never arrived. I thought I'd never get to build it, but then found it at an online hobby store I frequent. I bought two because I couldn't choose between the two profiles they offered! This kit was everything that other folks said it was. It was a well-fitting, easy build with nice detail. The only issue I had was that one of the two kits had a sizable wing root gap. But that was easily and quickly fixed. The only other gripe I have is that the canopy is not a consistent thickness, so the cockpit is distorted when you look through it. The bulkheads in the cockpit are a bit thick, but the detail is nice. The plastic is harder than previous Airfix kits, which I like and the panel line engraving was just about right. There really wasn't any seam work to speak of. The only addition I made was to add Eduard steel seatbelts, which are visible despite the warped canopy. I Found a couple of pictures of DB-V, but they were either too far away or too grainy to see detail. Other pictures exist of No. 2 squadron Spitfires, some very close up, and they show them to be fairly clean and not too worn, so that guided my weathering. There is some interesting controversy about the Cannon covers, which are clearly a different color than the rest of the wing, but since the pictures are black and white, no one know what color. I went with the same red as the wing tips and spinner only because they looked like the same shade of gray. The pictures also show a leading edge band along the entire wing which is also unusual. Again, no one knows the color. WIP is here Aftermarket: Eduard Steel Seatbelts Paint: Mr. Surfacer 1500 black primer / Hataka Lacquer Dark Earth / Mr. Color Middlestone / Mr. Color Azure blue / Mr color white and insignia red (spinner) Here it is with its companion build: And here they are with an Eduard Mk. IX I finished a couple years ago. Hope you like it! Questions, comments and constructive criticism always welcome!25 points
-
Hawker Typhoon | Airfix | 1/72 No. 245 Squadron, 2nd Tactical Air Force, Germany and RAF Warmwell, Dorset, England, June-August 1945 Finished this on 2/1/2022. I'm not normally a huge sharkmouth fan, just because they're so ubiquitous, but this one was so unique and looks so good on the Typhoon, that I just had to do it. I discovered early on that this aircraft had "Cuckoo Doors" in the intake, and so I had to get some aftermarket PE ones. The checkered band indicates this was post-war, so I opted to make it a much cleaner, more well-maintained machine. Pictures I found of MR-U with the checkered band back this up and also showed it didn't carry ordnance... which makes sense. I've made this kit before and it is a terrific kit. I really had no issues at all. The last time I made it, I ended up with a step on one side's wing root. This time I made sure to get a proper fit and there was no issue at all. There really wasn't any seam work to speak of, although the gaps at the wing roots were a little wide. The gaps were easily dealt with and were the only real problem I had with an otherwise terrific kit. Aftermarket: Bengrun "Cuckoo Door" air filter Paint: Mr. Surfacer Black 1500 Primer / Hataka Lacquer Ocean Gray, Dark green and Medium Sea Gray WIP is here. A close up of the "Cuckoo doors" And here it is with a more war-weary version, flown by Basil Stapelton. I believe that build was my first RFI here, too! Hope you like it! Questions, comments and constructive crticism welcome.24 points
-
P-51B Mustang | Monogram | 1/72 Capt. John Pugh, 362 Fighter Squadron, 357th Fighter Group, June/July 1944 Finished this on 2/20/2022. This kit was originally built by me when I was 13 or 14 as Don Gentille's "Shangri-la". When I recently made "Shangri-la" again, I decided to restore this one. I really wanted to do a Mustang with a Malcolm hood and originally thought I would do "Berlin Express". When the "Berlin Express" decals came, I found I liked "Geronimo" on the same sheet better because it was partly natural metal (which I don't see often) and because of the invasion stripes. So, I decided to do that one instead. The last time I did the Monogram kit in November of 2020, I had to scratchbuild the cockpit and wheel wells because neither have any detail. I was lazy this time and ordered Eduard's pre-painted PE cockpit kit, which is a model kit all by itself, and looks fantastic! I detailed the wheel wells in place because I couldn't get the wing-halves apart without damaging them. That was a real challenge and the wheel wells didn't come out as well as I'd like, but they look OK. I had some issues with pulling off decals with tape, even though I had "de-tacked" it. This was partly because I applied them directly to the metal paint, which was a mistake, but I found they pulled up from a well prepared surface (the wing) with just a post-it note! I had issues applying them too, so I can't say I recommend them. Another wing decal from the same sheet was applied, but had some serious silvering issues that I tried to resolve using future wax and a pin, but never could get it to look good. So that was a disappointment. Unlike last time I built this model, I elected to get some after market wheels, because they look so much better than the ones Monogram provides. I had to buy a cheap Hobby boss kit to get the gears and gear doors, since some of mine had disappeared over the years. WIP is here Finishing: Seams filled with CA Aftermarket: Eduard cockpit kit / SBS resin wheels / Eagle Strike Productions IP7203 357th fighter group Paint: Mr. Surfacer 1500 black primer / Mr. Color Olive Drab / Tamiya TS-30 Silver Leaf / Mr. Color white (stripes) / Mr. Color Insignia Red and Hataka Lacquer insignia yellow (spinner) / OD and strips dull coated with Mr. Color GX113 / metal surfaces coated with Mr. Color semi-gloss clear Cockpit details: And this is how it looked when I started: And with the one I finished in November 2020: I hope you like it! Questions, comments and constructive criticism always welcome!24 points
-
Hi all I have been working on this little beauty on my FAA thread. This is from the Cyberhobby kit which goes together superbly. I know there are some errors in the curve on the upper side of the fuselage profile but I am very pleased with it. I have added the cartridge shell shoots, the aerials and the seats are Pavla items with wire ejector pull handles. I also made the centre part of each wingfold mechanism Brush painted with Humbrol EDSG and Colourcoats Sky. Here's a link to the multiple WIP I have modelled XG731 which was on HMS Centaur. I used am image that I came across online from a Facebook group who are FAA enthusiasts. I will post a copy of this for reference purposes the photo is credited to a Mark Taylor on Facebook and I am thankful that he posted it Enough of the waffle here's the model Thanks for looking in Chris21 points
-
Depicted as the Douglas A-4C Skyhawk C318 from the Argentine Air Force flown during the 1982 Malvinas (Falklands) war. This kit was built as an entry for the 2022 NSW Scale Model Show's 40th Anniversary of the Falklands Conflict category. It was also built to take part in the Model Geeks Podcast's A-4 Skyhawk Group build. There is a full build post and more pictures at my blog but here's some photos15 points
-
Hi all I would like to present some images of my Horten Ho 229, built from the Dragon kit. There were many modifications, or changes made based on the info found in the Kagero Monograph on the Horten. I made these changes on the assumption that the Kagero book and plans are correct, so it may or may not be an accurate representation of the Ho 229. To the best of my knowledge from my readings, the Ho 229 V3 was never fully assembled until after the war, while on display at the Douglas Aircraft factory, and this is how I have chosen to display my model. This may prove to be the last aircraft model I will build, as I have been losing interest in the hobby over the past few years and have subsequently sold off all my kits, books, paints, finished models and awards. I considered this model as unfinished business, so that is why I have chosen to finish it and present it at this time. Thanks for looking15 points
-
Howdy All, Finished the latest addition to the loft insulation/too big to go anywhere collection After weeks of sanding: my third attempt at Airfix`s 1/48 B-57 kit Finished in the markings of 8thBS, based at Phan Rang AB, South Vietnam This one`s not quite OOB as I crow-barred the wallet open and treated it to a CMK resin cockpit to replace the awful kit one Other additions/improvements include: brake pipes, windscreen wiper, lots of P-38 car body filler, nav` lights on the tip tanks and cables.... ....bombs from Monogram Thunderchief, sanded a shed load of plastic off the nose, some antenna/formation lights on the tail cone, ..... ...trim tabs on flying controls, four gun ports in each wing and cross-brace on the open canopy. Oh and had to strip a couple of church roofs to furnish the nose with enough lead to stop it tail sitting Decals came from an Xtradecal set Hope you like the pic`s, thanks for looking Cheers Russ14 points
-
Final gallery of my fifth vehicle. The model shows a Hornisse vehicle after first modifications in March/April 1943. Two first pictures show stage before painting process Link to the workshop13 points
-
Here's my Revell 1/48th Eurofighter Typhoon. It's been on hold for a couple of years after I cracked the canopy trying to polish out the mold line. I received a replacement from Revell a couple of years ago but, until recently, didn't want to mess with the new canopy. I was much more careful in cleaning up the new canopy and once done, pressed on to finish the kit. Paint is Testors Model Master enamels, Medium Gray FS 35237 for the main color, lightened with flat white about 50%. The light gray is also Model Master, Flint Gray FS 36314, lightened about 30%. I tried to gloss coat with brush coats of Pledge/Future but it was blotchy. I airbrushed some Tamiya Acrylic Gloss and that looked better for decals. All kit decals, applied over 4 days. Luckily very few went over panel lines because they didn't want to settle into the lines. After Micro Set and Sol and a wipe down with warm water after letting it sit overnight I applied various dark and medium gray washes to select panel lines and access doors. Finally a blast of Tamiya Smoke for the APU exhaust and some grunge on the belly. Lastly was Tamiya Flat Clear overall. I still haven't painted the missiles. Hopefully I'll get them loaded in the next couple of weeks. Meteors and IRIS-Ts. Many thanks to the contributors to the Typhoon SIG. So much great info and photos that aided this build.13 points
-
Good afternoon everyone! I thought I would up date the story of my B17G with photos of the day that I handed it over to The Miniature Engineering Craftsmanship Museum in Carlsbad California. Here are a couple of photos of the Museum....... I was worried that the my model would be damaged on the long flight....considering that I packed it in a suitcase for the hold of the aircraft!....but you know, even though there was a bit of damage to the rear of the first section ( the ball turret hanging mechanism came away from the fuselage ceiling and broke in a few places)....it really wasn't a huge issue!....I spent the day before I went to the Museum repairing the damage in my Wife's Nephew's garage! So I am now confident that if I ever have to ship models abroad again I will pack them the same way! The next day I loaded the boxed B17G into the back of the Cherokee and drove the hour and half from Warner Springs to Carlsbad and to the Museum in California. A little bit of pressure now as I had the Curator and staff watching me as I un screwed the lids off the packing boxes to reveal the model.....phew!....no more damage! I spent the next hour placing all the parts onto the fuselage....tail fin/doors/real wheel/bomb bay doors etc etc....whilst the Curator prepared an area for photographing..... Once I had put it all together, I transferred the Fortress to the table for photographing and discussed how the model was going to be displayed....... The curator had a great idea of tilting the fuselage towards the on looker and also placing the fuselage ends towards the front so that you can see up into the fuselages... .....then a photo of yours truly for the website!!....... and finally, me signing over my model! I was then shown the cabinet where the model would be finally displayed!....I was so pleased as the cabinet was literally at the entrance to the Museum opposite the reception .....couldn't have asked for a better spot!! I then went home to let the Museum set the model in the display case and returned 1 week later to have a look at what they had done. I have to say I was over the moon with the display and I thought my model looked fantastic under the bright lights!...they added small touches like having a few photos of the interior on display and placed the magazine article from Flypast beside it.....I was so chuffed I have to say! Here are a few photos ....... So this finally brings an end to the journey that my Scratch built B17G "Fuddy Duddy" and I have been on!..... Although I felt a pang of loss when I drove away from the Museum I was also very happy that it was in such a marvellous prestige Museum for ever more! Thanks once again for looking in! Fozzy13 points
-
Hi all, my latest build is a well worn Eduard A6M2 Zero Type 21 in 1:48. Again, Eduard did a great job! Add the Brassin landing flaps and wheels, the rest is OOB.12 points
-
This is my enry for this GB. It is the 3rd F-14A Tomcat made using Matchbox PK-406 and Caracal decals, plus a few extra bits. The build thread is here:-11 points
-
Douglas F3D-2 Skynight 124603, VFAW-3 Cdr. Eugene A. Valencia, May 1960 1/72 Matchbox PK-134 with Print Scale decals by John L, on Flickr by John L, on Flickr by John L, on Flickr by John L, on Flickr Since posting these photos in the gallery I have added the decals to the centre of the fuselage stars and bars. I felt that those supplied with the Print Scale set were not correct and set about searching for likely replacements. With photographs of the actual aircraft proving difficult to find, I settled on an image of a paper model which sported the RCAF crest in that area. The decal sheet simply refers to the decal as a British symbol that was added when on a visit to Canada and the flag was added to the tail at the same time. Having decided that the RCAF crest was the more likely option I went with it and printed some decals on white decal paper. This last image is of the model as it stands now and replaces the underside view posted previously. by John L, on Flickr9 points
-
Well I was able to finagle and play with finances and picked up a Tamiya M4 early production kit. Not sure what Theatre or Unit I will go with yet ? Id love to do a Pacific Sherman so any experten with photo’s please feel free to help ? However Im considering British, commonwealth, or U.S. units in North Africa or Italy so please speak up if you have suggestions. Now the obligatory sprue shots. Now I used to build armor pretty exclusively in the late 1990’s. So I have a good amount of bits left over and may draw upon them. I did pull these out. I bought these brand new when they 1st came out about 20-25 years ago. Never got to use them but will try to use them here. Please feel free to ask questions, post comments or add thoughts. Dennis8 points
-
Hello everyone, here is my finished Panzer Kampfwagen II Ausf. F from Tamiya in 1/35. This was my first time using PE and I also made a work in progress post here for anyone interested. Thanks for looking, Tom8 points
-
Hello! This is my latest build. I purchased this little kit last June. I modified its landing gear legs as my tradition and airbrushed a display base with it. Imgur is continuously blocking my ip, so I am using my weibo album to host my photos. I have created a WIP post here in BM and also in scalemates https://www.scalemates.com/profiles/mate.php?id=67957&p=albums&album=76474#191 The build is mostly straight out of box, except for lengthened landing gear shock struts. The shock struts are modified with stainless steel tubes. I also planted a hold tube inside the center fuselage where a support tube may be inserted. The paints I used were mostly Mr. Color . AFV Club provided the Federal Standard colors in their instruction sheets, I followed the paint numbers. The display base was painted with my airbrush. I chose the runway threshold so I can depict an aircraft returning from a sortie. Blurred effects were made with my airbrush which could make the diorama more dynamic. Anyone who have problems seeing the photos may click the link below https://www.scalemates.com/profiles/mate.php?id=67957&p=albums&album=82707 Here are the final reveal photos:8 points
-
This started life as the Deagostini version I got cheap, it didn't run so all new electrics fitted, the plastic on these part builds is horrible and brittle and I never liked it. So, I decided to transform it into a early modified Ukrainian version with reactive armour. 3D printed armour blocks made and added, made new optics fir the turret, totally new paint job and a proper canvas gun mantlet cover, the original was a plastic 'look-a-like' that snapped. Si.8 points
-
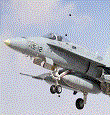
Kit manufacture: MENG Scale: 1/48 Type: F/A-18E Super Hornet Extras used: Decals from Eduard F/A-18E Paints and colors used: MM Light Ghost/Dark Ghost Grays, Mr. Hobby Flat Black, custom mix for orange stripe along fuselage spine, MRP metallics Other info: link to build log HERE8 points
-
I wish you'd have finished that Phantom, so I could compare the effects with my primered Frog Wessex Keith, godamighty awful over painted because of spraying yellow over primer. This Wessex put the end to me priming as a 'thing', the only one I have primed recently was the Whirlwind and boy did I keep the primer very thin, Humbrol aerosol grey primer for that.8 points
-
Tamiya 1/32 “Birdcage” Corsair Extras: Montex Masks, Quinta cockpit set, Eduard Brassin wheels, HGW seatbelts and Eduard cowl flaps. Here’s my Tamiya Corsair. A lovely kit that I really enjoyed making. Here’s the build thread: https://www.britmodeller.com/forums/index.php?/topic/235105728-‘daphne-c’-132-“birdcage”-corsair-panel-line-washes-and-fuel-stains-done/7 points
-
Greetings All. After my previous feeble attempts to complete a GB I have adopted new tactics including preparation, shameless copying research of the work of others, advanced bartering with a guy who know resin casting, and a determination to use what I have rather than buy more. So I'll be doing two Shermans based on the M4A3 from the items below The chicken fajitas were my lunch (and very tasty, thumbs up ALDI) but the package will be used in construction. Sushi the Supercat will also be involved as it's impossible to keep her away when working. Now the sharp-eyed will see three kits and I said I'd be making two models, doubtless some are thinking Sleeper has really lost it this time, they may be right but the plan is to build an M4A3 (17 pounder) of which 80 were converted in the UK for the US forces in ETOUSA apart from 3d Army who stuck with 76mm guns recovered from wrecks shoved into the 75mm turret. Cosy. Records found by Steve Zaloga and others prove absolutely these were built and shipped to Europe between March and May 1945 but nothing as to actual battle experience has shown up yet but we know the registration numbers. The other will be a Sherman Jumbo Sort of. This beast is a T68 Flamethrower tank one of two built on a re-built M4A3E2 retained in the US for testing and trials. Note how the flame gun is mounted rather higher than the hull mg was. The rubber block track will be a challenge but I may have a plan... Out of shot is a pile of Sherman spares that will provide the second set of HVSS gear and a set of single pin track from the recent Tamiya kit which will get new tracks. My M4 driver training project from STGB 1 may photobomb at some stage too. Wishing everyone a great build. Huge Thanks to @PlaStix for setting this up. Time for coffee then I'll start.7 points
-
Z-226B OK-MPJ from Aero Club Kladno, ČSSR, 1970... Cheers!7 points
-
Dear fellow Britmodellers, here's my 1/72 Arma Hobby P-51C Mustang in markings of 382nd Fighter Squadron, 363rd Fighter Group, in France 1944. I built from the "Expert Set", photographs by Wolfgang Rabel. A full build review will be featured in an upcoming edition of Phoenix Aviation Modelling magazine. Thank you for your interest, best greetings from Vienna Roman7 points
-
This is the Platz kit recently reboxed by Italieri, really is a great little kit both in fit and details. Decals from the kit for Ecole 314, Tours AB, 1962. The T-33SF were the ones the French upgraded with Hispan-Suiza licence built Nene engine. I biult this to represent the one I have been Helping to restore.7 points
-
Afternoon all........spent the last week finalising the Marder started back in April 2020, intending to take it to the meeting of the MAFVA club tomorrow for show and tell. Sorry about the quality of the pics. I'll try and take some better one's maybe next week. Cheers Simon.7 points
-
Good heavens - at the bottom of page 2 after only 18 hours - this really is a monster GB! Anyway, I have made a start and just to show you what I am up against, here is the original Frog cockpit! Wide open spaces at the back and front, though the latter is in part down to the ruddy nose wheel mounting, and all too visible under a big canopy, so the first thing to do was extend the floor/wheel bay roof. That's a bit better - not glued in yet of course. I have dug out some instructions from large scale Z-M and Tamiya kits which should prove very helpful. I will add side panels, stick and an IP up front and bigger side panels and the radio/radar boxes at the back, and wheel bay sides and front underneath. The seats are not too bad a shape actually and will have to do, but I will add the tubes for the compressed air ejection system. As I mentioned earlier I have to get a lot of ballast in somewhere so I may have to be inventive with the use of my lead window strip - I should be able to cram some it the tip of the nose in front of the wheel leg, and behind the radio/radar panel before I put a "lid"on both, and maybe even between the sides of the wheel bay and the fuselage. The nosewheel was rotated through 90o to lie flat in the rather shallow bay so I might get some lead in under the cockpit floor as well. The rest will have to go immediately behind the cockpit/wheel well and probably the front of the engine nacelles as well. I will also look at boxing in the main wheel wells as they too are wide open spaces! I just hope that the u/c legs can take the strain. This most certainly won't be OOB, but at least it does not have the usual Matchbox furrows/trenches - the panel lining is subded raised lines, though probably nothing like the real thing. More as and when - probably on page 10 by then. Pete7 points
-
Thank you Darryl. Hopefully all the "cats" will behave themselves and I can concentrate on my kit more!! Hi bigfoot and thank you. Yes I would imagine it's not ideal doing PE in 1/48 first!! Hopefully you'll get it finished one day. I've started with a bit of the PE with mine this morning. Decided I needed to make a start on my build this morning. First off I started adding some of the plastic parts to the metal hull, attached with Superglue. I wasn't awfully impressed with the joining surfaces with this kit. Not as level as some of Tamiya's 1/48 offerings, in my opinion: This is one of the poor areas I was aware of before starting the kit - it's well documented in reviews: A bit of filler was required. It's also well known that the track skids in this kit are a bit on the thick side: I was thinking of managing with them and making use of lots of mud at the weathering stage. However, I had a bit of an experiment with the PE skids supplied in the Hauler PE set. One seemed to go okay: It wasn't perfect by any stretch of the imagination. I don't have any PE bending jigs or specialist PE equipment. I ended up using some angled tweezers and a drill bit for forming the rounded section: No two are exactly identical, but I figure, once they are in place, they shouldn't be that noticeable.....hopefully! I can always go back to my mud plan!! Once fixed in place I also added the missing bolt heads! That process was a little And that's where I stopped for the day. I'm hoping I'll get a bit more time on it tomorrow. Comments and suggestions welcome. Kind regards, Stix7 points
-
Halifax GR II Coastal Command 58 Squadron RAF ST Davids1944. OOTB build brush painted with Humbrol and Revell acrylics. Thanks for looking, Cheers Greg7 points
-
I've been wanting to build this for some time but the kit has been impossible to find, so when it popped up on ebay last week it was impossible to refuse. The plan is to build as the Rolls-Royce owned aircraft.6 points
-
Hello fellow modellers It's not exagerating to say that it's a pure joy to publish this topic, since it's my first finished model since last century !!! ( in fact my previously finished kit was a 1/48 Heller Rafale A completed in 1998 or so ... before this kit was even released ) . The famous 2001 Hasegawa kit is splendid in some areas , and bizarre , really inaccurate or approximate in others . To me , it's the exact link between vintage and modern kits . Anyway I fell in love with this kit , not to mention the aircraft itself and I plan to build at least ten more ... No aftermarket parts were used or hurt during the building , I tried to upgrade the model the old way , the modifications are as follows : - Model entirely rescribed - Cockpit / Canopy upgaded with PC , metal sheet , copper wire , tamiya tape etc .... - Seat almost totally rebuilt with head knocker , reshaped head rest , harness etc ... - Landing gear and doors modified and wired , front wheel visually detached from gear . - Scratch built landing lights well in left leading edge . - Slat wells reshaped to be flush with the extrados. - Canons drilled. - Armament pylons rescribed , modified with scratchbuilt sway bars and connections - Fuel tank rescribed and " welded " , drain added . - Shrike missiles and Mk82 bombs detailled with scratched parts . - RBF and pins . The WIP is located in the Skyhawk STGB here : https://www.britmodeller.com/forums/index.php?/topic/235091381-a-4f-va-55-uss-hancock-nam-1972-hasegawa-148/ And now , here are the pics : Hope you like it . for passing by § Cheers !6 points
-
This is a kit it almost didn't notice being released but was too fascinated to ignore, and then subsequently I bumped it past a number of other kits in my stash because I couldn't resist the temptation to build something so nuts. I'd be similarly inclined towards the 1/35 Dora railway gun, if it didn't have such a monstrous price tag. But I digress, there's a brief build log for this one here. Ultimately it went together really easily, one of the best "Trumpeter" kits I've built over the years. I went for an "in-service, but been sitting around a lot" look, so some rust pigments to "age" it and some mud as if it's just driven across a field somewhere, but nothing too heavy on that side of things. I'm new to the weathering game (there's a few links in my profile for some recent efforts) and I'm pretty happy with the progress, it really takes the end results to another level. Well, let's not waste anymore time, enjoy Not the easiest thing to photograph considering the length of the thing (70+ cm), hope the photos do it justice6 points
-
I started this one last weekend and have managed 3 short sessions so far on it. I am doing this version from the kit decals. It goes together quite quickly and is nicely detailed. The wing fuselage area needs a little putty. Which was sorted with some PPP. Gear legs going on. Cockpit ready to be buttoned up. I noticed it is a tail sitter at the moment so before the nosecone goes on I will add some weight in the small amount of space available.6 points
-
Here is my finished Boeing 757-236 in 1/144 scale from the Zvezda kit in the ‘Animals & Tree’s’ World Tails livery from British Airways registration G-CPEL. The aircraft entered service in April 1989 with Air Europe. It then joined the BA fleet in August 1992 where it served passengers out of Gatwick and Heathrow. It was then transferred to FedEx in June 2010 where is was given registration N946FD and is still active with them today. This kit goes together seamlessly with very little sanding and filling required. It’s great that is has both engine options as well as having either the newer blended winglets or the classic wing tips. I’ve never built the Minicraft or EE kits but I absolutely can’t recommend this kit enough! The beautiful decals are from Ray at 26Decals. The Animals and Tree’s livery originated from Botswana and was designed by artist Cg’ose Ntcox’o who is of the Ncoakhoe People of the Kalahari Desert and the design depicts seven jackals at an oasis. It was wore by 7 other aircraft in the BA fleet around the same time. Paints used were Halfords appliance white for the upper fuselage, Halfords Fiat Capri Blue for the lower fuselage and engine nacelles and Halfords Racking Grey for the wings and stabilisers. Metals are a mix of Revells aqua range. The decals are excellent quality and I highly recommend them! I am already working on a few more BA liveries, the B767-300 in the Chelsea Rose livery and a B757 in the Landor livery. As always, all comments and feedback is greatly appreciated. Thank you for looking. Regards, Alistair6 points
-
A.41 Centurion prototype. Operation Sentry. May-July 1945. Development of the A.41 'Heavy Cruiser Tank' began in October 1943, (it would not be known as ‘Centurion’ until later). There was a need for a vehicle that would be at least equal to the German Panther tank with a weight of 45ton, a 650 horsepower engine, well sloped frontal armour, and it was to carry the new and powerful 17 pounder gun. Early trials proved very promising and an order was placed for 20 pre-production vehicles. The first of these was finished in April 1945. It was decided that six of these prototype tanks would be sent to the front in Europe for evaluation by combat units. The plan for this evaluation was called ‘Operation Sentry’. With the war ending in May the tanks arrived too late to see any actual combat but the trials continued until mid July. More information about Operation Sentry and the early development of the Centurion can be found on the Tanks Encyclopedia website Here. The AFV kit can be built as either one of the pre-production prototype tanks or as a Mk.1 Centurion however for an accurate representation of the prototype tank the wheels and tracks need replacing. The tracks on the early Centurions were narrower at 20 inches wide and AFV only supply the standard width tracks in this kit and those are the rubber band type. Fortunately Accurate Armour kindly sold me some resin 20'' tracks from their A41 conversion set. The early Centurions ran on what were basically Comet wheels which had one less reinforcing ring and a smaller outer ring. I used some resin Comet wheels from Brach model in Italy. I still needed to make some alterations to them though as the Comet hubs are wrong, so I had to cut the AFV ones from the wheels and fit them to the Brach ones. The kit doesn't provide a mantlet cover but it would make sense for an operational vehicle to have one so I fashioned one from Milliput. This is one of the parts of my model that I am least happy with. It just looks to thick and heavy compared to the one or two images I could find of the original. In hindsight I should have used some tissue over the putty. The model was painted with MRP SCC.15 Olive Drab and the and all of the markings were spray painted using stencils. The weathering was done with various pigments and oils. These tanks covered hundreds of miles during Operation Sentry and a lot of that was off road so I figured they would have gotten pretty grubby along the way. It was however early Summer so probably more dust than mud. Hopefully that is the look I have achieved. I did do a work in progress for this build and this can be read HERE This kit was a real joy to build and a pain to photograph, the colour balance was hard to get right probably due to the dusty tones on the green paint. It actually looks better in the display cabinet than it does in the photos.... Honest 🤞 Please feel free to point out anything I have missed or maybe could have done better. Anyway it's a nice feeling to get another one completed and now I can look forwards to the M3/M4 Medium Tank group build. Wayne6 points
-
No posts? That's because there has been no progress; until the last couple of days. I had the Pavla cockpit for this kit, but it still needs loads of work to get it to fit, and to be honest it doesn't really. Painted up it looks OK, as long as you don't notice that the bottom two rows of instruments had to be cut off the bottom of the instrument panel lower console to get it to fit. The seat isn't too bad. I hope my paint-job isnt too awful, but it'll look OK in the cockpit. Mr Surfacer 1500 was airbrushed on as a primer and filling, sanding and re-priming ensued: Following some white pre-shading the underside was done with Mr Color RLM65 and Lifecolor Sand went on for the first topside camouflage colour: The freehanded Tamiya Olive Green (I hate freehanding Tamiya paints): And touched up the underside: Gloss, decals and weathering next.6 points
-
top job Tony. I can only echo the comments above and back a page. It's great to see that despite the kick in the pants from the other week the Vixen has now emerged looking even better than before. btw - I just picked up a Mars 3 from the rainforest and since I've never been bright enough to learn from my mistakes, I am now looking at doing another KFAB (kit from a bottle)6 points
-
Assuming she's a Scot's lass, I'm NOT telling her anything of the sort. Not even from this range! Sorry Alan! 🚑 Thanks Johnny. I have to admit that the 3d printing malarkey fits this sort of thing perfectly for me. It means I can now make my own "aftermarket extras" without the hassle of resin casting and modelling a buck first! On that note, how much progress has been made this week? I'm happy with the landing gear so I've been working on printing the bomb doors and racks. They are both pretty simple designs but printing has been a little problematic. This is mainly down to figuring out the best orientation and support size that leaves me with minimal clean up (they are very fragile!) but does not let the supports fail due to the contact areas being too small. The first print was just the bomb rack carriage to check sizes, and that went well. So I went ahead and continued with the design ending up with this. Which gave me two tiny pieces of resin goodness... Only 2 you say? Well, more were printed, but the supports failed on the long extension at the rear end leaving it either bent or non existent. Hence the redesigning of the supports (a few times!) and further test prints. I thought that maybe the failures were in part due to an old, damaged, release film so I changed that this morning and there is another print running as I type, so expect another update soon..... They fit nicely so no adjustments needed on the parts themselves which is a nice relief! I think they'll fit the bill nicely and are better than both the Red Roo cast brass ones and the PE ones I have. Both of those are just the long rack part, and neither include the carriage fitted to the Battle for fitting into the bomb bays which allowed them to be extended to ensure the bomb cleared the wing when used as a dive bomber. By the way, does anybody know what colour these racks were? I would assume bare metal, but would the mounts be interior green? Thanks for looking in! Ian6 points
-
Thanks Jasper. Started work on it last night, it was past midnight somewhere in the world! Plus I’m away for a week from next Friday so not going to get much done in the next couple of weeks. I removed the ventilator blower cover and rebuilt the area using plasticard to get the recess. Need to blend it into the turret ring with putty. Extended the hatch splash guards to the earlier longer version, again need to add the weld beads with the putty. Started work on changing the rear lifting hooks to the earlier padded version and scribed the prominent joint where the glacis meets the side panel ready for, you guessed it, adding the weld beads with putty. Need to add the weld bead around the front MG casting too. That’s all the work needed to back date the dragon hull to the early version, so once the putty work has been done I can start assembling.6 points
-
Lovely paintwork Tony. Such an innovative and impressive design and construction project deserves, nay demands, top quality finishing and it’s obvious that you’re the man for the job. It was never in doubt mind I confess that, armed now with a modicum of newly acquired Fusion, Chitubox and Eelegoo knowledge, I’ve been re-reading this magnificent from page 1; and it’s been both wonderfully educational and increased my admiration several-fold. I now believe that, whilst I thought that I was impressed first time around, I was nowhere near as impressed as I ought to have been (and am now)6 points
-
Continuing the weathering experiment... Just for the novelty I'm trying a different approach to weathering, so far it's all oils and pencils... Perhaps I should have mounted the wheels prior to weathering rather than doing both separately and using different techniques The sandy/orange colour perhaps looks a little "rusty" but....I don't dislike it. Sure I can re-do the wheels to match. 🤞 The panels edges, corners and scratches have all been done with AK pencil "chipping colour" and then highlighted with a HB pencil on specific points. Dirt around filler caps courtesy of abteilung oil stains oil paint. Mantlet cover sprayed a homemade canvas colour, not enough contrast for my liking so an oil paint glaze was brushed on to "green it up" a bit, this has had a brown wash but still needs more work. Tools painted too! Anyone know what colour IDF Jerry cans are? Thanks for looking Darryl6 points
-
This will be my contribution to this GB, this will be the first tank I have built in over 10 years so thought I would start with something nice and easy.5 points
-
While I blatantly put off riveting my 1/48 corsair in this GB, I’ve decided to do a relatively quick OOB build from the stash. This one was a bit spur of the moment @modelling minion This fella… sprues look pretty good, (although with kinetic’s 2 in 1 box that one gets a ton of waste. not sure of the logic as theres enough parts to make approximately 1.5 models.) and stop… …actually i was going to post all the sprues here, but they’re all out there on multiple sites photographed much better than i can… so i wont. if one is interested you can find reviews via scalemates. but just wanted to personally share that some detail is great and some isnt… and the decals are ace although i might stencil the roundels as they look a pain round the intakes glue has been used! and we’re away… I will load it with some ground attack ordnance of course5 points
-
Hi there The Mustang is waiting for its 3D printed MLG's, following an attack by the carpet monster. The 2 X P-400 are drying up from an enamel paint layer - will take some time. I found myself with some bench time (the wife is down with Covid-19 in the bedroom ) So... I did not want to start a new kit - as this is just a temporary halt. It's not that I do not know which kit is next, but I try not to have too many kits in progress. I could have spend some time arranging stuff around the bench - boring After a while I decided to deal with this B-29 - as it is a big build with lots of parts, so I can sneak some progress here and there. This kit has a story - so let me share it. As you know - my dad was an a/c mechanic with the IAF. You can find one of his stories here. He was also a modeler and got me into the hobby when I was a kid. The story goes that at the night I was born he completed a big B-29, and with the family growing and the salary not, it was the last model he built for a long time. Later on he introduced me to modeling and we build together. These building sessions are some of the happier memories of my childhood. The B-29, along with a couple other kits (B-17, Anson, F-4) were hung up in our family room and later on moved to a shelf in my room. They were the basis for my model collection. I fondly remember the silver monster. I can't recall if it was a 1/48 or a 1/72. I will have to look up some old photos. I remember it was big but back then I was way smaller myself. When I got back to the hobby, my Dad was interested in all the updates and in my builds. We talked for a while about building another kit together, 'for old times sake'. When I moved to our current home, and got myself a decent bench, we talked some more and I suggested we build a B-29 - as kind of a 'getting back to modelling' build. It took us a long time to finally find the time. My parents live an hour from our home but most of the time they get here on family occasions. After a long time, we arranged for them to come early on some family gathering and we sat together. Even in 1-72, the B-29 is a BIG kit, with a decent number of parts. We started with airbrushing the bombs (all 32 of them) - and it was a new experience for dad. When I was a kid we could not afford an airbrush and all painting was done with Enamels and a brush. We followed up with some silver painting of some parts and then time ran out. Dad was happy but it was clear that sitting down with me and building was hard for him - his eye sight is not what it used to be. The kit being a 1-72 did not help either. Since then, the huge box is kind of a fixture in the back part of the bench. Last month, my dad turned 80, and it dawned on me that if I want to celebrate the completion of this kit with my Dad, I need to push forward on my own and find other ways to make it a shared and meaningful experience. With this idea racing in the back of my mind, my eyes fell on the 'fixture' and I decided that this will the 'micro project' I will spend some time on, and keep doing little steps with this kit in hope to get it to the paint booth and then finish it up. I opened the box, took some pictures of the things we started, spent some time arranging the setup - opening a new build folder on my drive, opening a new project and album on Scalemates, Opening a new album on Imgur and writing this up. A lot of setup for one build So, here we go: Kit sprues, box, instruction and two after market items - a decal sheet and a PE set: I decided to start with the cockpit, as per the instruction. This was a short sitting so I just cut and cleaned all the parts, glued some parts - those that make sense to glue before paint, reviewed the PE instructions to see I'm not building something I will have to remove. Then I sorted the parts to the 'green pile' - those will get a Z-C coat, and to the 'black pile' - those will get ..... a flat black coat. Green pile: Black pile: Stuff: That's it for tonight, and probably for a while. Ran5 points
-
The idea came to my mind to make a Hurricane model showing the plane in the process of being serviced and painting the fuselage stripes. The scene shows the moment when the work on the plane was stopped because it was five o'clock and it was time for afternoon tea.🤣🤪 Model made straight out of the box. These photos inspired me.5 points
-
Hello all, this is the latest from the shed. A fabulous kit with every part falling together and lots of marking choices on the decal sheet prited by Cartograf. I chose the Portuguese version just because I haven’t made many aircraft used by this country and I liked the large emblem on the side. The aircraft was designed by Claudius Dornier after moving to Spain post WW2. Then after the Dornier works were rebuilt in Germany the aircraft was assembled there, 428 being built and supplied to users all over the world. The model depicts an aircraft from Sintra A/F Base, Portuguese Air Force. Its painted with my first go at using Colour Coats paints. As they are matt this involves using gloss varnish prior to decaling then matt/semi varnish to finish. The only difficult part of the build was getting the yellow spiral decal onto the prop boss. Lovely little kit! Hope you like it. Thanks for looking Pete 🇺🇦5 points
-
More progress! Weathering added this round. I use a homemade wash mix I found on the interwebz: 4 pts. dish soap (I use detergent) 1 pt. paint (Tamiya Nato Black) 1 pt. plain water Apply and wait for it to dry completely before rubbing it off with a Q-Tip (or cotton bud, for our friends across the pond). The major advantage is that it doesn't attack certain plastics, such as Bandai, and if you don't like it you can easily clean up with a damp cloth/Q-Tip and try again. I found that the color I used gave the plain white paint a nice off-white finish in addition to building up in crevices and making raised features pop a bit. I'll be adding some more subtle weathering before gluing on the last of the details and tying it all together with a couple of light coats of clear Tamiya TS-80 flat lacquer. One caveat about this last, though...don't use it over any metallic paints, because it really dulls down the shine, hence the engine bells, vertical lifters and side maneuvering thrusters will be the very last things added.5 points
-
Well hold my Beer Spad !! Bill is also used to start some project at once.... Okay my friend.... If you want blood.... I get out of the woods.... Here is a pic of my waiting room.... Understand it, it's not my stash.... These are just the started projects , Mind yourself, some of these boxes contains 2 or 3 kits instead of one.... Not proud at all, and I will not attend the kit starters therapy group... Let's have a triple Karmeliet on this one !! The left hand lower door contains my airbrush paraphernalia.... The lower left one is for my moulding resin and diorama stuff.... The lower drawer is full of decals, the upper one contains already done resin parts but I still have some on the attic.... Shhhh!!! The B-47, The Flagon, T and RT-33 and F-80 did'nt have a dedicated thread, but on the other hand, I barely touch it for the while.... Now, if some of you still have a doubt about my complete lunacy ???? It's sweeped off, yes Gents, our dear @Martian is fully right.... I'm helpless.... And glad to be..... Sorry for drift Bill, I'll follow your Kestrel adventures in a "Just look, don't touch" way... I really appreciate your Dragonfly, it's an incentive to finish mines.... Sincerely. CC5 points
-
Interior ready to be assembled and weathered ... by Rodolfo Masti, on Flickr by Rodolfo Masti, on Flickr by Rodolfo Masti, on Flickr5 points


.thumb.jpg.d17ff607fc7e89ed057e63fcb6f2a888.jpg)


This leaderboard is set to London/GMT+01:00