
Leaderboard


Popular Content
Showing content with the highest reputation on 06/03/22 in all areas
-
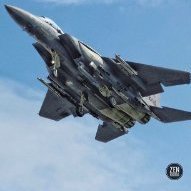
I got a little bit sidetracked with a few other projects, but finally got stuck into it again and finished. Here it is… After some time tormenting myself on exactly what colour should be used (the whole 357th fg US or RAF colours argument), I landed on both. AK real colours Dark OD 41 with 10% Tamiya buff for top, and tamiya raf medium sea grey unlighted for underneath. I used montex vinyl masks and decals. A fantastic product, but I didn’t see the funny side to it not having the subject’s serial number in the decals - the project number tag thing below cockpit. I used a tamiya decal instead. So serial numbers wrong but whatever. You’ll need a magnifying glass to notice it. for the invasion stripes on the fuselage I ripped the masking tape in the straight line so that the edge would resemble it being crudely painted on like they were. Happy with result. according to my research and pics I’ve found these things leaked like a Land Drover on the underside. Simple oils paints were used to replicate this. Surprisingly the ammo wasn’t too hard to paint. I use citadel base gold paint and dry brushed it on so it didn’t foul the colour underneath. barracuda placards and a few lead wires to spruce things up. The Eduard “look” dashboard was a nice addition too. Not too fussed about painted dashboards so it definitely made life easier. very happy with the kit, outstanding engineering. The I very much appreciate the clever use of magnets and screws for things like landing gear. Nothing worse than botching a glue job right at the end when attaching landing gear etc. it was one less headache. Highly recommend this kit.25 points
-
Curtiss SBC-4 Helldiver Air Group Commander. USS Enterprise (CV-6) 1/72 Matchbox The stash is now Matchboxless! Only the 2nd aircraft I have tried rigging since I came back to the hobby 15 years ago.16 points
-
Kit - Revell 1:72 Paint - All enamels Decals - Xtradecal & Kit Extras - None Hawker Hunter FGA9 XE552 'R' 229 OCU / 79 Squadron RAF Chivenor Early 1970's So the second finished build for this weekend and my last Revell FGA9 kit - I did have four at one time, and I still have one last F6 in the stash. Nobody needs me to say anything about this kit, it's all been said before. Personally I love it, and the only 1:72 kit I've built more of is the Hasegawa F-4 series. This is straight from the box except the decals which are from an early Xtradecal Hunter specific sheet, I forget the catalogue number, personally I think the red is too bright, I'd have probably been better using the kit ones, but I can live with that. Unusual for me to finish two builds almost at once, doesn't happen too often. Please feel free to ask any questions, make any comments or criticisms. All the best from a still sunny New Zealand. (All credit to Robin A. Walker / Air Britain). Ian.15 points
-
By no means perfect. I broke and lost a lot pieces over the course of time. But it looks nice on the shelf! Untitled by Arthur Filippis, on Flickr Untitled by Arthur Filippis, on Flickr15 points
-
As the real aircraft was rescued from the ice, this kit got rescued from nearly ending up in the bin! Given how awful this kit was, I am kind of amazed that it turned out even looking half as acceptable as it does, even with my meagre modelling skills. From nearly being thrown away partially built, to actually earning its place on the shelf. Build thread here - I hope you all think it's worthy and approve of the rescue mission.13 points
-
Here's my latest off the bench, the well known "Petie 2nd" Mustang (a P-51D-10, to be exact) flown by Lt. Col. John C. Meyer, as part of the 8 Air Force, 453rd Bomber Group (in detail, 487th Fighter Squadron, 352nd Fighter Group), whose museum this model is intended for. This is my first entry for the museum, the second will be a P-47D Thunderbolt, which I still have to begin working on. Back to this, the kit is the Tamiya one dedicated to this subject, in 1/48 scale; the only aftermarket addition was the Eduard PE set for the cockpit. Some minor scratch building was involved too, namely: - the gunsight reflectors, from thin acetate - the oxygen hose inside the cockpit, using thin copper wire winded around a thicker wire - the tail wheel arm, from a steel paper clip - the main struts brakelines, again with copper wire - the Pitot pipe, from brass tubes(because I lost the kit part in the process, it didn't really need to be replaced ) - the machine gun barrels, again from brass tubes - the tail light, from clear sprue - the main wheel wells back wall, from plasticard - piping and cabling inside said wheel wells, from various wires I also filled in (with PPP) most of the wing panel lines, according to the process used on the real bird to guarantee the lamina flow. I tried to keep them slightly visible though, as can be seen in period pics. Insignia and letters were airbrushed, using masks that I designed and cut with my Silhouette Curio, while the serials, stencils and all the rest came from the kit decals. Metallic paint is mainly Tamiya Gloss Aluminium from a rattle can, decanted and airbrushed. Variations were obtained with AK Xtreme Metal Chrome and Vallejo Silver. All other paints used were Lifecolor, Italeri and Tamiya acrylics. Weathering done with a mix of black tempera wash, oil wash and oil dotting (the latter only on blue surfaces), and some Tamiya Smoke liberally airbrushed on the metallic areas. The build thread is here: Here are some pics: Some shots of the interiors - they are over-exposed, I preferred going that way rather than using the flash Exhausts detail and machine guns Undercarriages And some from underneath All comments welcome Ciao12 points
-
Hello everyone Here is the first of three Mark I Models 1:144 Buffalo kits I have completed this weekend. It represents 3119, with the 5th Air Force, US Army Air Force, in Australia, autumn 1942. This was the last B-339D for the Dutch East Indies which had been kept by the manufacturer for trials and was on its way there together with several B-339-23s (export F2A-3s) when they surrendered and the shipment was diverted to Australia and taken over by the USAAF. Most of these were temporarily transferred to the RAAF throughout 1942 and were returned the following year. For some reason I have failed to discover, Mark I Models presents the option as "3120". I have managed to ascertain that "3-120" was used by the ML-KNIL in the Dutch East Indies and that none of the Dutch Buffaloes made it to Australia. 3-119 was the only B-339D used by the USAAF. Also, contrary to the instructions, this machine retained the Dutch scheme so I painted it this way (see my B-339C completed two months ago). I had to paint the "19" at the end of the serial number. Additions made to the kit were: the roll bar in the cockpit plus belts on the seat, the missing exhaust pipes, the wing pitot as well as the radio wires. The kit was fully painted and varnished by brush. Thanks for looking and all comments are welcome. Miguel12 points
-
Hi everyone, I assembled the Ebbro Kit to make this car: Lotus 49 Jim Clark Became the pole sitter of 1967 Italian Grand Prix Source:Carthrottle.com by Rodolfo Masti, on Flickr by Rodolfo Masti, on Flickr by Rodolfo Masti, on Flickr by Rodolfo Masti, on Flickr by Rodolfo Masti, on Flickr Here the WIP:12 points
-
Here we go, the Matchbox PK-4153 VW Scirocco is officially finished. It's mostly out-of-the-box. The most obvious addition are the dodgy home-made number plates (as bad as they are, the model looks a lot better than it did without them). Under the bonnet I've added ignition leads, a representation of the brake servo and windscreen washer bottle. On the interior I added pedals and seat belts (not that you can really see them). The rear bumper mounts were shortened and the side marker lights were removed for a more European look. Full details of the build and all the methods used can be found in the build thread linked below:12 points
-
Greetings, So, after a long time, I managed to finish another model. Atlas Cheetah C of the Ecuatorian Air Force, created using the wonderful AMK 1/72 Kfir kit and the appropriate ScaleWorx resin conversion set. The build was relatively easy, as the AMK kit is a joy to work with, I almost felt bad for cutting it up, haha, but it was needed in order to fit the resin conversion parts. The resin parts themselves are light blue color, very nice quality overall and satisfying level of detail. The only negative I found is that the provided resin canards (Cheetah canards are larger than conventional Kfir canards) lack panel-lining from the bottom side. No big issue, I rescribed them using reference photos. Other resin parts provided are basically the entire front section with cockpit and nose gear bay, the tail fin, exhaust and jet nozzle, refuelling probe, nose cone and some bits and bobs, aerials, etc. for the fuselage. Seat cushion is also provided, but I had the excellent Eduard PE set for the Kfir and opted to use that in combination with the kit plastic seat. I also scratch built some minor details around the fuselage, added small vents using repurposed spare/left over PE from other kits, furthermore I scartchbuilt hydraulic arms for landing gear based on pictures I saw, as well as brake lines, other small aerials, also drilled out landing lights and used gloss varnish to simulate glass effect. Used a Master pitot intended for Mirage 2000. The Kfir pitot seems to be much longer than the one used on Cheetahs. I also used leftover PE from Modelsvits Mirage III to enhance the exhaust area (the inner ring - not really visible on my pictures, but oh well). All paints used are Vallejo and Mig polyurethane acrylics, custom mixes, applied with a hairy stick. The paint job is probably the weak point of this model, but I am determined to keep brush painting for now. Decals are included in the ScaleWorx conversion set, printed by Uprise-decals. They are good quality, do not break or tear, however one has to carefully cut the carrier film, otherwise it will stand out on the finished model as it is quite thick. Microsol/set decal solutions helped with that. Sadly, the decal sheet doesn't contain enough numbers, as the Ecuatorian Cheetahs have their reg. numbers displayed in several places - aft fuselage just next to the exhaust on both sides, front fuselage on both sides, as well as upper side in front of the windshield, and lower fuselage on the front landing gear door. However, the jet I modelled (reg. 1371) seems to have the numbers on the aft fuselage area faded beyond recognition, so this got me around the decal problem. Other decals used were from the AMK kit and my spares box (especially small stencils for the missiles and fuel tanks, as AMK doesn't provide these!) There is a fake canopy silhouette on the bottom fuselage, the shape of which seems to slightly vary from jet to jet. I suspect I actually painted mine wrongly shaped (some jets have straight lines, some curved), but this is a mistake I can live with. Below are some pictures I took of the finished model. I apologize for the dodgy lighting, I am still trying to learn how to properly photograph models. I would like to thank John Weideman from ScaleWorx for making the excellent conversion set I used! Thanks for looking.10 points
-
My first completed build this year, the 1/48th HobbyBoss TA-7C Corsair II as converted to the EA-7L "Electric Horsemen" flown by VAQ-34 "Flashbacks" who were a Tactical Electronic Warfare Squadron of the U.S. Navy. It was established on 1 March 1983 at the Pacific Missile Test Center, Point Mugu, California, under the Fleet Electronic Warfare Support Group. The squadron was formed to provide realistic training for ship crews to counter Soviet electronic and cruise-missile threats and, along with a fascinating assortment of A-3 Skywarriors, they operated six EA-7L Corsairs (or "Twosairs") until 1991 when VAQ-34 was disestablished. In her later years the EA-7L was well known for being well weathered, maybe 'grubby', as a result of their operating in a harsh maritime environment and I wanted to catch that look in this build. 20220305_153722 by Ghostbase, on Flickr Starting with the kit, this is the 1/48th HobbyBoss TA-7C Corsair II. It is a straightforward kit which goes together well, requires very little filler, does have some shape issues around the jet air intake and fuel drop tanks (which I can live with), has a reasonable weapons sprue, and quite finely detailed panel lines. 20220305_153704 by Ghosbase, on Flickr For some reason I seem to have built the kit lop-sided, not sure the wing should drop that much! I air brushed her almost entirely FS36320 Dark Ghost Gray using Vallejo 'Model Air' acrylic paints which went on perfectly. 20220305_154039 by Ghostbase, on Flickr Decals were from the Caracal Models CD48180 A-7 TA-7C / EA-7L "Twosairs" decal sheet. As always, excellent quality decals, went on no fuss at all. 20220305_154125 by Ghostbase, on Flickr What was new for me was using a wash on this kit. I have used home made washes before to pick out panel lines however I have never applied a full wash to a model kit. I had a bottle of Humbrol Dark Grey Enamel wash which I applied with a thick brush and cloth, then very rapidly learned how long to leave it to part dry before removing with a cloth. It completely changes the paint and, where I got it right, does bring out the surface detail much more clearly. This was a good subject to use, the EA-7L Corsairs did get very grubby. 20220305_154342 by Ghostbase, on Flickr Any learning points? Yes, I need to make sure the wings are level! Also, despite my best efforts there were some paint bleeds when masking / painting the canopy and windshield which is a bit of a shame. 20220305_153958 by Ghostbase, on Flickr I did look at a weapons fit for this aircraft and did fit an AIM-9 training round. The EA-7L carried an exotic selection of electronic warfare pods; the ALQ-170, the AST-4, DLQ-3, ALQ-167 and ALE-43. I might come back to this build one day and see if I can add some of these. For now though, all done. Michael 20220305_153842 by Ghostbase, on Flickr10 points
-
My Buccaneer build is finally done. What started as an out the box build got a bit more involved as it went along. A few aftermarket sets got added, nothing much, but it took the build slightly away from my usual stock as a rock builds. I really like the look of the real thing and can see me getting seriously tempted by the new Airfix 1.48 kit when it turns up. Build thread here...10 points
-
Sitting on a beach, Culebra Beach, Puerto Rico to be exact, there is a very curious tourist attraction in the form of an ex Marines M4A3 HVSS 105 Sherman, It's slowly rusting away and covered in green seaweed and slime, plus large amounts of graffiti for most of the year, she tends to get a new coat of graffiti with every new tourist season I think, and therefore changes in appearance quite a lot, I have a sneaky feeling that there's a beach bar close to where she sits in the sand, plus, there's a great deal of pictures online now of this tank wreck, due to it being a popular tourist spot, which is very handy for projects like this, but anyway, I think the above picture would make a good little vignette, and it does have to be said that painting is not my strong point, so this could go south very quickly indeed, luminous green seaweed is not in my skillset... A little history on this particular M4A3 HVSS 105mm Sherman and how it came to be sat on a beach in the Caribbean, and this is all based on snippets of information gleaned from the internet so is probably not entirely correct, but here goes, during World War II the Americans had some bases on the islands around Puerta Rico, these bases were mainly used for testing purposes and as firing ranges for the duration of the war, most of the bases were maintained for quite a long time after the war, right up until around 1973 (ish) They were then shut down and abandoned, due mainly to protests from the locals I think? And when the Americans abandoned all the bases, for reasons unknown they left behind two or three ex Marine M4A3 HVSS 105's, which have been slowly rusting away in the sunshine and sea air ever since. Pictures above and below, this seems to be the most popular style of graffiti, judging by the pictures online, and is obviously the most favoured style by the youth of today, and statements like that make me sound very old, As far as I can tell the interior of the tank is pretty much fully gutted out, there's no engine left in the engine bay, just a load of old rusted metal junk, the sponsons are mostly rotted out as well, as far as I can see from pictures, but I'm guessing there's probably the remains of a transmission in the front, and probably a gun breech still in the turret, I need to hunt more pictures... Pictures above and below, there is a no luminous green seaweed option, which is a damn good thing for me at least, because that's probably going to be the hardest part to do, so I can always chicken out and just do all over rust, plus some graffiti on the turret and hull sides maybe, but it does have to be said that the green seaweed is what kind of makes this picture, for me at least, It takes a rusty old M4A3 105mm and turns it into something curious to look at, and provides good contrast and colour for a very nice picture. Picture below, this is as far as I got about six years ago, I was just messing around with various forms of destruction on some fairly good plastic kits (Dragon and Tamiya) plus an Aber metal barrel, and doing a little experimentation with various ways to create very badly rusted and pitted surfaces on armour plate and castings, mostly using ca glue and powder, and some very crude use of plastic card to create the areas where the armour plate has flaked away in big chunks on the hull sides, but apart from that, I didn't get very far with it, the prospect of green seaweed/slime scared me half to death. Comments on the build and ideas on how to do the bright green seaweed/slime/algae on the front plate are more than welcome folks, plus it has to said that this is just a chill out kinda build, just a little bit of fun in a world that has gone insane, accuracy of the model itself is not all that important to be honest, it just needs to look vaguely like a badly rusted and corroded M4A3 HVSS 105mm Sherman, covered in bizarre graffiti, and something that good old mother nature is desperately trying to reclaim as her own. You can all blame @Bertie Psmith for this build log, so when it all goes south, just remember he twisted my arm... Matt9 points
-
Hallo friends, This is my rendition of Wild Bill Crumps P-51. it’s the eduard kit in 1/48. The wings are puttied and airbrushed with silver. The difference between silver and natural aluminum of the fuselage is good visible. The decals came from Lifelike. I had a lot of fun and was very touched of his story. If you like visit his site , you won’t regret it, I am sure you will be touched too. I contacted Bills son who got a friendly permission to use these photographs. thank you very much Bob. have a nice weekend friends! Andy John William (Wild Bill) Crump was one of the 356th Fighter Group pilots based at RAF Martlesham Heath during WW2. Bill flew Republic P-47 Thunderbolts. That is not particularly unusual. But what is unusual is that Bill carried a passenger in his cockpit on at least five sorties. During the 1930s Depression in America, Bill tried to make a living by helping farmers with their coyote problem. On one occasion a farmer presented Bill with a baby coyote in a box and said he could “start with this one”. Bill could not find it in himself to kill the animal and adopted it as his pet. He later smuggled it into the UK when, after earning his wings as a pilot, he was posted to Martlesham Heath. Bill discarded his gas mask and "smuggled" the baby coyote aboard the Queen Elizabeth. The Coyote became a family member at the 360th Squadron, 356th Fighter Group, 8th Air Force The coyote had "dog" tags, a log book ("Form 5 "), Immunization record. The coyote was called "Jeep" NMI Coyote ( NMI stands for "No Middle Initial"), and he accompanied Bill on his missions, in the cockpit of his Thunderbolt, named “Jackie.” Bill later flew P51, Mustangs. Bill was billeted at Playford Hall during his stay here, and it was at Playford Hall that “Jeep” sadly died when he was run over. Jeep received a Military funeral, "missing man" formation, taps and a victory roll roll by his master, before being laid to rest with a gun salute of Colt 45s, in the grounds of Playford Hall. A plaque marks the spot. Over 60 years later, In the week preceding the VE Day celebrations at Martlesham Heath, Tennessee. Jim is friend of Bill Crump and had been asked to visit the grave on his forthcoming visit to England. Al was a WSO in B-58 (Hustler) and Jim was a pilot in KC-135s. I arranged to meet them both, along with their English friend Sandra (a Boeing 737 pilot) at the Duxford VE Day show on the 7th May. We had a great day together and I was enthralled with their stories. On Sunday 8th May the group attended the MHAS's VE Day celebration, where they met our gang and also Lt Nichelle Brokering (also a KC-135 pilot ). Later, Bob Dunnett and I accompanied the three guests to Playford Hall to see and film the grave of “Jeep.” It was a moving occasion. Tarkey Barker A biography of Wild Bill Crump can be found on , www.wildbillcrump.com a website created by Bill's son as a tribute to his father and celebration of his life.9 points
-
I was very pleased and proud of this model; it was made from two kits! Both were Helldivers, one was an Airfix and the other a Matchbox; I spliced the wings of the Airfix to the fuselage of the Matchbox kit and made one GOOD model. Very early in my latest spate of making models, it was a challenge! I also inherited a bomb bay and half decent landing gear from the Airfix kit and the wings had far better detail than the wings from the matchbox kit (even though the matchbox had wings wot folded!). I worked through it and completed it and was immediately proud of my efforts! Ladies and Gentlemen, I give you the SB2-C3 Helldiver '207', of VB83, USS Essex!9 points
-
Just to kick things off, here are a couple of my recently completed builds. I've had a bit of a "North Africa 1942" theme going on and so here are the Special Hobby Curtis's Kittyhawk Mk 1a and the Hobby 2000 (ex-Hasegawa) Macchi C202 both in1/72. I've got an AZ HJM bf109F4 in the cupboard waiting to finish off the trio. I've read some worrying things about the AZ decals. Has anyone had a fight with them?9 points
-
This is the bubble pack release of this kit. It's OOTB with the exception of the rigging. The markings are for a Polish aircraft after WW I.9 points
-
Last nights work, I am getting close to finishing up this side, the red panel should look good in there with placards dotted around too Cheers9 points
-
Already Sunday...well here is the update. There is a RAT in da house! The good work continues... I put on the last decals... Noticed that the canopy ram rod I found was for the closed position.....the open position... It's somewhere around there...... So I glued on a bit Next is the wing tip position lights....bleeding small things... Had to carve out a notch at the tip. And glued them into place....will have to sand a bit to make them flush. Then we have these small lights that goes to the end of flaps actuator housings, could use a few more, there are a couple at each side of the exhaust too. Broke off the pitot tube too I use a toothpick with a bit of tac-it at the end to move around those tiny lights. Got them into place at least. Back to the wingtip lights. Sanded them a bit. Then I painted the light colours ...blue on the right and red on the left... painted silver at the rear end and a dab of thick CA glue as a lens. Now for the wheelbay doors... flat coated and ready to be glued into place. First the nose gear doors.... Then the main gear doors. Now for the RAT.... cut the parts free of the printblock. Painted the outside and inside of the RAT housing door. And the generator in black...I managed to break a propeller blade but it was easy to glue back into place. Glueed the generator into the door.... Then a wash and a flat coat. Glued the canopy opening ram into place...I will shorten the ram rod a bit, no worries And the RAT is glued in place. And that´s it for this session Cheers!9 points
-
I got the scheme done a few weeks ago. First time doing a wrap around scheme, i found it a bit tricky making sure the masking was right, but i love the result. Here are the final pics of the Harrier. After the decals i kust gave it a light flory was then a mat coat. I used Eduard resin BL755 cluster bombs on the outer pylons. The rest are from the kit. I used a base from Coastal kits. I do like there carrier decks, they are perfect for a flat metal surface. But i am not so keen on these ones are there is no texture. But its the only option for this type of matting. This was used at the FOB set up at San Carlos in May 82. It allowed Harriers and Sea Harriers operating from the carriers to attack Argentinian positions, then re-arm and re-fuel before mounting another attack on route back to the ships. It also meant that aircraft could be on call to provide air support to the ground troops much closer to the front line than operating from sea. The FOB, known as RAF West Wittering to the RAF, was in use from the 2nd of June to the end of hostilities 10 days later. I only found out about this FOB a few years ago, which is a pity as i had been to San Carlos a couple of times when down south. I did cut away the printed grass areas and replace with static grass. Thanks for looking, all comments welcome as always.9 points
-
Time to move this one back to page 1, for probably the 2nd last time as this is the last update. Currently finding it very hard to get motived due to stuff going on at work plus am filled with equal parts horror and sadness with what’s occurring in the Ukraine. But I have made progress, some good and some not quite so…… …..after the last update she was pretty much ready for decaling, which I started with some hesitations. Firstly I was going to have to use the ZM decals which give me so much trouble last time with the RAAF beasty…. And true to form they sort of misbehaved again this time. Secondly what decals do I use, as in all the stencilling, and national markings. I have a set for the F-4E from Isradecal which covers the basics, thou no instructions on how to use them. Thirdly there is/was quite a bit of variation and it all depended on how the IDF received the aircraft; 1, straight form the factory, desert scheme, English stencilling 2, straight form the factory, SEA scheme, English stencilling 3, straight form the factory, Grey scheme (some RF-4E’s), English stencilling Then with repainting/upgrading; 1, Kurnass 2000 Update, desert scheme, Hebrew stencilling and reduced stencilling 2, Grey scheme on RF-4E’s, updated, Hebrew stencilling and reduced stencilling 3, Repainted SEA to Desert Alt scheme, full Hebrew stencilling That is pretty simple, however in between… it’s a bit more of a mess, the SEA scheme birds were repainted in the Sand scheme but it was a different pattern and the stencilling is all in Hebrew and it appears to also have full stencilling. As the Factory aircraft moved through service, major stencilling appears to have changed from English to Hebrew. Finally 69 Sqn aircraft were never updated to Kurnass 2000 aircraft, so there was probably a mix of stencilling between aircraft. So after all this and going over heaps of photos I’m going for the mix option, major stencilling in Hebrew and minor in original factory stencilling. Plus I have seen some aircraft where they have had spot re-paints and the stencils have not been repainted…….. which is good as some of the ZM decals…… So after all that and 2 ½ days decaling here we are…. ….and photos with the BMF missiles fitted, and the fins actually do sit that close to the ground. The only issue I did find is now I think this aircraft was actually may be a “#3, Repainted SEA to Desert Alt scheme, full Hebrew stencilling” aircraft!!!! Up to now I thought it was a factory aircraft going by the serial numbers. I have found one photo of 314 in the original SEA scheme, but all the other photos show 314 in the normal Factory Desert scheme and not the Alt. one like all the other Factory SEA scheme aircraft! Some of the aircraft had multiple serial number changes, so this may be the case with 314. Anyway it’s all very confusing and way too late to change it now. So all that’s left to do in some weathering/fading and finish off all those annoying little bits at the end of any build, I should have her finished next weekend. And finally a “Phlock of Phantoms”…….. the poor old RAAF bird is still looking very sad….. 🇺🇦8 points
-
been masking and painting the walkways and some ‘insignae’ (is that a word?) recently… did some more work chipping the flaps too… i like all the layers in these and their assymetry… masking…. painting… did my best to match the blue. though it was best to lay this down first despite white being tricky to overlay. it prevents a halo of white, if white went down first - ask me how i know. Untitled by Paul Wilson, on Flickr gonna lay down white parts next and then chip and weather it all away8 points
-
PK-605 Handley Page Heyford in 1940. Built OOB apart from the decals which were used in part. Here is the build thread.8 points
-
Hello everyone, Here's the kit for the true masochists. The model itself is quite nice actually, nice details, molding is fine, PE included is great, but the kit is engineered that way that it sucks all the fun from the building process. Especially the suspension. Anyway, the model I built should represent the tank belonging to 1st RTR, as photographed on 2 August 1940. It is still wearing the markings from the time before reorganization, when 1st RTR was part of the Heavy Armoured Brigade. However, at this point, 1st RTR was already a part of the 7th Armoured Brigade. The photo was taken during one of the initial raids against the Italians. Following initial skirmishes, 1st RTR participated in Operation Compass as a part of the 7th Armoured Brigade, and it was one of the units that were engaged in the chase across the desert to cut off the retreating Italians. It participated in the battle of Beda Fomm, suffering only light casualties. I don't know what exactly happened to this tank and its crew afterwards, but it probably ended up in Tobruk during the siege. When Rommel joined NA theatre with Afrika Corps, 'B' and 'C' Squadrons of 1st RTR were moved to Tobruk. They were there during the whole siege as a part of the 32nd Army Tank Brigade. The regiment broke out of Tobruk with the rest of the 32nd Army Tank Brigade and 70th Infantry Division, in November 1941 during the Operation Crusader battles. It was until mid-February 1942 that 1st RTR used their old and worn Vickers Lights and Cruiser tanks that they had from the beginning of the campaign. They were replaced in february with Honey and Grant Tanks, when 1st RTR joined 1st Armoured Brigade. You may notice that this is not the standard Caunter camouflage. The scheme itself is standard Caunter scheme for Vickers LT, but the paints are not. Instead of Portland Stone / Slate / Silver Grey combo that became standard later on, these tanks were painted in a higher contrast combination during Caunter scheme trials. It is not know which paints were used exactly, but the suggestion I got from @Mike Starmer is that it was Portland Stone, Green (for example No. 20 Olive Green) and very dark grey, almost black. This combination was not accepted because the contrast was too high. Model was mostly built out of the box. Spare wheel was not included in the box, so I used one from Universal Carrier Tamiya kit (not sure if it is exactly the same, but it is close enough). Also some stowage and POW canisters were added. Painted with a combination of MRP and Gunze and weathered with pigments and MIG's nature effects. And here's the real thing: And the replica my daughter built Thanks for watching and thanks for feedback. Cheers, Nenad7 points
-
Just finished this evening! I've had a ball adding stuff to this but there is only so much detail you can add to a 1/76 vehicle, I'm rather pleased with this.😀 I added a few bits and pieces; the main winch is actually under the back of the cab so there wasnt much I could do with that, but there is a set of three pulleys at the back that come off a larger pulley from the main winch, I added that from a bit of round injection moulding, drilled a hole and then used a needle file to carefully cut a groove around it. I also added a pair of long narrow rollers (just a piece of wire bend 180° and glued on). The tractor unit has a large towing hook on the front and on the rear but both were not moulded correctly; I closed them over by adding a little piece of thin fuse wire from the point of the hook to the shank. The transporter I have fitted out with a couple of pulleys, one in the swan neck and the other outside of the swan neck, these were for rigging the winch to pull a tank onto the trailer. The one outside of the swan neck is actually a spare tail wheel from an aircraft kit! The winch wire could come straight up from the pulley behind the 5th wheel and up into the pulley on the swan neck. I fitted some wood, under the chassis and some blocks of wood in the swan neck area along with a roll of wire that I added a loop on each end and rolled around a pencil, I then put a spot of superglue to keep the wire as a roll. I decided to make mine with the rear ramps up, added a pair of stays from the chassis and used thin fuse wire as the cables that helped raise and lower the ramps. I dressed the trailer bed in metallic paint and Humbrol Matt 29 (I have an old tin that's gone like sludge and is ideal like this as mud!) I added both the metallic and the 'mud' by using the knurled surface of an old craft knife, painted the paint on and then rolled the surface down the track faces of the trailer bed a couple of times, I was very pleased with the effect! The only thing it needs now is a tank to sit on it!😂 Enjoy! This one took me a couple of weeks, with all the additions, I'd been research on it for a while before that. Very pleased with it; I just need to make space for it in the cabinet.😀7 points
-
This was my first ever model car. A great kit to start vehicle scale modelling because fit is perfect. However for me car modelling is by far the hardest subject to get really good looking models. I'm happy with this result but I need more practice with model cars for sure. I got this as a gift from my inlaws after asking them for a Ferrari for my birthday! Untitled by Arthur Filippis, on Flickr Untitled by Arthur Filippis, on Flickr Untitled by Arthur Filippis, on Flickr Untitled by Arthur Filippis, on Flickr Untitled by Arthur Filippis, on Flickr7 points
-
Hiya Folks, I bought this last Saturday and started it that night,..... I wasn`t going to do it as a WIP but as I`d taken a few pic for a friend, I thought I`d stick them on here and sort of run with it!! I was originally going to build it on its undercarriage as a 19 or 92 Sqn aircraft based in Germany,...... But then I changed my mind,.... I`ll do a RAF Germany Phantom some other time,...... because I have always liked this shark mouthed aircraft from 41 Sqn and I have decals for it on an old ED Models Almark decal sheet; So,.....here is the cockpit; Before long it was coming together quickly; I was toying with the idea of depicting the model with its unercarriage being raised as it took off,...... but after checking out the dropped flaps and slapts required,.... and the extended oleo`s,.... I decided to close the undercarriage bays and have it going fast and low at full chat,...... but I don`t think the kit was meant to be built like this with the gear doors closed nd the canopy closed,..... as the fit of these parts was awful!..... So,.... after a lot of whittling and filling,..... here it is with the canopy closed; And a close up of the crew,..... probably not the best,.... but it will do for me; After a wash,.... I then started to paint it,.... here it is after the first brushed on coat of Aeromaster Drk Sea Grey,..... my last bottle! So that is where I`m at so far,..... I also bought a 1/72nd Italeri Hudson last Saturday too and that is ready to paint now,...... again, not the easiest kit in the world to build! Cheers for now, Tony7 points
-
Afternoon all, I've had a bit of a hiatus from this forum in recent times, but I've still been plodding on! I thought it was time I shared some of what I've been up to, and Tornados have featured prominently. I hope you enjoy them! Revell 1:48 Tornado F3 43 sqn RAF Leuchars IMG_5286 by Craig Scott, on Flickr Revell 1:48 Tornado F3 111 sqn RAF Leuchars IMG_3032 by Craig Scott, on Flickr Revell 1:48 Tornado GR4 617 sqn RAF Lossiemouth IMG_2972 by Craig Scott, on Flickr Revell 1:32 Tornado GR4 XV centenary jet IMG_1117 by Craig Scott, on Flickr Any comments or queries welcome, hope you enjoy them!7 points
-
The FICTIONAL story told by this model begins and ends with a zap, and has a 'crash!' and two 'bangs!' in the middle. Sometime in the late 1960s, and the day before the main events of the story, our crew, pilot Capt. Charles (Coolhand) Myers And Radar Intercept Officer (RIO) Lt. Ted (Ping) Grandes, were unfortunate enough to have to land their (Tamiya, 1/48) F-4B Phantom II on the wrong aircraft carrier. It wasn’t even their fault, their own deck was blocked by someone else's landing mishap, but trapping on the wrong ship has always earned some punishment in paint. VF-114 Aardvarks, the resident squadron on the other carrier, painted a cheeky little memento on their uninvited guest, while the VF-111 Sundowners crew were away for coffee. The positioning of the zap was well thought out. No-one would even know it was there until the wings were folded back on the deck of the USS Coral Sea. Imagine the embarrassment of Myers and Grandes, but worse than embarrassment was to come the next day. The following morning saw all of the Sundowners over North Vietnam determined to move some mud with several tons of high explosive. The target was an unexpectedly well defended power station. The crews were aware of the flak menace but were flying above its effective height. Until the SAMs arrived that is; while manoeuvring to avoid the deadly missiles with a full bombload, Myers inadvertently lost height and brought their aircraft within range of the guns. A shell made a direct hit on the underneath of the starboard wing. It entered the large fuel tank from the underneath and, missing any solid structure, failed to detonate before passing through the thin skin on the top of the wing. Even without a detonation the kinetic energy of the 30mm artillery round caused the tank to burst open violently ejecting gallons of fuel into the slipstream. It happened that Myers was looking out to port and was unaware of the impact at the time but Grandes was looking over his right shoulder for SAMs and saw the fountain of fuel erupt from the wing. It’s fair to say that he was not a happy man. He was just about to call Myers’ attention to what he saw as the impending explosion of the aircraft when… …a second shell hit the aircraft under the tail, penetrated the titanium heatshield and exploded inside. The explosion was partly contained by the structure of the tail but the shockwaves and overpressure caused a lot of damage. The heatshielding was ripped open revealing the stabilator control system inside. Fortunately the aircraft was not in afterburner at the time and a serious fire was avoided. (Sorry for the poor quality photograph taken from the wingman's aircraft 🙃) The fin blew up like an aluminium balloon before the skin gave way and released the pressure. The rudder, or most of it, departed the aircraft entirely as the tail whipped violently from the shockwaves Fortunately, the rudder is perhaps the least important of all the flying control surfaces! The stabilators stood up to the impact slightly better but lost portions of the lightweight honeycomb structure of their aftermost sections, leaving one trailing edge reinforcement flapping in the breeze. Amazingly the mechanism continued to function. All this was more than enough for RIO Grandes, who was already spooked by the damage done to the wing a second before. Convinced that the impact in the tail was the aircraft blowing up, he pulled first and, like the rudder, departed the aircraft. He landed unhurt and was soon beginning a ten year, all-expenses-spared, stay in the Hanoi Hilton. Oddly enough, the rudder also found a home in Hanoi, displayed in a propaganda museum no more than a mile from Ping’s new home. All that was left in the cockpit was the seat main gun, and a few connecting cables, and hoses. Coolhand felt, and saw in his mirrors, the ejection of his RIO. He expected to follow automatically when the command ejection system fired his seat ¾ seconds later. However, nothing happened! The Single/Dual selector was in the single position (oops!), but the pilot assumed that his seat was unserviceable and returned his attention to flying what was left of the aircraft. (The selector is the topmost black and yellow handle and should have been turned to the horizontal position) A good first move was to hit the ‘Clear Aircraft’ jettison push switch which explosively removed not only the bombs and missiles still on board, but the ejector racks, pylons and the big centreline tank too. This considerably improved the Phantom’s capacity to manouevre[DS1] and Coolhand soon had the nose up and the aircraft under control. He didn’t realise it at the time but Ping’s sharp exit with the loss of the weight of canopy and seat so far forward of the centre of gravity, was of considerable assistance in pulling out of the near fatal dive. A tendency for the aircraft to drop the port wing due to fuel imbalance was uncomfortable without a rudder but could just be managed with ailerons alone. This situation eased as the tank emptied. Myers was surprised that he was still flying at all and delighted to be leaving the target area. The whole incident up to this point had lasted less than 15 seconds but it had seemed a lifetime to him. Now he had a little time to take stock of the situation. He had lost his RIO but his wingman was still in contact and joined up for an inspection of the battered bird. Apart from the damage already mentioned, the wingman could find no further concerns. The fuel leak had slowed to a fast flowing river now that the wing tank was mostly empty, but fuel continued to leaking into the burst tank through fractured pipes and valves connecting it to the fuselage fuel cells. He now had two good reasons not to use afterburner. It would be a long trip home. While the wingman arranged for emergency air to air refuelling, Myers extended the AAR probe. It seemed to be working and he determined to leave it locked out and ready for use in case of problems with the hydraulic systems. Pretty soon a tanker showed up and the two Sundowners headed back to the nearest concrete runway available in South Vietnam. (It had to be concrete because the extended hook was likely to rip up any PSP runway on touchdown, with possible catastrophic consequences.) Coolhand was able to plug in to the tanker and refil his fuselage tanks, avoiding fuelling either of his wing tanks, but that internal leak remained a problem and on the slow trip south several more exhausting stabs at the tanker were required. Seemingly as fast as the fuel went in, it leaked out again, cleaning three month’s muck and grime from the wing and washing most of the grease from the flap and flapperon hinges. Arriving overhead the friendly runway, Myers allerted everyone on the base by the screaming of his aircraft. With everything dangling in the wind and a wing turned into a huge flute, the Phantom howled like a banshee as it turned finals. The approach end cable had been de-rigged to allow Myers to land without engaging it with his damaged hook and, unsurprisingly the braking parachute would not deploy. No problem, Myers almost enjoyed the long rollout allowing his trusty steed to come to a gentle halt, followed by fire trucks, an ambulance, the ATC jeep and tech support from VMFA-333, a Phantom close support squadron based at that airfield. Out of habit, he folded the wings and seeing that only one side moved, decided to leave everything else exactly as it was. He shut down with a sigh of relief. Myers was speedily removed from the hand painted cockpit to the Officer’s Club for a liquid debrief. In fact he left so quickly that he left his helmet hanging from the gunsight. The marines had two priorities. The first was clearing the runway which required lashing the hook clear of the ground. Their second priority was staking a claim to the Navy aircraft in the traditional way. And why not, it could not be denied that 206 had now made a second unplanned landing on the wrong ‘carrier’ in only two days. ~~~~~~~~~~~~~~~~~~~~~~~~~~~~~~~~~~~~~~~~~~~~~~~~~~~~~~ If you have read this far, thank you very much for indulging my whimsy. Now I’ll give you the conventional RFI information. This is a Tamiya 1/48 F-4B released last autumn. It’s a beautiful kit as you probably already know, probably the best one that I’ve build in the last 50+ years. Except for the decals, which were stiff and uncooperative. Much of the decaling came from the Italeri F-4J kit so there will be inconsistencies in the markings but this is a fictional story, based on real events, Hollywood style so don’t expect accuracy here. Having a good time and telling a tale was always my priority. That said, I made many modifications to get as much consistency as possible, for example I set the wing fold lever in the cockpit to the ‘Fold’ position, not a Tamiya option. There are more than 20 mods in the cockpit alone. For more details see the WIP here. The following photographs were the inspirations for the battle damage. They are all real, but did not all happen to the same aircraft at the same time. Nevertheless, I think it’s just about plausible that a Phantom could survive the events described. This is genuine damage from an exploding SAM This is a pilot standing in the hole made by his exploded wing tank This is a Phantom drone which survived a direct hit from a sidewinder (without a warhead). I hope that no RIOs ejected in these circumstances but this picture shows the possibility ~~~~~~~~~~~~~~~~~~~~~~~~~~~~~~~~~~~~~~~~~~~~~~~~~~~~~~~ As usual all comments are welcome and I will reply to every one of them. The wide angle shots which I forgot to include here are in another post a few comments down on this page, sorry.7 points
-
Built this for the F-14 STGB but ended up finishing it in the KUTA! An absolute pleasure to build. Any mistakes are all my doing! Build thread here: Untitled by Arthur Filippis, on Flickr Untitled by Arthur Filippis, on Flickr Untitled by Arthur Filippis, on Flickr Untitled by Arthur Filippis, on Flickr Untitled by Arthur Filippis, on Flickr Untitled by Arthur Filippis, on Flickr Untitled by Arthur Filippis, on Flickr Untitled by Arthur Filippis, on Flickr7 points
-
Hi guys, I finally, finally got that front panel right. Would you believe I stripped it down again earlier this week? Yes, of course you would, happens to all of us, right? @bigbadbadge's fine line tape really worked well. This is the panel, ready for round 2 of the blue. Some touch ups were needed. As you can see, I changed my mind again about the order in which to spray the colours. I found that the blue paint would not dry quite as fast as the white paint, which is why I had to redo the panel again. I had a mix of blue paint and it had gotten too thick when I sprayed it, so it reacted with the masking tape when I masked it to paint the white. So I stripped it, grey primer, white primer, then sprayed a thin layer of gloss white which dryed quickly. Then, mixed up a new batch of the blue paint and it went down well and thanks to the fine line tape the masking went well too. I think this is the way to go @Spiny. The tip at the bottom is not easily covered with the vinyl tape so that's a small piece of regular masking tape cut to size around the bottom edge. You can see that I needed some more blue paint on the right side of the panel (as we're looking at it). This is the final result and I'm glad that's over! Just a little bit of blue left to remove around that bottom edge. The vinyl tape really gives a nice edge. So this can cure now. The repair of the door went well too so I can clearcoat both these panels later this week. I can now focus on the interior and all the other bits. I'm hoping to get a lot done today!7 points
-
@Bertie Psmith @Dansk @81-er, thanks fellas your very kind ,paul i agree the pe mudgaurds do look good, and fit quite well which is always a bonus, Some paint on the top, i still have to redo the fuselage stripes, and there are a couple of areas that slipped under the masking radar7 points
-
... and so onto the Third Law of Modelling : "the modelling session shall end with the appearance of The Carpet Monster" i) after a suitable* period of time has elapsed the piece shall be returned to the modeller exceptions : a) insufficient quantity of swearing has been offered up in tribute b) insufficient quality of swearing has been offered up in tribute c) the piece is really small * "suitable" depends on the whims of the particular carpet monster, but usually around 5 minutes after the modeller has got down on hands and knees and realises that they are stuck7 points
-
Hawker Tempest Mk.V (A02109) 1:72 Airfix The Hawker Tempest was a development of the Typhoon, originally called the Typhoon II, it was envisioned to solve all of the issues that bothered its designer Sidney Camm. The main difference was a much thinner wing which reduced drag and improved aerodynamics of the laminar airflow. The wings could accommodate 20mm Hispano cannons that packed an enormous punch, and lent itself to the low-level attack role that it was designed for. The engines intended to power the aircraft were the Centaurus, Griffon and Sabre IV, and initially the Rolls-Royce Vulture, which was terminated early in the design phase, leaving the three options going forward and necessitating substantially different cowlings to accommodate their differing shapes. The Mark V was split into two series, with the Series 1 having the Sabre II that had a similar chin intake to the Typhoon and many Typhoon parts, while the later Series 2 used fewer Typhoon parts and had their cannon barrels shortened so they fitted flush with the leading edge on the wings. A few of the early Mk.Vs were used as test beds, while other marks were developed alongside it, such as the Mk.IIs with Centaurus engines and a cylindrical cowl; Mk.VIs which had a very short production run; the Mk.III and Mk.IV that used two types of Griffon engine and didn't see service, and later the TT.Mk.5, which is where a lot of Mk.Vs ended their days towing targets. The Kit This is a new tooling from Airfix in what I jokingly call “the one poo scale” to irritate my fellow Moderator, Julien who calls it “the one true scale”. In reality I have no issues with any scale, but prefer my models in 1:48 for aircraft. Truthishly, I’ve been more impressed with each passing release and the detail being squeezed into this scale, so you can be assured of my equanimity during this review. The kit arrives in a standard red-themed top-opening box, and inside are four sprues in Airfix’s usual light grey styrene, a small sprue of clear parts, decal sheet and a folded instruction booklet with spot colour printing. The sprues are filled with well-detailed parts and some clever engineering, which should please anyone in the market for a 1:72 Tempest V or anyone that appreciates a nicely crafted kit. Construction begins with the seat, which has a slightly soft quilted rear cushion and is attached to the head armour, with lateral tubular mouldings, which sets the tone for the cockpit being made in sub-assemblies. In order to close up the fuselage however, there are a number of other sections that need completing first. The simple two-part L-shaped tail-wheel bay is first; The instrument panel with clear gunsight/compass and instrument decal; then the three-part intake grille is made up with its circular centre. Two 0.6mm holes are made in the fuselage halves before all four assemblies are added to the starboard fuselage half after painting the cockpit walls, so the fuselage can be closed up. The cockpit sill insert is inserted into the oversize aperture later on. The lower wings are full-span, and are stiffened by adding the spar/wheel bay walls and the cannon barrels, plus the closed-up main bay doors if you’re going for a gear-up model. Clear landing lights slot into the holes, and another is added into the belly, and a few more holes are drilled. Surprisingly, the upper wings are full-span too, and have the cockpit floor moulded in with the foot trays ready for the rudder pedals and control column to be added once the wings are closed up. Rudder pedals at 1:72 is good to see, although only until you close up the fuselage and consign them to darkness, most likely. The completed wing assembly is then joined to the fuselage by inserting the leading edge into the back of the chin bulge, and dropping the trailing edge into place, gluing it all closed once done. The elevators are each single parts with P & S on their tabs, but you get a separate rudder to add to the tail fin, which you can offset for a more candid look. Beneath the tail you can close up the tail-wheel bay for in-flight, or pop a two-part tail wheel into the bay with a pair of doors installed at an angle on either side. The main gear is a single strut with retraction mechanism and captive door, and a short ancillary door that is fixed to the outer edge of the bay before inserting the main legs. A retraction jack and triangular inner bay door is then inserted into the two inner edges and the 5-spoke wheels are placed on the axles, with another 4-spoke set left on the sprues. Both sets have some sag engineered into the bottom of the tyres to give the impression of weight. Behind the chin take is an outlet ramp with a cooling flap that is added while the underside is completed by fitting L-shaped pitot; crew step and aerial, the latter having scrap diagrams to show their correct orientation. The six exhaust stubs are each made from two parts that interlink to create the stacks for each side, so they can be slotted into the sides of the engine cowling, then the single-part prop is given a choice of different shaped two-part spinners, before it is placed against a tubular insert that has the axle pushed through to join the prop carefully with as little glue as necessary. Once the glue is dry the tubular insert is pushed into the front of the fuselage and cemented in place, leaving you with a spinning prop if you’re careful. There’s a pilot figure included on the sprues, with a detailed painting guide if you wish to use him, and you also have a choice of open or closed canopies, fixing the windscreen first, and either butting the canopy up to the screen or leaving it open as far back as the head armour. An aerial is fixed to the fuselage spine at an angle, and another pair of scrap diagrams help with orientation. There are a pair of clear fuel tanks included on the clear sprue, but they aren’t needed for this boxing, and there are no stencils for the clear pylons. Markings There are two decal options on the sheet, as is common with Airfix kits, and you have a choice of one in D-Day stripes and one without. From the box you can build one of the following: Wing Commander Roland Prosper “Bee” beamont, No.150 Wing, Newchurch, Kent, England, June 1944 No.486 Sqn., Royal New Zealand Air Force, RAF Castle Camps, Cambs., England, April 1944 Decals are by Cartograf, which is a guarantee of good registration, sharpness and colour density, with a thin gloss carrier film cut close to the printed areas. Conclusion This is an excellent new tool from Airfix with plenty of detail baked-in. There’s no doubt that there will be more boxings, as indicated by the unused drop-tanks and wheels, so keep a look out to expand your squadron. Very highly recommended. Review sample courtesy of6 points
-
Fellow Modelers, Below are photos of my 1/48 scale spaceship Luna from the 1950 USA Movie “Destination Moon”. The movie told the story of man’s first attempt to reach the moon by rocket and it was the second major motion picture made about manned space travel. Honestly, the acting in the movie is poor and the story line is weak, but the science behind the space flight is based in fact (for what was known at the time). It is pretty entertaining and won the Academy Award for Best Special Effects. Most importantly it gave us a very cool rocket design named Luna, which looks pretty much like a glorified German V-2 missile. This is very large kit with the rocket height being 37”. This the same scale as the main miniature used in the movie. The kit only consisted of six resin pieces, with one of those being the lunar base! The astronaut figures are 3D Printings that I purchased from Shapeways.com. All the miscellaneous ground equipment was either scratch-built or came from my “spare parts stash”. The lunar surface was given a multicolor finish to match what was shown in the movie. The finished product is simple but still eye-popping due to its size and attractive lines. The last photo shows me kneeling beside the model to show how large it is. I hope you enjoy the photos. Phillip1 [u6 points
-
Some Bedfords, CMPs and a Scammell all in 1/87 scale. Manufacturers are ADP, Artitec, Trident and Wespe Pictures from the workbench: *KLICK* Cheers Macki6 points
-
Afternoon all, Here are a couple of in-flight models both were 'failed-to-complete' efforts for fairly recent Group Builds that I have only just found the impetus to finish off. First up, Airfix 1/72 'old tool' Buccaneer in SAAF colours. Completed with Alley Cat resin nose, slipper tanks and bomb bay. Additionally some Nord AS 30 Air to ground missiles printed from my own 3d model. Second, Airfix 1/72 A-4 B Skyhawk posed in the process of deploying two Mk82 retarded bombs. used the kit bomb casing and scratched the drag vanes. ...and a bit of photoshop fun. Thanks for looking. Cheers, Mark.6 points
-
Made these the back end of 2021, I only have one to get now, the RAF Refuelling set, can't seem to get a hold of one! And I'm saving my pennies for a trip to Norfolk in the summer to see some of the old USAAF fields! Hopefully after then, I can try and buy one! I did have one but it was already started and made a right mess of, completely unsalvageable and unbuildable; only cost a couple of £ so I wasnt too disappointed. I already have a USAAF ambulance but couldn't get the fire tender and so I bought one set and on opening the box there were two kits! So, I made one RAF and the other USAAF. The Americans used lots of British equipment at first until their own vehicles and aircraft started arriving. These were great fun to make and paint up! On the crash tender I hung a piece of wire over the hose reel and painted it with Revell No. 9 to look like rubber hoses, I also drilled out the foam jet and the two hose attachment points on the back! RAF first. and the USAAF versions.6 points
-
Boy, it's been a while! That one is completed now, Bill. RFI here: Now back to this - before I start my second (and last) entry for the museum, that is Not much of a progress, I only scratch built the DIAS ECM fairing that sits under the gun fairing. To do that, I taped some Tamiya Millimetre tape in place and traced the outline of the faring base with a fine tipped marker I then transferred that onto a piece of very thin styrene, and cut it to shape following the traced outline Glued in place with fast setting TeT Then using Oramask, I did the same to trace the outline of the bulky part of the fairing In this case I needed a thicker bit of plastic, so I used an old phone card support This needed to be tapered in thickness front to back, and then glued in place with Gator's Grip I had to do some filling with PPP and CA, and some filing/sanding to get to the correct shape, but nothing dramatic. The last bit to be added was a rounded protuberance; you can make out the appearance from the pic at this link: https://www.milavia.net/specials/greek-airforce-patron-saint-flight/img960/haf-tanagra_16.jpg To reproduce that, I cut out the corner part of a bit of sprue It's rounded enough to be a starting base to work with. After some sanding and reshaping, I got this Right, now I really need to tackle the outer wings, but also the speed brakes and auxiliary air doors on the Hasegawa kit. Plenty of fun ahead! All comments welcome Ciao6 points
-
And after a huge great big shove from me, it's done. Somehow I've just not been in the mood the last week or so. Maybe the outside world is sneaking into my little sanctuary. Whatever the reason, the final lap has been a struggle. It's done now and it's time for pictures. The missiles were sanded down, primed and painted white. It took a few coats to get a solid colour on them. The white looked very stark under the wings when offered up so I added a couple of bands to them. The blue inert bands are reasonably close to reality. The black bands around the nose are not. I added them because the missiles looked too plain to me. The TV noses are Molotow chrome ink. A better idea would have been to hollow out the noses, add some busyness and cap them with a blob of clear resin. Not on this build though. The canopy niggles me. The framing is not swept back enough and I keep seeing that. Had this been a straight out the box Matchbox build I wouldn't give it another thought. However, I've added aftermarket decals, FOD covers and a loadout from the Airfix kit, which suggests I've gone for a more detailed build. It's neither fish nor fowl now! See what I mean about having a struggle here? Anyway, here's the final result. And here it is, sat on a generic Matchbox base I made out of card wrapped 18mm MDF. A bit Triang looking, with all that bright red going on. Matchbox used a mid blue on their early promo stuff and maybe that would be a better colour. I'll give it a go later. The model really should be an out the box one for a base like this, so the Gallery shots will get a different look.6 points
-
This is my P-40 N with bazooka.6 points
-
The past week has seen considerable progress on the R Class. I was not happy that I had failed to make the out riggers out of brass on the Takom kits so a bit more experimentation was called for. After cursing and burning of the tips of the Martian tentacles, it transpired that I had been using the wrong flux and the wrong type of solder. Anyway, having got over this particular hurdle, I now have the out riggers under control and the next Takom builds will have brass outriggers. Work has now begun on the gondolas and the port and starboard engine cars are now safely on the model. They still need detailing but I kept losing them and eventually decided that they were better off attached to the model. Even I can't lose a Zeppelin, even if it is in 1/720 scale: can I? The gondolas looka bit wonky as they are not glued in place yet. I am now at the stage where I have a choice between building radiators in 1/350 scale or 1/720 scale. Alternatively, I have the choice of making some exhausts in the above scales. The ones on the Mark 1 models kit being just blobs and I think I can do better than Takom with the larger kits. With these three kits moving along nicely, I think I might get the U Class model underway in the near future. We absolutely have to have model of the L.48, the ship that started all this insanity in the display. Then we need at least one other R Class as I have parts of both L.31 and L.33 all framed up and ready. Thanks for looking. Martian 👽6 points
-
Belts, the instrument panel and a few other details and that will about do me for PE for this one. And am pleased to report pinging was kept to a minimum!6 points
-
Update time! Been plugging away at this one for the past couple of days and have done most of the work on the cockpit interior. The details from the kit are actually pretty good and I have decided to build it OOTB including the seats which I will try to tart up a bit with some more belts which are missing from the seat pan. I have used the kit decals for the instrument panels and have then given the IP's some detail painting and a bit of weathering much the same as the cockpit tub and side panels. Here are some pics of the cockpit parts as they stand at the minute starting with the cockpit tub; The two side panels; And the two instrument panels; I have also assembled both of the wings and tailplanes, the wings have an etched brass strake for the top; As you can see I have also drilled out the holes for the wing pylons, not sure what I will hang from them yet but most likely some rocket pods. Thanks for looking in and as usual all comments and criticisms are gratefully received. Craig. 🇺🇦6 points
-
1/48 Meng F/A-18F RAAF 1 Squadron This was a super fun build and I highly recommend this kit. I still need to paint the cannon at front but was photo shoot day today for KUTA so I thought I may as well post this now too.6 points
-
Hi all, Stuff has happened over the last few days - The mast got built and I made a start on the 4" gun deck. MB had the deck as just being smooth, whereas in reality, there were timber (Not sure what they're called, heelboards? steps?) or anti slip added to the deck, whether this was to help manhandle the gun round on to its target I couldn't say, but I needed to do something about this. First off - Make a template, I have access to AutoCAD so.... 10 minutes later I had a drawing. Next step, cut out where the heelboards needed to go. This then creates a stencil, I then drybrushed paint to mark out where the plasticard steps are going to go, once I'd done one side I turned it over and did the other. Tadaaah! Next, I cut a strip of 10x40 thou into segments 7mm long and started gluing carrying on until.... The 4" gun is built up, as is the pom pom (Which Daisy briefly decided would also make another tasty chew toy!) but I've still got to add some details to the main gun, while the 2pdr is there as backup if time runs short towards the end of the build. Take care, IanJ6 points
-
Yes, its time I started back on making aircraft again; I've made a good run of vehicles (some of which I still have to show - in the relevant section, of course!), I haven't made an aircraft model since November last year so its high time! I'm starting with a medium flavour bomber, this one has the BIG cannon in the nose, along with a couple of .50 cal' machine guns. I haven't made up my mind yet which scheme I'm going with; but I have made a start at least. I started by removing all the large parts and masking them prior to spraying primer, I don't prime my vehicles because at 1/72 and 1/76 there too small and angular to spray, and besides they get plenty of coats now that I thin my paint for brushing (by hairy stick). This one requires primer before I assemble it because there are small square windows in the fuselage; it's easier for me to mask off all areas to be glued and then prime by spray. I use Tamiya grey surface primer for this (if its a flying boat I use white primer on the underside and grey on top and sides).I learned that priming is better, the paint goes on better, it looks more uniform and rich in colour. If a model has no small windows in the fuselage sides then I build and then mask them, prime and then paint. Here are the parts I've prepared and then primed; Top and undersides of wings, both outer sides of fuselage halves, half of each nacelle and the two sides of the tail (in this case), I'll prime the cowlings and undercarriage doors too when I'm ready and since this will have a solid nose I'll prime that too (when I'm ready). This is the first of three B-25's I have to make, I have a Matchbox one and a new tool Airfix one to be made after this. Feels good to be getting back to aircraft again; I'm interested to see the difference in the paint work now that I thin the paint, compared to my previous models; the last one I painted from the tinlet was the P-70 Nighthawk, it turned out fine but it was all black! I like the Italeri kits of today, I made some years back and wasn't too convinced by them, these are pleasant enough kits to make. Thanks for watching.😁5 points
-
PK-4 Zero PK-62 Narvik Class PK-74 Panzer III Pk-118 P-38 All arrived now. Hurricane and Viggen may take a couple of weeks (Europe to US shipping). Now, to prioritize... Here's the Zero - still shrink wrapped, no less.5 points
-
I've got this: Chris5 points
-
Mrs Jockney is out tonight so a bit of progress Cheers Pat5 points


This leaderboard is set to London/GMT+01:00