
Leaderboard


Popular Content
Showing content with the highest reputation on 25/02/22 in all areas
-
Hi friends In hope not to bore you, as I already introduced both models, but not in combination! I hope you like them both now side by side26 points
-
Hiya Folks, To add to my 45 Sqn collection, here is a second Vampire T.11, but this time the early variant without ejection seats and a framed canopy, but it does have the later. larger fins. I used the High Planes conversion set, but did not use the early style booms and fins as the aircraft that I was depicting had been upgraded with the later, larger fins. The unit insignia came from a Hornet kit and this aircraft indeed used to help convert the pilots from Hornet`s to the interim single seat Vampire`s,...... before Venom`s took over. Here is the High Planes conversion set,...... having used the seats and one canopy,...... I can still use the set to convert another Vampire using some spares box seats; Here is the model; And here it is with the earlier model that I built, depicting a later T.11, fitted with ejector seats and with the fighter bars on the booms, as worn by the units Venom`s; Cheers Tony25 points
-
Hearing about the Zvezda 1/48 Su-25 being produced I dug into the stash and decided to finish some of the KP kits with aftermarket stuff I have collected for them. Nothing like the threat of a new release to get me clearing the stash. Lots of aftermarket, scratch built some minor details, added rivets, new chaff and flare launchers. Love to say I painted it but I cheated with the Authentic Decals digital sheet. This aircraft Blue 06 sadly was shot down in the previous Russian invasion of 2014. Lots of rivets added among other small details. Size comparison with Su-3522 points
-
This is the Revell 1/72 scale Saab J-35J Draken, Kit 04352, built as an Austrian J-35OE Mk1 from Graz Thalerhof in 1992. I built it for my friend’s 60th birthday recently. He doesn’t build himself, but has a few die-casts and particularly likes the Draken. The kit is a reboxing of the Hasegawa kit which, despite its age, is well detailed and goes together very precisely. I didn’t use any filler at all, which is a first for me. I thoroughly enjoyed building it and would definitely recommend it. What a great looking aircraft! I primed the model with Tamiya XF-1 black thinned with Mr Color Leveling lacquer thinner. The camo is unthinned MRP paint. MRP paints spray beautifully and are very forgiving. They’re pretty much impossible to brush paint though, even for touching up. I used decals that IPMS Austria published in 2001. I bought them at the UK Nats in 2001 iirc and have been looking forward to using them for years. I’ve recently started building again after a long absence from the hobby and my friend’s birthday was an ideal excuse to use them. The after-market decals went on very nicely directly onto the MRP paint without silvering. I used a couple of the Revell kit decals which did silver slightly, but not so as you’d notice. I think I’d gloss varnish before using Revell kit decals again. The model is lightly weathered, after decalling, with oil paints and a Flory wash. Everything is sealed with Tamiya varnish thinned with Mr Color Leveling Thinner. Since it’s Austrian, I modified the inlet on the left side of the spine to look more rectangular and left off the right hand spine inlet. The nose pitot and fin probe are Master Models turned brass and are lovely. The model is primed with Tamiya XF-1 Black thinned with Mr Color Leveling thinner. Camo paints are MRP, namely:- MRP-364 Light Grey FS36495 for the fuselage undersides. MRP-039 Haze Grey FS36270 for the upper front fuselage and fin. MRP-040 Gunship Grey FS36118/ANA603 for the upper rear fuselage. I sealed it with a 50-50 mix of Tamiya X-35 semi gloss clear and XF-86 flat clear thinned with Mr Color Leveling thinner. This draken is another 50s jet after my Gnat F1. I'm currently working on a couple of MiG-21s. I can sense a theme coming on! Happy modelling, Keith.22 points
-
RAF HS-125 CC2 XX507 32 Squadron c.1974 built from MatchBox's HS125-600. It's OOB except for the addition of the 4 underwing strakes/flap tracks and the roof antennae fairings. The paint is Tamiya Fine White Primer glossed with brushed on Future. I forgot to cut out and glaze the landing lights and wasn't going to mess up the leading edge paint to do them. So I daubed on another shade as a token representation. The decals are the originals except the underwing roundels (these are 18" whereas MBox provided 36") and serials (the MBox ones looked way too big) and went down beautifully even after all these years. I definitely overdid the attempt to show the differing metal colours on the engine pods but was too lazy to repaint them and the pod to fuselage join isn't great so don't look there. Comments and criticisms are welcomed and thanks for looking. David20 points
-
This is the very nice Special Hobby kit of this sexy looking liaison/trainer Italian plane. Apart from opening the canopy, scratched exhausts, the rest is from the box. The painting is done free handed with the faithful airbrush. I have done two of those, so on to the pics now. Best regards. 2916F4C8-55C8-4F7B-886E-F772AF88FF82 by jean Barby, sur Flickr A9D8DD25-8EF6-4959-ADE1-101589B02878 by jean Barby, sur Flickr B78BA3FB-E908-4441-8F68-AA16D1C82E46 by jean Barby, sur Flickr 01879EAD-D8B5-4E95-A9E0-42F29559DCFD_1_105_c by jean Barby, sur Flickr B90C633C-C721-44CC-A74F-57AFDF2B411C_1_105_c by jean Barby, sur Flickr 8043FB86-EA31-4F39-9353-83D46D02E47C_1_105_c by jean Barby, sur Flickr A838A93E-5E19-4730-8805-394FA6124346_1_105_c by jean Barby, sur Flickr 78091F27-A46A-454E-B86E-14391F049EBE_1_105_c by jean Barby, sur Flickr D2209A75-48EF-43B9-93F3-40A375904603_1_105_c by jean Barby, sur Flickr19 points
-
Hello, just finished!19 points
-
Hi this is the eduard kit no 8175. In the markings of 5./jg300. Which was flown by Ofw Karl Russack. Based at Lobnitz, German 1945. He survived the war. I was drawn to building this aircraft because of The external weights on the prop blades and the extra ground concealment camouflage applied by the ground crew I replaced the engine with an Eduard brassen resin engine. This was detailed with 0.2, 0.4 lead wire. The 20 mm & 30mm cannon barrels were replaced with brass tubing. The upper and wing bays were scratch build and detailed with lead wire and plastic card brass tubing. The propeller with the external weights is an ultra cast item. I over laided the cockpit armour with 5" plactic card.. Quick boost wing flaps True details resin wheels. The decals are from the kagero book fw 190'S over Europe Extra colour paints were used for the rlm colours. There are photos of this aircraft in Jagdgeschwader " Wilde 300 Sau" vol 2 on page 168. Thank you for looking. Comments are welcomed. Nick18 points
-
Following on from my build thread (Vosper build thread), here are a few pictures of the completed model MTB 34 was one of the first batch of 70ft MTB's built by Vosper's as part of the 1939 contract, completed in August 1940. She was converted to a target tug (CT23) in 1943 and sold in 1945. The drawings for the project were taken from the 1991 Model Shipwright plan and John Lambert's plan for marine Modelling international. In addition, details were confirmed from the IWM builders drawing that both these plans seem to be based upon. All rescaled to 1:48th scale and re-drawn. The colour scheme shows her with the 4th MTB flotilla based at HMS Beehive in Felixstowe in 1941 with very distinctive blue (B15) and white bands as illustriated in Coastal Craft History Vol 1 Below is that actual vessel at speed and the colour artwork from the Coastal Craft book. The torpedo chute bands are indicative of a senior officer in command The hull of the model is timber on ply frames, diagonal planked as per full-scale practice, the rest is a combination of brass, wood and some 3d printed items. The model has no commercial components, though the props were cast in bronze by Shapeways to my drawings She is shown weathered, not pristine, mounted on turned brass pillars and an oak base. A single crewman walks the deck to help people understand the scale and she carries a rigged danbuoy on the port side Here she is next to my last model, a Schnellboote to the same scale, for size comparison showing how relatively diminutive these vessels were Thanks to those who followed the build thread, I hope it was interesting and informative. I'll be back very soon with a new thread Cheers Steve18 points
-
Dear Fellow BM Members. After my last USAAF build I fancied something a little different. I've always had a soft spot for the Hurricane. I felt that it's never really been given it's true glory, seemingly being outshone by its more glamorous stable mate The Spitfire. I wanted to do this and the latest 1:48 scale Airfix kit caught my eye. I saw a few examples done here on BM so I was inspired to have a go myself. Thanks to Dunny for principally inspiring me to do this one with his recent excellent build for this aircraft The kit is very good I must say. I enjoyed putting it together very much. Apologies that I didn't do a WIP thread for this build but I think others have covered their builds more admirably . A 'Viceless' kit? Very much so. This build has allowed me to explore a few modelling ' firsts' for me anyway... 1. Using Micro Sol and Micro Set 2. RAF Desert scheme colours 3. Pre shading panel lines with black Primer 4. Making a Desert Diorama There are a couple of ' mistakes ' . I hope they are not too noticeable. I just wanted to enjoy the build rather than fret over historically accurate details.. so OOB and using minimal masking with the airbrush . I didn't use grey Primer but just the rather excellent AK Real Colour RAF Desert Paint set. I sprayed very close to the model and totally freehand. I did this as I wanted to try and get a feathered effect between the camouflage colours. Panel lines picked out in black Tamiya panel lIne wash. The strange spaghetti pattern I did with Sharpie pens.. I present for your appreciation and delectation my Hurricane Mk1 of 274 Squadron RAF Somewhere in the Egyptian North African Desert in 1941. My paternal grandfather was a RASC driver , a Desert Rat in the 8th Army. I guess he may have seen Hurricanes exactly like this .. I hope you like it as much as I enjoyed making it! The Diorama base is a piece of red cedar plyboard (about 80 years old ) PVA glue applied , then real kiln dried sand, real gravel and some Lichen added to represent Desert scrub . I found this lichen near the beach at Southwold a few months ago and I dried out. It took less than an hour to make up! As promised some shots taken in natural light.... Regrds, Andy17 points
-
Latest effort. Mustang MkIII of 316 (Polish) Sqdn Used on RAMROD and anti DIVER patrols June/July 1944. Critiques welcomed.14 points
-
This is the Hasegawa AH-1S in one of its JGSDF boxings. This is a very nice kit with some lovely surface detail and a good shape, moulded in a hard olive plastic that reminds me of some of Hasegawa’s older kits. The cockpit is a little bare so the interior was dressed up with a little plastic card and rod, and some seat belts from Tamiya tape. The exterior doesn’t need much attention but I used a set of Master barrels for the M-197 cannon, which are a nice addition. Camo is Gunze H320 green, Model Master FS30219 for the tan, and Tamiya NATO black. Decals are from the kit (I do like a sharkmouth!) and went on nicely, needing just a few nicks with a sharp knife to conform around the nose. After a bit of search around for a new photo hosting site when Village Photos stopped working, I followed a tip from @Markh-75 and went for Postimages. Let's hope this works for a while! Chris13 points
-
I wrestled the Cameo software into submission, and after three goes got some Oramask film cut to my satisfaction. I’m hoping the stencils for the wing walkways will work. They certainly cut cleanly, but whether I can extract them from the backing remains to be seen. Anyway, I prepped the model for masks by squirting white paint on it. It looks nice there, but as is my way, I think I rather undercooked it. It may look a bit grey in the end, though offset against dark camo and the black cross parts I may get away with it. Underneath, for my chosen scheme, it’s all black apart from some wear revealing the original RLM 65. The underwing crosses are simple here, just the white bits showing. I made a bit of a boob drawing up the crosses. I stuck rigidly to the scale formula I had, not remembering the upper wing crosses were a different format. Well, they’re wrong, and they’re staying wrong. Hardly anyone will notice. Sorting out which bits are painted and which bits are masked is a right puzzler, and made my head hurt for a while. There’s plenty of scope for it all to go wrong! Anyway, black on the upper works. I’ll leave the undersides until I’ve sorted out masking the various markings and got the camo pattern done.12 points
-
Henschel 126, PK-26 from 1974/5, original boxing and decals with some light cockpitology and home made vac canopy: WIP is here if you are interested. I said I was going to take some better pictures, but I will put these up otherwise I will forget. Now I've got a desert camo example to do after my SdKfz 251! Regards, Adrian12 points
-
Hello everyone, just a few photos of my completed Hawk to share. The model is a borderline tail sitter (interestingly an old boxing of this kit mentions nose weight but the new version I built doesn't and I forgot!) so the base serves a purpose as I can glue it down. Thanks Matt11 points
-
You can’t see here, but the aircraft codes are in place on the black splodge, and all the crosses have been masked fully. I may just splodge masking fluid here and there where the Oramask didn’t quite want to settle into the shapes correctly. I am tickled pink. Can you spot why? All the walkway demarcation strips, and the funny comb-shaped bits, all cut perfectly and laid down without a quibble. As they’re printed in grey on the transfer sheet, I decided simply masking the grey primer would be just the job. I am really excited to get a camo coat on now! I might get one colour done tonight, which can dry for a day or so before I set about masking the splinter pattern. That might be Sunday, as tomorrow we have a visitor. They’ve travelled all the way from Australia just to collect a commission I’ve worked on. I’m sure they’re doing something else while they’re here in Blighty, but it’ll be great to see them again.10 points
-
Took a while to get the pics, but here is my build of the Matchbox A-7D Corsair II. I improved the cockpit but otherwise it is pretty much OOB. I should really have replaced the weapons and ejector racks, both of which are pretty crude, but I have rather a lot of builds on the go due to a pile-up of GB I want to enter in the first half of this year, so I left it as Matchbox intended. Pete10 points
-
Hiya Folks, Here is another 1/48th Airfix Vampire, this time built as per the kit as an F.3,..... but I wanted to build mine wearing the distinctive scheme worn by a handful of 32 Sqn aircraft based at Nicosia, Cyprus in October 1948 including VV196, which can be seen below in this photo from the aviation photo company, shared here for reference purposes only,...... I do own a copy of the same photo too! The model was built from the box apart from a set of brass etched harness straps on the seat and finished overall using Tamiya rattle can Bare Metal Silver to replicate the High Speed Silver painted finish. For the decals I had to raid the spares box, with the unit badge on the nose coming from an old Esci decal sheet, the GZ codes were converted from a set of 1/32nd Spitfire decals, the F was made up from black strip, the B Type boom roundels and fin stripes came from Modeldecal sheets, and the upper wing C Type roundel and the serials came from Xtrdecal sheets. The model was given a brushed on coat of Humbrol enamel gloss varnish, ready for the decals and they were then sealed into place with another coat. After a few days to dry, Polly Scale matt varnish was applied to replicate a weathered silver finish and the panel lines were given a watercolour wash to finish off the effect. Here is the model; And all three of my Airfix Vampire`s seen together,..... F.1, F.3 & FB.9; Cheers, Tony9 points
-
Hello TA-7C from HB with Eduard PE,resin from QB, marking from Xtradecals9 points
-
A first light coat of RLM 73. I am using ColourCoats enamels, now that I’m a convert. As you can see, it’s going to need a fair bit more to lose the black underlying areas. I can’t wait to see how good - or bad - my second attempt at paint mask markings turns out. Patience is needed. Much patience.9 points
-
Some progress on the Meteor. Life has been getting in the way of modelling this week but I have been beavering away when I could filling and sanding multiple times to get this thing something like surface wise. Now got a nice even coat of white primer on and we are looking good, if all goes well I shall be getting the topcoat paint on this weekend. I have headed off another potential problem this week, The Aeroclub conversion comes complete with a vac form canopy. Not normally a problem you say, but to me the one thing I hate the most in modelling are vac form canopies, which I consider the spawn of the modelling devil. So bad in fact, that when dropped on the floor they are easy to find, yes shock horror, the one thing that gets rejected by the carpet monster! So my strategy, being aware that the 1/72 Xtrakit/Airfix Meteor F8 came complete with two injection canopies one clear and one with the rear fairing, and knowing that the PR10 used both types, I put out a polite request for one in the Britmodeller wanted section. And lo and behold I was answered by @Black Knight who very kindly popped one clear version in the post for me, so canopy problem solved, and a very a big public thanks and shout out to him! I have also started on Ejection seat painting, so magnifier out, hopefully that will look the business as well. So weekend plans are out with the medium sea grey and PRU blue! Selwyn9 points
-
The old Tamiya kit, which has had plastic card additional armour added to the sponsons and hull front as per the original. Tracks are AFV Club plastic set, which only just fitted. Detailed using Eduard etched brass set and leftover bits from Dragon Saladin armoured car, to give better detail to the turret. Crewman comes with the kit, but replaced the head with a spare Valkyries Miniatures British tank crew head, but works for an ANZAC figure. I weathered using various pastes and pigments from Mig, AK and Carrs. I used as a reference for the weathering Tim Pages’ Nam book, which has a few shots of guys sat on various vehicles, which are covered in reddish brown dust and mud. I am pleased with how this came out, apart from the shade could have been more brown and I forgot to add a couple of nuts to hold the spare wheel to the hull front, just noticed on the pictures 😊. Thanks for looking.8 points
-
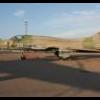
A quick update, I've finished most of the starboard weld lines, which seems to have worked pretty well under a coat of primer (Tamiya fine white rattle can), found a few little funnies, but nothing horrendous, and then its over to the port side again to get that up to this level !! The top edge of the grey stripe is actually the waterline, so it gives some idea of how long and lean the ship really was. Onward and upward !! Cheers gents David8 points
-
Ta154 by Pionner (PM Model) 1/72.8 points
-
I’ve long had a F-4 “Black Bunny” on my list, and finally worked myself up to tackle the gloss black finish. This the is the 1/48 Zoukei-Mura F-4J. Quinta Studios cockpit decals were added, and the exterior decals are from Furball. The Quinta cockpit set looks great, but I honestly use these more to speed up a build if I’m not in the mood to spend time on the cockpit. So my use of them is variable. The Furball decals are decent, but not great. Their adhesion is on the weak side. I displaced a couple with a gentle washcloth wipe preparing for the final gloss coats. The placement guide has some small errors. For instance, the rear ejection seat warning triangle is show as aligned to the cockpit sill and I later realized in reference pictures that it’s aligned to the ground. And it appears from reference pictures that the word “warning” and “caution” in the stencils should be red or yellow, not all white. There’s not much to say for the build and painting technique. The kit builds well. It’s not quite Tamiya fall together fit, but close. And there’s nothing special for shading or weathering with the overall black. The final gloss is Tamiya X-22 with Mr. Color Leveling thinner. The pictures The exhaust is painted with shades of Alclad II (most jet exhaust, burnt iron, and dark aluminum) with some metallic artists pencils used for highlighting. After the final gloss, these areas were masked off and spray with Alclad Semi Matte. The landing gear wells were also spray with Alclad Semi Matte, as the true high gloss looked like too much in the wells. As always, I’d be happy to hear any comments and/or constructive criticism! Thanks for looking! Eric7 points
-
Hiya Folks, I have a soft spot for the Vampie F.1, especially those flown by 3 Sqn RAF in BAFO, West Germany during the late 1940`s and so after our fellow BM`er Ben (Wellsprop) released his own conversion set for the new Airfix kit,.... I just had to grab one and build one,....... (here is a link https://www.ebay.co.uk/itm/224745817316 ). Thanks to another BM`er,.... author and all round good guy Chris Thomas answering my plea and sending me some spare codes and fin flashes(Cheers Chris!) that he had left over from his Alley Cat resin kit, I was able to built my F.1 as J5-M of 3 Sqn wearing my favourite F.1 scheme of Medium Sea Grey uppers and PRU Blue lower surfaces, using brush painted Polly Scale acrylics. After the green codes that Chris had given to me had been applied they did not seem to be dark enough, especially when compared to reference photos,..... so I carefully painted over these distinctively shaped codes using Humbrol Dark Green acrylic! Here is the real J5-M, with thanks to Jack Long of the 3 Sqn Association; And here is the model; And here are my F.1, F.3 & FB.9, all built from the Airfix kit,.... I hve a few others from Alley Cat etc too,..... gotta love the old Spidercrab!; Cheers Tony7 points
-
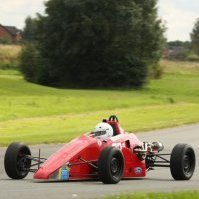
Here we go...openng up the gallery with Yuri Gagarin's Blue 66...the WiP is here: Nice simple classic Airfix build. No whistles or bells. I used the rocket pods and basic markings from the Revell kit (which looks ok, btw). Vallejo Air paints, etc... --JDCM7 points
-
Yes!!!! just won this on eBay €2.70 plus postage, missing canopy but not a big deal, yay.7 points
-
And I’m off. Gear bays and internal doors done (just realised I’ve not done the nose gear bay, doh!) SD7 points
-
While doing some small jobs on the half track, as I had given the parts a wash, I thought I'd keep on a roll. Base got clipped off and undercoated. I had read an method on here, of keeping half of a set of wheels on the sprue, and adding the other half. Thought seemed an interesting idea.. did that and then was on in the zone, had nothing else pressing o pressed on... 50620163 by losethekibble, on Flickr So, half the wheels cleaned up, and assembled. Did the visible faces first as well. Drilled out the holes in the drive wheel as I it seemed a useful little detail. Just visible in pic. The mould on this had either damage or gunk, and there were a few rough patches, and after the other kits I have done, The Morris C.8 set and half track, this was a bit crude and basic. Looking at the main body, maybe a bit overkill, I have a length of square section wood moulding, using a bit of brass right angle stock, one side was a good 90 degree. I cut some small sections, and then superglued these on, and the SG the sides. Makes very solid stable body now. I also added a strip of plastic sheet at the rear, to aid alignment of the rear panel. Result is a very neat and square base. I was surprised at the gap underneath where the tool boxes were, so cut some 10 thou panels to cover these, added some plastic strips first, and then the fill in panels. The gaps are not that visible, I also spent time truing up edges with a little flat file. but all good practice in basic skills, and quite satisfying. Finally, cleaned up and drilled out the barrel...1 mm drill (76.2mm/76 = 1mm) , and the side holes in the muzzle break, though the barrel had some unpleasant pitting along one side. Drilled barrel in pic, poking out from the wheels. Somewhat surprised to find no base to the turret, though looking at finished one, this is really not very obvious, in fact I not noticed this at all....but I think I'll add a plate to the underneath rear of the turret, to box in. All the above was done without reference to the instructions, something I could not have done with the other kits. Be time for some paint soon. thanks for reading. cheers T7 points
-
7 points
-
I've removed all of the political comments because politics isn't welcome on our site, as it will inevitably lead to a falling-out. There was already one close squeak that was avoided by cool heads. I hate having to enforce this rule because of the inequity of the situation, but we have to, as there is enough hitting the fan without us all falling out about it. Rest assured that as individuals your Mods are concerned for the people of Ukraine, and wish them all the best, hoping that they all stay safe. I've been watching videos of what's occurring today, and it's a horrible state to find yourself in. To all our members, model companies and everyone else that's currently under threat from bombardment, attack or whatever else is going on. We're thinking of you and wish things were different. Once I unlock this topic, anyone wishing to leave a note of support or information regarding the companies themselves may do so, but please leave the politics and name-calling out of it. It's difficult, but I know you're capable. Thank you.7 points
-
Before I add the camo’ pattern I want to add some aluminium colour along the wing roots for chipping, I used AK Xtreme Metal AK488 matte aluminium. In order to simulate the wear pattern I used a sponge dipped in some liquid mask. Eduard suggests Gunze H72 or C369, Tamiya suggest a mix of 5 parts XF-62 and 1 part XF-61. I didn’t think either of those looked quite right so I made a mix of 4 parts XF-52, 4 parts XF-49 and 1 part XF-3. The underside colour was masked to protect from over-spray and a marble layer was started with some Tamiya XF-68 NATO brown. Followed by Hobby Color H302 green… …and then Tamiya XF-57 buff. A final marbling using the dark earth mix. Then everything blended with a couple of thinned layers of the dark earth mix. Next I’ll be applying the dark green camo’… until next time as always, any suggestions, criticisms or comments will be gratefully received. rgds John(shortCummins)7 points
-
My 2021 production line was dedicated to Kawasaki, manufacturer of my favourite Japanese fighter series. It all began in 1967 when, as a school boy, I invested my meagre pocket money in a 1/72 Revell 'Tony', my second scale model (the first one was Revell's P-51 Mustang - more here). This sparked a life-long interest in Japanese military aviation... My exhibition starts with this grey gentleman - grandpa Kawasaki - Kawasaki Ki-10-I 'Perry' 2nd Daitai 1st Chutai Tianjin, China 1937/38 Lt Kōsuke Kawahara, 3rd Shōtai Leader The Ki-10 was an early design of Takeo Doi, a scholar of Dr Richard Vogt. It was powered by a Kawasaki Ha-9 of BMW VI origin and armed with two 7.7 mm Type 89 machine guns. With Kōsuke Kawahara, son of a famous Japanese corps commander, this Ki-10 arrived in China in July 1937. Leading his flight into an engagement with a large number of Chinese fighters on 25 March 1938 Kawahara had just scored his ninth victory when the aircraft was hit and the aspiring young pilot fell to his death. This original shows my subject before modification in March 1938. Obvious differences include balloon tyres, an antenna mast and a missing scoreboard. The model is a conversion of FineMolds' Ki-10-II (2009 edition) which was my contribution to the 'High Wing' groupbuild here. This earlier version is shorter, has a reduced wingspan (top and bottom) and a different rudder and elevator hinge line. The FineMolds kit itself is a very good product which I'm happy to recommend. Perry had three grandsons. The eldest one, called 'Tony', is next - My 'Hien saluting Mount Fuji' is a tribute to Brian Knight's box art for the Revell kit of 1963. Kawasaki Ki-61-I Hei Hien 244th Hikō Sentai Chōfu 1944/45 Maj Teruhiko Kobayashi, Sentai-chō (Group CO) Under Major Kobayashi's leadership the 244th Sentai gained some popularity and its colourful fighters became the subject of many photographs and models. Lesser known than his often modelled Ki-61-I Tei (c/n 4424) is this earlier Hien (c/n 3295), armed with the popular German MG 151/20 wing cannon. With this aircraft Kobayashi undertook a skillful ramming attack against a B-29 on 27 January 1945 from which he bailed out successfully to fly again the next day. I built this model in the eighties OOB from the vintage Otaki kit of 1972. As my first markings were incorrect I revised the colours in 1995 and returned again last year to make an all-out renovation - cockpit, canopy, exhausts, radiator, undercarriage and whatnot. The most visible weakness of the Otaki/Arii kit is a flat canopy and nose profile which I corrected with a new bonnet (Aires 4714 from the scrap box). The camouflage received just a few touch-ups but the markings were renewed once more. The next kinsperson is Tony's fraternal twin - Kawasaki Ki-61-I Tei Hien 56th Hikō Sentai Itami March 1945 Squadron Leader of the 3rd Chutai This picture of the 56th Sentai, based near Osaka for air defence in the Central Army Command area, was taken in March 1945. The spinner tip of c/n 4693 appears to be yellow indicating that it may have belonged to the Chutai-chō of the 3rd Chutai. My model, built from the 1993 Hasegawa kit, is strongly modified. In addition to a variety of aftermarket items it is equipped with detachable cowling panels to exhibit engine and gun compartments. More in a dedicated post here. Furthermore, there is the late-born Go shiki sentoki (Type 5 Fighter), nicknamed 'Goshikisen' - Kawasaki Ki-100-I Otsu 111th Hikō Sentai Akeno July 1945 Lt Mamoru Tatsuda 2nd Daitai The 111th Sentai was formed from the instructors' flight of the Akeno Training Air Division and, like the 56th Sentai above, augmented air defence in the Central Army Command. Lieutenant Tatsuda was probably a deputy Chutai commander in the 2nd Daitai, which sported Sky Blue #34 (Sora iro) as ID colour. This Otaki kit from 1974 had been in my stash for decades. Although there is a later and better Hasegawa product I decided to test my skills and make this classic kit look 40 years younger. I used a number of aftermarket items (engine, cockpit, wing racks, landing flaps, gear doors, canopy) and added some scratch improvements like wing root fairings, wheel wells and landing light. Look here for a more detailed RFI chronicle. Cousin 'Nick', finally, hails from the twin-engine branch of the family - Kawasaki Ki-45 KAI Tei Toryu 53th Hikō Sentai Matsudo November 1944 Shinten seikutai At the end of 1944 all JAAF fighter groups were ordered to form an air-to-air ramming flight called Shinten seikutai. It is doubtful, however, if this Toryu, specially prepared by removing armament and rear cockpit installations, was ever used for this purpose since the 53rd Sentai was relegated as a night fighter unit in January 1945. I built this model 15 years ago from a 1975 Nichimo kit. It received an aftermarket cockpit, canopy, engines and wheels, and several scratch modifications. With suchlike improvements I'm confident it can still hold its own against the later Hasegawa kit. A more comprehensive account is published here. And then, there are these offspring - Oops, they don't have wings! My apologies @Lee Chambers for 'borrowing' this picture of his wonderful Kawasaki bikes here and here. ハッピーモデル構築 - Michael6 points
-
Hi guys, This is my last project.Tamiya 1:48 Mustang with painting scheme of the aircraft piloted by L.K.Carson 362nd fighter squad.This model has been a pleasure from start to finish, Tamiya quality at its best.I decided to change only little detail from the original painting scheme for instance on the propeller. Following my reference pics, I tried to reproduce some weathering effects using oil.The model was brush painted using Vallejo colour for the exterior and Revell for the interior. I hope you like it and as always I would appreciate any tips and comments. 🙄6 points
-
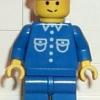
From 1964, here are Airfix's Bedouin Arab set in 1/76. One of each pose. Painted in Humbrol and Vallejo acrylics.6 points
-
This gun has printed well. It is in 12 pieces. Painting now.6 points
-
You'd have needed nerves of steel, an iron resolve and a strong stomach on that day Loren. Martian was directing ops in the competition area, blurglechruncheon at the ready, his Mare Acidalium flag waving majestically in the fetid breeze, ruling with an iron tentacle, chaos ensued, he even managed to co-opt me into the judging arena...mayhem. It's amazing we're ever asked back...6 points
-
Enough futzing about with this one. Yuri had a clean aircraft, being who he was and all. I'll et the rest of the images into the gallery later today. I must move on. Clear the bench! --John6 points
-
Took Friday afternoon off and was able to give this little un some attention. So I am going to fill and sand those panel lines. Wish me luck (or good patience at least!). And I tried to do the cockpit detailing a little bit if justice - a rough dry brush of the instrument panel and a wash for the cockpit wall panel. With that I added some fishing sinkers as nose weight, installed the cockpit and glued the two fuselage halves together. A dry fit of the wings, horizontal tail and canopy shows it fits/will fit together really well… once I get through my panel line sanding and filling! Quite a satisfying quick little build so far, which I guess was the whole point! Gerard6 points
-
As armament pylons and wings were very loose fitting, I did a simple jig for straight and more accurate fixing (Lego rules forever ;-)) : I painted camo. Tht's how Tonka looks now: As you can see there is still masking fluid on it, ready for chipping I think I oversprayed all preshading job too much. And here you can see what I have done earlier: Masking I and then shadows: Highlights and masking II: What do you think? Regards, Michał6 points
-
Hi all. I spent a couple of relaxing hours painting and decaling the cockpit. I’ve still to put the decal on the instrument panel as I painted it tonight so I’ll get on to that tomorrow. The seat will be assembled later in the build. Tomorrow I’ll hopefully close up the fuselage. So far this has been a pleasant relaxing build, I hope that continues. I just wish I could devote more time to it as I’m really enjoying it. Anyway, here’s a pic. Cheers Allan6 points
-
Recently I've been working on Airfix's 1/72 Whitley Mk.V for the Unarmed Group Build, certainly one of my favourite builds. It's a joy to build, totally recommend it. I'll have to build another at some point, but probably with a bunch of etch in the cockpit. Only issues were one small missing part which I easily made a replacement for (easier than bothering with Airfix spares) and there were holes for the aerials missing. The instructions tell you to drill some for the coastal command version, but there's no instruction or semi hollowed out bit to drill for one of the aerials that is needed for both versions. Also no hole for the pitot, easily fixed. This was replaced with a metal pin anyway, it just looks better than the plastic one provided. And here's the cockpit. Once I applied the map decal I wasn't happy with it at all, it just looked flat, oversaturated and out of place. So similarly to what I did with my Dambuster Lancaster last year I decided to replace it with paper. I cut the image of the decal from the instructions and used that instead. Airfix should just give a printed sheet of maps on paper to cut out and attach with a bit of pva or superglue or whatever instead of a decal. But this wasn't enough, so I made a book, perhaps a manual or logbook or something. Justwish I added seatbelts. WIP thread here6 points
-
Alright, am still on page 1 for a change! A lot more done on her and the painting for the most part is done……thank god, I’m quite over masking and re-masking!! The Green is on (as is the U/c) and she looks much more normal. It looks a reasonably straightforward camo scheme but it was quite a lot of work, as there is little variation in the camo patten from aircraft to aircraft. I tried to be accurate….. but it is close enough for me, least I drive myself completely bonkers masking! Masking templates would have been easier but the demarcation lines not hard but have a softness to the edge of them. You could maybe get away with it in 1/72nd but not with 1.48th and larger. Oh and another interesting (or boring) bit on info is there are 2 variations of this scheme, the original (here) and the later which started appearing in the 80’s and appears on all F-4E 2000’s, Plus there is also the SEA scheme aircraft as well, just to make things interesting! ...... and yes the above shot was before one of the many re-touch jobs! Anyway…….she now looks like a proper IDF F-4E Kurnass! ….and I can stop the painting now finally, time for a clear coat. I have been playing around with another config I have seen in one photo, though unfortunately it appears to be on a test squadron aircraft. The AIM-9 is moved to the opposite side and an AQ/ALQ-131 is mounted in its place. This is a common config on the Recon birds and I have seen it on other F-4E’s with different stores fitting. But only with the Popeyes, it was on a test aircraft and only fitted with one BMF missile fitted, probably something to do with weight! Speaking of which……. …these BMF missiles sit super low and look super evil, want to make sure the taxi ways where smooth! The green on this drop tank is a different colour on purpose. As mentioned earlier, the IDF used aircraft in standard SEA camouflage schemes. These were all aircraft that were replacing aircraft lost during the Yom Kippur War. These aircraft were referred to as “Kapada’s” and they stayed in this scheme until a major service was carried out. The vast majority of these “Karpada” aircraft were used by 69 Sqn and tank/aircraft miss-matching was quite common. I will try to get the gloss clear coat on today, but then I won’t be back to her till Monday, when I hope to start the decaling.6 points
-
Finished! The interior detailing isn’t completely wasted: And with some acrobatics you can even still see the instrument panel: Proper pictures tomorrow in daylight. I’m beginning to understand why people like Matchbox kits so much: although the detail is sparse and a bit heavy and the panel lines are random, the kits are well engineered and easy to assemble and align. I’ve enjoyed this one, which is good because I’ve got another one to do in tropical finish - I won’t bore you with repeat construction shots but I’ll post when I get to the desert paint stage. Thanks for looking, Adrian6 points
-
PK-123 Wellesley Mk.I finally done SD6 points
-
Blu-Tack is my weapon of choice. I must say I have gotten good at rolling thin wee But-tack sausages! On an very exciting note.... THE TUFFED DUCK HAS LANDED!!!!! I pulled parts of her out of the box....bad idea as they don't fit any more!! ...and Revell take note, you don't need a ridiculously huge box for a model!!!!! That's a 1/48th Viggen. She's going to be a huge mother!!!! 🇺🇦5 points
-
A little more done today. Firstly, I fitted the BAM models APU. The easiest way is to sand the area from behind to thin down the plastic: Then drill from the front: Then pop in the resin piece. I of course drilled the opening a little too big so some Mr Dissolved Putty required: Definitely improves the look of the APU. Cockpit was painted next. As always, the colour of the Eduard etch is impossible to match! No big deal as not much is seen once the seat goes in: And, thanks to @David W, I have a set of Airwaves resin MK.16 ejection seats. Just need to respray and detail: More soon, stay safe and lets hope things don't get too out of hand. Dave5 points
-
My first completion for the Matchbox 50th Anniversary Group Build and the first of my 2022 starts to be finished. Jaguar SS/100 Matchbox PK-304 by John L, on Flickr by John L, on Flickr by John L, on Flickr by John L, on Flickr by John L, on Flickr Regards. John5 points

copy.thumb.jpg.d8f94c146f5d2da12880c4799901d6dc.jpg)


This leaderboard is set to London/GMT+01:00