
Leaderboard


Popular Content
Showing content with the highest reputation on 05/02/22 in all areas
-
Depicted as aircraft R6835 XT-W flown by a New Zealander Brian J. Carbury Built straight form the box in about 2 weeks. Really enjoyed it despite the few minor fit issues. Will definitely build more. Full details at my blog but here are some photos.39 points
-
This is my rendition of Airfix nice Chipmunk kit. I removed location pins to get no warped wings and it works quite good. The 3 clear parts are little bit tricky, but it works too with a little patience. I used Mr. Hobby Super Fine Silver 2 and for the finish, Alclad Light sheen. Also did some riveting on the fuselage. Enough waffling on to the pic’s! Have a nice weekend! Cheers Andy37 points
-
I wanted to resolve my ongoing paint issues. I wanted to test the MMP/Future suggestion I found online. I also wanted to find my grey panel line wash that I failed at on my Mosquito build. With that in mind, I chose to do Ehle's aircraft in all black. I always liked the old Matchbox kit. Accurate outline, low parts count, a good test mule for my paint experiment but I MUST fix the air intakes. Once my brain figured out what they looked like, I couldn't un-see it. With those fixed, the rest went together quickly with no putty or filler needed. A quick cockpit and busy up the wheels with brake lines and vents was all I added. It was with a heavy heart I took one last look at those wonderful psychedelic colors clearly aimed at the glue/paint sniffing model builders of the '70s and applied a smooth coat of Tamiya Grey over everything. MMP Nato Black mixed with Future in a 50/50 mix went on well and resulted in a smooth black sheen ready for decals. I used a much darker grey than last time on my Mosquito build, (think battle ship grey) and that worked much better for me. I used aftermarket Print-Scale sheet 72-169 for Ehle's a/c. Airbrushed weathering then sealed with future than Testors Dull coat. Canopy frames are a mix of ruled decal and free-hand on my own vac copy. Added missing landing light, RDF loop from fine wire. Chipping is with silver pencil. The framing is not exactly correct and I goofed with the "A" on the nose, should be up higher. I'm enjoying building these old kits just as they are without going too crazy with pencil panel lines and all. Matchbox did a really excellent job of capturing the look and shape of the 110, better than some more modern iterations. All the panel lines are certainly livable with as is. No putty or filler was used or needed at all. Since this was really a test for new-to-me paints, I didn't add a lot of missing details like the landing gear spreaders and resin cockpit, etc. but I am glad I fixed the radiator intakes. The grey on black panel wash is working for me and will use again. The MMP/Future mix works as well. Hope this was helpful. Next is a FROG PV-1 Ventura to test the Vallejos for US Navy color accuracy and paintability.19 points
-
Hi all, some pics of my new built AH-1G in 1:32. I used the Special Hobby "Hi-Tech Kit" which is in fact the ICM model plus some resin and 3D printed parts as well as new decal options. Add the Quinta Studios 3D Decals and the Eduard PE`s and masks.18 points
-
Let me start with a story…… I am eight years old and it is the Summer of 1968. On holiday at Dymchurch in Kent my Dad starts pointing at the sky, and there they are, some very war weary looking Spitfires and Me109s coming back from a filming sortie. Spool on to 1970 and home in Biggin Hill valley just under the flight path of the main runway, when Ray Hannah turns up in MH434 still in a Battle of Britain scheme and beats up the airfield, valley and anything else he could find! Dad and I rushed to the airfield just in time to see him side slip it onto runway 29. Marvelous! He did it all again a couple of hours later when he left. MH434 remained in those colours until 1974. And that to me is a real Spitfire, a cleaned up Mk IX in Battle of Britain colours. So here is my take on MH434 during the filming. Is it MH434? Three cleaned up Mk IX single seaters were flown during the film. MK297, MH415, and MH434. They were all different! MK297 had fishtail exhausts so not that one. MH415 had straight exhausts and then later fishtail ones after an engine change, it also had strobe lights in the gun ports so not that one. MH434 it is, we’ll say later in the filming due to the lack of an odd short rod sticking out below the rear fuselage which is visible in some early shots. The colours? Hm…….always a contentious one this. Every photo you see is different. I have ended up using Dark Earth and Light Green, which are not quite colourful enough, but they are close once weathered. The under sides had a bluish tinge (look at the wing behind Kenneth Moore’s shoulder in the collapsed hangar. Not a flyer but they were all painted the same.) so I used Sky with added White and a dab of Navy. The weathering. Originally the aircraft were to be presented as quite clean and there are some photos around that show quite some subtle dirtying up. However the R/C unit was having trouble getting the models to look real on film so the great weathering up of models and full size began. Lots of dark washes and black brush strokes. The markings. These are from Fundekals and although reasonably accurate are some of the hardest I have ever had to apply. They are thick, brittle, and self-destruct the moment they get near the model, and the guide as to where to put them is incorrect in many respects. My advice is to look at the film photos in detail first. The under wing roundels are wrong for the film as well, but right for the actual battle. Excuse the lack of a gun sight, it kept falling off so I put it somewhere really safe, if only I could remember where that was…… Steve.18 points
-
Hello all, Look time lurker and I stand in awe of the quality that I see on here. I make no claims to be a high class modeller but I enjoy myself leaving gluey fingerprints on bits of plastic and crawling around on the floor looking for that the teeny tiny bit of plastic that pinged out of the tweezers. So here goes, Sword 1/72 Spitfire Mk XIVc. Out of the box apart from some Eduard seat belts which are now hidden and the whip aerial (which may or not be right, the painting instructions show it, the box cover doesn't) made from a decorating paintbrush bristle. Painted with Vallejo Model Air. I had a bit of fight with this one, I couldn't get the front cowling right, its been taken apart and put back together with a variety of plasticard tabs and as a result one set of exhausts sits out further than the other. I didn't deal with the flash on the intake properly and ended up filling it with sprue gloop and drilling it out. Oh, and the tail wheel covers hide the bodge where I broke the tail wheel off trying to stick it into a hole that was too small. Apart from that it was a breeze. Learnt quite a lot about building Sword Spitfires doing this which is fortunate as there's another two in the box... Also noticed that I need to touch up one of the prop blades. There's no hiding with the photos, is there? It really doesn't look as rough from the other side of the room😁. Quite please with it, its a mean looking beastie. Simon16 points
-
Converted from their Auster AOP.III kit to have the shorter cockpit of the earlier Mk.1, modified engine cowling, and no flaps. Additional work included scratch building thinner bracing struts and adding the missing trim planes under the tail. Also, the somewhat over-scale cockpit interior framework was missing some of the thinner struts, but this was not realised until after the glazing had been glued on and the faired in with putty. So the photos show the cockpit after it was prized off and modified. Not the only parts to be removed, modified, and re-built! LB367, 657 Sqdn, Ouston, early 1943 (22) w by Philip Pain, on Flickr LB367, 657 Sqdn, Ouston, early 1943 (23) w by Philip Pain, on Flickr LB367, 657 Sqdn, Ouston, early 1943 (3) w by Philip Pain, on Flickr LB367, 657 Sqdn, Ouston, early 1943 (5) w by Philip Pain, on Flickr LB367, 657 Sqdn, Ouston, early 1943 (8) w by Philip Pain, on Flickr LB367, 657 Sqdn, Ouston, early 1943 (11) w by Philip Pain, on Flickr LB367, 657 Sqdn, Ouston, early 1943 (13) w by Philip Pain, on Flickr 657 Squadron was newly formed at RAF Ouston, Northumberland in January 1943, and the early Auster Mk.1 was used for training and to develop battlefield tactics. In May 1943 the squadron moved from Ouston and re-equipped with the more capable Auster AOP.III. Auster Mk.1 LB367 was de-mobbed in 1948 and placed on the civil register as G-AHGZ. It is still airworthy to this day, now repainted in its wartime colours.16 points
-
Sopwith Camel My first finished model of 2022 is the new tooled Sopwith Camel by Eduard in 1/48, from the Limited Edition Dual Combo boxing. I used also a lot of accessories and some parts are scratched from wood and metal. The pilot was Walter George Raymond Hinchliffe, the commander of the C-Flight of the 10 Squadron of the RNAS. A detailed build log can be found here: https://forum.ww1aircraftmodels.com/index.php?topic=12717.0 And now have fun with the pictures! If you liked my little Camel, then hit the keys! Criticism is also welcome, of course, as we want to improve. Cheers, Frank15 points
-
The splendid Mod 22 had its wing cannons replaced with the long barrels Type 99 Mark 2 and became A6M3a of which 560 were built. They can be mistaken for early A6M5 of which they differ by the wing length. They saw a lot of action in the southern front, from Bougainville to Rabaul and here we have a plane of the 582 Ku, active on that front from late 42 to early 43. The plane shown is supposed to be the one of chutaicho Lt-Commander Shindo Saburo.This is the great Tamiya kit in 48th, nearly OTB but with Master cannons,and the whole rivets pattern. I did not weather the plane too much as the only picture shows a quite good condition airplane. Of note, as the A6M3 mod 32, the mod 22 has only been built by Mitsubishi and as such carry no Aotake in the U/C belly or leg covers. I have used a mix of masks and decals. Colors are from Mr Color and AK range. 4CC5A5BD-2EF9-4593-8696-5FBF2D247E3F_1_201_a by jean Barby, sur Flickr FEECAE02-8A07-40F4-BF32-6F493C54F937_1_201_a by jean Barby, sur Flickr 0BCDFECA-2E92-44B2-9D2A-200F92687476_1_201_a by jean Barby, sur Flickr 8B082DEC-7AA2-4352-94E3-E838D347AA25_1_201_a by jean Barby, sur Flickr 78A3B7E6-204D-43CE-884F-DE6F091266C1_1_201_a by jean Barby, sur Flickr 298C256D-12F5-4331-AEC6-5F9CC6DB71BF_1_201_a by jean Barby, sur Flickr 71BEB953-FA25-4B9E-8121-357BC4671399_1_201_a by jean Barby, sur Flickr 4D189F30-2DC1-4186-9192-2618197C380C_1_201_a by jean Barby, sur Flickr14 points
-
In the 1970’s and 80’s, the Spanish flag carrier Iberia had a fleet of some fifty DC-9 aircraft. As a 14-year-old plane spotter in 1969, I snapped a picture of the company’s DC-9-32 during a visit with my dad to the Copenhagen Kastrup Airport. The plane was registered EC-BIS and christened "Ciudad de Alicante". In a sudden nostalgic plane spotter mood I decided to build a model of that very plane. I ordered a 1/144 scale Fly Models kit, which was pretty simple but in my opinion all the essential details were there. The model went easily together although some sanding and putty was needed. For the old Iberia livery I ordered a high-quality sheet from the BOA, which contained the registrations and names for 24 different Iberian DC-9’s including the EC-BIS. I also used Authentic Airliners Decals decals for the cockpit and cabin windows. The dark gray cabin windows were printed in the cheat line of the BOA decal but since I wanted a more authentic look and decided to attach the AD decals on top of them. The windows were exactly of the same size but the distance between them was just slightly different so I had to cut out each window from the AD sheet and stick the 70 windows in place one by one. An entire day was spent in that job! I painted the white areas of the plane with Tamiya Fine surface primer, which I coated with Tamiya gloss varnish spray TS 13. I used Alclad's white aluminum on the wings, stabilizers and the lower part of the fuselage.The edges of the wings and stabilizers were sprayed with Alclad's polished aluminum. I also used Humbrol and Vallejo colors for the smaller details. I also scratched several details into the machine, e.g. pitot tubes, beacon lights, antennas, etc. In the summer of 1969 I made a round trip of the Scandinavian capitals with my dad. In Copenhagen I insisted that we visit the kerosene smelling Kastrup airport instead of seeing the Little mermaid statue or the Tivoli theme park. Well, my dad wasn't at all amused but after all we did go to the nice and busy airport where I could snap a picture of the Iberia DC-9-32 🙂14 points
-
He is my attempt at the A-4M Skhawk. A modified version created at the request of the Marines, and this is in the markings of VMA-324 "Devildogs". Here is a link to the build. Yes, it is a bit crude, and it is a pity about the payload, or rather lack of it, but if I had the time and inclination I could have raided my Hasegawa weapons sets. Still, it did not come out too badly. Pete14 points
-
Hi all, In November 1992 a large airshow was held at Auckland International Airport here in New Zealand called Air Expo 92. It featured the typical fare like a mock WW1 dogfight, warbirds of various stripes strutting their stuff, as well as various civil and military flying displays...all programmed to accommodate scheduled passenger services! I know several people who attended this wonderful weekend but I was only five and didn't get to go, however an official VHS was produced and a trimmed-down version was broadcast on TV (keep an eye out for the terrific RNZAF recruitment advert at 41:27): My Mum recorded the show and as a kid it was one of several videos on high rotation in our house, and did much to inform my love of certain aircraft. Several overseas aircraft were stars of the show: a Bede BD-5J imported from the USA, a Beriev A-40 Albatross/Mermaid, and an Ilyushin Il-76...which arrived carrying RAF Harrier GR.3 ZD668, the display of which was for many was the big highlight of the event. Photos taken by Phillip Treweek are available on his website Kiwi Aircraft images, here's one showing a pilot's name under the canopy rail (more on this later): Flown by Sqn Ldr Ashley Stevenson, many people maintain to this day it's the noisiest single-engined aircraft to ever appear at a New Zealand airshow! For those who keep track of such things this aircraft is now on static display at the Yanks Air Museum at Chino. As some of you may know already, or have learned from the video, Sqn Ldr Stevenson had quite an eventful time on Harriers: Understandably the story behind the pilot and aeroplane fascinated young Zac, and I decided should I ever build a GR.3 it would be this one. Last year I acquired the lovely new-tool Airfix 1/72 kit from a couple of years back and imagine my surprise when I discovered Xtradecals sheet X72186 contained decals for ZD668 in 1993! The only thing missing to make a replica of her as seen during her Kiwi sojurn was Sqn Ldr IA MacDonald's name, which was kindly printed by a friend. So although I wasn't there this was a very formative airshow for me and one of the first times I saw a Harrier in action, so nearly 30yr on it's wonderful to have ZD668 on display!13 points
-
Howdy all, got some pic`s of my latest effort, so thought I`d subject you to a few........ My second go at Gavia`s 1/48 Lysander kit As usual 99.9% from the box contents Only additions being a scattering of antenna here and there Finished SEAC markings, used for special operations in Burma towards end of WW2 Used the kit decals which worked fine Hope you enjoy the pic`s, thanks for looking Cheers Russ13 points
-
Greetings from Greece, This is my 125th build, straight from the box of Gaspatch Models’ latest release – the Me-163B, yet another example of the high-quality products this firm is capable of producing. It was built within just 4 months -quite an achievement for me- and It depicts W/Nr. 191916 “Yellow 26” of JG400 at Brandis in April 1945 which is also in the box art. Keep modelling.13 points
-
Primer's on! As I type the Alcladian aromas still linger on the breeze... My usual three coats of the black stuff went on without any great drama. It still needs to have a good polish and buff to prepare for paint of course, but even in its raw state I'm pleased with the way the surfaces have come out after assembly: The undersides will later get a final coat of Alclad's grey in order to reduce the number of layers of white paint required: I'd mentioned over on Crisp's excellent Hr. Ms. Bloys van Treslong thread how much sharper resin surfaces suddenly look the minute an opaque layer of paint goes down, so I was really pleased to see how sharply those wingfold mechanisms are now defined, even in monocolour: As well as sharpness if detail, the other necessary factor (especially on an aircraft that is basically a symphony in curvatures) that needed to work here was the smooth flow of shapes into one another along the airframe: So far anyway, the masking of the Avons seems to be standing up to the task: Likewise the cockpit areas seem to have been stuffed full enough that there are no obvious gaps to let overspray in: The outer wings likewise dandied up nicely: Before spraying their undersides with grey I still need to mask off the numbers and lettering for those areas to remain black - much easier to mask off and retain lettering as positives, rather than as negative stencils sprayed back on later. Something weirdly pleasing in a minimalist sense about the fuel tanks in this state: The etch primed as well with Alclad after receiving a slather of Mr.Metal Primer last evening: Finally the Obs. door, RAT, arrestory door and port drum of the AI.18: Smaller parts like th RAT doors, fuel probe and hook I left still stuck on their printing supports for priming - much less chance of losing them in the kerfuffle of painting as they'll require little in the way of making good after the supports are removed later. Overall including drying time that took a couple of quite intense hours but am glad to have got that done today. I've also been at work finishing off the paint masks for this aircraft. From a cursory examination I'd assumed that the 890 Sqn. witch insignia was about the same size as the wing roundels: Closer examination of reference photography soon revealed this to be erroneous, it is in fact smaller by about 1/6. Additional elements that I hadn't needed to worry about previously on XJ481 were the tail letter up high on the fin and the nose number of the aircraft. In the former case I had no reference notes as to the correct dimensions of that letter, so resorted to eyeballing a composite of original photography as a way of working out relative sizes: I used a similar technique for the nose number as well and then rather suddenly there was a complete mask set: The tail registration sits right on the limit that the Portrait 3 can successfully cut in terms of letters/numbers, so to be safe I added a second set as backup in case on or other of them goes stray. Cut to Oramask now and happy with the results: I'm not going to touch any more today but will spend a bit of time tomorrow doing a leisurely tour of today's work, checking for any flaws that I've overlooked in the initial euphoria at getting this part of the job done. Tara chucks. Tony13 points
-
Hi All, Another quick update. Once I had finished the flat coats the next job was laying down the Nato Black to complete the painting of the nacelles. Whilst I had the airbrush loaded with black, I thinned it down and put down the base layer for the exhaust staining, which was extensive and very visible on these aircraft. A top layer of thinned MSG was then applied to complete the effect. I'd already decided that the exhaust collectors would have a coat of white stove enamel applied to the front section, so I mixed 50:50 white and Sky Grey, as I felt that pure white might stand out a little too much. The standard Dunny Bristol HerculesTM treatment was then applied - a base coat of steel, progressively mixed in brass to show the heat treatment of the steel, then a highly thinned coat of red-brown. Here's the lot assembled (I did miss out on a few photos - humble apologies): Although it appears as if the exhausts are misaligned with the exhaust staining, it's just that the exhausts themselves stand off from the nacelle - all ist gut, as Uncle Helmut used to say 🤣. There is a rather prominent seam on the outer engine, but I'm not sure I'm of a mind to deal with it and spoil the paintwork😞. I finished off the unmasking - everything was looking rather splendid, although there may be a little touching up required around the cockpit framing - the masks pulled away a couple of sections. Not surprising given that they had sat in place for 4 years... Here's the front turret: Bit of a poor photo but the aluminium interior stands out nicely against the black. Finally here's an overall shot: You might note that I completely missed the addition of the propeller shafts - never mind, they'll have to be doctored and added later. Despite that I'm rather pleased with the overall effect - it certainly is an imposing beast! There's a fair bit more to do - ordnance will be a significant activity in its own right, but I am slowly approaching the finish! Thanks for looking, Roger13 points
-
This is my take on a venerable old Matchbox kit, PK-127, the DHC-6 Twin Otter (Revell boxing). It is in the livery of Yeti Airlines from Nepal. I made one or two adjustments to the kit, and more than a few errors. If you would like to see how it went, the build log is here: Thanks for looking, Ray12 points
-
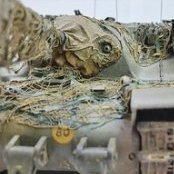
Wow what a kit! This is an exceptionally detailed offering from Riich. Comes with an extensive set of PE and accessories. No need for any aftermarket with this one. Even the suspension has real double coil spring! There are a couple of bizarre omissions such as the radiator which leaves a whacking great hole into the empty engine compartment but not to worry, an easy scratch fix. I think after building this I can strip and rebuild a real one blindfolded at night. I thought I would do it justice and put a bit of work into it. 😁 First off there are two points 1. There is nothing wrong with the Tamya offering so I don't want anyone dissing it. It's stood many a modeller well over the years. 2. I have to give a big shout out to these guys; https://vickersmg.blog/ As you'll see, this builds rabbit hole was the Vickers machine gun and I could not have done it without the help of them. So much info! I owe it all to them so check them out and maybe visit or donate. So on to the build. It depicts a Medium Machine Gun Carrier just come back from duty and having a bit of a tidy up,maintenance and re stock. They've found part of an old sign and used it as a work bench on top of some random ammo boxes. While the No1 is disassembling the gun and changing the barrel and jacker the driver is sweeping up the spent shells which as you can see get everywhere. All the helmets are kit with the inner liner on the 1st scratched and the webbing on the 4th one added. The rear bin and basket are scratched as the kit one couldn't be shown open. The brush is from the kit but the bristles added. Right then, The gun is 99% scratch. Tools are from the Miniarts set, petrol can from the kit. Tins and barrels and canvas covers are all scratch. I'm not sure if they ever changed the covers but I'm going for a refurb kit issued. There is a new cover, old cover, new barrel and old barrel still to be removed from the rest of the mechanism plus a barrel cleaning rod. The spring and casing I'm particularly proud of 😎 I did the fire extinguishers as painted but worn through to show off the brass. I was worried about the black leather seats but they seem to look ok. I'm also happy that you can see a lot of the linkages in the floor. Made it worth doing after all🙄 Those 303 shels get everywhere! I know they are a bit bright but I wasn't going to paint them! They are chopped up 0.3mm brass tubing. The barrels are 0.5mm brass tube so the bullets will actually fit 😁. The brown leather tube in the bottom right propped up next the the gunners seat is the spare barrel and cleaning rod case. Standard issue. The ammo boxwes are blue/green as was the case pre 45 and most were repainted before NWE campain however I'm going for some that slipped the paint shop for added colour. I put all the kit hanging from the side. I wasn't until it had all been made and ready for fitting that some know-it-all called @Mike Starmer 😉😁 Pointed out that no kit was hung like this as it would all get ripped off by bushes etc in the narrow lanes. They only did this in North Africa. Well these boys have either been very lucky, have a very good driver or just haven't learnt yet. The kit bags are all scratch as well btw. Bit of sustenance hidden from the Sergeant 😉 Bit out of focus but theres a cork hanging from the chain for bunging the water jacket. Had a bit of a nightmare with the ammo boxes. They are all kit with added webbing for handles but the main thing is the lack of decals for them. No one makes them. I even tried 3D printing stamps but that didn't work out. I was going to scribble some yellow paint but thought that would spoil it. The cammo netting is aftermarket stuff with strips of Rizla. WIP is here: Thanks all Andrew11 points
-
Hi, The Caudron Goeland very popular light transport machine. For years there was no injected kit of it (only vacu or resin) and few years ago RS filled this gap releasing nice kit in a half dozen of boxes full of very nice schemes. I was happy about it in general but also it made me unhappy when I had to decide which particular box should I buy. So I bought one and I have a kind of strange habit to search for a scheme out of the box. I have found one (ambulance), I thought it is not from box, but suddenly I noticed next box with this scheme... I decided to do machine in FFAF colors (Transports aeriens militaires) from late 1944 which I not noticed in any of RS boxes, When I was already advanced in build I have found, that this was a scheme given in one of previous resin kit... Nevertheless, here she is: The color from top is Humbrol 159, in my camera and today light it looks much greenish then it is... Comments welcome Regards Jerzy-Wojtek #3/202211 points
-
So at last some bench time and the build has moved forward quite rapidly. I now have the fuselage and wings fixed together and I'm pleased to say that the fit is not to bad at all. Obviously I will fettle the airframe where necessary as I move forward but for the time being I think she looks quite splendid 🙂. I also like the fact that the cockpit detail is still fairly visible which makes the time I spent working on it very worthwhile indeed. I like this kit, ok the build quality and fitment aren't up to Tamiya standard but I feel like the extra work required is more than worth it and hopefully when finished the end result will justify the extra work. Here's a few pic's of today's progress I need to let these parts set up now overnight then tomorrow I can continue to work on the build but as I've already said I'm very happy with the results so far and really enjoying myself with this kit. Thanks for looking back soon 🙂👍10 points
-
G'day Chums,may I present my take on the venerable Tamiya offering.This build started out life in the Achtung Panzer GB back in 2015.For whatever reason I fell off it back then.A few weeks ago she resurfaced so I decided to finish her off. The following websites were very useful; http://the.shadock.free.fr/sherman_minutia/index.html https://www.scribd.com/document/541299734/M4A3-AFV-Interiors https://www.theshermantank.com/ The mud and crud weathering was something I've never tried before and consisted of One Strike filler mixed with acrylic tube paint and slathered on with a trowel.The towing hawser was made from stranded wire. Thanks all for looking in.10 points
-
As I consider my Panther 99.9% finished, I started a new tank. Since I read about the Tank Duel in Cologne, where a Panther destroyed a Sherman, and then a Pershing destroyed the Panther, I decided to assemble the Sherman. I found out what type it was (M4A1 76W), to which division, regiment, company it belonged (3rd AD, 32 AR, F Company) and the commander (2nd Liut Karl Kellner), plus a couple pictures and a video showing the back of the tank. As there are no more pictures, and the tank number is not visible, I decided to go with what I had and assemble a Sherman as close as possible. Some of the boxes, canvas, equipment, dirt, etc will come in handy to disguise the numbers. I chose Dragon´s Sherman M4A1 (76mm)w Operation Cobra 1/35 to assemble this Sherman, which could have been an early 76mm. There are details that I can only guess, like the turret vent at the back of the turret, or the arrangement of fuel caps armored covers, so I decided to assemble it as an early 76mm without the turret vent nor the fuel covers around the engine vent cover. The kit is nice, looks like Dragon added improved parts toi the original kit. Metal cannon, correct wheels inside covers, and I have to find out what else, but it looks good (as you might have already realized, I am far from a Sherman expert, just learning). First thing I did was correcting the idler wheels, they are molded without the inner face of the wheel, looks like a toy wheel. Good thing is, the kit provides the older kit wheels and I could cut the inner face and glue in place, correcting the issue. Then I corrected the number of fuel caps/covers on the engine deck, I chose the option of covering the original caps with welded steel squares, which I simulated with plastic sheet. Here the first one already done, the other side would go next. How the idler wheels axes should fit in place, is still a mistery to me... first, the instructions show them backwards, with the bolts on the upper side, bolts should go on the lower side. And then the fit is... well, they don´t fit at all, I positioned them as close to reality as posible and glued with CA. I substituted the pins of the air filters with wire, much closer to the real ones. Here compared to the ones provided in the kit. And started working on the boogies, parts fit pretty tight, need some trimming to insert wheels in place. But no serious issues. Applying already a wash with yellow-white artist oils simulates quite nice fine dust, but it will get much more dirt later on. And by the way, it is not my intention to replicate the scene when the Sherman was hit, nope, I want to issue it as it would have appeared entering the city, similar to this picture below of another Sherman of the same regiment. Marco9 points
-
My latest build is the Authentic Airliners 1:144 Convair 440 in KLM colours. The Convair 440 is a further development of the 340, which in turn is a further development of the 240. The first flight was in 1947. Of all the variants (and there are quite a few) about 1181 were made in total. The main difference between the 240 and the 340 is the larger fuselage of the 340 and the larger wingspan. The 440 offered the option of a weather antenna (KLM did not have this option though), had the ability to carry more passengers and had better sound insulation. Many 340 aircraft were later converted to 440 (including the versions that KLM flew). KLM flew both the 240 and the 340 (440). The fantastic kit is from Authentic airliners. One interesting titbit is that this kit is a tailsitter, so you need to drill a hole in the fuselage and add about 20g of weight. This was easier said than done, but I managed to do it without much of a hassle in the end. The decals are from Vintage Flyer and the window decals are made by me. The I used Inspire Chrome for the metal parts and used different primers (grey, white and gloss black) to get the differences in metal colour. The wire antennae are hairs from my girlfriend. At any rate here are the pictures of the finished build: I have already started building my next projects (the Eastern Express Il-14, the Authentic Airliners Comet 4C, the Authentic Airliners L-1011 and the Zvezda Il-62), so keep an eye out for those in the future. Anyways, thanks for looking guys and see you next time! Martijn9 points
-
Hello all First completed build of 2022.... the Italeri 'big cat'. Pretty simplified parts and construction compared to say Hasegawa or Tamiya but it is about the quarter of the cost so I'm happy with that! 😁 Build was pretty straightforward with a little filler and rubbing down here and there. All was going well until it came to the aftermarket decals from FCM which were horrendous! They just disintegrated so I had many nights trying to repair with liquid decal film, spares box and paint. It's far from perfect but hopefully nobody will notice 😳 Paint was Mr Hobby Aqueous and Tamiya with final flat varnish from Winsor and Newton. Little bit of mig ammo panel line wash to finish. Hope you like. Next on the bench....a 'beast from the East' 😁9 points
-
Hi folks Just completed this one. OOB build no real issues apart from wing mirrors that keep getting knocked off. Cheers Keith9 points
-
My third Eduard kit and what a nice kit it is. The fit is great, 8 different colour options, fine crisp details, barely any flash, masks for the canopy,... just perfect. I painted it in a Sliac Airshow demonstrator but the red turned out more orange because it was less opaque than expected. Still like the result and I'm not big on realism.9 points
-
Hi All, Some good progress on the Stirling today! During the week I'd taken a bit of time to clean up around the decal disaster, and I also carefully cut out a stencil for the code letters. Here it is applied: I then carefully sprayed the relevant areas in Medium Sea Grey, before transferring the 'H' to the other side of the fuselage and repeating the exercise. Here's how they ended up: Not perfect but that, my modelling chums, is a save! 🤩 The mess you can see around the 'H' is just a slight residue of blutac, which cleaned away easily enough. Once that had dried I then proceeded to apply the rest of the decals, which occurred without incident: I then applied another gloss coat, and then applied a wash accompanied by Bon Jovi's 'Haze of Flory' (wait, is that right?) 🤣 I forgot to photograph that bit, so you will have to be content with the state of play after a flat coat was applied: I don't think the panel lines look too bad?? They sure have popped! I may yet apply another flat coat, but I'm starting to get a little excited - the end is not too far away! I may post another update a bit later depending on progress, Thanks for looking, Roger9 points
-
Hi there, here is a little diorama I made some time ago. It depicts a fictional scene - advancing US-troops inspect some abandoned "Wunderwaffe" somewhere in West Germany near the end of the war. Jeep is from Airfix, the Natter from Bachem, the figures from the internet Thanks for looking, comments & critizism welcome!8 points
-
Hello friends, The Aichi E16A1 was a seaplane that the Imperial Japanese Navy used on their battleships in a reconnaissance role in 1944-45 and were also active in the Japanese defense of the Philippines from their seaplane bases. The design included the unusual feature of dive brakes on the forward float struts, allowing it to double as a dive bomber. This kit had very light surface detail, some of which I could not preserve, but I think there is enough to keep visual interest. I used the good old sponge chipping method to portray the late war Japanese paint that was so susceptible to flaking from exposure to the sun and salt air. The resin engine was a little work of art and it's a shame it is not really visible. I used a lot of filler on the seams - a typical short run kit from 1999. Thanks for looking, and enjoy!8 points
-
After building solely cars for over 15 years, I needed something else to keep me busy during the Corona pandemic and I rediscovered 1/144 aircrafts. The big surprise was the availability and quality of the kits. I've build 11 kits in about 10 months (2 are not shown here) and only one was really disappointing. The trumpeter SU47 is just plain bad. Bad moldings, bad fit, bad decals, bad instructions,...... The Zvezda BF109 wasn't that great, but it's a cheap snapfit for a wargame at least the fitment was good, parts crisp and the end result really looks fine. The others are from Revell and Eduard and are good, with my favorites the Mig 15, Mig 21, Typhoon and F-15, those are great. Had a real fun time with these kits, I'm planning to make a similar display with only 1/144 helicopters in the future but next kit is something a bit bigger....Well something a lot bigger... (see last picture 😉8 points
-
Alright, back to this baby! Got quite a bit done today, plus you’ll get a sneak peek as well! The store and pylons are just about finished, just need a glossy clear coat and the decals can go on…..hmmm one pylon appears to have run off! The gear is now on because I keep damaging the underside whenever I plank the wee beast down. The fit is not the greatest, very sloppy, the gear wobbles so CA glue was use to help it behave! With the gear in place, she was given a gloss clear coat. I’m using Gunze’s Mr Color for this. I have only just started using this clear and I love it!! It’s really easy to use, about 50:50 paint to thinner (I now use premium automotive lacquer thinner, reasonably cheap and does the job perfectly) and gives you a nice shiny smooth finish. When first laid down it can appear a bit uneven/orange peelish, but give it 30min (you can handle the model straight away) and it all evens out. I really wasn’t happy with the original paint job on the tail, it had a real orange peel look to it. So I rubbed it back with 6000 grit micro-pad then a coat of the Mr Color Blue then clear. A tiny bit of “peel” to the finish, but so much better (probably the best finish I’ve gotten with gloss paints and an airbrush, I still struggle with them), I’m not al all concerned about it because a final Flat/Semi-flat still has to go over it at the end. With this done the nerve-racking bit starts, decaling. Let’s just say I had forgotten all about using Syhart decals. They are really nice, super thin and a bit unforgiving (actually frighteningly so). You really only get 1 or 2 chances to get the positioning right before the decals is there forever! Use setting solution and it’s one chance baby!!! Trust me I know! The colour doesn’t even remotely match the instruction sheet that comes with them, my LED lights and camera makes them appear more washed out in the photos, they look much better in natural light. The only way I’d know for sure if it is correct was if I could see the real thing. The majority of the photos of her on-line have been “corrected”, always easy to tell as the sky it just too blue! Where the blue finishes at a point on the tail, there really wasn’t a proper guide to tell you where to finish it, but by pure chance I nailed it!! So here is a brief look at her with some decals on. I so love the look of her, she’s going to look great beside her older sibling, RF-111C (I may now have to build another one…and not the HB horror either!)…. Plus guess I’ll now have to re-finish the F-4E as well!8 points
-
Ok, a bigger progress update today. I have added the tools and finished the lower hull details. I added cast texture to the rest of the hull plates, added the headlights and small lamps and added the wiring. I added the tools and wingnuts from the spares box for the clamps. The tools are quite crisp and will probably get covered with some stowage so didn't add p.e clamps (even though I have an aber p.e kit for this kit and the others in my stash). The lower hull has been given an all over hit of primer with a few minor areas to touch up. I have also started the turret which went together so quickly. I have added an Aber metal barrel and replaced the kit besa with a 3D printed one from FC Modeltrend. I will replace the sight vane as the kit one is way to thick, have added the thicker up armoured resin turret armour and have test fitted the turret on the modified hull. No surgery required!8 points
-
Cars are tricky. You have to be so careful not to mess up the finishes. I mostly finished the body and moved on to the wheels. Next up is the interior.8 points
-
Hello all. On this fine Forum there is a Group Build running which is concentrating on Classic Matchbox kits. It is quite a success as at the moment there are 9 pages of builds running, and it is certainly bringing out the nostalgia! My contribution was a Twin Otter (Matchbox ref PK-127) although it was a Revell re-issue. I like to do my Twin Otters in unusual markings, and this Yeti Airlines fits that bill. I got the transfers from Parkes682Decals (in the Manufacturer section on BM). I made a few modifications to the kit, left a few modifications off, and generally had fun. It was sprayed with Halfords Appliance White, but the green was brush-painted with Humbrol 101 mid green and 2 Emerald enamels, thinned with Colourcoats Naphtha Thinners. The gold was three coats of brush-painted Humbrol 16 Gold acrylic. I had a lot of fun, so why not pop over to the GB and have a go! The build thread (aka catalogue of errors!) is here if you want to see what was done: Any, here are some piccies: Oh yes, I was also daft enough to make some 1/72 scale luggage - a rucksack and a travel bag based on kit I have taken there in the past! That is it for now, thanks for looking, Ray7 points
-
Hello everyone I'd like to present my latest model The first Mustangs arrived at 303 Squadron in early April. They were equipped with flame shields from exhaust pipes. They did not have the Polish markings and squadron emblem. Later, the plates were removed and markings were added. In the photos from the era on my facility you can see these changes gradually. I wanted to make one from the beginning of April. You can see what came out in the photos. Tamiya 1/48 set + master barrels + propeller and Eduard cap enjoy the photos.7 points
-
My second new build for 2022. Another Airfix 48th Chipmunk this time as WK628( only a couple digits away from '630 previously build) code 13 of the CFS display team The Skylarks, at Little Rissington 1968. Nothing special done to the kit and builtas per instructions. All decals by Xtradecal ( set 484224) Silver paint was Xtracolor high speed silver. I really should attend to the gap between the black anti dazzle and top dayglo strip which, in turn, are a bit too narrow but was all I had left for the nose from the Xtradecal set. I had more success with the canopy this time and masked both insides and out before assembling and painting. I did mange to lose the canopy handles... all of them, even the spare ones from this and the previous kit.7 points
-
You would have thought so but apparently General von und zu Melchetthausen sent them off with Boddingtons instead, the predictable results of which ensured that the British could hear and smell the Zepps coming long before they actually saw them. Martian 👽7 points
-
Hi All, Filling and sanding is finished. ...and primed. I now have to wait until a pot of Light Aircraft Grey is delivered. Dave.7 points
-
WW2 German machinery? is so far outside my sphere of interest that I hesitate to posit a opinion about the things, but somebody must know. Anybody? Hope we can get an answer for Whofan, in the meantime we have a little 'steps forward quietly' addition to Whirly SACRU Made and ready to fit, when one of you comes up with a flexible enough cable to hang off each corner for me to try. That's the SACRU sitting on my experimental decal sheet, next to the massively oversized winch and adjacent to the yet to be added cargo door. As you can see Whirly normally resides in her own kennel. Which is where she will sit until get a tad more mo to add to my jo, not that I am despairing yet. This morning I have added her winch downlighter, antennae for the homing(?) thingy, Peach Melba or something oddly unmilitaristic. They sit under the nose awaiting trimming the lengths, let the glue set first though. The lamps are to be added, probably from Little Lenses, oh yes I need to add wipers and handles too, soon be finished.7 points
-
While I’m waiting for the oils to dry on my Russian Spitfire, I need to add a flat coat to protect them and I don’t want to risk the varnish reacting with the oils, so I’ve decided to start another Spitfire, after all you can never have enough Spitfires! I really fancy building a MkI so while I wait for the Kotare 1:32 version, if I only buy one kit this year the Kotare Spitfire will be it!, I’m going to build one from my stash, Eduard’s 1:48 MkI early version. I had toyed with the idea of building a two bladed Spitfire, however I recently watched a documentary called “Empty Skies” where RAF fighters pilots spoke about the Battle of Britain and their experiences, cracking stuff and so I’ve got to build a BoB version. Not being a fan of decals I opted to buy a Montex mask set, unfortunately this set is for a different (earlier release?) Eduard MkI offering. The “other” Eduard/Montex kit/set has 7 scheme’s for you to choose from, I’ve opted for F/O Brian J Carbury’s aircraft flying from Hornchurch late August 1940. I’ll use the roundels and fuselage codes from the Montex set, the only thing I’ll have to “work around” will be the aircraft serial numbers, I’m not sure what to do about those, perhaps I can “bodge” something from the kit decals, or I might not apply any as some early Spitfires didn’t have them, I’ll worry about that later in the build. Here’s the writeup on XT-W from the Eduard instructions… R6835, flown by F/O Brian J. Carbury, No.603 Squadron, RAF Hornchurch, late August 1940 Spitfire R6835 XT-W was flow by a New Zealander named Brian J Carbury, who shot down two Bf 109Es on August 27th 1940, when No.603 Squadron arrived at Hornchurch to replace battle-weary No.65 Squadron. He scored 15 1/2 kills during the Battle of Britain. On August 31st, he shot down five enemy aircraft over the span of three sorties, becoming one of two RAF ‘Ace of the Day’ pilots able to claim that status during the BoB. His aircraft carried the standard RAF Temperate Land Scheme consisting of Sky bottom surfaces. The blue/white/red roundels painted on the bottom surfaces were mandated by the Air Ministry on August 11th. The aircraft was equipped with a TR.9D radio with the wire antenna stretching between the antenna mast and fin. The IFF device is not yet installed, explaining the absence of the associated aerial wires between the fuselage sides and the horizontal tail. No rear-view mirror was carried yet, nor was the head armour plating in the cockpit. Next I’ll be starting, as usual, on the cockpit… until next time as always, any suggestions, criticisms or comments will be gratefully received. rgds John(shortCummins)6 points
-
Hi all, Normally i am a plane modelbuilder but a good friend of mine gave me this Tamiya Greyhound for my birthday and wanted to give it a try. Was something completely different and build it with a other mindset when it comes to painting and weathering but really enjoyed myself and am very happy my friend gave me something different to try... So this is my first armour build, i tried to make a litte base to put the Greyhound one, please let me know what you think of it, constructive criticism so i can learn is always welcome! Greetings from Belgium, Ringo6 points
-
I finished up this great 1/10 scale bust from Nuts Planet and it was a lot of fun. I tried to experiment with armor modeling techniques in the finish instead of taking a more "painterly" approach, which was fun. Comments and criticism welcomed as always!6 points
-
OK, couldnt resist Cheers Anthony6 points
-
This one is done -Phew!! RFI here: Cheers all Andrew6 points
-
Hello Gents !! Did'nt forget these ones.... From time to time, I took it back... Still struggling to mate the Heritage rag wing with old Airfix Hurri !! Meanwhile, the engine front is right on its place... But it has reopened the engine cowling....on the SH one.... Now I found this on FB, may be will it of any use for our Dear @general melchett and spark some laugh to our dear @Martian... Now finding such a device for rocket fuel chalices..... And see Gents, the old mojo is coming back... Little by little... Pieces by pieces.... Is'nt that another Hurricane that is started ??? Look like it is.... Hum Mrs and Mr airfix, do you know that a good Hurricane Mk II is still missing at 1/48 scale ??? Just saying.... Sincerely. CC6 points
-
I couldn't help myself in Hobbycraft yesterday. I built a version of the Tamiya VW Beetle around 20 years ago and it's a kit I'd like to revisit. When I first attempted the VW I built it as a very tired example and I'd like to build a pristine version. The Tamiya Porsche 911 Turbo is another kit I've wanted for a while as I built the "Flatnose" version something like 30 years ago and this kit is clearly related with a lot of the same parts. One day I think it will get a Revell 911 Carrera and Targa to keep it company.6 points
-
Hi folk's this is it as far as this week's work goes,away for the weekend but off next week so should see the gallery.6 points
-
FineMolds release of F-4 Phantoms rejuvenated my spirits to build one of my favourite aircraft. The F-4C limited release comes with seated crew making it easier to build the project I have in mind. The first years of US involvement with Phantoms saw them still in their original Light Gull Grey over White scheme. July 10th 1965 was the first air to air victories for Air Force Phantoms crewed by Captain's Roberts, Anderson, Holcombe, Clark, downing a pair of MiG 17s. This image gave some spark to the build with intentions of displaying an aircraft hooked up to a tanker. The only part of the refueling aircraft would be the boom, plugged into the spine AAR point. I will scratch the fueling boom using dense insulation foam and metal tubing and rod. Lucky for me the Digital Sim world has many visual resources and the important measurements came with the following image that outlines the lengths. The kit will require some backdating to bring it to 1965 standards, included is a slightly shortly radome chin pod. Although shortened already in this photo, I will check further as it may have to be shorten more still. Early Air Force Phantoms still had MB mk H5 seats installed and the important visual difference was the shroud around the upper section of the seat. This is one of a few excellent photos where you can see it. I trimmed the seat section slightly and using paper card to make the shrouds. Landing gear will be up and the fit of the doors was reasonable, nose excellent but a little less so on the main gear. The engine air aux doors are closed as well. The crew celebrating after the victory, the following day they received the Air Force Silver Star Award for the mission. The refueling for this mission took place prior to the engagement with the MiGs, so the aircraft will have fuel tanks and 8 missiles loaded. Early straight inboard wing pylons are needed along with early AIM-9s. The build is going well and I have a bit of work to finish on my F-15J also. Thank you for checking in.5 points
-
Another lesser know fact is that the first Zeppelin to be lost in the Great War as not due to enemy action, but as a result of Von Melchetthausen's, very short lived sidekick, Baldrich von Misthaufen* deciding to hold a fart lighting competition onboard to relieve the tedium of long flights. Martian 👽 *Misthaufen = German for dung heap5 points
-
Thanks Hendie. I don’t know about Master but it’s nice to make these things fit together at least. Thankyou for all your help. Couldn’t have done any of it without you dear boy. Thanks Alain. I did do a little more tonight. Just inside the PC . Dewey’s undercarriage got modelled along with some lower sections and other bits and bobs. Not much more left to do but I really want to get some RFI photos done over the weekend if I can. Here’s a pic of my screen. I’m planning on putting some bend in the legs before I print. The wires will be rubber tube. So not all 3D printed. 😉 Johnny.5 points


.thumb.jpg.d3635a7ef6507d35f372dd09671fe96f.jpg)

.thumb.jpg.d17ff607fc7e89ed057e63fcb6f2a888.jpg)


.thumb.jpg.ba34a9f6ddce411193946dbdcc7b5fe8.jpg)


.thumb.JPG.3498f40362ff13ebfc4b2e45abbd545e.JPG)


This leaderboard is set to London/GMT+01:00