
Leaderboard


Popular Content
Showing content with the highest reputation on 27/01/22 in all areas
-
Supermarine Sea Otter Mk.I, FAA, Maryborough, Australia, June 1945 Sea Otter was the successor to Walrus and entered service late in WW2. It was the last bi-plane type to enter service in RAF or FAA - but it still rescued airmen in the 1950 for example in the Korean war. Kit: Special Hobby 1/72 Supermarine Sea Otter Mk.I 'WWII Service' (SH72429) Scale: 1/72 Paints: Hataka Red Line Weathering: Flory Models, Vallejo, Tamiya & Ammo Mig Rewarding but challenging little kit by Special Hobby (originally Azur). Wing construction was the challenging part, other than that it was very nice kit - but packed with lots of tiny PE and resin bits which could be quite fiddly. I also added some details of my own like the railings and rope which are lead wire. Rigging (my first) done with rubber wire found from an undisclosed source. Painted with Hataka acrylics and weathered using Flory wash and different enamel and acrylic based weathering products. WIP:27 points
-
Hi, my first aircraft post here. last few posts have been motorbikes Painted in tamiya acrylics and Alclad EZ line for the rigging, this stuff really helps bring it to life. Apologies for all the photo's :-)27 points
-
My first kit completed this year - AV-8S (VA-1) Matador, 1:72 Italeri (ex-ESCI). My 5th Harrier so far! Built out of the box (except for Pitot tube from Master, resin ejection seat from Pavla and some scratch). Italeri's kit is old and needs some work, but I'm quite happy with a result. Thanks for watching!25 points
-
Hello everybody! Here is my new model from Tamiya. In my opinion kit has many details despite its age. Easy for build and it made my weekend enjoyable Most of the new kits have so many parts to glue but old Tamiya's are goldies ❤️ You can visit my ScaleMates bio and don't forget to add me https://www.scalemates.com/profiles/mate.php?id=101450 Cheers...21 points
-
Hi all, Here's the shots of the completed model. Thanks for your comments and support - appreciated. 'Wingnut Wings' Salmson 2-A2 from WW1. This model represents Salmson 2-A2, Serial No:381 of Escadrille SAL 28 during 1918. The fully detailed build log is here: https://www.britmodeller.com/forums/index.php?/topic/235100971-132nd-scale-salmson-2-a2/ As usual a fully detailed build log, in Adobe PDF format, will be available to download from my site (link in signature). Go to gallery 3 and just click on the PDF icon. Mike21 points
-
Trumpeter kit with modifications (extended fuselage and shortened undercarriage)19 points
-
Greetings Folks, This has to be one of the most challenging kits I have built in recent time. A big salute to those brave souls who have built this kit. The instruction was way confusing and the kit was really torturous. The kit to building this kit was yr instinct, always dry fit like 10 times then go for it, but then there would be a huge gap in many places, the cockpit was hard to work on but nothing like the spine, and oho took almost a day to fix it, it just won't fit at ALL, It was quite frustrating but with few pegs and some surgery well finally it fit. There are problems in other places too but I will skip it. Less the said the better it will be. The painting was done using Tamiya since I didn't have exact paints, so I mixed an eyeball with color reference. There are some places I still need to work on but I will do that when I am fresh again, this kit has taken a toll on me. Anyway, here it is, Thank you for watching and any feedback welcome, cheers. Mig-23UB (Known as Vikram) of No.223 Squadron, will add the serial number and yellow roundel later.19 points
-
Good evening, ladies and gentlemen! Let me present you my next model from Revell.16 points
-
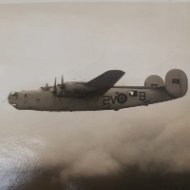
Always thought this was a very interesting layout for a bomber and eventually got round to building one. The rigging wires look a bit thick to me on reflection LightningBoy16 points
-
As some of you may know, the 1/32 Trumpeter Lightning falls short on a lot of fronts. The kit however is a very straightforward build out of the box and it does resemble a Lightning should you choose to build it this way.I had previously built a Trumpeter F3 with simple modifications (extending the fuselage by 5mm which removed the 'short wheeled base' appearance of the kit along with correcting the stalky u/c legs). I had the Trumpeter F6/2a kit in my stash and decided I would have a crack at improving the kit further. I chose to replicate XN776 ‘Charlie’ an F2a from 19 Squadron based at RAF Gutersloh, Germany. This particular aircraft was very lucky to survive and to go on to being preserved in a Scottish museum. On the15th February 1974, the aircraft whilst being flown by Steve Gyles had the upper right cannon disintegrate and jam the rudder and aileron controls which very nearly forced Steve to eject from 'Charlie'. Steve however, stayed with the aircraft and made a safe recovery into Gutersloh. The improvements to the kit necessitated extending the fuselage by 5mm, reducing the profile and extending the length of the fuel tank, tapering the spine, correcting the profile of the rear fuselage, correcting the cockpit sides, correcting the undercarriage and numerous other smaller modifications. This project took around two years to complete (an off/on build!)14 points
-
Hello Everybody! After the "E", the "F" and the "G`" already presented, now its is the turn of the "D" version to continue my Phantom saga. For that Rhino I used the old Monogram kit, which was - and even after the Hasegawa relates - to my opinion, one of the best Phantom ever produced at that scale before the arrival of the FM series. The overall level of details is very good and impressive for such an ancestor, the cockpit is just stunning, you can even find the electric connectors on the AIM-9B of the kit! Shape and size obviously fit the plan, Monogram masters its subject but the downside is unfortunately the raised panel lines. Unlike Hasegawa, the kit comes with a full load of missiles and ECM pods and the little pilots are very convincing! Last but not least, the kit comes with the airbrakes and the belly louvres opened, which is not the case in the vast majority of recents kits at that scale, needing a painful surgery. This kit has a particular story as I bought it long time ago with the idea to do a "C" but, under the express order of my son, I built it OOB for him without too much work. Then - and after his permission - I decided to de-construct it completely, remove the old paint and start again with the surviving remains, not wanted to spend money in another pricey Hasegawa. I spent a lot of time engraving the panels, riveting the surface again and adding some extra works when it was needed (tail hot area with extra metal plates, dropped ailerons and obviously the intakes inner tunnels). For the cockpit, I used the original one enriched with some PE and wiring. In order to complicate a little bit the built, I opened the nose section to show the radar and the one upper panel on the left wing, using an old Verlinden kit. However, doing so I had to scratch build the whole radar blackboxes behind which were omitted by Verlinden (the radar is given in its stowed position). It took me quite a while to modify the radar antenna by adding the tiny IFF interrogator dipoles and the mechanism to extract the whole stuff from the inner fuselage. Adding details inside the radome was also an interesting challenge at that scale! I added an SUU-23 gun pod, but I modified the gun muzzle and fairing, as the kit and the Hasegawa ones are too simplistic. The missiles's fins are made from an aluminium can sheet. Color and markings: To please our British Modelers friends I chose a Phantom based at Lakenheath during the "good old days in East Anglia", belonging to the 48th TFW before the Aadvark era because I found few photos of some of their birds with an interesting variation of the traditional SEA scheme, the original FS 30219 Matt US Tan being replaced by a lighter color. XTRA Decals instruct to use FS 34201 (SAC Bomber Tan) but I was really not convinced by that tint at that scale, so I made my own mix (forgot the reference). Some patches of FS 30219 were still there, especially on the fin. I used the XTRA Decals X72072 sheet for some parts of the markings, the rest is home made as I wanted to represent 66-504, having a left and right photo profile. To finish, I made simple dio inspired by a photo but without figures (I'm far from being a pro in modeling figures) to put the model in situation. I used aftermarkets products (ladders and tool box from Brengun) and scratch built the rest for the accessories. Here are the photos, which quality is not tip top (sorry for that): The real Phantom: My model: the little dio: To conclude, if you have this kit, you can build it easily OOB and slightly sand the raised panels if you wish (not a concern at that scale) to have a fairly nice Phantom. Thank you for your patience reading this topic and enjoy the photos!11 points
-
Beautiful kit, went together with no problems. -Dan11 points
-
I do not like bi-planes! Too many wings, and the rigging is a stuff of nightmares!!! Then along comes ICM's superb Gladiator. I have always had a soft spot for this aeroplane, despite it being a bi-plane. An absolute joy to build with no fit issues at all! Everything went together perfectly. I used some aftermarket seatbelts, and the decals are from AIMS. The chequerboard on the top wing disintegrated when I tried to apply it, so I had to paint it on. For the overall aluminium dope finish I used Tamiya's flat aluminium. The rigging was done with flower arranging wire. It was pulled and stretched taught before being cut to length and superglued into place. Thanks for looking Angelo.11 points
-
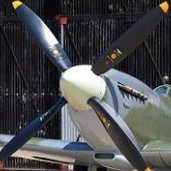
Just because you can never have too many Spitfires, while waiting for paint to dry on my triple Malta Spitfire builds, I started an ICM Spitfire Mk IXc from the movie 'Battle of Britain'. The ICM kit is no Eduards, but is fairly accurate in outline, (and is in the stash, anyhow). I started with the wings, removing the canons, canon bulges, and lots of filling, sanding, and rescribing. I also had to shorten the landing gear legs quite a bit, replace the inaccurate wheels, and reprofile the fat propeller blades. I filled the lower cockpit wing roots and added stringers, scratch built a throttle and landing gear control, and then turned to the ugly seat. it needed thinning, new sides, bottom and front, as well as a back pad. I'm using an Eduard's photo etch QR belt (this is 1969, after all), and also using a left over tubular exhaust from an Eduard's kit. I've got some paint on the interior, so close up can begin ... Oh yes, I also had to do something with the weird square spade grip! It's going to be open canopy, but with the access door closed, Robert Shaw's 'Rabbit leader' has a nice set of crosses across the door that I don't want to loose! Thanks for looking, Colin10 points
-
Over the Alps - an aerial diorama. Mirage IIIB, Swiss Air Force, Ueberwachungsgeschwader 16 and 17 Staffeln, Payerne, 1979 Build thread10 points
-
This is my second entry for the group build, I fancied doing one of the classic 1:32 car kits. When I checked the list of Matchbox kits I thought about revisiting the Jaguar SS100 or Mercedes-Benz SSK that I built when I was young, but I fancied the idea of building one of the kits that hadn't yet been part of the group build. The two subjects that held the most appeal were the Rolls-Royce Phantom and the Citroen 11 Legere. In real life I like the Citroen as a technological pioneer and for the low, sleek lines (particularly as in the coupe and roadster modelled here). Here's the box art, I found this kit on eBay described as complete and as new. Overview of the sprues, which certainly seem to be in great condition. Most of the body parts are moulded in black. Red for the floor, interior and engine. Rubber tyres with "Michelin X" and size markings moulded into the sidewalls and a tread pattern (is it authentic?). Lots of chrome parts; some make sense (e.g. the bumpers) and some don't (e.g. the suspension parts). The worst element is the glazing, which is full of mould marks and distortion. I may try cutting new glass out of clear plastic sheet. The kit can be built either as a coupe or roaster and the box art gives some nice inspiration for alternate colour schemes. It is also tempting to assemble the kit just in its multicolour plastic glory. You even get the option of having the bonnet open and a rear dicky-seat. Here's a quick overview of the instructions, for a small and fairly old model it is quite complex and detailed. The multi-part body looks like it might be a challenge to assemble and paint. My current thoughts are to go for the roadster version (better to show off the interior and dashboard), in a light colour for the body, or maybe a two-tone. I'll have a look at pictures of real Traction Avant roadsters for inspiration. I don't build many 1:32 scale cars (or 1:32 anything) but this looks like a step up in quality and detail from the 1:32 Airfix car kits that I've built. I hope you'll enjoy the build journey with me.9 points
-
Hello! I proudly present my 1:72 Bucc! It took just over a month to do and I'm very happy with the finish on it (brushpainted). I had lots of fun making this, it's a relatively easy model and the single colour fuselage really helps with build speed, one of my fastest models (although the fact that I had to self isolate for 10 days helped a lot with getting me time to build) Thanks for looking! Next RFI either F-15E or another JP T.49 points
-
The postman brought this today: I'll soon start a build thread with a look at the box contents, but I'm quite excited to have a go at this kit.9 points
-
Hi All, Some more good progress on the Stirling this afternoon. First activity was pre-shading - you can see from the photo below that I'd loaded up the airbrush with DE and started to spray the wingtip, before I realised I'd forgotten to pre-shade . Never mind - here's the job completed: Next I laid down mist coats of DE: Nice - pretty happy with how that's looking. There was a little Mid-Stone mixed into the top coat for tonal variation. I then masked up for the Dark Green, but forgot to take a photo of that stage, so here's the result: Very happy with that! In this final photo I've started to apply the masking for the Night (or Nato Black!). I decided to not rush to get it done, so that'll be all for a week or so as I'll be away for most of the weekend, Thanks for looking, Roger9 points
-
Dear Fellow modellers I offer for your pleasure my latest creation. The 1:32nd scale Trumpeter P47-D Thunderbolt kit as “Rozzie Geth II” aka “Miss Fire” flown by Col Frederick J Christensen as part of Zemke’s Wolfpack. A second lieutenant and captain in the Army Air Corps, he flew P-47 Thunderbolts with the 56th Fighter Group -- Colonel Hubert ''Hub" Zemke's Wolfpack This was a nice kit to make. Some problems with fitting but in the end it came together ok. Paints were a mix of AK and Hataka Redline. The cans, buckets and fuel drums are the Tamiya 1:35th scale sets. The invasion stripes were spray painted white and then masked and hand painted black to give a slightly ragged and hurriedly applied look. Weathering is my usual NMF approach, restrained with some panel line black. The decals were a pain mostly so i elected to use the minimum number. About the pilot - Frederick J Christensen Fred Christensen portrait (IWM American Air Museum) While in England, Christensen adopted a stray black cat and named it Sinbad. He is reputed to have taken Sinbad with him on missions, carrying him in the cockpit of his P-47 as both a good luck charm and inspiration to his fellow pilots, then bringing the cat to the United States as a pet in September 1944 after the end of his tour. UPDATE I managed to find some pictures, stills from a couple of British Pathe newsreel taken at RAF Boxted of Fred C and Sinbad. Also the only picture I could find for the inspiration for the name and nose art picture . It's not recorded what she felt about being displayed naked on a plane over Germany several times a week ! But the picture of her shows her enigmatic smile so maybe she approved! Rosamund Gethro..aka "Rozzie Geth" Sadly she died in 1978 before her time . She didn't marry Fred C Sinbad pictures One of my cats, Zoe playing the part of “ Sinbad”! Diorama I wanted to set this model in a diorama. My first serious attempt at this. I made up a few scratch built items from wood to detail the setting. Wheel chocks, an' A' frame for storage for drop tanks etc with red FIRE buckets. US Jerry cans and .50 Cal Ammo box. The setting is at RAF Boxted Station 150 sometime after D-Day 1944. I used both RAF Halesworth and RAF Metfield for field visits to get a sense of these hardstandings on the ground. I chose to make a representation of a Class A bomber station ‘Spectacle’ loop hardstanding and did a fair bit of research in to this. The base board was a piece of hardboard with grey and black primer spryed and some ancient railway grass scatter. I even used a piece of plastic from a Covid Testing kit as a drain inspection chamber cover! Anyway I hope enjoy and like what I’ve done .Critique and comments would be very welcome as always ! This was taken at RAF Halesworth of a Razorback on a hardstanding. This was my in part my inspiration for my diorama. I visited this place recently. The buildings are mostly still in existance as industrial units for small businesses. Miss Fire with Fred Christensen and his Ground Crew circa Sept 1944 Here's another WW2 pic of Miss Fire Thought I'd be a bit cheeky and take a shot of my previous build on he diorama base too.. My uncle Peters Tempest V.. I was also going to add some 1:48 scale Harrier Sidewinders to Miss Fire as a joke but maybe that's for another time 😂😂 anyway .. the diorama base works for the Tempest too I think... I hope you’ve enjoyed this RFI. Its taken about 3 months to get to this point. I’ve certainly enjoyed the build, the research and taking the pictures. Kind Regards, Andy8 points
-
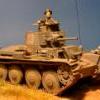
Gentlemen, thank you for the comments 👍👍 Today it's about the T54 again. After much deliberation, I have decided to use a different base for the scene. The reason for this is that the size of the building draws the eye and the tank, which is supposed to be the main character, does not really come into its own. The proportions do not feel right... The second problem was the figures. The figures from Dragon in combination with the one from Paracel are too different in terms of body size and also the details of the engraving - so they don't harmonise very well either. So I ordered another Paracel figure and thought up a new scene. It's rather simple, but it shows off the T54 much better. As always, the pictures show everything I've done in the last few weeks. Have fun! MD My 2nd and last figure from Paracel - WTF 17€! New arms from Dragon They can't be serious. Even the worst resin figures from the 80s weren't that bad. Better! Primer in Black-White Shadow from below in dark blue-brown (cold tone) Lights from above in light beige (warm tone) Basic flesh (my own mix from Tamiya). As you can see from the example of the head, with the right pre-shading most of the work is already done and you get beautiful contrasts. Basics in acrylics are done Now I still need a few bricks as rubble for the tank. As you can see, these are still quite new and totally unrealistic. This will change 😁 Plaster mixed with light grey paint... Turn like a schnitzel in the breadcrumbs 😋 Then work the nooks and crannies and you're done. A sign is needed as a height element for the scene. I have put together the design from various pictures and printed it. The frame. The concrete base coated with tile cement. Smooth a little.. Cheers! MD8 points
-
Been there, done that. And from YOUR plans Derek. Thank you!8 points
-
I only have one survivor from days of yore, this one was finished sometime in the mid-80s, IIRC. PK-303 Porsche 917-10 (and I'm fairly certain it was an original box, too). This afternoon, I dug it out of the box it had been thrown into 20 years ago when I left the marital home, stuck some bits back onto it (the rear view mirrors are missing, but may show up at some point), gave it a wash.... and now, for your entertainment here it is! Edit: I've got a feeling that there should be a small windscreen around the front, too. Hmm.8 points
-
Hi all, another ship finished for AMW a short while ago, this time it's Academy's 1/700th USS Missouri, finished in Measure 22 scheme as worn circa 1945. This was a nice, basic little model that benefitted greatly from some scratch building and super detailing as the kit parts were quite clunky and lacked fine definition. This was mainly done using a mixture of the kit supplied PE, Infini Models, USS Missouri/Iowa Brass Mast (and radar) set, White Ensign Models USN BB/CA catapults and Lion Roar US Navy WWII 'Cranes of Battleships' sets. The barrels for the main guns and secondary armament were replaced with brass items from the Master range and the Curtiss SC-1 Seahawks came courtesy of a Trumpeter pack. The model was finished using Lifecolor USN WWII sets 1 and 2, weathered with a combination of Abteilung502 oil paints and AK Naval washes and rigged using Uschi 'Fine' elasticated rigging line. All in all a reasonably quick and fun build with few problems to speak of. Hope you approve and thanks for looking. Cheers Melchie7 points
-
I have a few small builds to finish off and a fairly big conversion that needs to be done by June but to make sure I squeeze this in, I am throwing down a marker: PXL_20220126_174603392 by OutcastJoel, on Flickr It is the Dam Busters boxing and was a Christmas present from an awesome friend last year! I am planning to mount in a picture frame to give an effect like the photo below: LancasterRearCloser by OutcastJoel, on Flickr7 points
-
They'll need to put it in rice when it's pulled out of the water.7 points
-
I'm getting ready to start now, so I popped over to Cosford this morning to grab some close-up shots of their Victor.7 points
-
I've bought another kit for the Matchbox 50th anniversary group build. I'm a fan of the Citroen Traction and the coupé/roadster is a very stylish machine.7 points
-
I got the bit between my teeth last night and now have this beast : There are a whole load of unanswered questions - the answers I might incorporate or I might not. Fin flashes on both sides of the tail? That'll be tricky to do with the struts now in place but I might remove them and do the decal if there is any proof of this. Registration letter / numbers under the bottom wing? I expect so. The struts between the wings are now part yellow / part DE. I might repaint the wheel ones to be DE. Do I really want to run the vertical rigging wires between the wings? These are the ones I struggle at most. They just don't look neat and tidy. I now notice the outboard struts need to be yellow at the top. oops!7 points
-
It’s an update I wasn’t really planning!! I had planned to get the Growler along a bit further before I started this build…… but I wasted too much time on the Tomcat! So I started playing with a few bits and did a bit more research and before you know it plastic, and resin was flying everywhere! Ok I did my usual trick of building up modules, helps I think speed up the build, having built this one before ….almost! The cockpit/nose wheel well is together, the new resin radar scope is in place. Got too carried away here, glued it all together only to realize way later I needed to use part off another sprue!!! That’ll teach me, no harm, the differences a really minor, plus an extra cut out for one of the side panels. Must read/check instructions more often. Popped the inner wings together, fitted the new inner slats, the RH side didn’t fit 100% even after prior adjusting, and managed to get CA glue everywhere , extra unneeded clearing required. The outers fit perfectly; they’re just sitting there at the moment. These are the new resin outer wings, really nicely done. They have used 2 types of resin here, the softer grey, beautifully detailed, and a much harder cream resin. This give extra support for the control arms for the movable flying surface, very nicely thought out, and again the detailing is perfect. For the underside you get sections of adhesive plastic (I think) to replicate the strengthening plate/brace. I was reading that the IDF Phantoms did have additional strengthening sheets in this area, but I can’t find good photos that show them, and I don’t know how noticeable they were, so will leave this. The TISEO sensor is fitted, plus you can see the detail on the underside of a “Slatted” wing. The really nice thing with Zoukei-Mura kits, this one in particular is the huge amount of “extra” bit that come with it that are for future releases, good forward planning. You have pretty much all you need for the later models. At this stage in the Kurnass’s life Air to Air duties were taken over by other aircraft so they stopped carrying AIM-7’s. So various additional mounts/racks were made to use these spots for additional stores. In this case a single AIM-9D Sidewinder was fitted to the LH fwd Sparrow position. ZM gives you the base mount (2 actually) which was used to carry an ECM pod (IDF aircraft did use them in this position to). I have the missile, launch rail and fuselage mount, I just need to make the simple extension. As can be seen it’s very basic and will be simple to make. Same with the #2&8 pylons, they need to have flare/chaff dispensers fitted to the rear of these pylon, and low and behold they are there!! Nice one ZM! To fit the AGM-142, none shortened Mk.84’s and other long store on these pylons, they modified by making them longer. The black line on the kit part is about where I need to cut before adding a section. The reference book give me a good picture of how it’s meant to look. A bit of surgery and sanding and all will be good……I love this sort of stuff! Oh, and my Mk.84’s have shown up (among other things)…. got some great pictures of IDF F-4E’s with 4 of these beasts fitted! This build has gotten me so excited; I was worried there was going to be a lot of fiddley mod work required to convert this to the aircraft I need (thought it was a F-4E 2000), but it’s turning out to be a lot simpler than expects. Help enormously by this wonderful ZM model. Oh and the “office” it currently looks like a disaster area, bit everytime I look at it now it fills me with modelling joy! Oh and that green plant at the top (just see it) is a Hop’s vine, have 2 of them outside my window to remind me of beer…. As if I need reminding!7 points
-
Hi chaps and thanks for the comments. The canopy frame took about an hour to model for the initial pass, its a fairly simple set of solids and primitives all boolean-ed (combined together) plus being symmetrical you only need to model one half. After the initial modelling there was some tweaking required so about another hour. The longest part of the process was measuring the existing kit part to make sure the new part was close to fitting. Similar to the canopy frame, it is a set of solids and primitives boolean-ed. I modelled one tread block with enough depth to account for the curve of the modelled tyre profile and arrayed a set of five across the tyre, the two end blocks were cut in half. Four whole blocks were offset and all were adjusted for height above the tyre cross section profile to create the outer most curve. The whole lot were then polar arrayed around the wheel axis, the number iterations was adjusted until a suitable offset was achieved. It should be said that the models are nothing more than 3D sketches, most of it is seat of the pants stuff but as long as you make sure that you end up with a "closed solid polysurface" as rhino calls them the slicing software and the printer won't have any problem printing. Slow progress this weekend, painted and installed the pilot's seat and the steering assembly: Fuselage now ready to be closed up. Cheers, Mark.7 points
-
Hi All. I would like to fill another gap in the list with this . All parts present , decals suspect . Martin H6 points
-
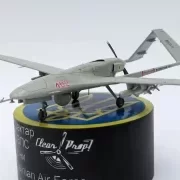
Hi all! Here is my completed Korean War F-51D. I came across a pic of a Mustang with these huge rockets and then found out that Brengun makes them in resin. I had to do it! I used kit decals, PE seatbelts, and painted with Mr Color Super Fine Siler 2 (great stuff!). My first attempt at going for a really war-weary appearance. Comments/critiques welcome! Thanks for looking! Rich6 points
-
As I was so rudely interrupted by a bout of covid 19 when attempting to get this project going it has taken a time to finish. It is of course the Airfix 48th scale Vampire and it was a joy to build. No major niggles , so another has appeared on my bench and is in the WIP location long with some momentous efforts of finger trouble by your`s truly. The other half of the DeHaviland duo and another gem from Airfix , their 48th Chipmunk . I had to model WK518 as it is in my log book and is still flying with the BBMF. I hope you like them. Comments welcome. Thank you for looking. Keith6 points
-
So today's update and I've been busy working on the wing halves plus the floor of the cockpit which on this kit is attached to the topside of the wings before the fuselage is finally fitted into position. Although very little if any of the internal wing work will be visible later on i still plan to weather and detail these parts slightly which I suppose is not really required but I don't mind that infact the total opposite i actually enjoy doing it 🙂. Like I say these parts will get some subtle weathering tomorrow and then I can close up the wings and move forward. Thanks for looking back soon 🙂👍. I'm also thinking about adding this chap to the build....what do you reckon 🤔6 points
-
To all those who wanted it blue, here it is in what is quite a shocking colour scheme (to me at least). This is going to take some weathering Be kind, some of these edges need tidying I know, hopefully I can make it decent and the weathering will help detract from the starkness of these imperfect contrasting lines, there is no-where to hide with this scheme and I'm rubbish at painting. First, I glazed the wheelhouse and added the clear-view screens, the rear locker assemblies, grab bars, the wheel (scratch-built in brass), light screens (rolled up, made in tissue), and then painted it Those lines across the torpedo troughs are a nightmare, should have added them to the decal set.. In the end I've added strips of 0.2mm thick perspex to provide an edge, this still needs more work as does the sheer line which is contrasting blue... Deck has had two caots but no varnish which will level it all up Rear of the wheelhouse showing wheel etc. The starboard side flag locker has its canvas cover (in tissue) the port side has some flags, also made of coloured tissue paper. Side seats in lime wood, grab rails in walnut. Note the masthead light now added but the mast still needs rigging of course. Hull scuttles still need glazing as do the various decklights and of course, the vickers tub is missing its guns, will add after painting the inner mount It's certainly distinctive, needs a lot of toning down... Cheers Steve6 points
-
Thanks Cliff, Yes, it is no a bad looking loco though the boiler is a bit large and heavy looking perhaps compared with some others. It is actually one of those that look better with smoke deflectors fitted to my mind - not all do. I suppose this is the "purest" of the common boiler shapes. Many had the Belpaire firebox fitted which resulted in the cab end of the boiler having a wider, flat topped fairing over it which broke up the line a bit, and of course GWR and LMS Stanier designed locos had a tapered boiler as well, but the Schools inherited the parallel round topped type from the Arthurs, rather than the flat topped Belpaire from the Nelsons. Anyway, enough lecturing - here is where I am at now. The kit wheel rims are too wide so the black paint is too prominent - should be about half that width but nothing much I can do. I left the cab roof off to make it easier to fit the windows. Neither the kits nor most of the Hornby etc steam locos came with glazing back then but a company called South Eastern Finecast brought out sets of inexpensive vac moulded sheets of windows for many locos and coaches which actually fit into the window spaces, looking much better that the normal sheet of clear plastic inside the bodywork.. I don't know if they are still going but they must have still been around when I bought these kits as I aquired 2 packs of their windows for the Schools, M7 and Battle of Britain loco. They are designed for the Triang-Hornby models and the square side windows are very slightly under size but look fine. The shaped ones for the windows at the front of the cab may be too small so I may have to revert to Krystal Kleer or something similar. Next up the valve gear, coupling and connecting rods etc, and that will be fun on past form. The instructions are not too good and I image I will have to drill out all the locating holes as they all seem too small on this kit - perhaps down to the age of the moulds. More as and when! Pete6 points
-
Update - not a lot to report, primed and painted the base colour for the cockpit. Decals for cockpit and make some seatbelts then I will button the fuselage up and attach to the wings, all looks nice and easy so far.6 points
-
Update from last weekend, works been manic this week so haven't had time to post anything till now. Managed to get a coat of primer on the model on Saturday and Sunday, As there's no easy way to hold the complete model and paint the whole thing in one go, I painted the upper surfaces first and gave it over night to dry, after which I replaced the masking tape on my vise with clean stuff and turned the model over carefully to paint the underside. it looks like its worked pretty well with no obvious seam between the two areas. I'll probably put at least one more coat of primer on, maybe two before any colours go down. Even if it is only primer, a coat of paint really brings everything together! Quite pleased with how its going so far6 points
-
I had a delivery today. The driver rolled up in this charming little vehicle, still in use in 1945, though rather rusty and battered. Lent to my Canadian Arty Regt by the Dorsetshire Regiment. He brought reinforcements for the diorama. I won't be using all of these but I think the Colonel and the mean looking one with the clipboard might find a place. All safely wrapped up until needed. I really like this way of organising them. The lower hull has had a few additions tonight and I stuck the insides in properly. Painting them before assembly would be possible but the benefits wouldn't be worth the hassle. Anything I can't paint after assembly wouldn't be very visible anyway. So far, anyway, though as I work my way up to the top of the internals there will be things I will want to paint before assembly, like the small arms and the big gun and of course, the figures. Other than that, I've been wheely busy again. (I'll do that joke for every Valentine in the series.😁) Clipped, cleaned, assembled, sanded and chipped. This is the kind of job only needs half of your brain and that really suits a film that only needs half of your attention. Tonight, for example, I've been enjoying Wonder Woman. (Ah, if only...)6 points
-
I continue. Fitting. Gluing. Result.6 points
-
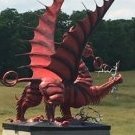
The short lived 'Golden Sunset' scheme was abandoned when it was found to trigger explosive bowel evacuation in the local seagull population. Looks like my meds are running low....6 points
-
More progress... installed the interior - seatbelts from thin strips of Tamiya tape coloured in with a permanent marker - instrument panel from a laser printed copy of a googled image of flightsim comanche cockpit. Who'd have thunk! - control wheels fabricated from a combo of drilled sprue, stretched sprue, 0.5mm styrene strip and bent fuse wire. Fiddly. That'll do - despite it being a bit of a glasshouse you can't really see that much inside - unless you get TOO close to the model. ie I've skipped rudder pedals (buried in the blackness under the dash) and control knobs etc (I can't see them which is all that matters from my perspective). You can better see in the pic below the 'tabs' I have running around the perimeter of the cockpit. This gives me a fertile glueing surface - whilst also shielding any view of the glue (unsightly glue is more important than rudder pedals...) Here's a dry fit of the fettled canopies - still with a bit of sanding dust on the inside (not a planned feature of the model). - canopies (and airframes) are marked "A" vs "B" as there are some subtle variances on the size of the canopy opening (and hence canopy size) - it's probably obvious, but once the windows are masked, I'll firstly be painting a coat of the interior ceiling/frame colour before any coats of the exterior colour. This'll give the desired effect. - perhaps I could have masked off the interior glass and painted from the inside - but not a big value add from my perspective. And here we are after using 5 minute epoxy to glue the canopies. A MAJOR milestone - always feels good getting to this stage as you can sort of see (or imagine) the finish line - canopies are roughly masked so I can keep my fat epoxy fingers off the bits that are supposed to stay clear. - really pleased that the epoxying has 'worked' - ie no unsightly squished glue visible on the inside and a nice tight fit all round (makes for easy blending) - back of shot has the obligatory cropdusters under way (for Zac!) - a 1/48 PZL LaLa-1 (AN-2 convesion) and a 1/48 Callair scratchbuild Next steps: - Blend in the canopies with Milliput - fit the horizontal tail surfaces (will do this after the vigorous canopy blending is complete - fit the tip tanks on the airframe with tip tanks - better get the control surfaces engraved - nearly overlooked that! - prep for masking, masking and PAINT!6 points
-
Hello all 🥳 Gentlemen thank you for your comments!! After a lot of work on several projects (T54 and Matchbox GB) at the same time, today a little update on the Austin. I had already cursed enough about the Mini Art plastic and am therefore glad to have finished the chassis. For all of you who are planning to build this kit, I have started to document all the difficulties-so only one person has to suffer 😁 I will put these tips online at the end of this project 🧐 The photos are described as always, so have fun! MD The frame is slightly warped, the floor brings more stability. I would like to show the wheels turned in. Therefore I have rebuilt the steering rods. I was surprised that this is not possible with such a detailed kit 🤔 Evergreen material is very usefull in this case I cut off the joints and used them again New stabiliser and brake linkage Ignition cable 0.2mm A horror to clean up, so just cut it off The assembly is ready for primer. Otherwise it will be difficult to reach all places later on. This is a better way to paint the engine 🤓 Mr. Surefacer 1500 In the meantime, other components are being prepared. This is about the wood grain. For the base a small piece of PE saw works very well. I did further more engravings with the Hobby Knife. Important with wooden floors are also some chipping for a used look. See you!6 points
-
Hello again! It's amazing what you find hiding in a lump of wood: beetles, fungus, or in this case, a 1/48 Hawker Siddeley Hawk T1 It took a bit of finding, but I think it turned out OK. For some reason I find propeller aircraft more satisfying, so this may be the only jet. Not sure. No WIP for this as its fairly tedious watching a piece of wood get turned into sawdust! Anyway, on with the photos Thanks for viewing; comments always welcome.5 points
-
Hi All, I've got the priming done. So, now to replace one shade of grey with two shades of grey - could be the title of my next novel. Dave.5 points
-
Masking off, tail band addressed and I’ve now got to this stage. That’s addressed all of the little niggles that I had - it’s now just time for the yellow leading edge stripes and then it’ll be gloss and decals over the next couple of evenings. Steve5 points
-
Hi. After successfully managing to aviod Covid-19 for two years, it has now caught up with us. 80% of the family are now sick with Covid since Monday evening, My daughter and wife are real sick with fever and everything. Myself and the youngest son are just sick with coughing ad runny noses. And the eldest son are still not infected. I'm not worse than I can sit at the building table glueing and painting the days away. And when you don't have to go to work, things at the building table happens real fast. I've done the cockpit for the F-16 023 by Bosse Persson, on Flickr 024 by Bosse Persson, on Flickr As well as the Harpoons. 025 by Bosse Persson, on Flickr 026 by Bosse Persson, on Flickr 027 by Bosse Persson, on Flickr And since the Kinetic kit comes with a bomb adapter that fits in the pylon I glued it to the missiles. 028 by Bosse Persson, on Flickr The air intake on this kit looked a lot better than the last two I've built. url=https://www.flickr.com/gp/156426495@N05/39C8x6][/url]029 by Bosse Persson, on Flickr Just two ejection pin marks that were easy sanded down. I'll be adding some sensor pods to the F-16, the kit comes with the older Pathfinder/Sharpshooter pods so I might as well use them. 030 by Bosse Persson, on Flickr And to keep me busy during the days I've been glueing, priming, painting and even gloss coating lots o fsubassemblies. 031 by Bosse Persson, on Flickr 032 by Bosse Persson, on Flickr 033 by Bosse Persson, on Flickr 034 by Bosse Persson, on Flickr 035 by Bosse Persson, on Flickr 036 by Bosse Persson, on Flickr The main gear bay on the F-2 has been painted fully so I've also glued in place in the bottom fuselage. 037 by Bosse Persson, on Flickr And thank God for home delivery pizza when you're sick. 038 by Bosse Persson, on Flickr To be continued..... /Bosse5 points
-
Is everyone sitting comfortably.... We are now on our 9th page of builds in this GB, congratulations everyone , keep them coming ! Cheers Pat5 points
-
The main parts of the IKEA turret are now together. I ignored the instructions here and glued the sides to the turret roof first as the larger mating surfaces help align everything much better than how the instructions want you to do it. It’s quite a nice little kit this and a nice change from the Dragon complexity of my last few builds. Sean5 points


This leaderboard is set to London/GMT+01:00