
Leaderboard


Popular Content
Showing content with the highest reputation on 23/12/21 in all areas
-
Hiya Folks, Well probably the last one for the year,.... but we`ll see! The new Airfix Vampire F.3 kit includes most of the parts needed to build an FB.5 or FB.9 too, apart from the wing tip light covers,...... so as I have wanted to make this 8 Sqn aircraft for some time,..... I used the decals from an Alleycat kit combined with Xtradecal to replicate WR259 with its large OC`s pennants on the rear booms. Here is the real aircraft; I enjoyed the build, but despite cramming in lead weight everywhere,.... including the wing tanks,.... it was still a tail sitter,.... so a section of clear sprue was used to prop it up! Here is the WIP, which was pretty painless,,,,,,, although the cockpit pod took some jiggling and some of the smaller flap parts were fiddly to locate,... that aide,.... this is an excellent kit; And here is the model; Cheers Tony31 points
-
This is Airfix's new Chipmunk. I have fond memories of this type from having my first flight experience in one of these as an air cadet! I still have my old logbook somewhere so I would dearly love to get another 'Chippie' to do as one I flew in. I built the aircraft out of the box, bar adding some Kitsworld Decal seatbelts. The Kitsworld set additionally came with 3D decals for the instrument panel but I omitted these on account of the actual panel being the wrong colour, some dodgy green, therefore I decided to stick with the 2D but more accurate kit decals. Overall the kit was nicely detailed but the kit was questionable in some areas, I found each assembly needed to be accurately put together as the tolerances weren't forgiving when coming to add on the next part or sub-assembly. The model was painted using all Tamiya acrylics, and the kit decals were employed too. The model was lightly weathered, mainly with oils, before finishing off with a semi-matt gloss from Tamiya. Here she is along with Airfix's Gnat in the same scale Many Thanks for looking, Angelo20 points
-
hello guys i want to show you my 262 night fighters i hope you liked18 points
-
This is as close as I think I can get to the correct camo pattern and markings for Sea Mosquito TW257 405/CW of 790 Squadron at Culdrose in 1949. I chose these markings based on photos of the late Lieutenant Commander Jim Summerlee who was a pilot in 790 squadron. They can be found here: https://www.naval-history.net/WXMemoirSummerleeJ1.htm. I know the font for the 405 code is a bit too chunky but this was the closest size of lettering I could find in yellow. In common with others on the squadron, she had her cannon troughs faired over and patched in a dark colour. There's no way I could tell what colour the patched areas were. Tonally it looked like EDSG so I used that but they may have been red or grey-green primer. Photos show her with different colour spinners. In one, they are probably Extra Dark Sea Grey but in another they are definitely glossy black. So that's what I used. This is the Airfix FB.VI/J.30 release. It contains the 4 blade props necessary for a Sea Mosquito. I added the arrestor hook, wing hinges and port fuselage strake from an old C Scale conversion set. The longer 'tropical' carb intakes are from Paragon. I was really lucky to find a set online but I see now that they aren't quite the right shape. They should sweep up more so the actual intakes are a bit closer to the bottom of the engine nacelle. The elevators were extended with plastic card. The reshaped nose cone is cut from a spare 1/32 Harrier drop tank and the radome is the front of a bomb from the spares box. The unique Sea Mosquito undercarriage is from an MBox Wellington coupled with MBox Mosquito mudguards and some plastic rod. The real thing has a web of tiny pipework at the foot of the u/c legs but I couldn't manage to reproduce it convincingly. The slightly smaller mainwheels are anonymous ones from the spares box. I also had to leave the canopy as provided by Airfix - the TR33 canopy actually had a bulged window on the starboard side. Apologies for my exhaust stains - another skill I need to work on! David17 points
-
HI everyone!🙂 this is my 1/24 hasegawa fairlady 240Z. I add some detail and change the wheels..the body color is mix by myself.. a very nice kit to build hope you guys like it!😀 and here is the video build if you are interested:🙂16 points
-
Having picked up a bit of an RAF Bug I decided to go rooting through the stash for my old Airfix Buccaneer. The kit was a gift from my Brother and much to my delight (or torture depending on how you look at it!) there were 2 whole kits in the box so I have a feeling an Early RN S.2 is on the books... This kit however was destined to be an RAF Brick from the outset. I used Pavla's nice little cockpit set to spruce up the interior and a lot of patience getting the rest to fit!! However, once victory was mine, I used Mr. Colour Acrylics to paint the aircraft, and employed pre-shading to vary the tone. Following this I mainly weathered with oils and picked out the details in Humbrol enamel. To finish the model off, I sprayed the aircraft in Xtracolour Enamel Matte Varnish in order to add to the weathered affect. Thanks for looking, Angelo15 points
-
hello guys i want to show you my p40n I hope you liked15 points
-
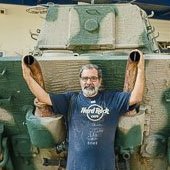
Taking a break from aircraft modelling, I thought I would have a go at armour. I chose the RFM Chally 2, just because I wanted something modern and I like all the TES add on's. A lovely kit, no issues putting it together, just like the experience of others that have built these. I used the MIG anti slip paste on the upper surfaces. Paint was Tamiya acrylics NATO green and NATO black. Weathered with dark dirt and grime Flory washes. Also used VMS EU brown earth pigments. All comments welcome. Rob.14 points
-
The plan and goal in developing the Boeing 757 was to replace the already ageing Boeing 727. The new plane type made its maiden flight in 1982 and during the next 12 years some 1.050 pieces of Boeing 757 were built in two different versions. In their fleet Finnair operated seven longer fuselage Boeing 757-200's powered by Pratt & Whitney 2000 engines. These planes were mainly used for chartered holiday flights and I also flew a couple of times with them to Madeira and to the Canary islands. The planes’ seating was normally very cramped and the Finnish holidaymakers gave the Boeing 757 the nasty nickname ”the guinea pig cage 🙂 I built the model from an excellent Authentic Airliners resin kit in 1/144 scale. There were no problems in assembling the model; only a bit of sanding and putty here and there was needed but nothing special worth mentioning. I bought decals for the the Finnair livery from Draw Decal and the cockpit window decals from Authentic Airliners. The corogard and stencil decals are from Flying decals. I painted the white areas of the model with Tamiya Fine surface primer coated with Tamiya gloss varnish spray TS-13. The gray areas in the wings and stabs were paint brushed with Xtracolor X150 (Canadian voodoo grey). I also used various Humbol and Vallejo paints for details.14 points
-
Hi All, Another new model from myself. This time that is the great collab product of Sir Frank Whittle and Gloster Aircraft which was destined to became the greatfather of all the British jet aircraft and with its centrifugal compressor engine heavily influenced aircraft industry across the world. The recently issued Clear Prop kit is a little marvel of injection kit industry. It's extremely well detailed out of the box, supplemented with some photoetch details for intake and undercarriage, The only my addition was a photoetch fret from Clear Prop too which helped to produce even more detailed cockpit and add some minor details into undercarriage bays. Despite kit's molding perfection - construction was not the simplest though as the fit is great but supertight. As soon as you miss fit by a fraction of a millimeter here and there - you start to accumulate gaps ending in not really well closing fuselage or wing not fitting well. Nevertheless after some careful dryfitting I think I was able to pull everything together in a nice way. The only handcrafted additions were the pitot tube from brass tube and metal wire and wire antenna from fishing line. Decals are from the kit. There are 4 options to model any of the two airframes: W4041 in three schemes as well as W4046. Decals worked perfectly. Very thin but at the same time very strong. Good adhesiveness. Not a lot of them but great quality helped to get the decals job done literally within an hour. Model was painted with Tamiya acrylics XF-81 and XF-82 for upper surfaces and Hobby Color H329 for yellow. Panel lines are highlighted with a pencil. Some weathering added to flaps and undersides. Finished with Tamiya satin clear. Lastly, here is a size comparison photo with Gloster Meteor: Feel the difference! And of course photoes of my collection of aircraft powered by centrifugal compressor engines. Kind of the the Father and the Sons: Hope you like this topic! Merry Christmas 🎅 and Happy Holidays to everyone! Kind regards, Dennis14 points
-
Hi, everyone! Most likely this is my last model in this year. Happy New Year and I hope it will be more successful for us. Link to folder with photos13 points
-
I built this from the old RugRatResins HS Andover kit and finished it with home made decals for an ETPS aircraft in the high-visibility Raspberry Ripple scheme. The nose boom was scratchbuilt from brass rod and getting the angles and lengths right took some working out. Thanks for looking. Steve12 points
-
Hi All and seasons greetings. Here is my latest completed model: Zvezda kit with 26Decals and Druz144 resin early RB211 engines. Merry Christmas 🎅12 points
-
Well,.... its all done and dusted,..... so another one finished for 2021!!,.... looks like I knocked the pitot while photographing it,.... ah well. And,.... despite all of the weight that I added,.... it was still a tail sitter! I`ll stick a RFI in later,..... Cheers Tony12 points
-
2021 - what a rubbish year. Good riddance to it! Events of 2021 really sapped my mojo and there were some modelling projects I really wanted to do at the start of the year that just didn't happen. Despite all that I'm really pleased with what I did get done this year. It started slowly - didn't finish anything until April - with the Norseman and Otter I built in the Australia and NZ group build: Then there was this Hercules - Minicraft 1/144 kit converted to an L100-20 using a Welsh Models vacform fuselage, and custom printed decals A couple of Skyhawks next - both Hasegawa 1/48 kits: Then things took a turn in a civvie direction, starting with this Revell Embraer 190 with Nazca decals for this Alliance Airways scheme commemorating the 100th anniversary of the RAAF: Rusair 1/144 Antonov An-10 - a nice little resin kit that has me wanting to seek out more Rusair kits: Next was my favourite build of the year. Zvezda 1/144 Il-76 converted to an Il-76LL engine testbed with a 3D-printed test engine and custom decals: Sticking with Russian airliners and testbeds, next was the Zvezda 1/144 Tu-154M with custom printed decals for the Gromov Flight Research Institute: And another Tu-154M in Guyana Airways colours (Classic Airlines decals): The F-RSIN Plastic Bristol Britannia was next. A bit of a tribute to my Dad, who passed away on July 3 and had given me this kit for Christmas a few years ago. He was quite excited at the time that I wanted to build a Britannia, and I wish I could have shown him the finished model. Eastern Express 1/144 Q400 in the unmistakeable FlyBe purple colours (the purple hasn't come out properly in the photo): Eastern Express Viscount 700, F-DCAL decals: Amodel Caravelle 10R: And finally - Roden C-133 Cargomaster: That makes 15 builds, with the C-133 just creeping in before the end of the year - despite everything this is the most I've managed since I was a teenager. Meanwhile I have some interesting plans for 2022 and a psychologist who's got me doing some "behavioural activation" which involves deliberately setting aside time for modelling at certain set times each week, so I'd better do as I'm told! merry Xmas and happy new year to everyone on BM Julian11 points
-
This is my first attempt at vehicle models. It's the Aoshima Beemax Celica group A rally car. It's the Australia rally version, but I got after market decals to do Carlos Sainz's 1989 Lombard RAC rally entry. I also got the detail pack, but in the end didn't use much of it. The kit went together pretty straight forward, no issues. All comments welcome. Rob.11 points
-
I hope you liked11 points
-
All done! Just a quick once over with the airbrush (mainly for the wheels and the too shiny air horns) and next stop is the gallery 🙂 I really like this one, thanks for following along and commenting, much appreciated.11 points
-
Me no drillin' no holes! I've got the Ginter volume and it has some nice layout drawings. The center of the astrodome is 14 feet from the center of the rear top turret - which puts it right in line with the leading edge of the wing and, as you say, aft of the front top turret. Plus, I have photos of Ol' Blunderbuss that shows this location. By the way, I took the lazy way out. I painted a flat black circle where the astrodome should be, and will glue the dome right on top of it. Looks good to me! If I had drilled a hole, it would be a black hole anyway...here is the "Black Spot" courtesy of Pew at the Admiral Benbow Inn: And the framework for one of the bubbles - this covers the rather ill defined vacuform frames. The clear bubble has been glued to the trunnion ring, and will be blended in with my spot glazing putty. I still have to add the trunnions back onto each end of the ring. I should get to that tomorrow, I hope, although my son and his family are heading up from Maryland, then the festivities will get in the way of modelling for a few days. But that's OK, family is more important. Cheers, Bill11 points
-
This is Airfix's Gnat which I purchased soon after finishing my Chipmunk (Found Here on RFI) and getting a taste for the training scheme. Overall this aircraft is a lovely kit, and went together nicely. The detail out of the box is superb and thus I kept this to an out of the box build for the most part. I painted her using Tamiya Acrylics, followed by a weathering down lightly using mainly oil paints. Finishing up, I went in with a Tamiya Semi-Gloss Varnish. Overall I highly enjoyed this build, and the Gnat makes a nice little stable mate for my Chippie, which may form part of what seems to be a collection of RAF trainers if I can get my hands on a Hawk! Many thanks for looking, Angelo10 points
-
This is 1/32 Hasegawa P-40N Warhawk with the markings of 'Geronimo' 45th Fighter Squadron on Nanumea Airfield, Ellice Islands, Dec 1943. Modifications are; Eduard instrument panel and seat belts Eduard exhausts Paints : Gunze Sangyo and Tamiya acrylics. Customized Nose art is from CustomHobby Decals (www. customhobbydecals.com) Happy Modelling10 points
-
Thanks for watching !!9 points
-
Hi, My fourth machine of Regia Aeronautica from Italian invasion on Abyssinia in 1935-36. This is Caproni Ca. 111 C belonging to 65 Sq. RA. This was a second main derivative of Caproni high-wing colonial bomber/transport machines, next to three engine Caproni Ca 101 . The Ca 111 had single Isotta Fraschini Asso 18 cylinders W engine. It was used also as strategic recce machine due to relatively long range. More on this type here https://en.wikipedia.org/wiki/Caproni_Ca.111 The kit is Broplan "advanced vacu" (with injected small parts), very nice kit, athough not well detailed regarding undersurfaces. I started construct it within "Nothing but injected" GB, however did not manage to finish on time. Some record of work is here: Here is the result: And my shelf (the top one) with machines from Ilaian invasion on Abyssinia, from left Fiat CR 20, Caproni Ca 101, Capronie Ca 111, Romeo Ro 1 and Ethiopian Farman 192: This is mine #20 in this year, very likely this is the final score (still it is possible +1...) Comments welcome Regards Jerzy-Wojtek9 points
-
Talking of mistletoe, I overheard the other day a guy say to a lady. 'Would you kiss me under the mistletoe?" Her reply was, 'not even under general anaesthetic!" To all here watching Martins build. A very merry festive season. Colin9 points
-
Hello and welcome to my next "Work in Progress", a build of Academy's British Army AH-64D. I've not built a helicopter before and I decided it was time to put that right! Having spent the last 10 months working on Eduard's Coastal Command Liberator I wanted something smaller and, dare I say it, more out of the box which I should be able to get done in a month or two. First impressions of the kit are really good - the instructions are clear and the bits I have dry fitted so far seem to go together without much hassle. As is traditional I've started with the cockpit and it looks great with nice detailed control panels and consoles - no need for any aftermarket etch here! The only thing I've updated so far are the seats. These will be quite visible under the canopy and I've spruced them up a bit with some milliput cushions, embossed with a cotton cloth, and foil belts, here's the before and after: Then all the various bits and pieces got a shot of tamiya rubber black followed by a slightly lighter highlighting coat: I painted the cushions by hand with a dark grey, applied the plain green decals for the screens, gave everything a drybrush with another shade of grey and finally picked out the buttons and switches with a fine brush: It's nothing special but it's got a certain "pop" and I'm really pleased to have finished off a cockpit in a few hours for once! Hopefully this one should come together quite quickly, any tips or things to watch out for would be greatly appreciated! Thanks for dropping by, Sam8 points
-
Laat year F-RSIN released the L-14 at 1:144 scale and I couldn't pass it up! I use 12 passengers as a minimum for the models I make, so this aircraft is really on the edge for me. The L-14 is a further development of the L-10 Electra (which KLM also flew) and had room for 12 passengers. The first flight was on July 29, 1937. The L-14 was also known as the Super Electra, Electra Senior and Sky Zephyr, but was ultimately mainly referred to by the type number. The L-14 had a deep elliptical fuselage, compound taper on the trailing edges, twin fins and rudders, and retractable landing gear. Unlike the L-10, the L-14 was a mid-wing monoplane and Fowler trailing-edge area increasing flaps. The L-14 was available in a number of variants, the main difference being the type of engines (Pratt & Whitney Hornets and Wright Cyclones were the options in the original configuration). Lockheed built a total of 112 (civilian) aircraft. The L-14 was further developed into the L-18, which had a longer fuselage and modified wings, but was otherwise similar to the L-14). Northwest Airlines was the first to introduce the L-14 on the Twin Cities-Chicago route on October 1937. KLM was the first non-American airline to purchase the aircraft in 1938. A total of six aircraft were purchased (four of wich for the West Indies). The model kit is fun to make, but really small (about 10cm in lenght). The antennas and the cockpit and window decals are made by me. The wire antennas are once again made from a hair from my girlfriend. The original decals provided with the kit were missing the KLM logo's, but Laurent from F-RSIN was kind enough to send me a new and correct decal sheet. At any rate, a few pictures: My next build will be the Authentic Airliners Convair 440, also in KLM colours. Thanks for reading and see you next time!8 points
-
As part of the new Series 2-1 "Grounds for Divorce' range? Others would include a 'Vulcan scramble' with four kits in the box, and the TSR2, which is the most expensive, but you only get two in the box.8 points
-
Cripes. I don't usually have my house thermostat set that high, let alone the garage. Telling the missus that the heating bills will also increase is not likely to be a winning argument. Anyways. Without fully committing to the idea I've plodded on - inbetween the pre-christmas distractions - with the seperate windscreen framing concept. Painted the outside: And the inside: And here they sit - waiting to see whether they'll fix neatly enough to the PETG windscreens to pass muster. And - I've still got some work to do before I can get back to the bench and try it out.8 points
-
I've spent the last few sessions on upgrading or replacing some of the smaller details. Unfortunately, after spending a few hours making tool clasps and brackets from strips of thin brass sheet I discovered, from period photos, that these early Cents didn't seem to carry any tools, at least not on the track guards. So I then spent time having to fill in holes where AFV would have you place them. The kit exhausts were drilled out and plastic strip was glued in to represent the supports/baffles. The AFV gun cradle seemed oversize so I scratched another one from plastic card. There were a few weld beads to add here and there and some metal plate edges were thinned down to give an illusion of scale thickness. I was going to use the Accurate Armour Bazooka plates but they are drilled for the grab handles and have the later attaching method so rather than filling the holes I decided to use the kit ones which once thinned down a bit are just fine. I did notice the way the plates are attached on the museum tank seem to be the later method and differed to period photos so I assume the Bovington tank has been altered at some point in its life. I managed to mess up the Accurate Armour towing cables by cutting them to short but it was the length suggested in the instructions, I guess they forgot it has an extended hull. That's pretty much it for the building stage. Next step will be to strip it down and give it a good clean ready for the painting stages. Wayne8 points
-
Hiya, Again, working for the NHS mid-pandemic has its drawbacks, especially when trying to finish an apprenticeship whilst working frontline in the ambulance service!! Nonetheless I've managed to get 2 off the bench! Tamiya's 1/35 Cromwell with Blackdog Upgrades and Miniart Tankrider Figures Eduard's 1/48 P-51D out of the box Thanks for looking guys! Have a Healthy and Happy Christmas Sam7 points
-
Not quite shake & bake but quite pleasing for all that. The joining of the upper & lower fuselage/wing halves was quite trying, a bit of filler around the intakes & I don't see how the windscreen fits without shaving a bit of material off the base of the gunsight! A tail sitter & as I didn't have any depleted uranium lying around I used lead fishing weights but sadly it was impossible to squeeze in enough to keep it on it's nose wheel! I built it as an FB5, using the expended undercarriage legs & flat wing tips (the kit includes a pair of the latter but tbf I found them a bit too thin so I attached the rounded F3 tips, then cut & sanded them to shape before adding the clear navigation lights from the kit). Decals from an old Xtradecal sheet for 20 squadron. I dropped the flaps & opened the air brakes which may not be commonly seen on the ground but the Vampire is quite a clean airframe & I simply wanted to add a bit of visual interest! Certainly looks nice when completed.7 points
-
Interesting new twist... people registering their disappointment BEFORE the announcement!7 points
-
Yes, may I just add my best wishes to everyone for a very merry festive season......we tend to have a bit of a blow out here at Melchett Towers (dependant on the prevailing conditions) and fully intend to, this year. Nothing wrong with feeling otherwise but we plan on making the most of it, gives Lady M a reason to live...besides it also gives the surfs a little hope, I always let them have a decent head-start on the Boxing Day peasant/turkey shoot, plus they get to keep the Christmas turkey scraps....(but only after Baldrick's rifled through em for anything 'useful'). Already got them sorted....7 points
-
If Airfix are going to honour the 40th anniversary of the Falklands War then I hope they do a commemorative Black Buck boxing complete with two Vulcans and eleven Victors…7 points
-
Whoa boy...I started in January and didn't finish until October of 2021. This is built from the Sword kit, and it was a fight from start to finish. Like any short-run kit, the parts were clunky, and imprecise. Fit was mediocre at best, and a lot of details were missing. The clear parts are very thick and fit especially poorly. What really made the whole experience unnecessarily frustrating were the poor instructions. Not only were they vague on where smaller parts should fit, they also had contradictory directions on landing gear doors (they want you to fit both kinds that are in the box, at the same time), and allude to details which are not part of the kit (e.g., drop tank sway braces). Its as if the left hand didn't know what the right hand was doing, as the kit was being manufactured. Disappointing as the kit and the project were, I'm happy I pushed through, as the final product is hideous and cool, and now I can say I successfully finished a short run kit.6 points
-
The photos aren't nothing special because this thing is way to big for my improvised photo box. Stay well. Cheers LM6 points
-
This was an enjoyable reboxed version of Eduard Hawker Tempest MkV as one of their limited editions. As I was going to do Sqn Ldr Roland Beaumont's aircraft it was fitting to also build Tamiya's sublime V, which Beaumont became a multiple ace in 'killing over 30 V1's in this particular aircraft. And side by side side with its older brother the Hawker Typhoon MkIb6 points
-
Hiya Folks,..... I started this one a week or so ago but have only just decided to run it as a WIP,......., so here is the kit; Here is a good article from Airfix Magazine showing the sprues and decal options etc; https://www.keymodelworld.com/article/airfix-148-de-havilland-vampire-f3 With one of the photos of the sprues here,.... it is a lovely looking kit; And here are the decal options; I really like the Canadian option and having already started another kit,..... I may just go for that one,........ although I do like this 32 Sqn F.3,... which I may do if I can find some suitable code letters; But I digress,...... as I am building this first model as an FB.9 of 8 Sqn,..... and would like to go for this aircraft, the CO`s personal Vampire; ,........ I do have decals for this from the Alley Cat kit,.... but the colours of the squadron bars are incorrect; They should be like this, from an old Modeldecal sheet, from top to bottom,....., yellow blue and red Thankfully I have a new Xtradecal sheet which includes the correct bars,..... although the yellow is not as bright,..... but they will do. So, on with construction; A nice fresh brew ready,..... and after pre painting the interior black and the intakes silver, the floor and rear bulkhead were put in situ along with the jetpipe and intakes with lead airgun pellets used for weight added too. The booms were built and set to one side, as were the wheels; Cockpit complete the upper and lower halves were joined and the tail booms ready to fit too; And the main airframe is now together. The cockpit pod can be hard to close together if everything inside isn`t lined up properly and I had to push the cockpit floor down as it had risen up. Once this was done the upper and lower parts closed together well and although the seam line looks like it might be untidy, with a bit of sanding it soon become flush. I do like the way that Airfix have broken down the kit ; Thankfully, as well as the longer wing tips of the F.3 variant, the kit does also include parts on the sprue for an FB.5 and the FB.9 which I want to do,..... these include clipped wing tip parts (parts 15 & 16) that both of these later variants had and the longer air intake trunking for the right jet intake which was seen on some updated FB.5`s and all FB.9`s which housed an air conditioning unit to help keep the cockpit cool in hot environments. These would be added to this basic airframe next; First the seams were given some filler just to help smooth them out and the model was sanded, including the wing fuel tanks; Now,.... a jump forward,... the model is painted, receiving a few coats of Tamiya Bare Metal Silver from a rattle can... I did take some progress pics but they were spoiled,.... my camera or memory card is playing up and sometimes overlaps a number of photos onto one image,..... very strange; There is a panel on the side of the nose on the right side, just in front of the air intake and I only noticed it after painting,.....I`m not actually sure that it appeared on RAF aircraft, especially the FB.9,.... so I need to check further to see if it needs filling in on my 2nd model; After this, the model received a brushed on coat of Humbrol enamel gloss varnish ready for the decals and it looks rather sleek! Cheers for now, Tony6 points
-
Aldi special Airfix kit bought December 2020, finally got to the top of the pile. Nothing special about it really, but there were (as ever!) some learnings along the way. Firstly, you can use methylated spirits to remove acrylic paint. I initially attempted to brush paint the red over a white Tamiya primer, it became clear after the second coat that was going to be a long and arduous road so decided to get a rattle can instead. Don't ask why that wasn't my first port of call! Before spraying, though, I wanted to get rid of what I'd painted. Tried Mr Muscle oven cleaner but that didn't touch it - but a £2 bottle of meths from Screwfix did the job perfectly. I now have a can of Mr Muscle that I have no idea what to do with - I won't be asking the good lady wife for advice 🤣 The finish from the rattle can of Humbrol 19 is lovely, the red is so deep and vibrant, if I was trying to do that with a brush I'd probably still be at it! One small issue I did have was that the white primer showed up on the edges of the red when I removed the masking from the canopy. Not great as its really obvious given the contrast with the red. Not entirely sure how that happened. Also - the recommended 2.5g of nose weight is not quite enough (or, my scales are rubbish!). She's ever so slightly tail heavy so I need a small blob of blu tack under the nosewheel. Thought about trying to get some blu tack inside the cockpit but there's not enough room, and it'd probably look rubbish. Lesson there - fill the nose with as much as you can! I was a bit worried about the red background on the Central Flying School titles not matching the paint, but I don't think its meant to. Saw at least one picture online where it didn't. Really happy with the glossy finish from the Pledge as well - looks the biz. I've chosen not to weather her - she's a display bird so going to assume she was kept in top notch condition. Anyway - on with the pics. Next up is, I think, a Sword Gannet AEW.3. Feel like that's going to be an entirely different kettle of fish! Al.6 points
-
Might do Mark. But the main canopy will be hinged to the side so doesn't have the same blending in issues... Cyano G. Like this.... Dry fit. Promising. The whole purpose of it is to give me a strip of plastic to fill/sand etc. to make the blending of the windscreen into the fuselage easier than it would be with just the PETG moulding. I should have dry fitted the coamings underneath - they'd have looked better then6 points
-
In lieu of "Christmas" greetings this year, I am advised by the legal department to post this message instead: Please accept with no obligation, implied or implicit, my best wishes for an environmentally conscious, socially responsible, low-stress, non-addictive, gender-neutral celebration of the winter solstice holiday, practiced within the most enjoyable traditions of the religious persuasion of your choice, or secular practices of your choice, with respect for the religious/secular persuasion and/or traditions of others, or their choice not to practice religious or secular traditions at all. I also wish you a fiscally successful, personally fulfilling and medically uncomplicated recognition of the onset of the generally accepted calendar year 2022, but not without due respect for the calendars of choice of other cultures whose contributions to society have helped make America great, neither to imply that America is necessarily greater than any other country nor the only "America" in the Western Hemisphere. Also, this wish is made without regard to the race, creed, color, age, physical ability, religious faith or sexual preference of the wishee(s). IMPORTANT: This message is intended for the use of the individual addressee(s) named above and may contain information that is confidential, privileged or unsuitable for overly sensitive persons with low self-esteem, no sense of humor, or irrational religious beliefs. If you are not the intended recipient, any dissemination, distribution or copying of this message is not authorized (either explicitly or implicitly) and constitutes an irritating social faux pas. Unless the word “absquatulation” has been used in its correct context somewhere other than in this warning, it does not have any legal or grammatical use and may be ignored. No animals were harmed in the transmission of this message, although the Yorkshire terrier next door is living on borrowed time, let me tell you! Those of you with an overwhelming fear of the unknown will be gratified to learn that there is no hidden message revealed by reading this warning backwards, so just ignore that Alert Notice from Microsoft; however, by wearing a tinfoil hat and pouring a complete circle of salt around yourself and your computer you can ensure that no harm befalls you and your pets. If you have received this message in error, please add some nutmeg and egg whites and place it in a warm oven for 40 minutes. Whisk briefly and let it stand for 2 hours before icing. Close cover before striking.6 points
-
"Think I heard rummaging in the kitchen..... should go take a look ..... just have to open my eyes but takes too much effort .... zzzzzzz"6 points
-
This is Revell's 1/32nd scale Opel GT snap-together kit, a new release in 1970. The kit reflects the moulds age with serious mould lines down the sides, andd a major step in the right front wing which needed filling as well, and it has few parts as it is a snap-together. It's a kerb-side with no real engine sump detail underneath so the underside is just painted matt black and left as-is. Let's be honest, unless you're a mechanic or do your own vehicle maintenance you never really look under a car anyway so I have treated the kit the same! It is a representation of the GT-J model, hence the black trim and the simple 'GT' on the wings. The GT-J wheels are more basic as well, but I have used the kit wheels in the style of the GT-J wheels. The front spotlights are just painted as they are moulded with the front grille and bumper, and I am pleasantly surprised how well they turned out. Scratch bits - Gear shift lever and handbrake; neither are provided in the kit. Registration plates. Aerial from a paint brush bristle and a couple of scap bits for the base. Exhausts from brass tube. Extras - Bullet wing-mirrors, reversing light and registration plate numbers and letter decals from Moto-Bitz (brilliant supplier). Paint - Zero Paints Bright Red ZP-1003 and 2-Pack Diamond Finish Clearcoat. Black paints of various shades from Mr Color. Chrome - Moltow pen for the wheel chrome and the door handles, Bare Metal Foil for the window trim and and the exhausts. This was built for a chap I used to work with who owns a real one, and he doesn't know I have built this for him so I hope he likes it when I drop it over to him.6 points
-
Here’s my interpretation of the Boulton Paul Defiant Mk. I, N1801, “Coimbatore II”, from No.264 Squadron, Royal Air Force Duxford, flown by Flying Officer F. D. Hughes and Sergeant F. Gash (gunner). This is another excellent 1/48 kit by Airfix, built entirely out of the box, with a few exceptions; I added a pilot (no gunner, I’m afraid) and antenna wire, plus applied riveting to the surface to liven up the monochrome night fighter scheme. I also used Montex masks so I could weather the roundels, squadron codes etc.: they were good for this job but horrible for transparencies, peeling away almost instantly. I wanted the challenge of painting entirely in shades of black, hoping I could create enough variety to make something visually satisfying. Many of the images I used as reference indicate the night black paint the RAF used would chip and fade dramatically, and I imagine the color shifts would be similarly dramatic. Not sure I made that as clear as I hoped, but it was fun to use every chipping technique I could think of to convey the beating these poor, doomed aircraft went through. I used Mission Model paints over a coat of Tamiya lacquer silver, layering greys up to Nato black (with additional colours), chipping through to the layer beneath each time. Although Airfix might not achieve the miraculous engineering of Tamiya or the erudite detailing of Eduard, each kit I’ve built falls together with predictable ease and makes a satisfying canvas to paint on, which is where modeling comes alive for me. Thanks for your time!6 points
-
Puttied up the seams yesterday and sanded them down this morning...donlt worry...I'll take care of that bit behind the cockpit. Figured I'd move along to this... So I did. I'll have to smooth the edges around the nozzles and fill the narrow gaps in the wing roots. Nothing too dramatic. Looking ahead... After a very slight clean up, they popped right into place. I'll have to fill some gaps. --John6 points
-
Does that open up the possibility of posing it on the stand with the gear halfway through a closing cycle, as though the aircraft has just taken off and is busy cleaning up? The pilotless cockpits break that illusion a bit, but I suppose to indicate how incredibly fast the Blackbird is, a couple of random 1/48 pilots could be posed behind the aircraft sitting on their butts on the ground wondering where their ride went, Wile E. Coyote style6 points
-
It's interesting to see how the floats blend in to the background with a black and white image, particularly with the light falling on different angles. If I hadn't seen the RCN colour photos, and found a written description, I would never have twigged to them.6 points
-
Another update today (duplicate of KUTA posting). Since the weather has turned nasty and any spray painting has entered the holding pattern I got the next couple steps of this build done. Ailerons & flaps were assembled and installed. Pictures show these aircraft were typically flaps up and ailerons drooped when parked, so that is the route I decided to go with. Options are provided in the kit to position both flaps & ailerons in the up or down position. Pretty slick. The flaps were very snug to try to finagle into position, but a slight taper trim to the alignment tabs allowed me just enough additional angle to slide them in w/o sacrificing too much strength of the tabs. Outer wings were assembled and installed. Elevators were clipped off the trees, cleaned up, and reinforcement plates added. They were then slid into the slots with no glue, as this will allow me to pull them back out for painting at a later stage. Another note to the elevators, multiple angles are provided in the kit. I opted for the mild tail edge droop. With a bit of luck this one may be seeing paint by the end of the year.6 points
-
This was the best place I could think of to put this; I hope those of you who see it will enjoy it, and I hope Julien leaves it in place...this time! A Modelers Night Before Christmas, 2021 (with apologies to Clement Clark Moore) T'was the night before Christmas, and as quiet as could be, I was sneaking new kits in so the Missus wouldn't beat the stuffing out of me! The stockings were all hung on the mantle for inspection Awaiting some new-tools, or at least some resin corrections. The children were nestled all snug in their beds, While visions of new Arma Hobby releases danced in their heads. When up on the rooftop there arose such a clatter That I sprang out of my bed to see what was the matter! When, what to my wondering eyes should ,appear, But a big silver Zeppelin pulled by eight bare metal tiny reindeer! With a little old driver wearing a camo'd Covid mask' I knew it was our dear Martian- I didn't have to ask! More rapid than a Hunter, his coursers they came, And he whistled and shouted and called them by name: Now CC. now Navy Bird, now Sky Keg, now Courageous; Now Redboost, now Ridgerunner! (Whose builds are outrageous!) As I drew in my head and was turning around, Down the chimney came our dear Martian with a bound. He was dressed in an old flight suit from his head to his toes, With a sleeve for each tentacle: (You know how THAT goes!) He spoke not a word, but to my surprise, He filled all the stockings with new kits and supplies! And laying an airbrush aside of his nose, He holstered his blurglecruncheon, and up the chimney he rose! He sprang back into his airship and gave his team a shrill tweet And away they all flew like a Tornado in reheat! And I heard him exclaim ere he chandelled out of sight- "Merry Christmas to all- and stay Covid-free this night!" On a serious note- to all my new and old friends, and styrene surgeons from around the world who hang out here on Britmodeller, sharing their references, techniques modeling projects, and last but not least, their fellowship and humor, I wish each of you a safe, healthy, and happy holiday season-may we all enjoy a safer, healthier, and more joyous New Year in 2022! Mike6 points
-
Surviving FW 190Ds are rare, unlike the radial engined FW 190As which are well represented in European museums. I did get to see and photograph the only surviving FW 190D-13 in Flying Heritage & Combat Armor Museum which was founded by Paul Allen. A set of my FW 190D-13 photos can be downloaded - for personal use or for illustrating something in this thread only. If you want to publish them elsewhere, please get in touch with me first There are 40 large pictures making up a total of 325Mb, so I won`t recommend downloading to a mobile. Som pictures show other aircraft as well besides FW 190D-13 836017, I just left them in the set for no other reason that I could not be bothered to remove them... Download link for a week: https://wetransfer.com/downloads/682e5ccdca97d6780562a105878841cf20211222095703/788df21fbd2de55bdc1e41bb49028f3d20211222095954/93805c Consider it a slightly early Christmas present to the users of this forum.6 points


.thumb.jpg.d3635a7ef6507d35f372dd09671fe96f.jpg)


This leaderboard is set to London/GMT+01:00