
Leaderboard


Popular Content
Showing content with the highest reputation on 14/12/21 in all areas
-
In 2015, that is two years BEFORE 😡 the ICM put the new (beautiful) mold of the Dornier 215 on the market, I decided to make one, but given the horrible fuselage of the ICM kit, I decided to 'combine' only the ICM wings with the fuselage and the tailplanes of a Do17 Z Airfix. Work not easy but not impossible, as you can see from the photos (Of course, if you have the new '215, from 2017, the problem does not arise, as the new ICM mold is very good). Here some images of my Dornier 215 B-4, belonging to 1.(F)/AGr.124, based at Stavanger, sommer 1940. The nose decal is self-printed. Colours are mixes of Humbrol enamels. Hope you enjoy, thanks for looking. Giampiero Piva46 points
-
Greetings Friends! Here is my latest model completion... The HK Models 1/48 B-17F Memphis Belle... What a kit! It took me full time 3 weeks to build this! I had 2 weeks off between jobs which helped! This is basically OOB with the only changes being the excellent Eduard 'Look' Instrument panel and pilot seat belts. The other change related to decals. The Kit comes with excellent Memphis Belle decals by cartograph. However, the insignias are not properly drawn. The Star was not symmetrical! I substituted kits world Insignia and used the rest of the excellent stencil kit they sell for B-17F's. Otherwise kit decals were great! I attempted to paint it like it appeared in the US Bond drive where there are many photos of all angles of the Belle. The appearance changed a little, and at some point the ship got a repainted or new vertical fin. There are some airframe patches around the plane that I tried to replicate. The paint is Gunsie Mr. Color, Olive Drab C12 and Dark Green C302. The Underside Grey is Testor's Model Master AMC Grey. I hope you like it and leave comments... Hope you guys try and tackle a B-17 in 1/48! Last one I did was the Monogram in the 1970's! It's like a rite of passage for a modeller! I found out after it was done, that it doesn't fit in my display case! I will have to get a new bigger case for this one!25 points
-
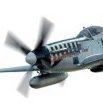
Hello everyone, Here's my take on Reggiane Re.2005 Sagittario. This was one of the three late WW2, Serie 5 Italian fighters, built around Daimler-Benz DB 605 engine. Only 48 were produced, and they took part in the defense of Naples, Rome and Sicily. Due to the powerful engine and large wings, Re.2005 excelled at high altitude. However, the complexity of the Re.2005 design, small dimensions and very high production costs (it was the most expensive Italian WW2 fighter to produce), led to the Fiat G.55, to be selected as a superior choice for mass production. These three Serie 5 fighters were basically my entry into aircraft modeling and with Sagittario, I finished all three of them. I find all three of them very fascinating machines, but I like Sagittario the most. I find it to be a beautiful aircraft. Kit itself, Sword No. SW 48010 is quite nice. Not much details I would say, although I haven't build many aircraft kits, so not much to compare. There were some minor fit issues, but nothing dramatic. The only AM parts I used was CMK Supercharger Air Intake. It is painted with Gunze Mr.Color lacquers, mix that should look like Verde Oliva Scuro 2 and Grigio Azzurro Chiaro. Not sure if it does. I am quite inexperienced with aircraft weathering, so I kept it at minimum, although I tried to avoid factory fresh finish, Unfortunately there are no Re.2005s that survived up until today. There is only a tail section of the fuselage in the Museo dell'aeronautica Gianni Caproni, and markings I used here are actually representing this aircraft, Cheers, Nenad24 points
-
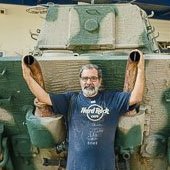
- This special version need a transkit, this one comes from C.M.K ,the kit itself is the good old TAMIYA24 points
-
Hi all, It took some time but finally Miss Virginia is finished! It was on 19 April 1943 when Rex Barber shot down Isuroku Yamamoto flying this aircraft. Below couple of shots of finished model though for more better quality photos and detailed description of the process please follow the link to my blog https://www.fine-miniatures.art/post/miss-virginia-weathering-and-final-assembly Hope you like it!24 points
-
Good afternoon! I'd like to present you my latest built and finished model - PZL P.7a of the polish company Arma Hobby. It is their first mold and it is a cute little thing. Small quantity of parts, easy for building and complete short, fast and fun project. Enjoy!22 points
-
Dear fellow modellers, I would like to show you my latest finished model. The Caravelle III is made from the very challenging Mach 2 kit with the use of Werner Lehmann's excellent Authentic Decals Window set and the Airway Graphics set for the SAS livery. The most visible flaw of the kit is the wrong position of the cockpit windows. This could be mitigated by the use of decals but required a lot of sanding. Other difficulties where the fit of the wings to the fuselage. I opened one engine nacelle and put in an engine. The experts will recognize where it comes from originally. I cut out the flaps and installed them in a lowered position, a state you can often observe on fotos of parked aircraft. The original OY-KRD is preserved in a Danish museum and I used some fotos to work out some details. Enjoy watching the fotos! greetings from Germany, Norbert21 points
-
Hi all This is the old Revell/Dragon Me163, finished in the markings of White 18, flown by Lt Jupp Mulstroh of 2/JG400 at Brandis during late 1944. Fairly straightforward build, although building the landing skid in the 'down' position was a bit of a challenge and I can see why a lot of these builds show them as retracted Painted with a mix of Vallejo and Mig acrylics and using the kit decals, which despite being ancient went on fairly well. I tried to leave a bit of a shine on the overall finish, as I understand that these aircraft were waxed and polished for maximum speed during the climb. Anyway, here's the pics...17 points
-
And that, as they say, is that! I've really, really enjoyed this one and can definitely see more coastal command subjects getting built in the future. I hope you've enjoyed what I've done with the old girl and thank you for your patience as I've pottered along for the last 9 months! RFI to follow in a few days but first to tidy up the bench and decide what's next... Over and out, Sam16 points
-
Karaya Resin model was a bit of a challenge. Polish Kosciuszko Squadron aircraft flown by Maj. Fauntleroy in 1920. Used Gunze paints and Aviattic wood grain decals. Alclad for engine cover. Used a few items for Rigging and Braces. Uschi Line, Ceramic wire, Steel wire and Albion Alloys Interwing Strut bracing wires on actual aircraft were covered and I tried to duplicate this( Not 100% satisfied). Received a custom made base for displaying my Kosciuszko aircraft and loved the base made by "Bases by Bill". Thanks for Looking Comments Always Welcome Cheers Bill D.15 points
-
This is the first of 6 Boeing 767s that I built simultanously. Revell's Boeing 767 kit is already 30 years old and got recently a re-release as Chelsea Rose British Airways. For its age,the kit still stands up well,even compared to the newer Zvezda kit. It has fewer parts and is overall simpler in design but it captures the lines of the 767 quite well. For my conversion I used the first release kit from 1991,that came with Lauda and LTU Süd decals.(More on those builds later.. 😉) I had the ELAL decals for some years now and planned the build for a while,but other projects delayed the realisation. The decals were from Liveries Unlimited and seemed to be in perfect condition,but upon application they showed their age.They started to tear as soon as they came out of the water and were also quite stiff. A coat of liquid decal film solved the tearing but the stiffness remained...only careful application of softener helped,but then they started to tear up again. Lot of TLC along with foul language and careful touch-ups led to an acceptable result. The build and conversion itself were quite easy.5 windows in front and 5 behind the wings needed to be removed,then glue together the fuselage parts,followed with some filling and sanding and rescribe some lost panel lines. The parts all go together really well and the fit is overall excellent. Painted with Gunze and Tamyia paints and the white for the fuselage is Gunze white primer coated with Gunze Premium clear. I originally planned to build the first Boeing 767-200 of ELAL,4X-EAA,but when aplying the decals the letters "A" for the registration fell victim to the carpet monster,so the second 767 was chosen.As I found nice pictures from the delivery of the 767,I chose not to weather it and build it factory fresh. Cheers Alex Next up is the Revell Boeing 767-336 British Airways in Landor livery...15 points
-
This was a pretty easy build, with the overall level of detail and fit being quite good on this kit. I just added an instrument panel and PE seatbelts in the cockpit, connected a few cables to the winch and added some other small exterior details. I cut out one of the cockpit windows as well and mounted it in the opened position. The camo colour was built up with different tones of green, tan and grey (Gunze/Tamiya) and weathered with oils, a light drybrushing and some pigment dusting. Decals are from the kit: nicely printed but terribly brittle, causing them to break up easily. They settled well on flat surfaces, but getting the large ones to conform to the curved nose and tailboom required quite a bit of work (and touch-ups with paint afterwards). The very nice Heller Jeep received some parts of a Brengun PE set and I also added a scratch-built antenna/radio unit. Figures are from CMK/Hasegawa, with some ValueGear items and Eduard’s PSP base completing the little scene. Hope you enjoy the pictures: thanks for looking! Comments always welcome, Patrick P.S. For those interested in the subject, I came across this YouTube video with interesting footage of VNAF UH-34D's operating from a.o. Da Nang AB: https://www.youtube.com/watch?v=D228_1s5zaU Credits background picture: designed by Freepik, photo by jannoon028: https://www.freepik.com/free-photo/tourism-flight-stratosphere-scenic-cloud_1048502.htm#page=1&query=stratosphere tourism&position=44&from_view=search15 points
-
This is my latest project. Big fun to build.14 points
-
This is the original Revell 767-300 kit that came with Gulf Air and British Airways decals and additional RollsRoyce engines in 1992. The decals were not in the best condition,although I used the Gulf Air decals for an other 767. The BA decals had an error in the tail,so I ordered a set from 26decals that also offered the option to build all BA -300s as well as the -200s that flew in the USA. The windows are from Authentic Airliners,quite an adventure to get the correct layout for each 767... The build was straight forward.Everything fits very well and not a lot of filler was needed. The only thing thats quite annoying,is all those different windows and door layouts the 767-300s have in airline service.I found out about 4 ! different layouts throughout my builds🤪... But thats not the kits fault. I really like the Revell 767,and I recently bought 2 of the Chelsea Rose release as well as another 1991 Lauda kit.I still have some decals for the 767... Painted with Revell,Gunze and Tamyia paints. Revell 371 for the grey upper fuselage,Tamyia Royal blue for the lower part and engines. Gunze 315 for the light grey on the wings and a mix of Tamyia 56 and 66 for the corogard panels.Clear coated with Gunze Premium clear. I am planning on building most of the BA fleet in the Landor livery as I think this was one of the smartest and most elegant liveries ever designed.There are still a few types needed to add,so this will be a story to be continued... Cheers Alex Next up in line in the next days are Gulf Air 767-300 LTU SÜD 767-300ER LAUDA 767-300ER QANTAS 767-300 Special Livery14 points
-
Dear fellow Britmodellers, this is my 1/72 AZ Model Bf-109 G10/R2 in markings of Nahaufklärungsgruppe (short-range recce group) 14. Painted with Mr.Hobby acrylics. Photos by Wolfgang Rabel. "Black 12" was photographed by US Troops at Fürth airfield in May 1945. Color pictures of this aircraft are featured in the MMP book "Bf 109 Late Versions". I tried to replicate the complex camo scheme the best I could. The AZ Model kit (WNF factory) contains the decals, but not the camera housing on the lower fuselage. I used a resin part from AML (#72068). Photo-etch from Brengun, pitot tube and guns from Master. Vacu canopy from Rob Taurus, exhausts from Res-Im. Thank you for your interest! Best greetings from Vienna. Roman12 points
-
All done, treacle! This was the first aircraft kit since my acrimonious fall-out with wings modelling in January. On the whole, I'm pretty happy with how it went. There are some paint and decal errors, but nothing major and notes have been made for next time (most probably a 1/72 F101) This is a great little kit. Sadly, I don't have the space to store and display models of strategic bombers in 1/72 scale, so to find aircraft like this in 1/144 was good news. The Vulcan was a trial, but this one has whet my appetite and I look forward to the Victor waiting in the wardrobe. Recommended.12 points
-
Not the only thing on the tree or should I say in it.10 points
-
Another Superb Resin/3D printed kit from Ben Druel of Black Cat Models WIP here: Thanks for looking Rob9 points
-
Good day to you all. Eduard is really giving us some marvelous models to day, and their P-51 is no exception. The Iwo-Jima Very Long Range box is a sin as it is so much difficult to make a choice! It is not an easy kit, it requires very good eyes, and at 70 they are not what they used to be! I have puttied the wings like in reality and used all my knoweldge to overcome the nasty aluminium problems. My biggest concern were the decals! I use to do my markings with masks but this time I thought about an easier time with the decals! Oh My! Please Eduard , go back to your previous cartograf deal, the new one are sincerly not friendly! Well after a lot of struggle here is the mount of Maj Robert. W. Moore who started his tallies on P-40, when he was the Commander of the 45th FS, 15t FG at Iwo-jima south in August 45. Those pilots were flying long distances over the ocean, cope with bad weather, had to protect the B-29 and fly back to do it again. I can imagine the level of stress! best regards to you all. C2DE67C8-6F72-4EC6-8072-DBBDED3E48C0_1_201_a by jean Barby, sur Flickr 541F2EB4-30CC-4977-A9D5-D62F4F477EEB_1_201_a by jean Barby, sur Flickr 50C5C7B5-8E8C-4751-8258-6D5D8FD3D9DE_1_201_a by jean Barby, sur Flickr 8E0D28AA-2AB6-42D2-AB53-3BD982F9B7E1_1_201_a by jean Barby, sur Flickr 016E2365-F9BF-497A-AD53-223AC4D2E50E_1_201_a by jean Barby, sur Flickr BE446B0A-B3E2-4BD0-9A2A-9BEBED999CC3_1_201_a by jean Barby, sur Flickr 0F8DA54B-E9EC-4AB3-B887-16DD75D51DB7_1_201_a by jean Barby, sur Flickr 95CB36AD-3588-4D4F-B651-EDA265D86CF4_1_201_a by jean Barby, sur Flickr9 points
-
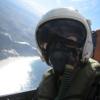
This build was part of the F-14 Tomcat STGB as well as part 4 of my VF-31 Tomcatters SIG build (built F-14D, F/A-18E, in-progress F-4B). The model of course is Tamiya’s amazing 1/48th F-14A with a few extras thrown in, but to be honest you really only need the Qunita Studio cockpit decals and some nice resin cans (and not the Aires ones like I used, surprise surprise they don’t fit without surgery!!!). The model just falls together, with maybe a couple of tiny spots of filler required, other than that it has to in my opinion as one of the best models out there to build for fit and finish. There were a few details that need to be changed on the model so are to represent an early F-14A-80-GR version, Tamiya includes some but they don’t supply the eastly type gun port vents. The scheme, other than being one of my favourites and if you know your US Navy squadrons a bit different. The decals are form the long since OOP Microscale set with includes decals for a Pacific Missile Test Center bird. When VF-31 replaced their F-4J’s they were still deployed on the USS John F. Kennedy and carried the tail codes AC, they operated off the Kennedy for a bit over 2 years (Oct1981 - May1984). They then moved on to the USS Forrestal, which they stayed with for 8 years with the F-14A’s. Now the USS Forrestal carried the AE tail codes. These decals have the AE code but the USS John F. Kennedy as the carrier. They are not a mistake either, I have only found one photo of this combo, all the others (and there are not many) have the correct carrier name with this tail code. The only other early scheme I have seen was a SuperScale set (again super rare) for the F-14A which had the AC code only and no Felix….. anyway….. ………time for some photos, a link for the build is supplied, plus some extra family photos as well. Thank you for looking, please enjoy. Model: Tamiya 1/48th F-14A Tomcat Paint: AK Interactive Real Color, and MRP, Tamiya Acrylics, Alclad Lacquer Extras: Amur Reaver – F-14 Tomcat Detail set DEF Model – F-14A Early Type wheel set Eduard – BigEd PE set Legend – F-14A/B Ejection seat set LF4046 Mircoscale Decals – F-14A’s. – 159449 Quickboost – F-14A Gun Cover Early Quinta Studio – F-14A 3D Decals ResKit – F-14A Exhausts Open & Closed set .... and some family photos9 points
-
Hi all Finally the Anson is complete, I started the year with a yellow Twin engined Ventura and finished the year with another yellow Twin too. I have enjoyed this slow build and would like to thank all those who have offered me support and encouragement along the way thank you so much and also need to thank @tonyot for his invaluable info, thank you very much, really appreciated fella, Max @galgos for sending me the replacement nose glazing after having a mishap with mine, thank you Max, you saved the build. Tha faithful Annie is finished Thank you everyone I hope it meets with your approval. Thanks for your support Chris9 points
-
"I'm sorry I haven't a clue" on radio four did something along the lines of "book titles suitable for cats" the other week. Can't remember them all but I was tickled by: "The spy who came in from the cold and then wanted to be let straight back out again, although it was still clearly cold" and "To catch, play with, maul and finally kill a mocking bird"9 points
-
Engine interior parts were painted with various mixed ratios of AK Xtreme Metal Titanium and Burnt Metal. The effect was finished off with Colourcoats Corticene, which is a WW2 linoleum used on Royal Navy battleships but happens to be a spot on match for heated titanium These engine faces and afterburner parts are duplicated in the kit for use with the separately mounted engines, which is something other manufacturers could take note of (cough *TAMIYA*, cough cough) Started thinking about the paintwork - I just want to give a BIG shout to Mike at MJR Models who has impressed me by having full stocks of MRP Paint and shipped the same day as the order My backup paint is Colourcoats Night which i think will be a perfect complement to the MRP AMT-6 Black as the base coat. The bad news - back to work tomorrow Still hoping to finish this by Christmas. Thanks for the excellent input and responses on the thread so far, really glad this has piqued your interest. Cheers Alan9 points
-
Hello fellow britmodellers, this is older Special Hobby which still builds very well. I only added few missing panel lines and some other smaller details omitted in the kit. On the 10th May 1940 the '221' was flown by H.Doppenberg who shot down one Bf 109E over the De Koojl airfield, but the machine was destroyed on the ground few days later. The kit was painted with Gunze H colors according to instructions, just the Beige came out little odd on the pictures (it fact it is more greyish). Cheers Libor8 points
-
I read the posts, and you are coming off as rude and aggressive now, so I'd wind your neck in just a little, because "they" is me.8 points
-
Hi, I have built a PZ. III Ausf. G - DAK for a while ago. It was built from an old Dragon Kit (9032) with a lot of improvements like Aber fenders Voyager PE Archertransfers Resin Decals Friul tracks Panzerart mantlet and still no paint on it - 😞 Hope you like it. Regards8 points
-
Hi all May I present the latest off the hobby desk (as we call it). Knocked out in Argentan is my first attempt at building an urban scene. I saw the original picture and knew straight away i wanted to have a go at doing that. I found it odd that the placement office was left virtually untouched by the bombing while the rest of the street was knocked to bits- shows the contrasts you can find in war. I made a brief WiP which you can find here if you'd like to know a bit more about the techniques involved: https://www.britmodeller.com/forums/index.php?/topic/235098840-knocked-out-in-argentan-wip/ And with a bit of photoshop: And the original inspiration (for info only): Hope you like it and thanks for looking. Any comments and critique welcome. Thanks Graeme7 points
-
Hi! Here is my finished Ducati Panigale 1199 S from Tamiya. I also used the Top Studio detail set, Tamiya front fork and Tamiya carbon fiber decals for the front fender. Body Paint is Tamiya Italian Red with a Zero Paint 2K gloss coat. And without cowling: Cheers, Markus7 points
-
Well that's the pain finally under control and me back on the Cent. For those lads who know me, here was my palatial room for 4 days It was newly refurbished and no-one knew who to work the temperature control. Consequently I froze on the first night then they brought a radiator in! Highlights of the stay were making my own bed for two of the four days, doing a room sweep at 2330 hrs on two nights as it was a pig sty and hadn't been cleaned and having to open my and close my curtains for three of the four nights and two of the four days, as well as being pushed with full force into a door by a porter when taken down to x-ray, with all the impact being taken on the leg that I'd had the hip operation on. I did have the pleasure of giving them full written feedback. I expect the day and night care staff will be on show parade by now and expecting a nice trip to Colly. What an utter shambles. And here is me. Well part of me Picture is reversed but its actually my right leg in reality. If you look at the leg in the piccie, it's the left. Its about 50% bigger (as was the hip) than the un-operated on hip & leg. Its still mahoosive as its only a week today, but I'm back on the model, so should be able to spend a good 7-10 days pretty much full time on the Panzers before the new year, and she isnt moaning about it! So. My last comment on why you should buy Voyager etch if you do one of these. The bracket on top is the UnAmmusing Hobby kit bracket and the bracket underneath is the Ederwooda etch, which is soon to be destined for the bin. Time to crack on. Hopefully I will nail the majority of the outstanding build items by the end of the day. That's the plan anyway! Oh - one hip down, one to go...........7 points
-
Just for fun 1/24 Airfix Sea Harrier off the HMAS Australia, formerly the HMS Invincible home design and made decals7 points
-
Ha, quite Chris! Although you're not supposed to keep them in your normal kitchen fridge. I can't remember the reason. Maybe they have midnight feasts from your salad tray? Temps are yo-yoing between 3 and 6 degrees in there now, which is ideal. Hopefully waking up wont have done him any harm, but they burn a little too much energy going in and out of hibernation so it's not recommended. He should be ready to face the world again around February. I'll give him a prod once a week, and weigh him every month. Very weird thing to have as a pet by the way. Not my choice either, we inherited the grumpy sod! Lets see where we're at with this flying boat then. Here she is currently. I can't remember exactly where we left off now, so apologies if I'm going over stuff twice, or skipping chunks. The engine support struts and engine nacelles are just dry fitted. It's all a bit wooly here as without the top centre wing section fitted nothing has a positive fit. I don't want to jump ahead and start fitting the wings just yet, as I need to refresh my memory to where all the rigging goes, and work out a plan for fitting everything in. Picking up the Stranraer again by Mike, on Flickr Picking up the Stranraer again by Mike, on Flickr Also, I want to have a go at some subtle weathering before the rigging makes a large part of the flying boat impossible to get too. After just making a mess at a salt weathering I invested in a couple of mask sets from Uschi. Despite my issues with Alex's lack of comms, I'd still recommend his products, and I'm probably going to invest in some of his rigging threads as well in the not to distant. I raided son no.2s bedroom for a paint mule. Picking up the Stranraer again by Mike, on Flickr Then dialed it back until the effect was barely discernible. Those big A1 roundels give me much joy, many thanks @Vulcanicity Picking up the Stranraer again by Mike, on Flickr Picking up the Stranraer again by Mike, on Flickr The effect just looks like dust here, and seeing as it hasn't been touched for months that's more than likely the case Picking up the Stranraer again by Mike, on Flickr Picking up the Stranraer again by Mike, on Flickr There are lots of small bits to do next I think. Engines and exhausts, the beaching gear, the Scarff ring in the rear hatch.7 points
-
from a bottle of resin that is. That and my trusty Elegoo Mars printer. what a wonderful invention What follows is not for the faint hearted. This was yet another of those I had no idea what I had gotten myself into until it was too late builds. As some of you may be aware, I am slowly building my way through a collection of 28 Squadrons aircraft from a Camel to a Wessex. One of the aircraft which was proving a real challenge was the Westland Wapiti. It was a challenge as there just isn't a kit out there. I could probably have butchered an old Frog Wallace, but my chosen scale is 1:48 and there's nothing even close. Nothing. Zilch. Nada. Therefore, if I really wanted a Wapiti I had no option but to scratch one. So I did. The twist to this story is that I scratched a Wapiti from a bottle of resin - I printed my own kit... eventually - I had to design it first, and that threw up a few challenges of its own. However, after wrestling with the software, and several gallons of coffee I had something approaching a Wapiti shaped flying machine The engine was fun to design though. The challenges didn't end there though. Printing such a large beast had it's own set of issues - with the sheer size and geometry of some of the parts there were issues in trying to control warp and shrinkage. The wings in particular put up a brave fight and it took me many, many goes before I got something I found acceptable - but learned a lot along the way. At times it was fun. At times frustrating, challenging, and at times soul destroying, but there were also times when it was very rewarding - particularly this evening when after 11 months of Wapiti-ing, I completed the build and it was added to the display cabinet. Enough rambling. Trials & tribulations WIP here... and shots of the finished article follow What? All this from a bottle of resin? (note: the roundels aren't as pale as they show up here... I have an old camera which doesn't really pick up the colors properly) Glad to be finished but also very glad to finally have a 1:48 Wapiti in my collection. Thanks for reading. Normal service shall resume shortly.6 points
-
Hurricane Mk.I VY-G of No. 85 Squadron, RAF, Advanced Striking Force, Lille-Seclin, France, May 1940 It's been a while since I have posted a completed aircraft build in this section. I've mostly been making AFVs in the GB area. This will be my only aircraft build of this year and it's actually one I started in a GB back in 2016! After I had finished the last of my current projects in the GB section earlier this year, I decided I'd like to finish this, partially started, Hurricane. My original GB project had been to make two Hurricanes - one taking off and one on the ground. I completed the taking off version but ran out of time with this one. I enjoyed finishing off of this build but it's taken a lot longer than I thought it would. The kit is lovely, if a little flawed in places. I added most of the parts from the Eduard PE set designed for this kit and also replaced the four spoke wheels with replacement 5 spoke, resin wheels from CMK. I have also done a bit of extra work on the kit, to correct some of the issues, and the WIP for this build can be found here: https://www.britmodeller.com/forums/index.php?/topic/235100221-back-into-the-hurricane-mki-airfix-172/ As always, all the paint was applied by paint brush. Kit: Airfix 1/72 A01010 Hawker Hurricane Mk.I Extras: Eduard Photoetch Set, CMK Corrections 5 Spoke Resin Wheels Set, Lead Wire and 1 strand of hair Paints: Humbrol, Revell and Citadel Acrylic Paints all applied by brush. The first few photos were taken against a sky photo background with some Gaugemaster Grass Mat on the base: This set of photos were taken against a white background: A few closer views: I have made the canopy so it can be removed to see into the cockpit: …..but it's still difficult to get a photo of the detail in there - so I have included a few photos here of the cockpit during the assembly stages: And some photos in Sepia: Finally - this is how the completed 'taking off" version looked back in 2016: More photos of this model can be found here: Well I enjoyed my one aircraft build of 2021 and I must try and make a few more aircraft in 2022! Comments and suggestions welcome. Kind regards, Stix6 points
-
Well, technically, I haven't bought it, my mother in law has, and I won't see it again for a week and a bit but: Looking forward to parking this next to the Bentley and GT40... best, M.6 points
-
There are a few “details” that needed to be picked out win different colours, vallejo 70.950 black was used for the pitot tube?, attached to one of the wing struts, and an oil pipe? below the engine. Revell suggest that the tail wheel cover, you’ll noticed I’ve managed to knock-off the tail wheel!, should be black however I’ve decided to paint it vallejo 72.763 desert yellow and then dry-brushed with black. I decided to paint the fuel cap vallejo 70.957 red. As I’ve followed @Tail-Dragon's timely advice about the anti-collision lights and removed the “flashers” I’ve painted their housings grey… …the “lights” will be added later in the build by adding dots of PVA glue and some transparent red and green. The wheel hubs were painted with vallejo 77.717 dull aluminium. Vallejo panzer aces 305 light rubber was dry brushed over the treads which had been previously painted with MRP NATO black. Next I’ll be adding some subtile weathering to the wings and airframe… until next time as always, any suggestions, criticisms or comments will be gratefully received. rgds John(shortCummins)6 points
-
Do you mean wooly Allen ?? CC6 points
-
I’ve heard that the General can be a bit of a windbag. Have you considered collecting some of his “output” in order to fill the zeppelins so that they might float around in a realistic manner? AW6 points
-
Hi Dave That's what I thought bout the filler cap And yes, the access flap (fuel door) on top of the left headrest/spoiler is different between the real Mille Miglia 722 and its replica / Revell Kit I just achieved to modify a spare part (headrest/spoiler) , cutting on it a more accurate fuel flap, and starting to sand the sides to give it a closer shape... this work isn't finished but you can see on the third photo below that the left headrest (on the right) has already a more acute triangle shape that the right one on the left. The next step is to finishing the shaping of both headrests, making the fuel flap with 0,4 mm styrene sheet of aluminum sheet, and its hinge . If the outcome is inconclusive, I'll try to 3D drawing/printing them. I've also filled the side front lights housing with putty And sanded off the added putty everywhere: Actual state: Stay tuned if you like 😎6 points
-
Looks like this poor bloke got wind of Martian's imminent arrival....simply couldn't take it, poor blighter.6 points
-
Thanks Los. The windscreen will still be tilted (more of which later) but without a 'working' hinge (probably a crazy idea in the first place to be honest!) Your solution to paint a grey stripe on your trafficators has worked really well - sometimes the simple solutions are the best. 👍 Cheers Vytautus. I started to worry that I was a bit 'strange' in enjoying to learn about the traffictors, so it's reassuring to find I'm not the only strange person around. They'd be nicely at shoulder height on good old Moggy Minors so likely did take some hammer Mr P. Quite a bit higher on the L 4500 though so probably a tad safer, unless Shaq O'Neil happens along! Thanks John. I agree with you that the etch trafficators don't look very much like the real thing, which is something that has been bothering me. I've been mulling over what to do about this and have come up with a kind of compromise (more of which later). Cheers Nik, I appreciate your kind comments. Thanks for the Sd,Kfz. 9 picture too - very interesting, and certainly not too late, in fact just about perfect timing! 👍 Right, first things first, a loose end to tie up. A while ago @Jochen Barett kindly posted a cab interior picture which I thought was strange and 'non standard'. Coincidentally I stumbled across an interesting site on fire trucks based on the L 4500 chassis. One of the examples appeared to tally with the odd cab interior picture (split screen, bottom wiper location, wide cab, and the 'how on earth did I miss that' spotlight thing): Here's a fire-truck with the standard cab for comparison (note the full screen, top wiper position and slim cab). I reckon this would make a fantastic scratch build project, but I mustn't get tempted, no I really mustn't: Moving on, John mentioned that the etch trafficators don't much look like the real thing, and he is bang on, certainly with respect to the brackets. Voyager have been a bit too cute in attempting to cater for two trafficator variants using the same etch. The instructions indicate that the bracket (B17) merely has to be flipped to produce either the '\/' (top/right option) or '/\' (bottom/left) variant. Unfortunately in reality it's not that simple. For the '\/' variant, the etch housing is OK but the simple bent bracket is totally wrong. For the '/\' variant, the simple bent bracket is OK but the housing is wrong (it being more of a simple rectangular box). So, in attempting to provide both variants Voyager have, in effect, provided neither: What to do? Well I thought I'd have a go at manufacturing replacement brackets, which was very fiddly, with a disappointing end result (being too crude and chunky in my mind): So I was left with a compromise of leaving the bracket alone but enhancing the cab attachment point to more resemble the real thing. You'll see from this shot that I've attached the cab roof to the cab back, where the fit was excellent needing only the slightest smear of filler. The door fit is very good too, which is reassuring even though I'll probably have both doors open: It was about at this point that I noticed that the attachment point on the kit looked to be much lower than on my 'go to' reference picture. 'Oh bother', I said (or something similar ), but thought I'd check further references before attacking things with a scalpel. Strangely, there appeared to have been variations on the attachment point location, some being around 2/3 up the window, others 1/3. The cable exit hole however, looks to have been pretty much at the same point: We have the low attachment point, so all is good. Phew! Here's what the compromise looks like with the trafficator in place (nothing is fixed here pending paint). I don't see how to improve this any further, so I'm afraid this is about as good as it's going to get: Finally, news on the windscreen replacement, in that we have a proof of concept! It's just tacked on at the moment to see what it looks like, it being nice and clear and suitably to scale (perhaps a bit too thin if anything?): Looks pretty good doesn't it? Well yes, and no. In a certain light and at a certain angle you see these bubbles. I'm kicking myself as this is self inflicted, being due to the Klear/Future I brushed on (an old trick used on aircraft canopies to give a glassy look). I'll see what it's like in better natural light (if we ever see the sun again!) before I decide whether I'll need to drum up some mojo to strip it back and start again: And that's things up to date. Cheers, thanks for looking and thanks for the feedback, Paul.6 points
-
There has been more clamperage, filling and sanding. Glue has been applied to various sundry part and we now have something that looks vaguely Phantom shaped. That'll be left to settle for a bit and then worked on tomorrow. Thanks for looking, Cheers, Alistair6 points
-
Here some photos of my rendition of the 1/72 scale ESCI AB 205 Huey in UNTAG colours. UNTAG was the name given to a UN group that oversaw the implementation of UN Resolution 435; the transition of the then South West Africa to the independent country of Namibia. Thus also being the last African colony to gain independence in 1990. UNTAG consisted of various contingents from all over the world, amongst others Germany, Australia, Spain, Italy to name a few. Italy’s contribution to the effort was amongst others a couple of Hueys. They were initially intended for use in logistical purposes, but were pressed into service much more urgently in medi-vac and similar mopping up operations, as the peace / independence process go off to a shaky start. With the peace deal between South Africa, Cuba, and SWAPO signed and sealed, and the South African forces being disarmed and retreated as per agreement, the so called liberation fighters from SWAPO thought it would be a good idea launch a full invasion attempt on day one of the transition period when the UN took over the administration of South West Africa. In the following clashes with the hastily re-armed South African forces, the SWAPO fighters suffered heavy losses. The UN had its hands full tending to the mess, with the Hueys being used to ferry casualties. When said casualties were not too severe, the liberation fighters were unceremoniously dumped back at their bases in Angola where they were supposed to be according to the peace agreement. The “incident” became known as the “April fools party”, as the first day of the transition was 1st April 1989. Anyway, these Italian Hueys were the first Hueys that I ever saw, never mind heard! Hence the choice of this particular scheme. The model is basically built straight from the box. Albeit being the second time, as I restored this model. I added minor details here and there, such as the ventilation louvres on the engine cowling and the antennas specific to this version. The only problems I had with the kit were the clear parts. Never mind the glue marks from the previous build, they were just too small to really fit. I guess that during the molding process the dwell time or pressure or a combination of such was wrong so that the parts shrank post injection. The side windows I could glue in using gelled cyanoacrylate glue to fill the gaps. However, the windshield was too far out. Therefore, I used the original to create a male former for a vacu-formed replacement. The decals are home printed – hands down the easiest print yet, as they all are black or red on a white background. So no juggling for color compensation etc. The red cross in the window is a print out on paper (as the original appears to be) held in place with some future. I kept the weathering relatively low, as they were delivered all clean. Just added a hint of exhaust staining on the tail boom, gave the walkway on top of the fuselage, rotor blades, and panel lines a wash of dirty white. The dirty white weathering stemming from the white dust that is so characteristic of Ovamboland, where the April Fools Party operations took place. R5 points
-
Hi folks. After a certain amount of wrestling, the Moebius Colonial Raptor recently waved the white flag and moved out to the flight line.5 points
-
My first space-themed kit. Done a couple of cars recently, but otherwise nothing since I was a teenager. All painted with a brush, but the base, fuel tank and solid rocket boosters were done without the benefit of thinners so really showed up the brush marks in places. The orbiter was generally more successful - the heat shield on the underside and nose, for example, was done with multiple thinned coats and is much smoother as a result. Obvious stuff, I know now, but I'm gradually getting the experience and confidence to handle various situations myself rather than slavishly following the instructions because I'm too nervous to do anything else! Things like doing some sub-assembly then using filler/sanding on joins before priming is a good example, and Jinx's excellent scratch work crafting his own cockpit windows on the same kit is also something I will take inspiration from for future projects. There are still some rough edges that I missed for some reason (edge of the cargo bay doors in places) and the alignment of the two halves of the orbiter body at the front nose, and the fit of the cockpit windows, was fairly poor out of the box and I didn't really know how to effectively fix that (see confidence issues above!) I've deliberately not glued the orbiter to the fuel tank struts yet so I can still separate them. Comments and advice all very welcome!5 points
-
I can’t be the only one of us in this position. I’ve just started to document my decal stash and am currently up to 906 sheets, almost all 1/72, and not even started on the Modeldecals yet. Taking a conservative average of 5 subjects per sheet, I can only draw the conclusion that I don’t have enough kits, so need to up my game with the plastic stash. But seriously, it’s ludicrous but I can’t bare to part with them. I offloaded almost all of the 1/48 decals and kits a couple of years ago. New Years resolution is to build more than one model a year. Good grief! SD5 points
-
Yup. I made the mistake of watching the op on youtube. In with a knife, next its an angle grinder to do some cutting, then its a power drill to drill some holes then its a 10lb stainless steel lump hammer to do some very serious hammering. The surgeon must have arms like popeye. I wish I'd not watched:-) Best get back to the plot! Track guards on. I used the kit mounting brackets as previously explained. I'd like to have taken the rest of the plastic off and used etch, but I'd need a 1/20th scale model Cent to use the Ederwooda stuff on.................. I reckon another 5 or so hours without interruption should crack this. The plan is to get it to the same place as the 2 Chally 2s and the Centaur and Cromwell then job lot the weathering. I've also got 21 little lads to do. I must say the Cent is a pleasing bit of armour. I've got an Australian 5/2 and an ARVE to do but I suspect its a break from armour after these. Its either.......... the Wokka, or a 60" HMS Dreadnought next. Or maybe a 1/35th Thunder Models Scammell artillery tractor + gun or a stringbag in 1/325 points
-
Lumme! Over a month since I last appeared here. My excuse? Getting three of these things finished. (If you want to see more, click the pic and visit the Flickr gallery.) They’re off to their new owner on Thursday this week. That’s cleared another part of the logjam that had developed on the paying work bench due to physical and mental health, life, and pandemics. One more part-finished job, then I can start on the backlog of new commissions. *sigh* Anyway, I’ve given myself the rest of the year off. I am assessing my life-work balance, and realising I need a bit more work to happen. A good old clear-up around the bench, get rid of clutter, and spend some quality time with a plastic kit or two. High on the list, obviously, is the Skua. It would be good to complete before the year end, so it can be included in my 2021 Yearbook. So, that’s why I’ve been quiet for so long.5 points
-
Running gear and tracks added. I also added the side skirts which when fitted I thought they were overly thick, should've spotted this earlier and replaced them with brass sheet, ho-hum...next time. A bit of touching up of the paint work and we'll be heading for glossing before decals. Stuart5 points
-
F-14A VF-31 "Tomcatters" - USS John F Kennedy 1984 Model: Tamiya 1/48th F-14A Tomcat Paint: AK Interactive Real Color, and MRP, Tamiya Acrylics, Alclad Lacquer Extras: Amur Reaver – F-14 Tomcat Detail set DEF Model – F-14A Early Type wheel set Eduard – BigEd PE set Legend – F-14A/B Ejection seat set LF4046 Mircoscale Decals – F-14A’s Quickboost – F-14A Gun Cover Early Quinta Studio – F-14A 3D Decals ResKit – F-14A Exhausts Open & Closed set5 points


a.thumb.jpg.58d92d116b0315dc55d352fd191d65e4.jpg)


.thumb.jpg.b4a5069fd2c2dd5708ce1694345c5b11.jpg)


Wedge-TailedEaglePortraitRaptorDomains.thumb.jpg.41a306d3445a68f0f2df773e01776ea6.jpg)


This leaderboard is set to London/GMT+01:00