
Leaderboard


Popular Content
Showing content with the highest reputation on 10/12/21 in all areas
-
A-7D Corsair II, 356th Tactical Fighter Squadron Green Demons, 354th TFW, Myrtle Beach, South Carolina 1972 Kit: Matchbox Corsair II A-7D (#40101) Scale: 1/72 Paints: Vallejo Model Air Weathering: Flory Models Dark Dirt wash Simple hassle free build, built straight from the box without adding, altering or removing anything. Painted using Vallejo Model Air acrylics. Decals were old and colours were fuzzy but settled down suprisingly well. The kit has toy-like qualities but that was part of the charm - realistic details and finesse are for other builds. Thanks for looking!33 points
-
Salutations, Today I would like to present the largest model I've ever made! It is a Be-12PS in Ukrainian Naval Aviation markings. The build spanned 4 months of occasional work due to my constant flux of motivation to continue assembling these parts which fought me at pretty much every step of the way. However after liberal application of filler putty and careful sanding, I got the joins looking smooth enough to paint. I have to say that landing gear door and support assembly was one of the most complex subassemblies I've put together so far and it was a true test of my modelling mettle. The kit came with masks which behaved well. I feel accomplished for seeing this project to the end and giving it a suitably grimy and well used aura! These aircraft have been in service since the 1970s and reportedly, Ukraine still has 2 in service. The rest had to be left behind when Russia annexed the Crimea in 2014. As you can see, this beast takes up a whole half of the top of my drawer display area! I've placed it next to my PB4Y-2 and Revell Arizona tucked off in the corner. 😀 I have plans to make a seascape base for my next floatplane... Thanks for looking and I hope you like it!32 points
-
Greetings Comrades! For the first time, a Soviet machine came out of the Bizzinisky Production Factories, the people's machine, the Glorious Mikoyan-Gurevich MiG-21 SMT, made by the ally Eduard! The painting is done with Tamiya acrylics, the patina with basic oils. The assembly is unsurprising and very pleasant, even if I took a year more or less to complete this machine (shame on me); Building is here (build also last summer (2020) like my 109 G14) : https://romandiemaquettisme.forumgratuit.ch/t359-mikoyan-gourevitch-mig-21-mt-smt-eduard-1-48-concours-fighter Without further discussion Comrades, the Glorious Images, which will shake the spies capitalized, slipped among us: That's it my friends, Have a nice day Vincent32 points
-
Hi all, Here are the pictures of an assembly I made last summer (2020) , a Messerschmitt Bf-109 G14 from the Nachtjagd. Eduard 1/48 scale model, a lot of fun to assemble it, and no flaws to note. The decals are relatively excellent, and I printed (thanks to a friendr who drew them for me) the shooting star and the 8. I do not often board planes because I am not very gifted, but for the moment I must say that I find it rather successful. The assembly can be found here (swiss forum) : https://romandiemaquettisme.forumgratuit.ch/t386-messerschmitt-bf-109-g14-eduard-1-48 And the photos: That's it my friends, Have a nice day and best regards, Vincent27 points
-
When I posted my Fokker 100 a few days ago I mentioned that I had a second Air UK model on the way and here it is - the Revell BAe-146-100 (the TNT boxing) finished as G-UKJF circa 1993. G-UKJF had a rather nomadic life beginning with TABA Airlines of Brazil in 1983 and ending with WDL Aviation in Germany who retired her in 2012. She was with Air UK from 1990 until 1998. Like the Revell 146-200 the -100 kit is an easy, pleasant build apart from the fiddly undercarriage. I deleted the cargo door on the aft left fuselage and scribed a few panel lines but otherwise the build is OOB. Paint is overall Halfords white with Tamiya and Revell metallics. Livery decals are by Two Six with an Authentic Airliners windscreen and detail decals from the kit sheet. Thanks for looking and as always constructive criticism is welcome. Dave G and finally the two together ...23 points
-
hi all, Some images posted for my good friend Joe in Texas. He's finished his Tamiya F-4B after a little pressure from yours truly 😉, and i think he's made a marvellous job of it. What do you think? Andy18 points
-
Fiat G. 50 "Freccia" 1:48 scale model from Flying Machines company completed. The build went remarkably well considering it's a shotrun, the fit of the plastic and resin parts was very good, the sheetmetal fit was good too. Painting the markings from the masks makes the job a lot easier than applying decals. And replacing the rifle barrels with metal just added to the charm of the "Freccia", But here's where you need liquid to blacken them. The metal barrels came out great. Model represents a machine Fiat G. 50/AS, MM. 6393, flown by Capitano T. De Prato, commanding officer of 150a Squadriglia, 2 Gruppo Autonomo 1941.18 points
-
alut everyone, Here is the last born to come out of my workshop(in realkity, it has been complted in march 2021), a 1/48 Spitfire HF Mk VIII from Eduard, . I wanted to build this model for a while now, the box art made me want to. The painting is done with AK Real Color references, and the patina with oil paint and pigments. It is a very good model, without flaws, apart from a few joints to fill up here and there, and decals really too thick. You will find the assembly here: https://romandiemaquettisme.forumgratuit.ch/t401-supermarine-spitfire-hf-mk-viii-eduard-1-48 Places with pictures, of, to my taste, is one of my most successful planes! It seems that it is traditional to drink a whiskey when completing a Spit, so Slaìnte (I like my Whisky with ice, don't kill me please XD) That's all for today guys, Have a nice day and best regards Vincent18 points
-
Hi all, Back here again this time with this Jag, I've added some extra parts as the kit comes with French a2a and not aim 9, also had to use a drop tank from revells tornado and also had use one of the outer pods, the an/alq-101 from the tornado kit and purchased the other one from online. Painted with xtracrylics desert pink. I think it turned out OK but you be the judge. Well here she is. Oh I did mean to do hairspray chipping but forgot to put the hairspray on lol. Never mind aye, maybe next time. Thanks for looking Dave.16 points
-
Howdy all, thought you wouldn`t mind if I shared a few photo`s of the latest addition to my French ( Indochina ) collection My attempt at Special Hobby`s 1/48 Siebel si.204 kit Dressed up to ( loosely🙂 ) represent a SNCAN Martinet used by the French during the Indochina conflict Had the kit hanging about for a while as I thought someone would do some after market markings or propellers....... .......but got bored waiting so thought I`d have a go myself From what little I could find out, they were virtually identical except that some later ones had 3 bladed propellers and varying aerial layouts..... Didn`t bother about cabin layout or details as you can`t see any of it any way but assy`d and painted bits from the kit so there`s something in there Decals were cobbled together from the spares box as were the prop`s Hope you enjoy the pic`s, thanks for looking Cheers Russ16 points
-
Hi All Haven't posted for a while but i thought this one would be fairly important as there's been a lot of fuss around this kit. As i'm sure were all aware this is a brand new design, not a re-mould of an old kit...just wanted to make a few points that Airfix could have taken the opportunity to address... 1. For a 1:48 there is not a lot of detail! 2. The plastic itself is fairly thin and can easily be bent, the nose was out of alignment 3. Difficult to add enough weight to the nose of the model, a supplied ball bearing would have been perfect! 4. Although this a brand new design, there are still a lot of the same fixtures and fittings we've seen from Airfix for last few decades, namely the landing gear, cockpit and the canopy are all fairly basic 5. The Vampire never had the most elaborate liveries, but the 3 on offer all more or less the same! A few good points though: 1. The top/bottom design of the fuselage/wings does make for a better looking finish, even though the plastic is thin, once the internal structure is added it is fairly sturdy 2. The decals are bright and clear, you can tell they're new! 3. the overall fit and finish is actually pretty good, there was no need for filler and the seams mostly follow actual panels from the aircraft. I had a few pointers from my Grandad, who used to work on planes during his national service in Burma! ive always had an affiliation with the Vampire! Anyway let me know what you think13 points
-
Starting tomorrow lads! I have to go to work (curses!) but sprue shots to follow. Never been this excited about a kit since the old days. Possibly the first time in my adult modeller's life I've dropped everything else to start a new arrival. Since there is no dedicated aftermarket for this kit (yet), I'll only be replacing the seats (Pavla) and adding decals (Warbird) and a pitot tube (Master). I'm building Article #974 as the Gooney Bird, following its enforced grounding on Midway Island in 1969. This airframe had one of the most colourful histories of all the Blackbirds and was generally regarded by all crew as a 'good ship'. Although not recognised as one of the speed record breakers, it flew the first operational sorties from Kadena AFB over Vietnam in 1968, and recorded the most operational sorties from this Det. Sadly, it was also the last SR-71 to be lost, crashing into the sea off Okinawa in 1989 following a catastrophic engine failure after takeoff. Both crew ejected safely. It carried the colourful tail art of a habu viper coiled around a number '1' and the nickname 'Ichi Ban' (Number One). On the very brief occasion of being stuck on Midway Island following a generator failure, it also received artwork of the famed 'Gooney Birds' (albatross) which inhabited the island. The paint used by the artist (a local naval officer's wife) unfortunately wasn't milspec Mach 3 resistant, and didn't survive for long! So - the plastic looks excellent, possibly Revell's finest effort to date as regards mould quality and presentation. Detail is fine and the decals are superb, especially the cockpit detail decals. Let's see how it goes together! Alan11 points
-
Hi Back this time with Bandai's 1/12 Mandalorian. This is the silver beskar coated one so all but the silver bits were painted using Tamiya acrylics. I really like the bandai kits, the figures and the ships they go together really well and the detail on them is great. Ant way enough from me, here he is. This is the way. Thanks .11 points
-
Aaaaand...we're off! First of all, I'm taking care with the large sprue gates for the main fuselage halves: Especially take note with the top half - the edge of the chine overlaps to the underside, and two of the sprue gates are attached onto the lower face: Those familiar with Trumpeter kits will be well skilled in painlessly carving these off! Can't resist an initial tape-up: Even without the central reinforcements, it fits nicely together. For such large parts, the fit is pretty impressive. If anyone would quibble about this level of fit, I would say they might want to consider golf or stick to Lego. No seams really evident at the tail end. I think everyone can relax about the quality of fit. By the way, if anyone thinks this doesn't cut the mustard, I double dare them to try building the competitor Alrighty then...let's melt some plastic! This is the long keel section which forms the main structure of the fuselage. It runs from the tail stinger to the nose gear well. There are three transverse shaper bulkheads that fit into recesses on the upper and lower halves. Helpfully, the front-facing side is marked, like a Claymore This again fits perfectly. I'm applying pressure in this pic, but once the glue was applied and dried, it is rock solid. Here's the fit at the front on the nose gear well retraction jack recess. Very snug! The main structural elements fitted and glued. I've already drilled out the stand mount holes as the stand will be useful for the paint stage as well. As previously mentioned - the fit is spot on, but clamp it while it's drying to ensure the shapers and spine are firmly fixed to the lower half so the shape is consistent. I used Mr Cement SP to ensure a fast and secure joint. This is already too big for my workspace - I'm going to have to be creative! So far, so good. I know for many people Revell will just never be a consumer choice no matter how good it gets, but all I can say is this: if the name on the box is making you question the value - you're missing out. Alan11 points
-
This last weekend the kid wanted to build a model and he pulled this kit out of the stash. Having been working for the last few weeks on my dual-build of a P-35 and Re.2000, I figured a simple little diversion would be welcome. Hasegawa's venerable Fw. 190D kits date from the 1970s and as such are simple enough to complete in an afternoon or two. Of course project creep tends to rear its head around these parts... IMG_3874 by Evan Bailly, on Flickr What happens when you take a backup fighter and combine it with a backup engine originally intended for bombers? One of the best fighters of the war. The Focke Wulf Fw. 190 was originally selected by the Luftwaffe as a backup to the Messerschmitt Bf. 109, should production of that fighter ever get disrupted. What emerged from Kurt Tank’s drafting table was nothing short of remarkable. Some years later, the demand for a “backup” high altitude interceptor, encouraged the use of a “Jumo” engine originally intended for bombers to be fitted to the Fw. 190 airframe. This backwards development process netted a fighter that was every bit as good or better than any allied fighter in the air. It was as fast as a Mustang, and more maneuverable in certain arenas. The Fw. 190D-13 was the definitive variant. While others were on the table, the D-13 was the last to actually enter serial production in the last month of the war. 17 were produced before the factory was overrun. Equipped with every bit of tech that the dying Reich could muster, an “ultimate” 2022HP, fuel injected, supercharged version of the Jumo engine, and three 20mm cannon, it was the masterpiece of an already doomed fighter force. This kit is a recent (2014) rebox of Hasegawa’s 1/72 scale Fw.190D kit dating from the 1976. The new kit contained several cast resin parts to represent the D-13 version. The kid helped by building subassemblies and painting them before I put the whole thing together and did the fine and overall assembly and painting. To this I added a True Details resin cockpit and Eduard seat belts that I had in the spares box and some scratch made details; the loop antenna, the brake lines, the cockpit step, etc. The kit decals represent the only surviving D-13. I modified them to represent one of the others from the same production block and painted the aircraft in a generic-ized version of the paint scheme (before unit markings and further camouflaging were applied at the unit). All paints were from Vallejo's Air range, undersides in RLM 76 and a couple silvery-shades for the bare aluminum parts. Topside camouflage is RLM 75, RLM 83 (the green one, not the blue one), and the “power-egg” (engine) top in RLM 82. While not quite the afternoon-build diversion that we originally thought, it was done in three evenings. Now back to the WIP... IMG_3867 by Evan Bailly, on Flickr IMG_3871 by Evan Bailly, on Flickr IMG_3864 by Evan Bailly, on Flickr IMG_3870 by Evan Bailly, on Flickr IMG_3877 by Evan Bailly, on Flickr11 points
-
Around 1/4 scale but I'm planning on some upgrades until I have the 1/1 model10 points
-
Hi All, After my recent Land Rover build I had the bug to build something else in 1/24 scale (and to use some of the A/M stuff that didn't get used on the LR build. At the same time, I remembered some really cool, dynamic looking figures from DG Artwork Minatures, so I put together a plan to build a Toyota Hilux (or Hilux like pickup) in an amush/encounter with a few of the operators from DGs "Black Cohort" range..... strange names are apparently a feature. The figures aren't explicitly stated to be a specific nationality or force, but looking at the gear/helmets/weapons, they're clearly some US based force. So I chose to paint them in some variant of MultiCam/OCP. With my previous 1/16 Legends figure, I used a sample image from what was clearly a very new piece of OCP which was quite green. This showed in the final build - this guy clearly looks like he's using a brand new uniform on his first op. Looking at images of more used OCP uniforms, it seems to get dirty and fade towards a browner tone which hides a few of the 6 colours in the scheme. I didn't keep a record of my painting process, but once the figures were assembled (minus the heads), seams filled and mounted on toothpicks, I primed them all in MRP-161 Dark brown. Then I used a Vallejo Model Air Dark & Light Brown mixed on a wet palette to highlight the top edges & folds. From there I basically pulled out my Vallejo greens, browns & tans and started mixing up colours on the wet palette until they looked right (to me at least) and started painting 1 colour on each figure at a time before finishing with the two chocolate brown & deck tan small dotted colours. From here, I used Vallejo Khaki grey as it is a very good match for the Coyote Brown straps & bags. Sorry if this wasn't the best explanation, but if anyone has any questions about colours, I will try my best to answer them! Everybody smile frown for a group photo! So from left to right: Aside from the camo painting that all of them received, I try to mix it up in terms of weapon painting, boots & gloves. This chap, who I think looks a little like Dr Strange/Benedict Cumberbatch, is going to firing from cover having exited the front passenger side of the pickup truck. This guy with his anatomically questionable posture will also be on the passenger side twisting his way to get a better look at whoevers shooting at him - he's also missing his magazine as that is a separate piece for him alone for .... reasons? I think his face probably came out the best although my photography probably doesn't show it. 4 photos for this chap! - he will be leaping from the bed of the pickup. Again the face is pretty good even if he looks a bit pale and haunted. Also, despite being the only one with a helmet, he obviously thought wearing it would spoil his hairstyle Finally, our driver will be leaning out from behind the drivers side front wheel/fender. This is the figure that made me chose the range since it's such a cool pose - much better than most stiff upright figures you normally see in 1/35th. All the faces were basecoated in a few shades of Vallejo flesh colours before Abt. 502 oils were used for more advanced flesh tones, blending, shadows, the whites of the eyes and the pupils. Finally everything received a coat of VMS flat varnish (my new favourite flat clear!!) before a few drops of Tamiya X-22 for the glossy eyes/scopes. I'll start posting updates soon on the diorama where I plan to take an Aoshima Hilux and cut it up so I can have the doors opened....we'll see how well that goes soon enough I gues! Thanks for looking!9 points
-
So I got as far as step 14 of the instructions and still no cockpit! On with the landing gear... The nose gear well is divided into its constituent walls. Nice if simple detail inside but they have the big LN2 dewars in the nose gear well. As with the other components so far, these fit together seamlessly. Meanwhile, further back... The main gear wells are also built up by their walls. I guess you could add extra detail here if you were so inclined. Again, seamless fit of all these components. This is a simple and very easy-to-build exercise so far, I'm motoring through it. Certainly looking forward to the engines now! I've found one mistake in the instructions! Check the parts I've changed - you can recognise the correct handing of the leg halves by the oleo links lining up on the correct side. Take note! On the sprue this will make sense: These are the two halves the instructions would have you put together - but as you can see, the torque link hinges won't match! Part 87 goes with 88, and Part 91 with 90. Anyway - all the gear parts assembled, tidied up (the joins need smoothing but otherwise it all fits together fine) and ready for primer. I even had time before sundown to do prepare the cockpits! They finally appeared at step 19 of the instructions Again, sorry to sound like a stuck record, but the back bulkhead on both cockpits fitted perfectly and they both slot into the fuselage snugly. The kit seats are a bit weak in detail, but not terrible. The moulded belts look fine for this scale. In any case, I'd already bought the Pavla seats anticipating a much worse kit than this. This is Pavla - they also fit the kit perfectly so no worries about compatibility. You don't have to remove the riser moulded to the floor of both cockpits. Well, all the interior priming is done, looking forward to some paint tomorrow! Although I am already a fan of this kit, it's looking like great value for money right now. Thanks to Jumblies and Jadlam, both my kits cost under £75 delivered. Though I'm sure someone will say 'for that price, they could have included bombs'9 points
-
hello Dears, A secret of this size cannot be saved for so long... Here's the next project of our dear Alien !! Stunning is'nt it ?? Once finished in 1/72 scale, this would be called modelling at its best... As we did'nt wanted to disturb this great huge project, Speaking about melted rivettery is stricly forbidden.... Of course, he will receive the clever assistance of @general melchett, knowing that Baldrick is testing some way to represent the burned out fabric.... Let's support this wonderful project !! Sincerely. CC9 points
-
Straightaway you can see this is a much sturdier and solid construction than the I/T kit: There's a solid longitudinal keel with bracing ribs to shape and support the two massive fuselage halves. Strange decision to split the seat halves a la AMT Valkyrie. This is why I opted for the Pavla seats. The shock cones are beautifully rendered, as long as they fit okay! Nacelle and nozzle construction looks nice and neat, with the option of displaying the engines separately on the mahoosive display stand. Unlike most kits where the engine is displayed separately, Revell provides two sets of afterburner sections enabling display of the full engines without losing the afterburner section inside the nacelles. (Hear that, Mr Tamiya? If only your 1/32 F-16 had been that generous!) Here's your different noses... And here are your decals: Colour-wise, they look a bit bright, but quality-wise, if they're anything like Revell's other releases in the past four or five years (and why wouldn't they be?), they will be immaculate. The best part of the 1/32 Super Hornet kits is their superb decal sheets. There are four decal options - two high-vis, and two low-vis birds: Anyway. All this and I was excited to start with! Tomorrow the adventure begins! Alan9 points
-
FB-111As of the 509th Bomb Wing out of Pease AFB, at Red Flag 84-5, Nellis AFB, August 1984. 67-7193 “Chappie’s Cruiser” 67-7195 “Kendra’s Choice” 67-0196 “SNAFU” 68-0256 Thanks for looking, Sven8 points
-
With assembly finished, I thought it would be fun to add a final accent to the plane. The Dutch company Reality in Scale makes a set of resin birds for dioramas which would be perfect. Since the Martin-Handasyde was a British aircraft and flew only in Britain, I wanted the bird to represent a species common there. I also wanted one with attractive coloring; *Parus Major*, better known as the Great tit, fit the bill. Now sporting my best rendition of Great tit markings, the little bird was attached to one of the Martin-Handasyde’s kingposts. Perched on this strange mechanical oddity, the professional aviator checks out the amateur.8 points
-
Part 2 I cut the rudders from the casting blocks...without snapping anything off (yay) Glued the rudder to the tail fin Added the actuator housing. And dry fitted the fin...this won´t cause any problems at least ! Next I added the housings to the flaps. The flaps on JA are different from the AJ family because the slats move as one and have an extra actuator and the inner and outer flaps are joined. Jetmads could have done the flaps as one piece. Then I glued in the actuator housings to the wings. the outer most is the extra one on the JA. Last I did a dry fit of the Oerlikon KCA pack... will need some work too but I can´t put it into place until the fuselage is joined. That was all for today! The progress has slowed down somewhat but soon the fuselage joining will happen and then it gets interesting again! Cheers!8 points
-
That's what I did with my old 1965 vintage Revell B-24. I picked it up for a couple of bucks at a vendor table, and built it into a PB4Y-1. Came out OK with a little TLC, some aftermarket and some scratch building. Cheers, Bill8 points
-
All right BMers, let's have a look inside the box... That's a great sight on opening a model box! As expected, it's not as sharp as some of the Far Eastern producers, but it's pretty damn good. The lines are quite fine if not very sharp edged, but that's a plus point in my book. The RAM panels are very clear and sharp across all the surfaces, One-piece rudders but fixed in position - if you want pivots you'll have to do it yourself. Two different style nose fittings for CAPRE (early, top right) or ASARS (late, bottom right) radar fit. Nice! No optical OBC nose though. Engine nozzles - bit more defined than the Italeri/Testors version, but then they should be! Again very nicely moulded and a distinct absence of flash. Look at those wheels Really sharp shock cones. They're very well moulded. Okay what's on the inside...? Some people will want a replacement cockpit, but honestly, why? This is 1/48 and quite hard to see. Pilot's cockpit is just as good. Nice, accurate instrument panels, but wait... These are the best panel decals I've ever seen. Bed these down over the raised detail with your favourite setting solution and Quinta/Eduard can do one Landing gear is still a bit Revell but I can work with it. You may wish to replace the pitot cluster though! Master does a beautiful set for the other 1/48 kit. What's that, you say? 'What are the engines like?' Why, take a look: This is some pretty fine moulding. Each engine comes in four longitudinal parts, with additional single-pipe bleed ducts to add. If is fits well, we are talking seriously good OOB details. Wait, voices from the back...'What about the clear parts'? Okay then... As clear as you can get with very little distortion. You could probably get away with closed cockpits and still be able to see seat detail, maybe even panel detail. Wheelwells are made up in box assemblies - still quite simplified but way better than the predecessor. Alright, that's enough plastic, what about the instructions/decals...?8 points
-
First AFV completed .......7 points
-
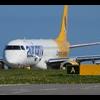
Some shots from the Wings over the Illawarra Airshow 2021 held on the 27th and 28th of November this year. Really, really grotty weather with a low overcast, rain and poor visibility so photography was challenging. It was worthwhile as the last public display days for the RAAF legacy F/A-18 Hornet and some very spirited flying was displayed. It was also the first public display of the F-35 and we had a Seahawk Romeo sporting a new paint job on the nose.7 points
-
Hi there..... Just when you thought you had seen the last of my B17....another post comes along!🙄 Well it's more of an update on the packing method I have done ready for the first leg of getting it to the Museum in California! On Tuesday I am flying back to the UK from where I live in Bulgaria and then in February I will take the B17G on a flight to L.A ......Its all in the lap of the Gods on if it gets there in one piece! I feel pretty certain that it will be OK but not looking forward to opening the box at the other end!......after 10 years of work it needs to get there without any breakages! I have shipped models before using the hold of an aircraft without any problems so far...touch wood! The trick is to suspend the model away from the sides/top/bottom of the box its in. I made the boxes out of MDF and the front and rear sections are held in suspension using polystyrene packing.....if its not suspended then vibrations during transportation can damage the model. When the sides and top of the box is screwed down the polystyrene clamps the model in position.....well that's the plan! Here are a few photos of the boxes to give you an idea and also to show some of you that might want to try it with one of your models one day...if you haven't already........ Here is the front section placed in the box.......... This next photo shows the side screwed on and the polystyrene clamping the model in place........ I placed some bubble wrap over the top of the fuselage and then screwed the lid on...... Here 's the rear section in the second box...packed the same way..... All I had to do then is find a big enough suitcase to place these boxes in........ That's it really!......just got to hope and pray that the baggage handlers don't kick the bag about too much!.....(I do know how they treat baggage as I worked Airside at Gatwick Airport many years ago and I'm guessing they haven't changed!!).....forgot to mention....never put fragile stickers on the case....red flag to a bull! So there you go! I promise this is the last of the B17G "Fuddy Duddy" story here!..........except to say that I am really really pleased that one of the editors of the FLYPAST magazine saw my model on my Scratch built models facebook page .........https://www.facebook.com/martinfostersscratchbuiltmodels..... and asked if they could do a piece on it in their January 2022 issue!...of course I was delighted and said yes......its out in the shops now! Thanks once again for those of you that followed this build ....and I'll see you on here real soon as I have started another project....a whole lot smaller than this one was!! All the best and Happy Xmas and New Year to you all! Fozzy7 points
-
You should know better than to tempt me Melchie, its a bit late for these two but if I could just find a way of reproducing the latticework of those frames....... Great to see that you are no longer AWOL, that just leaves @corsaircorpwho's missing. Hang on, I have a horrible thought that I left him locked up in the naughty corner for some misdemeanour or other. Martian 👽7 points
-
I've just found this,haven't got a clue if this is in the right thread but i thought someone might like it...7 points
-
Hi All, its been a long time since I posted anything on the forum, that's because I've been working on this one for the last few months. I had made my mind up to finish every model in my modest stash and this was the last one, that is until Aldi once again starting selling their pre Christmas cheap Airfix models. I really enjoyed the build, it went together really well with very little filler used anywhere. Midway through the build I was disappointed to read that this is not a very accurate representation of the 'Belle,' so I think I will have to build another. any recommendations on a more authentic model would be appreciated. Anyway, this one was built completely out of the box and painted with Tamiya, Revell, Humbrol and Vallejo acrylics. Thanks for looking, all comments and criticisms are welcome. I hope everybody out there has a brilliant Christmas and New year.7 points
-
A-7D Corsair II, 356th Tactical Fighter Squadron Green Demons, 354th TFW, Myrtle Beach, South Carolina 1972 Kit: Matchbox Corsair II A-7D (#40101) Scale: 1/72 Paints: Vallejo Model Air Weathering: Flory Models Dark Dirt wash Built straight from the box without adding, altering or removing anything.7 points
-
Hey, This will be the last posting of the open frame. I have everything I want to accomplish at this point and I'm ready to move along. These photos are of the last remaining components to be added to the frame along with making sure that everything holds together for the future body work. I believe that this is the compressor for the air tanks. and this is where it lives. I believe this is the main fill/bleed pump for the brakes. it's located here............ and these are the fan parts........ in the groove........ thank you fans............ mounted into place....... I'll add more dirt and grease as I go along, but this is now a rolling frame,100% done. the body work starts with the front bumper. I'll be back.7 points
-
Hi, I got from my friend a nice gift 🙂 I decide to add just seat belts and hood pins .... otherwise it is standart kit without any other detail sets or so. I just want to train few new techniques as carbon decals and open front doors (a lot of cutting) . Iam not complaining about kits, everything can be somehow done but ... decals in this kit are horrible!!! There are two sheets, one with small details is preaty OK but second with exterior subaru yellow stair and texts are hard as ****, even until 20 min of trying and moisture with all my softer waters it was almost imposible to bend it to shapes that I need. So be careful 😉 Here is result:6 points
-
Hi everyone, ... late as usual ... I'm starting to assemble this Kovozávody Prostějov kit: by Rodolfo Masti, on Flickr to make this aircraft: Source: CAVOK Military Aviation Photographs by Hans Rolink A quick look inside the box: by Rodolfo Masti, on Flickr by Rodolfo Masti, on Flickr by Rodolfo Masti, on Flickr6 points
-
I just wrapped my 21st model of the year, this awesome MK44H-0 Whiteknight "Prototype" in 1/20 scale from Hasegawa as part of the Maschinen Krieger property. The kit was pretty much built out of the box, with the only changes are the replacement of the kit vinyl tubes with metal coil springs. It was textured with Tamiya putty and painted with AK Real Color and Tamiya paint. I weathered it with Ammo Oilbrushers and enamel effects. Comments and criticism welcomed as always!6 points
-
Guys, this is the end, ready for the new owner I hope to find on the auction! Please, keep fingers crossed! Now I am going to switch to a tall ship, as Cutty Sark 1:96 has been on the waiting list for few year... Regards and see you in maritime section6 points
-
Just completed & probably the best fitting model I've encountered!6 points
-
This is a bit of a retrospective post, since the car is complete but I didn't fully document the initial stages, and then didn't post any of the pics at the time anyway! Made in October/November as a gift for my son as he loves the car and loves the film Le Mans '66. So we start with the chassis, wheels and interior already done: Although fiddly, the interior wasn't too bad to do, even with separate decals for all of the dashboard instruments and dials. Every. Single. One. Suspension, steering rack and wheels weren't bad at all, apart from the shock absorbers which had the tiniest little hook clips on each end to mount onto the chassis and suspension wishbones, and which both snapped at the bottom on both sides of the front suspension… *sigh* Painting the body shell was almost a disaster, thanks to colour mixing ratios which I still simply can't believe are correct. The instructions specify 70% Light Blue Gloss (50) and 30% White Gloss (04), and that's what you see on the left in the image below. I was convinced this was much too dark. Fortunately the kit comes with a few redundant optional parts, so I was able to try other mixes and overcome my nervousness at my relative inexperience with these kits and also the desire to not screw up something that was supposed to be a present! The light blue on the right was my first mix "by eye", and after much procrastination and looking at endless pictures of real-life Le Mans liveried GT40s, I adjusted the mix to the middle shade and plucked up the courage to go with it for the whole body shell. I was a little worried it was still too pale, but I was happy with the finish, so I stuck with it. After feeling like the last step was pretty successful, I was a bit concerned that adding things like the lights and windows wouldn't go as well. The lights seems particularly messy, but I was fairly pleased with the masking on the orange for the front of the car, though. Bit of a jump, but getting the main decals on went really quite well, and gave me a much needed confidence boost that the build was going to turn out Ok! Natural daylight gives a much better idea of how the blue paint mix turned out, too. The outer edge of the main front orange decal was really fiddly - it's literally just that thin black line around the front wings - I got it positioned a bit better than you can see here, but not much. Decal softener worked out pretty well in getting the main stripe and door circles to conform to the contours of the body. I went with the 1969 decal configuration, although I did cheat in one area which is to use the black light surrounds from the '68 version in order to hide my lousy gluing skills!! One problem I couldn't solve was the poor fit of the rear body shell… Just couldn't work out where the problem lay. Didn't appear to be fouling on anything, and I'd removed paint from locating pins/tabs/recesses etc. to make sure everything was within tolerance. I suspect it was an alignment problem at the rear where it comes up from the engine under tray, but it was one of those situations where you've built the whole engine/suspension as a single assembly and then there's no opportunity to adjust anything when you find out it doesn't mate quite perfectly with the chassis. Oh well. Part of the reason for doing these is a bit of a calming/switch-off for my brain, but also accepting that not everything can, or needs to be perfect, and that if you make a mistake you can almost always do something about it, rather than get panicked and anxious over having "done it wrong". Overall I'm pretty chuffed with the end result, and so was my son, which is what it's really all about, right?6 points
-
The third aircraft of the Lithuanian aircraft designer Antanas Gustaitis - ANBO-III ANBO-III - light training and reconnaissance aircraft was built in 1929 for the Lithuanian Army. It became the first aircraft of Lithuanian design to be built in series, with two batches of four aircraft produced in 1930 and 1931 Crew: Two Length: 6.90m Wingspan: 10.55m Wing area: 18.20 m2 Engine: 1 × Walter Mars I 9-cylinder radial, 108 kW (145 hp) Maximum speed: 185 km/h6 points
-
Here's my Tamiya F-16C in the Lizard (or is it flogger) Viper scheme. I used Afterburner decals. SMS and Mr Color paints. There is a full build report here and a lot more photos of the finished build here . I did do a set of images without the stick but I thought it looked a bit weird just hanging there in space so all bar one are of it with the stick. Anywhere here's a few images of the finished aircraft.6 points
-
With many of my other experimentals so you can see its size This was the future – once upon a time. The AW 52 was originally conceived as a bomber during WW2 but afterwards this was changed to a 6 engined airliner. It was preceded by a glider but as this had its limitations a twin engined version was designed to investigate the higher speed area of the flight envelope. Two prototypes were built. The first had Nene engines and the second had Derwents. The first, TS363, first flew in November 1947 but was lost in a crash after suffering uncontrollable pitch oscillations. Apart from investigating the flying qualities of a tailless aeroplane it was also used to investigate the possibility of maintaining laminar flow over much of the wing surface. To try to achieve this a special aerofoil was used and boundary layer air was sucked into a slot ahead of the elevons but without success. As for the model as soon as I learned of its existence I had to have one. As they say, be careful what you wish for! It has its good points. It’s a kit that I never expected to see and it makes up into fairly accurate model. The engine nacelles and main u/c should be located further outboard and the aerofoil section bears no resemblance to that of the a/c. The downside is that it is a nightmare to build. It is overly complicated with much internal detail that cannot be seen and almost nothing fits. I cannot believe that anyone tried to assemble one before it was released or if they did it was with the cynical attitude that idiots like me snatch at something that they knew would be unlikely to come along again. Some specific points… Starting with the cockpit interior one is directed to fit a component that does not exist. The hole in the floor for the control column is in the wrong place. The seat is too low. It is modelled without the support structure underneath. I didn’t know about this structure until later on after I had solved the problem by glueing it to the upper fuselage section instead of the cockpit floor. If glued to the floor the pilot's eyeline would be about level with the edge of the cockpit. There is a lot of PE for the cockpit instruments and also some 3D decals which appear to do the same job and the instructions are not much help. It's all a waste of time anyway as none of it can be seen. Joining the wheel halves together it appears that one half should have spigots that fit in to holes in the other half. It doesn’t. Both halves have holes. There are two quite detailed engine models to be assembled but only enough combustion chambers for one. It doesn’t really matter as only the front section is visible if you look down the intake. If you can think of a way to fit the engine nozzles after painting the model it would make life easier Fitting the pieces that make up the internal portion of the intake involved much cutting, Milliput and bad language. There was a CAD drawing of this in the Rumourmonger section showing the parts fitting neatly together so how it got so wrong in real life is beyond me. The cockpit, engines and wheel bays fit into the lower half of the centre section and the upper section is then fitted…except it doesn’t. Several things prevented this and so I took my sanding block and ground away at the internals until it did fit. The wheel bays were the worst culprit and I was pleasantly surprised to find that I had not gone through to their internals. Once that is done you have to fit the outer sections to the centre section and become aware of two problems. The first is relatively trivial in that the wing section bears little resemblance to that designed by the RAE but the second is close to a showstopper. The wing sections of the centre and outer wing do not match, and not by a small amount either. The outer section is much thinner. (At this point it was all too much and the project was consigned to the shelf of doom for several months). I got around this by cutting away the rib at the inner end of the outer wing until just the wing surface was left. I then replaced the bits I had cut away with several ‘pillars’ cut from thick sheet which forced the upper and lower surfaces apart until a reasonable match was obtained with the centre section. The wing surfaces have some nicely engraved panel lines which have to be filled as the real aircraft had very smooth surfaces to try to achieve laminar flow. There should be slots ahead of the elevons but there are none. I thought that cutting these would be beyond me and settled for decals instead. There are a couple of problems with the canopy. This is offset to one side so it means that one side of the cockpit is longer than the other but for the model a ‘normal’ one is provided which means some careful scraping of cockpit and fuselage followed by filler to get it to sit without it leaning. I do not think that the rear of the canopy is correct. One last problem presented itself. The u/c legs have spigots to fit into mounting holes but there are no holes for them to go into. I was most surprised and relieved that it required no adjustments to sit level after fitting the landing gear - about the only thing that went right. I discovered this website that has a lot of pictures of the aircraft and a copy of the article about it which appeared in 'Flight' in December 1946 https://ww2aircraft.net/forum/threads/armstrong-whitworth-aw52.49979/ Thank you to Dave Swindell and David Womby for providing information about the seat. It is here for anyone who needs to see it https://www.britmodeller.com/forums/index.php?/topic/235101803-armstrong-whitworth-aw-52-cockpit/ Finally - despite all its issues it does make up into a nice model which looks 'right'. The finish is Halfords 'Appliance White'. It needs as much weight as you can pack into the nose. All I have to do now is find somewhere to put it. It is rather large. (edit: picture added to show how much space in takes up in my display cabinet) Time for a lie down in a darkened room Edit: Jan 2023 I have seen another one built. The builder said that he did not bother with most of the internals as they were completely hidden once assembled. He also fitted the outer wing panels to the centre section before joining them as I did. This left a gaping hole along the leading edge which was then filled with Milliput. John6 points
-
Afternoon Gentlemen A little progress today: - The driver's door has been cut off, it will be articulated, as the trunk lid - Plastic thickness plastic of the body has been drastically reduced at wheel arches, driver's door, 2 ventilation apertures in front of the windshield - 2 tiny pieces of styrene sheet 0.3 mm has been added on the sides of the left aperture, they were missing on the kit, after comparison with the reference photos. - The Mercedes Benz Star emblem on the nose of the car has been cut off, because it would be difficult to paint it Chrome later, and it will be replaced by metal transfer (spare part from my 4th MEB 300 SL kit ) - I would like to do so on the trunk lid, but here, there is too under the star, the letters "300 SLR", for which I've no Metal transfer nor photo-etched parts, so, I'm hesitating about what to do....I must sleep on it. This one too might be modified, making the fuel door openable Stay tuned for next steps 😎6 points
-
Hello Dears, So, I must be a& mad man, Staring at the Monogram Propeller, I found it a bit tiny.... Indeed it was.... Daredevil on its way, knowing the fragile old plastic... I'll replace the monogram by Eduard ones.... Thanks for the overtrees Ed !! Sincerely. CC6 points
-
Ammo box painted and now installed. I decided to use some of the left over PE seatbelts as the tie down straps. This I think worked out reasonably well, certainly when all is installed there’s not a lot of detailed scrutiny possible. Next, I thought it prudent to mock up the main assembly, primarily to see how the rotor machinery would sit, but also just because… I think it’s sitting a little high but otherwise I’m quite happy with how it’s coming together. It won’t be too difficult to drop the rotor machinery down a mm or so as there’s a bit of meat on the plastic below that I can shave off. I’ll install the instrument panel and button up the fuselage and then I’m much closer to the fun stuff. Cheers.6 points
-
Always look at the bright side of life... Yes, the sanding continues... You don´t get away with anything in this scale! And after I hav a nice blend to the fuselage I will have to redraw lost details before I can get to fixing the fit at the rear to the tail cone The result after todays sanding, only using 300 grit and finer now. And checking with primer, looks better but there are still things to fix. The tip of the wing roots still needs fixing, thinking of going with CA glue when I´ve blended the wings. Time to fill the bad spots... After all the necessary evil I wanted to glue stuff together! end of part 16 points
-
Still waiting for my Alclad Chrome order to arrive to spray my window frames and trim so I continue to whittle away on the interiors, chassis and engines. Finished the '60 Impala and '65 Comet interiors: Masked and sprayed the underside of the four hoods with Tamiya X-18 semi-gloss black: Attempted to hand-paint the molded-in wiring on the '60 Impala and '64 Dodge: I generally do this using a fine brush and Tamiya acrylic paint over the lacquer clear coated engine bay panels and scrap the excess paint away using a chiseled toothpick - let me know if there's a clever way too detail these features short of grinding off the molded-in cables/ wires and installing actual wire. Initial work on detailing the four engines: That's all for now!6 points
-
Thanks Col. It’s old and has raised panel lines but goes together without any problems and looks like a Tunnan. And it’s finished: Gallery shots to follow. Thanks @trickyrich for running the group build and well done every one on the great models. Merry Christmas and a Happy New Year! AW6 points
-
And another fly in guest from Temora6 points
-
Hiya Folks,..... I started this one a week or so ago but have only just decided to run it as a WIP,......., so here is the kit; Here is a good article from Airfix Magazine showing the sprues and decal options etc; https://www.keymodelworld.com/article/airfix-148-de-havilland-vampire-f3 With one of the photos of the sprues here,.... it is a lovely looking kit; And here are the decal options; I really like the Canadian option and having already started another kit,..... I may just go for that one,........ although I do like this 32 Sqn F.3,... which I may do if I can find some suitable code letters; But I digress,...... as I am building this first model as an FB.9 of 8 Sqn,..... and would like to go for this aircraft, the CO`s personal Vampire; ,........ I do have decals for this from the Alley Cat kit,.... but the colours of the squadron bars are incorrect; They should be like this, from an old Modeldecal sheet, from top to bottom,....., yellow blue and red Thankfully I have a new Xtradecal sheet which includes the correct bars,..... although the yellow is not as bright,..... but they will do. So, on with construction; A nice fresh brew ready,..... and after pre painting the interior black and the intakes silver, the floor and rear bulkhead were put in situ along with the jetpipe and intakes with lead airgun pellets used for weight added too. The booms were built and set to one side, as were the wheels; Cockpit complete the upper and lower halves were joined and the tail booms ready to fit too; And the main airframe is now together. The cockpit pod can be hard to close together if everything inside isn`t lined up properly and I had to push the cockpit floor down as it had risen up. Once this was done the upper and lower parts closed together well and although the seam line looks like it might be untidy, with a bit of sanding it soon become flush. I do like the way that Airfix have broken down the kit ; Thankfully, as well as the longer wing tips of the F.3 variant, the kit does also include parts on the sprue for an FB.5 and the FB.9 which I want to do,..... these include clipped wing tip parts (parts 15 & 16) that both of these later variants had and the longer air intake trunking for the right jet intake which was seen on some updated FB.5`s and all FB.9`s which housed an air conditioning unit to help keep the cockpit cool in hot environments. These would be added to this basic airframe next; First the seams were given some filler just to help smooth them out and the model was sanded, including the wing fuel tanks; Now,.... a jump forward,... the model is painted, receiving a few coats of Tamiya Bare Metal Silver from a rattle can... I did take some progress pics but they were spoiled,.... my camera or memory card is playing up and sometimes overlaps a number of photos onto one image,..... very strange; There is a panel on the side of the nose on the right side, just in front of the air intake and I only noticed it after painting,.....I`m not actually sure that it appeared on RAF aircraft, especially the FB.9,.... so I need to check further to see if it needs filling in on my 2nd model; After this, the model received a brushed on coat of Humbrol enamel gloss varnish ready for the decals and it looks rather sleek! Cheers for now, Tony5 points


.thumb.jpg.d17ff607fc7e89ed057e63fcb6f2a888.jpg)


Wedge-TailedEaglePortraitRaptorDomains.thumb.jpg.41a306d3445a68f0f2df773e01776ea6.jpg)

This leaderboard is set to London/GMT+01:00