
Leaderboard


Popular Content
Showing content with the highest reputation on 23/10/21 in all areas
-
Hello everyone. I don't get on this part of the forum very often as my builds tend to be rather prolonged affairs, but here we are: this is my attempt at building an accurate Sea Vixen FAW.1 at 1/72 scale. A full account of the research materials and design process can be found on the WIP here: The build originally started out nearly two years ago with the original intention of modifying two existing kits (an approach which I pretty soon abandoned on grounds of quality/accuracy),deciding instead to design my own. Shown here is the result of 3d printing with some homebrew PE and vacforming for details. A few other details like pylon braces were hand-made from brass, whilst custom masks and decals were produced to handle the colour work. The designs for this aircraft were produced from a combination of photo-interpretation and the aircraft maintenance manuals - each indispensable in confirming the details of the other - using Fusion 360. I've no background in CAD, or 3d printing - or even making your own brass etch - so the whole undertaking turned out to be a major learning exercise on multiple fronts as different sets design problems arose and needed to be resolved. The aircraft here is actually the first of two FAW.1 designs that I've produced; I'll talk a little more at the end of his post about the next one. Aside from the encouragement of a regular bunch of knowledgeable and generous friends on here, there are specific individuals that I need (as always, I never consider anything I do on here solely 'mine' so much as the result of shared knowledge) to single out for thanks. @71chally - in my view the peerless historian of this de Havilland aircraft made sure that I had the bumps and colours of this aircraft correct. @Navy Bird provided support in the early days of the project and proved (should proof be needed) of how generous modellers are with information. @canberra kid as usual seems to have every British aircraft manual under the sun and filled in the blanks most decently with the pages missing from my own copy. @hendie was - with the routine resin masterpieces that he casually lobs into his builds - the single biggest influence on me turning to 3d printing and has by this stage cost me a bloody fortune in tools over the years.... The following photos then show my reproduction of XJ481, an early production Vixen that ended up being co-opted as a trials aircraft in the late 60s, at which time she received this bold diagonal scheme for work on trials of the Martel missile system. The paint scheme shown here is intended to represent the appearance of the aircraft circa 1970; a more detailed service history being available on the FAA Museum site here. Studio photos to start with then showing some of the details: My personal preference remains the use of daylight in terms of judging the effectiveness of my work in relation to the actual aircraft: Next up over on the WIP will be XN708, a later production version of the FAW.1 that was lost on night exercises in Lyme Bay in 1964. This one will be built as a full display version with wingfolds, moving radar and removable Avon engines: It's already printed - I just need to get cracking and build the thing! Thanks for looking in. Take care, Tony33 points
-
New Airfix He-111 was worth waiting for all these years. Great kit, straightforward build, OOB except for the Eduard canopy mask and seatbelts. Gunze colors were used. Weathering was done with Mig fluids and artist oils. As my several latest kits, this one was also started in the Group build but finished well after deadline.27 points
-
Hi folks, here's my representation of a Dominican Air Force F-51D as used towards the end of its' career in the 1970s! Airfix kit, Eduard etched brass seatbelt and Armycast cz decals. There are I'm sure a few inaccuracies (probably used the wrong canopy and I think I should've tinted it green) but it was an enjoyable build. Don't overlook the Airfix kit, though the detail isn't as fine as Eduard's it builds up just fine. 20211010_100754 by bryn robinson, on Flickr 20211010_100801 by bryn robinson, on Flickr 20211010_100823 by bryn robinson, on Flickr 20211010_100832 by bryn robinson, on Flickr 20211010_100838 by bryn robinson, on Flickr 20211010_100848 by bryn robinson, on Flickr 20211010_100919 by bryn robinson, on Flickr 20211010_100930 by bryn robinson, on Flickr 20211010_101033 by bryn robinson, on Flickr 20211010_102948 by bryn robinson, on Flickr21 points
-
Hello everyone …. This is my very late finish of an AT-6D started in the Texan single type group build. It represents an aircraft operated by ALA MIXTA N° 46/GANDO/C.6-167 circa 1975 in the Spanish Sahara. A brief history that I found stated this. “This armed Spanish Air Force C.6 (T-6C/D) of Escaudron 463 at Ganda, was used in the counter insurgency role over the Spanish Sahara during 1975.” I chose the markings as there is a plane about 1 mile from my house that used to wear these markings as a warbird. Though it currently wears a new scheme. The kit is the Encore release of the Academy plastic. The underwing rockets are based on these. https://en.m.wikipedia.org/wiki/8_cm_Flz.-Rakete_Oerlikon The ones in my build come from the Newer Airfix MiG-17. Seems the Soviets cloned the rockets at some point. Please feel free to ask questions, post comments or thoughts. Please also feel free to visit the build thread. Dennis19 points
-
Hello to all.After a long time I have manage to finish this awesome f-14.The kit itself is the well known hasegawa kit and all of the issues that I red about are true.I added the aires resin cockpit and the exhausts.The cockpit is a pain in the you know what to install.My customer asked for a closed cockpit and that complicated matters even more.The jasmine decals I partialy used are bad and innacurate so I had to use the hasegawa OOB ones for it. Enjoy the photos.18 points
-
Hi folks, this time one of my recent quick builds using the Profipack edition. Built OOB, just for the display purpose I acquired LP Model ladder and wheel chocks. Painted with Gunze SM range. Cheers Libor18 points
-
Hi comrades! This beast finished. The build was complicated. Everything possible to exchange with aftermarket parts was exchanged. Some additions were scratchbuit. More details on the build can be found here: Thanks for looking17 points
-
F4U-1 “Bubbles” After grinding away on one particularly difficult short-run model I decided to pull an “easy” kit out of the stash. I selected Tamiya’s 1/72 scale F4U-1 “birdcage” Corsair. Of course, the subject I chose to model ended up being a challenge in itself. “Bubbles” was a particularly well photographed Corsair based at Guadalcanal in 1943. Sources disagree on whether she was assigned to the USMC’s VMF-124 or VMF-213 but I am inclined to believe the later. Regardless, her very well used appearance and distinctive weathering pattern (apparently she was a leaker) drew me to attempt to duplicate her as closely as I dared in a model less than 6 inches long. Built out of the box with addition of Eduard seatbelts and some scratchbuilt details such as the engine spark plug harness out of fine wire. Antenna wire is EZ-Line. Paints are mostly Vallejo Air Acrylics, with some AK and Tamiya colors here and there. Weathering was a combination of acrylic washes, AK chipping mediums, salt, and Tamiya weathering powders.16 points
-
Beginning the splotcherating of the underside. My photo lights have diminished the effect somewhat; damn diffusion anyway. It's more noticeable to the naked eye, so I don't want to overdo it. Exhaust stains, oil drips, and paint chips will come later (I suppose). The blues on top will be faded with various shades of blue-grey and it will be interesting to see how badly I muck it up. Stickers will go on at some point. Once I've satisfied with the amount of damage I've done, then there will be a flat varnish followed by more damage inflicted by pastel chalks. And maybe another coat of flat varnish to make sure the pastel dust stays in place. To be honest, I prefer painting nice shiny display schemes. Cheers, Bill16 points
-
Hi, finally managed to finish a couple of ships this year, the first being Combrig's lovely HMS Banshee in 1/350 scale. This ship is poorly documented in photographs but I found an image of her late in her career in the Mediterranean, with raised funnels, taller foremast (for aerials? higher signal flags?) and altered stern flagpole/tiller arrangement. Also with shelter awnings behind the conning tower. I was intending to modify the kit's funnels but bodged the job and actually robbed my HMS Earnest kit for these items. I suspect they could be a little taller still. I used Sovereign paints for the ships. The two-flag signal means something like "I don't like the look of the weather". Cheers, GrahamB HMS Banshee starboard by Graham Bird, on Flickr HMS Banshee starboard quarter by Graham Bird, on Flickr HMS Banshee starboard bow by Graham Bird, on Flickr HMS Banshee port by Graham Bird, on Flickr HMS Banshee port quarter by Graham Bird, on Flickr HMS Banshee port bow by Graham Bird, on Flickr14 points
-
Here are the results of a project I have been doing on and off since the beginning of the year, Dragon's old but good Ferdinand and Tamiya's great Elefant kit, with extra bits like Atak Zimmerit and metal tracks on the Ferdi. My photoing is getting better but some good weather would be nice so I can get some natural daylight involved. As always thanks for looking and thanks for following the WIP and some great tips and history lessons and general chit-chat.👍👏13 points
-
Hi again, another Atlantic escort finished, this time the successful (6 U-boats destroyed/.shared) HMS Duckworth, a Captain Class frigate ((=Buckley Class DE). Apparently, my father (HMS Belfast in Korea) knew someone from her who had been transferred to Belfast. I used the extensive F-Star upgrade set along with the WEM Captain Class etched set as well, where required. The latter's DC storage racks were too short and I added an extra 1/3 by using scrap etched "sprue". Painting was with Sovereign enamels and I went for the G45/B20 scheme - but I might have erred here - could have been white/B55 though. Some G45 was supplemented here and there for economy with my own Schminke ink mix. The 3rd Escort Group emblem on the funnel was made from cut-up pieces of signal flag. It was a very complex build - the structure could be that of a cruiser in places! Cheers, GrahamB HMS Duckworth starboard by Graham Bird, on Flickr HMS Duckworth starboard quarter by Graham Bird, on Flickr HMS Duckworth starboard bow by Graham Bird, on Flickr HMS Duckworth port by Graham Bird, on Flickr HMS Duckworth port quarter by Graham Bird, on Flickr HMS Duckworth port bow by Graham Bird, on Flickr HMS Duckworth starboard bow 2 by Graham Bird, on Flickr HMS Duckworth starboard midship by Graham Bird, on Flickr HMS Duckworth starboard aft by Graham Bird, on Flickr12 points
-
Light field howitzer 10.5 cm leFH 18 L/28 from the 155 Artillerie Regiment (motorisiert), 21 Pnzer Division, Libya, November 1941. Zestaw: First to Fight (1/72).12 points
-
Around 12 years ago whilst out walking my dog I met and became friends with lovely gentleman named Ron. One day the subject of Ron's military career came up and it turned out that Ron was part of the BAOR in the mid 50's where he drove Centurion tanks. He would often tell me tales of his time there and seemed to have a fondness for the Centurion. At the time I was mostly building models of WW1 aircraft and I hadn't built an AFV for many years but I thought it might be a nice idea if I could build Ron a model of his tank. I tried to get as much information as I could from him but sadly Ron's mental health was declining rapidly and he was taken into care before I could present him with the finished model. Thanks to Ron though my interest in and building models of British armour was reignited and of them all the Centurion is probably my favourite. The photos above are of the model I built for Ron, a Mk.5 from the AFV Club kit. The model was painted in Bronze green from a mix of Tamiya paints that I found on the internet. I have never been happy with my paintwork on it though and I do intend to strip and repaint it one of these days. I did however thoroughly enjoy building the kit so I soon built another one, this time as a MK.11LR. The Mk.11 was one of the last of the line for the Centurion ( in British hands at least ) and so when AFV Club announced the Mk.1 kit I jumped at the opportunity to build the first Centurion as well. I particularly want to build one of the prototype Centurions that were sent to Germany at the end of WW2 for testing and evaluation purposes in Operation Sentry. The tanks didn't arrive in time for actual combat but valuable lessons were learned about how the tank could be improved upon. The AFV Club will need some additional work and parts to build it as one of the A41 prototypes but I have managed to source most of what I need. There was talk on some other forums about the rear hull vents not being correct in this kit but looking at the instructions it appears the AFV have amended those parts. I have been watching and admiring @simmerit's build of the Amusing Hobby Mk.5 and I know Darryl @Jasper dog has just started a Shot Kal build so I will try not to repeat too much of what they are doing but it may be interesting to compare the AFV to the Amusing Hobby kits. I'm looking forwards to getting started on this one. Hopefully I shall something to show in a couple of days. Wayne Wayne11 points
-
Tamiya 190 is excellent kit, I enjoy this stress-free builds. Gunze paints, did not experiment a lot with the weathering.11 points
-
More beauty shots of this greasy pig:11 points
-
Infantry gun 7,5 cm leIG (Kgz)18 L/11,8 of unknown unit, Poland, August 1944. The kit: First to Fight (1/72).10 points
-
Infantry gun 7,5 cm leIG 18 L/11,8 of unknown unit, Poland, September 1939. The kit: First to Fight (1/72).9 points
-
So she has been finished last night - a Stampe of Belgian Air Force in May 1940. Absolutely lovely kit, easy to build with no traps. The paint is a mix of Tamiya orange, white and earth, decals from different sources (insignias are from the Frrom decal sheet of Belgian roundels). Rigging was made with invisible mending thread and the weathering is really subtle, the planes were well maintained. Thanks for looking.9 points
-
Thanks Keith. I have a bit of a thing for Sabre's I must admit. I have a few more in the stash. Thanks Bill. Mrs T says she is looking forward to seeing you again at Telford! Thanks Martian. It does always seem to be a bit of a rush this time of year. How's that Submarine doing 😁 Yes I realise I'm a lucky boy Giorgio! An Italian F-86 would look pretty cool. The first F-86 I ever saw for real was at a Biggin Hill air display back in the 60's. Very nice jet in those colours. Brilliant shot of G-ROBN, she does get about a bit! I had a quick look on your Flickr feed and was very impressed. Lots of good aircraft and indeed warship reference shots. That's brilliant Duncan, many thanks indeed. Thank you Tony, I guess the pleasant vibes must come from the Dorset air! Thats spooky Steve! A sort of parallel masking universe I guess. Well you can blame Tony I reckon, he started it! Sounds like a great aircraft also. Years ago during my PPL course I booked a 30 minute Aerobatics lesson in an SA Bulldog. My instructor recommended it as I had become less than relaxed trying to master particularly difficult cross wind landings for about the third week in a row. The guy that took me up in the Bulldog was an ex-fast jet chap whose last job was at Boscombe Down as a test pilot. Boy, what a shake out lesson that was, but it certainly did the trick! I finally nailed the cross wind landings after that experience. The Bulldog had sticks, and I much preferred them to the yoke in the PA-28's. Don't you start, he'll blame me again! On inspecting the nose of the Astir, I can just see some darkness underneath the red, which is a small patch of resin that was just showing through from constant polishing prior to top coat. You can hardly see it in this shot, but it is there. So we'll need another small dusting of red on that. So when I get the red out again later, this one will get some red too. The wing tops stay white for this particular example. The other drone is due some red as well, but I snapped the wing off whilst masking it up, so that's "resting" for now to allow the fix to set. And while we are at it, I have three bucks being prepared for the Viking. I'm actually going to cast all three in a silicone mould, making six altogther and then vacform over all six at once, giving me six chances at getting a decent canopy in one shot! Nothing will get done on these tomorrow as I'm off to the Yeovil Model show. I daresay I might come back with some souvenirs. If anyone else is going and wishes to say hi, you will likely find me on the Poole Vikings stand (IPMS Dorset). Terry9 points
-
A realization of some years ago, the Ju 288 of Huma; on the whole it is a good model, but it required a great work of modification, both of the cockpit (almost totally rebuilt)… and of the wings and engines details. The model represents the Ju 288 V103 (C-1), as it appeared in Dessau in the summer of 1943. The camouflage is in the classic 70/71/65 (Humbrol Enamels mixtures); the codes are decals printed by me, the crosses and swastikas instead are from other models. Everything, as always, has been totally brushpainted.. Hope you like. Thanks for viewing Comments and suggestions welcome. Giampiero Piva9 points
-
Managed to start this one over a few nights. The first nice thing about this kit is that you get something substantial quite quickly. Always a bonus in the early stages. The second nice thing about this kit is the quality of parts is absolutely superb. It's a wonderfully detailed thing. Everything is crisp, everything is straight and all the moulds are indexed perfectly. I suppose it is a brand new set of moulds but even so it's excellent. Everything fits like a dream and I haven't had to adjust anything. Yes the bogeys are fiddly but nothing a little patience wont solve. The first of quite a lot of PE which fitted like a glove And the first stirrings of track. The bogies like, Modelholic has stated, are a little fragile in thier fixings and the alignment is tricky. I think I've got there though. The other thing is the tracks are supposed to be fixed early on and judging by the guards which go on next they may be tricky to put on afterwards. I'll have a think about that one. Cheers all Andrew9 points
-
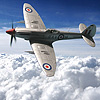
A while back I was thinking a Spitfire PR.XIX with bubble canopy could be pretty cool. Thing is, no XIXs left in The Stash. But a friend on another forum had sent me an Xtrakit 1/72 Mk.22 last year….add decals from another friend and voila: meet the Spitfire PR.23! The harsh New Zealand light really washed it out but the model is in fact in overall Humbrol PRU Blue. In fact I'm tempted to re-shoot it because the difference is so stark! I'm hoping Spit experts can spot the PR mods I added and I also hope they don't point out the flaws etc because it's not intended to be serious and I had a lot of fun with the whole build. Thanks again to my two friends for their help!8 points
-
Just for reference, this should be fairly accurate for some UK phantoms. John8 points
-
If metal then metal... There are many modellers on this website with more skill than I. One of them is @Steve D who champions the phrase 'If metal then metal' this summarizes his belief that where-ever possible, a modeller should try to use prototypical material in the model. So if the original part was made from metal then try to model in metal, if the original part was in wood then try to model in wood. His results are spectacular; go and have a look here if you want to see what I'm talking about. Another truly world-class, modeller is @airscale . Airscale makes extensive and expert use of metal while scratchbuilding museum-quality, 1/18 scale aircraft. One of the skills he has mastered is the extensive use of aluminum lithoplate to skin his aircraft. Despite my comparatively basic skills, I am inspired by these two experts and have decided to try skinning my Mirage with metal. The major benefits that I'm hoping for are: A really smooth skin with absolutely no remnant trace of wood grain. A really robust skin that won't dent with handling. Sharp details, for example a nice sharp tip of the trailing edge of the tail. The current MDF tip is already becoming a little blunt due to handling. Sharp, clean, well-defined, uniform panel lines. At this stage I have no intention of using the aluminum to represent a natural metal finish. This jet will be painted, most likely in the standard RAAF green and grey camouflage. Many years ago my dad gave me a sheet of used printer's aluminum lithoplate and I've used it for numerous modelling duties since but never for anything as ambitious as this. Let's start with the tail. By careful measurement we transfer the shape of the tail onto the lithoplate - I also make an allowance for the curvature of the tail's surface by making the skin slightly longer than the actual tail so that the leading edges can 'wrap around' and meet on the front. If you have a look at my Mig-15 project you will see that I was never completely confident with how to represent panel lines. But with lithoplate it's relatively straightforward. We just use a ruler and scalpel to scribe the lines directly onto the surface. An alternative method would be to make each individual panel and glue them on separately allowing the joins to form the panel lines. I tried both cyanoacrylate glue and Selly's powergrip glue. Both are good, but the powergrip is a bit thicker and can go on bit lumpy. Each subtle change in the glue's thickness translates into a slight bulge or hollow in the lithoplate so now I'm favouring the cyanoacrylate. I know Airscale uses 'impact glue' but I've never seen that here in Australia; perhaps it has a different name. I'll have a closer look next time I'm in a hardware shop. The photos show a nice clean-looking process but in reality the glue went everywhere. Luckily it all cleans up with acetone with no problem. I didn't leave enough surplus aluminum at the front and rear of the tail and the wraparound was a bit short. Lesson learned. In this case I've just filled the gap with two part automotive bog filler. Here I'm using a needle to mark a 'datum point' on the wing's underside. This will become one of several reference points that I can use to transfer the panel-line pattern from the plans to the lithoplate. Digital calipers are very helpful for this kind of work - just ask @Putty Animal, he'll tell you. Here's the outline of the largest panels on the underside. I'm going to treat this job like packing a suitcase. Get all the big bits in place first and then fit all the little stuff around the edges. Here's a rectangular panel that will go on the ventral surface Since this piece has to wrap around the curved underbelly surface it must be heat-annealed to kill all of it's springiness and rigidity. Here I'm hitting it with a Creme-brule' butane burner. Once the metal has cooled it can be shaped easily and can be made to fit its contoured position very nicely. Here are the other panels I've done today, still nothing on the topside. This is not expert work, but it's not too bad either. Got to start somewhere. The acid test will be when I have to get the edges of different panels to actually meet up nicely, and when I have to deal with the compound curves in the fuselage. 😱 That's it for now folks. Thanks for all of the interest shown, Bandsaw Steve8 points
-
@Pete in Lincs as you wish 🙂 As I mentioned hoverbike is a kitbash of aviation parts in various scales ...and this one is fully scratchbuild.8 points
-
After a bit of a delay (going to NL to see my daughter get her MA - the travel restrictions were eased just in time for us to get there!) I’ve made some progress. Fuselage halves stuck together and clamped: Lots of sanding was needed at the top to get the top windows smoothed in and polished again. I had the enviable option of three viable vac canopies: Canopy on and looking good: Next, I need to fill around the canopy and all around the wing/fuselage joints, including the flat underside. There Will Be Sanding. And then some of Mr Halford’s finest primer. (after masking, of course) (oh, and tailplanes, I suppose)7 points
-
Miles late for Charlie time, but I’m still here. The best 1/72 Vixen ever, without any doubt. Staggeringly, ridiculously good. I have always believed that piece of angle iron down the central strut of the windscreen was at least partly designed to cut any barrier strands that were in danger of decapitating Destiny Angel (which autocorrect seems to want to render as Density Angel - has the poor girl let the end go that much in middle age?)… but with the amount and quality of your research, I’ll go with your version; besides, part of the demisting system seems more plausible. Glad you did it, though; that odd angular windscreen is an integral part of the sheer de Havillandanity of the entire beast. In the idle moments of my too-long period of enforced inability to model, I too have been experimenting with pencils. Your results have inspired me to stick with it.7 points
-
Last update before i put it together I've done a tad of oils ,not too much ,and I've given it a coat of windsor and newton Galleria matt ,which isn't totally matt but still gives a nice sheen , just enough so as not to make it blackboard flat, wing struts are secure, and just about all painted ,only some small details left ,like the wing airel struts and rigging and paint the rear ski assembly, a few pics Engine looks good ,but the headlights not so, they weren't a great fitting part, What i found out quite recently though was the only picture that i found of 119 has its headlights covered, or painted over in a darker colour, also 119 is a recce lizzy and hasn't got the winglets fitted, now i found this out very late, after the wing struts were fitted and aligned, and removing them would need some very gentle remedial work that this kit would not handle well (or the handler) so the winglets stay ,but no pe,and bombs on the winglets ,the headlights will be masked and painted over ,which is a good job because they look terrible The pe cowl cooling flaps, is not the best fitting bit, dora have you butt joint it ,after you've shaped it to the exact dimensions of the cowl with ca ,yeh right, my advise is to use little sections of foil tape , it sticks like the proverbial poop to a blanket and stick that around the inner cowling , don't use bits of plasticard, there isn't enough play, then once the pe part is rolled to give it a curve (don't have to be perfect) stick it to the tape sections , close to the cowl then with thin ca from the rear weep it in ,this part then fits over the fuselage to the correct position A view inside You can just make out the little pins i put in the wings here to attach the front strut, the rear one has no locating point identifiable on my kit so i left it to float and glue after, there is a bobble on the kit wing to locate the strut, but really this is a little less than useless ,do this and you can glue the struts in place by dry fitting the wing and resting it in the pin, once the struts are set you can handle the kit a bit more ,which is essential to fitting the wings after painting, it sounds more trouble but its not Cheers all 👍7 points
-
Strong and silent types eh? 😁 No modeller should be without one Michael! Perfect for either resting the model on to avoid breaking bits off, or else getting the head down for a few minutes' kip at the bench whilst waiting for glue to dry... 'Fetish' 'Freud' and 'Vixen' in the same post Terry. I think we're all beginning to get the picture... 😁 Had it out drying in the wind and sun on the windowsill a couple of weeks back Adrian and one of our tomcats nearly sent it spiralling to oblivion... 😁 A classic case of: 'If I knew then what I knew now, would I ever have started?' Simon. 😄 Hi Pascal and thank you for sharing such a fine set of pictures! (I've them bookmarked now). Admiring your superb work on the Hydrograaf last evening has me flirting with the idea of trying a ship myself in the near future: the Gull lightship has recently fascinated me after reading about a predecessor in R.M. Ballantyne's evocative The Floating Light of the Goodwin Sands: From a member of the legal profession this seems on the face of it rather unlikely Steve. 😁 Deeply touched by your first paragraph James. 🤗 In trepidation at the second as to all the flaws that Mr. Kilner will notice... Bit dazed myself to be honest Keith in finding that it eventually worked! Err. There's an RFI now up over here. I finished something. Not quite sure how that happened....7 points
-
Dear all, Posting pictures of the remaining two of Valom's 'Duel in the skies' kits of the Camel and Dr1 Triplane. Great little (tiny!) kits from Valom - built OOB. Regards Dave6 points
-
Hi everyone. I've always had a soft spot for the Viscount, flew in them many times in the 70's- early 80's (Cambridge to Jersey). Loved the look of them and the distinct sound of the RR Darts. The kit went together reasonably well, just a shame its so expensive for what is, in 1/144 a very small kit. I wanted to do it in an in-flight pose so I borrowed a Corgi stand until I've machined up a more permanent display stand for it. I removed the props and replace them with clear plastic discs which were then air brushed yellow whilst they were mounted on mandrel, held in a battery drill. The decals are from 26 decals. Paints are a mixture of Alclads metalics, Mr colour and Halfords appliance white. Comments and criticism welcomed. Thanks for looking gazza l6 points
-
It's been a wild ride from Catapult one to the landing approach, and now you've hit the three wire! She looks fabulous and you are entitled to be very proud of this unique build. I'll wager @Ex-FAAWAFU 's old Seaboots there isn't another one on the planet.* *(Who doesn't love the smell of salty leather in the morning?) (Did I say that out loud?)6 points
-
The prototype (which the Airfix kit depicts, obviously, as the only that was built and flew) was the Rotodyne Y. There was a proposed larger Rolls-Royce Tyne-engined variant, known as the Rotodyne Z or FA-1, which is what what was ordered by New York Airways (possibly licence-built by Kaman) and BEA. That also would have had longer wings with swept-back leading edges, and a 'beaver-tail' arrangement at the rear. I built one a few years ago, using one-and-a-bit Airfix Rotodynes, and a Revell Transall C-160 which contributed the engines and part of the wings: I'd happily buy a 'new' one though - although I have bits left over to build a prototype, it would require splicing parts from two kits (I also later bought an incomplete kit off eBay) and, newly-created decals would be welcome! Tim6 points
-
Merci mes amis. I have been wielding my paint brushes over the past few evenings. I have a lovely set of Windsor and Newton Series 7 brushes, and you can still get really fine lines with a No.3; amazing. Airfix suggest Oxford Blue for the overcoat, but that seemed too dark, until I went on-line and saw how dark the French uniforms actually were. Oxford Blue it is. The gaiters are a mix of German rey and Black, and there is still the detailing to come. His face was painted with a mix of Vallejo Flat Flesh and Vallejo Light Rust, high and low-lighted and some details added. Please bear in mind that in the photos he is much larger than the actual model piece, so it is much easier to see all the errors. And there are lots... His uniform so far (I know there are touch-ups to do eg. the red on his sleeve among others): His face and hat - the peak and front cockade of his hat are a separate part. Don't forget, these images are over five times the size of the actual part:6 points
-
Hello everybody, This is 1/32 Special Hobby Westland Whirlwind Mk.1 with the markings of P6985 HE-J No 263 sqr RAF, Exeter air base March 1941. Model build OOB except for Eduard seat belts and CMK wheels set. Paints are Gunze Sangyo acrylics. Happy Modelling6 points
-
Alright pushy...😁 Add some brass wire as you do with these things and sprayed some primer to see how it looks. Using the enterprise neck part as the rear of what to come I think could look good, neededs a lot more greebles adding and definitely need a nose section now.6 points
-
V quick progress report. Like Terry @Terry1954 I've been masking. Spent all Friday evening on it. (slight hyperbole - did stop to eat, drink wine, chat with Mrs F and watch a bit of TV; still it felt like all evening….) But have stopped short of masking the whole of the underside (p'raps not as paranoid as Terry? - p'raps foolish? - p’raps lower boredom threshold?) Topsides paint later hopefully. Random thought. If any paint lift on de-masking it might just show the alclad ‘chipping’ coat. Might then be able to claim it as a designed part of the weathering process. In which case I’ll come back and edit this post to delete this remark……6 points
-
Two weeks ago I started Gulf War Tonka. I had to do a pause in my maritime project which appeared more troublefull than I expected. I hope you will find here some interesting and helpfull points and... sorry for my english 😉 . As usuall, I work together with my 8 years old son who is big history and aviation's fun. He supoports my high morale strongly 😉 He cutted almost all plastic parts, glued with Tamiya Extra Thin, however now it's time for me. Working with interior are quite long and complex, every seat contains about 15 parts. It was a little shock for me as I usually do planes of II world war era, far less complicated. 2 warnings: 1. You have to fill or cover gaps in the floor, as resin seats are narrower than plastic: 2. After fitting seats, there is almost no place between pilot's seat and dashborad for steering column. Dry-fitting and cutting both seat's back side are must! Best regards, Michał (and Mikolaj)5 points
-
mesdames et messieurs: the one and only, fantastique, unique sexy high-finned Mirage 2000 prototype 01: Mirage 2000-01 Prototype ESCI 1/48 + Eduard PE + Master pitot + Fonderie Miniature Magic missiles + Cocardes magazine for inspiration + BM GB support the first 2 Mirage 2000 prototypes originally had a differently shaped, higher fin. 01 got the series fin relatively quickly though! and is now in some French museum in the later white scheme ESCI very quickly released a Mirage 2000, but unfortunate, (or fortunately for me!) they tooled the original protoype fin and radom. (and also provide accurate and still great decals!! ) They relatively quickly noticed their error and updated their molds in respect to the fin. The radom is still the metal one with access panels that is only suitable for the prototpyes .... the wing leading edge angle is generally too big as well and is more representative of the Mirage III wing shape... the kit itself is great, incl. nice recessed panel lines. the Eduard PE adds exactly were necessary. maybe it is the best fitting Mirage 2000 kit out there! voila: work in progress in the still ongoing French Fancy GB 🇫🇷 (Gallery) how all started 3 month ago: the original in the air in ~1978 https://images.dassault-aviation.com/f_auto,q_auto,g_center,dpr_auto/wp-auto-upload/2/files/2017/05/M2000-01_1er-voli.jpg I am not sure if 01 ever carried any weapons or even pylons that is.... but they look cool and surely were a possibility for some airshow or display.... for those interested in details: 2 times ESCI Mirages 2000s, one peculiar, unfamiliar high fin, one series production fin (both without ECM on the wing rood trailing edge, but differently shaped! ) both of course have the slightly wrong shaped delta wing of the Mirage III series.... ESCI never corrected this... I hope you like it! merci! Werner5 points
-
I have been doing this as a distraction from my more involved builds. This is a model of an Aircraft that flew from Poland to Buenos Airies via Senegal and Brazil in 1933 by Stanislaw Skarzynski. The smallest aircraft at the time to complete a trans Atlantic crossing. The Aircraft was built in 1933 and had extra fuel tanks, two in the wings and one in the rear cabin in place of the rear seat. The rear side windows were also removed. The kit is lovely and with very few parts simple to construct. The kit was manufactured in 1985 and was built OOB apart from the exhausts which were from Albion Alloys brass tubing. Decals were from the kit and went on quite well with a few applications of softener. The model was brush painted with Humbrol enamels as usual. Thanks for looking in Chris5 points
-
Evening all, the latest completion done and dusted- Zvezda's superlative Su27ub. I've always thought the two seat Flanker a fine looking 'plane ever since Heller brought theirs out in the very early 90s. When Zvezda announced theirs I was very keen to get one and was even more excited when the decals included Red 10...the only Russian Flanker done in this very smart overall grey. I've occasionally wondered if it isn't dressed to replicate a Strike Eagle for the purposes of DACT, but whatever the reason, the scheme suits the graceful lines of Sukhoi's thoroughbred. Completely OOB, with paints from Tamiya; the overall grey was XF63 if anyone's interested. The engine covers were Mig Ammo and heat staining with Tamiya clear yellow, blue and smoke. Would highly recommend it; have the Su27SM and Su30SM in the stash!5 points
-
What you feels in yer waters me dear lad is an excess of chamomile teas in Yorkshire's tearooms, fortunately for us I feels in mine that we are in for more of this treat. Worms. Why do my 'worms' never look so controlled environmental? I can never get straight, even lines of blutak.5 points
-
Well, having taken a deep breath and gone several steps backwards, I'm back with another update. Here are the two kit intake ramps with the etched grilles from the Eduard 72686 undercarriage set: and in place and test-fitted with the port intake front: I'm really happy with them - I wish I'd known about them before I started trying to fit the resin intake ramps. Here they are painted up in Barley Grey and white: Of course they're missing the distinctive patterns of bleed holes, so I've tried to replicate them with a darker grey. Masking them up was fun and painted with Dark Gull Grey as per the cockpit interior: They need a slight touch-up but I'm happy with them, I think. They should have rounded corners, but my eyesight just ain't up to masking that shape that small! I've glued re-glued the fuselage halves back together, so some actual progress (or re-progress). More soon... Simon5 points
-
Once again two of mine behaving most uncat like.5 points
-
It's a funny thing but every time I drop in to read this thread, I think I want to buy one of the Lancasters. This happens despite: the cost, which is simply too much on my pension my lack of interest in the subject, which I became bored with years ago after making lots of them including a couple of the 'big' Tamiya ones, as we called them at the time, in our innocence my inability to sustain interest in anything for the year it would take me to build it my one bedroom 'cosy' flat, which would probably fit inside the box the Lanc comes in my almost total inexperience of 1/32 aircraft, caused by not liking them very much my insight that I'm vulnerable, like most people, to a sort of child like desire to belong to the big kids gang by having the cool toys. my fear of missing out, carefully nurtured by the advertising industry and the model manufacturers and traders And right at this second, I really, really want one. Fortunately, this madness will go away in a minute or two but ain't people complicated things when it comes to their wants and needs?5 points
-
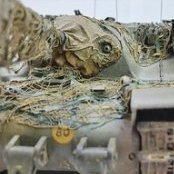
Hello everyone, I played around a bit with a stowage options for Ausf. H. It will probably look like this. I may add fascines as well if I figure out how to make them. It is mostly Value Gear, except the wooden box, which is some other brand (I don't remember which) with lid added. It is not exactly the same as seen on a reference photo, but close enough. Ausf H. received Mr.Surfacer 1500 primer. I did some additional cleanup before applying RAL 7021. This time, it was Gunze lacquer (Mr.Color 513). It is not that accurate straight from the bottle because it's a bit on a light side, but I love using Mr. Color for base coat. When cured, it is extremely hard and it can endure all kind of harassment. Also, it will be covered almost completely by RAL 8000. Wheels of PR 8 tanks were painted white to protect rubber from overheating. However the paint rubbed off from most of the wheels after the few months. It usually remained visible on the return rollers. There's chipping fluid applied before white paint, so I will additionally chip the white paint. Ausf. H will be shelved for some time for now waiting for the RAL 8000, and I am switching back to the Ausf. G. Decals are applied. These are Archer's dry transfer decals. Applying them always makes me nervous, because there are so many ways to screw things up. Some of them were applied as dry transfers, while some were first applied to decal film and than applied as water slides (turret number for example). Anyway, the disaster was avoided this time Font is a bit different compared to the real vehicle, but it works for me. I usually don't like applying varnishes and avoid them whenever I can, but this time I had to apply some (Mr. Premium Clear Flat) to seal the decals and to protect the base paint, which is Mission Models and is a bit fragile. And finally, after spraying few coats of chipping fluid, here's the camouflage color applied. It was applied very sparingly. Looking at the photos of PR 5 vehicles, including 131, it was the case in real life. The reason for this is probably because all of the vehicles had to be painted in one night and they probably had very little time per vehicle to paint it. Also, I guess that paint supply was very limited. Some of the PR 5 vehicles were almost unpainted, with only few streaks here and there. It is not known which paint was used, except the fact that it was yellow and lighter than RAL 8000. There are many theories and I am leaning to the one that it was Italian paint, but it is just I guess. I used MRP Light Stone, which actually is not light stone because I got a bad batch. But it looks good to my eye. After that, I did just very mild chipping: And than tracks. Blackening fluid applied. I used VMS blackening fluid, but the old version, where you have to apply two different chemicals. Even though I was trying to remove all the bubbles, it was not very successful, and most of the nooks and crannies were unaffected by the blackening fluid. Fortunately, shiny metal is partly covered by the residue so it is not that visible. I will have to find some better way to deal with bubbles in the future. That's it for now folks. Cheers, Nenad5 points
-
I've been doing a bit more work on the body and have added some internal structures such as a rear parcel shelf and a bracket to support the dashboard. The body's also had its first coat of primer. Superficially the body looks OK, but up close the primer reveals a lot of defects including some characteristic striations caused by the 3D printing process. It looks like I've still got some work to do! Cheers5 points
-
Stretch the forward fuselage. Slightly bigger wingspan with tip tanks and outboard pylons. Bigger Twinwheel maingear. Astrodome. Radar nose. Bigger fins (B-24?) Smaller (square?) Fuselage windows. Olive over grey paintjob. That should about do it.5 points
-
What a load of stuff that I'd rather not mention on a family-friendly forum... Annoying people of every kind exist in all communities while the vast majority is friendly and only glad to help. Just have a browse through the many pages and posts of this forum and you'll see it ! Now back to the Revell kit, since this thread is supposed to be about this kit and nothing else....5 points


.thumb.jpg.158e2e086d45b8f96b7d93b8bee8dc21.jpg)


This leaderboard is set to London/GMT+01:00