
Leaderboard


Popular Content
Showing content with the highest reputation on 21/10/21 in all areas
-
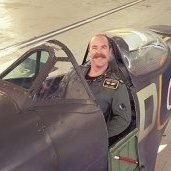
Hi All My latest completion is off the bench after a 6 month project build. It is the Trumpeter 1/32 F-14D Tomcat done in the markings of VF-101 Grim Reapers. The model includes resin ejection seats, resin wheels and resin wing seal bladders. The decals came from DXM and are printed by Cartograph, they performed flawlessly. Paints are all lacquers from MRP and SMS ranges and the weathering was completed using Tamiya panel line wash, Tamiya pastels and AK colour pencils. There are some known inaccuracies with the Trumpy kit but fixing those was outside the scope of this project so I picked my battles. Anyhoo - enjoy some pics. I hope that looks ok, I'm quite happy with how it turned out. Cheers Andrew P.32 points
-
Hiya Folks, A bit of a shelf of doom one this,....... I finally got it folded, finished and wearing the markings of 822 NAS aboard HMS Searcher in August 1944. It was brush painted using a combination of Polly Scale acrylics and Humbrol enamels. Here are some photos of 822 NAS Wildcats aboard HMS Searcher; And here is the model,...... the main conversion from the F4F-4 configuration to the Wildcat Mk.V,.... which was an Eastern Aircraft built FM-1,... wa the deletion of the outboard gun bay in each wing,..... the FM-1 only carrying 4 guns and not 6. Cheers Tony16 points
-
Hello all, here is the latest from the shed., It’s the old Heller SAAB Lansen kit with extra cockpit detail, belly fuel tank and airbrakes from Maestro Models. The markings came from Moose Republic sheet 72002 from which I chose to do the J32 E from around 1994. I did a little rework on the kit parts before I started in the form of rubbing down the raised detail and then re scribing new panel lines. I also reshaped the gun ports (ish) and cut out the slots where the airbrakes go. Construction was straight forward after that other than bending and gluing the etch airbrakes and making a few blade aerials. It’s finished with Humbrol enamels and Xtracolor varnishes. I used Tamiya powders to try to give the effect of slightly faded paintwork as some of the pictures I have seen of these aircraft showed the paint finish ranging from very faded to pristine. It was great fun building a Lansen and revisiting much earlier modeling times via the Heller kit, which I did'nt think was too bad at all for an oldie. Anyway probably not the most accurate Lansen in the world but I’m happy with how it turned out, heres some pics. Hope you like it The etch detail fitted perfectly Very fiddley bending these, but well worth the effort I think. Thank goodness I have a bending tool. I was surprised how much bigger than the Draken it is. Thanks for looking Pete15 points
-
As promised over on the build thread HERE here are a few pics of the finished build. A rather odd sort of duck, but a nice addition to the collection... Ed15 points
-
Hello Everyone This is Tamiya’s excellent 1/35 Panzerkampfwagon IV Ausf.H. I’ve always admired Tamiya’s box art even though the AFV’s are usually just the vehicle against a white background. There’s something about their artwork that makes you want to buy it in the first place and then to at least attempt to replicate the fantastic artwork. Anne 823 hasn’t had a difficult life and I wanted to keep the weathering to a minimal but realistic level. The only modifications were to the springs on the mud guards, a metal tow cable, the outer doors on the turret Schurzen and the main Schurzen on the sides of the tank. It’s been painted with Tamiya paints and weathered with some of the Mig Ammo Splashes range and I also used a selection of Windsor Newton oils. It’s also the first time I’ve spent some time on figure painting, lots of lesson’s to learn but I’m getting there. Many thanks for looking. Regards Trace13 points
-
Greetings to you all, Well I have just finished my Avro Vulcan as XM607 just prior to Black Buck 1. I was able to source the long out of production CModels Black Buck weapons set, thanks to @DougC, which really helped as it has the early non-faired pylon onto which was mounted the Dash 10 ECM pod. The old Airfix Vulcan set helped supply the other faired pylon for the port wing. The Shrike anti radar missiles were mounted to these on later Black Buck missions. Apart from the CModels weapons set and some XtraDecal decals for XM607 she has been built out of the box. I had a few issues with the intake seams, but a few cycles of filling and sanding soon had lovely smooth intakes. Painted using Tamiya and Mr Color paints. Onto the pictures then! I am quite happy with how she has come out and feel I have captured XM607 fairly accurately (there is always something I miss!) just before she set out on her historic mission. Many thanks for viewing Matt13 points
-
Greetings, hope you are all doing well! This is my latest completion, Hasegawa 1:32 Boeing P26 A Pea Shooter. This is quite an old kit, the plastic was hard and brittle, one yellow sprue was more like bakelite. I built this as part of a club build and put in a bit more work for this one. Quite a bit of work went into the cockpit. The instrument panel was replaced with a spare Kingfisher decal and I built up a front piece for it. The seat was replaced with my first attempt at vac forming and the rest of the cockpit was embellished with various bits and bobs. Typically when the fuselage was closed up you couldn't see a lot so here are a couple of WIP shots The back cushion was shaped out of miliput and lap straps were meant to be made from tape but found some Corsair ones which looked much better. I also added some cockpit placards to add a bit more interest. The gun barrels were replaced with brass tube. The kit comes with raised detail but I removed this as the joins while being not bad werent really good enough to keep the detail. The panel lines and rivet detail was then redone, using the rivet wheel for the first time (a second first!). All the paint work is from the airbrush with copious amounts of masking tape and ALOT of patience! The only decals were the badge behind the cockpit, the '23' and the 'US ARMY' on the under side. For the engine I replaced the push rods and exhaust/inlet piping with brass rod and some wiring harnesses added. There is a lot mentioned regarding the fit of the cowling around the engine so with this in mind I added a couple of thin slivers to widen the cowl. This worked really well and I didn't have to do too much faffing around in fitting out the cowl. It was still a right pain though and had to be done slowly. For the rigging I opted for rigid stainless wire, cant remember the size but it was quite fine. I think it is slightly over scale but it serves its use. The kit comes with all the rigging holes open so its a big invite to throw it in there. I did simplify the rigging between the spats as there is a bullet shaped fairing where the wires crossed. This just got far too complex so was left out! I think that's about it, quite pleased with how it turned out especially after that paint job! Thanks for looking in! Bob13 points
-
Hi Folks! This time I read all the comments about this particular aircraft in 1/48 scale before starting the build. Dang! Just in time to put aside the Italeri kit and went for the Airfix new tool! Definitely, it worth it, because the building of the kit was a delight (after the Italeri's Hurricane experience). I used only some decals from the Italeri kit, because I like the yellow RLM 04 spinner tip on this particular Stuka. The pilot and rear gunner figures came from Zvezda kits. Here are the photos of the Airfix kit for the Junkers Ju-87 B-2 'F1+DP' of 9./StG 77, Caen/France, August 1940, during the Battle of Britain. Cheers and happy modelling, Cris.12 points
-
Here’s my just completed model built from the newly released Airfix kit. It’s like the curate’s egg: good, in parts. I fixed the incorrect aft bomb bay fairing with some styrene rod, and I appreciated the mask parts provided for the wheel wells. The cockpit and bomb bay are well detailed for the scale too. But … the kit is let down by the transparencies. The nose cheek windows would be a foot thick in real life and the main canopy framing lacks finesse. I’ve been building a Tamiya B.Mk.IV alongside this one and the clear parts are far superior. Still, it’s a big improvement on the Matchbox kit and I’m mostly happy with the finished model.11 points
-
1/24 Citroën 2CV Revell kit OOB, except for some wheels and tyres borrowed from my parts bin (originally from a Fujimi Nissan Silvia kit) and additional Green Stuff World graffiti decals. Nicely detailed and well engineered kit, fun build. Build log here.10 points
-
Like so many of you, the Mosquito in all it's various iterations of color and equipment has been THE favorite since my early childhood. With all the excitement about the new Airfix Mosquito, I thought it would be fun to show what our new Airfix build will be joining on the shelf. I hope everyone follows on and posts their Mosquito collection as there are so many of you that are as passionate about this aircraft as I am and we'd love to see your builds. My son's build of the old Monogram 1/48. Conversion I did for my Dad years ago, Monogram 1/48. Airfix conversion for my "Holly Wood Air Force", "633 Squadron" 1/48. FROG 1/72. Matchbox 1/72. Old Airfix 1/72. Airfix Lancengine 1/72. Tamiya conversion 1/72. I wonder how many different Mossies we can get on one thread........9 points
-
Grumman Wildcat F4F-4 from Tamiya 1/48 converted to an English Martlet II (F4F-4A). I used the Aires Gun bays,Quikboost resin engine, vacuform canopy from Rob Taurus and decals from Xtradecal .It depicts an aircraft from 888 NAS,FAA,HMS Formidable during late 1942.9 points
-
It took a few attempts but I think it is a reasonable representation.9 points
-
Hiya Folks,,.... Another once across the line,..... and one more addition to my growing 45 Sqn collection. This is the excellent little Airfix 1/72nd Vampire T.11 with decals from Xtradecal and a couple of old Aeroclub metal seats were put into the cockpit to help with nose weight. The model was painted using Tamiya rattle can bare metal silver and brush painted with matt varnish to better replicate RAF Hight Speed Silver. I tried to make it look well weathered due to the tropical climate,.... but I may have over done it?; And next up,.... I`m tackling the same kit but with the High Planes conversion to make the early variant with framed hood, no ejector seats and smaller fins,..... which also includes decals for a 45 Sqn aircraft,... photos of the real aircraft show that it did in fact have roundels on the booms, so the image below must be a printing error;8 points
-
Here’s my 1/48 Airfix Chipmunk T.10 in University of Liverpool Air Squadron markings. These aircraft were based at RAF Woodvale. This was a fun and easy kit to build. I used the Kits-World 3-D printed instrument panels and seat belts, which were a measurable improvement over what’s supplied in the kit. I’m already planning my next one.8 points
-
So I was going to finish off the interior today after work but......a couple of my paint racks turned up so I decided to add a bit of Bling to the cave instead 🙂 I'm still waiting for more "Essential " items to arrive but that will do for now. Hopefully I'll be able to crack on with the interior after work tomorrow. Thanks for looking back soon 🙂👍8 points
-
G'day BB, As Jim has stated, the first group of A-24-DE aircraft were from the 27th BG and came to Australia immediatly after the Louisiana war games. 52 aircraft had outer wing panels and enpennage removed and were loaded aboard SS Bloemfontein which docked in Brisbane on 21 December 1941. The aircraft were then trucked to RAAF Archerfield for assembly. They were originally intended to be sent to the Philippines but the rapid success there by the japanese negated this plan. The A-24s were reassigned to the ill fated Java campaign. Less than 20 returned to Australia. In February another 15 aircraft arrived and these, with the survivors, were allotted to equip the 8th BS of the 27th BG. On 31 March 1942 they moved up to 7 Mile Strip at Port Moresby in New Guinea. Their operations through April were escorted by the Kityhawks of No. 75 Sqn RAAF. The RAAF pilots had nothing but great admiration for the American aircrcrews in their outdated aircraft. Later, USAAF P-39 aircraft took over the escort duties. By the end of July, the squadron had been fought to a standstill and, with its few remaining aircraft, were evacuated to Australia. The few surviving A24-DE aircraft were assigned to observation, liaison, and communication duties and, as unit ''hacks'. One of the first group of A-24-DE aircraft on arrival at RAAF Archerfield. The 27th BG inscription can be seen under the A/C number on the fin. More Banshees awaiting assembly. I believe that these A/C are probably from the second group that arrived in February. Note the 'Navy style' rendering of the A/C serial on the fin. A couple of aircraft, probably from the second group, shortly after assembly. 41-15766 was lost in late July 1942. The 'Navy style' rendering of the serial and the yellow(?) aircraft number are clearly visible. The AWM shot you posted of 41-15801 was taken in February 1944, well after the exploits of the 8th BS operating out of Port Moresby. The aircraft had been assigned to a Liaison squadron by then. The shot below is a larger and, I think, clearer version of the one you posted. No. 4 Sqn did not move to New Guinea until November 1942 and White empennages weren't promulgated until August/September 1943. The photo shows a number of errors in the colour profile, particularly the serial, which is not stencilled but hand painted and, I believe, that the band on the cowling is painted on and not a reflection. I have not seen this band on any A24-DE of the 8th BS and I believe that it is peculiar to that particular aircraft or, to the Comunication Unit to which it belonged. If the aircraft had been painted accordance with the orders issued, it would also have had white leading edges on the outer wing panels added circa November 1943. Finally, the colour shot you posted is of an A-24B-DT, so the markings on it are irrelevant. These later, Tulsa built, aircraft, were produced in 1943, and were based on the SBD-5, whereas the earlier A-24-DE was based on the SBD-3. Most differences were internal equipment, but there are some noticable airframe differences, particularly around the front cowling. Not also the DF loop on the ventral fuselage. Below is another late war A-24B-DT. Apologies for the long winded reply to your question, but I hope the above helps provide some answers. Peter M8 points
-
Evening all, I decided to give my Waterloo dio figure making a break and get back on this - as it still needs a little work to finish, first I made to Two real Jerry cans / airbrushed them and placed them at the rear in the frame, then I made the Three aerials from some wire I have, and I finnished off with a couple of flat coats airbrushed over. Still needs its tow ropes placing but I need to make some locking attachments for them as mine broke. Erk.8 points
-
That looks just like the stuff to me Terry I find it intermittently useful. And I haven't had to go out and buy anymore Dymo tape.... Even it that is more wordificatory correct (as to which I reserve my position m'lud) it just sounds so vile that I don't think I can even bring myself to think about it More preparatory phase first G Added some more colours - various well-thinned tamiya browns and greys: Mostly applied through random stencils - as also used on occasion I believe by our notable Naval Brother, not to mention a certain senior brown job. Until. Endex. And then knocked it back/blended it together with a light dusting of well thinned Tamiya Sky Grey prior to painting. So that the final post preperation/pre-painting look was this: And (finally G), I began painting proper on the underneath with a first session with colourcoats medium sea grey. Again well thinned; and applied with a random 'marbling' type technique; looking to keep some variation in tone/shade/hue to avoid bland uniformity and simulate variable fading/reflectivity/shadow - but without it being too stark: It's basically a matter of taste of course; but I think I'm pretty satisfied with that. Post shading tbd if required. Chipping, washes and filters tbd too (obvs.) Fun eh?8 points
-
Evening all, I've spent a bit more time at the bench this week, as well as seeing a 1:1 scale Sunderland in the flesh - well a Sandringham actually but close enough. We had a weekend down in Southampton and whilst there I sweet-talked the wife into letting me spend an afternoon at the Solent Sky Museum. If you're in the area it's well worth a visit - lots of great exhibits and history about Southampton during the war years but the star attraction for me was of course their rather beautiful Sandringham that used to fly for Ansett: They even let you dive inside - the interior is a little different to the one I'm building but it was great to have a nose around nevertheless. I imagine this example is a bit more comfortable than the Sunderland! The main reason for my visit was photograph and have a measure of the beaching gear which is a job I'm going to be tackling soon, and I managed to get plenty of useful reference shots: On to the model itself, I thought it time to have a closer look at the transparencies. It's important to get the fit of these correct just in case there was some additional structural work to be done before commencing on making their interiors. The turrets were carefully cut from the backing sheet and test fitted to the model. Here's the rear and mid-upper in situ - both fit really well: The only work needed here was build up the rear turret fairing a little more with card and Milliput. The cockpit glazing itself fits remarkably well - phew! For the nose turret, the MkII I'm building still had the early type fitted. This will be installed in the fully retracted position so I have made and added a platform for it to sit on as well as adding the details around the opening itself: The props have also been painted and lightly weathered: And look the part when installed on the engines: And that, boys and girls, brings you up to speed. Until next time, Tom8 points
-
Hi Guys, I've just ended up this model. It was a challenge to assemble all in one shape. Enjoy See you soon with the new project, regards to All7 points
-
Today's update. I noticed that I hadn't cleared away last night and that this project was getting as scruffy and inefficient on the desk as it is in my head. So I didn't just tidy up but I spent an extra half an hour preparing for a hypothetical 'AOC's inspection'. I scrubbed down the surfaces and put everything back into its proper place. I have a habit of discarding large sections of sprues when they empty. I find this very encouraging as the box of chaos slowly shrinks away to nothing. As you see, there's not a lot left of this one. These are my sub-assemblies now tidily sub-boxed so I don't spend ages hunting for parts. Some people say I'm a well organised chappie, often with a slight raise of their eyebrow. I notice that the ones that say and do that that tend to be hopelessly confused about everything in their own lives. Apart from that, I've been on a six mile dog walk in the rain to think about this and my other project. The Vulcan got a huge update this morning, especially considering that I haven't actually received the kit yet. I've less to say here. My grain of sand in the Vaseline of the Mk V project, the realisation that I can't expose as much of the inside as I'd wanted, doesn't matter. It's just a side effect of learning how little room there is in a tank. The thing is, I've never been inside one. I haven't even looked inside one. I've seen many YouTube explorations of tanks, as well as more 'professional' documentaries but like estate agent's brochures, it's difficult to appreciate how wide angled their lenses are until you are actually standing in the kitchen, er, turret. A Mk V is a big object and I assumed that there would be a reasonable amount of space for my sightlines but as someone put it, there's an awful lot of gubbins in there. The engine and gearbox unit alone must be 15 feet long and the sponsons are full of guns. I'm short of words to describe what it must have been like inside under power and under fire with nowhere even to duck. And they are probably all like that right up to the Challys and Abrams. Believe it or not, I wanted to join the RTR when I bunked off from the factory and ran away to the military. Fortunately the bloke in the blue suit in the joint services recruiting office saw me first and called me Sir and that was enough to change my life forever. I'm rambling. So, I've learned a lot, and when I re-read memoirs like A Company of Tanks, by Maj William Watson, a brilliant tale of the tanks in the Great War, I'll have a much greater understanding of all the details. (I highly recommend that book btw.) I won't change much on the model at this point. It might be possible to leave the roof dismountable, though the unditching beam rails will be a problem together with the considerable distortion the roof has undergone lately. I'd planned to weld it into place with very strong cement! Even if that's not a goer, I'll still enjoy the process of finishing the insides with debris, chipping and bloodstains even if it's only visible in photographs. At least you will all have a look at it before it's sealed like a tomb. And so what if it isn't seen by anyone apart from me. Even if it had proved to be as I imagined it, all opened up like a kipper, only one or two people would ever have viewed it before it fell foul of one of my periodic culls and went into the bin. In sum, nothing is really lost and much has been gained. Tomorrow I'll crack on as if I were normal.7 points
-
1/48 Revell Rafale B Escadron de Chasse 1/4 'Gascogne' Operation Chammal, 2018. Build thread Cheers Dave7 points
-
Hi, My next French machine, this time of extremely short life time in my stash: when I bought the kit about two weeks ago I immediately started build... This is Kovozavody Prostejov new mold kit of D 501 (1/72). I used the paint scheme not from the box. It is machine No 198 (R-228) belonging to GCII/10 in January 1940 ( so still in Phoney War time) based in Rouen-Boos. When this squadron got more modern machines the Dewoitines were phased out to flying schools, it is likely that this particular machine went to Polish training center in Lyon-Bron. I reshaped the wheel spats to unique one seen on some D 501 (including that one). Here she is: Comments welcome Regards J-W6 points
-
Last Friday CV-22B 08-0047 (Knife 71) made a planned visit to Newquay Airport, a rare sight in Cornwall and something worth getting the wife to keep my dinner in the oven for. Things didn't quite go to plan for the crew who ended up staying in Cornwall for five nights. I popped by the airfield the next morning hoping to catch its departure but it soon became obvious that the Osprey was going nowhere. With rumours that another one was on the way down with parts I decided to hang around for an hour. While waiting this Spanish Navy Citation arrived for a quick stop, surprisingly either unnoticed or ignored by others waiting to see the second Osprey. The second Osprey, 11-0059 eventually arrived for a quick gas and go.6 points
-
Is that one of them turbo fag lighters ? ( tho you probably can't say that in Americy )6 points
-
Daryl took matters into his own hands, trying out a little soldering…. The learning curve was steep…6 points
-
Here’s my 1/72 Airfix Blenheim Mk.I finished just last week. The model won 3rd place in its category at the Granitecon show in Manchester, NH this past Sunday. It was a well attended show with over 500 models entered across the various categories.6 points
-
It's been a while since I updated this thread but work is continuing in the background on the big B-24D. Since last time, I've painted the engines and installed the nacelles onto the wings: Undersides: The tail assembly has also been completed and added - along with the rear turret. The unsightly join has been minimised with painting the mating surfaces black before joining and although not perfect, it's certainly better than simply sticking the parts together. I've also added the 2nd Air Division white circle on the tail which will be masked before the OD goes on: I now need to finish off the cockpit and nose interior before adding the final transparencies and she gets a splash of paint: Until next time, Tom6 points
-
Some images of Ar234 ETC. HTH Giampiero6 points
-
Pretty much all the decals are done now. I'm not sure the fuel filler is the correct pattern, but it'll do. Mirrors have some hefty ejector pin marks on the lens which look like there should be a plated part to make the actual mirror, but I couldn't see any reference to such a part. I ended up drilling into the ejector pin hole to provide a support when painting the mirror housungs. Mirror lenses were made from thin plasticard coated in Bare Metal Foil. Just need to attach the mirrors and license plates and I think this one will be complete.6 points
-
Cracking on with this, one little bit (or several little bits at a time)! I'm waiting on the Hypersonic fin tip arriving so in the meantime I painted up the front coaming, added the HUD and the last bit of the Quinta set: The windscreen was masked off using the Furball mask set and sprayed before being fitted: That's about as far as I can go with the fuselage for now. I had toyed with the idea of fitting the cockpit frame and centre section but I think I'll leave these off until after painting as this should make it easier to mask up. In the meantime, I built up and painted the exhausts. Now, I was a bit dubious at the way these were to be assembled but shame on me for doubting Tamiya, as they just fall together and look great fitted: The ejection seats were painted and detailed. Pictures aren't great, but you get the idea My intention is to paint and finish the sub assemblies - landing gear, pylons, MK.77s and so on in stages until the fin tip arrives. Hopefully by that stage I'll be able to fit it and go straight to priming. I'm away to Malta for a few days from the middle of next week so hope to make a dent in the above over the next couple of days, though I can write off Saturday as that's my birthday 😆 More soon and stay safe Dave6 points
-
Hello all. Sometimes in this world, something happens which makes you feel very lucky and privileged indeed. Last Sunday, I was at an outing with my model club, when one of our members asked a colleague if he knew anyone who would like to build this - and produced the 1/72 Special Hobby Vickers Vildebeest MkIII. My colleague took one look at the box, and unerringly pointed in my direction, straight between my eyes! 'HIM!' he said. I had a look in the box, but I was already hooked! I had wanted to build one ever since I heard about the fact that Azur-Frrom had produced an injection-moulded one (I had toyed with the Contrail vacform idea but never got one). I first heard about it in a copy of SAMI from August 2011, and I still have the copy waiting for a re-read (which has now been done). Well, I had a natter with our club member (Paul) and found out that a friend of his wanted him to build it but it was not his speciality, so that is why he asked around. I hope to do a good job with this (Paul and his friend have said it is okay for me to do a WIP on here). This is the boxing I have been given: It contains a supply of nice injection moulded parts: And some photo-etch and resin: A good transfer sheet with an amended #13 transfer - the original was too big (a carry over from the Azur-Frrom issue): And this is the markings I have been asked to do: Paul's friend's father (if I remember correctly) flew these in Singapore in the silver finish. I am glad about that as my head still hurts after reading about three threads on camouflaged Vildebeests! I popped a request for help in the 'Interwar' section in this Aviation Forum, and have been given some guidance and also some images which will help me out, including the fact that it does not seem to be an overall silver, but has some areas of Cerrux Grey, ala silver-doped Swordfish. I am looking forward to this, but with a little trepidation as it is for such an important reason! More in a mo, Ray5 points
-
Hallo This is my Panzer IV Ausführung H in 1/35 from MiniArt. Actually I wanted to build one Panzer IV with full interior. So, MiniArt was my choice. Here I have to say, after building aircraft for 25 years, the sidestep to vehicles and tanks is somewhat an astonishment. Soon, after building the main types without interior I choose to build them with interior. This new MiniArt kit is to my opinion the most detailed kit I have ever worked on. On aircraft modelling just the new Mini Base is close to this quality. Far behind also WingNut or anything else you know, Hasegawa, Dragon, Tamiya, AMK, also Takom and ReyField. The detail and the size of parts, here my eyes are on the very limit, with glasses and magnifier, even my tweezers are on the limit! Well, so I thought about assembling. Here I choose following idea: Subassemblies in one color only. Parts with different color will be sprayed separately. Masking must be a minimum, due to high degree of detailing, masking is nearly not possible! So I worked down the base plate and the rear bulkhead. I had to write a matrix to get along with this amount of ammunition. All grenades I intend to spray. The gear and engine is now done, and some parts of the rear compartment are left to do tomorrow. The brakes for each side will be next on my agenda. Well, next days I report more. Happy modelling5 points
-
Hi fellow modelers, This is my finally built resin behemoth, the Anigrand Lockheed C-5A Galaxy. Enjoy! I had it on my shelf for almost 10 years, never dared to build it. Just too big, I was kind a 'scared' of it. But finally last year I had the guts: I'm going to start it and finish it! This is the kit with box art: This is what you get, a lot of resin: Bags with resin parts, here are the engines / gear wheels and parts / flap hinges: Crisp details and panel lines (nice work Anigrand! I have seen worse kits from Anigrand..): Nylon, brass and stainless steel parts for a sturdy gear construction: The clear windshield part: Very nice detail and panel lines: And a very simple manual.. Doesnt matter, the placement of parts speak for themselves with this kit: I didn't want to make the dull grey MAC Galaxy, so I decided to buy a DrawDecal aftermarket decal set for camouflaged and grey Galaxies: This will be the end result: Source: airliners.net First I reinforced the 2-part resin upper deck and lower deck with aluminium strips and screws. This is really necessary as it's a very fragile construction..: Then I reinforced the slightly warped wing halves with aluminium tubing: I glued the 4 fuselage halves parts together: Here's a test fit of the fuselage halves with upper deck, with a 1:72 Piper Cub for scale comparison: I strengthened the upper and lower deck construction to one fuselage half with little N scale screws and polysterene edge strips for extra support: I constructed the tail parts together, in total 168 grams and the size of a 1:72 Fighter jet kit: This kit needs a lot of weight in the nose, it's a potential tail sitter.. So I experimented with adding weights until I reached a balance. In this case I drilled a hole in the lower deck, and made a construction of M13 bolts and nuts and washers. A lot of them ; ) : Measuring and drilling holes for better and sturdier fit of the wings to the fuselage. Only glue is not enough and not reliable.. after all it’s only resin. With a dry fuselage-wing fit I heared all kind of sounds like crackling etc. So I decided to give that construction more strength. The holes are for little bolts and nuts that will connect the wings trough the aluminium strips on the upper deck: Glued washers on the underside of the wing holes positions, so the nuts and bolts have better grip: Drilling the same holes in the upper deck on the same position as the holes in the wings: Constructing bolts and nuts trough the upper deck, upside down so the remaining part of the bolts can be used for the nuts from the wings: The advantage of this construction is that I can adjust the height of wing position by fastening or loosening the nuts: Then i glued the fuselage halves together, in parts as it's too much to glue at once: Then I started sanding, a lot of sanding. The length of the fuselage is 1 meter! I secured the tail to the fuselage by using fine steel rods as split pens. Now the tail can’t come loose anymore: The 1/72 figure is standing next to a hatch. I read somewhere that there’s a ladder in the tail to this hatch, for maintenance. C-5 crews sometimes sit on top of the tail during airshows to have ‘a nice view’. Well I believe they have some view up there! The construction I made for glueing the wings to the fuselage to keep everything level: After attachment of the wings to the fuselage there were some gaps between the joints. So I used pieces of plasticard to fill it up, after that cutting to size and sanding and filling the joints smooth: Securing the bolt positions by sealing them wit Loc-tite: Dryfitting the part that will cover the construction of the wings: Filling and sanding the upper plate: Preparing to spray the landing gear by attaching parts to sprues with a tiny droplet of superglue. The wheels are on fabricated axes: Spraying the gear: Constructing the gear parts together: Test fitting the gear. As you can see, the pile of M13 bolts and nuts as nose weight in the nose section prevent it successfully from tailsitting! Attaching the cockpit windows to the fuselage and filling and sanding again: I used Tamiya surface Primer (2 cans) to prepare the monster for the camo paintjob: Ready for a camo ‘jacket’! The sheer size of it.. unbelievable: Only the gear of a C-5 weighs about 25000 kilograms in total.. Underside airbrushing: Did the camo paint job with a friend of mine at his house. It was real teamwork; constantly refilling and diluting paint for the airbrush while the other one was paintbrushing, one holding the beast in certain positions so paint could be applied at more difficult places, holding a lamp for extra lighting etc. Paintjob ready! Applying Gloss varnish for the decals: An evening applying decals. Not easy I can tell you, carefully manoeuvring a 1x1meter model in different positions while trying to apply thin decals! Preparing the decals. DrawDecal prints its sheets in 1 piece, so you have to cut out every single decal: This one is from Altus AFB, 97th OG. The only Galaxies which flew with the camo scheme and later the grey scheme on this decal sheet. Finally, after 2 months struggling and scratchbuilding with resin, aluminium and a lot of superglue, may I present: A 1/72 scale totally resin Lockheed C-5A Galaxy! Never thought I would actually manage to finish this kit. A final coat of matte varnish to seal the decals and give it the dull look: I joined the Scale Model challenge 2019 in Veldhoven, The Netherlands with this model. Didn’t win a prize, but I didn’t expect that either.. the models at that show were outstanding quality, from international professional modelbuilders. Hope you enjoyed it, and feedback is welcome! Greetz Dick5 points
-
Hiya Folks,.... just finished this Hasegawa Mosquito as a PR.XVI of 87 Sqn RAAF,..... converted using a set of resin two stage Merlin`s, wing tanks and a Falcon canopy with DK Decals,..... although I did muck the canopy up a bit. The model was brush painted using an old bottle of Polly Scale acrylic PRU Blue. A massive thank to my mate Lee for sending me a bunch of kits with resin conversion parts which he said he wouldn`t build,..... I do hope that I`ve done you credit mate,..... just a shame I cocked the canopy up! Thanks also to my friend Franta too for sending me a photo of the real aircraft,..... as well as including this option on his superb DK Decals. Here is the WIP,.... done alongside a pair of the new Airfix kit; It now joins my PR.40 from the same unit in my `Aussie Mossie' collection!!;5 points
-
L to R Tetley, Evie & Tilly5 points
-
This old boy was abandoned when his people moved away and he was left in their rented house. He then spent 4 months in the animal shelter. We got him about a year and a half ago. He's adapted well to his forever home. Chris5 points
-
The other side was rigged. And I must have been feeling brave because..... Not as much hassle as I was expecting. Now wondering why I spent three days staring at the rigging diagram and planning it out. Who am I kidding i was too scared to try. . Thanks for looking, Cheers, Alistair5 points
-
Finally the nerve has come back to Polmont. A start has been made. More later? Thanks for looking, Cheers, Alistair5 points
-
I made a very conscious decision to complete models on my Shelf of Doom. Just 2 - but 2 big ones. This Academy Catalina had stalled for nearly 10 years. Loads of excuses, so it was great to get it finished, as something VERY different to the Airfix Black Cat that I'd built previously. Then this Airfix Nimrod, as an early R1, so slight modifications from the kit offering - and I wasn't happy about the glazed cockpit. Resulting in excuses, and about 4 years delay. AND a resolution to not let that happen again!5 points
-
My summer project came to an end!! Ireally enjoyed my second bare metal journey!! Hope you like my effort to replicate this bare metal beauty!! Some more on her here...5 points
-
Finished, not the best pics but my setups not suited to such a large build5 points
-
Love the comment. Thank you Jeff. Thank you V for the encouragement. Your comments made me smile when I read them. Thank you for the kind words. Building two decks simultaneously proved harder to for me to make a decision on which to go with. The worn wood deck definitely catches my eye more than the plastic deck. I do miss some of the raised features above the deck line the plastic deck has. Today I have been working on some of those details for the wood deck. Pictures soon. I also spent the evening cleaning, debuting, and sanding the Uboat rails. I dipped the stern aerial supports in hot water and added the bend in the legs successfully this time without incident. Am about 75% complete on the propellers. Still some minor touch up and details. Since I did not use the periscope housings and internals which act also to keep both halves of the deck together. On my break at work I made some plastic threaded Nuts to clamp it together . My birthday is coming up in early November and I saw this Revell kit (05045) for sale. I could not it pass up.5 points
-
Now if only the same degree of loving care and attention could be applied to an old 'awk or two... We can but wish Wonderful stuff Steve. I really hope the chipping works out5 points
-
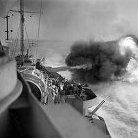
IJN carrier Shokaku, Pearl Harbor, 7 December 1941.5 points
-
Okay, how do you fancy this as a proposed timetable for 2022?5 points
-
After four weeks of fighting with this beast...finally got it to this stage. Decals were an absolute nightmare...and far from perfect...but as good as my eyes and hands would allow. Yes...there are imperfections and errors...however...having got this far...I can now get back to some assembly. I will let the pictures and your eyes decide....... With a lot of complex assembly now to do...such as joining the main air scoop to the cockpit shroud...the rear wing to it's support and then to the chassis...some struggles still to come 😱 Having said that...I am really pleased to have got this far after all the previous issues Ron to be continued............5 points
-
The black car got a full on flat off this morning using 1000 grit paper followed by a couple of stages of micro polishing. I ended up with a nice, flat, soft sheen. Rather than try polishing it all the way to a gloss, I hit it with a couple of wet coats of clear. They went on OK, but a bit of orange peel managed to appear after the paint flashed off. Curses. I'm leaving the car to harden in the warm overnight, and will decide what to do with it in the morning. It's usable as is, but I would like it a bit better if possible. Here's how it looks at the moment, a bit dark and forbidding against the two white cars. It really does need its stripes and window trims adding to bring it to life. It should get them tomorrow.4 points


.thumb.jpg.ba34a9f6ddce411193946dbdcc7b5fe8.jpg)


This leaderboard is set to London/GMT+01:00