
Leaderboard


Popular Content
Showing content with the highest reputation on 19/10/21 in all areas
-
Here’s my 1/48 Airfix Chipmunk T.10 in University of Liverpool Air Squadron markings. These aircraft were based at RAF Woodvale. This was a fun and easy kit to build. I used the Kits-World 3-D printed instrument panels and seat belts, which were a measurable improvement over what’s supplied in the kit. I’m already planning my next one.29 points
-
Here’s my 1/72 Airfix Blenheim Mk.I finished just last week. The model won 3rd place in its category at the Granitecon show in Manchester, NH this past Sunday. It was a well attended show with over 500 models entered across the various categories.26 points
-
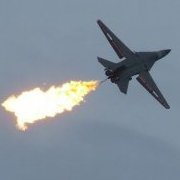
Greetings to you all, Well I have just finished my Avro Vulcan as XM607 just prior to Black Buck 1. I was able to source the long out of production CModels Black Buck weapons set, thanks to @DougC, which really helped as it has the early non-faired pylon onto which was mounted the Dash 10 ECM pod. The old Airfix Vulcan set helped supply the other faired pylon for the port wing. The Shrike anti radar missiles were mounted to these on later Black Buck missions. Apart from the CModels weapons set and some XtraDecal decals for XM607 she has been built out of the box. I had a few issues with the intake seams, but a few cycles of filling and sanding soon had lovely smooth intakes. Painted using Tamiya and Mr Color paints. Onto the pictures then! I am quite happy with how she has come out and feel I have captured XM607 fairly accurately (there is always something I miss!) just before she set out on her historic mission. Many thanks for viewing Matt25 points
-
As you may know, I quite like the 'Utopia' or 'World Image' liveries introduced by British Airways from 1997. However, these liveries were not universally popular and were quietly dropped in 2001, with all aircraft receiving the current 'Chatham' tail fin design from that year onwards. The A380 entered service over a decade later in 2013. I couldn't help wondering what this aircraft would have looked like with that massive tail covered in one of the ‘Utopia' designs. This build was the result of my pondering and can be seen here if you want to watch it come together, complete with the production of the custom decals I used on this model. The design I chose was one of the rarer ones, used on just one aircraft. I hope you like it.🙂 As ever, comments and criticisms are welcomed! I have five more of these kits in my stash(!), so other Utopia liveried A380s will follow in due course - it would be rude not to...!24 points
-
Here are my four 1/72 Fw 190s finished over the weekend. They are an Eduard A-5, an Airfix A-8, a Hasegawa A-8, and an Airfix D-9. They were all entered in the Granitecon show in Manchester, New Hampshire on Sunday. One of the A-8s won a second place in its category, I’m just not sure which one as they only announced it as an Fw 190A-8 not the make of the kit. I’m pretty sure it was the Hasegawa that placed as the Airfix has some seam issues. Hasegawa on left L-to-R: Hasegawa, Airfix, Eduard Hasegawa and Airfix Eduard Hasegawa Airfix Airfix D-919 points
-
hi everyone !🙂 this is my tamiyaI 1/24 lotus europa special the kit is easy to build,I made some modification and add some detail parts on this beauty.. hope you guys like it!! and here is the building video if you are interested🙂17 points
-
Here’s my just completed model built from the newly released Airfix kit. It’s like the curate’s egg: good, in parts. I fixed the incorrect aft bomb bay fairing with some styrene rod, and I appreciated the mask parts provided for the wheel wells. The cockpit and bomb bay are well detailed for the scale too. But … the kit is let down by the transparencies. The nose cheek windows would be a foot thick in real life and the main canopy framing lacks finesse. I’ve been building a Tamiya B.Mk.IV alongside this one and the clear parts are far superior. Still, it’s a big improvement on the Matchbox kit and I’m mostly happy with the finished model.16 points
-
Hi! I’m Sophie. Thought I’d join up and introduce myself. I am an archaeologist who specialises in WWII, I hail from London, and I am a bit of a history buff. I have been building models since I was about 8 but fell out of the hobby as I got older. Got back into the hobby about a decade ago, and though I primarily build 1/32 WWII aircraft, I do enjoy vehicles, and been trying my hand at ships recently too. I also used to do a few sci-fi models in to past too. Most of my models are fictional vehicles, with a sort of ‘historical plausibility’ about them, and I am currently planning a Luft ‘46 project. I don’t think my skills are the best, and I often don’t show my finished work off as I think some of the builders out there far outstrip me in skill, but I hope I can share a few with you guys as I get better. I’ll stick a couple of pics of my earlier work down below. Hope to chat to you all soon! Sophie15 points
-
Hello all, Here is my recently completed 1/48 Revell Rafale B, in the markings of Escadron de Chasse 1/4 'Gascogne', during Operation 'Chammal' over Iraq and Syria during 2018. The build thread is below. Extras used included BAM models intakes, exhausts and update set along with Wolfpack Designs ejection seats, Wolfpack updated nose and missile launchers, L'Arsenal Damocles pod, New Ware masks, Syhart decals, Renaissance models MICA IR missiles and Skunkworks MICA EM missile. Paint is overall MRP Dark Ghost Grey and the weathering is a mixture of Abteilung oils, Tamiya pigments and Flory wash. Thanks for looking and stay safe Dave14 points
-
My attempt at the Kinetic Starfighter. An excellent kit with lots of options. I finished it as a Belgian example with decals from the Eduard NATO fighter boxing. Paints are from the Hataka red range. zz20211018_203646 by Derek N.Ferguson, on Flickr zz20211018_203633 by Derek N.Ferguson, on Flickr zz20211018_203603 by Derek N.Ferguson, on Flickr zz20211018_203558 by Derek N.Ferguson, on Flickr14 points
-
So she has been finished last night - a Stampe of Belgian Air Force in May 1940. Absolutely lovely kit, easy to build with no traps. The paint is a mix of Tamiya orange, white and earth, decals from different sources (insignias are from the Frrom decal sheet of Belgian roundels). Rigging was made with invisible mending thread and the weathering is really subtle, the planes were well maintained. Thanks for looking.14 points
-
Hi all, Here's a rarer kit, with many thanks to @bootneck for selling it to me at a most agreeable price This was one of the harder builds I've done, as I am not very familiar with building full resin kits; the kit was also a bit of a challenge as it was solid resin, so lining everything up was quite a challenge. On top of that, some of the parts weren't fully formed and there were a fair few air bubbles in a lot of the parts. I drilled and pinned a the components to ensure a strong construction (although this didn't stop me knocking the tail off)! Despite this, I was happy with the build. I replaced the kit ejection seat with a resin one and CAD modelled and 3D printed the following parts: Fuselage spine intake Undercarriage legs Wing fences Cockpit interior Underwing stores (fuel tanks and buddy pod - I still need to put propellers on the buddy pod!) I also replaced the kits vacform canopy with my own DIY vacform, having CAD modelled and 3D printed the mould. The decals were a mixture of Xtradecal, Fantasy Printshop and homemade (underwing serials and tail beer mug), painted using Hataka brush acrylics and humbrol white spray. Overall, I'm very pleased with the result, if a little rough around the edges close up. It looks a little wonky tail-on Love this view! Thanks for looking! Ben13 points
-
MIG-21 PFM out of the Eduard kit with some accessories (also from Eduard), slightly modified by adding 2 outboard wing pylons (same type and position as on latter versions, M, MF, bis, etc) it was a one-off Romanian “upgrade”; the plane was in service within Fortele Aeriene Romane till late 90’s. Decals (roundels and tactical number) are from spare box; painted with Mr. Color enamels. Any comment is appreciated. GX9A4237_031 by Iulian Macovei, on Flickr GX9A4250_034 by Iulian Macovei, on Flickr GX9A4252_032 by Iulian Macovei, on Flickr GX9A4247_033 by Iulian Macovei, on Flickr GX9A4249_033 by Iulian Macovei, on Flickr13 points
-
This is the Kinetic F-16AM in 1/48 scale. Ididn't find it the easiest kit and as there are lots of options, I think there are more parts left over than I actually used. Finished in Hataka red range acrylics and with the excellent Syhart decal sheet depicting FA-57 as it appeared at Fairford in 2019. The artwork is superb. zz20211018_203811 by Derek N.Ferguson, on Flickr zz20211018_203808 by Derek N.Ferguson, on Flickr zz20211018_203752 by Derek N.Ferguson, on Flickr zz20211018_203745 by Derek N.Ferguson, on Flickr zz20211018_203722 by Derek N.Ferguson, on Flickr13 points
-
mesdames et messieurs: the one and only, fantastique, unique sexy high-finned Mirage 2000 prototype 01: Mirage 2000-01 Prototype ESCI 1/48 + Eduard PE + Master pitot + Fonderie Miniature Magic missiles + Cocardes magazine for inspiration + BM GB support the first 2 Mirage 2000 prototypes originally had a differently shaped, higher fin. 01 got the series fin relatively quickly though! and is now in some French museum in the later white scheme ESCI very quickly released a Mirage 2000, but unfortunate, (or fortunately for me!) they tooled the original protoype fin and radom. (and also provide accurate and still great decals!! ) They relatively quickly noticed their error and updated their molds in respect to the fin. The radom is still the metal one with access panels that is only suitable for the prototpyes .... the wing leading edge angle is generally too big as well and is more representative of the Mirage III wing shape... the kit itself is great, incl. nice recessed panel lines. the Eduard PE adds exactly were necessary. maybe it is the best fitting Mirage 2000 kit out there! voila: work in progress in the still ongoing French Fancy GB 🇫🇷 (Gallery) how all started 3 month ago: the original in the air in ~1978 https://images.dassault-aviation.com/f_auto,q_auto,g_center,dpr_auto/wp-auto-upload/2/files/2017/05/M2000-01_1er-voli.jpg I am not sure if 01 ever carried any weapons or even pylons that is.... but they look cool and surely were a possibility for some airshow or display.... for those interested in details: 2 times ESCI Mirages 2000s, one peculiar, unfamiliar high fin, one series production fin (both without ECM on the wing rood trailing edge, but differently shaped! ) both of course have the slightly wrong shaped delta wing of the Mirage III series.... ESCI never corrected this... I hope you like it! merci! Werner12 points
-
Hello all, These vintage Heller kits date back to the mid '70s and are known for several shape issues of which I corrected (only) a few. The bulges on the tail fin and horizontal stabilizers were flattened. The cockpits were completely scratch-built as the kit is pretty much devoid of anything. Same for the nose gear wells. The ejection seat in the J-6 is homemade, with a Pavla resin MB seat being used in the F-6. The Heller kit builds into a long-nosed Mig-19PM, so I shortened both noses by some 2 mm and reshaped the intakes using Milliput and styrene strip to better resemble the overall Mig-19S / J-6 profile: not perfect, but close enough too my eyes. The distinctive guns are also absent in the kit: I added some Master gun barrels (the pitot tubes come from the same set). The parachute housing and AIM-9B sidewinder pylons on the PAF aircraft were scratch-built also. Final touches are Reskit resin wheels and the smaller scratch-built fins/actuators on the wings. I used Printscale decals for both aircraft. The PLAAF roundels are from the spares box though, as the Printscale ones are way too large. Paints are Gunze/Tamiya acrylics; weathering was done with oils. Thanks for viewing - comments always welcome! Patrick12 points
-
Greetings, hope you are all doing well! This is my latest completion, Hasegawa 1:32 Boeing P26 A Pea Shooter. This is quite an old kit, the plastic was hard and brittle, one yellow sprue was more like bakelite. I built this as part of a club build and put in a bit more work for this one. Quite a bit of work went into the cockpit. The instrument panel was replaced with a spare Kingfisher decal and I built up a front piece for it. The seat was replaced with my first attempt at vac forming and the rest of the cockpit was embellished with various bits and bobs. Typically when the fuselage was closed up you couldn't see a lot so here are a couple of WIP shots The back cushion was shaped out of miliput and lap straps were meant to be made from tape but found some Corsair ones which looked much better. I also added some cockpit placards to add a bit more interest. The gun barrels were replaced with brass tube. The kit comes with raised detail but I removed this as the joins while being not bad werent really good enough to keep the detail. The panel lines and rivet detail was then redone, using the rivet wheel for the first time (a second first!). All the paint work is from the airbrush with copious amounts of masking tape and ALOT of patience! The only decals were the badge behind the cockpit, the '23' and the 'US ARMY' on the under side. For the engine I replaced the push rods and exhaust/inlet piping with brass rod and some wiring harnesses added. There is a lot mentioned regarding the fit of the cowling around the engine so with this in mind I added a couple of thin slivers to widen the cowl. This worked really well and I didn't have to do too much faffing around in fitting out the cowl. It was still a right pain though and had to be done slowly. For the rigging I opted for rigid stainless wire, cant remember the size but it was quite fine. I think it is slightly over scale but it serves its use. The kit comes with all the rigging holes open so its a big invite to throw it in there. I did simplify the rigging between the spats as there is a bullet shaped fairing where the wires crossed. This just got far too complex so was left out! I think that's about it, quite pleased with how it turned out especially after that paint job! Thanks for looking in! Bob11 points
-
Hiya Folks,.... just finished this Hasegawa Mosquito as a PR.XVI of 87 Sqn RAAF,..... converted using a set of resin two stage Merlin`s, wing tanks and a Falcon canopy with DK Decals,..... although I did muck the canopy up a bit. The model was brush painted using an old bottle of Polly Scale acrylic PRU Blue. A massive thank to my mate Lee for sending me a bunch of kits with resin conversion parts which he said he wouldn`t build,..... I do hope that I`ve done you credit mate,..... just a shame I cocked the canopy up! Thanks also to my friend Franta too for sending me a photo of the real aircraft,..... as well as including this option on his superb DK Decals. Here is the WIP,.... done alongside a pair of the new Airfix kit; It now joins my PR.40 from the same unit in my `Aussie Mossie' collection!!;10 points
-
So a new update on the Delta build and today I decided to work on the chassis, suspension etc rather than the shell due to having to take the car for it's MOT 🙄 and other life chores that needed taking care of. Although my day has been full of interruptions I have managed to complete the chassis though tbh there wasn't actually that much work involved. So I now have a choice between the interior or the shell although I'd rather finish the shell first if possible just to see what final colour i end up with. Thanks for looking back soon 🙂👍10 points
-
Evening All, Managed to finish the cockpit, well almost I've still got the gunsight to add once i have the fuselage is in one piece. I used an undercoat of gloss black enamel then a dusting of tyre black to tone it down a bit, finally i dry brushed the whole lot with silver to bring out the raised detail. The seat frame is just gloss black and dry brushing as my reference pics show it as very shiny black, i liked the way the rivet detail really stands out. Once it was dry i added eduards pe set for the dials switches etc. Anyway onto the pics... Oops, forgot to add the ejection seat firing handles... Thats better, the black stripes were added using a fine sharpie pen, it wont stand up to a close inspection, my eyes ain't what they used to be! I added some weight to the rear of the cockpit bulkhead using a large washer and lead shot held firmly with a shot of zap ca, the nose cone received the same treatment, hope its going to be enough! Finally I've been playing with the underwing stores, I have Aerocraft's 230gal big tanks and the corrected pylons. Using a drill i carefully hollowed out the tank sections to reduce the weight. A collar is supplied to join the front & rear sections together. Sofar dry fitting has shown that they maybe a bit well, 'wonky' as the tolerances are a bit loose. I'll let you how it goes. The SNEB rocket pods are from flightpath and look the biz, the kit offerings look to pointy for my liking... Next up is getting the fuselage in one piece and the joins cleaned up. Then I'll be working on the wings and adding the flap set i have as Airfix looked like they ran out of steam here as they have zero detail on them. Anyhow that's all for now. Cheers10 points
-
good place to be just behind a Grognard mesdames et messieurs: the one and only, fantastique, unique sexy high-fin Mirage 2000 prototype 01: Mirage 2000-01 Prototype ESCI 1/48 + Eduard PE + Master pitot + Fonderie Miniature Magic missiles + Cocardes magazine for inspiration + BM GB support work in progress: I am not sure if 01 ever carried any weapons or even pylons that is.... but they look cool and surely were a possibility for some airshow or display.... thanks, was a great experience! therer is at least another prototype with the original high fin.... overall white 02... 🇫🇷 thanks, Werner10 points
-
Hiya Folks,,.... Another once across the line,..... and one more addition to my growing 45 Sqn collection. This is the excellent little Airfix 1/72nd Vampire T.11 with decals from Xtradecal and a couple of old Aeroclub metal seats were put into the cockpit to help with nose weight. The model was painted using Tamiya rattle can bare metal silver and brush painted with matt varnish to better replicate RAF Hight Speed Silver. I tried to make it look well weathered due to the tropical climate,.... but I may have over done it?; And next up,.... I`m tackling the same kit but with the High Planes conversion to make the early variant with framed hood, no ejector seats and smaller fins,..... which also includes decals for a 45 Sqn aircraft,... photos of the real aircraft show that it did in fact have roundels on the booms, so the image below must be a printing error;9 points
-
I drew it on plywood and cut it out.9 points
-
Grumman Wildcat F4F-4 from Tamiya 1/48 converted to an English Martlet II (F4F-4A). I used the Aires Gun bays,Quikboost resin engine, vacuform canopy from Rob Taurus and decals from Xtradecal .It depicts an aircraft from 888 NAS,FAA,HMS Formidable during late 1942.8 points
-
Refinished in BASF Aztec Red lacquer. Duplicolor gold stripes. Transstar clear. Engine wired and plumbed. Scratch built battery terminals, starter solenoid, air filter element, master cylinder, E brake cables, Shelby traction bars, hood pins.8 points
-
Hi Folks! This time I read all the comments about this particular aircraft in 1/48 scale before starting the build. Dang! Just in time to put aside the Italeri kit and went for the Airfix new tool! Definitely, it worth it, because the building of the kit was a delight (after the Italeri's Hurricane experience). I used only some decals from the Italeri kit, because I like the yellow RLM 04 spinner tip on this particular Stuka. The pilot and rear gunner figures came from Zvezda kits. Here are the photos of the Airfix kit for the Junkers Ju-87 B-2 'F1+DP' of 9./StG 77, Caen/France, August 1940, during the Battle of Britain. Cheers and happy modelling, Cris.8 points
-
Hiya Folks, Well we all know the silly mistakes made with the new Mossie kit,...... re the TT.35 bomb doors and rear bulge instead of the bomber parts,....... but these aside I was really pleased with the new kit. Hopefully I have covered some fixes here in my WIP if it is of any interest; Well Freightdog Models have released a pair of sets to help sort out the bomber version and also a set of flat bomb bay doors plus H2S blister ,..... with more sets in the pipeline. I have used both sets to build; A B.35 from 14 Sqn based at Wahn, West Germany during the late 1940`s; The unit also features in this fabulously atmospheric painting by Anthony Cowland GAvA depicting 14 Sqn Mossies down at low level during an exercise attack against the UK from its German base; And a PR.XVI of 684 Sqn based in India, SEAC during 1945; Here are the models; First off,.... the B.35, with decals from Freightdog Models too,.... ad I have to confess,..... I have replaced these photos as I originally got the canopy wrong and added the roof bubble. Since then I have put the correct flat canopy in place and sanded the over large panel lines from the rear section, polished it and added some internal frame lines from painted stretched sprue; And the 684 Sqn PRXVI with decals from the spares box; Cheers, Tony EDIT,.... New photos of the B.35 added as the cnopy was changed.8 points
-
A bit of a “can’t sleep” shift later, she’s starting to look something like. I’m pretty good at justifying my lack of weathering on a given build, on my recent Potez it was a nice clean plane because Charles de Gaulle travelled in it and so it would’ve been kept tidy, on this one it’s a plane whose first and last combat engagement (AFAIK) was the Pearl Harbor attack so it must have been shiny and new, but the truth of it is that I’m rubbish at weathering and avoid it like the plague. I’ve just put a light enamel wash on it (50:50 Humbrol dark brown and dark grey diluted with lighter fluid), the panel lines are so fine that it was hard to make anything stick but the overall effect is quite subtle and probably fairly authentic (the next build I have in mind is an Airfix Bf 110 and the panel lines are like trenches by comparison). Again the nose is just being tried for size, as are the canopies which came up ok bar a tiny bit of interior framing bleed that I may be able to shift. I used a satin rattlecan finish, I gather these planes were quite highly polished but I don’t get along with gloss varnishes, at this scale I think it makes the end result look a bit like a kid’s toy. Anyway, fiddly bits next. Thanks for looking in!8 points
-
Hi Chris. Thank you very much for your comments. I always enjoy making the cockpits of aircraft - even in 1/72 - but it's always a shame how little can be seen later on. Hi Mark.Thank you for your comments and you are more than welcome to tag along. Way too kind as always Giorgio, but thank you. Hi FLM. Thank you too for your comments. Over the weekend, I did manage to get a bit more done. Before that though, I thought everyone would like to see the highly sophisticated, very technical, way I kept the fuselage halves together while the glue set: Impressive eh? Actually, I do like the way Airfix have done the fuselage - with the rear lower section as a seperate piece. It means I was able to tape up the halves, without any glue on, as can be seen above, and then I applied the glue from the inside: The result, for me, is a reduced chance of glue oozing out over the detail. With the glue set and the tape removed, it looked like this: Then I started work on some of the additional things that needed to be done before the wing sections were added. First off, I scribed the panel lines for the outsides of the panels which should be behind the armament bays: Before adding the filler to the fabric areas in these panels, I decided to file off the inner sides of the rear trailing edges of the wings. They are way too thick: You'll be able to see the result once the upper and lower wing sections are joined together later......(yes I forgot to take a photo of them at that stage! ) Then I used filler in the areas Airfix have as fabric in those panels: This photo showed me the areas I still needed to add some filler that I hadn't noticed by eye alone. You'll see the improved filler in a photo later on. I then got the parts attached for the wheel bay on the lower wing section - including adding the necessary PE parts: Once the glue was set I got these wheel well parts painted with a couple of thinned coats of Revell's Aqua Aluminium metallic paint - applied by using a small pointed brush: I used a small piece of 0.6mm lead wire to represent the pipework. Then, having read through my eperience with the other Hurricane that I made, using the same basic Airfix kit - I decided I'd glue the upper wing section in place onto the fuselage, before gluing the upper and lower wing sections together. I know the fit of the wing roots was a bit 'gappy' on my first build and a test fit, with this one, showed similar issues. So, the photos here show the upper wing section glued in place and I have done some work to fill the gaps in the rear sections of the joins at the roots: You may be able to see the gaps better on this photo from underneath. I think it was easier fixing this issue without the lower wing in place: This photo should show the better coverage of the filler in the panels behind the armament bays: Finally, yesterday, I did a little cutting and scribing with a scalpel blade to get a bit of movement in the elevators: Next up will be gluing the lower wing section in place and cleaning up all the edges of the wings. Comments and suggestions welcome. Kind regards, Stix8 points
-
Hi all, here my new built Meng F/A-18E Super Hornet in 1:48. Pretty good fit and a lot of fine details. Add the Eduard PE Set and some HGW RBF`s.7 points
-
Wow it’s been a month since the last update!! Lots done, she’s about 99.9% done and was nearly 99.9% in the bin on Sunday! I needed seat belts for her so pinched a set of HGW seatbelts for her from the F-4B which I didn’t need any longer, 2 hours later and only 3 belts done I was ready to throw the lot in the bin! I have used these before on a 1/32nd build (Ta-152A-1) and they were ok, but in 1/48th!!!!!! It was already on the “shelf of doom” when I found the leftover QS seatbelts for the F-4B build. Probably not 100% accurate for an F-4EJ but they will do. So will fit them and she’s done! Prior to all this I had finished all the decals and started the clear coat process, what a “Firetrucken” process that was! I was trying Tamiya’s new Lacquer clears, Matt & Semi-Matt, they go on nice but there was no difference between them in the finish! So I was forced to go with the SMS Flat which I hate, for a change is sort of behaved itself………. until I removed the masks on the canopy! As can sort of be seen here it had some reaction with the tape and the canopy which has resulted in “plastic burns/crazing” lines in the canopy. I’ve tried polishing them out, but they are quite deep and I can’t at this stage remove the front canopy anymore. So she’s just going to have to stay like this, am now very disappointed with the build. Well I still plan to finish her, everything is on her now, I just have to finish off the canopies and fit them. It’s a pity about the few dramas as I do love this scheme a lot.7 points
-
Good afternoon This is my build of the 1/72 Douglas Dakota from Airfix as used by the Royal Australian Navy. I completed this earlier in the year. In the 1950's this particular aircraft, N2-43, was fitted with a Sea Venom nose and radar and a Gannet radar under the rear fuselage and served as a flying classroom for Observers (Navigators) for those front line aircraft. When the Sea Venoms and Gannets were replaced with Skyhawks and Trackers in the late 1960's the radars were stripped out and N2-43 was returned to general duties but retained the modified nose. Built as a C47A, it's original USAAF serial was 42-92711 and it flew with the RAAF as A65-43 until being delivered to the RAN in 1949 as N2-43. It flew with 851 Squadron which became VC851 when the RAN flew mostly American aircraft. I used decals from Hawkeye Models and a resin nose from Southern Sky Models in WA to modify the kit. This Dakota is currently on display at the Australian Fleet Air Arm Museum at Nowra NSW. Paints used were: Tamiya X-2 Gloss White Tamiya XF-71 Cockpit Green Vallejo Metal Color Aluminium various Tamiya blacks Minimal weathering, as these aircraft were kept in very good condition. Flory grey wash to highlight panel lines and Abteilung oils for exhaust and hatch stains. The kit went together quite well except for gaps on the upper wing roots which required some attention. Also some of the smaller parts were a bit brittle and snapped. This seems to be common with some of Airfix's new plastic or it could just be my not so small fingers. Just behind the wings on the fuselage underside I have scribed a square panel which is a patch on the real aircraft covering the hole where the Gannet radar used to drop down. The underwing serial '800' was not included in the decals so I made a stencil and air brushed it on. This is the aircraft on display at the RAN FAA museum at Nowra, NSW. These photos were taken by me in March this year in between covid lockdowns.7 points
-
I still don't feel like making the hull so I do stuff on the board. I was looking for illustrative photos of real ships' decks but uncle google mainly shows me pages with paid photos so I'll be improvising. I decided to take care of fire safety on this ship and build fire hydrant box. Safety first isn't it? The fire hose is made of paper. I cut a narrow strip and folded it in half, then wound it around a plastic tube. It's probably a bit too thick but the first time it was too thin and I don't want to do it a third time. I soaked the spool with cyanoacrylate glue and after it dryed I cut it in half because it was too wide. I pasted a piece of styrene on the protruding piece of paper to easily fit the valve later. There is a chink, but it won't be visible From the spare parts, I chose the appropriate elements: an airplane (?) wheel and a piece of shock absorber which will be the valve. Previous owner glued it badly and painted it even worse. Only a small fragment was usable, but that's enough. I put black styrene underneath to match the size of the hose box. I also made another 'no-idea-what-is-it-doing' device. Let's assume it's some compressor. A cropped air bomb taped with styrene strips to improve the look. Another piece of shock absorber as a valve. Hot bent 1mm rod as a tube and a bit of styrene as a frame. And that' the engine primed I have some free time now so work should speed up.7 points
-
Rough? You’re not fooling anyone G …..Smooth Italian style all the way….. So when I airbrushed the chipping fluid onto best-spittie I was forewarned and just ignored any beading - and it did indeed self-level to a smooth finish: And I’ve just begun to apply some preparatory tonal variations to the base coat ready for the camo. Note to self - I need to tone down the black a somewhat before applying the camo colours as it’s a bit disproportionately intense (Edit: done that now post these photos - with a light dusting of white). Bloomin ‘eck; I’ve just noticed them in the last couple of photographs too. The answer Tony is: No, Nope, No way, Never, Not a chance; them is never getting photo space again. Something vaguely sinister about having nitrile gloves as your signature look….7 points
-
On the final stretch now. One job that I had left until last was the headlamps and their brush guards. I have the Eduard etched set for the M3 Scout Car, but on inspection, I decided against using it for the brush guards as they are so very fragile as to be useless (well at least in my clumsy hands). So I looked at the kit's offerings, and they're not too bad. A lot better than the Italeri ones. The inverted U shape of the guards is a bit on the thick side, so using a coarse sanding stick, I rubbed them down to a more acceptable thickness. At the back are a couple of triangular fillets which I removed and replace with thin card. When I was happy with them, they were glued in place. But then........I had another look at the etched brass ones and thought, well why not give them a try. So once removed from the fret, I bent the frame to shape and added the open mesh guard... carefully. Breathe on them and they would bend out of shape. I managed to attach all of the mesh by adding super glue, using a piece of very thin stretched sprue. I was happy with the finished article, so I removed the kit item, and glued the etched ones in place. I'm leaving the headlamps off until after painting as it would be nigh on impossible to get the lenses fitted with the lamps in place. Basically, that's the build finished. All I need to add now before proceeding to the paint shop, are some pieces of kit and a camnet. The first bit of kit that I wanted to add was a stretcher, as there are photos of these A/C's carrying them. For the shafts, I used lengths of plastic channel and glued strips of 10thou card to them, and then glued short lengths of 40thou rod to the ends for the handles. The feet were pieces left over from an Eduard set for the Academy Grant. I bent them to shape and then super glued them to the shafts. The stretcher's canvas is blue towel roll soaked in dilute white PVA glue, and then the whole thing was affixed to the side of the A/C. The retaining straps are also from the Grant set, plus some strips of pewter foil. On the other side and the rear I added some personal kit which came from a Verlinden set. I added a couple of straps and buckles to the large pack on the rear of the vehicle. Finally, I rolled up a length of camnet, soaked it in dilute PVA, and then positioned it around the top edge of the roof. I decided against adding any straps as the few (not very clear) photos that I have of these vehicles with camnets appear to show them just laying on the roofs. And that's the build completed. All that needs to be added are a couple of aerials and the headlamps, and these will all be done once the painting is finsihed. Hopefully, I'll be able to make a start on painting this over the next week. As always, thanks for looking and for any comments. John.7 points
-
Hello! My name is Dmitry, I am 54 years old, I live in Russia. I apologize immediately for my English. I don't know him very well. You could say I don't know at all. I've never studied it. The computer will help me translate. Do not hesitate to correct me if I write incorrectly or incomprehensibly. It will be useful to me. As a child, I made many plastic models in 1/72 and 1/100 scale. It was mostly planes, I didn't like ships. Now, I have free time, I want to assemble something with my own hands again. Some kind of ship. There are a lot of ships, but, I don't know why, I chose HMS Brave Borderer. Starting to study the ship, I was surprised how little information there is about it. I found Polish drawings. They are not very accurate, but there is no other. I found the Britmodeller website and the JohnWS build: https://www.britmodeller.com/forums/index.php?/topic/235056797-172-hms-brave-borderer/ I watched John's work with pleasure. Much has become clear. He found a lot of new things and worked so deeply on detailing. This is excellent! I express my great gratitude to him. I understand that I am a beginner and will not be able to assemble a ship, as experienced craftsmen do, but I will start doing it. After all, the main thing is to enjoy creating something with your own hands. I will post the assembly process on this site, I hope they will tell me better about the English ship here. I'm doing everything slowly, so the build will be long. I hope I will finish the job. I hope… 🙂6 points
-
Time for something completely different I've started it in August during holidays and it went to the shelf until I finished two lagging ships. Just a few more 'improvements' and I'll move on to painting stage.... It's also clearly visible that the Tamiya tanker looks like medieval peasant beside James Bond, compared with the Stalingrad dudes.... I'll have to figure out a way around that problem.... Cheers Mick6 points
-
Hello? Mmmm.... I know I've been here before, but it's been a while. I almost didn't recognise the place. I was looking around for a while wondering where all the wheels, sprockets, tracks and turrets had gone and then realised where I was. Anyway, while I'm here, I ought to build something with wings on. I realised a while back that I hadn't built any aircraft at all this year! It's been a busy year generally, plus I've hosted two Group Builds, which took up a fair bit of time too. So, to rectify this lack of aircraft kits from me, I was wondering what I should build. So I started looking through the stash. Down at the bottom, under LOTS of tank kits, I noticed a 1/72 Airfix Mk.I Hurricane box. On opening it, I realised it had been partially started. In fact, I'd started and not completed it in the Hawker Hurricane Single Type Group Build back in 2016. I had planned on making two Hurricanes but only finished one. The original build thread for both Hurricanes can be found here: The kit I'm going to try and finish is this one: For this kit I'd also got hold of the Eduard PE set for it - which had two frets: ......plus I obtained this wheel correction set from CMK: The original plan, which I am going to stick with, is to have this one displayed wheels-down, on the airfield. I will probably make a small base for it too. The other Hurricane, that I actually finished looked like this: This was photographed against a sky photo backdrop and I have Photoshopped the clear plastic stand out. More details about this build can be found via the link above or more photos of the finished Hurricane can be found here: Some views of both kit's sprues and other bits can be found here: On the one I'm going to work on here, I had just about completed the cockpit painting, but not assembled the parts together for the frame, seat, instrument panel and fuselage halves. Here are some photos of said work: I must admit I cannot remember what overall plans I had for building this kit so I'm looking forward to getting back into it. I may try and get something done on this later today or tomorrow. Comments and suggestions welcome. Kind regards, Stix6 points
-
Hi, My next French machine, this time of extremely short life time in my stash: when I bought the kit about two weeks ago I immediately started build... This is Kovozavody Prostejov new mold kit of D 501 (1/72). I used the paint scheme not from the box. It is machine No 198 (R-228) belonging to GCII/10 in January 1940 ( so still in Phoney War time) based in Rouen-Boos. When this squadron got more modern machines the Dewoitines were phased out to flying schools, it is likely that this particular machine went to Polish training center in Lyon-Bron. I reshaped the wheel spats to unique one seen on some D 501 (including that one). Here she is: Comments welcome Regards J-W6 points
-
Hi all, Fresh from the Hellcat STGB is the superb Airfix 1/24 F6F-5 Hellcat, converted to an FAA NF.II using Aerocraft's conversion and decal set. This is the first 1/24 kit I've ever made and it's absolutely spectacular. A really impressive piece of engineering. This is built OOB apart from the conversion and beautiful wheels from Defmodel of Korea. The fit is damn near perfect, the assemblies are complex but everything slots into place very snugly (so snugly that even a thin coat of paint can throw off the placement). The surface detail has to be seen to be believed. It's so well-rendered I decided not to do any weathering as the surface textures provide all the visual interest on their own. The kit is also very accurate, and provides different options for the instrument panel and drop tank, as well as US and British rocket stub patterns. The engine and other internals are perfectly rendered and the massive 75-page, 310-step instruction manual gives excellent clear placement details. All the cockpit placards are provided as decals, though you could also consider the Airscale replacement for additional detail. This is all OOB. Anyway...if you fancy a 1/24 scale model, this is absolutely worth the £100-odd price tag and will build up into a really impressive (and HUGE) display model. I can't recommend it enough. The very nice radar and decals conversion from Aerocraft were just the icing on the cake, it looks very smart in its Glossy Sea Blue coat and FAA roundels 😊 Here's the Hellcat STGB build thread which may help if you have our want one of these to build: Thanks for looking, Alan6 points
-
A realization of some years ago, the Ju 288 of Huma; on the whole it is a good model, but it required a great work of modification, both of the cockpit (almost totally rebuilt)… and of the wings and engines details. The model represents the Ju 288 V103 (C-1), as it appeared in Dessau in the summer of 1943. The camouflage is in the classic 70/71/65 (Humbrol Enamels mixtures); the codes are decals printed by me, the crosses and swastikas instead are from other models. Everything, as always, has been totally brushpainted.. Hope you like. Thanks for viewing Comments and suggestions welcome. Giampiero Piva6 points
-
It’s been a while since I made my last tank, (a T34/85 as I recall) so I thought I’d have a break from aircraft and scratch a long standing Tiger itch I’ve had. This is the Dragon Models version of an early DAK Tiger 1 and goes together really easily. It’s built out the box with the included PE, but I couldn’t resist adding a set of Friul metal tracks to add a bit of weight to the model and give a fairly authentic sag to the assembly. Paints are Tamiya acrylics, Windsor & Newton lacquers, and various washes, oils and powders have been utilised to dirty up the tank and tracks. Weathering AFV’s definitely isn’t my strong point, but it’s fun trying new methods and ideas which may, or may not be of use at a later date, and I really must try making dioramas at some point. Anyway, here it is…6 points
-
This beast has been my first kit in about 20 years! The Eduard Superbug kit is a limited run redox of the Hasegawa F/A-18E in 48 scale bundled with some of their aftermarket bits and some nice decals from Furball Aero design (printed by Cartograph). The kit is out of production but there are plenty still in circulation at retail price. As I've learned this is probably not the smartest kit for a first timer or long lapsed modeller, but I was still able to get a solid 80% result. Someone with a little more experience would be able to take it a little further. This kit would probably be ideal for someone who's got 2-3 builds under their belt, nailed the basics and wants to take their skills to the next level. I learned a lot working with it and it's great for introducing you to intermediate and advanced concepts like filling gaps and trickier masking. It's well made and the moulding was probably state of the art when it came out. Minimal flash and pretty good fit. I did have to do some filling and fitting but mostly on the underside and places that are only ever going to be seen if you go looking for them, so if you're new to these things this is a good kit to try it out on without fear of ruining things. I should note that the plastic is for an early Super Hornet with the early ECS pipes but the schemes were for a late one, aftermarket replacements are available but it does require some minor surgery. I've also added some Eduard ECS pipes, AGM-65's and AGM-88's. The ECS pipe conversion is very achievable if you take your time. The detail on the AGM-88's is exquisite. However the AGM-65's's are really hard to work with. This is no fault of Eduard as neither I nor their competitors can see a better way of doing it better. Getting both halvs of the missile off the casting blocks and making a nice parallel join is beyond me so mine are a little crooked. I also mangled the seeker head glass so I had to improvise with some UV resin. Someone with greater skills than mine can make these look really good, I'm just not quite there yet. The 32 scale version is probably easier to work with. WIP thread for a blow by blow Scalemates Project link Kit Link Eduard ECS pipe upgrade Eduard AGM-65 Eduard AGM-88 And now some shots of the real thing!6 points
-
Trying hard to ignore the end of the week approaching, I've been busy with the builds. I'm not happy with the paintwork on either Hertz build so I did what anyone staring a deadline in the face would do, I repainted them. I thought if I blew it, I could put my feet up now and enjoy the rest of the GB models coming along. I think I've got away with it, so far. All three car bodies got a scrub up, a T Cut and then a flatting off with 2000 grit paper. Tamiya white primer for the white Hertz and the potential third build. Full size car black primer for the black Hertz car. The black primer was added very carefully indeed. Any reaction and it would be a case of All Bets are Off for the build. So far, so good, no visible reaction at close of play an hour or so ago. It wasn't ideal spraying weather today being unseasonably warm and somewhat humid here. I gave the paints and the car bodies a bit of a warm up using a fan heater before getting on with the painting. Giving things a gentle cooking between coats worked fine. Leaving the fan on for a couple of hours to warm the primers right through saw me add a bit of topcoat to the white cars later in the day. I used Tamiya pearl clear over the white primer as I'm out of straight Tamiya clear. I have full on car stuff here but didn't want to take a chance mixing brands. The pearl has a really nice, soft finish that looks OK for the Hertz car and should look very smart for the new one as I intend to add metallic blue stripes to it, hopefully tomorrow. The white cars will get new stripes in the morning, the black one will be seeing a bit of autopaint clear. Wheels and tires got a bit of attention as well today, along with some interior work on the new build. Two different style Halibrands are in the frame for the new build, I'm undecided which ones yet. Goodyear white lettering has been started for the Hertz white car. Confused? You soon will be...6 points
-
just read through the thesaurus and couldn't locate a term adequate enough to describe this venture so have to resort to old home-speak... that yin's a belter, she's an absolute brammer!6 points
-
I couldn't resist sending this photo to my friends at the fishing club. I informed him that I was building a boat. Everyone was interested in how many people it would accommodate and whether there would be a ship's toilet?6 points
-
First I scaled the drawing to 1/35. If there is no large printer, scissors and glue will replace it.6 points
-
Booty shot!! 99% finished. Not as heavily weathered as I initially planned but enough to make me happy. Will get the decent camera out and post an RFI in the next couple of days. Cheers all for following along, even if there was a massive gap in the middle.👍6 points
-
Time for an update. 1. I have cut out all of the openings for the instrument lighting 2. Made up a light box for the grill lighting on the deck 3. Followed the templates in the Paragrafix set to alter the cockpit side consuls 4. Light blocked all of the parts using Mr Surfacer Black and Mr Color Silver 5. Black primer coat some of the PE to be used with Mr Surfacer Black 6. Made up and soldered together the centre screen, drilled a hole for the SMD, painted the inside white, Mr Surfacer Black as a primer on the outside I think I will go with Warm White for the lighting as there is not a lot of space for the lighting and maybe Cool White might be to bright So on to the photos5 points


This leaderboard is set to London/GMT+01:00