
Leaderboard


Popular Content
Showing content with the highest reputation on 20/09/21 in all areas
-
Fairey Swordfish MkI, K8393/E5A flown by Captain Oliver Patch RM and Lieutenant David G Goodwin RN, No 824 Naval Air Squadron, Fleet Air Arm, HMS Eagle. No 824 Squadron was originally part of HMS Eagle's air group in the Mediterranean, and was transferred to HMS Illustrious just before taking part in Operation Judgement, the attack against the Italian fleet at Taranto, Italy, 11/12 November 1940. Operation Judgement was itself part of a larger series of operations under the codename Operation MB8. It's a complex story, best read on the Wikipedia page. The Swordfish, nicknamed the Stringbag for its ability to carry almost anything rather like the 1940s housewives' string bag, really needs no introduction. If you are unfamiliar with the aircraft, perhaps a start with the Wikipedia entry would be a good primer for you. The new tool (albeit nearly a decade old now!) Airfix kit needs some effort, but makes up into a tidy scale representation of the classic biplane. I was lucky to acquire this particular boxing containing the Taranto raid markings as a secondhand purchase from a fellow Britmodeller. I added a photo etched rigging set from SBS Models, but otherwise the kit is built out of the box. I had been anticipating this build for some time, being a bit worried at the parts count and, well, it's a biplane. I felt it would make a good entry into the High Wing Group Build, and so the die was cast. I needn't have worried, as the kit was well thought through, and built up with very little trouble if you take your time over it. If you want to see the WIP thread, the link is below. As well as the aftermarket rigging set, I used the kit transfers, ColourCoats enamels for the main camouflage, and Humbrol acrylics and enamels for the detail painting. I have one or two more models to build to complete this part of my Fleet Air Arm 1940 collection, though I have yet to acquire a Sea Gladiator.28 points
-
This is the1/48 Academy F4N Phantom which I recently completed. This represents the F4N version as flown by VMFA-531 “Gray Ghosts” of the USMC from the USS Coral Sea around April 1980. At the time the Coral Sea was on station in the Indian Ocean and Gulf in response to the Iranian hostage situation. The F4N was a refurbished and modernised F4B which extended the life of the older airframes and enabled sufficient Phantoms to remain in service pending the introduction of F14’s and F18’s. It has been built OOB. It's painted with Tamiya acrylics. The main colour was a custom mix to replicate Light Gull Grey. The tail was X-3 Royal Blue and the rest were various blacks, metallics X-2 And XF-2 whites. Weathering was fairly minimal with Flory dark dirt and grime washes plus Abteilung oils. The build was good and any issues were entirely my own making. The instructions call for the undercarriage to be put in early in the build as well as the ejection seats and crew figures. I left the wheels to last. It was a bit tricky to get them in but it meant they didn't get knocked off along the way. I had to scratch build a few small pieces after the originals pinged off into the dark recesses of the cave.26 points
-
Hi everyone. The latest aircraft from the workbench (the Mrs dining room table). Two starter sets of the relatively new tool Airfix Tomahawk iib, one a gift and the other an Aldi £5 special. I thought I might as well build them side by side! Nothing major to report in construction, the nose panels need a bit of fettling to get looking right, as do the wing roots, but nothing a little bit of filler and sand paper can’t handle. I built the first as the box option of Neville Duke’s 112 Squadron aircraft and the other as a 26 squadron aircraft based at Gatwick (thanks again @PhantomBigStu for the decals). Paints were a variety, Vallejo, Humbrol and Aeromaster acrylics. Having built aircraft with canopy masks recently, manually cutting my own on these was time consuming! Decals went down ok, the Xtradecals broke In places so had to replace them with the kit offerings. This was my first sharkmouth decal and I was pleasantly surprised with how well it went down! Anyway, enough blabbering, here are the models in question: Cheers! Ash24 points
-
This is Zvezda's new 'snap fit' Hurricane. I didn't enjoy doing this one as much as their earlier Bf 109F. One problem is the way the wing halves go together, with an awkward and difficult to remove join line which runs diagonally across the flaps. Other parts are a bit crude but then that's to be expected when no glue is required. Two excellent pilots are included, though - an RAF bod and his Soviet equivalent. I chose not to use the kit decals, preferring to do this very famous aircraft flown by the CO of No. 87 Squadron, Denis 'Splinters' Smallwood. I repositioned the pilot's head to add a bit of movement, and gave him a colourful silk scarf! All the best, Ian23 points
-
I consider Reggiane Re. 2002 "Ariete" model in 1:48 from Italeri as finished. It depicts a machine from Reggia Aeronautica. 239Ma. Squadriglia, 102 Gruppo Reggio Emilia, Italy, February 1943. Model made straight out of the box, I know the carbon paper is getting silvered because I copied it myself. Workshop23 points
-
Greetings Model Friends- Well I am still keeping up the progress and finished my 3rd Model in last Month! This one is a 1/48 Academy P-47N with some nice Nose Art! '2 Big and Too Heavy!' This flew out of Iwo Jima and is the 'Big' version of P47 with the larger wing and looks really 'different' compared to a standard wing P47. This one had a resin cockpit which was a bit of a challenge to get to fit in the fuselage! I also added the resin propeller so it would be the right type. NMF really scares me and I don't yet know how to weather it well, so leave it in nice shape. This bird was repainted with the tail stripes originally, so I pictured it just after that and is really clean. The original plane photos don't show much weathering, no gun soot, only some exhaust stain, so that's what I did. This time I tried the Gunsie Mr. Color super metallic paints and love them! The Main areas are painted in SM201 super fine silver, and as you can see is like a mirror. Then I did the flaps and ailerons in a SM204 stainless and the section of wing over the MLG also in the stainless which is a little more flat and darker as this was in photos. Then the Gun doors I painted in SM203 Super Iron to get them darker like in photos. I really liked the finish and it looks more interesting having different sections of fuselage and wings in different silver colors. The fuselage side panels and cowl flaps were also painted the darker stainless silver. Decals were a huge issue. The stencils came from the kit, and a zotz P47N sheet. The Main decals for insignias came from an Aeromaster P47N sheet. Then the Nose art came from the excellent Zotz decal sheet for this P47N. Unfortunately the zotz sheet had the cowl decals too large! I had to use Aeromaster which were correct size. All in all I needed 4 different sheets of decals to get the decals for the complete airplane all selected for different parts so they would look right. Some things I goofed were the tail stripes. I used the aeromaster sheet and they fit the Academy kit well, however the carrier film connected two stripes (narrower) and the third is separate. So the stripes are not quite right. Next time cut stripes apart and put them on individually. The other hard part was the underwing rocket mounts are molded into the lower wing! These needed to be removed for this airplane. Photos show them not installed. So that was really hard cutting them and sanding and filling the lower wing that had the remnants of the rocket mounts to remove. This was really hard to do. So don't look at underside of model! It was a fun build and I enjoyed it and it looks smashing on the Pacific TO shelf in the model case !22 points
-
Hello to all.I present you my quick harrier build.I built this kit in a week.I am pretty pleasently surprised by the quality.Despite its lack of cockpit details and trench like panelisation this one is a really nice kit to work on.I will get the gr.5 and FA2 at the first chance I get.I upgraded the instrument panel and seat.Also I made a new pittotube because I broke the old one like 15 times.The model is painted in gunze and tamiya acrylics.I just love all types of harriers.I made a youtube build video - Removed. Read the thread in announcements regards,Dragan22 points
-
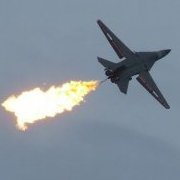
Finally finally finally completed the KH Jaguar. What a poor kit. To summarize: Decals are terrible and mostly fell apart. I used Microscale Liquid Decal Film but still had problems hence the cut down fin flash for example. Unfortunately I couldn't find any after market decals on the web that could deliver within months and no decals for this squadron so had no choice to persist. Instructions are average at best, have errors and some steps missing. I was confused and installed the landing gear legs incorrectly and had to order 2 replacement sprues. Fit is not very good particularly around the cockpit to fuselage joint and intakes. I gave up on this build several times and it sat on the shelf of shame staring at me for a while but I kept coming back to it simply because I wanted a Jaguar in the collection. But I ran out of energy on this one and you can see some areas where I just couldn't be bothered spending the time. Landing gear is very basic. Speedbrake interior is vacant however I couldn't find a single reference photo with which to work with. All in all, I am surprised because this year I also completed the Kitty Hawk Super Etendard and it is a fine kit. My therapy now will be to break out a perfectly fitting Tamiya F-14A and cruise through along for a while. I need a beer!18 points
-
Breguet Br693AB.2, Aircraft No93, 1 Escadrille G8A I/54, Toulouse Francazal airbase, 25 June 1940. The commander of 1 Escadrille used this machine to attack advancing German forces on 6 June. In 1934, the French government issued a specification for a strategic fighter. It was to be twin-engined and a crew of two. Breguet and Potez submitted proposals, with Potez being chosen to develop what became the 630 family. Breguet thought their design still had merit as a low-level ground attack aircraft, and developed a prototype using their own time and money. Happily, the French air ministry saw potential in the new fighter bomber, and placed orders with Breguet in 1938. The first variant, the Br691AB.2, was powered by Hispano-Suiza radial engines, was armed with a single 20mm cannon and two 7.5mm machine guns in the nose. It also had an internal bomb bay that could carry eight 50kg bombs. For rear defence, a flexible mounting carried a single 7.5mm machine gun in the rear cockpit, with a fixed machine gun facing down and rearwards in the belly, with the intention of deterring low-flying fighters. While the crew was protected by armour, it was expected the high speed and manoeuvrability would help the aircraft escape ground fire. The Hispano engines proved unreliable, so Breguet adopted the more reliable Gnome-Rhône 14M radials, giving a total of 1,400hp. The airframe, now designated Br693 was otherwise unchanged from the previous version. The Br693 was designed as a fast, low-level attack aircraft, strafing ground targets and delivering time-delayed bombs. Operational training of two units began in late 1939, initially equipped with Potez 633 aircraft until the BR691s could be delivered. The earlier aircraft were later replaced by the Br693s from March 1940, and by June some 200 had entered service. Unfortunately, due to the late delivery, crews were still working up to operation readiness as the German forces invaded in May. The first operational sorties on 12 May were disastrous. German anti-aircraft artillery was far superior to anything the designers had expected. Tactics were reviewed, with attacks taking place from a higher altitude using a shallow dive to deliver the bomb load. Lack of accurate bombing sights meant many attacks were unsuccessful, and the fast low-level attacks were resumed but using fewer aircraft per sortie. By this time, the situation was becoming desperate. The fate of France could not be changed by the few aircraft in service. The Br693s had a short operational range, and were not capable of flying across the Mediterranean to North Africa, where the French government hoped to regroup the remains of the air force. By the time of the armistice in June, 119 of the 200 Br693s had been lost to accident and enemy action. Surviving aircraft were used for training purposes by the Vichy regime. After Germany occupied Vichy France in 1942, some aircraft were sent to Italy for use as operational trainers. The kit is pretty standard Azur fare, with resin parts for engines, a small PE fret for various details, and the usual medium grey styrene. Fit was pretty good for a short-run kit, and I only added brake lines to the undercarriage, and replaced some small parts like pitot tubes and nose machine guns with brass rod. Painting was using ColourCoats enamels, freehand airbrushed to give the camouflage pattern. Detail painting with Humbrol acrylics and enamels. This kit was built as an entry in the French Fancies 2 Group Build. I have also made a shorter WIP post in my ongoing France 1940 thread. I'll share the latter here for your entertainment.17 points
-
Hi folks, it's been a bit of a weird summer, so I hope you are all keeping well. Here is a beech and mahogany Bf109 G-6 in 1/48 scale. Took me quite a while to do this one, I started full of enthusiasm then quickly lost my way as I got the underside of the nose wrong. It languished on the table in a pile of sawdust and despair for a few months while I gathered the momentum to finish it. For a plane that looks like it was designed only with straight edges it was surprisingly hard to get it to look correct; the machine gun blisters were also a right pain to get symmetrical. Anyway, I'm glad I persevered as I think it came out OK in the end. Thanks for viewing, hope you like it Nick14 points
-
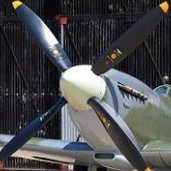
Hi All, My latest completion is Tamiya's beautiful 1:32 Spitfire Mk.IXc. As many of you know this is a superb kit, and it's out of my normal 1:48 comfort zone. Although I was severely tempted to model the kit scheme EN398 JE*J, as flown by Wg Cdr Johnnie Johnson, I ended up modelling as MJ586, as flown by P/O Pierre Clostermann, whilst he was part of 602 (City of Glasgow) Sqn, which formed part of 2 TAF based at Longues sur Mer during July 1944. Here's a couple of pics of the aircraft: And here's Clostermann in the cockpit: Here is the WIP thread if anyone is interested: I added a few extras for this build: The Montex mask set depicts another of Clostermann's aircraft MH526, so I had to be a little creative in cobbling together the aircraft serial number! Anyway, on with the pics: Here's a couple of the engine from the WIP: I'm glad to have finally got this one over the line - it's a superb kit and I really don't feel that I've done it justice, but it's turned out all right! Thanks for looking, Roger14 points
-
Hi all, A while back a friend sent me a started MPC (Airfix) 1/72 Northrop P-61 Black Widow, which went right into the stash because I had no clue what to do with it. Then I had a bright* idea. Presenting a WW2 Royal Air Force nightfighter you may not have heard much of, the Turbinlite-equipped Northrop Prowler NF.I! *Bright idea! Bright! Because of the Turbinlite! Wehey, geddit?!!13 points
-
I tried the old 1/72 once and I wasn't pleased with results so I jumped at the chance to try this one and I am happy with the results.13 points
-
Dear fellow Britmodellers, here's my 1/72 P-63A King Cobra in Soviet Air Force markings from Arsenal Model Group. I built from the box and painted with Gunze/Mr.Hobby acrylics. Photographs by Wolfgang Rabel. This is my first kit from Eastern European manufacturer AMG. The sprues show similarities to Dora Wings and Avis, seems as if these companies are related. The surface quality of parts is excellent, and fit is very good throughout. The box includes a small photo-etch fret (for cockpit details) and a nicely cast resin radio. Vinyl masks are a nice addition, but they don't work well on curved surfaces. Underwing and belly tanks are provided in the kit. Most photographs of Soviet Air Cobras show them without tanks, so I left them off. Unfortunately the model turned out to be a tail-sitter. I added a plastic stand (borrowed from Hasegawa's B-26) for stability. Thank you for your interest! Best greetings from Vienna, Roman13 points
-
Hi everyone, The Bf 109 GB finished a couple of weeks ago, but my Bf 109 E-4 only crossed the line today. Although I had not finished this model when the GB ended, the main delay is due to my dropping my cutting mat with a lot of clutter on it, on top of the pretty much finished model.... That proved nasty for my mojo. Anyway, when I gathered the courage to look at it again, I realized I could fix it, even though every single small part had hit the road. So here it is, photographed today in the early afternoon sun. That is when I realized two things; 1 - the stretched sprue I used for the aerial is far too thick. But it will stay that way until the day I break it through sheer clumsiness. 2 - I forgot to paint the wing tip lights. I will pass for now (see sheer clumsiness above). This is built to depict the 109 E-4 of Gerhard Schopfel, Staffelkapitan of 9/JG 26. I have only added 8 victory marks, as that is all I could find, and the plane is supposed to have a yellow fanion on the aerial mast. On that day it was being washed by his faithful mechanics, so I omitted it! Here are some photos of my first 109 with a red Cerberus under the cockpit! I am a real fans of the BoB Emils, so there will be more. It was a fun and exciting GB. Have fun everyone! JR13 points
-
Hello everyone I spent the weekend at Duxford for the Battle of Britain Air Show. The weather on Saturday started off foggy and then turned into a beautiful late summer day, the downside of which was shooting into the sun. Sunday started off bright and then the airfield was covered by an overcast, but thankfully the threatened rain did not materialise. Here is my first batch from Saturday. I apologise for the quality of the Russian Spitfire in particular, but I had not seen it before so am posting them for the record! Enjoy. I'm not sure if this works.... What an incredible sound! Thanks for looking.12 points
-
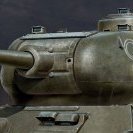
This is the third CSM armoured car I've built and, like the two Lanchesters I built a year or two back, this one was a really nice little kit. Almost perfect fit, and plenty of detail without becoming an unnecessary parts-fest. There's a nice interior but, as is so often the case, little of it can be seen. The kit's fairly generous with marking options, although most of them are pretty similar being mainly overall dark green. The one here is a Regia Guardia car based in Turin in the early 1920's. Thanks for looking Andy12 points
-
Hi Everyone This is the Tamiya 1/48 Mitsubishi Ki-46 Dinah which has been lurking unfinished for ages and collecting dust. I finally decided to give it the extra push and consider it to be finished now. Hope you enjoy and thanks for looking. Trace12 points
-
And as if by magic, an aeroplane appears: I probably could have done a bit more on the interior, but I didn't want to get tooooooo sidetracked. I just painted the radio dials, added the seatbelts (the infinitely frustrating Eduard superfabric ones -- I've ended up using almost none of the Eduard PE set so far), and sprayed some dullcoat to cut down on the shine. The lower part of the fuselage with the cannon barrels is not an amazing fit, and I'll probably have to go back and do something with it later. I wrongly drilled out the hole in the center of the nose cone that's for the AI radar aerial, so I ordered another kit (darn) and will rob it once it arrives.12 points
-
Hello friends! This model of SPG M109A6 Paladin in 72-nd from Riich Models was build by me short time ago. Allmost out of the box with some addings there and here. Anntennas - Orange Hobby. Have a pleasant viewing!11 points
-
This has been sat on my desk for months 80% complete. It’s the Roden 1:72 kit of WWII British Armoured Car (Pattern 1920 Mk 1) finished as “Ajax” of the 1 Armoured Car Company RAF in Iraq in 1941 (or so the box says). Brush painted used Vallejo acrylics and weathered (rather more than intended) using a variety of acrylic washes, Army Painter quick shade washes and dry brushing with oils. Headlamp glass made from some Humbrol clearfix. Not my best work, some of the fit was so-so and as I said I’ve made it a bit grubbier than intended. But that RAF roundel on the turret came out ok, so not too unhappy. Thanks for looking.11 points
-
The still very good Tamiya FBVI in the markings of the Canadian squadron N°418 mount of Flight Lt Lr A Kipp RCAF April 44. I have used the old CMK cockpit, not so good, Ultracast exhausts and mudguards, Master 3,03 Browning and Verlinden ammo boxes. The inside tubular structure of the canopy was made from scratch with evergreen rods. Apart from the character, no decals were used, home made masks did the job. Colors are Mr Color RAF set range, lacquers. A very pleasant project. Thanks for watching, and any comments are welcome of course! F3A8CF2E-9D64-48C2-A67D-C75859B7FF04 by jean Barby, sur Flickr 3ADA3A0E-2794-48F2-B00A-510A91EA0026_1_201_a by jean Barby, sur Flickr CBCC64E9-10B7-4F96-85C5-40B13CF5E4A5_1_201_a by jean Barby, sur Flickr 2FDD295D-6F31-4E2F-BB9C-5DE4CF107BD3_1_201_a by jean Barby, sur Flickr 1D17FE69-82C9-492C-99B1-378D02B2B0B3_1_201_a by jean Barby, sur Flickr A20606FD-6DC4-492B-95D9-A56D0D0A9B6B_1_201_a by jean Barby, sur Flickr 1FE0AC32-FA61-4AC1-9392-C96C736ED8E0_1_201_a by jean Barby, sur Flickr11 points
-
Some years ago I decided to build the very interesting looking Westland Wyvern S.4 which was a British carrier-based multi-role strike aircraft. The plane saw active service during the Suez crisis in 1956 in the Anglo-French Operation Musketeer whose aim was to capture the Suez canal from Egypt (who had nationalized that vital sea route). The Wyverns engaged in 82 missions, both in fighter-bomber as well as reconnaissance roles and black- yellow identification stripes were painted to the planes during the crisis. The Wyverns were powered by a turboprop engine driving eight large counter rotating propellers. Only a total of 127 Wyverns were built. I built my model from a 1/48 scale Classic Airframes kit which in my opinion was the best quality CA kit I have so far come across. The fit was very good and for instance the engraved panel lines were very fine and accurate. The model depicts the Westland Wyvern of the 830 Naval Air Squadron that operated from HMS Eagle in 1956 during the Suez crisis. Unfortunately I don't anymore remember the number of the paints but the colours were Extra Dark Sea Grey, Sky and Maroon.10 points
-
Hi, We no longer present the Mirage IIIE, flagship of French aeronautics from the 60s to the 80s which equipped many air forces around the world. The plane presented here has a rather particular history because it is one of the two planes which took part in the operation Tamara in July 1973. This secret operation at the time consisted in dropping on the atoll of Mururoa on August 28, 1973 a 6KT nuclear bomb AN52. The decoration of the plane corresponds to the standard scheme of the time but with some markings specific to this event, in particular the pennant of the C46 on the left fin, emblem of the EM 85 "Loire" based in Mururoa. The model used is that of Modelsvit.. The decoration is also from the box. The model is excellent. Detailed in every nook and cranny with high quality engraving, even if some are skeptical about riveting. In addition to its extreme details, the model is also very precise with high quality of all the assemblies. The whole is at the price of a sometimes a little high complexity and an equally important number of parts. This is the brand's first Mirage III box. The few defects of this box (seal on the rudder, lower surface seal, fixed elevons, dimensions of some cans a bit too short) are all corrected in the following boxes. Well done to Modelsvit for this quality. Make way for photos. Complete set of photos can be find here and the work in progress there. Hope you will like it. Alain.10 points
-
A regular build I am sure and oft seen here so nothing new and too interesting guys 😛 After 35 years absence, this is the first aircraft to inhabit the upcoming BoB shelf/s in display cabinet. Many things have changed, when I was a young fella we had never heard of such things as panel & pin washes, weathering, detailing etc. Still, I am loving the 'learning curve' though God, it takes far longer now than when I was a young fella! I knocked them out at the rate of one or more a week then! It is all Out of the Box (OoB) except for the aftermarket 5 spokes. The aircraft has recently landed and the Ground Crew have not yet attended. It was built as open cockpit since I needed the handsome pilot to replace the Orc (see my Avatar) of the upcoming Airfix Spitfire Mk1a! The weathering has been kept light since as has been stated by your good selves, most BoB aircraft just didn't survive for very long. There are many bits I am not happy with but I am sure we all feel the same of every model we build. A perfect model is unattainable, at 1:72 even more so I feel. It has been slow progress and the poor thing too often handled, being used as mule to a fair extent and being the first built in so long a time, whilst trying to learn new skills. Hence the slight, odd visit by a very drunk 'Rosy the Riveter'! You can play 'Where's Wally' there guys if you know the kit 🤣 Big thanks go out to @fishplanebeer (Colin), @Black Knight, @noelh, @vildebeest, @Fukuryu & @Werdna for all their help along the way and special thanks to @Troy Smith for my now much improved knowledge of Mk1 Hurry's and Mk1a Spitfires and the wealth of knowledge and images supplied 👌 Anyway, here goes: I scratch built some wing tip lights from clear sprue. Much nicer than just a drop of paint. 🙂 I placed the Gas Detection Patch where Airfix show it and everybody else puts it but I would have thought it should be inboard of the port upper wing roundel? For interest, the elevators were down as seen on many images (Mk1's anyway) and the rudder turned (pilot may have been desperate for the bathroom?) Sutton Harness is made from brown envelope paper. It is far more 3d than decals. There is also a scratch built mirror and gun sight 🙂 The aftermarket 5 spokes as replacement for the incorrect (and too large a diameter) 4 spokes. I can't stop myself drilling out the exhausts! They don't look right without a hole and a dot of Matt black isn't very convincing or 3D to my mind 🤣 Thanks for all the help guys from what is a great forum👍 Regards, Lindsey10 points
-
A project that was a germ of an idea 40 years ago when I was an ATC at Nadzab Papua New Guinea. Tranamerica operated out of there for a few months hauling mining equipment up into the Highlands , I was quite taken with the scheme and hankered to make a model of it. Two years ago I bought an original Airfix kit complete with Bloodhound and 11 months ago I started the conversion. I sourced an old built model wreck that was the source for the fore and aft fuselage plugs that were needed to stretch the model. Bit of filling and sanding (a bit! jeez heaps!) masking and decal design and production was required, Construction was completed today, I just have to dirty her up a little and of course finish the stand.. I took just one pic before the battery went flat.10 points
-
A 1990 kit in a 2012 boxing and it was a bit of a battle. I managed to lose the air-brake part but as I was building it closed I just filled the space. The fuselage was significantly warped and the wings were squint. Filler and clamps were used. In saying that It was still fun. Decals from Xtradecal X72216 Royal Air Force Update 2013-14. I had used stuff from this set for my 617 GR4 and thought I might as well use them on this as it was an interesting scheme. Primed with Tamiya Neutral Grey. Painted with Tamiya Light Grey, Nato Black, Nato Green, Rubber Black, Flat Yellow, Italian Red and Flat White Mr. Color Gloss Black ColourCoats Light Aircraft Grey. Finished with Mr. Color Super Clear III Gloss. Thanks for looking, Cheers, Alistair9 points
-
My first Duxford air display for around 10 years, and what a great day it was! Highlights for me were the three ex RAF/FAA Westland helicopters now in private hands, and of course the 15 strong 'Bader Wing' Spitfire/Hurricane balbo that was the climax of the event. On with the show. Thanks for looking! C&C always welcome. Mark9 points
-
Hello, Here's my just finished 1/72 Special Hobby AH-1S Cobra. I did mine as 71-21024 of the 503rd Aviation Company, based just outside Hanau in (West) Germany in around 1980. Lovely little kit, just a little fiddly. Painted with MRP's Helo Drab. Thanks for looking, Pete8 points
-
They look similar, although the base plate seems rather different: Anyway, your suggestion prompted to raid the PE spares, and I found a base plate just like I needed. Problem is, it was only one, and I needed four... so I went for scratch building, see below Cheers Johnny, thanks - much appreciated Thanks Erwin Might be a little early for a mike drop, though.... Thanks Simon Take my bestest to Lady Rose Thank you Ben There's no pleasing you , is there? See below, a couple more colors have shown up.... I wuill certainly try those, thanks Gene! Thanks Cookie, much appreciated! Alright, WE progress report.... one day later. I had some trouble with my PC yesterday that prevented me from posting this, but now it's all sorted. On we go; I decided to scratch build the IFF antennae, by cutting their base plates with my Curio, gluing them in place with TeT Quick Setting and gluing on top of them some duly shaped 0.4mm plasticard bits They'll probably show up better under some paint. A quick dryfit: In for a penny, in for a pound. Right behind the starboard antenna there's a small intake that is often seen open on parked Phantoms. Here's the FM version (in the closed position) with some black wash in it The Eduard PE set for the HASE kit sports this detail, so I just copied it onto some brass sheet cutout (0.1mm) and bent to shape After having carved some plastic out, I glued it in place with CA Before gluing the top part of the nose to the rest of the front fuselage, I tidied up the WSO IP cabling And it's in! I also glued the "hump" in place As you can see, it shows a but of a step/gap, but I think this is totally self induced; when I glued the fuselage halves together, I clamped the back side and squeezed them together, but in retrospective I think I should have left them loose - the Door 19 (that's the correct name for that part) sets the correct width and height of this part of the fuselage. I also removed the beacon antenna from there, as it's not present on the HAF Phantoms. Next, the IP coaming went on (glued with TeT) It was only at this point that I realized I stupidly neglected to protect the molded in AoA probe, that become completely blunt as a consequence of continuous manipulation So, just like I did on the Hase kit, I replaced it with a sewing needle tip It would have been much easier to do it beforehand, to wit before gluing the fuselage halves - that will teach me Time to thin of the intakes; first off, FM offers these sensor mounts molded inside the main intakes, but without the actual probes So I glued in two brass pipe segments with CA The airframe I'm modelling also sports the DIAS ECM antennae, two of which are on the intake shoulders; they are not present in the FM kit, but luckily they can be found in all the Hase boxings, so: The FM outer intakes clearly show the pre-set holes for future, different variants releases, albeit placed differently compared to the Hase mounting pegs Anyway, keeping the aft peg as reference, it was easy enough drilling a corresponding new hole and gluing them in with TeT As usual, Hase plastic reacted a lot to the TeT and some pressure, hoozing some plastic out of the joints. Also, a few gaps needed some PPP treatment. Here after cleanup and filling I then airbrushed the inside with Tamiya Flat White Same for the inner intakes Which then got glued in place with TeT While I was at it, I airbrushed AK Extreme Metal Steel on the compressor faces of both FM and Hasegawa kits, followed by a black tempera wash. That's it for the day, all comments welcome Ciao8 points
-
I hadn't originally intended to, but I spent the better part of today's bench time detailing the engine. My initial plan was to replace the kit's bare-bones engine with a resin one from Engines & Things. However, when I took a close look at the resin part, I was left unsatisfied: Better than the kit but lacking detail, especially on the cylinder heads (which is all that will be visible with the cowl in place). Clive did a great job detailing the kit pieces on his build, so I thought I'd give it a try. A few hours of work later, and this is what I came up with: I could have gone further, especially if I wanted the option of removing the cowl. But, that's not in my plan so I focused on the cylinder heads, valve actuators, and spark plug wiring. Even that modest goal took quite a while to complete, but in the end it was time well spent!8 points
-
And finally:8 points
-
Hi folks, well I am calling this done, I ordered some replacement shield generator towers from Shapeways, as the kit resin items were a bit fragile and crude in details compared to 3D printed ones. I also ordered a Rebel Blockade Runner and some TIE fighters that were about the size of a grain of rice! The tiny Imperial Shuttle did come with the kit, I wasn't too sure how the final display would be presented, in the end I opted for the traditional captured Blockade Runner from the original movie opening scene. But I had a bit of fun photographing the various options. Happy modelling and may the Force be with you! Finally, if you want to see the work in progress of this build, click the link below. I've also created some videos to compliment the model.7 points
-
This is my number 3 so I thought I'd go for a traditional RAF colour scheme this time. Decals are from sheet 4 of the new Xtracolor ones. Including all the dayglo markings. What made life a little easier this time was the new set of canopy masks from ArtScale. So its just a red white and grey one to go, plus G-BXGL off the forthcoming Xtradecal 'civil schemes' sheet. Thanks for looking again. 1 2 3 4 57 points
-
Had a touch of The Plague over the last couple of weeks and decided that after watching 6 seasons of Game Of Thrones that I could do with a change, so I went to the stash. Kit selection criteria was as follows: 1) It had to be a kit that wasn't in the loft. 2) It had to be a kit that wasn't camouflaged as I really couldn't be bothered with faffing. So, based on the above I present the Hasegawa Sea Harrier FRS1. 899 NAS, HMS Hermes 1982, EDSG all over. No weathering, no additions (other than tape belts), no messing, no fuss. Not a bad little kit and it got me away from the TV.7 points
-
I have everything that I wanted as a teenager, only 60 years later. I don't have to go to school or work. I get an allowance every month. I have my own pad. I don't have a curfew. I have a driver's license and my own car. The people I hang around with are not scared of getting pregnant and I don't have acne. Life is great. I changed my car horn to gunshot sounds. People get out of the way much faster now. Gone are the days when girls used to cook like their mothers. Now they drink like their fathers. I didn't make it to the gym today. That makes five years in a row. I decided to stop calling the bathroom the "John" and renamed it the "Jim". I feel so much better saying I spent ages in the Jim this morning. When I was a child, I thought "Nap Time" was a punishment. Now it feels like a small vacation. The biggest lie I tell myself is: "I don't need to write that down, I'll remember it." I don't have gray hair; I have "wisdom highlights"! I'm just very wise. If God wanted me to touch my toes, He would've put them on my knees. Last year I joined a support group for procrastinators. We haven't met yet. Why do I have to press one for English when you're just going to transfer me to someone I can't understand anyway? Of course, I talk to myself. Sometimes I need expert advice. At my age "Getting lucky" means walking into a room and remembering what I came in there for. I have more friends I should send this to, but right now I can't remember their names. Now, I'm wondering: did I send this to you, or did you send it to me?7 points
-
Some new pics, I spend over two weeks on masking and painting green camouflage.7 points
-
This is my RWD-8 pws . It is a Polish Trainer and Liaison plane at the pre-war and early WWII. It is a Mirage kit. Scale 1/487 points
-
Sorry for no updates lately, my in-laws have showed up and so a lot of my time had been spoken for. I also started the diet program Noom, in a desparate attempt to lose about fifty pounds -- as opposed to my normal method of losing fifty pounds, which is browsing Hannants. With any luck, you folks won't be able to keep your hands off me the next time I go to Telford. I applied the cockpit placard stencils today: Then, overcome by fumes, I decided to get cute. I took some lead wire and bent it into shape, glued it together at the ends, and painted it yellow: You see where I'm going with this, don't you? I then glued it into the cockpit and trimmed it a bit: I think it should look okay once closed up:7 points
-
Hello folk, My most recent build, a small diorama of the operation Desert Storm, in February 1991. The kit of the tank comes form Rye Field and the figures are Alpine resine references. For this build, I have try a lot of new methodes, especially for the figures (I'm the most beginner as possible), and also for the diorama. I have follow the excellent videos of Uncle NightShift on Youtube (I'm pretty sure that a lof of us knew him). The whole model, diorama, accessories and figures are painted with Tamiya acrylics, and the weathering with AK and Mig references. here the building : https://romandiemaquettisme.forumgratuit.ch/t408-the-american-way-of-war-m1a1-abrams-rye-field-model-1-35 And the pics; Honestly, I consider this small diorama as my best build ! And I'm very proud (I'm the best)(just kidding) For the tittle, it comes from an article about the american army and his capacity of improvisation during wars Have a nice days guys, Best regards, Vincent6 points
-
Hello there, Here a build I complete 3 months ago, the american supercarrier USS Kitty Hawk from Trumpeter at 1/350 scale! I work on this kit 15 months, after buying it to celebrate the end of high school. The kit is really good, with a good assembling (very little putty is needed), and I have completed it woth 6 sets of 1/350 aircrafts (the kit contained at maximum 15 aircrafts) (There is actualy 45 aircrafts on the deck), 8 sets of photoetch from Eduard, 2 sets of resin crew figures (180 figures on the deck) , 2 official patches of the ship (from Ebay), and a friend of mine print me in 3D the plate that I have painted. For the paint, I have used a mix of differents tamiya's colors for the bridge, and for the hull and the tower, the Mr Hobby/Gunze FS references. Here the build (from a Swiss Forum) : https://romandiemaquettisme.forumgratuit.ch/t389-supercarrier-uss-kitty-hawk-cv-63-trumpeter-1-350 And the pics; To protect her from dust, the ship recieved a plexiglass protection. I have a friend who is a great photograph woth better material than mine, I will contact him for better pics, That's it my friend, Have a nice day and best regards, Vincent6 points
-
I finished this one up, came out ok, mostly happy with it. I used a couple shades of black on the body but the wings mostly obscure the effect. Also used Tamiya's Clear Red to tint the nose and hatch windows. Overall another fine kit from Bandai.6 points
-
Background: The 4th generation (ST162) Celica would be my preference of all the Celicas. Elegant and understated and very Japanese - just like the Supra A70 I've recently built. The kit is very much like the Supra A70 from Tamiya and I bought and built them both at the same time. Pros: Nice proportions, easy to assemble. Headlights open. Comes with two dashboards in case you want to put the steering on the wrong side - I'll leave the reader to decide which side is "wrong". Box doesn't take up much room in a stash. Cons: It's a very simple kit with metal axles front and rear - so no steering. No brake discs/calipers are supplied with the kit either as they'd be entirely hidden by the stock wheels. Curbside so no engine either. The pop-up headlights don't like staying up - in fact they're worse than the aforementioned Supra kit for staying awake, more trouble than they're worth. The interior door cards lack depth and detail. The seats have no backs and have to be filled. No pedals. Also there's a lot of masking to be done - so many semi-gloss black parts on the main body that are not moulded separately. Verdict: A good kit for beginners. It's an easy kit to build with an easily achievable good result but I can't help but wonder if Hasegawa will release a kit of this car given their current form, which coming 30+ years later, would be better. Build notes: Built over the course of 7 weeks in August/September 2021. Other kits have been started (and in one case completed) whilst I was debating whether or not to strip the Audi Cosmos Blue (I didn't). I've changed the wheels (Fujimi wheels from their NSX-R kit), added brakes from a Toyota Crown kit, textured the parcel shelf, Aside from that it is as-supplied. Painted in Audi Cosmos blue from Halfords - a colour I'm still not 100% sure I like. Something paler would have contrasted better with all the black parts. Clearcoated with Mr Hobby Gloss. This is my 100th build. The 101st will be something more special - the McLaren Senna.6 points
-
One of my forays into Armour, I'm more of a ship builder and painting and weathering is not really my area of expertise. If I'd been posting my earlier work you'd have seen a tendency to use artistic license and "overpaint" details on Armour subjects with the result often looking excessively unrealistic. I think I've got to the point where I'm mostly avoiding that particular pitfall, and adding a wash after the painting and decals are done to dirty the end product a little also helps, even if the end result still looks factory new, but then that is how all my models look so I'm not too concerned with that at the moment. Thanks for looking6 points
-
Hello to all of you good people.I present you my eduard MiG-15uti of the Algerian air force.I built it pretty much OOB.The kit is awesome.The fit is really good.I just hand made the FOD cover in order to cover all the led I had to put in the nose.The painting was done with Mr color paints.I also made a video of the build process so who is interested can see it on the following link https://youtu.be/yjDsYQK2bjw6 points
-
I don't know much about cars so am always worried I'll get conned when I take it to my local garage. You can imagine my relief when I was told the only thing it needed was indicator fluid.6 points
-
I did use a PVA based product - Gator’s Grip thin. But I only used small drops to tack the canopy in place before wicking in cyano to (purportedly!) do the hard work. So the reverse of your method Alan. P’raps I’ll reverse my approach. I’ve read about the transparency fogging tendency of cyano - but never had a problem with that when using it on my PETG thermoformed canopies. Dunno why. But I’m generally sparing (seemingly too sparing!) with it . Anyways. The rear canopy cleaned up well. No need to thermoform another one. And after some hesitation - but distressingly little persuasion I popped the windscreen off as well: Deja Vu….. I’ll probably (carefully) re-fix the windscreen with TET seeing as it’s the kit part and there’s fairly broad contact point to ‘fuse’. I’ll wait for the colourcoats paints first to re-do the interior framing. The rear canopy I’ll use the silver sharpie again to do the interior framing and just use thinned Gator’s Grip wicked around all the edges ala hendie. In both cases I’ll try and make sure that the appearance of the join is as good as I can get it before sticking the transparency on - so as to minimise any work/pressure on the join afterwards. I’m sure I’ve learned that lesson before…….6 points
-
Call That ART? Not that I dislike preserving Jagwarrs, even the Jaguar Motor company green thing at Brunty, but displaying her as a dead prey animal on the deck is awful. I recall Debs had similar opinions. Now what I call art is B looming lovely Tony Edit to add: Mmmmm Celia...6 points
-
I have had the Eduard 1/48 Messerschmitt Me110G-2 in my stash since its initial release, I have been intending to build the R2 version since then, I purchased over the years, the Eduard photoetch set, the Brassin wheels and the Master metal BK37mm Kanone barrel, even then I didn't get around to building this kit. Then AIMs released a resin 'conversion' kit which renewed my interest in building this kit. The AIMs set provides a more accurate gun pod, the Nitrous Oxide tank (carried in the rear of the cockpit) transparent cowling covers, the ammunition plus holders, transparent wing lights, a brass gun barrel and upper nose cover. Nearly forgot 2x W.Gr.21 rockets. Build was fairly straightforward plenty has been written about Eduard's 1/48 Me110s, especially the cowling fit! I did find the wing to fuselage joint rather poor requiring plastic card fillers to fill the gaps. I was a little concerned about using the AIMS resin cowling replacements but they were a very good fit. I cut out the leading edge slats to show them in the extended position. The canopy required the rear gun opening being filled in with a piece of transparent plastic and also the centre piece of the canopy was replaced with a spare from another 110 kit. This was necessary as this part of the canopy in the G-2 kit has a bulged fairing on it, which this version does not luckily I had several spares from other kits. I chose this particular version of the G-2 not just for the Kanone but also because of the tank for the Nitrous Oxide system, which was something out of the ordinary. It shows the desperate measures the Luftwaffe were driven to combat the B-17s and B-24s of the US Air Force. I painted the 110 using a combination of Vallejo & AK Real colour 74/75/76, the W.Gr.21s were painted a different shade of 76 to make them appear newer than the airframe they were attached to. When it came to the markings I really wanted to find a different machine to M8+KM which appears in most photos of this version, I was going to go for the machine shown flying in formation with KM which was SM, but could I find the correct style white S in my decal bank, of course not!!!! These machines were not photographed very often, however in a Classic Publication of the Me110 I found a photo of a line up of ZG.76 G-2s all of which appeared to be the R2 version. One of these machines was coded M8+F? so correctly or not chose to mark my kit M8+FM!! Decals used were all from Eduard Me 110 decal sheets. This machine represents one of 4./ ZG.76 in Czechoslovakia 1944 :- Cheers Andy6 points
-
I've forgotten how long masking takes Couple of hours work and we are ready for MRP115 Ocean Gray Lunch time yet again then I might break out the masking putty in preparation for the green.6 points


.thumb.jpg.d3635a7ef6507d35f372dd09671fe96f.jpg)


.thumb.JPG.2ce06c4ff2300a5faba93aaeacbdab25.JPG)


This leaderboard is set to London/GMT+01:00