
Leaderboard


Popular Content
Showing content with the highest reputation on 17/09/21 in all areas
-
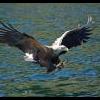
Finally finally finally completed the KH Jaguar. What a poor kit. To summarize: Decals are terrible and mostly fell apart. I used Microscale Liquid Decal Film but still had problems hence the cut down fin flash for example. Unfortunately I couldn't find any after market decals on the web that could deliver within months and no decals for this squadron so had no choice to persist. Instructions are average at best, have errors and some steps missing. I was confused and installed the landing gear legs incorrectly and had to order 2 replacement sprues. Fit is not very good particularly around the cockpit to fuselage joint and intakes. I gave up on this build several times and it sat on the shelf of shame staring at me for a while but I kept coming back to it simply because I wanted a Jaguar in the collection. But I ran out of energy on this one and you can see some areas where I just couldn't be bothered spending the time. Landing gear is very basic. Speedbrake interior is vacant however I couldn't find a single reference photo with which to work with. All in all, I am surprised because this year I also completed the Kitty Hawk Super Etendard and it is a fine kit. My therapy now will be to break out a perfectly fitting Tamiya F-14A and cruise through along for a while. I need a beer!36 points
-
A Hasegawa kit, no modification. It was when I wanted to test paint chipping by brush. The chipping was done using Tamiya enamel paint, applied using 0 size brush. Nanond30 points
-
This is Monogram's venerable 1/48 Mossie done up as FB Mk. VI "Wolf" of 605 (County of Warwick) Squadron, 100 (Bomber Support) Group, flying from Bradwell Bay, Essex in late 1943. According to Aeromaster's 48-552 "Mosquito Raiders V" sheet, the squadron flew in support of the Main Force Lancasters to counter the threat of German nightfighters. Wikipedia adds mention of intruder missions and 'Doodlebug'-tipping over the Channel and Southern England. Paints are Tamiya acrylics. Hope you enjoy!28 points
-
Hello! This is my new model! In the assembly the model is easy. Most of the time I have been correcting my own mistakes. As an addition I usd photo-etching setfrom Edward , a machine gun from a Mini World, a bow from an SBS. Xtradecal decals. Painting AK Real Color.27 points
-
Hiya Folks, I started off building this model using the initial release of the Sycamore by AMP but I soon realised that this Australian boxing did not have the right rear doors to build an RAF version,...... so I ordered the later boxing with the clear bulged side doors instead and left the initial kit to do an RAN aircraft at a later date. I had intending on cutting the rear cabin doors from the initial kit, but it soon proved very difficult to remove the rear doors from the clear glazing sections, hence buying the second kit,....because the 118 Sqn aircraft that I was seeking to replicate were fitted with these as well as having the doors removed. Talking of the subject,..... before the full scale troubles erupted in Northern Ireland in 1969 and required the British Army to be deployed en masse, Republican IRA terrorists had been conducting a Border Campaign along the border area between Eire and Northern Ireland since 1956 and to help the Royal Ulster Constabulary in the task of combating this the RAF`s Search and Rescue roled Bristol Sycamores of 275 Sqn ( later renumbered s 228 Sqn) were used when available to help their mobility. This ad hoc help was put on a more permanent footing in September 1959 when 118 Sqn (which had recently disbanded as a Hunter unit in W. Germany) was stood up as a dedicated Internal Security unit at RAF Aldergrove equipped with 4 Sycamores under the direction of 39 Infantry Bde whose soldiers were also assisting the RUC. The Sycamores proved highly successful in the anti terrorist role until the Border Campaign ceased in 1962, developing tactics and procedures such as border recce, cordon and search, troop drops, border crossing inspections etc which helped pave the way for helicopter tactics used from 1969 when the terrorism increased to such an extent that Operation Banner began, otherwise known as the North Ireland `Trouble's (although make no bone about it,..... it was actually a war!) with aircraft like the Scout, Lynx, Wessex, Puma, Sea King and Chinook taking on the role of the Sycamore over the years.. Here is the subject of the model,.... I was going to have a go at hand painting the tail rotor danger marking,.... but then stuck with oe of the kit options,..... after all it `might; have received a more standard marking like the rest of the units aircraft,...... well that`s my excuse anyway LOL; Here is the WIP; Here is the model; For anybody interested,..... this is an excellent book dealing with this subject; Cheers, Tony22 points
-
Hi, We no longer present the Mirage IIIE, flagship of French aeronautics from the 60s to the 80s which equipped many air forces around the world. The plane presented here has a rather particular history because it is one of the two planes which took part in the operation Tamara in July 1973. This secret operation at the time consisted in dropping on the atoll of Mururoa on August 28, 1973 a 6KT nuclear bomb AN52. The decoration of the plane corresponds to the standard scheme of the time but with some markings specific to this event, in particular the pennant of the C46 on the left fin, emblem of the EM 85 "Loire" based in Mururoa. The model used is that of Modelsvit.. The decoration is also from the box. The model is excellent. Detailed in every nook and cranny with high quality engraving, even if some are skeptical about riveting. In addition to its extreme details, the model is also very precise with high quality of all the assemblies. The whole is at the price of a sometimes a little high complexity and an equally important number of parts. This is the brand's first Mirage III box. The few defects of this box (seal on the rudder, lower surface seal, fixed elevons, dimensions of some cans a bit too short) are all corrected in the following boxes. Well done to Modelsvit for this quality. Make way for photos. Complete set of photos can be find here and the work in progress there. Hope you will like it. Alain.21 points
-
Hi All. Here is another of my completed models. It is the Eastern Express Convair 990A Coronado with my own 26Decals plus Authentic Airliners windows. Kit went together really well after cleaning up the parts and can recommend it Cheers Ray19 points
-
I purchased this model along with a Vampire and Sea Vixen which required TLC. It was painted with what appeared to be a thick coat of gloss dark green and grey. The undersides were painted in what appeared to be White House paint. After some disassembly, the parts were soaked in Dettol to remove the paint. Due to some ham-fisted use of glue some details were lost or partially destroyed. Initially I thought it was going to be a simple restoration but a couple of surprises along the way and other remedial work threw that plan out of the window. I did a build log here This is the before - well nearly. I forgot to take pictures before I started. This is the finished Meteor depicting EE-337, No 778 NAS, Fleet Air Arm, Royal Navy. The decals are home made. I’m extremely happy with the result.19 points
-
I'd been meaning to try out the salt and hairspray chipping techniques for a while and needed a suitable guinea-pig. I found Airfix's A6M2b kit on sale at amazon for $9 USD with free shipping. That fit the bill perfectly. The model was built over two weekend nights from the box but with Eduard seatbelts (which you can hardly see) and a decal set from H-Models representing aircraft of the 204. Kokutai based at Rabaul in 1943. I figured an early war Zero in mid-war New Guinea would allow me to go a little crazy with the chipping. Aircraft "101" from the decal set, with its striking cross-hatched green overspray spoke to me. I couldn't find an actual picture of this particular aircraft, but was able to find another profile of it via the web. The profile from the internet differed from H-Model's interpretation by having much heavier and thicker green lines making up the camouflage, so I went kind of between the two in the end. The first time I started painting, things went horribly, horribly wrong and things turned into a soggy, salty, ugly mess about midway through the process. I tried to use some micro mask for some more directed chipping, only afterwards did I read on the bottle that it is only to be used on top of petroleum based paints. It didn't like acrylics, hairspray, and salt. So, lesson learned, I spent an afternoon sanding everything back to bare plastic and starting over. For the second-try finish, I sprayed the entire exterior with Vallejo Air aluminum which was then sprayed with hairspray and sprinkled sparingly with salt, both fine and course. This was then sprayed with IJN Medium Grey and after drying I removed the salt and sanded with a 3200 grit pad. The medium gray was then sprinkled with hairspray and a heavier application of salt, attempting to go over the areas already lightly chipped to the aluminum. This layer was then sprayed upon with a cross-hatch of IJN black-green. This too had the salt then chipped away and the finish sanded with 3600 and 4000 grit pads. Everything else was per normal: gloss coat, decals, dull coat, a few different washes, and exhaust/muzzle staining. Enough rambling, here's my Zeke and an original IJN Presentation Red-Lacquered Bowl...18 points
-
Hi guys! Here are some pics of my USMC M1A1 Abrams. It’s the Meng Models 1:35 scale kit; built as it comes out of the box. I just added some Tamiya stowage plus the markings for this specific tank I ordered from Italeri. The model is airbrushed&hairspray-chipped with Tamiya, it was weathered with Abteilung 502. Looking forward to your feedback!12 points
-
Howdy All, Thought you wouldn`t mind me showing some photo`s of my latest effort, hot off the kitchen table My second attempt at HobbyBoss`s 1/48 Avenger kit Completed to represent a New Zealand Air Force TBF-1C Built almost completely from the box contents, only additions being brake pipes, seat belts and radio antenna wire The previous HB kit I did with the wings folded and I expected a bit of hassle doing them open but in the end it was no trouble at all Decals came from Ventura Decals set V48101 and I was torn between this and the Donald Duck option....... ........but in the end opted for the indigenous artwork Paints were Xtracolour enamels and my first attempt at brushing a feathered edge with them just hoping it looks OK to your discerning eyes😬 Hope you enjoy the pic`s, thanks for looking Cheers Russ12 points
-
Hi All, One new jet added into my collection! And this is the one I wanted to add for quite a long time because it's Swedish, it's from early jet age, it has centrifugal engine, and it's a twin-boomer. So win-win-win for me J21R was not super successful or super numerous aircraft. Neither it had a super long career. However this stands among those first generation jets that opened jet age for pilots and engineers in their native countries. I have a soft point to that era of aviation so very glad I now added this jet to the collection. I had a thread in WIP section on this project so there are some insights on construction. In general I did not find construction process too challenging. Even alignment of booms was not complex. Decent Czech short run with only reasonable dry-fitting required, nice perks in the box such as resin wheels, rich PE fret. In fact this can be called an OOB build as only contents from SH box were used except for manually added pitot tube (the kit's one was super-thick) and also an antenna on the starboard wing made with fishing line. Paints used for the scheme are Hobby Color H309 for green and H53 for grey. The scheme I used is for F7 Såtenas wing circa 1953-54. As far as I understand this was a fighter-bomber wing and J21Rs of that wing would normally be armed with gun pods or rockets which was making them A21R really. J21R is definitely not the most ordinarily looking aircraft. And honestly I was not perceiving this as 'beatuful'... But after putting this on wheels and placing it on the shelf - WOW! It is actually a very appealing bird! Look at these a little more 'artistic' photoes: And finally there are some group shots. With another Swede in my collection: ...with it's British stablemate ...and full collection of twin-boomers from my cabinet Hope you liked it! Kind regards, Dennis9 points
-
Thanks for all your comments everyone, greatly appreciated! I have finally completed the rebuild. As it was a job of rebuilding the spine, the respraying it the cages & walkways it didn't take as long as i thought. The modular design of the Eagle makes it easy to break down, then rebuild. The finished Eagle: Alongside the Round 2 44" & 12" Eagles for comparison:9 points
-
@coneheadff @Stew Dapple Thanks gents, much appreciated! Finished up spraying the white on the fuselage last night and de-masked this morning, it's looking good! First snap is after a two or three very thin coats applied and the pre-shading still showing through pretty strongly: Stopping at this stage would give a very worn look and make a nice base for more weathering and fading with oils, etc later. However, the photo references in the Eduard book which comes with the kit don't seem to show this much contrast in the white so I kept going and added a few more thin coats: The pre-shade is still showing through a bit and I'm happy with where I've stopped. Inevitably there's a few bits to touch up but nothing too drastic. One other trick was to mask off a few random panel (over the wing TE, just in front and behind bomb bay doors) for one of the airbrush coats so that these have a slightly different "shade" of white to the others - again this has helped to break things up and make big slabs of white look a bit more interesting! Here she is with wings slotted on - next step is to get the underside of these, and the fins at the back, painted up the same way.9 points
-
Here is my 1/48 Airfix Bristol Blenheim Mk 1F, Depicted as ZK-A Flown by Mike Herrick RNZAF No. 25 Sqn RAF September 1940. Full build at my blog is here but here as some photos of the finished kit. More Pic's here8 points
-
G'day everyone. With my Beaufort project finished, I summoned up the mojo to deal with a few outstanding issues on this project. And shortly after that, it was done! This is the Airfix Beaufighter TF.X with some modifications to turn it into the first Mk.21, as flown on May 26, 1944. The work needed for the conversion was relatively tame compared to the Beaufort, but I ended up making a bunch of extra work for myself with resin engines and Eduard lowered flaps. Here are some details Kit: Airfix Beaufighter TF.X Aftermarket: - Barracuda resin wheels with tread pattern - Eduard general photoetch set - Eduard photoetch flaps - Eduard masking set - HPM resin autopilot housing, instrument panel and rear canopy - CMK resin hedgehog exhausts - Vector resin Hercules engines - Quickboost resin undercarriage doors Paint: - Exterior: Gunze H-302 (approx. RAAF Foliage Green) - Interior: Mix of Tamiya XF-81 (Dark Green 2 (RAF 2)) and XF-21 (Sky) Decals: From the HPM set, tail number modified into A8-1 (the font is not quite correct but close enough. If I stumble across a better set in future I'll repaint and re-decal that area) Other modifications: - Drilled out the gun ports in the lower fuselage - Left off the HPM machine gun barrels as A8-1 and A8-2 didn't have the extra wing guns - Drilled out bulbs in the wingtip lights - Opened up tubes on the front of the exhausts by rotating the point of an exacto knife - Added EZ-line aerial wire - Removed second antenna behind DF loop - Added greebling inside the fuselage (slightly visible from just the right angle) - Added feature on front of canopy (rear-view mirror?) from styrene card And now, here are the photos! This is definitely one of my better finishes for an aircraft with a single colour all-over. The canopy windows are big and very clear. The after-market flaps, wheels and gear doors all look great! Finally, here are a few side-by-side with the Beaufort. At this rate, I think I'm actually finishing kits faster than buying them this year! 😮8 points
-
Hasegawa's version of Trimasters 1:48 Ta152H. Nanond8 points
-
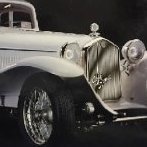
The silver T-bar section on the roof acts as a clamp for the windscreen and the two glass panels on the roof, meaning no glue is needed for this glass. Yet another sub-assembly finished: The dashboard. The photo as quite a lot of grain in it as was taken in less light that I'd have liked. Making seatbelt material. Masking tape put onto a suitable low-adhesive background (Hotel Chocolat wrapper!) then sprayed once with orange and once with yellow. Adding seatbelts and retainers are the only additions I'll make to what's in the box. Except *perhaps* a custom number plate. With all the hidden details in this kit, it's amazing it didn't just include the very non-hidden seatbelt retainers. I don't know what kit manufacturers have against them - never found a kit yet with them. Fortunately the as-yet unthreaded seatbelts have the holes already opened in Tamiya's mould. Also added are two seatbelt retains which shortly get a dab of red paint. Finally many sub-assemblies come together in the completed inner body. Minus the wheel arches which I'll add now the photos are done. I've taken some better photos at this point as the inner body is as much a completed model in itself as the entire car will be.7 points
-
This was a conversion from the 1/72 Minicraft Consolidated PB4Y-1 to a Liberator GR Mk V. I used the Pavla conversion kit along with some QuickBoost Turbo Super chargers and some 50 cal barrels. The decals came from a mix of the Xtradecal Coastal Command Heavies and a Grey set of letters.7 points
-
The kit is a direct descendant of the Frog offering from 1973 but there was a previous offering from 1955. Let’s just say the moulds were verily light on the detail - probably through use/cleaning. The pilot’s seat/cockpit area look like they're a plywood mock-up. It needs an ejector seat and some more detailing. Some CAD (cardboard aided design) may be needed. What panel lines there are, are only just visible - but that just means there’s not that much so sand back for re-scribing - which in itself should be fun😱. All of the kit parts are there apart from one clear part which is a nose side window. I should be able to fabricate a replacement out of some clear packaging (where’s that doughnut box?) I found on Scalemates that Revell did the same kit at one stage so I downloaded an printed a set of clearer instructions - come to think of it, the pale green plastic does remind me of earlier Revell kits. I might see if can get some decals off them…… These look very much like a Shackleton MR3 wheel It’s barely out of the box and there’s fit issues already. Nothing some tape and a good application of TET/Mr Cement won’t fix. The kit detail7 points
-
Great subject for this group build! I just finished a Tamiya 1:32 F-4EJ in this scheme, using the same DXM set but in 1:32 They are excellent decals and went down really nicely, the only thing being that there were so many of them..... Looking forward to seeing how yours turns out! A pic of my effort:7 points
-
Last year, youtube phenomenon and professional painter Emil Nystrom, better known as 'Squidmar', crowdfunded a set of Kolinsky paintbrushes, aimed specifically at miniature painters. The brushes met with a mixed response. Reviewers shilled the heck out of them- they were undeniably the best mini brushes on the market! Some backers weren't so sure, with complaints of late delivery and serious quality control issues popping up all over the place. Mine were delivered on time, looked absolutely gorgeous and got thrown into the 'ready use' drawer, to be given a months long ignoring to until I could finally find some time to use them. Well, last month I finally got a chance to dust them down and see for myself. The results were illuminating, to say the least. First, the chaps, from the old Dark Vengeance box set. (A box I enjoyed so much I grabbed another when I started to run out of minis to paint from the original...) The minis are simple, the detail is crisp and they're all pretty open, allowing easy access for your brush. The brushes were beautifully packaged: And the brushes themselves are beyond gorgeous! They're probably the best looking brushes I've ever seen: I chose the 'L' brush and eagerly got stuck in! Things didn't exactly go according to plan. The brush refused to hold a fine point, making detail work tricky. Worse, the hair was much softer than I as expecting, bending and splaying almost as soon as I touched hair to plastic. The full belly of the brush- I'll come back to that- holds a huge amount of paint, which it proceeded to drench the mini with. Repeatedly! I stuck at it all evening, but the harder I tried, the worse things got. Thoroughly deflated, I washed the brush and headed off to bed. Having slept on it, I figured I had to be doing something wrong. These are a premium product, with a huge personal investment from one of the most popular, up and coming painters on social media, working in partnership with Germany's top brush manufacturer. They've both got far too much to lose to risk punting out a poor quality brush. So, with much humming and beard stroking, I headed back to my painting table. The first issue was me using the biggest brush on a figure around an inch high. I usually use British No 1 size brushes, Rosemary, W&N and so forth. The Squidmar 'L' is closer in shape and size to a Raphael 8404: Although the bristles are around the same length it's actually a much larger brush. Here's a W&N 7, An Artis Opis and a Rosemary Series 8. The Brits are considerably narrower, with a much smaller belly: So I switched to the 'M', cutting the amount of paint in the brush by half. Issue resolved, simples, right? Er, no, not exactly. Turns out there really are some quality control issues: Ok, fair enough, the 'M' is a dud. It happens, I've heard people claim the same happened with all of the quality brands- it's a natural product, sometimes you get a duffer. I've washed the brush, snipped off the worst of the spider legs, but it's never going to be a needle like my beloved Rosemarys. Time to move down another size... The Squidmar brushes hold an unlikely amount of paint. By keeping the bristles short they keep the tip wet, even if you use it for an extended period. As most of our (miniature painters) brushes are actually water colour brushes, they tend to need frequent dips into the water pot or the palette to keep the tip usable with acrylics- water colours are much kinder and hardly ever dry out. It's something we do unconsciously, but it keeps us off the mini for a lot of the session. Emil paints at an insane pace, only returning to the palette to change or blend paint. His brush allows him to stay on the mini for longer, completing a piece in a fraction of the time a regular brush would allow. The full belly of these brushes is a feature, not a flaw. Emil also tends to apply paint in thicker, translucent layers. His talk of 'values' is describing how he uses a high contrast style, applying bold colours next to each other. For that to work he needs to lay down solid layers. Personally, I'm more of a 'two thin coats' sort of guy. I actually use airbrush paint and inks a lot of the time. I don't mind having to go over a panel a few times to get a smooth finish and I get a kick out of transitions made up of multiple layers, sometimes of different colour. I don't 'do' 'values'! My paint is so thin it just floods out of a Squidmar brush the moment it strikes the model. My third session was with (much) thicker paint and careful attention to applying brush strokes in a single direction. The brush stopped fighting me and I managed to apply solid coats in a surprisingly short period. I wasn't brave enough to try Emil's style, but even with my painting by numbers approach the potential of this kind of brush is obvious. It's just not for me! I'm back to my regular brushes, and my preferred style. I'm glad I joined the kickstarter, happy with three of the brushes and I've gained an insight into how one of the rising stars in our community manages to achieve what he does. I might attempt the 'Squidmar' style at some point, but until then, this is what I managed while trying to adapt to his technique...6 points
-
Academy 1:72 SB2C-4 Helldiver. The kit is excellent out of box with detailed bomb bay and cockpit. Nanond6 points
-
Hello all, Here is my recently completed 1/48 Eduard Hellcat MK.II, in the markings of 1844 Naval Air Squadron, flying off HMS Indomitable in the Pacific in 1945. Indomitable's Hellcats accounted for 40 enemy aircraft downed during their Pacific campaign. JX814 was flown by Sub Lt W.M.C Foster who became one of the few Hellcat aces in the FAA after downing 5 Japanese aircraft during Operations to secure Okinawa. JX814 was subsequently downed by AA fire from allied ships. The build thread is below: Built completely OOB other than an LF models camouflage mask. Paints are from MRP with the weathering being a mixture of Abteilung oils, Flory wash, Tamiya powder sets, AK pencils and dry brushing. Thanks for looking and stay safe Dave6 points
-
Hi all Just finished this old kit, it is the 1982 Lindberg boxing of the old 1968 Inpact kit. The build thread is here The fit of the kit is quite good although a bit basic but considering it's age it has done quite well. The cockpit is very basic so I scratched a representation of the cockpit from scrap plasticard and brass rod, the gauge bezels are made from Little Cars 0.1 mm wire The guns are from Mini World and are very detailed I scratched the gun mounts from some plasticard and left over PE parts. The cowling raised panel lines were removed and rescribed. The model was brush painted in Humbrol enamels and rigging is Prym Knitting elastic and invisible thread. The engine is an Armoury Armstrong Siddeley Jaguar IV engine and is a lovely model in it's own right. I added the ignition leads from 0.2mm lead wire and pushrods from 0.33 mm brass rod. Decals are from the lovely Model Alliance, Wings and Waves part 1 set and the model depicts S1282/10 of HMS Glorious (Mediterranean Fleet) in 1930. Anyway enough waffle here's some photos Thanks to those who have supported and encouraged me during the build. Thanks for looking in Chris6 points
-
Here's an idea of the diorama setup, with one of the Reedoak figures for scale:6 points
-
Another 1/48 Airfix Sabre F.4 finished. This time it’s XB931 / G in 4 Squadron colours circa 1954 RAF Jever c/o Xtradecal sheet 48107. Left the ammo door dropped on the port side with this one as it was often down when on the ground for use as a crew step. Extras used include a couple of the new Eduard detailing sets. I also relocated the tanks to their correct position. Paints were airbrushed Humbrol enamels, all three colours lightened slightly to hopefully give a better scale effect, weathering was dry brushing along with a Flory 50/50 dark/black wash and Tamiya weathering pastels - may have gone a tad to far but don’t care. Loved every minute of it. Might think about doing that yellow and blue Yugoslav Sabre next. Happy for any comments good or bad. Hope it’s of interest.6 points
-
Not forgotten nor finished, but it is a step closer to being finished. I've got three GBs on the go at the moment and a couple more waiting to be started so sometimes one stalls for a bit. I think it's ready for decals next. Dave.6 points
-
Thanks Cliff. I experimented with the Polish Khaki for the upper surfaces in readiness to spray the wheel spats. I have the Hataka Orange Line series paint for Polish aircraft. I decided to darken the C011 Light Polish Khaki a fraction with the C010 Dark Polish Khaki as this aircraft is to be portrayed early in its life, Ratio was approximately 5 parts C011 : 1 part C010. This brought out a little more of the tinge of green closer to FS34088 while preserving the Polish Khaki basis. I thinned the Hataka with Mr Color Leveling Thinner. Seems to not present a problem. Laid down nicely and dried quickly. Wheel spats are masked. I gave the spats a light coat of gloss clear GX-100 to seal the mask edges then Mr Finishing Surfacer 1500 Black to reduce the red, being careful not to build it up on the mask edge. Now ready for the Khaki. I will let that dry a little longer before using the Hataka. PostScript: Nice stage to reach, masks off and the tricky pattern on the wheels spats is done. I'll let it dry properly and then mask the circular lower strut mount and finish it in aluminium and all should be good. Ray6 points
-
OOhhh blimey. It's been a while since I've been through these doors isn't it? You will probably be very surprised to hear that I have actually been doing some fettling on this over the last week or two. Nothing major, but fettling nonetheless. I have the printer going full steam ahead printing Wapiti parts so while that was chugging away... This build hit a wall when I had to reshape the underside and remove those nasty nasty seafaring lumps to get rid of the Waspness and start transforming it into a real aircraft. I had used plastic filler and it wasn't really working out so this was put on the shelf and I got on with other things, but my recent experience with milliput and the success I had on the Whirlwind tail section prompted me to try again. It worked. (of course, completely forgot to take any photos so you'll just have to believe me) Following the success of the belly bloating I went for something simple to get me back in to the way of things. That's really just an excuse to avoid saying that I had completely forgot where I was with this build and what my plans were. The center console seemed an easy target. I've also bookmarked @Chewbacca's wonderful Wasp thread as it provided many useful details that I would not otherwise have come across. One of the things I'm not too keen on with this kit is the fact that you have to fit the glassware very early on. Transparencies are my Nemesis and I've come to cringe every time I have to go near one. With this build, those clear bits have to go on pretty much at the start because you can't fit anything or paint anything without them in place. Hey ho. On we go. I used my favorite diluted PVA method to stick 'em in The glassware isn't that great to start with and the fit is definitely a bit iffy, but I'm not going to fret too much over it. Despite how these look, they cleaned up reasonably well. Well, better than how they look here. With the front see-throughs in place I could get the floor glued into position, followed by the rear bulkhead. Note the transmission deck off to the side - a read through Chewbacca's thread reminded me of his discovery that there is a well in the middle of the deck and not flat as I previously believed, and as Fujimi would have you model it. That lead me to dog out my previous work and replace it with a lowered section. Getting all excited at the progress I thought I could attempt something a little bit more difficult. Rain channels to be precise. There's nothing on the kit to represent the very noticeable rain channels. Thinking about it was a lot easier than doing it. I searched though all the scraps and spares and couldn't find anything suitable so it was back to the old fallback - wire. I used masking tape to mark out where the rain channel terminated, that's be the corner where the two strips of tape cross over, then drilled a 0.4 mm hole at those two locations. SS wire was then bent to shape and pushed through the holes, then secured in place. It was that easy. No it wasn't . It took a good half dozen attempts to get the bends in the wire at the right place so they would fit through the holes and give me a good approximation of the real thing Eventually... Then the wire was filed down a tad to have that flattened look on top. In this shot it looks like there's a slight gap under the wire - I checked and there isn't - that's the remnants of black paint making it look like a shadow. I also scribed in the nose panel and if I remember later I'll add the fasteners too. Hinges will go on later as they're bound to get obliterated between now and paint. There's a little bit of greebling that can be accomplished prior to turning it into a greenhouse so a few holes were cut, and some paneling added. All of which then had to be revised later. More wires, sorry, rain strips around the nose. If you look dead on the nose they are slightly asymmetrical - I made the rookie mistake of using the rivet lines on the kit as a guide, only to notice after I had done this that the kit detail wasn't symmetrical. I should mention that for these strips I scribed a Vee groove into the plastic to give the wire a channel to lay in, which also (planned of course!) made them not quite so proud of the fuselage as the rain guide on top of the nose. I still haven't decided whether to file them flat or not, but there's plenty of time before I need to commit to that. A more pressing issue was the fact that the transmission deck did not fit as nicely as it should. I put this down to my lack of forethought and using so much plastic filler. I think all that filler had the effect of warping the sides in slightly, thus preventing the deck from sitting down in its nest. Easy remedy - glue in two sections of big thick runner ... which can then be shimmed out when cured in order to get the fuselage sides to flex outwards and allow the transmission deck to fall into place. Like so After gazing at this for some time I came to really dislike the holes I had cut for the steps just aft of the cabin, so while I was loading up another batch of Wapiti bits I threw in a couple of step plates. I could then enlarge the nasty holes and plug them with these nice little steps. Much nicer. Another miss by Fujimi, and it may not be a miss, but certainly for the Scout (not sure about the Wasp) there were a couple of fluted ribs missing between the mina body and the tail. For this I used 0.6mm rod, and as with the rain guides, I first scribed a small channel as a guide, then used a Vee shaped scribing tool to deepen the groove and allow the rod to sit in the slot. It was at this point that I realized I had made the inset compartment in that area too deep, so added a thicker section of styrene on the lower "shelf" to provide some area between the fluted rib and the compartment. Now I may have already mentioned that canopies/transparencies/clear bits are my nemesis. I say that because well, they're my nemesis. This build is going to prove no different. Exhibit A: Big glass dome fitted on top. It sort of fits on this side if I press down really hard. Well, some of it sort of fits. The rear quarter is off doing its own thing. And don't even look at the front join to the nose. Just don't! But taking a gander at t'other side proves just why I hate these things so much. It's nowhere near a fit. The only thing that fits at this point is me. The rear quarter on this side doesn't even belong on this aircraft. That leaves me in a quandary. - And before anyone dares to suggest it - NO! I'm not making a plunge mold or vac-form for this one. I'm just not. Okay? I think I can deal with some of this non-fitting-ness, though I'm almost certain I'm going to have to cut off the rear quarters and plunge mold those somehow. I'm also tempted to remove the doors as most of 660 Sqn flew without the doors on. That would give two benefits; 1, you could see inside, and 2, I don't need to worry about those door frames. Essentially, the canopy would fall where it falls, and without door frames, you wouldn't (shouldn't?) be able to tell that it's not in the right place. Thoughts from the hive on that one? Doors or no doors? While I'm losing sleep over that fun challenge, I had to greeble to calm myself down. This greeble involved taking a piece of brass square tube, and filing the top half off to leave me with a 'U' channel which was then mitered on the front end, and the side walls removed on the back end, leaving just a tab. Which was duly fitted to the transmission deck to masquerade as a fuel filler/drain channel. The plastic on this kit is like petrified wood. The scriber barely makes an impression on it and even the chisels were having a hard time. I had to use so much force to get anywhere I was in imminent danger of lancing myself There we are then. Temporarily back in action. I will try and pay a bit more attention to this build, but bits of Wapiti are calling at me and I've only a few more bits to print before I can (theoretically) start assembling it. Dib Dib chaps. See you at the next campfire.6 points
-
My first large scale GK that I have been putting of for some time but once I got started finish it in good time and didn't really have any problems with it either. I added the LEDs as you don't see many GK kit with them and the gun was fitted with magnets so it can be removed but I like the look of her with it. I used a few 1/144 gundam decals to add a bit more detail. Thanks for those who followed the build thread and happy for your coand feedback. Cheers Brian. Link5 points
-
Starting to look like a ship. Funnel and bridge in place, not sure when I'll fir the masts. Probably when I've finished all the deck fittings, guns, paravanes and railings etc. Knowing me if I put the masts on now I'll bend them. Jon5 points
-
Little more progress in the paint preparation today, got as far as the primer With the masking complete I went over the frames with MRP Interior green. Then MrSurfacer 1500 from the rattler Theres a few bit I need to work on, Ive lost part of the rear fuselage access door detail, so need to rescribe that also the join between the rear fairing and the main fuselage is a bit soft so might dare to put a scribe line around that to sharpen the area up. I'll let the Primer dry for a couple of hours before doing much more.5 points
-
I'm calling this one done. All the little pieces are attached, the Leigh Light is on and yellow tips painted. The nose aerial was made from a left over ME262 radar set cut and glued together. It looks pretty good I could do more weathering but I wont.. I could go over the canopies with a cocktail stick improving the paint lines (I might) but otherwise, It is done. Having never built a coastal command aircraft before, I've enjoyed it. I found cutting and attaching the nose glazing and dumbo nose really hard. It is as good as I can do and I'm pleased with the results.5 points
-
Thanks for the advice, Martin Grandboof, yes all the location fittings are a bit dubious on this. The notion of spending out on a Decal sheet and postage from the other side of the earth for this little critter is a nonstarter though. Getting the 26decals option for the Twin Otter Scillies Skybus is more than enough for me in the way of extras. The transparencies aren't so good.... The front windscreen at the top there is clear, but it's too small for the opening. The side windows are like the bottoms of beer bottles. I'm going to try to glaze the front some other way. So far I've installed pillars. The flaps are coming out with a view to some deployment. Also relieved the rudder for some movement, the trim tab will go back on maybe with a bit of deflection. And other than that, the puny wee pilot is getting an arm and a better head with a baseball cap.... We'll see how that goes. You're very welcome to this one Adrian if you want it, but I expect it will be too small to fit your kit as well. Unless you want to play with the fuselage opening somehow. I'm thinking of glazing the side windows with Kristal Kleer, instead of the kit parts.5 points
-
5 points
-
What a fantastic kit this is. Any issues were of my own making and that was only a slight misalignment of the Cannon Cartridge Ejector Chute which caused a little fit issue with the wings. Everything else was a great fit. Primed with Tamiya Neutral Grey. Painted with ColourCoats RLM66, RLM 76, RLM 81, RLM 82, RLM 02, FAA/RAF Yellow, RAF Dark Green Tamiya Lacquer Red, Semi-gloss Black, Rubber Black, Linoleum Deck Brown, Dark Iron, Alclad Copper, Aluminium. Finished with a light Flory Dark Dirt wash and Windsor & Newton Satin Varnish WIP Here. Thanks for looking, Cheers, Alistair4 points
-
Hi, I would like to introduce my next project. This time this is small russian tank T-60. This is mi first attempt with winter cammo. To enlarge pictures just click on them4 points
-
RS model 1:72 Dornier Do17P. The camouflage was my own mix of Mr.Color/Gunze lacquer paints. Nanond4 points
-
Well that told me!4 points
-
Strange isn't it that these companies actually want to make money and stay in business 😂 But yes it's the modellers that drive this and unfortunately a good percentage of modellers will only mainly build the popular types they know well.4 points
-
Hey guys, made quite a bit of progress over the last few days. The wings are on as are their slats. I dropped the ailerons which was more of a challenge than I though, needing quite a bit of plasticard to build them up internally. Having only built the UK versions of the kit previously I was surprised to see how much less detail there is in the long nose kit. I’ve added some of the lumps and bumps that are specific to the AUP - the ECM antennas on the intake shoulders, the DIAS antenna under the nose (scratch) and the IFF antennas above the nose. (nicked from an F-16) I knocked off the air data probe from forward of the fin so replaced this with some brass tubing. The mount for the Litening pod is fitted to the forward left sparrow well and the pod (also from an F-16) is made up and ready to go. All the external ordinance, wheels and bang seats are done and awaiting paint and I’ve fitted the Eduard brass to the canopies too. All that remains before paint is tidying up the joint between the Center canopy frame and the fuselage and she’s ready for paint! Chris4 points
-
Just a short update. I have finished the drawings of the knock-offs. I have a new printer that I do not seem to get to work. Waiting for support from Anycubic. Pity because I wanted to print the knock-offs and the axle stands as well as a new version of the radiator I drew some time ago. The earlier drawings of the radiator had horizontal heatpipes which is incorrect, so I removed them. After this one is printed, one should be able to see through the radiator as the square grid is open front to back. I will show it after it is printed. Here are the pictures of the knock-offs. Just like the original above I made sure that the text on the outside (smontare and destro/sinistro) is indented as well as the arrows. I also did a little bit of work on the side mirror. The driver side door has 2 holes which I failed to fill before painting. The mirror does not cover both holes so I added a little plate to the foot of the mirror and soldered 2 guide pins that will fit the 2 holes. With that it should be possible to attach the mirror to the door properly. Next up are the door handles, but that's for a later update. Hope I have my printer up and running soon so that I can show you the printed results. Thanks for watching.4 points
-
More or less done now, just lacking a few details such as mirrors. Expect some pics in Ready For Inspection soon.4 points
-
Mail call for me today! I've received the kit. So tomorrow the fun can begin As I already said, it will a completely OOB build. But i tihnik some "friends" may be helpful in the process: Fine Molds belts and Fightertown's data and weapon decals.4 points
-
I'm also skilled in this aspect of the hobby 😉👍4 points
-
I'm a sucker for a Subaru Impreza WRC Rally Car. On it's way an ebay bargain by Airfix. Bonnet lamps await! Or make some more!4 points
-
Thanks for the kind remarks. It is coming together nicely. Finished the black undercoat and then masked and sprayed the Bulgarian tri-colour rudder. Mirage do provide some decals. I think painting is easier. You can see I have applied the red for the fuselage stripe. Quite a bit wider than required. Nothing more frustrating than missing a bit that will go under the mask. Time to cut some masks and give it a good 24 hours before application. No need to rush. Ray4 points


.thumb.jpg.d17ff607fc7e89ed057e63fcb6f2a888.jpg)


This leaderboard is set to London/GMT+01:00