
Leaderboard


Popular Content
Showing content with the highest reputation on 10/09/21 in all areas
-
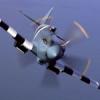
Greetings all, I havent been very active here or on the modelling scene for a while. Those that remember me will know I generally model civil stuff as my preferred subject and avoid preshading, fading, weathering and panel line accentuation like the plague. (Actually I do do these things but really subtly) I am a volunteer at the Bullcreek Aviation Museum in Perth and have built this model for an imminent display. Steve Murray a former Rhodesian Air Force Hunter pilot and more recently a former Qantas check captain has donated a former Singapore Air Force Hunter to the museum. Along with the real airframe which is being currently cosmetically restored (in RAF scheme) he donated a Revell 1/32 model kit to be built and finished in the colours of his former mount. I like the Hunter, I eyed off this kit and thought I would take it on.... the dude in the cockpit was supplied by my favourite Uncle Les (thanks cobber). The stand is a home made design in timber and the model can be rotated on its roll plane for display. The dedication is a temporary paper print taped on on to show how it would like when I print it on glossy sticker paper.. I can't do that yet as my printer has crapped out. I realise I still have to glue on the pitot tube and have to put in a bit of crystal clear in the hole portside cockpit which I thing is meant to represent the emergency hatch blowing lever. This will be displayed near the real hunter in a protective case.34 points
-
Thank you all when I left you last, I was working on all the little bobbins in the cockpit - switch panels, control boxes etc - most of these are PE faces, custom decals & toggle switches from wire, some of the bigger knobs & buttons are modified watch parts (cogs & shafts etc)... ..these are the front cockpit right hand side.. ..and fitted - the fuse panels in the lower half were first made up, then finely chopped coloured wire dropped onto blobs of CA - a bit like decorating a cake with hundreds & thousands.. ..same for the left.. ..here the knurled wheel was a modified 1/24 tailwheel (Fw190 i think) with ribs added.. ..rear right.. and rear left.. ..the rear bulkhead has quite a lot of complex work and it's own buoy and target towing control panel - the yellow thing in the middle is a pull cord to cut the towing cable.. ..when dry fitted in the airframe it starts to look like this.. ..then as we modellers like to do, we start to cover it all up.. ..here with the upper decking.. ..and when built up the cockpit starts to look a bit busier - in all areas there is still quite a lot of cabling & wiring to add.. ..and thats it for now - until next time.. TTFN Peter20 points
-
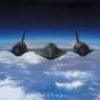
Hello colleagues, I'd like to present another self-made one. This time, a dream come true on the shelf. Drawing quite a complex configuration, mainly from printed schemes with appendices. Fitted the rest of the geometry from the photos. Experimented with painting of the marking and added a bit of customization in the form of serial numbers and the flag on the keel. Paint and varnish with brushes. Paints: GSI urethane-acrylic, PC88 acrylic, Tamiya lacquers, +plain pencil. Enjoy the view!17 points
-
I ought to post an update, oughtn't I? As you can see: some light panel line washing, gear on, RP rails (after seemingly endless deflashing) added, resin exhausts painted, weathered, and added...once the USPS drops off the wing walks that John (who is even more generous than he is handsome, if such a thing can be imagined) mailed to me, I'll apply them, lay down a second gloss coat to blend stuff in, and then the spinner and matte coat. I should probably add the whip aerial if I can figure out how to do it without messing up.17 points
-
I’m pleased to roll out and present to you my latest build, which was intended as a quick space filler between others. In the end she took a bit more effort than I had expected as I discovered the additional features of these machines. The model depicted former Dutch RNEIAF F-51K Mustang “F-305” (ex 44-12754, H-305) as operated by No.3 squadron of the Air Force of the Republic of Indonesia (A.U.R.I.) around early 1958 https://en.wikipedia.org/wiki/Indonesian_Air_Force. I chose this machine as she stood out when I purchased the Dutch Decals sheet nearly two years ago. However, upon matching the only image I am aware of her (below) in this colour scheme against the instructions it was clear there were differences – errors. I consulted Max Schep. It was agreed that the scheme, instead of being a single green, was in fact a two-green camouflage pattern. THere is no red nose apart from the sinner. In fairness Dutch Decals allude to this possibility. I then noticed that this aircraft carried the No. Squadron “3” on the fuselage side, believed to have been in yellow. This is not in the Dutch Decals sheet. Note also that the serial and axe are oversize! Credit; Dutch Decals Sheet Later, while building the model, I saw that there were other differences. Firstly, the decal sheet shows the sharksmouth as having a red interior whereas the photograph clearly shows a very dark colour. You can match the red of the national insignia and it becomes clear. I opted for black as it matches other known black features like the eyes. The greens used for the upper surfaces are unknown too and so I have made a judgement call on what I think they were. Contrary to the decal sheet instructions I painted the undersides as natural metal rather than grey, citing the natural metal surrounds to the serial numbers. With help from other BMers, I chose black as my colour for the cockpit, citing the Dutch Air Force Museum machine as an example. I used an Aires cockpit set that was languishing in a box under my desk 😉. I also had a F-51K prop ready but didn't need it. She needed new rocket rails and so I fashioned these from Plastruct rod using a photo of a machine in the Jakarta museum as a reference (below). Credit: @Troffa Apart from the above it was reasonably straightforward. I used some aftermarket to spice her up a bit and tried to enhance detail by, for example, drilling out the exhausts. You can see that I dropped the flaps too. The only issue, and it has occurred with all of my seven Tamiya Mustangs, is that the windscreen takes some careful fitting. The wing panel lines were filled with PPP. Other things to change on the Tamiya kit are: 1) deleting the strengthening patches above and below the wings, and 2) modify the main gear doors as they dont sit right when following the kit parts locating positions. The cockpit set was nice (no rivet counters please). It’s a shame that most of it gets buried! The aircraft is depicted as she was during the troubles in Indonesia in late 1950s, fighting insurgents. This story is best captured here: https://www.dc3dakotahunter.com/blog/pby-catalina-26-invaders-p-51-mustangs-cia-rebel-air-force-attacking-indonesia-1958/. F-305 was damaged on 07th May 1958 during an attack by CIA-supported PERMESTA forces on Laha Airbase. What did I do/use? 1. Kit – Tamiya F-51D Mustang (54) in 1/72 2. Decals – Dutch Decals Sheet (72070). The “3” was drawn by @Giorgio N and printed by Arctic Decals. Likewise the replacement sharksmouth was printed from my revised drawing by Arctic Decals too. I used Xtradecal white and black striping for the flap angle indication. 3. Aftermarket – Aires cockpit set (7074 ), flaps from an Airfix kit (Thanks @rossm) 4. Paints - Colourcoats Green Olive Drab (ACUS19), USAAF Olive Drab 41 (ACUS15), Insignia Red (ACUS26) Matt Black and Tyre Black, Humbrol 27002 Polished Natural Aluminium and others. She has a final Satincote finish. 5. Weathering – Prismacolor Silver pencil, Tamiya Weathering Powders and Flory Dirt and Sand I hope you like her. Martin PS: Yes, I know it has a Hamilton Standard prop. It is correct, despite being a F-51K.16 points
-
To all visitors, hello! I present to you another nostalgic model. The build has included significant, but not all successful, refinements. The reworking of the supporting structure, ended up giving a small "helicopter" at the tail end. Accordingly, it is worth reconsidering the truss assembly and tilting. Also it's necessary to rearrange wheel alignment of small diameter wheels. From a binding to a prototype, it was necessary to refuse, owing to absence of some moments on the information at the necessary moment. Therefore, it was built in the image and likeness of the car circa 1909, on which Louis Bleriot has made a flight over the English Channel. Despite some setbacks in the build, experience was gained, understanding of the many points in modeling machines of this type. Painting and varnishing with brushes. Paints: GSI urethane acrylic, Tamiya lacquers. Enjoy watching!16 points
-
Thanks for watching !!15 points
-
My latest finished project - "little bit" upgraded Hawker Tempest Mk.V 1/72 Academy kit. I made design and 3D print of the new cockpit, wheelbay, gunbay and engine. (all of them will be available on www.u3d.cz) The crazy is that during my work on the project another producer notify a new kit of this plane ... "c est la vie" ( now I know that the KP is not much better ... who knows how wil fit the Airfix )15 points
-
Evening All, Serious aviation modellers know that the only real aircraft are pushers with two or more wings so when I came across the Oertz W6 Flugschoner (Flying Schoner), courtesy @Marklo in the Anything but Injection GB recently I had to thank him for the introduction. The Oertz W6 was a double biplane with two pusher engines, so it must rank as a very real aeroplane indeed! The only problem with Mark's model was that it was in the wrong scale (1/48), so someone had to correct the error and as nobody else came forward I thought that I would have a try for a recent Flying Boats GB on another site. This model is in God's Own Scale and has a wingspan of approximately 12 inches (30 cm). Dr.Ing. Max Oertz studied nautical design at the Royal Institute of Technology, Charlottenburg, Berlin and worked in Helsinki and St Petersburg before returning to Germany in 1895. He built the first yacht in aluminium for a banker and founded a company to build more yachts, including one for the Kaiser. Oertz was interested in aviation and designed a gondola which could be lowered from Zeppelins and allow the Zeppelin to remain unseen above the clouds while the observer could be beneath the clouds and have a good all round view. In 1909 he built his first aeroplane, and in 1911 a second one. He then combined his skill in designing yachts with his interest in aircraft to start building flying boats. Two machines were built before 1914 and more were built for the German Navy during the war. In 1917 he sold his aviation interests to Hansa-Brandenburg: post war he continued designing ships and other marine craft. He died in 1927. Oertz submitted a number of flying boat designs to the German Navy in 1914, of which the W6 was one. It was known as the Flugschoner, (Flying Schooner), and was ordered in August 1914. It was distinguished by its tandem biplane wing design which was chosen to provide a large wing area within a reasonable span to increase the range. It had a crew of three and was powered by 2 x 260 hp Maybach Mb. IV engines mounted in the hull driving pusher propellors via shafts with bevel gears. Although construction was completed in the summer of 1916 delays in the supply of the engines meant that the machine was not sent to the navy until July 1917. When it was delivered for trials it did not have wing tip floats, and ailerons on the upper front wings only. Trials showed that floats were advisable in the choppy waters of the North Sea and that the aileron control was inadequate, so a second pair were mounted between the rear wings. The hull had a very broad beam which made the craft stable in the water, and the tail surfaces were mounted on booms high above the hull. The aircraft took off and landed well but overall performance was sluggish, even though the range was greater than had been calculated. It was not considered worth while proceeding with the design as it would have proved vulnerable to fighter attack and so the machine was dismantled after the tests had been completed. Sadly there is no kit of this aircraft so I had to cobble it together from wood, plastic sheet, strip and rod, and brass rod. It is rigged with rolled copper wire and the markings are from Arctic Decals. Thanks for looking. P14 points
-
The model is not often seen on modeling forums, i.e. the EA-18G Growler Trumpeter 1:32 It's basically a version of the F-18F from Trumpeter with additional hangers, so it's a lot different from the original. The model itself fits quite well, so there are no major problems with folding it. The model is basically a boxed version + a Red Fox printed cockpit which is generally a disappointment for me, especially since it is quite an expensive accessory.13 points
-
For those of you who may not know what a "squadron hack" is, it's usually a certain aircraft used by various personnel to make short trips to other locations, for various reasons, such as one squadron/wing/base commander visiting another for whatever reason. In case of it being an actual unit commander, then squadron, etc. pride comes into play, where the visiting commander wants to show off the maintenance and discipline characteristics of his/her command. Sometimes they are really polished to the hilt. (For some reason, Col George Laven, Jr comes to mind...) Anyway, when highly polished, they are meant to show unit pride. After finding that I had no T-33 in my collection, I decided, why not go the extra distance... For those interested, pictures of the actual aircraft, the build thread (and art work) are HERE Other than saying that this Platz kit is the best-fitting model that I've ever built, I'll let the pictures do the talking: Thanks for looking, Ed11 points
-
Hello all, Having had a productive year of modelling I decided today to do some photo cataloguing of what I’ve built. First up were two 1/48 Spitfires, dutifully photographed in the back garden. Unfortunately it was 43 degrees C outside and both myself and the models were in strong danger of melting! Hence there is only one picture of each… First is the Hasegawa Spitfire Vb in the markings of 185 Squadron RAF based in Malta, 1942. Other than some Eduard seatbelts and spares box decals it’s pretty much OOB. Second is Eduard’s beautiful Spitfire VIII in the markings of 43 Squadron based in Southern France in late 1944. This one is OOB. One of my favourite kits of all time! Hope you like them and thanks for looking! Chris11 points
-
Yet another Hasegawa 1:72 Fw190F-8. It's my favourite variant because the ordnances it carried gives it that badass look. Out of the box, not modification on this one. Nanond10 points
-
Hi all, This is a model of an Argentinian air force A-4C Skyhawk from the Falklands war. The kit is the Trumpeter 1/32 A-4E and converted back to C standard with the AMS resin set, all of which fitted perfectly using very little filler and sanding. Also added to the model are the Aires cockpit (again a perfect fit), Aires wheel wells (perfect front well, but the wings……), Reskit wheels, Eduard brass slats and flaps detail set, Eduard brass vortex generators (well worth the effort), plus brass gun barrels and a steel ladder from a couple of companies I can’t remember! The kit itself has a few errors, all of which i have corrected or adjusted. I also added some extra wiring to the u/c legs, mixed my own Gunze and MRP paints to match photos, with the blue on yellow weathering carried out using micromesh polishing pads. I must say that this was the first Trumpeter kit i have made and the general fit of the plastic parts was superb. Decals are from Aztec and performed well. Hope you like it Andy9 points
-
Доброго дня! Извините, но мой английский язык =---1 На второй странице Есть моё фото с Михаилом Орловым. Благодаря ему и своим поискам оригиналов в 1997 году были созданы краски серии АМТ и не только АМТ-1: http://shop.akan.ru/ru/6xxxx-series/109/136/63000.html АМТ-4: http://shop.akan.ru/ru/6xxxx-series/63001.html АМТ-7: http://shop.akan.ru/ru/6xxxx-series/63002.html АМТ-11: http://shop.akan.ru/ru/6xxxx-series/63044.html АМТ-12: http://shop.akan.ru/ru/6xxxx-series/63045.html Фотографии не исследую, а только в работу идут достоверные материалы. Как они выглядят на фото на различных экранах (даже калиброванных) меня не сильно интересует. Есть и в этой ветке такого рода исследователей экранов, но я с ними не спорю и вам не советую. С уважением Александр Аканихин, создатель"Краски АКАН".9 points
-
Suitably rebuked by Pat @JOCKNEY (which idiot gave him all of that power? Oh yes, that was me wasn't it ), I thought I'd share some pre jolly hol's progress... but first, here's the compulsory yé-yé track courtesy of Jacqueline Taïeb, the song title means "The heart at the fingertips". Anyway, here's the engine intake and exhaust washed with black to highlight the detail... ...here's the basic cockpit without the sidewalls, I painted the dials, the decals didn't work out well for me... ...this is the cockpit with the sidewalls, rudder pedals and stick added... ...the basic cockpit colour is black with added black, I used Tamiya Tyre Black for the basic cockpit and Humbrol matt black 33/Revell semi-gloss black to provide some contrast. highlights in silver, HB graphite, red and yellow as required. The cockpit isn't too worn as I'll be depicting the aircraft early in its career. Finally, the wings being glued together... I've also done some work on the small fuel tanks, thinning down the fins but the photos didn't come out too well, I'd also glued the intake and exhausts together, glued the whole lot and the cockpit into the fuselage (but forgot to take some photos ). I've glued the fuselage halves together and left them clamped together awaiting my return from holiday. Hopefully, this little update will keep JOCKNEY off of my back for a while?9 points
-
Time to throw my hat into the ring with my choice for this GB which I have been looking forward to since the last one finished, as I built a Swedish subject last time I thought I should choose one from one of the other eligible countries. This lead me to choosing a subject from Finland and one that I have wanted to do for a while, a Draken. Unlike a certain Australian member of the forum who posts pictures of kits downloaded from the internet and claims to have them in his stash but never actually builds them I do have one in my stash and enough (for me anyway) goodies to make a half decent Finnish machine. So we will start with the usual box and un-touched contents pictures; You will notice that this boxing is for Swedish machines and as such only came with markings for them, fortunately a couple of years ago another member of the forum who had the Finnish boxing wanted to build a Swedish aircraft so we swapped decal sheets and copies of the painting guides, a win win situation for us both. Hear are the decals and one of the painting guides; As you can see these are the earlier large national markings, and the ones that I like the best. The only additional goodies that I will be using on the build are a quickboost ejector seat that come with the belts moulded on (much better than trying to work with etched brass as far as I am concerned) and a set of brass probes by Master; I hope to be able to make a start on this one very soon in between working on my Hs-126, thanks for looking in and as usual all comments and criticisms are gratefully received. Craig.8 points
-
The Chinese built MiG-17 two seater made up from parts from a KP MiG-15UTI and a MiG-17PF. This is my first attempt at major plastic surgery, as there are no kits of this aircraft in 1:72. I saw an article in an old copy of Scale Models International from November 1988. It didn't look too complex to do, so I decided to have a go... I decided it was easier to use the more basic older KP kits for this as I didn't want to use the more modern kits for this project in case it did not work out. I cut out a part of the MiG-17 fuselage to put the cockpit section of the MiG-15UTI in, which is where I had my biggest issue later on trying to blend it all in and sanded through the plastic in several places. The rest of the MiG-15UTI was not used. Next fiddly bit was removing the radar from the intake splitter. The rest of the build was no real problem, considering it's an old kit. The pitot booms were replaced with wire as I ended up breaking them off. Painted overall SMS PMT09 Aluminium. Decals are from the spares file, but the numbers are all induvidual decals, so that was a bit fiddly. Build Progress Video8 points
-
The main painting is done just bits and bobs to do with the hairy stick, The arizona desert beaten buff, gloss decals and "ahem weathering next" Cheers all According to pictures , the undersides faded just as badly as the upper 😁8 points
-
Hi @modelling minion, @fatfingers, @PeterB, @exdraken and @JOCKNEY. Thank you very much for your kind comments and interest in this build. I am sorry I haven't replied sooner, or updated this thread for a while, but life is still busy and when I have been here on Britmodeller I have been concentrating on keeping up with the Less Than A Tenner GB - which I have been hosting. The polls (yes there are currently two polls) are open now - so please go and vote. Here and there, I have been doing some work on my AMX-13 - but it's not as far on as I would have liked after three weeks. I have been taking photos - so I'm afraid there's going to be a lot of photos - but you know that's the case with a lot of my threads!! So, with the paint now on the lower hull, I decided I fancied building something - so I made up the parts, I wanted to, for the upper hull - including the photo-etched grill. As I brush paint, I usually only add the parts I think I can successfully paint and weather without the remaining parts getting in the way: I then built the turret: At this point, I decided I wanted to go back and get the lower hull and running gear completed. I first got the sides of the hull dirtied up by stippling on very thinned Humbrol's acrylic Dark Earth and then Desert Yellow. I created some streaks with a variety of thinned colours. Next, the wheels were painted in the base colour of Humbrol's Matt Olive Drab. Then I applied my usual base weathering. This consists of a very, very thinned wash of Revell Aqua's Gunship Grey - applied with a soft medium brush. The latter, to my eye, gives a dusty appearance and tones down the base colour. Once the latter is dry, I use a small, fine, pointed brush to apply some very thinned Revell Aqua's Antracite in and around the details - to create a sort of deeper shadow effect. With this dry, I then dry-brush over everything with a lighter version of the base coat, to which I add a touch of matt yellow. The tyres on the road wheels were painted with thinned Anthracite and then toned down with very, very thinned washes of Gunship Grey. I then used a fine pointed brush to apply some very thinned Humbrol's Gunmetal to what, I think, would be worn metallic areas. These are then somewhat toned down with an application of very, very thinned Anthracite over them. Finally, I use very thinned Railmatch's Acrylic Light Rust to create slightly rusty/dirt areas - in and around some details. With the wheels, drive sprokets, idlers and return rollers in place it looked like this: The tracks were given a base coat of thinned Anthracite before the metallic areas were dry-brushed with Gunmetal. The pads were left Anthracite. I then applied a wash of Desert Yellow: I'd read that the tracks, supplied by Tamiya in the box, were too short and didn't allow for any sag along the top run. I did some careful stretching of the tracks - which was more successful on one side than the other. They were both stretched to the same length but one side's running gear is obviously closer together - so the sag is more than I would have liked on the starboard side. With the tracks in place I next painted the upper hull and turret - Humbrol Olive Drab again - applied thinned, with water, using a medium flat brush: Once dry, the upper hull was fitted in place: I then couldn't resist a test fit of the turret: I'm hoping that, now the Less Than A Tenner GB has finsihed, I will get some more done on this, this weekend. Comments and suggestions welcome. Kind regards, Stix8 points
-
Aww maaaan! The first big dodo! The right main wing wingtip has not cured, it had bonded to the packaging material. The outmost tip is missing and the rest of the tip is soft and sticky...unworkable! Let´s see how the Jetmads customer service deal with this.! The details and riveting on the canards are reall nice. More closeups on the printed stuff and the missiles and pylons. I´m somewhat disapointed that the pitot tubes are printed...they WILL break, had much rather seen turned brass pitot tubes.....Master, I´m looking at you! Hmmmm...the details on the instrument panel doesn´t come through as crisp in the details as many other parts.Actually poor details and soft ones at that....Quinta Studios, I´m looking at you again! The struts looks amazing however! wonderful, crisp details. The slimelights looks a wee bit overdone, may have to sand them down a bit. The tail fin looks fine. And finally...I have procured some paint masks from Maestro that will make my life simpler when it´s time to paint Final conclusion is that this is a hell of a model!!! I can´t wait to sink my teeth into it...but I do have to wait sice I have a comission job to finish first. These little babies in 1/48. Cheers and keep an eye out for when the build starts!8 points
-
Google translated so you don't have to. "Good day! Sorry, but my english language = --- 1 On the second page there is my photo with Mikhail Orlov. Thanks to him and his search for originals, in 1997, the AMT series paints were created and not only AMT-1: http://shop.akan.ru/ru/6xxxx-series/109/136/63000.html AMT-4: http://shop.akan.ru/ru/6xxxx-series/63001.html AMT-7: http://shop.akan.ru/ru/6xxxx-series/63002.html AMT-11: http://shop.akan.ru/ru/6xxxx-series/63044.html AMT-12: http://shop.akan.ru/ru/6xxxx-series/63045.html I do not research photographs, but only reliable materials are used. How they look in the photo on various screens (even calibrated ones) does not really interest me. There are also screen researchers of this kind in this thread, but I do not argue with them, and advise you not to. Respectfully yours, Alexander Akanikhin, creator of "Paint AKAN"."8 points
-
I've been asked to refurbish (rebuild!!!) a 44" Eagle transporter for the new National Film & Sci-Fi Museum which has just opened in Milton Keynes - https://nationalfilmandscifimuseum.com/ Its a replica, not screen used, but it has generally been built to the same standard as the screen used models. The Eagle is in a bit of a state, having been dropped. Also, the brass spine & cages have been glued together and not soldered. Here's what I've been given- As you can see, the spine is coming apart at the joints-7 points
-
I have really enjoyed this kit apart from a fiddle with the undercart. Built as standard with no extras, last coat of matt varnish is due after the white spirit for the shading dries, then off to try the cockpit and nose glasswork assembly.7 points
-
Why not turn all those bits into a Vogon Constructor Fleet ship? Look, heres some plans for you as well: Helpful of Mars 👽7 points
-
10 Years ago today Saturday 10th. September 2011, Display Aircraft at RAF Leuchars Airshow 2011. As previously mentioned , until they ended in 2013 I attended the Airshow at Leuchars on their Enthusiasts Package which gave access on the Friday for Arrivals and Practices and then for the show itself on the Saturday. Although during the actual airshow anyone on the Package was free to move around all of the public areas there was a dedicated viewing area set up on the site of the old Q Sheds adjacent to the VASS Ramp used by most of the display aircraft and following the line of the taxiway towards the western threshold of the runway. Weather for the Public Display on Saturday 10th.September started off wet , grey and murky with low cloud , improved to dry and sunny by the time the flying display started mid-morning and generally continued so but with periods of increasing cloud and the occasional short, heavy rain showers. While I have tried to show a selection of participants here , some which had their practice displays in better weather on the Friday are not included. For a variety of reasons , not all of which made a lot of sense then and make even less with the passage of time RAF flying participation there was somewhat lighter than in other years before and after while Royal Navy and Army participation was non-existent. Other than Tucano and the Hawks trainers participation was limited to a pair of Tornado GR.4 flying direct from and back to Lossiemouth and four Leuchars based Typhoon FGR.4 operating from the former No.111 HAS Site. Nevertheless the Typhoon and Tornado took part in a professional and seamless series of displays that closed the show. The four No.6 Squadron Typhoon conducted performance take-offs into the vertical in stream with the two Tornado sweeping into their Tactical Demo as the last cleared the airfield. The Tornado Demo followed with the usual smoke , bangs and flashes as they made various runs across the airfield before ending with a pairs flypast by single examples of Tornado and Typhoon to mark their part in Operation Ellamy over Libya that year. With little delay three of the Typhoon returned in formation with the fourth following in reheat and going vertical just as a lone piper blew his last note and the station flag was lowered in what was the traditional ‘Sunset Ceremony’ to end the display. All that remained was a standard run-in-and-break by the four Typhoon to land and thereafter doubling back along crowd-line following the main runway rather than taking the more usual southern taxiway route back to the HAS Site. 01 Possibly the smallest aircraft in the flying display was G-BKER a seven-eighths scale replica of an SE5a hand-built by its pilot Neil Geddes , I have seen him flying his excellent display several times from small enclosed airfields but on speaking to Neil he described participating in shows like Leuchars as being almost like flying each manoeuvre three times in succession to cover the length of the crowd-line. 02 Probably the largest was to participate was Vulcan To The Sky’s Avro Vulcan B.2 XH558/G-VLCN with the Mighty Fundraiser seen here crossing the runway threshold with everything down and dirty seconds before cleaning up , applying full power and roaring up and away to complete its display. 03 Actually a Canadian Vickers built PBY-5A , Plain Sailing’s G-PBYA seen here making a very quiet flapless approach to land is marked as USAAF Consolidated OA-10A Catalina 44-33915 of the 5th. Emergency Rescue Squadron of the 8th. Air Force based at Halesworth in Suffolk during early 1945 albeit with some rather obvious more modern changes to the glazing. 04 Perhaps a close runner-up to the SE5a replica in being the smallest aircraft in the display but there were two of them , the Vans RV8 of the RV8tors display team taxy out for their display. 05 The four Extra 300 of The Blades aerobatic team in a typically close formation manoeuvre perhaps give a clue that their pilots had all previously flown as members of the Red Arrows , the logo above and below the wings is that of the RAF Association charity. 06 Underside view of specially marked F-16AM , J-105 , of the Royal Netherlands Air Force F-16 Demo Team shows the ‘Brabant Lion’ design applied to both upper and lower surfaces , this historically being part of the country’s coat of arms with associations going back to the 12th. Century while the use of Orange , the national colour , dates back to the mid-1500s , ‘Smokewinders’ are carried on the wingtip AAM rails. 07 Specially marked F-16AM , J-105 , of the Royal Netherlands Air Force F-16 Demo Team about to do a roller as part of its display before going into afterburner , closing the air brakes and retracting the landing gear to take-off again into its display , ‘Smokewinders’ are carried on the wingtip AAM rails. 08 Although brightening up after another rain shower F-16AM FA-110 the specially marked Belgian Air Component F-16AM Display Team display aircraft did not share the clearer weather enjoyed by unmarked FA-95 the display spare when it conducted Friday afternoon’s practice display , ‘Smokewinders’ are carried on the wingtip AAM rails. 09 Underside view against the low cloud with the afterburner doing little to brighten the scene during the display by F-16AM FA-110 the specially marked Belgian Air Component F-16AM Display Team mount , ‘Smokewinders’ are carried on the wingtip AAM rails. 10 Sparkling following recent rain 4 FTS 2011 Hawk Solo Display Team Hawk T.1 XX245 flown by Flt. Lt. Jules Fleming returns after displaying , the special markings celebrate the 70th. Anniversary of RAF Valley where the aircraft is based and the Royal Air Force Association , similarly marked XX244 was in the static display. 11 Hawk T.1A XX237 of the Royal Air Force Aerobatic Team ‘The Red Arrows’ during the team display. 12 With access steps lowered , personal and servicing gear hanging where convenient , canopies and nose bay open the Hawk T.1A of ‘The Red Arrows’ with XX264 in the foreground are attended to after their display. 13 Although not a team display aircraft Hawk T.1A XX284/CA still in standard No. 100 Squadron markings had been used by ‘The Red Arrows’ for much of the 2011 Display Season and arrived in formation with them carrying visual cues such as the white circle ahead of the engine air intake (location of a badge on team aircraft) and white outlined vents as reference points during formation flights. Perhaps a sign of our obsessive virtue signalling and mock funerial times but one TV reporter claimed that the black scheme and skull and crossbones tail markings were to commemorate a team member who had died only shortly before . . . . . even before PC became the norm service humour did have its limits. 14 With support crew in the rear seats the Alpha Jets of the Patrouille de France aerobatic team begin to taxi out for their departure for their next event after their display on Saturday , of interest perhaps is that the tail number on ‘1’ is slightly higher on the rudder than the numbers of the other team aircraft. https://cdn01.hobbyphotohost.com/p?i=75b0a47f28b089844d4ba5ecef97b722 15 Trailing water vapour from the wingtips in the damp air one of the Patrouille de France Alpha Jets shows off its undersides while flying through the red smoke of another team member. 16 Tornado GR.4 ZA549/041from No.XV Squadron was one of the pair that flew direct from and to RAF Lossiemouth to conduct the Tactical Demonstration and is seen here making a fast and low high speed run in reheat with wings swept fully back as one of the first steps in an escalating ‘Show of Force’ , the other aircraft carried No.617 Squadron markings and both carried the usual load of underwing droptanks and a pair of BOZ Dispensers. 17 Tornado GR.4 ZA549/041 from No. XV Squadron from Lossiemouth moved directly from its part in the Tactical Demo into a pairs flypast with Leuchars based Typhoon FGR.4 ZK317/ES to mark the participation of both aircraft types in Operation Ellamy over Libya during that year. 18 From the pairs flypast Typhoon FGR.4 ZK317/ES then re-joined ZK310/EL and ZK304/EB to lead a three-ship No. 6 Squadron formation flypast during the Sunset Ceremony and lowering of the Station Flag in front of the old Control Tower. 19 As the lone piper played the last note of his lament and the flag was fully lowered No.6 Squadron Typhoon FGR.4 ZK300/EJ following the three-ship formation in trail and in reheat pulled into the vertical as it passed in line with the old control tower to officially close the display. Like all of the Leuchars based Typhoons that day EJ carried a pair of droptanks but also had a weighted RAIDS Instrumentation Pod on the right outer pylon (some others carried an inert ASRAAM on the left and others carried no outer pylon stores). 20 Following a standard fighter run-in-and-break the four No.6 Squadron Typhoons made a stream landing along the full length of the runway with ZK317/ES showing its right profile as it reached the turn-off to the Southern Taxiway near the western threshold. 21 Rather than following the Southern Taxiway back to the former No.111 Squadron HAS Site from where the No.6 Squadron Typhoon FGR.4 were operating during the display after all had landed all turned around and taxied back along the main runway following the crowd-line as seen here with ZK317/ES showing its left profile for comparison and an inert ASRAAM carried on the outer wing pylon.7 points
-
Way too much information!! Gondor7 points
-
I hope you'll all bear with me as I get a grip... For hand holds on the right side of the Corsair fuselage, every aircraft had a push-in, horizontal hand hold just forward of the windscreen. A diagonal handhold was later added halfway down the fuselage directly below the horizontal hand hold; this second grip was not seen on Corsair Is, IIs, or IIIs, but was introduced on Corsair IV KD762. (Another hand hold was added to the left side of the fuselage, just forward of the windscreen, late in Goodyear production, but I can't find if or when that turned up on Corsair IVs.) The step in the right inboard flap was originally a kick step (later converted to an open step after the war). Like the second hand hold, the flap step was not seen on Corsair Is, IIs, or IIIs - it was introduced on Corsair IV KD868. It's unclear if Brewster ever replaced the bombing window with an aluminum-skinned hatch. Vought made the change on Corsair II JT425, while Goodyear began the change before the first Corsair IV was built. While I've read secondary sources talking about field unit painting over or plating over the window, I've never found any documentation to support this. (That doesn't mean ir didn't happen, but no one explained what they were doing to BuAer. The cowl flaps switched from hydraulic operation to mechanical very early in production, so no hydraulic cowl flaps were ever seen on FAA Corsairs. Other fluid leaks and forward visibility continued to be a problem, so field units were directed to disconnect and batten down the top three flaps. A change order directed field units to remove the top three flaps and replace them with a sheet of 064 gauge 24ST Alclad sheet. As this "dead cowl flap" tended to tear off in flight, a second change order switched to a more robust replacement made of reinforced 051 gauge 24SO Alclad. The factory began delivering British aircraft with dead cowl flaps (though it's unclear which version) on JT425 (Vought) and all Corsair IIIs and IVs. Cheers, Dana7 points
-
The Mistercraft reboxing of the ZTS Plastyk RWD-5, an interwar Polish aeroplane which is most famous for flying from Poland to Buenos Aires, being the smallest and lightest plane to cross the Atlantic Ocean non-stop for many years. It's a very nice and simple kit, build thread, such as it is, is here if you are interested. Pics:7 points
-
As suggested in the discussion thread I am building the 1/144 Avro 618 '10'. A 1920s airliner which could carry ten people. This aircraft was used by Imperial Airways, the Australians and others. Freeman Freeman-Thomas, or Lord Willingdon Viceroy of India even had one for his own use. The kit is very basic being predominantly injection moulded and has nice resin engines and a bit of photo etch. Note different fuselages. The one I have chosen has a slightly more rounded nose and looks most like the photographs. I have already started thinning the fuselage from the inside and glued the wing halves together.6 points
-
Oldie just finished after one year,not successfully,but finished anyway...tks for watching.6 points
-
And we have wing walks, thanks to @John Laidlaw! Not since my future mother in law gave the future Mrs P a book on "settling" while we were dating have the stars aligned so fortuitously for me. And just like Mrs P, the model and decals were subjected to a brief, fumbling, and likely unsatisfying on their part experience at my hands.6 points
-
Good evening! Thank you for your kind words. My research is not limited to the colors of the USSR-Russia. There is a list not so extensive, but still: England, Germany, USA, Japan, France, Finland, Ukraine, Greece, Iran...All this can be found on my website and look at it. There are also various metallics and consumables. Today there are more than 2200 different colors in total.6 points
-
The canopy is cast in clear resin, it looks nice but will need a polish to be really nice..but still not bad at all! So many parts! All cast resin and 3D-printed.I like how the 3D-printed stuff are packed in cast resin cakes that you just lift out from the packaging foam. A quick look at the 3D stuff...they look really really nice! incredible details over all. The rudders, nicely cast As are the missile bodies and weapon pylons and the launchers. The wheel wells are equisite! as are the fanfront...too bad it´ll hardly show in the finished model.6 points
-
thanks! mmmm 16 years she's put up with me .....but she lets me but silly expensive models!! .... but I just have to sneak them in sometimes!!6 points
-
Selected the red I intend to use. I went through various options before deciding on Mr Color 327 FS11136. Wheel spats ready for masking: It was a nervous stage getting that motor cowled. In the end it was not too bad and the result was pleasing. I am glad I swapped out the PE cowling struts for the wire frame. Cowling glued and ready for sanding and a re-scribing of the join line. Mirage provide some PE for the latches which are welcome. What's there will be sanded off. I used a combination of my favourite glues for this; Gel CA to glue the motor in the bottom cowling, Tamiya Extra Thin for the cowling halves join, thin CA to wick in and attach the motor to the top cowl and CA/talc for any gaps. Now it is time to start playing with the exhaust manifold. A fair degree of fitting and adjustment is needed. Originally the kit offered this part in resin, my boxing has it in white metal. I have no issue with multi-media, but white metal is my least favourite material. No use complaining. Let's see what I can do with it. A job for the weekend. This is one of those kits that does not have a high parts count and yet requires a serious time commitment. Let's call it a value for money kit. Nothing fundamentally wrong. Just rewarding to spend some extra time like I have done getting that front windscreen right and that shape around the wing trailing edge at the root. The black is me checking for defects, not the best colour for this job, simply convenient as it was already loaded in the air brush. Mirage provides the top canopy section only. It is a little hazy in the following image as I have thinned it and it still requires a polish. Typically the Bulgarians completely removed the rear canopy sections providing an open cockpit or, alternatively, it was enclosed with the front glazing removed for ventilation. I intend to replicate the latter version which will required fabricating the framing and rear glazing like so: I have no clear hobby material, and the panel is slightly curved matching the spline shape. Hopefully, I can find something in this lot. Another weekend coming up, expecting some good progress. Ray6 points
-
I assume that's the FM "Decal Guy" checking his production handiwork. That's a job I wouldn't mind having. But then, FM has been showing this snazzy test model for months: Gene K P.S. You only have 185 F-4 models? Rookie.6 points
-
What, me worry? - Alfred E. Neuman, c. 1966 ***** So, I've been thinking about starting a polystyrene recycling facility. In case you were wondering, here are the parts (so far) that I'm NOT using for this build: There are more than a few Cobra resin bits in there as well. I actually save all this stuff and I have no idea why. The leftovers from each kit are in their own plastic bag which is labelled and then thrown in a big box never to see the light of day again. Although those resin engines might come in handy someday - if I can remember that I own them. Meanwhile, back at the build...I had to remove the vacuform canopy and re-attach. Somehow I positioned it incorrectly and I had a huge step on top. She's looking much better now, but there still needs to be a wee bit of putty work. I also noticed that the trailing edge of the wings and elevators do not align as well as they should (not sure how I missed that when gluing - probably paying more attention to the leading edges). Some work will be needed there. Slowly...towards something. Maybe one day I can paint this thing blue. Cheers, Bill6 points
-
Aaaaand done: More pics in the gallery in a sec. Thanks for a super group build and thanks for the interest in this one. Adrian6 points
-
evening all I have been messing around with lots of little bits, but it's ok as it's all in the cockpit and I just lurve doing cockpits ..I took a look at the seat - I started this back in 2018 and used the base part as a basis for correction ..it's made of bakelite sort of stuff and needed the sides building out for these sort of 'wings' on the sides.. ..details, seams & rivets were added and the rear cushion made from milliput - the seams on this are lead wire and my sculpting skills are not very well developed ..then they were painted - lots of the tonal stuff seems lost in the picture.. ..also made the adjustment assembly & lower mount struts.. ..and it sort of goes here.. ..then made up PE bits for various consoles and fittings - many of these are in layers, much the same as the instrument panel.. ..after paint and decals I have a lot of work ahead still to do all the switches and knobs and make up the laminates plus glazing for those with dials.. ..speaking of instrument panels, I made this one from custome PE, custom airscale decals I tacked onto a trade order and lots of bits & bobs.. ..its as close as I can make it to the one in Steve Long's care in Oz.. ..yet to make the compass that goes in the compass stand.. ..long way to go yet, but it sort of goes here.. TTFN Peter6 points
-
Hi all. This I purchased this kit a couple of years ago at Telford when I had an idea of building a NI fit cab. As usual with my builds I build memories, having done 3 tours in Ulster starting in the 80’s these along with the Wessex are pinned in my memory. Moving on I wanted the boxing that had the PIP filters and the tiger meet boxing it was. The kit itself was obviously a design of the day so moaning is fruitless although the quality of the clear part is shocking and I feel I definitely got the Friday version. I wanted to add a bit of detail to the kit as I think for the pose I had in mind, too much would be on show. My original idea was a flyer with the 3 undercarriage legs lowered, a gun mounted and a Santa Clause in the other door. Alas I couldn’t find a suitable candidate so another option was chosen. Plan B was a 14 Int photographer hanging in the door way and I found a 3D printed figure on the bay in 1/32 scale. So the build pressed on and through research and advice from guys on here and on PPrune I modelled this cab of 1563 Flt which was part of 33 Sqn from Oct 94 and just prior to the application of the 2 tone green. The MRB are actually straight as the look slightly drooped in these photos. The whole disc is removable but the kit is mounted on the pole. The nose antenna were replaced with 0.28mm rod and looks quite well in this scale. Anyway I’m rubbish at photography but I took advantage of today’s sunshine and here we go. Build log is here 869E6AB0-A3D5-4738-8816-7ECCFAA46188 F74CCD14-2E19-46C9-9B44-4C515994B3F0 BF416798-7E39-4113-A388-F43D837EC97C 51852B87-275F-4B27-AC04-ED865CCE3436 7BD2D1F6-4D07-4739-8190-DF9332194839 B8AB78AB-D2FA-445A-9EAE-428FF4C9E3FE 5ECB3F9C-CF20-484D-A09A-6DF948084B91 4578ABA0-39B6-4EEA-8EA2-0E5C01394CA8 B907009A-F66D-4C72-A1D4-A9E64DEED7E3 6FFBCCD2-2008-49ED-88D1-B3D33AF877F2 6586A696-8DB6-47DE-9D88-7C2307470AF5 45E17CA2-DDD1-44D8-8309-6000ABB4C7D5 23B776BC-29C3-4A6B-9818-750FEE686E79 AA6E6796-6082-41E1-B64D-546DD06AF658 8397A977-8C37-4E69-A794-4874792698B3 5ECB3F9C-CF20-484D-A09A-6DF948084B91 My thanks go to Pete in Lins, Jabba, Rickoshea52, Benbow, tarlucan, Sammy da fish. I’m sorry if I’ve missed you out but it’s been a great example of everyone chipping in. I’m calling this one done and I’ll have a break before starting the next project. Thanks for watching, Steve.5 points
-
10 Years ago today Saturday 10th. September 2011, Static Display and Support Aircraft at the RAF Leuchars Airshow 2011. As previously mentioned for the arrivals day , until they ended in 2013 I attended the airshow at Leuchars on their Enthusiasts Package which gave access on the Friday for Arrivals and Practices and then for the show itself on the Saturday. In previous years the Friday Arrivals Day normally ended with a ‘Ramp Plod’ through the mainly unobstructed Static Display but a combination of a new team running that part of the event and ongoing movements prevented this in 2011. However direct early morning access onto the airfield for parking by the Enthusiasts Marquee meant that following the all-inclusive included cuppa and bacon roll I was on the static ramp by 0800 as the first visitors were coming through the gates. So plenty of space on the way up in the grey early morning drizzle but rather more crowded on the way back in the more photo-friendly bright sunshine. Despite a smaller than usual static display aircraft were rather jammed together although instead of the usual metal barriers several were separated by cones and blue nylon rope which I suspect that might have been down more to cost-cutting than to benefit the photographer. Also included are some aircraft that were supporting show activities rather than actually displaying in the air or on the ground. 01 The only Typhoons on base for the display were FGR.4 from Leuchars based No.6 Squadron with ZK307/EE (without PIRATE) being one of two on the Squadron’s stand in the static display , the right wing of ZK309/EG in the foreground has a weighted RAIDS Instrumentation Pod on the outer wing pylon. 02 Former No.111 Squadron Phantom FG.1 XV582/M ‘Black Mike’ remained at Leuchars for many years wearing the special scheme applied during its final year or so of service and unusually thanks to a manpower shortage it was not on this occasion surrounded by steps and access platforms for cockpit photographs , the aircraft was later bought privately and via some interim stops is now part of the South Wales Aviation Museum at St.Athan. 03 Between barriers , spectators and the large Flight Simulator Funfair Ride in the background it was starting to get rather crowded around Hawk T.1A XX332/CD of No.100 Squadron , an unweighted RAIDS Instrumentation Pod is carried on the wing pylon. 04 Static display Hawk T.1 XX244 from 4 FTS at RAF Valley shared the same colour scheme as that years Solo Display team aircraft (including the name of that year’s display pilot Flt.Lt. Jules Fleming) XX245 marking the work of the Royal Air Force Association and the 70th. Anniversary of RAF Valley. 05 Barriers and crowds rather limited this (almost) unobstructed head-on view of Tornado GR.4 , ZA547 , from XV Squadron based at RAF Lossiemouth and carrying the ‘One Million Flying Hours’ markings applied to mark that fleet-wide milestone , crests of all the RAF units to operate the strike Tornado can be seen along the lower fuselage aft of the Mauser Cannon muzzle. 06 No. 45 Squadron Beech Super King Air B200 ZK453/M ‘Morpheus’ in the final version of the types standard marking scheme with Squadron Crest and stylised 'ROYAL AIR FORCE' titles was a recipient of the cones and blue rope barrier approach. 07 The rather sparse static line-up meant that there was space on the ramp for Squirrel HT.1 ZJ276 of the Defence Helicopter Flying School , in busier years it was not unusual for the lighter helicopters to be positioned out on the grass alongside and guaranteed damp feet all day following a wet start such as on Saturday. 08 Griffin HT.1 ZJ242/E from No.60 Squadron as part of the Defence Helicopter Flying School 09 With special markings on the tail celebrating 30 Years of RAF service a member of the crew of Odiham Wing Chinook HC.2 ZH895/HJ engages with the public , the various aerials , lumps , bumps , warning receivers and self-defence system boxes and brackets tell their own story on how the aircraft has been developed over that time from the original HC.1. 10 Not quite as ready for the crowds as the Chinook parked in front of it was Merlin HC.3 ZJ124/H from Nos.28/78 Squadrons is about to meet its public , later like all RAF Merlin it was transferred to the Royal Navy and now serves as a grey painted HC.4 (still coded H) with 845 NAS. 11 A large grey aircraft on a wet grey morning proving a bit of a challenge to get into the viewfinder , KC-135R Stratotanker 23520 from the 157th. Air Refuelling Wing based at Pease Air National Guard in New Hampshire was the only CONUS based USAF aircraft to make it to the show due to Atlantic weather conditions. 12 A smaller grey aircraft on a grey day was the other F-15E that arrived from Lakenheath for the static display , 492 Fighter Squadron’s LN/98-0134 which like 98-0131 was carrying a full set of four baggage pods below the conformal fuel tanks. 13 Said it was green . . . . . but no idea what shade !! Nose and crew door area of Dassault DA20 ECM , 053 ‘Munin’ , from 717 Skvadron of the Royal Norwegian Air Force just after the sun came out , the name ‘Munin’ refers to a far-seeing crow belonging to the Norse God Odin. 14 Fenced off with cones and rope it turned out that it was possible to get an almost uninterrupted view of EADS CASA C-295M , 0455 , from 242 Tactical Squadron of the Czech Air Force from within the static park although a long increasingly frustrating wait as random strays kept wandering through , the figure on the ladder at the open engine cowling was a suitably attired shop window dummy. 15 During its last few years the Leuchars show attracted the occasional airliner associated with nearby Dundee Airport to the static display such as Saab 340 G-LGNK operated by Loganair on behalf of FlyBe with details of the integral airstair seen here although positioning on the ramp created a challenge to photograph the entire aircraft. 16 Bombardier BD-700-1A10 Global Express N616DC operated by DJW Aviation was one of the many regular biz-jet visitors to both Leuchars and to nearby Dundee for major golf events and its presence for the weekend happened to fill a convenient space , always wondered if they got a reduction from the MoD on their landing fees that time round. 17 Not part of the static display as such although parked on the runway side of the crowd-line Sea King HU.5 XZ920/07 from HMS Gannet SAR Flight with Saltire on the nose arriving from its base at Prestwick and settling into the long grass where it remained throughout the display on SAR Standby. 18 Although there were many excuses offered ranging from financial to commitments elsewhere for the dearth of RAF assets on show it was encouraging to see that the RAF was able to spare Northolt based Bae 125 CC.3 ZD620 from No.32 (The Royal) Squadron to bring the Chief Of The Air Staff to the event for a few hours , seen here departing after a mid-afternoon rain shower. 19 Jetstream 4100 G-MAJI in Eastern Airways livery parked on the display aircraft ramp late on Saturday afternoon after the flying display had ended was the choice that year by aviation industry sponsors to transport corporate guests away after the event. 20 The left-hand side on departure shows it is just as blotchy as the right-hand was on arrival as Transall C.160R , 61-MF/RII from ET01-61 supporting the Patrouille de France powers up with propeller vortices starting to form as it prepares to release brakes for take-off.5 points
-
Well gents, My NMF adventure which brought me much joy and many tears (and occasional bursts of anger, frustration and despair) has come to an end. She's finally RFI! This is my first finished NMF model where I experimented and learned A LOT, mostly about what not to do! I hope that the next one will be better since I should now know what I am doing... to some extent. I call this adventure Zen And The Art Of NMF, as I needed a lot of patience, inner peace and tolerance for all the f'ups I made. 😀 It turned out OK in the end, although I should have taken care of details better (I didn't even paint the navigation lights), but I just wanted to get it done in this lifetime and move on to the next build. The Vallejo satin coat definitely killed the sheen more than I intended, but now I know better about the order of painting and how to potentially avoid clear coating over metalizers... At least I hope. For those interested, all my agony and ecstasy can be seen in the WIP thread below: I am not much of a photographer and will have to improve on that. Thanks for looking. Any comments and criticism are more than welcome. Best, Nikola5 points
-
10 Years ago today Friday 9th. September 2011, Arrivals and Practice Displays for the RAF Leuchars Airshow 2011. Until they ended in 2013 I attended the airshow at Leuchars on their Enthusiasts Package which gave access on the Friday for Arrivals and Practices and then for the show itself on the Saturday. Accommodation originally was in the old Lightning and Phantom-era Q Sheds at the western end of the runway in line with the runway threshold and on the edge of the Visiting Aircraft Servicing Section (VASS) Ramp which was where most of the display aircraft operated from. In the final years after the Q Sheds were declared unsafe and then demolished marquees were provided on the same site instead. Friday started dull , grey and wet in the morning but improved into the afternoon although the wider weather pattern elsewhere created some problems and led to a few cancellations. In addition RAF involvement in what was by then the last ‘Battle of Britain’ event held on a frontline airfield could have been better although in the later years of the display it did tend to be feast or famine. Ten years on here are a selection of images of arrivals and practices from , Friday 9th. September 2011 and barring unforeseen circumstance some from the display day itself will follow tomorrow. 01 Lakenheath based F-15 were regular USAF visitors for the static display at Leuchars with LN/98-0131 being one of a pair of multiple Baggage Pod carrying F-15E and among the first of Friday’s arrivals to arrive with the weather at its worst. 02 With poor weather over the Atlantic preventing most of the usual CONUS-based USAF multi-engined participation C-130J-30 Hercules RS/88605 from the 86th. Airlift Wing at Ramstein in Germany arrived for the static display on Friday afternoon. 03 Support for the Belgian and Dutch F-16 Display teams was usually provided by the early Friday arrival of an Embraer ERJ-146 from 21 Squadron of the Belgian Air Component with CE-04 here taxying to depart after unloading the usual large amount of beer and smaller amount of very large coloured team hats although departures were rather more restrained than on the few occasions this support was provided by a Belgian C-130. 04 Belgian Air Component F-16AM Display Team arriving on Friday morning with specially marked FA-110 in the lead followed by the unmarked display spare FA-95 carrying the specially marked baggage pod of the display aircraft, both carry ‘Smokewinders’ on their wingtip AAM rails. 05 By then without the centreline baggage pod ‘Smokewinder’ equipped F-16AM FA-95 of the Belgian Air Component taxies out on Friday afternoon for its practice display , it seemed to be normal practice at that time at least for the display spare to be used for the practice slot. 06 Specially marked F-16AM J-105 of the Royal Netherlands Air Force F-16 Demo Team arriving on Friday with ‘Smokewinders’ on the wingtip AAM rails , as its display involved the use of flares the aircraft operated from within the former No.111 Squadron HAS Site on the south side of the airfield for safety reasons. 07 About as close as F-16AM J-872 from 323 Squadron Royal Netherlands Air Force would get to the public over the weekend as it arrived as display spare on Friday carrying wingtip ‘Smokewinders’ and a centreline baggage pod in a display scheme from around ten years previously , as the display involved the use of flares the aircraft spent the weekend in the former No.111 Squadron HAS Site on the south side of the airfield. 08 A rather distant shot but not quite unobstructed view of EADS CASA C-295M , 0455 , from 242 Tactical Squadron of the Czech Air Force taken through the drizzle on Friday morning before it was built into the static display. 09 Saab JAS-39C , 9243 , from 211 Squadron of the Czech Air Force complete with large droptanks arrives in the rain on Friday morning. 10 Saab JAS-39C , 9243 , from 211 Squadron of the Czech Air Force minus droptanks taxies out during the dryer afternoon with a rising cloudbase to do its practice display on Friday afternoon. 11 What a paint job !!! Well weathered and much re-touched Transall C.160R , 61-MF/RII from ET01-61 arriving as the weather started to clear around lunchtime on Friday as support aircraft for the Patrouille de France. 12 Ground support equipment including the team Renault van for the Patrouille de France being unloaded from Transall C.160R , 61-MF/RII of ET01-6. 13 Licence built in Switzerland and operated by the Swiss Air Force as U-1230 De Havilland Vampire T.55 (export version of the T.11) is marked here as PX-M as operated by 336 Skvadron of the Royal Norwegian Air Force during the 1950s and is now flown by the Norwegian Air Force Historical Squadron although carrying the Norwegian civil registration (LN-DHZ) and seen taxying out for its practice display on Friday afternoon. 14 Originally operated by the Swiss Air Force as J-1196 De Havilland Vampire FB.52 (export version of the FB.6) it is marked here as PX-K as operated by 336 Skvadron of the Royal Norwegian Air Force during the 1950s and is now flown by the Norwegian Air Force Historical Squadron although carrying the Swedish civil registration SE-DXS taxying out for the teams practice display on Friday afternoon. 15 View of the Norwegian Air Force Historical Squadron single and twin-seat De Havilland Vampire Display Team in close formation highlights some of the more obvious structural similarities and differences between the different configurations. 16 Last time I saw one of these it was overall gloss dark grey with high-viz full-colour national markings , Dassault DA20 ECM , 053 'Munin' , from 717 Skvadron of the Royal Norwegian Air Force taxies in for the static display on a very grey Friday morning but according to the crew it is actually a very dark green (in the right light) although experience has taught them with US personnel just to eventually agree with them that it is black , the name ‘Munin’ refers to a far-seeing crow belonging to the Norse God Odin as shown by the tail insignia. 17 Seen on the VASS Ramp on Friday morning for post-flight refuelling and servicing after arriving at Leuchars Tucano T.1 ZF489/489 was the Tucano Solo Display Team spare although like the primary display aircraft ZF407/407 it carried standard markings with no embellishments or unit markings other than the 1 FTS badges on their fins. 18 Prior to the Tucano 1FTS operated various variants of the Jet Provost including Jet Provost T.3A XM479 which as G-BEVZ was then bought and operated by a consortium of private pilots as the Newcastle Jet Provost Company and is seen arriving on Friday afternoon showing a rather more cramped cockpit than its successor. 19 2011 Hawk Solo Display Team seen after their Friday arrival at Leuchars with the display Hawk T.1 XX245 in its special colour scheme in the foreground and the display spare Hawk T.1A XX220/220 in standard 208 Squadron markings in the background , both aircraft are being flown clean-winged without any of the pylons or stores that might be carried in their day-to-day training role. 20 Seen arriving at Leuchars on Friday as display spare for the 2011 Hawk Solo Display Team is Hawk T.1A XX220/220 in standard 208 Squadron markings which were perhaps the most striking of those carried by non-display Hawks in the overall black scheme , neither the stores nor pylons that might be use in day-to-day training are carried. 21 Apparently a late addition to the static display after initial listings showed no RAF Tornado were due to appear was Tornado GR.4 , ZA547 , from XV Squadron based at RAF Lossiemouth and carrying the ‘One Million Flying Hours’ markings applied to mark that fleet-wide milestone , the aircraft carries the usual mix of underwing tanks and pods with CBLS mounted on the carriers below the fuselage. 22 The dark green schemed Puma HC.2 are not especially photogenic on the best of days far less Friday morning’s dank conditions but XW237 operated by 33/230 Squadrons at Benson comes into land with the crewman working between both open cabin doors as a check for the pilots as it approaches touchdown, the large yellow item in the rear cabin is a rescue pack/dingy carried by most Support Helicopter Force helicopters on overwater or longer cross-country flights.5 points
-
my latest finished kit the newish 1/48 tomahawk MK11 ,decals are from the kit for a plane flown by 26SQN army cooperation command. this is a great kit completely out of box except for belts. 228980488_1616921185169914_8358737109518946764_n by paul sabin, on Flickr 238927494_1616921305169902_2781794979447430713_n (1) by paul sabin, on Flickr 238600899_1616921135169919_7047747835032463846_n by paul sabin, on Flickr 236087956_1616921351836564_6269187658389983669_n by paul sabin, on Flickr and with my recently finished Tamiya P38. 235764166_1617019888493377_6048186629934286270_n by paul sabin, on Flickr a really fun build.....my next one wont be far away.5 points
-
AH-1G Cobra (Late Production) US Attack Helicopter ICM 1:32 (32061) Most modellers will instantly recognise the Bell AH-1 Cobra Attack Helicopter. The AH-1 was the first production Gunship or Attack Helicopter to see service. During the Vietnam war the US Army began to see the need for armed helicopter to escort its unarmed UH-1 Hueys into combat. In parallel to this Bell Helicopters had been investigating helicopter gunships as early as the late 1950s. In 1962 Bell displayed a mock up concept to the US Army. This Helicopter featured a 20mm gun pod, and a ball turret mounted grenade launcher. It was felt by the Army to be lightweight, under powered and not suitable. Following this the US Army launched and Advanced Aerial Fire Support System (AAFSS) competition. This competition gave rise to the Lockheed AH-56 Cheyenne heavy attack helicopter. However this proved to be to advanced for its time and was eventually cancelled in 1972 after 10 years of development (some things don't change!). Despite the AAFSS programme Bell stuck with its idea of a smaller, lighter gunship and invested its own money developing the AH-1. They used all of the proven components they could from the UH-1 platform, adding these to a newly designed fuselage. When The US Army therefore asked for pans for an interim gunship for Vietnam Bell was in a fortunate position to be able to offer the AH-1, or the Bell 209 as it was then called. Given the work Bell had already done the programme was completed in a relatively speed eight months and won the evaluation against the competition. In 1966 the US Army signed an initial contract for 110 aircraft. Some slight modifications were made to the production airframes. The heavy armoured glass canopy was replaced by Plexiglas with an improvement in performance. Wider rotor blades were fitted and the original retracting skids were replaced by simple fixed units. The G model was the initial 1966 production model gunship for the US Army, with one 1,400shp (1,000 kW) Avco Lycoming T53-13 turboshaft. Bell built over 1100 AH-1Gs between 1967 and 1973, and the Cobras would go on to fly over a million operational hours in Vietnam, approximately 300 were lost to combat and accidents during the war. The U.S. Marine Corps would use AH-1G Cobra in Vietnam for a short period before acquiring twin-engined AH-1J Cobras. The AH-1 went on to serve the US Army until it was replaced by the AH-64 Apache. The last one leaving active service in 1999. The AH-1G could be fitted with the The M-35 Gun System, this was a single M195 20mm cannon (a short-barrelled version of the six-barrel M61A1 Vulcan) on the port inboard pylon of the AH-1G. 950 rounds of ammunition were stored in boxes faired to the side of the aircraft. The system was primarily pilot controlled, but featured dual controls to be either pilot or gunner controlled. For this purpose the pilot was provided with a M73 sight. The Kit This is a brand new kit from ICM, and their first helicopter kit. The quality of the moulding is first rate from ICM with fine engraved panel lines and nice rivet detail on the tail boom and tail. While this boxing is the the early G you can see from the sprues that other versions will be along as there is the opposite handed tail, different landing skids, an upturned exhaust, different winglets and TOW missiles on the weapons sprures. The kit arrives on 5 main sprues of grey plastic and a clear sprue. As well as the main helicopter and armaments, the kit also comes with the ground handling attachments for the skids, something often missing from kits. While there is good detail on the kit and the option to open up the engine and gearbox area, this area is not massively detailed and will open itself up for the super detailer if they want. This boxing comes with an additional sprue for the M-35 Gun System. Work starts conventionally in the cockpit. The two five part armoured seats are built up and added into the main cockpit tub. Tail controls are added to the floor ,and for the pilots station a cyclic and collective columns go it. For the front seater the weapons control column is made up ad fitted in. Side controllers are also fitted for the gunner. Instrument panels and coamings go in for both stations with instruments being provided as decals. Now the cockpit is complete the visible parts of the engine/gear box and its compartment are built up. This is followed up by parts for the rotor controls. The tails are added onto the fuselage. Here there is quite a large part which overlaps to compete a good solid join. The tail rotor needs attaching to fuselage half before closing up if you want it to move. The engine / gear box parts are fitted into the right fuselage followed by the cockpit and cockpit rear bulkhead parts. The fuselage can now be closed up with additional cockpit armour panels being fitted at each side. At the rear of the engine housing the exhaust part goes in. At the front of the helo the nose goes on, being careful to choose the right parts for the decal option being modelled. The side applique armour panels can be fitted to the model if needed as these parts are marked as optional. Turning things over the large central fuselage insert goes on with additional parts at the nose. The chin turret is now fitted with either one or two miniguns depending on your decal option. A light goes behind the turret. The final exhaust ring goes on the back (if modelling option 3 then the anti IR upturned exhaust is fitted) and the tip of the tail is added. Next up we concentrate on the stub wings. The two wings are built up and the weapons pylons are fitted. These are fitted to the fuselage along with the rear stabilisers towards the tail. The landing skids can then be fitted. Next up the large clear canopy parts go on. A sight is fitted to the front of the central glazing section. The front and rear large side canopy parts are fitted, these can be open or closed as need by the modeller. The access panels can be fitted to each side of the open engine/gear box area; again these can be open or closed as required. We now move to the main rotor. Each of the two blades are split upper/lower, and they are joined together. The central rotor head is made from tow parts, these are upper and lower, these sandwich in the rotor blades. Once these are on the control arms to the swashplate are then added along with the central mounting shaft. The rotor this then mounted. To finish off armaments can be added to the pylons as needed. The kit provides Two M157 7 shot rocket pods, two M158 7 shot rocket pods, two M200 19 shot rocket pods; and two M18 minigun pods. If the modeller want to use them then two pairs of ground handling wheels can be made up and attached to the back of the skids, Towing bars then can be attached to the front of the skids. If fitting the M-35 Gun System then one of the pylons is left of the left stub wing as the gun fits directly to the inboard station here. The two large ammunition panniers fit to each side of the fuselage. A cross feed links the two sides at the front, and at the rear the feed to gun itself goes on. Decals The decal sheet is in house from ICM, the decals look thin, in register and have minimal carrier film. 3 Options are included; 68-17074 "The Gladiator", C Troop, 16th Cav, Can Tho, January 1972. 68-115031 "Pandora's Box", 238th AWC, Vietnam 1971. 68-15012" #1 Du Me Mi", F Troop, 4th Cav, Phu Bai, 1972. The first 2 carrying the M-35 Gun System. Now normally with ICM the decal and painting guides are quite clear, for some reason they are not for this kits, they are very dark and indistinct, a little bit of a let down. Conclusion This is another great looking kit from ICM which great tooling and possibilities for future variants on the sprues. Very Highly recommended. Available in the UK from importers H G Hannants Ltd. Review sample courtesy of5 points
-
It's a Carpet Monster egg! Get rid of it immediately - before it hatches and you get an infestation of the blighters in your modelling area!!5 points
-
They famously recycled pots and pans (or at least said they were going to) into Spitfires in WW2….Over to you Bill5 points
-
I repainted the cockpit with Tamiya Flat Black to darken it down and cover the Sky overspray. The replacement canopy didn’t go exactly to plan as when I initially cut it out, trimmed it to fit and sanded the edges, I was pretty certain that the fit was pretty good. However, when I went to fix it in position using Humbrol Clearfix, the sliding middle part was the wrong angle where it meets the rear conical section and nothing wanted to fit whichever way I had the middle section. The only solution I could see, as this replacement was intended for a Cyber Hobby kit, was to re-trim the rear section the middle section overlaps. Minor gaps were ‘filled’ with more Clearfix. It wasn’t my finest effort, but hopefully it’ll turn out ok in the end. I could always have the canopy slid back and add the pilot again as though the Meteor is taxi-ing. While messing around trying to get the pieces to ‘fit’, some of the Mr Masking solution rubbed back leaving clear spots, so more solution was added. Due to the humidity, it didn’t take long to go off. Then, Chris, came the moment you’ve been eager to see! But first some Nato Black had to be added, where the Sky had covered it, to keep the weathering a little mere consistent and darken the framing of the canopy prior to the top coat being applied. Next up was the IJN Grey (my choice of colour to emulate Extra Dark Sea Grey scale wise). I have just enough for this model so I’ll have to get some more. Again, the paint was thinned, the pressure turned down and the airbrush stop set to allow a fine spray. The Nato Black has almost disappeared on the fuselage but overall it’s turned out ok. Maybe flat black would have been better on the upper grey surfaces I gave the paint 20 minutes to dry off and removed the masking. I’m happy with the results so far.5 points
-
well the end of the first week of the tour is nearly upon us and I have already noticed something strange...... Last time there was a brutal fight between Dragon's & Tufted Ducks (Draken's & Viggen's) with the Duck being victorious from memory. Roll on to this adventure and there's not a Duck to be seen, just masses of Draken's...... even a mythical one too! Come on people, we can't have an Nordic GB without some Viggen's, I hope to have mine here but it's still a few weeks away from being sent. Oh and speaking of grills (we were?), this is for @Marlin, just a nice simple BBQ meal last night, a home cooked burger and fries, Black Angus Beef patty, Onion fried in red wine, American southern style slaw with a nice Black Magic Woman! 🥰5 points


.thumb.jpg.d63052df9f30de247fb49bf44f442289.jpg)


This leaderboard is set to London/GMT+01:00