
Leaderboard


Popular Content
Showing content with the highest reputation on 05/09/21 in all areas
-
I have just completed the final planned entry for my Wisconsin Air National Guard collection: the A-10A Thunderbolt II (a.k.a. "Warthog"). Over the past two years, I have added the F-51D Mustang, F-86A Sabre, F-89 Scorpion, F-102 Delta Dagger, O-2A Skymaster, OA-37B Dragonfly, A-10A Thunderbolt, F-16C Falcon, and F-35A Lightning. In October 1981 the Wisconsin ANG's 128th Tactical Air Support Wing was re-designated the 128th Tactical Fighter Wing and began trading in their Cessna OA-37B Dragonflies for the A-10A. During the A-10 era, the unit received two Outstanding Unit Awards, three Air Force Flight Safety Awards, and in 1991 an "Outstanding" in its Unit Effectiveness Inspection. Deployments with the A-10 included Operation Coronet Cove to Panama, and "Checkered Flag" missions to NATO bases in West Germany and England. With the end of the Cold War, the early 1990s marked several changes. In March 1992, the wing became the 128th Fighter Wing and shortly thereafter began transitioning from the A-10A to the F-16C/D block 30 Fighting Falcon, which they fly to this day. This is the particular aircraft I have modeled: The kit: and a bit of aftermarket: Painted using Mr Color: Decals are by Caracel, plus a few I made myself. The build log can be viewed here: On with the show! First, a walk-around: Next, some shots with a more suitable background: and a few detail photos: Model Master's GAU-8 really puts the icing on the cake! Finally, a couple more to end the show: My display case dedicated to Wisconsin-themed aircraft. Not much room left! Thanks for viewing! Comments are invited.34 points
-
Good Evening from Japan, Please see the work in progress thread. I haven't updated it in a while, as it takes so long to get the photo equipment out and upload everything. I've been working to try to have it complete to turn into the local hobby shop's summer contest, due by Wednesday. Lots and lots of detail work, see the photos of the finished version below! P1050562 by J Hooper, on Flickr P1050560 by J Hooper, on Flickr P1050581 by J Hooper, on Flickr P1050580 by J Hooper, on Flickr P1050578 by J Hooper, on Flickr P1050577 by J Hooper, on Flickr P1050575 by J Hooper, on Flickr P1050570 by J Hooper, on Flickr P1050569 by J Hooper, on Flickr P1050567 by J Hooper, on Flickr Cheers, and thanks for looking! Hoops29 points
-
A nine-year-old model that represents a decidedly little-known subject, the FW187 A-0. As always, the greatest amount of modification work concerns the cockpit and the landing gear area. The kit represents an operational aircraft at the SchiessSchule der Luftwaffe, based in Vaerlose (Denmark) in May 1943. The model is camouflaged in 74/75/76 (Humbrol Enamels mixes) and is totally brush painted. Hope you like. Thanks for viewing Criticisms and suggestions welcome. Giampiero Piva27 points
-
I just completed my quartet of Bulgarian Bf-109's in the Bf-109 STGB and thought they may interest you. The four builds map Bulgaria's use of the type from receiving the first Bf-109 E3's in early 1941, using the G2 's against the allied bombing raids 1943-1944, a G6 after the Bulgarians switched to the Allied side in the last half of 1944, and a post-war G6 in Republican OF markings. All the kits were 1/48 Eduard with Kora Decals and some hand cut masks. Paints are mostly Gunze Mr Color lacquers. Do I have a favourite? Well it is the 1944 G6 "White 7" mainly because it was a subject I have been wanting to do for some time. I hope you enjoy them as much as I did building them. 1941 Spring Bf-109 E3 (Eduard E4) 1943 Summer Bf-109 G2 (Eduard G2) 1944 Autumn Bf-109 G6 (Eduard G6) 1946-1947 Bf-109 G6 (Eduard G14) There is a detailed WIP and Gallery images in the Messerschmitt Bf-109 STGB for all the subjects. Here are some images of the G2, that being the last completed. The techniques and finishes are similar for all. Ray27 points
-
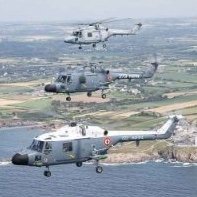
It's a while since I entered a GB but this one grabbed my attention and with plenty of early Airfix kits in my stash I knew I would have a suitable candidate. Choppers are my preferred taste, being an ex FAA maintainer (grubber). The Scout did sterling service in the jungles of Borneo, s my build has represented one of those, no particular unit . The basic kit is poorly detailed and the engine is undersize! So the strengthening strakes on the fuselage/tailboom were removed and replaced with stretched sprue. The cockpit had a added/corrected detail added, as did the main rotor gearbox and rotorhead. The engine is C Scale as is the tailrotor. Decals are from the Xtradecals range. The base is made from long sosatie sticks glued to a card base, stained and painted with the H to represent a jungle landing pad. Thanks for looking. Colin26 points
-
Dear fellow Britmodellers, here's the new 1/72 Kovozávody Prostějov Hawker Tempest Mk.V in markings of 486. (NZ) Squadron, flown by Squadron Leader Warren Schrader in March 1945. I built from the box, adding whip antenna from stretched sprue. Painted with Gunze/Mr.Hobby acrylics, photographs by Wolfgang Rabel. The new KP kit is superior to the Academy model in terms of shape and dimensions, but does require some work, especially around the wing/fuselage joints. The wing walkways are airbrushed. Thank you for your interest in this topic, best greetings from Vienna! Roman25 points
-
Fw-190A-7 | 1/72 | Hasegawa II./JG I "Oesau", Dortmund Field, Germany, January 1944 Finished this on 8/31/2021. After a prolonged absence from the bench I decided I should get back in the groove with a "simple" build -- low part count, high quality kit, straightforward paint scheme. This Hasegawa Fw-190A-7 checked all the boxes. I wasn't too excited about the kit originally because the box art made the paint scheme seem much less interesting that it turned out to be! The decals were damaged; the waxed paper covering had stuck to them and they were slightly yellow. Therefore all the national markings were out of the spares box, and the cowl black and white stripes were painted. I used the number 3, the unit crest on the cowl and the stencils from the original sheet, I just carefully cleaned the paper off with water before soaking the decal. Worked fine. Not much to say about the kit except that it was practically painless to put together. I only had one trouble spot on the cowl where the gun insert went and that may have been my fault! Practically OOB, except for some tape seatbelts and lead wire break lines. Oh, and I had to fabricate the step out of styrene since Hasagawa molded it retracted. WIP is here. Finishing: seams filled with CA. Paint: Mr Color RLM 74/45/56, Mr Color White/Mr. Surfacer black on cowl, Tamiya Red for spinner and stripe, Hataka RLM 70 propeller. I hope you like it. Comments, questions and constructive criticism always accepted!23 points
-
A quick build (after a long haul with a Tomcat). Builds very well, a sheer joy to build ... and gives you the opportunity to go all in on the weathering. Built OOB, with just a few pipes added. I really recommend this little gem. /Torbjörn20 points
-
Hi all. This I purchased this kit a couple of years ago at Telford when I had an idea of building a NI fit cab. As usual with my builds I build memories, having done 3 tours in Ulster starting in the 80’s these along with the Wessex are pinned in my memory. Moving on I wanted the boxing that had the PIP filters and the tiger meet boxing it was. The kit itself was obviously a design of the day so moaning is fruitless although the quality of the clear part is shocking and I feel I definitely got the Friday version. I wanted to add a bit of detail to the kit as I think for the pose I had in mind, too much would be on show. My original idea was a flyer with the 3 undercarriage legs lowered, a gun mounted and a Santa Clause in the other door. Alas I couldn’t find a suitable candidate so another option was chosen. Plan B was a 14 Int photographer hanging in the door way and I found a 3D printed figure on the bay in 1/32 scale. So the build pressed on and through research and advice from guys on here and on PPrune I modelled this cab of 1563 Flt which was part of 33 Sqn from Oct 94 and just prior to the application of the 2 tone green. The MRB are actually straight as the look slightly drooped in these photos. The whole disc is removable but the kit is mounted on the pole. The nose antenna were replaced with 0.28mm rod and looks quite well in this scale. Anyway I’m rubbish at photography but I took advantage of today’s sunshine and here we go. Build log is here 869E6AB0-A3D5-4738-8816-7ECCFAA46188 F74CCD14-2E19-46C9-9B44-4C515994B3F0 BF416798-7E39-4113-A388-F43D837EC97C 51852B87-275F-4B27-AC04-ED865CCE3436 7BD2D1F6-4D07-4739-8190-DF9332194839 B8AB78AB-D2FA-445A-9EAE-428FF4C9E3FE 5ECB3F9C-CF20-484D-A09A-6DF948084B91 4578ABA0-39B6-4EEA-8EA2-0E5C01394CA8 B907009A-F66D-4C72-A1D4-A9E64DEED7E3 6FFBCCD2-2008-49ED-88D1-B3D33AF877F2 6586A696-8DB6-47DE-9D88-7C2307470AF5 45E17CA2-DDD1-44D8-8309-6000ABB4C7D5 23B776BC-29C3-4A6B-9818-750FEE686E79 AA6E6796-6082-41E1-B64D-546DD06AF658 8397A977-8C37-4E69-A794-4874792698B3 5ECB3F9C-CF20-484D-A09A-6DF948084B91 My thanks go to Pete in Lins, Jabba, Rickoshea52, Benbow, tarlucan, Sammy da fish. I’m sorry if I’ve missed you out but it’s been a great example of everyone chipping in. I’m calling this one done and I’ll have a break before starting the next project. Thanks for watching, Steve.19 points
-
Hi All, First armour build from an aircraft builder. Didnt enjoy all the wheels, but did enjoy playing with weathering powders and making mud. The figures came with the kit and I decided to use them at the last minute to add interest to the model. I also used a home made base to add interest for display purposes. DSC_0494 by Richard Page, on Flickr DSC_0491 by Richard Page, on Flickr DSC_0490 by Richard Page, on Flickr DSC_0488 by Richard Page, on Flickr DSC_0487 by Richard Page, on FlickrDSC_0486 by Richard Page, on Flickr DSC_0485 by Richard Page, on Flickr DSC_0484 by Richard Page, on Flickr18 points
-
Here’s my effort for the Hellcat STGB. Eduard 1:48 Hellcat Mk.II "Out of the box" except replacement resin machine guns, I broke the kit supplied ones shortly after assembling the wings. Build log: until next time as always, any suggestions, criticisms or comments will be gratefully received. rgds John(shortCummins)17 points
-
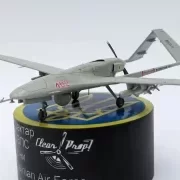
How are you, mates? Today I present to you another creation of Ukrainian manufacturers. Believe me, the model is a pleasure to assemble. According to many experts, this is the most accurate model at the moment.17 points
-
Dear fellow Britmodellers, here's my 1/72 Kovozávody Prostějov Lavochkin La-5 from 4th GIAP, flown by Y.Dimitri in summer 1943. I painted with Gunze/Mr.Hobby acrylics, decals are from the box. All photographs by Wolfgang Rabel. This is the updated version released by KP in 2020, which differs from the original 2015 boxing by finer surface details. The pitot tube was replaced by a piece of steel wire. I also replaced the tail fin antenna with stretched sprue. The sharkmouth was problematic to apply as it did not want to conform to the engine cowling. I had to use copious amounts of setting solution, pressing the decal onto the surface repeatedly with cotton buds. I was still left with some slight wrinkling. Thank you for your interest, best greetings from Vienna! Roman16 points
-
This is a surprisingly good kit and I am really pleased with how it came out. The stowage is mostly made from milliput. The bike and welded on track armour are 3D printed.14 points
-
Hello to all.Here is my latest finished model.The great zvezda/dragon mig-17.I love this kit.The fit is superb.I only upgraded the seat.Made the pittotubes out of needles and the canons out of hypodermic needles.The paints used are gunze and tamiya.The decals came from the spares box.I made a full video of the build process and if you would like you can see it on the link bellow. https://youtu.be/C-Dw2nqAGIg14 points
-
Fresh off the bench is the Italeri 1/48 Grumman S-2G Tracker. This is built as a Royal Australian Navy aircraft, using the decals supplied with the kit. I also added Eduard's interior and exterior PE sets. This is a kit which nearly defeated me multiple times throughout the build. There was a litany of issues, both with the kit itself and self-induced. They really sapped my motivation, but I'm glad I managed to power through. The Eduard interior detail set really spruced up the cabin - but my clear parts all fogged up on the inside! I'm not sure what happened there (I always use white glue for clear parts etc). My first foray into 1/48 aircraft, and I found it quite time-consuming, and very bulky and unwieldy to handle and paint. I'm now all the more impressed with what the larger scale modelers achieve, but I think I'll stick to 1/72 for a while! Enjoy the pictures, and any critique/advice is always welcome.13 points
-
Hasegawa 1:72 Fw190F-8. I used HAD decals for this Hungarian markings. I designed and 3D printed the small SC50 bombs under the wings. The extended nose fuse are made from metal wire and small circular PE pieces. Nanond13 points
-
Click for the WIP by Rodolfo Masti, on Flickr by Rodolfo Masti, on Flickr by Rodolfo Masti, on Flickr by Rodolfo Masti, on Flickr by Rodolfo Masti, on Flickr13 points
-
Hi folks, This is my last attempt, F-14D 1/48 from Tamiya. Straight from the box except for the Eduard ejection seats. This is really an easy building, even if numerous steps are sometimes tiring. The decals are coming from DXM, and the acrylic paints from Vallejo. Regards12 points
-
Dear fellow Britmodellers, here's my 1/72 Dragon M4A1 (76) Sherman, with BlackDog stowage added. Antenna is from stretched sprue. The model represents "Duke", a vehicle of D Company, 2nd Armored Division, France 1944. Painted with Gunze/Mr.Hobby acrylics, weathered with pastel chalks, artist oils, graphite pen and some real mud (provided by my friend @Dieter! Thank you. Photographs by Wolfgang Rabel. The kit was one of Dragons earlier releases, containing photo-etch details and a metal towing cable. The rubber band tracks were much too short. I broke off both idler wheels when trying to install them. I tried to re-inforce the wheels with a metal rod, but this didn't work either. In the end, I placed some plastic stubs behind the idler wheels for support and covered the area with mud. Thank you for your interest. Best greetings from Vienna!11 points
-
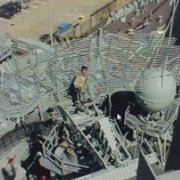
1:48 Tamiya Sea Harrier Gday to my BM mates !! I've been looking forward to this one, the mighty RN Sea Harrier.... After the Falklands conflict this jet had us all in awe, and I was fortunate to see the HMS Invincible as a young boy when she came into Fremantle, Western Australia in 84 or so. We were actually there because she was in company with HMAS Aurora, which was one of the my Dad's ships he served on... Please bear with me, I'll show you a few pics... This is my Dad standing the awesome Sea Harrier: Here's the big girl, I'm at the bottom centre of the pic...... And my Dad's old ship !! Okay back to the build..... If you have one in the stash or are thinking to buy this one, my only advice would be, DON'T WATCH THE REVIEWS !!! Well each to their own, I probably don't have as high standards than others, but this is another kit that I built as a young boy. I didn't have any big issues, I added a Big Ed PE kit (for Kinetic) and I had fun building it, and thought it turned out okay... Build is here: Here's the RFI... Thanks for stopping by, hope you liked it.... Cheers JJ11 points
-
I just finished these 11 models for the BF 109 Group build. Enjoy, Cheers Jes11 points
-
My entry - Tamiya 1/48 Dewointine D.520. Wip here: https://www.britmodeller.com/forums/index.php?/topic/235096353-tamiya-148-dewointine-d520-complete-050921/11 points
-
TYPE 97 CHI HA 8th Tank Regiment Tamiya 1/3511 points
-
The Airfix MiG-15bis built in Hungarian markings using a mix of RV Decals and the kit decals. Not a bad build, but Airfix [;attic is quite soft, so easy to sand off more than you wanted to sand off. Like ant MiG-15 kit, needs lots of weight in the nose, but nowhere to put it. The kit canopy was claimed by the floor monster, so another dive into the spares box for a replacement MiG-17 canopy. The pitot tube on the starboard wing is made from wire and the underwing radio antennas are from the spares box as these are not included in the kit. Overall SMS PMT09 Aluminium. Decals are a mix of RV Decals sheet No RVD-72018 for the markings and bort number and the wing walks are from the kit decals. Build progress video11 points
-
So having spent much of the year making life hard for myself by grappling with some pretty challenging kits against GB deadlines (and abandoning more than one project along the way), I’ve decided that for a modeller of my modest abilities and aspirations maybe some modern tool OOBs are the way to go for a while. After I’ve got my Heller Potez over the line I’m going to have a crack at a little Tamiya fighter, acquired on these very pages from Mr @matto21. Don’t expect a modelling masterclass(!) but I thought I’d stick it on here. Oblig sprue shot. I’m not used this. It is beautifully moulded. I’m not sure I’ve ever done a Tamiya (maybe a Corsair many years ago) but I think this shouldn’t give me too many headaches. Cheers Tony10 points
-
This was my first GB entry ever, a Hawker Hurricane Mk IIb built for the Fancy French GB. It's also part of my Hawker Hurricanes around the world project--the first instalment of the second phase, which is to represent Hurricanes in non-UK, Allied markings. I used the Fly Mk IIb kit, which was expensive and has its issues (mostly related to the camo call-outs, decals, etc. (@Troy Smith has much to say in this regard!), but in the end I was quite happy with it and how it came together. I did borrow a spinner from an Arma kit and replaced some of the decals with Print Scale. I kept the WIP separate from the larger project, so it is here: This is the plane I was modeling: And here is my version in b&w: And, now, in colour!10 points
-
Evening. Completed this build a few days ago and just got round to doing the pics. Its the ESCI 1/72nd kit ( which came with an Albatross DIII in one box by Italeri. I know its not a brilliant kit but its the only one I have seen in ages. The Revell one from yonks ago is one I have built a few times and not seen that one around either Roden kits... well they have history don't they by way of being complicated builds if you can get that far. Anyway the decals used on this are by Leading Edge Models and a fairly recent sheet. I think it was released a few months back. It has options for four SE s 2 silver and two in PC10. One s a 2 seater. I opted for the one you see here. I used Humbrol Ivory No.41 for the doped linen and Olive drab for the PC.10 as it is fairly close to the many shades of that colour. Its not fully rigged as my eyes and shaky left hand were doing overtime in trying to get the work done! There must be some reason why a civvy reg was worn by some of these but modelling wise it makes an interesting subject10 points
-
Breguet BR693AB.2 Aircraft No 93, 1 Escadrille G8A I/54, Toulouse-Francozal airbase, 25 June 1940. The commander of 1 Escadrille used this machine to attack advancing German forces on 6 June. Azur 1/72nd scale kit, ColourCoats enamel paints. WIP thread here:10 points
-
1:43 Heller Mercedes 450SL bought for 99p in November 2011. Main colour Zero Paints Byzanz Gold. Other colours from Tamiya, Mr Color and Vallejo. Chrome stripped and redone with Alclad, with Moltow for door handles and trims.10 points
-
1909 Rolls Royce Silver Ghost This is the 1/32 Pyro kit and represents the Silver Ghost from the motor museum at Beaulieu (as it looked in the mid '60s, when the kit was released). After some initial surgery to correct a twisted chassis, the kit was built OOB and was finished using a combination of mainly Humbrol enamels and Alclad. The build thread is here is you would like to see more. Cheers10 points
-
So I fixed up the damaged invasion stripe. If anything, it looks slightly worse in person, but I'm very much hoping a gloss coat or two smooths things out. Then it was time to mask and paint the cannon fairings. As far as I can tell, the fairings were painted the uppersurface colour all the way 'round for one reason or another. On the Typhoon, it seems like the starboard outboard cannon was Dark Green, and the other three were Ocean Grey, with the front half of the port outboard fairing Dark Green again. Anyway, that's what I did. This isn't perfect -- the circular plates where the fairings meet the fuselage should also be the same colour -- but I am but a man. I think the next step will be glosscoating for decals.10 points
-
G'day Chums,may I present Hugh and Ailsa,alias the Airfix 54mm Scots Grey.This one has been a bit of a ride but we've got here eventually.The build thread is here. My thanks to Plastix and Enzo for doing their repective bits,Black Knight,Grey Beema and Troy for splendidly useful gen and to all who looked in,chipped in and generally encouraged.10 points
-
https://flic.kr/p/2mmdJKp Tamiya 1/35 Sd.Kfz. 7 with Italeri Sd. Anhänger 51. Whitewash now very faded & last action engaged with a ground target.10 points
-
Droppies It is a strange feature of Australian linguistics that almost any noun that is either multi-syllablic or compound is likely to be reconfigured. The standard method is to preserve the first syllable and replace the final one with 'ies' Thus: 'Photograph' becomes 'Photie' 'Picture become 'Pickie', 'Tradesmen' become 'Tradeies' 'Barbeque' becomes 'Barbie' 'Football' becomes 'Footie' Australian becomes "Aussie'... and so forth. Having never actually served in the RAAF I cannot be sure, but I'm willing to bet two shrimps and a dingo that they used 'droppies' (and not 'drop-tanks') on just about every Mirage mission. So let's make a couple of 'droppies' shall we? First though I promised to cut some rebates into the air-intakes (airies?) on this thing? It's pretty self-explanatory really but here's a couple of 'photies' to show the process. Note how I've also cut out and started carving the dorsal spine. No rocket science. It's not yet fully carved to shape but it's getting there. The process with making the 'droppies' is very similar to that of making the nose-cone. As you can see, here I've reverted to a set of 'standby' drawings enlarged to 1/32 as the master set does not include drop-tanks. First take a bit of aluminum lithoplate and cut it to match the shape of the tank. Also measure and record the final diameter of the tank, here 14.05mm, this is the width that we will have to turn the dowelling down to. You can hand-carve these things but it's way way easier to turn it with a lathe. Just keep lathing away and slowly bring the piece down to the shape and size indicated by the lithoplate pattern. Getting there... It's important to keep working on both tanks at much the same time, i.e. do a little bit on unit 1 and then do the same thing to unit 2. This way you give yourself the best chance to produce two items that are close to identical. As you get closer to the final shape and size switch to a fine-tooth rasp. As you get even closer, move to coarse sand-paper and finer and finer grades as you get closer to the final shape / width. Getting close now... Looking pretty good. The trick is to get them looking identical. The lathe can only get the ends so fine though, so cut them off and then... Sharpen the tips up with a chisel. These are not finished yet, there's more sharpening to do and they still need fins and pylons, but I think they are definitely adding to the look of the thing. And from behind. So - the droppies are mostly done and we are home in time for tea and biccies! See you next time Mirage fans, Bandsaw Steve10 points
-
Hi fellow britmodellers, this is my recent Airfix Beaufort project that eventually turned up into a minor conversion to Mk.IA version. Whilst most of the alternative parts were already included in the kit, some extra bits had to be added on my own either as scratch built items or aftermarkets, Markings comes from Xtradecal sheet for DD959 of 217.sq and the kit was painted with Gunze Aqueous and AK Real Colors. Cheers Libor9 points
-
That must be why wifey says I'm such a character... 🚪 Oh dear...I thought a certain General's skid mark was bad. ***** So, just in case anyone wondered what she looks like with all that nasty red stuff covered up: The Privateer is not yet ready for her camouflage paint. There still are quite a few areas that need to be fixed, cleaned up, or further changed to meet my incredibly high standards of perfection. Ha! What really remains are fixes for my silly mistakes.... Now, for anyone who wants to build this kit in the future - don't! Just kidding - one tip I can give is to reinforce the fuselage in the bomb bay area. I kick myself for not adding extra interior support in this area. What I see happening is that the wings, due to the large moment arm they represent, are flexing the sides of the fuselage. This changes the dihedral of the wings (slightly) but also puts extra strain on the top fuselage seam. This popped on me and I had to reinforce it with a lot of superglue and then reapply the putty, etc. I think this has happened to others who unwisely chose to build this kit. You may recall I built the old Revell PB4Y-1 (1965 vintage) and its plastic was thicker and more rigid than this one. Consequently, I didn't have the problem with the older kit. Lesson learned. Cheers, Bill9 points
-
Here are my "Japanese Navy Auxiliary Vessels" by Tamiya in 1/700. In a couple of shots you can see it with my cruiser Natori, just for a bit of size context. 13 is a sub-chaser - those are supposed to be depth charge racks on the back there, with a thrower either side. It has a twin AA gun on the tail and a deck gun forward. 19 with the three larger guns is a mine sweeper - it has the gear for that on the rear. According to the instructions, the mine sweeper would have to go in ahead of the main taskforce so it needed some heavier guns in case it ran into....an American destroyer which would probably wipe it out easily. The other one in the middle with the Japanese writing on the side is a minelayer. These are pretty old and very simple little kits. Here's the build thread if you're interested:9 points
-
Cheers Jes9 points
-
Cockpit finished up. Pilot seated. Gear doors and other misc underside attachments fitted. Just need to get the canopy fitted/masked and the other inner pylon installed and it will be ready for primer/paint. Looking forward to get this one pushed off the desk.9 points
-
Evening boys and girls, It's been a glorious sunny day here in my corner of Kent so I got the camera out and snapped some pictures of the recently installed engines. With each 'power-egg' complete it was just a case of adding them to wing-section of each nacelle. The Revell Beaufighter cowl flaps were an absolutely perfect fit for the kit's forward firewall, so it was just a case of applying some Araldite to the inside surfaces of the cowl flaps and sliding them into place. The relatively slow drying time of the epoxy glue meant I had ample time to ensure each engine was aligned correctly, both with the plans and each other. When installing them, I didn't realise that the engines canted outboard at such an angle, but references confirmed this was the case. It certainly looks a little strange that the thrust line is so off central, and I presume there is a valid reason for it, too! Anyway, on to the pictures... As you can see the fit is nice and snug, and engine no.1 looks the part now it's hung on the wing. The early MkII-style straight exhausts will be made and added later: Engines 3 and 4 - lots of care was taken to align the engines carefully during installation: When I was hacking about with the kit-supplied nacelles I removed and kept the very crude carburettor intakes in the hope I could make something useable from them - as you can see from the three finished intakes at the top of the picture they scrubbed up fine: These were than glued in position on the lower section of each nacelle: She's really starting to take shape now: Thanks for stopping by folks, and stay safe! Until next time, Tom8 points
-
Airfix 1/72nd Fairey Swordfish MkI K8393/E5A, flown by Captain Oliver Patch RM and Lieutenant David G Goodwin RN, No 824 Naval Air Squadron, Fleet Air Arm, HMS Eagle. The squadron transferred to HMS Illustrious just before taking part in Operation Judgement, the attack on the Italian fleet at Taranto, Italy, 11/12 November 1940. Operation Judgement was just part of a much larger operation that had been set up by the Royal Navy in the Mediterranean with an aim of confusing the Italian fleet. Search Wikipedia for the operation for the full story. The kit was built straight as Airfix intended, with the only addition being a set of PE rigging wires from SBS and scratch Bowden cables for the tail control surfaces. Painted using ColourCoats enamels, with detail painting done with Humbrol enamels and acrylics. I had originally approached this build with a degree of trepidation. A peep in the red box revealed four plastic frames, filled with finely moulded parts, and it's a biplane! Scary stuff! However, I was pleasantly surprised. The kit is well thought out by the designer, and builds into an excellent scale rendition of the famous Stringbag with very few issues. Even the thick transfers behaved themselves. You can see how it went together in my WIP thread. Obviously, after taking the gallery photos, I noticed the bent tail antenna mast, and the unpainted machine gun barrel on the starboard side. WIP thread here:8 points
-
Modelsvit Mirage IIIC E C 1/2 Cigognes Dijon Longvic Air Base 1967 Paint Humbrol Metalcote brushpainted Build thread here https://www.britmodeller.com/forums/index.php?/topic/235096898-modelsvit-mirage-iiic-ec-12-cigognes-dijon-longvic-ab-1967/ Patrice8 points
-
Cheers Davey! not quite finished, as I’ve got to string the Stringbag. Setup, tools and materials. I’ve found using PVA to place and hold the fine metal strips ideal, with CA to fix if I think it needs it. My usual bench lights are pretty bright LED, and I use an Optivisor to give a closeup view. The model was prepped a long time ago by drilling holes following the directions from SBS - more on that later. Fine tweezers to manipulate the rigging, for which I prefer the curved fine point ones, and a curved scalpel blade to cut the parts from the fret. SBS assign letters to each part of the rigging, and it pays to follow the stages carefully. You can just make out the first parts running from the nose to the centre wing section. The second and third parts are fitted to the outer interplane struts. My technique has evolved to dipping end of the piece of rigging in the PVA, attaching it to a location point and then inverting the model to let gravity drop the other end into more or less the right place. A drop of glue in the other location point and careful manipulation with the tweezers follow to fix the part in place. I tend to do one part on one side, then do the opposite part on the other side. This gives the glue time to go off a little bit so the first part doesn’t just drop off again. I do find that parts occasionally need careful trimming to fit. This may be down to my error in making location holes, or the wings aren’t quite as accurately assembled as SBS expect. The other important thing is to take your time. Don’t rush anything. Don’t even think about rushing anything. Methodically working through, taking my time. And that’s the wings done. Just the tail braces to fit. With those done, I need to break out the elastic thread to rig the rudder and elevator wires. More soon.8 points
-
As I got woken up early by the phone this morning. (Possibly the worst thing about a life of signalling trains is the classical Pavlovian conditioning about bells and phones.) I got on with the Vega. A couple of coats of Mr. Color Super Clear III thinned with Mr. Levelling Thinners. First a misty coat and when dry a wet coat. After that had dried I fitted the engine. After that a dry fit of the cowling and prop. I'm reasonably pleased with that that. Thanks for looking, Cheers, Alistair8 points
-
Two-seater Vampire to be precise. Contents of the box. I have some aftermarket, such as resin intakes and interior PE. Decals are sourced from Galdecal sheet. This Airfix kit is looking real nice. Right, so I will be building my hometown planes. Vampires were the first jet planes Finland acquired (single seaters first, followed by double seaters) - and they were stationed in Pori. Why? Because Pori had the only tarmac field that was suitable for jet fighter operations in whole of Finland in 1955! Top photo is taken during the plane's arrival in 1955. I will be doing mine sometime during summer 1957.7 points
-
I was alluding to bad decisions in my other post...well, this is it. With how well the dual F-16 build is going and my curiosity of the manufacturing differences between 2 companies 3 decades apart is making me want to take the plunge. That and I love the look of the Norm81 birds. I think I'm actually going to be able to get away with minimal AM on this one. I decided to hold off on seats, as after closer examination I think the kit ones may end up looking just fine w/ some belts added...I'll make final decisions after I build one up. As far as exhausts, I think I can make the stock Academy cans out of the Eduard kit work on this with a little bit of modification (I've already done a bit of mocking up before deciding to move forward with this). I've got some resin wheels & AIM-120s ordered...and hopefully that will be the extent of AM for this project...which is just fine as the cost of paint (converting to MRP for external paint) is costing more than I paid for the kit and the 2 pieces of AM (I'm blaming Rich for that). It'll be a little bit before this one goes. It'll be worked alongside the Z-M JASDF build (and the Draken) after the F-16s are finished up. Which is fine, as it will give me a chance to find out a bit more about the late ICE update package which added the AIM-120 capability. According to the decals "technically" only the 2 test/eval schemes carried the 120s. One of the late schemes (81b) might be "close enough" to me since I'd rather build a service jet rather than a test/eval. We'll see.7 points
-
Evening all, hope everyone is well and enjoying the much needed sunshine! Progress is being made with the B-24. I finally got some coloured paint on the upper wings and fuselage though the missing wing in the photo is still in the paint shop for final touch ups. I'm pretty happy with where I've got to with this, there's a hint of pre-shade showing through and the masked chips have worked quite well (I'll get some better photos of these up later...). The colours look a little bit bright and the chips a bit too stark at the moment but fairly confident it'll look about right once its been varnished and weathered with oils and pastels. Once the other wing is done I'll mask the top sides and start on the white underbelly. Thanks for dropping by! Sam p.s. Liberator wings are too long and result in ropey out of focus photos!7 points
-
At Sleaford Classic Car and Motorcycle Show yesterday - four VW campervans, three of which are split window types. Trevor7 points


.thumb.JPG.3498f40362ff13ebfc4b2e45abbd545e.JPG)


This leaderboard is set to London/GMT+01:00