
Leaderboard


Popular Content
Showing content with the highest reputation on 23/08/21 in all areas
-
I’ve always been a fan of the Yak-28, so when Bobcat released their Yak-28PP I had to snap one up. Plastic looked good but the instructions were daunting, so it took some while to get going. Fit of parts was generally good, but I’m afraid that the engine nacelles were absolutely awful. Brute force, ignorance and 240 Grit won the day, and then it was onto the paint….. I found that the camouflage scheme in the instructions was impossible to interpret, so I resorted to letting the airbrush run free – at least until I put paint in it! I’m afraid that I struggled to get to grips with the AV Vallejo paints that I used, and I’ll be the first to admit that it was purely down to my technique – I didn’t have one. The upper surfaces were sprayed freehand, and then I made the mistake of spraying the underside with faded blue. At this point, the kit ended up being banished to the Shelf of Doom as this colour looked too dark to me. Fast forward ten months and I pulled out a tin of Colourcoats Light Grey, and hey presto – log-jam gone. Other bits and pieces used : · sections of the Eduard etch set for the interior of the Yak-28P Firebar · Eduard masking set for the clear bits on the Yak-28PP (an absolute must) · Quickboost Landing lights · Quickboost front-end fans · Quickboost Exhaust gondolas · Scale Aircraft Conversions Landing gear (only used for the outriggers because the kit parts come moulded with the wheels) · Aerobonus pilot figure · Coastal kits base Thanks for dropping by - hope you like it. mike39 points
-
Hello All Just finished this one, literally hot and still wet from the shed (the kit, not me). Cracking kit to make, out of the box other than glue and paint. The resin detail and the vac form canopy are some of the best examples I’ve ever seen. Alas none of you will get to see the cockpit detail as it’s below the tiny cockpit aperture and is not visible. I did manage to get the photo etch torpedo propeller blades onto the torpedo, but I did need to lie down afterwards! It’s finished as an aircraft operated at RNAS Lee on Solent in the fifties. As usual I used Xtra Color paints and varnish with a little weathering and a Flory wash. Hope you like it. The kit comes with 2 canopies so I've a spare if anyone needs/wants one. I don't know of any other aircraft that tilts the torpedo to accommodate take off. Quite an innovative idea I feel. Yes, there is a prop blade on the end of my finger All 8 in place (ish) Thanks for looking Pete27 points
-
Hi all another model from old Italeri mold finished. Yes, there are a lot better F-16s on the market, but those are still worth to be done, as at the end represents this nice plane quite fine (with all existing flaws....but) I wanted to do this colorful version for a long time, and now it is done. I tried to do small corrections, like drilling intake duct and make it deeper, adding cockpit details, relocate horizontal tail surfaces to more correct position....and some other minor details. Colors are AK, with minimal weathering as i wanted to have this one clean as possible in balance with beautiful tail decal. Not to bother you more, i hope you will like it, best regards, Djordje25 points
-
Here's my recently finished Grumman F9F Panther. Although the HobbyBoss box states it's a -3, it's actually an F9F re-engined to -2 standard. This beastie flew from USS Essex in 1952. Cheers, Luka24 points
-
Hi Folks So here is the final build and as I said in the build post Im not really that pleased with it (all my own doing). If you take a closer look you will see what I mean. Having said that it is a superb kit and I thoroughly enjoyed building it and looking at it now from a small distance brings back some very enjoyable memories, so not all bad for me. Thought I would give a couple of bits of info on this beautiful aircraft that you may be interested in. Single seat Hunters were started by a fuel system, two seat versions with a large cartridge, 3 in total, if the first failed there were two back ups (they were an absolute bugger to fit and remove). The liquid start for the single seater was a fuel called AVPIN (ISO Propyl Nitrate, as close as you can get to rocket fuel) & very volatile. This was a particularly nasty substance, being a mono fuel could burn without oxygen. If you got this in your eyes in any sort of quantity there would be a good chance of blindness. Ive had some in my eye and its painful & very uncomfortable. Also when the fuel is ignited it gives off a thick black acrid smoke containing Hydrocyanic Acid (I will leave that to your imagination). You will also notice on some of the pics on the underside an engine bay door open. Reason, when the aircraft had started and the black smoke had gone we had to go up into this bay to disperse any flames around the AVPIN pipe joints (common). Armed with just a large asbestos mitten we had to tap around the flames (could not put them out but just hoped that patting them would help it burn itself out). Had a very frightening experience with this but thats another story. White intakes you wonder. When I worked on these aircraft they were 30 odd years old then. From many hours of hard flying there was obviously a considerable amount of stress on the air-frame. Cracks appeared and rivetts became loose. An absolute disaster in an air intake. Anything ingested into the engine could be catastrophic. So they were all sprayed with a white rubberised paint to prevent this from happening, clever huh. I hope you have found this of interest and that Ive not bored the life out of you. I have really enjoyed this (which is the main purpose) but Im sure you will agree that some builds in the end you just cannot wait to put to bed. Next on the bench and unusual for me is going to be a two on the go job, Trumpeter 1/48 Wellington MkIII (one of my favourites) and a Tamiya 1/48 P51B Mustang (another of my favourites). I am going to be very focused on these builds because the Wellington was given to me with lots of AM stuff by a very dear friend who is very kind and generous Laurie Stewart. The P51B was given to me with AM stuff by Murfie from another forum, again a very kind & generous person. Thank you Laurie and thank you Murfie very much. You have stopped the men in the white coats from taking me away. I appreciate it very much. Take care and safe all Si21 points
-
I’ve just finished this, the well-known 1/48 Ford from Tamiya. The only addition is Superscale decals for VMF(AW)-115 - one of the units in the kit’s decals, but much nearer the end of their time flying the Skyray. Well, that and a couple of rudimentary seatbelts, because the cockpit’s surprisingly sparse under that tall canopy. I got aftermarket decals to do something a bit different, and it was a good thing I did, as it turned out the kit’s decals were shot. They looked fine, but when I tried to use one of the walkways I found it just wouldn’t let go of the backing paper. I did without - there seem to have been any number of approaches to walkways, including not having any at all. I’ve not been having a lot of luck with Tamiya decals … but then, I do stow kits for an awfully long time before I get around to them. This one’s a stripling - only 17 years old when I finally built it. The kit itself is pretty good. I came across the same little foibles as just about everyone has found: wing profiles that don’t match either side of the fold, and odd intakes with half a duct leading to an engine face attached to a bulkhead. But you can batter the wings down, and you can barely see into the intakes. My own discovery was that the windscreen wouldn’t sit properly on the nose: there seemed to be a bump at the front that held it away and wouldn’t respond to filing without removing some of the frame. Formula 560 to the rescue! Also, a common feature of kits with automatic slats: it gives you a well to sit them in, instead of the flush fit at the trailing edge. That lets you build it slats-in but isn’t so good slats-out. But the fix is dead easy: a thin fillet of plastic card (or in my case yogurt pot) sanded flush does the job. And you can even leave its forward edge untidy and ragged, as the slat hides it. Other features of the kit are better, like the foolproof fin attachment and the neat handed pins so you don’t mix up the left and right tanks. The basic paint scheme is Halfords Appliance White and Humbrol 129 light gull gray (several coats). I painted the intake lips as I had no confidence whatever that anyone’s decals would work. And overall, I thoroughly enjoyed myself.19 points
-
After few month brake I decidet to glue something "fast and easy". I've choosed AVIS model of Lee-Richards Annular Monoplane. On Friday I found few low res photos on the Internet and started work. Today I can (maybe not "proudly" but "sattisfied") present my new model18 points
-
Hello all Another recruit to my rapidly increasing 'brail scale' air force, and this one means more than most as its my favourite aircraft of all time... the English Electric Lightning. This is the fairly old Revell 1/144 kit built completely OOB apart from some Tamiya tape for the seat belts and some brass rod for the pitot tube. Paints were a real mixture as I couldn't seem to get the correct shades I wanted from actual tinned colours. After much trial and error I settled on Xtracrylix 1136 for the medium sea grey (which is actually FS36375), Tamiya XF80 for the barley grey, and Gunze 51 for the light aircraft grey. The trouble with the later low viz Lightnings is that they were so heavily weathered that no two airframes seemed to look the same. Decals were a mix of the spares box and 144th.co.uk (who's Lightning decal sheet is mind blowing by the way) and then some pastels for the weathering. Hope you enjoy, comments much appreciated Inspiration was from this photo from Scale Modelling Now... And here....... https://www.flickr.com/photos/8531201@N04/4794416320/15 points
-
The kit The quality of this kit is quite good. The details are very good, cockpit detail is quite acceptable, it comes with photo-etch parts and indispensable paint masks (of excellent quality), and fittings are quite good, requiring just occasional fixes, and a minimal stress build. The major criticism I have is over the instructions, who are a little inaccurate on mask patterns, decal positions and numbers, and over the frail panel lines / rivets, which need to be enhanced or you can erase them by a primer layer. The build This is a very enjoyable kit to build, mostly due to how cute and chubby the R2 is, and how it starts to shape in. Most of the difficulty of this kit will derive from how small it is, in most ways smaller than average 1/72 kits. The biggest challenges will come from closing the fuselage with the cockpit inside, on smoothing the fuselage ribs to an acceptable height, and on wing rigging, which I prefer to use styrene instead of the provided metal parts. The red / white paint job is very unforgiving, so any masking mistakes or trapped dust will be hauting you forever, so don't stress too much on it, the overall result will always be stunning. Other than that, this kit looks great and it will be a very interesting addition to your collection, I recommend this kit if you are in the fence for it.15 points
-
The Airfix 1/48th scale TSR2. No aftermarket used. Cockpits detailed with plastic card, wire, and tape for seat belts. Nose probe replaced with steel tubing. Painted with Tamiya acrylics. Thanks for looking Angelo13 points
-
Hi folk's.Another box dug out and some beyond repair but this old build was a quick repair.If you ever think you've over weathered a build look back on this one! inspired by a photo taken post war of Japanese planes lined up on an airfield.Thanks for looking in.13 points
-
Latest finished one. I've been working on this for some time. Lots of new stuff to play with, white wash finish, snow and modifying figures. All in all a lot of fun. I hope you like it. On to the next one! Thanks for looking in. Dan12 points
-
A late Monday lunchtime update, as the rest of the week is liable to be unpredictably busy work-wise. Writs first. Careful lad - this could quickly bloom into a full-blown conspiracy theory. Lucky we never put in on the Internet! Knapping or CADding. Despite the intervening millenia we just can't wean ourselves from silicon based technologies can we? It was so long ago I did the design work on that part of the aircraft Giorgio that I actually had to go back and consult my desk notes about decisions made at the time. I had to do a bit more work in Fusion at the weekend and not having touched the software in so long I felt incredibly rusty! Praise from the arch-greebler. Duly 'umbled Alan. With my similarly indelicate paws I work using the 'iceberg' system of engreeblification, i.e., a region 2/3 larger than that visible is embedded in the aircraft. Given that those antennae so sharp though I'm probably going to end up as anannual freak statistic about the catching of tetanus from a Sea Vixen.... I think you're dead right Michael: no matter the material involved, it's always likely to require such a finishing procedure to iron out remaining micro-variations. I wonder what Peter Carl Fabergé used? I may indeed have small parts Ced but try to keep them shiny. From some more recent photographic discoveries I was able to piece together more clearly what's going on at the rear of the aircraft in respect of the relaying of Martel data to the chase aircraft. Not knowing exactly how much museum refurbishment of various features has subsequently been done on XJ481 since the early 1970s, I've largely relied on contemporary shots from the 1970s. On one shot of the aircraft in her black/white garb for example the upper cable duct appears to have been removed altogether leaving only the the transceiver element on the rear of the fin, whilst the aircraft today has it back on. Co-ordinating shots of the aircraft as it appears today with period photographs (themselves frequently often low res scans of slides or prints) I was able to come up with a working drawing of what to build next: The outer surface of the transceiver itself looks slightly more convex in period shots than the more planar looking one does on 481 today - I don't know whether that is a trick of the light but at this scale I added just enough roundness to be able to say to people it's faithful to period photography, whilst it's subtle enough to be able to say 'Noooo. it's flat, you're eyes are playing tricks' to someone who definitely has evident that the flatter looking one of today is the correct appearance instead. I also noticed that there was a section of exposed wiring between the very end of the ducting and the transceiver that had a semi-circular dog-leg to it for some reason. Prior to attacking this set of tasks though I paid some more attention to the lower rear apex(es?) of the fins themselves. Being so fragile at I've constantly been brushing against the tips and breaking them off until eventually a very simple solution suggested itself whilst scrutinizing shots of this region during research of the above. Borrowing once more from Julien's most helpful FAW.1 walkaround shots on the forum, you can see that (strengthening?) panel just above the tail bumper: - is a perfect candidate for some raised surface detail in this region used metal foil. Fortunate also that said panel on either side of the fin will provide invaluable reinforcement against me snapping off apex detail any further. Back into Fusion then (I mentioned above to Giorgio just how rusty I'd become after not having touched the software at all over the summer) to draw out a panel suitable to cut out from foil at 1/72: These were then dashed off on the Portrait cutter and subsequently burnished on to said apexes: I then brushed some Mr.Metal Primer-R (I've no idea what the 'R' bit means) over these foil additions, knowing I'd forget to do it later.... From then on it was just a straightforward job of adding the transceiver and cable duct along the fin/boom. Or I should say, straightforward enough regarding the transceiver on the apex but the ducting itself, well my first attempt using 0.5mm Evergreen strip honestly looked horribly crude done in plastic, especially when it came to getting the material to conform to the varying number of compound curves involved along its length. I lived with it on the aircraft for a day and then stripped it all off again, this time using 15 amp fuse wire for the duct, flattened into the requied square cross section on the small anvil with a planishing hammer: - before being pinned to the aircraft using some (actually in my case) eye-wateringly small staples that I had to make out of 0.3mm brass rod, approximating the fixings visible on the real thing: Despite the time and effort required the manner in which the metal conforms to the compound curves was a great improvement over my earlier pitiable fumblings: - - most particularly in conforming to the front profile of the boom where it the cable enters the wing: Finally, attention was turned to the companion details below the wing, where the cable emerge from the wheel well and curves forward to connect with port inner pylon. This time I remembered to draw out the cable run onto the aircraft and drill out all the holes first, before then adding the stapls in a single pass along the ducting: The staples themselves were attached using drops of Rocket Max and any remaining evidence of the drilled holes being refilled with resin to tidy up: A final upper/lower view of the cable aspect (note to self, more Mr.Metal Primer on those ducts...): Before I go any further now I need to pay some attention to the wings stores and the pylons in terms of drilling out attachment points and fixings; let's see what time I can claw back during the week to make a start on that Another ongoing project has been trying to grow more exotic foodstuffs in the greenhouse this year, a particular favourite being okra which I love for Indian cooking but which is almost impossible to get fresh here in Ireland. Having obtained some seeds back in the Spring, three plants managed to hold on despite the climate, though only one has borne actual fruit so far. Last night though one of the others completely stunned us by putting forth the most singularly beautiful bloom - the most delicate of yellows around a sensuous burgundy-like centre: Something must have awoken in the air here over the last 24hrs as the garden is also full of red Admiral and Peacock butterflies getting stoned on the buddleia this morning. Soul-warming to witness. Take care of yourselves until next time. Tony12 points
-
Hello! Latest project, another ‘109, always a nice model. This one from Eduard is very good, came with some resin, PE and canopy masks. I’ve tried to display a very weathered one, as I think it should be the case operating in north Africa those days. Decals went just fine. Hope you’ll enjoy! Cheers!11 points
-
Mirage IIII; Dassault' masterpiece, and the sexiest jet there is... Modelsvit 1/72 Mirage IIIB-2 DD 250, 2/91 Bretagne, St.Dizier-Robinson, France, 1987 Surprisingly and enjoyable build considering the multimedia and mixed reviews of the kit. Yes it's tricky but really catch the sophisticated elegant looks of a Mirage III. WIP can be found here; Very sorry for the lousy pictures from my cellphone... Cheers, Mario10 points
-
I decided there was really only one feasible way to replicate the reinforcing strips, the same one used in the review build in the Valiant Wings Hawker Typhoon book. Imagine my excitement. I cut thin strips of styrene sheet to more or less uniform width using my scalpel and my very poor spatial sense, Then, using tweezers, my scalpel, and latterly, just putting them on the Tamiya Extra Thin bottle's brush, I applied them to the model. Yes, I know it looks like crap. To say the process was fraught is an understatement. I used the plans in the Valiant Wings book to place the fishplates. It took about an hour, all told. Hmmm, I daresay all of these make it look pretty dire. Here they are at a more normal viewing distance: I'll sand them down a bit once the glue dries and hopefully it will look at least a bit better.10 points
-
Removing the fuselage empennage was easier than I thought (not enough glue?) and I thought it might be a good idea to compare it to the resin part: The Matchbox part has a "lot" of B-24 about it (especially with whatever that small protrusion is) whereas the Cobra resin correctly captures the shape of the Privateer's bum. Since the resin part is thicker and shorter, the turret will sit higher up with respect to the fuselage and back into the fuselage opening more. I taped together the rear turret bits and it looks like things will position correctly. So, a little dab of superglue later and we have: The only issue I see is that the resin part is slightly too narrow, so another round or three of filling and sanding is in order. I really need to start paying attention so I don't make these silly mistakes. Maybe I was distracted by the baby blue flatiron - yeah, that's it. I also test fit the front ERCO turret and I think that it will be OK. The bombardier's window on the lower front of the nose will need to be masked off and attached in order to properly position the base for the ERCO turret. Now, I have two choices for this window - the kit part, which I have to admit is crystal clear, and the Cobra clear resin part which needs some work. What is the difference? The framing is correct on the Cobra part, but not with Matchbox. Accordingly, I sanded and micro-meshed the clear resin window and then dipped it in Future. Looking at it the next day, it is fine. I'll go with that. So, it's a slow slog. Mojo says to start another kit so you don't go crazy with the progress on this one. Maybe I can help Carter build another model. He keeps pointing to the Revell 1:72 Tornado GR.1 that's on my shelf and saying that's "his." I give him credit for choosing British subjects, but that puppy is mine. He can buy his own. Cheers, Bill10 points
-
This is the ICM MiG-25PD dating from 2008, so an earlier generation of kit than this manufacturer’s current excellent range of Foxbats. This is still a good kit and was (I think) the best fighter variant MiG-25 on the market … until ICM announced a new tool MiG-25PD for 2021 just as this build was headed for the spray booth! This older boxing needs an awful lot of fill-sand-repeat to get a good result. I’ve augmented my interceptor Foxbat with a Neomega cockpit (intended for the Condor MiG-25P but a nice set of resin that fits fine), Begemot stencils, Armory exhaust, intake injectors and wheels, a Master pitot probe, and a Pavla canopy. The MLG required a lot of work to get a good fit and there is some extra metal rod in there to give it some strength. I added a couple of Quickboost air scoops to replace those lost in the sanding (the Quickboost set has enough for two models). The main scheme is Ammo MiG FS36375 over a black base, and the metal parts are Vallejo. This was my first time using Ammo MiG paints and I wasn’t wild about the coverage; however, some research indicated that was my fault for using a gloss black base, rather than a matt primer – I've had no problems since, so live and learn! The markings are from the kit for Red 65 of the Ukrainian Air Force in 1995. I did make up some R-40 missiles using those from the Condor kit but, although the results were ok, they were just ok and I quite like the purposeful lines of the Foxbat unencumbered. The weathering is a little harsher than I intended but these birds were fairly grubby by the end of the service careers. All in all, I’m quite pleased with this and am sure that the new mould ICM PD is worth the wait.9 points
-
I have been on and off this build for around a year and half. Every time I felt I was close to done I would screw up something and came close to making it a paint mule a few times if not trashing it. The discontinued Airfix kit has some nice detail in parts and is puzzlingly lacking in others. I scavenged my spares box to try and overcome some deficiencies and before I screw it up again by overcorrecting, I think this is good enough and will call it done. Apart from bits and bobs from the spares box, since I was building an Indian Navy bird, I used Magic Matra missiles from an old Heller Mirage 2000 and used my pin vise hand drill to make holes in the tailpipes of the missiles. Colors, wash and clear coat are Tamiya. The decal instructions said that this airplane, IN618, was heavily weathered by 2005 and the extra dark sea gray had worn down to a dark sea gray. Decals are a mix of the ones that came with the kit and Model Alliance Indian Navy SHAR decals though the roundels are from the Italeri SHAR boxing. This build could have been better but for my overcorrections and impatience. Regardless, I hope y'all like it. I do hope the new tool SHAR from Airfix out in the winter is much better. I have high expectations. LLAP 🖖🏼9 points
-
Hi Guys, this is my last project. Avro Lancaster in scale 1:72 Airfix. The aircraft I tried to reproduce in scale was the "S for Sugar" No 467 Squadron Royal Australian Air Force ,Royal Air Force Waddington, Lincolnshire 1944. The model has been very well designed by Airfix and it didn't present any particular issue for a young modeller like me. I completed the item with seatbelts and a few bombs after market (the Airfix ground crew was not considered since I didn't want to build a diorama). The model was hand painted. I tried some dirty effects on the undercarriage with oil colours and using Tamiya master weathering for the engine exhausts. I hope you like it and as always I cannot wait to receive your comments. Thanks9 points
-
Another Tamiya classic. I hope I didn't outbid anyone from here, the auction didn't reach half or what buy-it-now sellers were asking. It looks like a nice kit, there's even some self-adhesive felt carpet. Pity there's no engine but at least the seats have backs.9 points
-
My first ever Wildcat, I know this aircraft for a long time but never got the chance to buy and build it. Since I'm more fond of the Japanese side But looking at those details and rivet line out of the box. Make me think again and want to build it. The kit went well event it was released in 1999 or 1990 something. The only downside was the decal was very thick, and leave a lot of silver around it when applying. Thank you for watching I made a painting video on my Youtube Channel, feel free to check it out. And thank you for enjoying my work https://i.postimg.cc/2yt3F4vk/IMG-0772.jpg8 points
-
As a follow up on my JA 37 Viggen, I just finished the two-seater, an SK 37 Viggen from Special Hobby. Same kit as Tarangus, with all the pros and cons of that kit. The biggest setback of the kit being the fit of the upper air brakes and the intakes. I used thin plastic card to shim the airbrakes, and managed to get a good enough fit, instead of filling, sanding and rescribing that area. The intakes I just dealt with the "old school" way though, with filling, sanding and rescribing. Paint from Mr.Paint from Slovakia. Chipped the wing, air intakes, fin and canard leading edges with some masking fluid after painting them aluminium. Then painted the black, and rubbed off the now dry masking fluid. I think it turned out convincing enough. Added some fading to the paint as well, although I think it's more visible IRL than on the pictures. Also added the ejection seats safety handle at the right side of the headrest, and some seatbelts. The flying surfaces were also cut a bit to make them hang. Above the exhaust I added the RWR. Pitot tubes and AOA probe were replaced with Master brass items. Decals from the excellent Moose Republic Decals range. Now on to the pictures.8 points
-
Evening folk's,dug out another box of old build's for a clean up and the odd repair so here's four I didn't bin in a recent clearout I'll keep these as they are some of my favourite aircraft and yes that includes the Attacker!All in 1/48 scale.8 points
-
No-one that is, until you Tony. No matter, exceptions to mature and sophisticated are also welcome here. In fact, they fit in far better with myself! Glad you're enjoying it Thommo. I've had a silhouette cutter sitting unpacked on the table for a few months now, one day I'll find somewhere to set it up! @nick thanks for those tips, I'll file those in "useful"! Work has been very quiet this month so more (slow) progress has been made. Before I did anything though I couldn't resist this.. I do like the way this is going! Right, where were we? Ah yes, bonnet panels. Not too difficult to fix. A little gentle sanding in the bottom edge of the left one was all that was needed. The right one took a thin strip of plastic along the bottom rear and lower front edges. Joining surfaces where thinned with the scalpel and the bonnet is now on. I also fitted bonnet locks made from .8mm tube with a .6mm insert. That made me cross eyed, and I've already knocked one off! Next up, mudguards. You may remember that I spent some considerable time getting them aligned earlier in the thread. The problem with that is that the tyres are now smaller, so the gaps are wrong again! The rear ones were simple as I just needed to raise the front slightly each side. On the right side I simply straightened the mount and re-bent it with a smaller locating part. Unfortunately the left one wasn't long enough so I had to make a new mount. It's not as though I haven't had practice at that so that was completed fairly swiftly. Happy with that. The front is proving (there's the hint, longer job!) somewhat tougher. I initially thought I could get away with shortening the mounts so I filed them down to drop the headlamp mount to the correct position. That looked promising, so I CA'd the assembly (using only a tiny drop as I knew I would have to remove it again) to the chassis to test the fit. Of course, I then had to bend the upper part further out as I'd effectively narrowed the assembly by shortening the bottom of the mounts. Then it started to go pear shaped: The bend looked wrong, then the right side solder broke. Then the attachment at the top end broke off. Damn, said I (or words to that effect). Nothing for it now but to make new front mountings from my piece of brass T-bar. However, this time I will make a card template to make sure I have the correct angles and lengths. I'm not doing it today, so that will be the next job when I get back to the bench. I've also done a little reshaping to the front mudguards. All 4 will need repainting too, along with the mounts of course. The good thing is, that this is the last major job and once done all I need to do is stick the little bits on! Thanks for looking in, take care and stay safe! Ian8 points
-
Work up to this point. The camera really makes any error pop out! Just like Mike, it looks better with the naked eye (through a welders mask). Still a few things more to do in the cockpit, some gloss in dial faces and the radar screens etc. But should be able to button up soon. Intakes were glued, sanded and primed this evening along with the pylons. And some work has been done with the wing parts and tail.8 points
-
I'm (slowly) working on several Wirraway builds at the moment, and thought I might share a few details of Wirraways here for your interest and edification! The first item of interest is the correct radio aerial detail for the Special Hobby kit depicting A20-444 "NV-J". I've corrected the box-art to show how the aerial should be configured (the two wires out to the wing-tips are missing from the box art) as well as to show the correct cowling configuration for this aircraft (no air intake on the upper front edge of the cowling). Hope you find this of interest. The first of my builds is here:7 points
-
This is an RF-4ETM from 173 Filo 'Safak', in the then new disruptive camouflage scheme. This particular aircraft was shot down by Syrian air defences above the East Mediterranean on June 22nd, 2012. Basic kit is the Revell RF-4E because I could get one, and reviews suggest it is a decent compromise between accuracy, detail and ease of construction; better than the Italeri and a fraction of the price of the much better Hasegawa. Research suggests the ETM upgrades were largely internal to do with systems and electronics so I should be OK with the basic kit if we agree to ignore the instrument panels (and the aftermarket already has, so I'm kind of stuck as scratching 1/72 IPs isn't in my skill set). Box is a bit battered but whole. Contents are fine. That decal sheet looks very impressive but is a bit yellowed so a new decal sheet is a boon. Decals are by Hi Decal. Don’t think I’ve used them before but they look good and there are millions of stencils for me to go cross eyed over. I can already see me only using an edited highlight of the sheet. I'd also like at least one standard E to do a fighter scheme On to the build. More news when it happens. Andy7 points
-
It's a wee bit late, it should have been posted on the 12th. This is my model of the 34 Sqn T-Bolt my dad was flying when they got the call back on VJ day 1945. I've tried to capture the worn and weathered look of these hard worked war horses, not easy with a paint brush! Lest we forget. John7 points
-
Got a little update on the progress of the beast, at last it is starting to look vaguely like the real one, , though there is still a very long way to go. All of the hull is now blocked in, and my current efforts are being directed towards getting the general lines and surfaces running properly before things like the armoured belt, gash chutes (various) and lots and lots of openings n stuff. Port side taped up and taking shape, next stop a bit of filler I fear ! I suspect that this phase is going to take weeks to get it all correct, but I'm cautiously optimistic that I can (if you know what I mean). Starboard side, I think I will sort out the surfaces on the other side completely and the drop onto this side, try to keep it manageable (he said, rashly using the word manageable with reference to a 4ft long aircraft carrier !) I will post some more pictures of the surfacing operation as it progresses ! Cheers from the dark side !! David7 points
-
Got to painting today. Things moved pretty fast once I got in the groove... plus the preshading stencils I use really speed things up too. First I masked the red stripe after confirming the paint was fully dry Then I went over the area with Mr. Surfacer Black 1500. I then remembered that the cowl had to be masked, since it will be black too... so... And then I painted the RLM 74 Gray green using the stencils: I then put on a top coat and while I was doing that noticed in the instructions that I was supposed to fill in the ventral radio door. So out came the CA and I sanded it smooth... I should've realized this, but I wasn't really supposed to do that... Hasegawa got it wrong. At least according to my Fw-190 book (I was looking at something different and saw that just a couple of minutes ago). So I guess I will be penciling it back in when I'm done. ugh. A quick mask for the RLM 75 gray violet: and once that was done, a quick mask for the RLM 76 Blue: And when all was said and done: Masking the area where the wing met the fuselage was tough. I see now that my glue on the canopy looks bad... not sure what I can do about it, but I'll see what I can do. I had to put the spinner on, just to see! So, next up I need to paint the white stripes on the cowl and the few RLM 75 mottles on the tail. And the little parts....7 points
-
Knocked out a nice simple Tamiya kit in lockdown just to get something finished. It's in 1/72, with the plastic straight from the box and Eaglecals used for the markings, although I did not use the white stripe decals. Much easier to actually paint them on using 1mm kabuki tape. Eventually I'll do the other 3 to sit beside her.6 points
-
We had our first club meet for 18 months last weekend. I put this bad boy in. It's destined for the museum when we can find a case big enough.6 points
-
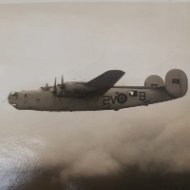
Hi everyone! I've got a wee Britmodeller story to tell. Apologies if there's a better section of the forum for this but it felt like it fit here the best as its not strictly modeling related. (Mods please feel free to move it if there's a better place for this) A few months ago I made my first post on the forums in the WW2 aircraft discussion section, looking for some help with reference for a long term project I've started, to build a model of the B-24 that my Grandfather flew during the war (I'll put a link to the original thread at the end of the post). The response I got was overwhelming with members offering to share their knowledge and pointing me in the right direction to get copies of the ORB's and other documents that were immensely useful. (I've stuck around on the forums ever since although I've been hiding out in the group build section for the most part so far ) Over the course of the conversation I mentioned my Grandfathers name Robert Douglas Methven. A few weeks later I received a PM out of the blue through the forums from @CookieMonsterRAF who wasn't a member but had come across my post and recognized the name, he reached out to let me know that he had found something on a militaria website that I might be interested in, A dress uniform jacket which very clearly had the name R.D. Methven written on the label inside the jacket. (the listing is no longer on the website or I would add a picture here) I showed my Mother the picture who confirmed that it was very definitely his hand writing. So we bought it. And it arrived a few weeks ago. It's in stunning condition like it was hardly worn. Tailored in 1942 which would have been shortly after he returned from Iceland and we think to reflect his new rank at the time. We have no idea where it's been for the last 80 years or what happened to it after the war but its obviously been looked after. I picked up a stand for it and my Mother dropped off his hat which she's had since he died. The hat was made by the same tailor and although it doesn't have a date it appears to be made from the same fabric so we think it was made at the same time to go with the jacket Here it is re-united with the hat. And a picture of him with his Liberator crew wearing both the hat and the jacket (middle of the front row). At least I'm 99% confidant that its the same uniform as the picture, it was taken a few months after the jacket was made. Eventually I want to set up a display with the uniform and the completed Liberator model when its ready. I wanted to thank the Britmodeller community as a whole for being an amazing bunch of people, both welcoming and keen to help out with research and for being the catalyst for this and allowing us to bring the jacket back into the family, and in particular I wanted to thank @CookieMonsterRAF for reaching out to me, without him I would never have come across it. Link to my original post:6 points
-
My favourite aircraft landed on the shelf, another MiG-3, built this time from a vacuum kit. The vacuum kit, unlike the usual plastic kits, is quite entertaining. Built it for the first time, seemed to win... Due to the thinness of the plastic and the geometric nuances of the kit, some of the features of this car, I had to observe as far as possible. I used the technology of "structural rigidity" in the form of studs without piling up the power kit and all sorts of framework, which was invented and proposed by Dmitry Tarasov (tardmi). In my case, the studs worked perfectly! For a prototype was taken Pyshkin N.M. from 25th IAP. Photo of prototype (scans) provided by his grandson. The pictures were taken at Transcaucasian front, Azerbaijan, aerodrome, Nasosnaya station, 1941. The regiment at the time was in the protection of the oil refining areas. The tail number, unfortunately, was not known. If there was one? There's nothing in the flight logs... Paint and varnish with brushes. Paints: urethane-acrylic GSI Mr.Color, acrylic PC88, varnish Tamiya, futura, + pencil. Enjoy the view!6 points
-
Ok first picture post here but part of my ongoing Bomber Command project. Both Airfix, both 1:72. Only question I have - can you tell which one I built over a year ago, and which one is the most recent? More pics on request if you don't stone me.6 points
-
Hi All Here is my latest aircraft build. It is Special Hobby's Siebel Si 204D. It is a typical Special Hobby kit except that it features alignment pins! Mind you most broke off in the locating holes when I test fitted the fuselage together. The only problem I had was getting the dihedral on the wings correct as they were a bad fit with much sanding of the locating tabs and slots. I thought I would have a problem with the cockpit transparency as I read that some found that it was wider than the fuselage and needed bending and heating but mine fit with just a little persuasion with several strips of thin Tamiya Tape. The circular front piece fitted on with no problems. Thanks for looking Mick6 points
-
Hello all! I'm posting this on the 80th anniversary of the first flight of a Beaufort Mk.V. This was also the first airplane assembled on the site where I now work. The plan had been to get some photos in the original factory (which is still standing but full of Boeing 787 flaps), but COVID had other ideas here in Melbourne. Here are some details Kit: Airfix Beaufort Mk.I Aftermarket: - HPM Early Beaufort conversion set (minus the extended-chord vertical fin) - Eduard Brassin wheels - Eduard Photoetch set - Eduard masking set Paint: - Topside 1: Gunze H-302 (approx. RAAF Foliage Green) - Topside 2: 10 parts Vallejo 71.323 to 1 part Vallejo 71.105 (approx. RAAF Earth Brown) - Underside: 1 part Vallejo 77.701 to 1 part Gunze H-1 (aluminium dope) - Interior: Tamiya XF-71 (cockpit green) Decals: From the Airfix kit other than T9540 serial (from the HPM set) and black arrow at the port wing root (from the spares box) Other modifications: - Relocated one aerial to the belly - removed gun from rear turret (the first aircraft was unarmed at rollout) - Drilled out bulbs in the wingtip lights - Added EZ-line aerial wire - Added 1940s aerial photo of Fishermens Bend Airfield to the navigator's table And now, photos! I posed a few RAF vehicles and figures around it for a few photos. I wasn't able to take photos in the factory, but some of these are being featured in the local newsletter at work next week and I wanted them to still have an interesting background. I know they're not prototypical! Here's the real thing rolling out of the factory. I tried to match the angles of the propellers. Finally, here's the WIP for those interested. Now, on to finishing the first Aussie Beaufighter!6 points
-
Yes, I have a setup for taking photos. I started taking interest in it, and at first I had a foldable / popup light box but it didn't work really well for larger stuff and getting the background in was a pain. So now I have this: It's a simple IKEA cupboard than I can move around easily, to the back of which I screwed a white furniture board. I use that to clamp A2 sized thick paper to, either black or white, for the "infinity curve". The cupboard holds the photo stuff like my camera and tripod and such. I use a proper camera for RFI shots, and my phone for WIP shots (no tripod). The lamps are Bresser 65 W / 5500 K daylight photo lamps in cheap sockets. I mounted them on rods which I attached to the sides of the cupboard like so: They rest on a screw and are held in place by saddles for electrical pipe. I can rotate the lamps a little which sometimes helps lighting. For RFI shots I use a third, somewhat smaller, lamp which adds light from the direction the photo is taken. It's simple and it (usually) works. I adjust my phone for light sensitivity, and sometimes I use Faststone (free image viewer) to "post process" the shots a little for lighting and / or contrast. I find this setup is easy to use, even for quick WIP shots. I like it when they look clean 🙂6 points
-
Thanks Rob. I'll try not to either screw it up or abandon it half way through... I made a start on the PE. I thought that was important to do. Well, it's essential actually since I need to paint the hull. The forecastle deck gets improvements around the anchor handling equipment mainly, which starts with a brass overlay through which several 0.5mm holes are drilled. On to that are affixed 4 resin parts. Nothing too exiting here. I'll get this airbrushed next before adding all the sticky-uppy bits which will be a different colour. On that front, the hangar deck is #20 Standard Deck Gray whilst according to the instructions JohN Snyder wrote on my own website that all external decks other than the flight deck are 20-B. So is the forecastle deck external? The very forepeak does extend forward of the flight deck, so I think 20-B is probably the way to go here. If anyone thinks differently, now's the time to chime in I've also managed to get the degaussing cables fitted between meetings / over lunchtime today. I just stuck these on using PVA but the ends of the bent bits are tacked with CA. I happened across these photos taken during the damage control efforts during the battle. I need to make a lot of hoses. Notice in the following photo that Tom Cheek's Wildcat is still lying upside down in the background and there is a TBD-1 without the folding wing panels hanging overhead. This TBD-1 has possibly been there a while as it's still carrying the red and white stripes on the rudder and meatballs in the fuselage insignia. I think this one shows one of the hangar deck bulkheads which would tally given the white paint. There's a lot of splinter damage evident by contrasting with the paint and severed cables. I'm not sure I'll go that far but if someone does peer through the model it needs to look like a carrier that's had a bomb down its throat.6 points
-
It’s called O’Kra over here; a greener version6 points
-
Well, after the clear parts done... Turned out there's only small parts left to glue. I guess she's done.... More pics in the gallery, guys... Cheers, Mario6 points
-
Italeri B-58 Hustler what if in USAF SIOP Camouflage based off a well known drawing on Pinterest which I was unable to fully replicate due to decal issues with the tail numbers so used kit ones. Painted with Xtracrlix Greens and Vallejo Tan and Humbrol Black and finished with Winsor and Newton Matt.6 points
-
This is the Airfix 1/600 HMS Campbeltown (F4S/01204-3) with PE railings and finished as USS Buchanan, which was supplied to the Royal Navy in 1940.5 points
-
Here in 1/48 scale is the Norman (or NAC) Fieldmaster a 1980’s British cropduster. If ‘Norman’ sounds familiar – you are correct. Here’s a little bit of history courtesy of Wikipedia… “NDN Aircraft, which was set up in 1976 by Desmond Norman, one of the founders of Britten-Norman, the manufacturers of the Islander, to build the Firecracker trainer, designed a new agricultural aircraft. The resulting aircraft, the NDN-6 Fieldmaster was a large single-engined low-winged monoplane with a fixed tricycle undercarriage, powered by a Pratt & Whitney Canada PT6 turboprop engine” “The first prototype flew on 17 December 1981 at NDN's airfield at Sandown, Isle of Wight. TNDN moved the premises to Cardiff, Wales in 1985, renaming itself the Norman Aeroplane Company (NAC). Production finally started in 1987” “NAC went into receivership in 1988, after the production of six Fieldmasters, including the prototype. Brooklands Aerospace attempted to continue production, rebuilding one of the Fieldmasters with a more powerful engine as a specialised firefighting aircraft as the Firemaster 65” The scheme in the model is G-NACL (NACL = Norman Aeroplane Company) which undertook a sales tour of Australia in 1988. But no sales… The build has been tracked over in the Work in Progress forum. Just for a size comparison - here she is alongside an Airfix 1/48 Tiger Moth cropduster. The Fieldmaster (WS = 53ft 3", L=36ft 2") is actually bigger than a Britten-Norman Islander (WS=49ft, L=35ft 7")5 points
-
Cheers Werner. 48ers no longer post orders under £150 to the UK due to the whole VAT debacle so I'll have to make do. I had an unexpected hour or so at the bench today so I decided to do the only bit of surgery needed on this kit and that was fitting the Wolfpack wing tip missile rails. The kit parts, to my knowledge, represent early launchers. You can see the difference between the two: A quick chop later and they were fitted: A very minor gap to fill on each which some sprue gloop has sorted. Meanwhile, I've cleaned up the fuel tanks (I really hate this job as they always look such a mess) and as per usual, some detail lost. The raised lines around this tanks are quite defined so for the small parts that were lost, I ran some Mr Dissolved putty across them with a needle. It worked quite well and looks like raised detail, albeit not the cleanest line! Should look fine under some paint and weathering: More interesting stuff to come! Dave5 points
-
Airfix Bf109E-4 1/72 Aircraft flown by Oberleutnant Franz von Werra Gruppen-Adjutant I/JG 3, Samer, France, August 1940 Thank you for looking, Tom5 points
-
Unless it’s the OCD Typhoon. I started one but could never get the detailing finished5 points
-
Another bit done, and the primer is on. Next step is looking for issues and deciding whether they can be fixed or whether I can live with them!5 points
-
Rareplanes Supermarine Spiteful for £5 off the bay, finished in three weeks and a day. Straight OOB (it didn’t have a box) plus card, paper, brass tubing and cocktail sticks for the guns: …and a reminder that once someone points you at an undercarriage bay walkaround it’s impossible to un-see it! It is marked as RB515 (first production airframe) on the port side and RB518 (fastest ever British service piston aircraft in level flight at 494mph) on the starboard side. WIP is here if you are interested. Thanks all for a great fun GB - I’ve really enjoyed building my four and watching all the other builds! Regards, Adrian5 points


.thumb.jpg.158e2e086d45b8f96b7d93b8bee8dc21.jpg)


This leaderboard is set to London/GMT+01:00