
Leaderboard
.thumb.JPG.2ce06c4ff2300a5faba93aaeacbdab25.JPG)


Popular Content
Showing content with the highest reputation on 05/08/21 in all areas
-
Well, what a delightful little model. I've been waiting for one ( or several) of these for quite a while and I must admit I wasn't disappointed. Delicately moulded throughout, parts go together with a minimum of fuss. Just be sure to clean off all the paint where parts fit together and don't forget to trim off the upper wings locating pins to stop the much mentioned wing droop. The cockpit is nicely detailed but I'm sure our usual resin chaps will be on the case soon enough. The decals for the instrument panels are fine as they are, so no need for any upgrades here. It could though do with some nice seatbelts. These are no problem though as various generic ones are readily available and easily painted into your favourite colour. If you're intending to show the engine I would suggest trying to thin down the cowling sides as much as you can as they are rather chunky and do look a little odd if left so thick particularly as the rest of the model is quite delicate. I was fortunate as to have two 'good' models without any short shot parts or cracked canopies so that was nice. Also if you want to open the canopy you'll need to trim away some of the fuselage sides at the rear of the cockpit, just forward of the reinforcing strap. This will make the canopy fit much better and keep it level. One extra little thing that's easy to add is a brake hose at the bottom of each undercarrige leg. A nice selection of markings are supplied but I'd always intended to build this particular aircraft as it used to be based at my local airfield for many years. It now resides elsewhere in new markings. The decision was helped greatly with the release of the Avalon sheet which is where I obtained the markings. Roll on the Xtradecal sheets. Anyway, go on, you know you want some... Thanks for looking. CH1 CH2 CH4 CH3 CH536 points
-
Here are the final photos of my 1/32 scale model of Spitfire PR.IV AA783 flown by Alistair McDonald on March 13th, 1942. It was one of the earliest PR.IVs, the first factory built photo-reconnaissance type of the Spitfire, and was not yet equipped with the outer wing vents. The model is based on the Hobbyboss kit, with significant alterations and additions. Quickboost spinner and propeller Tamiya Mosquito engine (a generic single-stage Merlin; augmented with spare parts and scratch built items) Quickboost Spitfire Mk.I/II exhausts The engine firewall was moved forward about 1 mm The shape of the fuel tank was rounded to improve the profile The windscreen is from the Grey Matter Figures PR Spitfire conversion set for Hasegawa, as are the side blisters on the canopy The cockpit is based on the Eduard Brassin set for the Revell Mk.II; changed substantially to fit the Hobbyboss fuselage and to change to PR specification The cockpit features an adapted Yahu instruments panel (added gauges for the additional fuel tanks, for example) The cockpit door is from Barracuda The oblique camera port came from an Alley Cat PR.XI set Tail units replaced by Quickboost items Wings were converted to type D specification; this involved removing bulges and gun hatches; adding new bulges and filler caps Added the mechanical landing gear indicators Boxed in the rectangular sections of the wheel bays Wheels/tires from Eduard The model was painted mostly with Mig Ammo acrylics; decals were from various sources. Build thread here: Anyway, on to the pictures! Thanks for looking, comments and criticism is always welcome!30 points
-
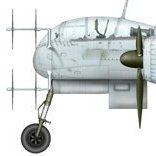
Finally and at long last I've managed to get this one finished although it's probably the one I'm least happy with of the five I've completed since returning to the hobby late last year but I think it looks like a Dornier Do217E in the main. It represents a machine from 5/KG2 which narrowly missed bombing my late mom back in July 1942 when attempting to attack the Rover factory and gas works in Solihull so it sort of has a family connection. Sadly I wasn't able to discover the exact aircraft involved but it could have been 'G' so it's as near as I've been able to get. The kit itself is showing its age with raised panel lines, problematic fit in some areas and instructions that are somewhat vague in many areas too but I suspect the main issues were my lack of practice and modest skills allied to not having built such an old style kit for several decades. The 'extras' used were the Airwaves PE set, albeit for the later marques, Eduard seat belts, aerial wires form EZ line, resin MG's for the front and dorsal gun positions and a combination of the long OOP decal sets from Tally Ho and Eagle Strike combined with the kit decals, plus an Xtradecal sheet for the tail letters. I did buy the correct red I Gruppe 'Holzhammer' badge from Peddinghaus but the colour distorted badly when applied so I've had to go with the white version on the basis that the machine was transferred from I to II Gruppe at some point but they forgot about the badge - possible. The paints used were Colourcoats RLM73, Humbrol 66 (in lieu of RLM72 as it is out of stock with Colourcoats) and Xtracolor Tyre Black for a less dense black effect on the undersurfaces. In terms of weathering I've just applied some faint soot marks behind the top exhaust manifolds on each wing using black pastel but the effect is quite restrained so I may add a bit more at some point. I did apply a Flory's wash of Grime to all surfaces which gave a nice effect but then found that after applying the final matt enamel varnish coat it all disappeared. Special thanks to Graham Boak for selling me the kit and for providing me with lots of information on the build and the correct colour schemes and markings. Regards Colin.22 points
-
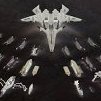
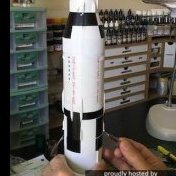
Today I bring you Mistel 5. Being a combination of He162A-2, Arado E-377A flying bomb and Rheinmetall-Borsig take-off trolley, it was one of countless wicked ideas that German engineers came up with by the end of the WW2 and never left design phase. Model is the old Dragon release with some scratch built details like antennas etc. Painted mainly with Vallejo Air.17 points
-
Kia Ora once again from NZ, not little Australia 🇳🇿 Another recent finish and one I'm supremely proud of as it's my all time favorite. This was made using Airfix's 1/72 Starter Set so few decals to speak of. Extras included: Eduard harnesses for the cockpit and a masking set from the same maker. Turret guns were from Quickboost which is a direct replacement for the kit parts. Exhausts, pitot and lower fuselage antennae from Quickboost also. A few extra panel lines were scribed on the rear fuselage and a bit of scratch building inside the turret to add extra depth (gun sight, control handles, gauges etc). Painted with Mr Color lacquers. Paint chipping using Humbrol Maskol and a small chunk of sponge for dabbing. Mig Ammo Dark Wash for the panel lines. Guns painted using AK Acrylic Gun Metal. Photo's taken with my trusty Samsung phone. Enjoy14 points
-
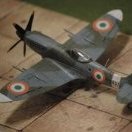
Good evening everyone The Spitfire needs no introduction. Although ‘iconic’ is a very overused word these days this aircraft - as a symbol of piston-engined fighter development - surely qualifies; it is a classic blend of aggression with elegance! I have never built a 1/48 scale Spitfire before so decided I would start with Airfix’s new tool FR XIVe (kit A05135). This is a kit that has had a very mixed reception since it first appeared in 2019. I bought a set of Exito ‘Sweet Fourteens’ decals but then had a thought: if the kit is ‘a lemon’ then why waste a good set of decals? So I decided to build the other aircraft in the box: TZ112 of II (AC) Squadron, 2 TAF, RAF Bückeburg, Germany, 1950-51. At this stage I must say that I have benefitted from the advice and observations of modellers (of this kit) before me. It is worth watching Paul Budzik’s (Scale Model Workshop) review of the kit, and look at Brett Green’s build in ‘military illustrated modeller’ (October 20, issue 109) if you can. It was an enjoyable build (though not everyone says this)! The fit of my kit varied between okay and good. For additions/changes I: added seat belts from Tamiya tape; thinned the wing trailing edges; positioned the control surfaces; added the underwing lights, IFF spike antenna, and VHF whip aerial; drilled out the exhaust ports. One of the best tips was - after a little sanding of the fuselage joint (Budzik) - to glue the upper wing surfaces to the fuselage before gluing the lower part (Green). No gap at all. For painting, though I am a Tamiya fan, I could not find a suitable mix of flat aluminium and chrome silver to give the required silver finish. I ended up using Humbrol 11 silver as per the kit’s instructions. On the decalling side I believe there is an error in the instructions. I found a photograph of a line up of II (AC) Squadron Spitfire XIVs which clearly shows the starboard ‘G’ and ’01’ are reversed. I intend to hang the model from the ceiling so I like to try and simulate a spinning propeller. Not easy and I’ve tried several techniques over the years - still not 100% happy with it. Anyway enough from me. Just like to say thanks to my wife for her photographic contributions. Would I build another Airfix XIV? Yes! Now - where are those ‘Sweet Fourteens’ decals…? Thanks for stopping by! Mike14 points
-
As stated over in the build thread HERE May I present a few pictures of the tiny beast: Notwithstanding the miscues along the way, this was a fun build. Hope you enjoy the pictures, and thanks for looking. Ed13 points
-
This is as finished as it'll get, for now anyway. Sick to death of seeing this floating around the bench and getting in the way! Started earlier this year for the Pzr III GB but life got in the way. Great kit from RFM along with the RFM upgrade set and a few bits of stowage from the spares box. Commander figure from Evolution. Had planned on a small vignette with a couple of figures but after painting the heads countless times and still not being remotely happy with them I've parked those, for now.. Winter whitewash "achieved " with my specialist version of the hairspray technique....that is forgetting the hairspray layer prior to spraying the white! Enough woffle and the pics.... Thanks for looking Darryl11 points
-
A beautiful day at Duxford, which resulted in the usual challenging light for photography! One of the staff members said that 3800 of 4000 tickets had been sold, which gave a feeling of normality after the disruption to our lives. The line-up was slightly disappointing and even when squinting, the relevance of some of the participants was extremely tenuous with 19 Squadron! The surprise fly pasts by the two Strike Eagles was a pleasant and very welcome surprise! The Twin Otter was not part of the show, but a lovely sight, nonetheless! I couldn't decide which one I preferred! Thanks for looking!11 points
-
This wasn't on my production line but having all the paints out for the Spitfire Vc I was working on and having reread the Eduard "Aussie 8" book again, I decided to do a quick build of "Sweet as a Song", a really attractive looking scheme. The plane is the aircraft of Squadron Leader Tom Trimble who I'd been listening to an audio interview about recently. Tom worked after his RAAF career at ARL (Aeronautical research labs) in Melbourne now absorbed into DSTG. I suspect he was the boss of one of our well known Britmodeller members 😀. It's finished in Foliage Green/Dark Earth/Azure Blue with the original large roundels overpainted with RAAF Dark Earth. All the main paints were Colourcoats other than the Foliage Green which is Humbrol 30. Hu 30 is meant to be the equivalent of Authentics HB1 which I used as a match for Foliage Green on one of my Boomerangs. Painting out the swatch showed it to be a close match to HB1 so it was conscripted into use. One difference is the consistency of HB1 and Hu 30. Like many modern Humbrol paints Hu 30 is more like a paste and needs extensive thinning to make it ready for an airbrush (or paint brush). The build went together pretty easily as I've done a heap of this kit. The only real variation was using the closed door/open canopy option supplied by Eduard as the nose art of the plane partially overlaps the cockpit door. Some variations with the finish are the aluminium painted tyres to reduce sun wear and the extensive exhaust staining caused by testing lean fuel mix to extend range. The only after market parts were the Falcon canopy and the Barracuda treaded tyres. Cheers Michael11 points
-
Hello all. I have just finished this little beauty of a kit in the 'Less than a tenner' Group Build on this very Forum. The premise was that the kit and any accessories should not amount to more that £10 in total. I bought my kit in the 1980's when Palitoy did a 'buy one get on free' deal but neglected to state that the cheaper kit was the free one, so I tried it on at my local store and did not get away with it! It cost £1.75, and the other kit I got was a DH4 which had long since been built. That meant my Pup was only half of the £1.75. I bought a Blue Rider transfer sheet for this (BR-243) which cost £5 here in 2021. I also used 4 roundels from an old Microscale sheet again from the 1980's which was allowed in the rules, and finally I used an etch control column handle which would not have added much, so all in all, still all less than £10. All behaved well, the Blue Rider sheet bedded down over details very nicely indeed, but, oh boy, was it translucent! That was why I used the Microscale roundels, but they were not willing to settle, even with their Set and Sol. I did add a few bits and pieces along the way, from scrap plastic I had around. The model represents C242 from No 7 Training Squadron, Netheravon, 1918, and it is slightly colourful, in a subdued sort of way. The build log is here if you would like a look: There are some amazing builds on that Group Build, it shows we do not always need to spend mega bucks to get something good out of modelling. Anyway, here is my completed, drab-looking Sopwith Pup: It was fun! Thanks for looking. Ray10 points
-
The set is acceptable, although the bonnet part is a little fooled. Modified the cockpit a bit (threw the belts and sight). On the landing gear with imitated hoses. Made LDPE. I deepened the joining and added rivets. The decals were surprisingly translated without any problems! Base color (presumably RLM63), mixed from RLM02. Mixed in two shades for panel effect, cockpit and chassis niches. The vehicle belonged to (2_J88 “Legion Condor”, pilot Norbert Flegel, Spain, 1937) (code 6-7). Painting and varnishing with brushes. Paint: GSI Urethane Acrylic Mr. Color, Tamiya Varnish, Futura + Plain Pencil. Happy viewing!10 points
-
Spotted this morning at Lidl in Sleaford. Dark green Triumph Herald Estate - E or F reg. Didn't get much of an opportunity to see the plate properly. Trevor10 points
-
Progress! After fiddling around with various bits I decided to concentrate on the turret, which I can then box up safely while I tackle the hull. The basket that I made a year ago had only been attached to the turret by two brass pins on the bottom rail so I got the bracketry finished off and the basket securely glued in place. The only parts that needed to be made for the turret were the stops for the shell eject door. These were easily fabricated from square brass stock and inserted into holes drilled in the turret. The smoke grenade launchers and the barrel just needed to be glued in place, plus some wiring for the launchers. I can now concentrate on the hull without having to worry about damaging the turret...I have already dropped the Fire Control turret twice during the build after forgetting it was not glued in place and turning the turret over!10 points
-
Here is Tamiya's excellent Panther Ausf D in the markings of Pz. Regt. Grossdeutschland, 1943. This vehicle apparently fought with Pz. Regt 39 at Kursk, was damaged and repaired, transferred to Grossdeutschland and then finally knocked out later in the summer. I built it straight from the box, just adding Tamiya's engine grill set. My only slight complaint with the kit is the lack of any detail in the commander's cupola, but the nice little (half) figure helps fill the space. I used Tamiya paints as usual, and various washes, pigments, pencils and oils for the weathering. All the best, Ian9 points
-
Hi everyone, my first build for perhaps nearly 30 years having just got back into it! Could not start without going back to my roots and building a Spitfire having served in the RAF for many years. The build is a Revell at 1:72 so nothing special or tricky to do although this is the first attempt at any sort of weathering and finer detail stuff. I'm still building my accessories up and paints so pretty basic attempt I imagine. I have now bought an airbrush although not had the time (ie when my wife is away) to give it a go! Anyway, it was great fun to build over many weeks little bit here and there getting stuff out and putting it back again. I served through the Cold War and have an interest in Vietnam as well as WWII so there's plenty of scope and kits that interest me. Great to be back!9 points
-
Messerschmitt Bf-109 E-4 / B, S9 + GT from 9 / SKG 210, Uffz Werner Ringel (?), Russia, March 1942. The Airfix kit, very poor in detail, so I added some resin accessories from Pavla (it is just necessary, especially the control surfaces and flaps) U-48-35 and U 48-36, Eduard's photo-etched bits in the cockpit, Aber and Pavla's barrels. Of the things that don't match the actual aircraft, it's definitely worth mentioning the compressor air intake filter cover, which should be typical for Fieseler production, the headrest, and probably the bomb ejector - but it was a replaceable item, so let's not worry. Overall, it's not state-of-the-art, and I didn't have a heart for it, so it took far too long to build this simple kit since the holidays of 2019 or even longer. But generally, I show everything I've finished, so another boring and mediocre Bf-109 lands in the gallery. Painted with MRP and Gunze paints. Wash and weathering with specifics from Modellers World, AK pigments. Decals from TOPDRAWINGS No. 4 by Kagero - excellent. Overall, I tried to be as close as possible to what is in the drawing in the book. The photos of the S9 + GT show a dark spinner - but I painted it yellow according to the book. Strangely enough - this is one of the heaviest World War II fighter models in the 1:48 scale I have. The parts are thick; there is a huge lump of plastic pretending to be an engine in the front - it has its weight. Hubert9 points
-
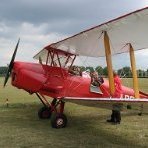
Dear all, Here is my first effort at a scratch build. This is modelled on Bristol Scout 1264 which lives at Old Warden in the Shuttleworth Collection. When I first set eyes on this pretty little biplane I decided I had to make one in 1/32 but no kit was available so with the encouragement of a friend I dived headlong into the scratch building pond. Although it took just over a year, most of the time was spent scratching my head, rubbing my chin and staring blankly into space. It is by no means perfect and I could spend forever retouching and refining things but if I take my glasses off it looks terrific to me from a distance and most importantly I had so much fun with this project. To anybody contemplating scratch building I would highly recommend just having a go. The materials are cheap or free, for instance the cowling is the lid of a sauce bottle. Anything you cock up can always be remade and you will learn a lot, especially about the virtues of planning and patience but above all you will have great fun. What have you got to lose? Anyway enough my random ramblings, here are the photographs, I hope you like the Bristol Scout and are encouraged to learn about this wonderful aircraft and have a go at scratch building something. 1/32 Scratch built Bristol Scout by Richard Williams, on Flickr 1/32 Scratch built Bristol Scout by Richard Williams, on Flickr 1/32 Scratch built Bristol Scout by Richard Williams, on Flickr 1/32 Scratch built Bristol Scout by Richard Williams, on Flickr 1/32 Scratch built Bristol Scout by Richard Williams, on Flickr 1/32 Scratch built Bristol Scout by Richard Williams, on Flickr 1/32 Scratch built Bristol Scout by Richard Williams, on Flickr 1/32 Scratch built Bristol Scout by Richard Williams, on Flickr 1/32 Scratch built Bristol Scout by Richard Williams, on Flickr Many thanks for looking in. Here is a link to the build thread in case you are interested Richie9 points
-
And then today there was this: http:// Oh, Arthur..... Cheers, Mark9 points
-
First test shots pics. Source: https://blog.revell.de/2021/modellbau/die-testshots-der-sr-71-blackbird-sind-da/ V.P.9 points
-
Video of the build: This was one of those kits that you wonder if the kit is very hard, or if the kit is just that bad. Either way, you end up wondering if you are not good enough for it, and makes you want to go back to a Tamiya/Eduard kit to prove yourself that you are not that bad. I appreciate Mikro-Mir's efforts in making a very detailed kit, but if they assembled it, they would understand the need to fix the moulds and release a new version. Lot of corrections, sanding, putting, fittings, etc in almost all steps. In this video above I list all the things you should be aware before giving a try on this one (I wish such video existed before). Anyway, at least the kit made me much better at rescribing and puttying. I also played with magnets, stress metal effect, some scratch build... the most enjoyment I got was from seeing this beautiful shape coming along, while putting out the decals. I hope you enjoy the pictures. All criticism is welcome. I know it is far from perfect, and I just want to improve for the next one.8 points
-
A blast from the past. One of MPC's Gangbuster series. Airfix joined the party with a boxing of the 1928 Lincoln Touring, and threatened to issue a couple more, but none have surfaced up to now. Anyway, here it is, the 1932 Chrysler Imperial, along with some of the Gangbuster accessories provided... I did pop back to the sixties after finishing the build, and entered an MPC model contest on a whim. To my surprise, I got an award! I'm currently building the others in the '60s Airfix catalogues. They will turn up here at some point.8 points
-
Piaggio PC.7 Pegna, resin miniature by SBS Model. Painted with Gunze Super Italian Red and Vallejo Liquid Gold. It was my first purchase from this company and I am positively surprised by the quality. The cast is sharp with amazing detail and excellent fit, on part with Tamiya and Finemolds plastic sets. The crude wooden trestle is scratch built, as they didn't have the SBS ones at my usual hobby shop8 points
-
This is part of a group build. I wanted to build my 1/48 Tamiya but I was short on time and had to choose between the Aoshima or Matchbox kits in my stash and chose Matchbox. Many years back I saw Jagan Pillarisetti's research where he traced flight logs to discover that Indian pilots flew a couple of Buffalos that at one time belonged to 67 sqdn and were flown to India as Singapore and Burma fell. These were acquired and flown by No.22 AACU (RAF/IAF composite unit that was later IAF). This is one of the 2 aircraft that the Indian pilots of No.22 AACU flew based on Jagan's research - W8245. The build is entirely OOB except for the decals. For 1/72 scale I use my hair for antenna wire as I have done here as well. Paints, wash, gloss and dull coats are all Tamiya.8 points
-
An odd title, you may think. It's inspired by the car stickers one used to see, usually on decaying old rust-buckets, that stated "My other car is a Ferrari/Rolls-Royce/Cadillac/" etc. Anyway, I had a Wingnut Sopwith Pup, a figure by Elan13 of an RFC pilot called "Henry" who is depicted holding a small spaniel-type dog, and a career that involved working and living in Gosport for nearly 10 years, and all this came together in this model. The subject is a Sopwith Pup from the School of Special Flying, Gosport, where Major Robert Smith-Barry developed a system of flying training that produced far better results than previously, and is basically still in use world-wide to this day. The markings are an option in the "Gnome" boxing of WNW's Pup, although I only used the fuselage roundels, serials, prop logo and instruments from the kit decal sheet: everything else was masked and painted. Anyway, without further ado, here's Henry "Sorry old boy, even at my rank I'm not allowed to take you flying" Forgive me for having a play with some effects in one or two of these photos: Thanks for looking. Comments and any suggestions for improvement welcome.8 points
-
Spotted this afternoon - asked my wife to get a photo and believe it or not, this is the best one. 😑 C-reg Capri, wide (X pack?) arches, twin exhaust in the middle,huge red mudflaps fixed with ugly aluminium brackets. [/8 points
-
Hi All, here some more wip pics. I addede Atak Zimmerit on fighting compartment and all the weld lines using Yellow putty. The nuts are from Meng Feel free to any comments. Ciao Filippo8 points
-
Jaguar 420 This is the soon to be re-released 1/32 Airfix kit (although mine was an American MPC boxing). Built OOB, it was an enjoyable kit but let down slightly by poor quality clear parts. It's finished in Alclad 'Steel' with a couple of brush painted Klear top coats. The build thread is here, if you would like to see more. Cheers8 points
-
I went for the Airfix Mystery Box lucky dip for £22 after reading a Facebook post saying it was a scam 🤔 Here's what I got: Very pleasant surprise to get the Meteor! And further proof that Facebook is a hotbed of lies and paranoia 😂 Alan8 points
-
Hello All, First one completed after a house move. YEA! This is the Airfix FR Mk XIV kit. It is not without fault but in the end it looks really good. For fun I painted Barracuda's late war pilot to go along with the Spitfire. I hope you enjoy the pictures and any comments are always greatly appreciated. All the Best! Don7 points
-
Hallo This kit is nothing special. A unique model it is. One of the first quite inexperienced designs. You may notice it on awkward solutions for easy things. As the direction indicator, mirror or search light mounting. The rear license plate mounting is a superb solution by itself. Just wondering… The kit by itself has some miracles: Holes of extra big size for pins, where no pin fits. The driver seat for instance. No holes, where pins requires a hole and so on. Maybe this is a special Dragon kit, actually, I had some of these experiences all the way long, when building amour. The age of the kit is no excuse for such errors. Anyway, I got along. Now on a Sad.Kfz.251 from ICM. Happy modelling7 points
-
Hi Everyone, Thought I`d share some pic`s of my latest effort, hot off the kitchen table My attempt at representing an early Pacific War Wildcat with the over painted smaller markings peeping out Built almost completely OOB as usual.... ...from Hobbyboss`s 1/48 F4F-3 (Late) kit Additions include the usual: Brake pipes, Ignition Harness and Seat Belts Improved the canopy sit by sanding down the fuselage until it sat comfortably on the rails Decals are a mix of: a Yellow Wings Decals, some from the stash and some from the kit and finally a group shot of my trio of Early Pacific War builds, thought there`s a Vindicator in the stash to join them one day Hope you enjoy the pic`s, thanks for looking Cheers Russ7 points
-
Finished at last! Overall, I'm pleased with the result but the poor glazing still grates. I must try harder next time . There are two more faults to admit to as well: despite my best efforts, I ended up abandoning the working bonnet hinges I made a schoolboy error when printing off the number plates - there shouldn't be a gap between the '762' and the 'F'! Thanks to all of you who have supported this build and to @Brad for hosting the GB Off now to do battle with a 'Less than a Tenner' Silver Ghost..... Cheers7 points
-
I hardly build Spitfires or Messerschmitt Bf 109s anymore. In my old modelling days I see to drift more and more towards the esoteric and strange when it comes to aircraft! I am not sure why, but I love these odd, hardly-built-at-all planes! The FFVS J 22 was built in reasonable numbers, but is still quite unknown to many aviation enthusiasts. But I had to have Planet Models new 1:48 kit of this and when I discovered there was an all red specimen amongst all the standard painted and marked ones, I of course had to make that one! It was called "Röda Blixten" which means "red lighting", quite appropriate, I think! I apologise for the rather bad images, I am certainly no photographer!6 points
-
I've wondered for a while where to put these pictures as they don't really fit in any single category. However, having read a number of build threads this morning with Roden and WNW Hissos in them I've decided to pop them here as the origins of the engine's design are resolutely aeronautical. They are also a little different from the normal fare and might be of interest. If the mods disagree, feel free to move it to where you think is appropriate. The models are scratch-built Wright-Martin H3 engines in 1:8 scale, but to further muddy the waters the engines I've modelled have undergone a marine conversion undertaken by the Auto Engine Works (AEW) of St. Paul Minnesota. Post war there were quite a few of these engines knocking about and AEW offered a conversion package that allowed them to be fitted in a number of very successful racing boats in the 1920s and 30s. I've produced both magneto ignition and coil ignition versions, the latter of which is destined to be installed in a model racing boat. The H3 was a licence built version of the Hispano-Suiza 8F and manufactured in the US. This isn't the engine seen in the SE5a and various Spads. The 8F's capacity was increased to 18L from the 11.8L of the previous 8A and B engines resulting in an increase from 220HP to 300HP. I've seen it described as essentially a bored out version of the 8B, but that isn't really true. The engine is substantially larger in all respects as can be seen from this comparison of CAD versions of the 8Ab and 8F engine blocks side-by-side. The models were initially designed in CAD using original drawings and references, then 3D printed to produce mould masters. Silicone moulds were taken from these and the major parts either cast in resin and painted or 'cold cast', the latter being a posh term for resin casting loaded with powdered metal. All of the main 'aluminium' parts of the models were made with resin loaded with about 60-65% aluminium powder by weight. The same for the 'brass' parts, but with brass powder obviously. For those interested the build is described ad nauseam on my blog. The image below was taken before I put the exhaust header bolts in, which I almost forgot! As mentioned above, the red engine is destined to be installed in a boat model, so the fuel and water connections have been left unfinished at this stage.6 points
-
On the topic of revealing one’s nationality with mannerisms and speech patterns, please indulge me with a short story. My wife and I are US citizens born and raised in the States. However we were both taught the Greek language as a first-language and speak it fluently with Greek that sounds as natural as a native’s speech. In Athens, 1995 we caught a cab downtown Piraeus and asked the driver to take us to the Zographos district. Because we were in a hurry we used certain slang for “Hurry Up” with the hope that the cab driver think that we were natives (and would take the most direct route possible without running all over town to pump up his fare). He announced, “I don’t know where you’re going! Find it yourself! Then tossed a map in the back seat. We pointed out the general location of the address on the Greek map. The cab driver then said, “are you Americans in need of a cab ride back to Piraeus?” We asked him in fluent Greek how he knew we were Americans. His response, “you used the words ‘please’ and ‘thank you’—Greeks never use such words. They just bark instructions.”6 points
-
Amazon also sells the VINCKOLOR sensor, which works with a Bluetooth app and also gives direct L*a*b* readouts on its own front panel. It uses an included white tile for self calibration. In the item description it's called a spectrophotometer, and if the specs for repeatability and inter-instrument agreement are correct, they aren't bad. I figured it might be worth the $44.99 asking price, so I ordered one. I'll keep you all posted. EDIT: I should have it sometime tomorrow afternoon. After it's fully charged, rest assured I'll be going through the RAF Museum book's color chips, checking its readings against those from my XRite I1 Pro spectrophotometers. Stay tuned!6 points
-
Tabby cat being a cheeky beggar as usual... Regards, Steve6 points
-
Bf 109 G-2 W.Nr. 10639 'Black 6' Built at Leipzig by Erla Maschinenwerk GmgH in September 1942 Flown in combat by III/JG77 21 Oct 1942 - 13 Nov 1942, Libya, N. Africa. Now restored and on display at the RAF Museum, Hendon, London, UK Kit - 1/72 FineMolds Bf 109G-2 Paint - Sovereign Hobbies Colourcoats Aftermarket bits - Canopy - Rob Tarus, I/P - Pavla, Seatbelts - Eduard Decals - Dave's Decals for Black 6 plus others from my stash Build Thread (if you want more...) here; Thanks hosts!6 points
-
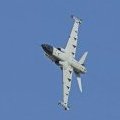
Having just finished my O-2A Cessna Skyhawk, I'm now ready to start on the last planned entry for my Wisconsin Air National Guard collection: the A-10A Thunderbolt II (a.k.a. "Warthog"). In October 1981 the Wisconsin ANG's 128th Tactical Air Support Wing was redesignated the 128th Tactical Fighter Wing and began trading in their Cessna OA-37B Dragonflies for the A-10A. During the A-10 era, the unit received two Outstanding Unit Awards, three Air Force Flight Safety Awards, and in 1991 an "Outstanding" in its Unit Effectiveness Inspection. Deployments with the A-10 included Operation Coronet Cove to Panama, and "Checkered Flag" missions to NATO bases in West Germany and England. With the end of the Cold War, the early 1990s marked several changes. In March 1992, the wing became the 128th Fighter Wing and shortly thereafter began transitioning from the A-10A to the F-16C/D block 30 Fighting Falcon, which they fly to this day. For this build I will using the well-reviewed 1/72 Revell kit, which I found on eBay for a reasonable price: Inside of the end-opening box are two gray sprues and one clear sprue: The clear parts, unfortunately, were not separately bagged, and there are a couple of obvious scratches on the front windscreen which I will have to polish out: There is also water damage on the decal sheet, so I've ordered aftermarket decals for the numerous stencils. As usual, I will print custom decals for the Wisconsin ANG markings. Besides the 235 board number and "WI" on the fin, "Bucky Badger" (on the engine pod) is the only other Wisconsin-specific marking: I also have amassed a goodly collection of aftermarket items, not all of which I expect to use: Let's get started! My first task is to make the Aires resin cockpit fit in the fuselage. Although the Aires cockpit is designed specifically for this kit, every Aires cockpit I've used has required significant thinning and rework of the fuselage to achieve a good fit. I marked off the areas that would need to be thinned, and attacked them with my rotary tool and a set of set of small scrapers: The rear deck behind the ejection seat also had to be modified: After much trial-and-error, the cockpit eventually fit nicely in place: Aires provides a nice replacement for the forward "dash", which requires cutting away the kit's representation: Here's the replacement piece test-fitted in place. I did end up with a gap at the front, but that's no big problem and I'll tackle that at the appropriate time: That's enough progress for now. Next step will be to paint, detail, and assemble the cockpit pieces.5 points
-
Just over halfway through the year and I seem to have photographed enough Helicopters to make up a varied thread which I hope are of interest. All (apart from the US Marines) were taken in Cornwall. 1. 2. 3. 4. 5. 6. 7. 8. 9. 10. In April I sneaked across the border into Devon for the epic US Marine visits, It was good to get out after months of lockdown and engage in some good old fashion banter with some familiar faces 11. 12. 13. 14. 15. 16. I'll slip in a couple taken just before Xmas, This Griffin had received a comprehensive service with Cobham Helicopter Academy at Newquay and is seen returning on its final test flight before being transported by road / sea back to Akrotiri. 17. 18.5 points
-
Hello everyone who visited! This is my first model built. Mastering even painting over large areas, revision and manufacturing of parts and assemblies. Of course, a lot has been missed, but I'm still happy. ) Machine ownership (1962, Australia, Melbourne, Norwa base, Royal Navy) (Codes 828) Painting and varnishing with brushes. Paints: GSI Urethane Acrylic Mr. Color, Tamiya Acrylic, Tamiya Varnish. Enjoy viewing!5 points
-
I have been planning to build an Spangdahlem F-4G for some time and got a set of decals for this. The pack included a set of Sharmouth decals for the other half of the mid 80s hunter killers pair, the F-16C block 30. Now I have built a few F-16s in the last year or so and had saved one kit with a view to using these decals. Equipped with Shrikes and Aim 9s but before the full on block 50 Weasel F-16s, this is how she turned out Now the kit. It’s an old ESCI A model. I took off the rear stabilisers and replaced them with the standard larger ones and tilted them up. I opened the airbrakes, scratch improved the cockpit and wheel wells. Plus various other little bits. Decals are a mix of ESCI kit stencils and Xtradecal Spang set. The ECM pod is the best I could find. I seem to have mislaid my ALQ 131 pod - it will turn up at some point. Hope you like it - thanks for looking5 points
-
Finally got some work done on this build. Progress is going to be slow as I'm still doing a lot of work in the new hobby room. First job that I tackled were the VVSS units. The tank which I am building had the straight return roller arms with a pillow to raise the roller, which the kit has. I won't go into too much detail with regards to the assembly of these units as I've covered the procedure in other M4 builds. So briefly what I did was to assemble each unit, drill four holes on the forward face and add a piece of 5mm X 6mm 10thou card to the rear face. I scraped the leading edges of each track skid to a more acceptable thickness, then glued them in place. Finally, four bolt heads were punched out and added to each skid, and four more to the rear face of each unit. Drive sprockets (of the plain variety) assembled with no problem, and they fitted perfectly on the FDH stubs. But then it comes to the idlers. There are two types included in the kit. Ones with backs to them and the old hollow backed version. Guess which ones the instructions would have you use, bearing in mind that all of the road wheels are the ones with backs to them. Yes, the hollow ones. Another anomaly. I'm going to use the backed ones, simply because they look better, but it requires trimming the stub axle down a bit and packing out the hole in the back of the idler because the thing flops around on the stub. Also done some work on the rear of the hull. Not a lot to do there, but the air cleaners are in place and I've added some etched brass clamps instead of the over scale kit offerings. The two drilled holes in the doors are for fixing the exhaust deflector in place once the upper and lower halves of the hull are joined together. I know that it doesn't appear to be much, but this lot took me several hours. I hope to get some more work done on it at the weekend. Thanks for looking and any comments. John.5 points
-
Work on the undercarriage, wheels are tyred at last. I expect Vallejo Steel will stand-in for iron, laters huh?5 points
-
I haven't read all through this discussion on RLM 83 and the paint analysis of He 115 W.Nr. 2398 I and my colleague Pilawskii conducted some years ago, but I have noted the rude and mocking replies of this Kaldrack character. I do not understand why you, Kaldrack, cannot critique our research and analysis without resorting to such descriptions of us and our work as you did? Why cannot colours of aircraft be discussed without one or both parties resorting to name calling and the lower levels of human interaction. I just don't understand that. You use terms such as "charlatan" and "sensationalism" about me and my research. How can you assign such terms to me and such a motif to my activities? As far as I know we have never ever met, and I cannot therefore imagine I have hurt you to such a degree that I deserve such characteristics in what should be an innocent debate about aircraft colouration!? I strongly suggest that if you want to present yourself as a serious researcher or participant in scientific discussions (which this is, after all) that you refrain from calling people you do not know such names and try to belittle their research activities by using characterisations for which there is no basis to use. Do you think I invented the colouration off the He 115 at Sola to be outrageous and sensational so I could become famous and well-known in the community. Sentences like this: "Erik Pilawskii and the guys pushing the narrative for the BV 138 float being RLM 83 Dark Blue are even suggesting that this He 115 was painted in RLM 83 Dark Blue which quite frankly is absurd considering that it was lost in the lake on 28th December 1942. This is the level of sensationalism these charlatans are willing to lower themselves to..." says more about you and your lack of character than me and Pilawskii. And it is also factually wrong as to what we said in our research document, see below. I will give you one more chance, Kaldarack, display some integrity and apologise for using such terms when describing my character and admit you had no reason to use them and I will hold no grudge. You can disagree with me all you want and I will welcome that and we can discuss RLm 83, the He 115 and Luftwaffe colours in a civilised manner. You can conceivably for all I known be correct about the colour on the BV 138 artefact, after all, and I could be wrong, but I will not accept your characterisation regardless. So, can we perhaps try to bring this down to a level of academic, civilised discussion and not name-calling. Guess which one is most productive scientifically!? I will refrain from commenting on your remarks regarding the PH-method as that was not my responsibility during our research, but I will comment on this: "I think that what has been presented over the course of this topic illustrates that the possibility of both the float and the He 115 being painted in RLM 83 Dark Blue as impossible based on the areas in which these machines served and the areas/timescale of the testing/introduction of RLM 83 Dark Blue. It just does not match in the slightest and I believe that any researcher worth his salt would come to the same conclusion." In future discussions with me I strongly suggest you read the document you critique and then try to understand what you have read. Nowhere in the document have we stated that the He 115 was painted in RLM 83! That part of the analysis was an aside dealing with the single Bv 138 float and that analysis stands. The He 115 was painted in an odd mix of RLM 02 on the ventral surfaces, and an unusal combination of what appears to be RLM 66 and a local mixture of a darker grey which itself seems to be a mixture between RLM 66 and 22, on the top surfaces. The yellow parts were overpainted with a strange bright green colour. I have seen those colours and the airframe for myself. we compared the RLM 66 on the outside with the RLM 66 in the interior of the nose area, we certainly did not make up colours of our own minds! Have you seen it? Have you analysed it first hand? And the Bv 138 float was analysed for what we saw and for what it was. It may not fit with what we know of the introduction of the blue RLM 83 colour, but given the evidence at hand, that is not enough to discount the colour seen on this float. What you are trying to do, Kaldrack, is to fit the terrain to the map! That float is blue, we need to find out why, not dismiss it because it doesn't fit with our current understanding of the use of RLM 83. To the rest of those who may read this, I am sorry about blowing life into what is apparently an old thread, but I cannot let such characterisations about myself as those quoted above stand unopposed. Kjetil Åkra5 points
-
this is the dark sea blue , what do you guy's think . it's not a finished paint job , would like some opinions though .5 points
-
OK, this is the Tamiya schimmenwagen. 50620981 by losethekibble, on Flickr the easy bit. After some rooting about I turned up a set of Tamiya US Infantry at rest, which come with a "US light vehicle" so they don't have to say jeep... the chaps chosen are the one sitting in the box, and the jeep driver... 50620982 by losethekibble, on Flickr OH this will be easy i thought..... Here we are taped together, seats held in with blu-tack, just a few saw cuts, some filler, and a new hats, note in the pic above there is a peaked hat as per the reference photo.. Bit of eye wincing surgery later 50620983 by losethekibble, on Flickr smashing... 50620984 by losethekibble, on Flickr the cap, bit of flat sprue, and leather punch, I did build up the head, but that wasn't needed, the top, larger hole of leather punch, and 10 thou card, 2 bits, bit in the middle smaller, and if you dent card on a soft surface it keep the dent, I over dented it, and then though that i could just dent it up into the pom pom. I did try doing the hat from memory, and then remembered I had a set of ww" mags that had a several issues on uniforms, by Andrew Mollo, they were a book in the 70's, and are pretty detailed, I was able to find the mags, find the issue, and there was a painting from a photo, and a photos of 8 or so of sailors in them, which really helped in getting it to look vaguely like it should. but the devil is in the detail..... 50620984 by losethekibble, on Flickr the steering wheel doesn't line up, and neither do the figures..... hmm, more surgery is needed... much much more as it turned out... 50621016 by losethekibble, on Flickr note these two photos are take 4 days apart, and maybe 3 sessions totalling several hours..... One thing I did finally realise, that try to do all this dry fitted with blu-tack was nnot going to work, so eventually the main bodies got glued to the seats. The legs didn't want to sit in the footwells naturally, the arms betwen them were going to clash... the original left of the passeneger went 'ping' and did dissapear.... and very unusually has not reappeared, another arm did the same. I had to to extensive surgery to the legs, part cut and bend, but these bits would not stay put and it was getting very very trying..... in the end I went for using a needle in a pin vice as a centre point, and then drilling into each limb, and adding flexible joiners of 15 amp fusewire, the drivers legs can be seen to the left, the drivers hand came off, and was pinned to hold the wheel, the passgers arm, was chopped about, and in the end, I lost the hand the pale grey arms are from an Airfix Hurricane pilot, and were not used in the end, I had to drill and rod the driver head. The lost passengers arm was replaced by another from the set, I had it modified so he was smoking, now he will be holding a bottle of wine, which came from the Tamiya British Infantry set, which has a farmer greeting them with a bottle... Basically it has been a right pain, and it has only been sheer bloody mindedness that I kept going, while muttering, you could have has them just standing about and not had all this grief.... EVENTUALLY I got to here, and I do mean eventually, in getting them to sit naturally, not be too close for comfort, and be able to hold the steering wheel....... 50621017 by losethekibble, on Flickr This is in place, and the first go with CA and talc on the joins.... I also had a go at the flag. I read about using dressmakers tissue on a figure guide on the Historex site, as it is smoother and finer than standard tissue, so I ordered some (5 sheets of 50 x 30 inch infact via ebay) and it is smoother. Not sure if it was worth the bother or not as yet... painted some with Vallejo offwhite, and then some red and blue, and, as I don't have the comp next to the desk, did it from memory. It's too small. this I hope shows why I spent so much time fidding with the sit of the figures, or maybe not? Maybe not in the photos, but they do look like people leaning back and relaxed, I filed grooved into the underside of the arms so they would sit against the bodywork sills. 50621018 by losethekibble, on Flickr the red of the flag is OK, the blue looks too light vlcsnap-00011 by losethekibble, on Flickr Oh, finally.... the schwimmenwagen.... now, it's not super clear, but from looking at the other vehicles, it's been repainted in Olive Drab... I'll discuss that in the next post as I've had enough for now. Comments and glaring mistakes pointed out appreciated.....5 points
-
Evening all P4 finally clear coated! I'll let that cure for a few days. Despite decals mishap still pleased with how it's looking... Now that all the spraying is done on this I'm back on the Cadillac (should probably start a build log for that one...) for its clear coating (I'm going through cans of TS-13 like there's no tomorrow! 😄) Thanks for looking, Nick5 points
-
And as a special treat for fans of a certain 80s sitcom, the name of the gentleman concerned is Herr Flick.5 points


.thumb.jpg.ba34a9f6ddce411193946dbdcc7b5fe8.jpg)


.thumb.jpg.d17ff607fc7e89ed057e63fcb6f2a888.jpg)


This leaderboard is set to London/GMT+01:00