
Leaderboard


Popular Content
Showing content with the highest reputation on 26/07/21 in all areas
-
Monogram's 1978 moulding of the handsome B-26B Marauder is a real labour of love. I made a tentative start over three years ago and picked it back up again in March this year. Despite its many challenges, I was determined to get it over the finish line. I chose to finish it as 'Valkyrie" which was an aircraft in the 344 BG. It is the perfect kit for anyone who enjoys extended sessions of filling, sanding, fettling, swearing and fiddling around (on a repeat cycle). I decided to rescribe the raised panel lines and rivet the airframe. I replaced the kit wheels and gun barrels with resin items from Quickboost. Apart from the nose art, the yellow serial code on the rudder and the propeller, all the other markings were sprayed on. For the first time I used a Montex Mask set for the national insignia and I cut the fuselage codes from Tamiya tape. These were easy to do as they did not have any curves. For the first time I tried a marbling technique rather than pre-shade the panel lines. I primed the model with black Stynylrez followed by a blotchy application of light grey. I then used 3 different shades of Olive Drab sprayed on in dabs rather than one smooth coat. The biggest ball-ache in the Monogram kit is the tail gunner area. The photo below shows the scope of the challenge. It's almost as if there were two pattern-makers corresponding over the phone - Mike working on the rudder and John doing the transparency! I ended up sawing off the over-extended horn (oo-er missus) and reshaped it with Milliput. I also cut out the rudder as it made it easier to work on the tail gunner area which also allowed me to offset it when gluing it back into position. Here is the photo of the first stage of the Milliput cycle. This is what I finally ended up with - not perfect but good enough. I didn't go mad with detailing the cockpit. I added some photoetch seatbelts and built a front bulkhead from plastic card. Strictly speaking, I think the floor should have been dark grey but I can live with the interior green... To finish off - one final photo converted to B&W plus a grain effect courtesy of Photoshop. Would I build another 1/48 Marauder? Definitely, as it is one of my favourite aircraft but only if ICM were to bring one out 😀 Cheers Richard C32 points
-
I'm afraid I've been absent from BM for sometime because finishing this became an obsession..... I started it for the Africa Group Build back in February. Everything was going really well until I started applying the decals. Let's just say that everything literally went South.... I never managed to finish the build in time, but I had gone too far to bin it. which was my first inclination. Anyway, not quite the finish I had hoped for, but what's done, is done. Link to the build process can be found here : 1/72 SAAF Buccaneet (Airfix) - run aground..... Thanks for looking mike17 points
-
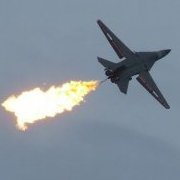
Hello guys I would like to show you my model F-15S National day 89 special livery the kit I use is Academy F-15K 1/72 the decal is custom made I hope you like it ˆ_ˆ real photo for the aircraft taking by me at king Abdulaziz International airport in jeddah city the model17 points
-
Hello all, Here is my recently completed 1/48 Eduard Bf-109E7 Tropical in the markings of Jagdgeschwader (JG)27, based at An-el-Gazala airfield in Libya in 1941 and flown by Ludwig Franzisket, who would go on to shoot down 24 aircraft over North Africa. Franzisket was shot down by Spitfires of the RAF on 29th October 1942, breaking his leg when striking the tail after bailing out. He would go on to command JG.27 and finish the war with 43 victories. He died in 1988. Built completely OOB, the build thread is below: Paints are from MRP and as usual, went on flawlessly. With my earlier E4: Thanks for looking and stay safe Dave15 points
-
Good afternoon This is my recently completed 1/48 Messerschmitt Bf109 G-6 from Tamiya. According to Scalemates, this aircraft was flown by Oblt. Wilhelm Schilling of JG 54 Grünherz in February 1944. It is a new tool Tamiya kit from 2017 and I would say that it is the best quality kit I have ever built. The engineering is superb and the fit is next level. I used a tiny amount of filler to cover redundant hatches, otherwise just a bit of light sanding. Even the smallest, complex parts are beautifully moulded and fit exactly where they should. The only negative would be the decals - a bit on the thick side which is a Tamiya trait. There are parts for open or closed cowlings which can be interchanged. They are held in place with magnets. Built OOB. There is no need to add anything. All Tamiya acrylic paints. The upper surfaces were: Grey; XF-54 Dark Sea Grey + XF-63 German Grey mixed 3:1 Green; XF-24 Dark Grey + XF-27 Black Green mixed 1:3 Yellow; XF-3 Yellow + XF-6 Copper mixed 5:1 The lower surface is XF-23 Light Blue Also used were various blacks, greys, silver, aluminium. Weathered with Flory Dark Dirt and Grime washes plus Abteilung 502 oils.14 points
-
Juat another Beaufughter, nothing too fancy and OOB build from the Airfix kit, getting a littlw bit more practice with the airbrush and basic weathering, need to get the canopy masking a bit better.13 points
-
Hi This is the very old Monogram 1/48 Do 335 A which has been modified to a B-2. I had to scribe each of the panel lines, make new gun pods for the wings and a few other small modifications. It's also got a new front windscreen but it's been in the sun hence why the clear plastic has discolored, lesson learnt. I've got the Tamiya Do 335 nearly completed so I hope to show that one soon, regards. Trace13 points
-
Ah, it were the pictures that led me astray. The instruction booklet has these nice little diagrams that show what look like the windows (the ones for the spots where I had to open up the fuselage) being modified to be a millimetre or so shorter in each dimension. Sounds easy to me. Only the pictures are telling you to make the opening in the fuselage smaller than the moulded in cut lines, not the windows. Needless to say, I opened up to the cut lines, and now have windows that are too small. This leads me to wonder why Matchbox would have moulded the cut lines larger than the windows that they knew you were going to put in there. Seems rather asinine to me. No big deal, I will now have to make new windows some other way. I think I'll use clear sheet styrene. ***** Remember how I said I might need a "ton" of filler for the waist turret side panels? Turns out it was a ton and a half. I think this will be OK - we'll see when we get some primer or paint on her. When sighting at a grazing angle everything looks smooth. Cheers, Bill13 points
-
Hi all, I thought I would share photos of some of my older builds, all taken in natural light. This is done by using a Fuji camera and a base painted to look like concrete that measures approx. 3’x3’. I use the local airport as the back ground. In my opinion, there is nothing quite like the sun showing the work. When taking the photos, I try to envision the angles that I would be taking of real aircraft. scales are 72, 48, 35 and 32. Hope you enjoy the pics. NEW: got rid of photobucket.12 points
-
Finished the second model for my RAF training aircraft build. Airfix 1/72 DeHavilland Canada DHC-1 Chipmunk T.10. Built out of the box with a couple of mods done with plastic card and brass tubing (exhaust pipe, anti- spin strakes and blade aerial). Painted with a mix of Tamiya, Gunze and Humbrol acrylics.11 points
-
G'Day All, Been working on kits in the back ground. Keeping to the RAAF Theme, here is the Airfix 1/72 BAC Canberra painted and marked as 1 SQN A84-227. The panel lines were rescribed and the raised panel lines sanded away. Few mistakes were made during the scribing process that needed some patching. Model was then primed with Gunze 1000 Surface Primer and black based with Gunze H2 Black acrylic. Gunze H1 White was then applied in a random pattern. The top of the fuselage was painted white and masked off. Vallejo Metal Color Aluminum was blasted through the airbrush - still have problems getting this brand to airbrush, thus the need to blast is through the airbrush. Attempted to do panel varation, however something went wrong with the main Vallejo Metal color, which lifted when masked... so plan jane silver scheme. I checked with a friend and these aircraft were painted silver, so no panel variation was present - kinda boring being a plan Silver colour. I airbrushed the fuel tanks a different colour to mix it up a bit. The Bombay, wheel wells, under carriage and doors were painted Gunze H8 Silver and weathered with Tamiya Panel line wash. Bombs painted a Olive Drab colour and glued in. Decals are NovaScale Decals. A84-227 isn't an option on the decal sheet, so had to carve up some of the existing decals to make up the number. Model had Tamiya Black Panel Line wash applied.10 points
-
Airfix Short Stirling Mk1 This has been with me since the days of paper rounds, endless summer holidays and eating as much as you want and never put any weight on ! I think it was the almost HMS Victory quantity of parts in the box that has put me off all these years, so this GB was the ideal opportunity to finally get it built. Thank you to everyone for the encouragement and support, it was greatly appreciated, I hope you like it Cheers Pat10 points
-
Here's my long term love/hate and hate a bit more Airfix 1/24 scale, Sea Harrier FRS1 of 801 Naval Air Squadron, embarked on HMS Invincible 1984. I have to say I'm not a great Airfix fan at the best of times but needs must when you love the FRS1 and building big planes. This has taken the best part of 6 years and has languished beyond the shelf of doom, in the dark depths beneath my work bench. Overtime I went to spray at my spray booth, it would tap me on my knees, just to say it was still there. The basic kit looks like a FRS1 and so that's good for me, I did add a plethora of Heritage bits and the Flightpath Aftermarket set (lots of this I still have as I'm not totally taken with it) that said its the only one so I picked what I wanted and the rest stays in the box. the kit fought me all the way and without Nick G I would have probably binned it, so thanks Nick and the IPMS UK Harrier SIG, for inspiration at every SMW to get on with it. It isn't my best but its finished...9 points
-
I abandoned this kit a few years ago as I wasn't all that happy with the way the finish was going. This week while using the kit as a test mule I thought, "Why not just finish this one rather than starting another project." Results. So while it's not my best effort at least it isn't sitting on the Shelf of Doom anymore. Thanks for looking in. Dan8 points
-
Decal time. They were few and good quality. Just the way I like it At this point I realised that the landing lights were included in the kit (part C1) but there was no mention in the instructions that you have to cut a slot for them yourself. So little bit cutting was in order. This saw is from Hasegawa Dauntless kit that comes with a PE fret for the dive flaps. Few moments later. At this point the weathering started. I went with Flory Models Grime, it's bit lighter than Dark Dirt so I thought it would be more suitable for such a bright colour. Excess wash cleaned off. Landing lights glued in and continued work with the weathering, I made some chipping on the leading edge. Landing gear were pretty complicated affair but had no big issues putting them together. Giving the extra support by pinning the main landing gear legs was a good idea, they seem really sturdy now. Wheel well doors attached. Exhaust painted and glued. Continued work with the weathering. Getting real close now... There was no parts for the antenna attachment points in the elevators so I had to go thru my bits box. These are from Eduard PE fret, I think they were eject handles from an ejection seat. Lots of antenna wires in the tail! Hard to make them stand out in a photo, the Mig rigging wire is quite thin. Next up, finished plane once I get around taking proper pics Until next time.8 points
-
Last one for tonight... Chipping is done, and the missing Zimmerit patches are in place.8 points
-
Hi all! Another few weeks have passed and time for another post!....done quite a bit so it will be a big post! I have finished both waist guns except for the ammunition belt which I will have to think about as it won't be easy! First off I had to make the swivel mechanism that holds the gun in the perspex....so this first photo shows the wooden stick I will use!....just thought you might like to see the stick!!!! After sawing a piece off and drilling a hole and sanding....this is how it looked.... Next photo shows the 2 plates that the swivel mechanisms are bolted to... here we have if glued to one of the window frames.... The next photo shows a dry run of the fitting of the MG....and looking at it I must remember to take the sight post off the end of the barrel as that's for the MGs without the compensating sights on! I rummaged through my collection of clear plastic packaging and found a suitable piece to make the perspex for both windows apertures. I already half built the guns a few weeks back and now it was time to finish them off.... ....and here they are completed .... I had to do a little research on the K-13 Sperry Compensating sights that I wanted to add to these guns....so after searching the internet and gathering the photos together I started out on the sights... The sights took me a week to make as they are tiny and quite complicated but got there in the end....here are both the guns with the sights attached and all painted and ready to fit into the fuselage...... I glued both guns onto their mounts through the perspex and added a little more detail ..like the control cables (that I haven't a clue what they actually operate.....something to do with.... adjusting ...something!!) .... Any how here they are in the fuselage...... Going to have to rack my brains now for a solution on how to make the ammunition belts bend and twist from the ammo boxes to the guns.....so see you next year! All the best and thanks for looking in! Fozzy8 points
-
Since I finished my huge He177 I had to build a display case for big birds. The space available is big enough to accomodate two more heavies. Here is the first one: Tamiya`s Lancaster, finished here as a B I. I used some PE for the cockpit which is completely invisible and Eduard masks for the clear parts. Apart from that, all is OOB. Paints used were Tamiya X-18 (semi-gloss black), XF-81 and MrHobby H-72. Camo was sprayed free-hand. The upper sides were primed in light grey in order to lighten up the camo colours. The plastic of the kit is black so I guess that was a good idea. (Btw.: Black plastic is painful to my old eyes, when you handle it there is nearly any contrast.) The build itself was pleasant, the kit is not up to Tamiya`s recent standard, but with a little bit of filler it came out OK: Thanks for looking! Volker7 points
-
Evening, all! After building on and off since first lockdown(!) I've finally managed to finish my Hasegawa Harrier, built as GR.9 ZG511/82 as she was during her last deployment to Kandahar. This build was a real labour of love. It's still the best big wing Harrier in this scale in my opinion, but she really fights you along the way. The end result is worth it though. I threw lots of aftermarket goodies at this one. I felt that the subject was worth the effort. Aires cockpit (butchered to more resemble a Brit Harrier) Eduard MB Mk.12 Ejection Seat AlleyCat 100% LERX Eduard TERMA & Sniper pods DJRP from @Shaun (many thanks, again!) Eduard PE Eduard weighted wheels & outriggers Belcher Bits LAU-5003/CRV-7 Pods L'Arsenal PWIV Model Alliance decals This was my first time using Hataka Red line acrylics, and they performed flawlessly. Weathered using Windsor & Newton oils, Flory wash, and sealed with W&N Acrylic varnishes. There was a bit of scratchbuilding and correcting to do to represent a British Harrier. For anyone interested, trials & tribulations can be found on my WIP here. Anyway, here's some pics. Hope you enjoy them as much as I enjoyed building it! C&C welcomed as always. Thanks for looking! Daryl.7 points
-
Thanks, guys! While the Panther is on another little pause I'm going on with this one. Last time I left off just before the painting stage. Prepping took a little while as many of the things needed to be masked. Then went on the primer. Preshading is really not necessary this time, but as I tend to be not very good at this, I decided it's a good place to practice it a little. Then goes on Panzer Gray. I used Tamiya XF-63 German Gray straight out of the jar this time. After a coat of semi-gloss clear on the gray I had most of the decals on and then some more masking. Also all the tools were temporarily added on fenders for the next stage of painting. On the photos it has a bit more sheen as there is hairspray also sprayed on at this time. And then a coat of desert yellow. I desired a pale light desert yellow on this one and used a mix of Lifecolor UA084 German Desert Yellow with UA090 Sand. It's gonna be a very early DAK vehicle when they didn't have designated desert colors assigned to DAK panzers yet. Cheers! Kristjan7 points
-
Messerschmitt Bf-109 G6 Strela Bulgarian "White 30" 3rd Yato Circa 1946-1950 1/48 Eduard Bf-109 G6 Build log is here: Ray7 points
-
Things have been very slow on the acquisitions front for the past few months. Then I got a text yesterday from my local friendly hobby shop owner, asking me to look over some stash he'd bought up. It was a very productive encounter, especially with Matchbox and Frog GBs in the future. First up, Matchbox goodies. Last year, I bewailed that the Siskin had never been reboxed by Revell, as it was one of the few kits I never got around to buying in my youth. Then lo and behold, not one but two turned up. The P-12 and Seafox were very high on my list of "must get again", and it's always nice to have another Norseman, especially if it's still shrink-wrapped. Next, Novo, all ex-Frog of course. I never bought the Vimy or Gloster E.28/39 before, so these are very welcome. Likewise the Supermarine S.6B, which I suspect - like the Comet Racer - will be better than the Airfix offering. I did build an Eastern Express boxing of the Miles Magister, and the spare Irish Air Corps markings will come in handy for one of the two I bought here. The Dewoitine 520 and P-47 Razorback were more a case of "why not, they're cheap". Not much from Airfix, but I couldn't resist a late-1970s boxing of the German Reconnaissance set, and a bagged version of the Bristol Bulldog, which may be from the original production run in 1969. But ... there was a bonus. Inside an old chocolate box, there were four unidentified kits, no instructions, no decals, which I basically got for free. The first three are what I thought they were: an Airfix Avo 504K, an Airfix Airco DH.4, (both in odd cream-coloured plastic), and a Revell Stearman Kaydet (just started). The last is a mysterious WW I biplane fighter. I have yet to ID either the aircraft or the kit manufacturer.7 points
-
This is the Revell of Germany 1/48 scale F-5E modified into a Hesa Saeqeh.The decals are from a Hi decal line sheet for Iranian F-5. Saluti Giampiero6 points
-
If it's anything like the Hurricane book, don't. That is shoddy, badly researched and full of errors. As is the Mosquito book according @The wooksta V2.0 and their Boomerang book. for example https://www.britmodeller.com/forums/index.php?/topic/235024331-concerning-tempests/&do=findComment&comment=2776608 I'm now very dubious about anything by the author, as this seems a pattern, where information is gleaned from many sources, is not checked and some downright cobblers is stated as fact. I can do a 5 minutes on the Hurricane book before I get rather cross and have to do something else. Given the sheer volume of books produced by Richard Franks, on a range of types, this is not that surprising. Re the Tempest series 1 vs series 2, it's not clear cut. The first Tempest were based on Typhoon fuselages, and they had other small features, some of which get changed over at different points. As the quote below will demonstrate. You will make your life easier by picking a scheme you like, and then pinning down the details, by going @Chris Thomas author of this and others and a series on the 2nd TAF as well, and the book that came in the Eduard Royal Class Tempest boxing as well. OK, this is what I was looking for, same thread, for ease of reference, by Chris Thomas. https://www.britmodeller.com/forums/index.php?/topic/235024331-concerning-tempests/&tab=comments#elControls_2779625_menu " Tempest V Series 1 and 2 First let me say that difference between Series 1 and Series 2 Tempests is not entirely clear to me. The terms seem only to appear in Hawker records; I have yet to find an RAF record that mentions them, let alone defines them. Records of individual airframe status no longer survive so photographs (frustratingly few) provide the most reliable record, supplemented by official correspondence which states intent rather than the actual event. By definition ‘Series 1’ Tempest Vs were the first production aircraft and somewhere in the the first batch (100 aircraft JN729-773, JN792-822, JN854-877) the Series 2 appeared (or after the first 100 some would have us believe). There were a number of changes in this period and I feel that the difference between Series 1 and Series 2 would have been defined by more than the replacement of long-barrelled cannon with the shorter variant (as usually cited). The first 50 Tempest Vs (presumably JN729 to JN773 and JN792-796) were built using the centre-sections from a cancelled Typhoon contract. This is the box-like structure, made from steel tubes, that sits between the wings. The Typhoon centre-section was very similar to the Tempest version but because of the latter’s slimmer wings, the wing root fairing would not quite fit over the Typhoon version. This resulted in a small blister over the offending structure which is evident in photos, often with much of the paint rubbed off by fitters’ feet. One can be clearly seen in the photo of JF-L or J (which may be JN768) in June Miljevic's link. I rather suspected that this feature might have been associated with the ‘fishplates’ discussed in the above posts. However I was a bit surprised that when I examined relevant photos closely and the fishplates were evident well beyond the first 50 Tempests, almost to the end of the JN-series. Latest airframe identified so far is JN862 (85th). First confirmed without the plates is JN875 (98th). The longer-barrelled cannon (Hispano Mk II) was replaced much earlier than sometimes claimed – some sources indicate all the JN series were Series 1 with the long cannon. The latest airframe I’ve been able to identify with the protruding cannon is JN767 (39th). There is a photo of JN801 (55th) in full stripes at Newchurch in late June/early July 1944, which is the earliest found with the short-barrelled Hispano Mk V. Some sources state that the shorter cannon was retrofitted to some of the earlier airframes but I have not found any evidence to support this. Finally we have a set of internal changes that cannot be determined from photos, namely the fittings required for the carriage of long-range tanks (LRT), bombs or RP (unless the aircraft in question is actually carrying one of these devices). Also in this category is the equipment with spring-tab ailerons. However, it is known from Air Staff correspondence that LR tank capability was expected from the 51st production aircraft (JN797) with bomb carriage fittings from the 151st aircraft and RP fittings from the 351st, i.e. bombs and RP were not available until the 51st and 251st EJ-serialled Tempest Vs entered service. This was no handicap as bombs were not used until April 1945 and RP not until the last quarter of 1945. There was no possibility of the LRT (and possibly the bomb/RP) mods being retrofitted owing to the limited access in the Tempest’s thin wing. The arrival of the much-vaunted spring tab ailerons remains obscure (to me any way). So exactly which of these features heralded the change from Series 1 to Series 2 I don’t know for certain but the ‘pukka’ Tempest centre section, the short cannon and LRT capability all seem to arrive after the 50th aircraft which might well be changeover point?" which is why I say, pick an airframe, and go from there. HTH T6 points
-
This made me smile... https://metro.co.uk/2021/07/20/meet-paddy-the-cat-who-leads-a-secret-life-comforting-people-who-are-grieving-14959619/ Regards, Steve6 points
-
Picked up two of the new Airfix Vulcans. Said all along I'm not going to bother with it as its too big for the cabinet and I'll probably never actually make it. In the local model shop and the owner says he's just had a couple delivered. Next thing you know I'm squashing both into the boot!6 points
-
That self beaching boat was most likely the new RNLI "Shannon" class lifeboat. They are designed to be launched from a beach on a trailer, and frequently this is how the beach. They are a "Jet" boat and have no external propeller, which means that they can work in extremely shallow water. If I recall, they are powered y two Scania turbo-diesels of some 11 - 14 litre capacity. The only reason I know this is: a) I worked for the company that supplied the on-board monitoring and control software (Electronic dash-boards etc.) b) Dungeness is where one of the craft have been deployed. One of the first, I believe. Cheers, Alan.6 points
-
Box art - ref. 3002 - Lun-class MD-160 Ekranoplan Source: https://www.facebook.com/TAKOM-354803674728188/photos/pcb.1603294433212433/1603293989879144/ V.P.6 points
-
With Flyhawk's kit released I'm getting lots of questions now. Sometimes @dickrd and I are asked to help with the kit paint guides at Flyhawk but this time they only dealt with Frank Allen of the HMS Hood Association (which is perfectly sound - Frank isn't daft). What Frank may have intended as not overstating the known truth appears to have been interpreted as ambiguity as far as HMS Hood's anti-fouling paint goes, with some on the big wide internet deciding that "it's still an open debate" about whether the anti-fouling paint was actually grey or not. I've even seen two people decide that the HMS Hood Association website's information only cites grey from 1920-1925. What Frank actually wrote on the HMS Hood Association website was: My bold. This is where a small amount of knowledge is dangerous, and I'm not referring to Frank! Whilst most of the D.495s do not specifically name a colour, they do specifically name the manufacturer of the paint, and that manufacturer only made it in grey or black! That the person filling in the D.495s didn't specifically write "grey" every time doesn't mean red is a possibility of equal likelihood, however black cannot be ruled out as Peacock & Buchan's did offer that choice. Frank originally shared these images of the 1937, 1938 and 1939-40 D.495 Docking Forms on Shipmodels.info's Calling All Ship Fans/Battleships and Battlecruisers/HMS Hood thread Page 36 (http://www.shipmodels.info/mws_forum/viewtopic.php?f=47&t=4702&start=700) in November 2020 when he first noticed something that didn't match what he like everyone else alive today thought they knew: 1937 1938 1939-1940 They all still name Peacock & Buchan's, albeit abbreviated to "Peacock's". Richard then shared this excerpt from the Rate Book of Naval Stores: You can see that in most cases the hull was given two coats of "protective" paint which guarded against corrosion in contrasting colours so you could see bits where it had worn through followed by one coat of anti-fouling paint in a different colour again for the same reason. To help folks visualise this, I've drawn a picture as is my way. So in summary, if you know what colours Peacock & Buchan's actually offered, red isn't really on the cards at all as the external finish for HMS Hood despite what modellers expect and want to see. If you haven't seen it, Richard drafted a very interesting article on what he had to date and it's hosted on my site. The good news is that he's gathered a h:eap more since the National Archives opened again and is planning a redraft. I don't know yet if there are any errors in the current version he intends to straighten out, but I do know there is a lot of modeller-useable information he plans to add to it. https://www.sovereignhobbies.co.uk/pages/royal-navy-anti-fouling-and-boot-topping-colours6 points
-
Things are starting to come together now, with the floor pan assembly now essentially complete. I've just got the hub caps to add, once I've done the chrome-work. As I've mentioned before, I'm building OOB with no attempt to add/paint extra detail. There's not much more to do now, just the bodywork, chrome and clear parts. The latter are so poor in my kit, that I may show the side windows wound down . Cheers6 points
-
OK the decals are on……. and oh what 2 days of fun that was!!! The kit decals are by Cartograf and looked awesome, but the initial ones I did (on the weapons to test them) gave me some trouble. They didn’t really want to stick to anything other than my tweezers or fingers, and they were super thin. Needless to say, a couple of them died! (RIPieces little fella's ) Later on they then decided to stick to anything!! This was not helped by Academy getting the numbering and positioning wrong on a few decals, including those big red flashes on the tail. I used some decal setting solution with them and they eventually snuggled down really well, just a bit of softener used in places to help them conform. First up I just wasn’t happy with the Dark Grey line work on the flying surfaces, it was just too dark……. and I completely forgot to post/mention this other than this one photo!! The radome and sensor panels along with leading edges and strips on tail surfaces were all painted this dark grey. Going over all the photos of there areas, there is quite a bit of difference in the colour of this grey, it looks to lighten over time. But I wasn’t really happy with the colour on the flying surfaces, in a lot of the photos it was lighter than the colour on the sensors/radome. So more masking and a re-paint, am much happier with the colour now. So I started decaling on the weapons and over time moved between them and decaling the aircraft……. And what a job that was…. ….. there are more decals on one of those AIM-120’s than on most 1/72nd aircraft, something like 35 decals!! Each of those small GBU’s has 20! They’re ready for another clear coat before I start the panel lines. Luckily this aircraft doesn’t have the billions of stencils on the underside like an F-4 Phantom. Interesting things is the orange colour used for all the warning messages. Not too many issues with the ones on the upper surfaces, other than again they got some of the placements confused, the instructions showed the IFR marking halfway down the spine! I do like the Bat!!! The red flash was also shown to be on the wrong side…. Luckily I managed to remove the first one after I realized it was wrong. So next up will be another gloss coat then I can start the final panel line work and flat coat her. I reckon if I an get a little bit more done to her over the week then there’s a good chance I’ll finish her this weekend or almost will!6 points
-
How right you were! It needs a bit of sanding, but I think we're on the right track here. I am in your debt. Nope, Mrs P laid the blame squarely on Winston. She was so angry she dropped about six or eight big big Fs in front of Grant, who said "mommy, you're scaring me". "GOOD," she snarled. She is much better now, the margaritas helped. Somewhere in the middle of this anecdote I retreated into a protective fugue state. This is why I refuse to fly with the children.6 points
-
Well that was the most nerve wracking part of the build so far, taking this And with a small drill and file turning it into this Not perfect, but they look better. I wanted to just buy some resin ones and sand these off completely, but the only ones I could find (thanks to some elses thread in this GB but I can't remember who or find it again) are in the US. Very well priced at $3 a set but $26 shipping to UK is unjustifiable unfortunately.6 points
-
@bigbadbadge@Cookenbacher @(ex)Sgtrafman @Fritag @Navy Bird, thanks all, the encouragement is greatly appreciated! I've been on a lovely getaway to Northumberland for the last week so not much progress to report. Before going I worked away at the joins on the nose section and got them as good as I could. Having sanded a fair bit of plastic away I also did my best reinstating rivet holes with a micro drill and rescribing panel lines. You can see in the photos below that it's looking ok though the fit along the magnet held panel line has worked out better on one side than the other... Since getting back I've added the fuselage windows - these fit well once you realise the edges are sloped slightly so you have to get their orientation correct. Again, these have been masked with the super helpful Eduard mask sheet. I've also dry fitted spare parts over the big hatches on the side and squeezed on the bomb bay doors in the closed position to protect the paint job inside. So this is the state of play this evening. It's got its "stealth" coat on - a thin layer of tamiya rubber black which I find is good for showing up imperfections and provides a good base for a mottled preshade which also doesn't mind being masked later on: Tough to photo at this stage but hopefully I'll have some more progress to report soon. Thanks for dropping by! Sam6 points
-
OK, I'm calling it done. Thanks for the encouragement everybody, and thanks to @Col. and @Enzo Matrix for running the Group Build!6 points
-
Well I've certainly taken my time getting this one finished having bought it aged 13 ! However I'm finally calling it done, I hope you like it and I've done the kit justice after all these years waiting patiently to get built. Thanks for all the support and encouragement, photos below Cheers Pat6 points
-
Don't go expecting this one to be completed soon, I'm not expecting it to get started in earnest until early 2022 but with the British weather I figure I need to get this painted before it gets cold (and wetter). This one is the Aoshima kit which was rereleased a couple of years ago - I'm doing the rubber bumper variety as that's what was on the roads when I was a kit. The fad of returning them to chrome didn't start until I was much older. That is an option with this kit, as has been said many times it come with the chrome and rubber bumper parts, but I'm sticking with the unfashionable rubber bumper version. One thing I'm not sticking with though is the triple wiper setup the kit comes with - to me that just looks wrong. So I did a bit of googling and eventually found out where the holes should be for the two-wiper version. The good news is that the driver's side wiper doesn't move from where the kit has it so only had to drill a hole for the passenger side. And as the wiper holes are symmetrical, I could have used the kit to get the location but instead I did it the hard way by finding a drawing of where the hole should be in the real thing and scaling it down. If anyone is wondering, that dimension is 11mm (just under to be precise, but 11mm is close enough) and it just needs to sit the same distance from the windscreen as the other wipers. The hole for the middle wiper needed drilling out anyway, so all I had to do was fill the hole for the passenger wiper. With that filled, I gave it a coat of grey primer to identify any sink marks, mould lines etc. And the good news is that there are very few. I'm not sure how Aoshima did it, but the only mould-lines I could identify are on the front and rear valances and (annoyingly) within the headlight recesses. I did wonder if they'd followed the chome belt line, but if they did I can't see it even in primer. The photo should make it obvious where I sanded it down - there's very shallow sink marks on the passenger doors which is why they got a smear of filler. And the filled wiper hole sunk so has had a second fill, but I'm hoping that will sand smooth next weekend. And that's as far as I've got at the moment, unless you count a coat of primer on the chassis and the wheels. Expect somewhat slow and erratic progress on this until I get the Jag finished. Thanks for looking.5 points
-
I'm parking this here (need to clear a few kits from the workbench before starting). I'm planning on building this '69 Mustang Boss with the C1 RTR-X mod kit, not an exact replica more inspiration. The mod kit seems to be 3D printed (I think) resin pieces, I'm not great at the old filling and sanding so should prove interesting. I've also got some other 17" wheels and tyres which hopefully (somehow) I can make fit. No idea on colours yet.5 points
-
Evening all, Thanks Jamie & Pascal, that’s useful. Another update. I’m afraid I didn’t amend the boot line in the end, I was a) being partly lazy and b) bit worried I’d be building up ridges of paint. So while it bothers me slightly, I don’t think you’d notice unless you’re a Bismarck expert… pathetic I know! That said, I’m pretty happy with the results so far. The false waves turned out better than I thought. Next up… Schiffbodenfarbe III Rot 5! (Keel) I’m loving the Sovereign paints, beautiful to spray and the colours look spot on. I’m so glad I went with them now, and knowing they’re ‘correct’. Top product. Guy5 points
-
Hi There, This one wasn't even planned in the queue. There was a question in another thread about Storch kits which I chipped in to. I got the kit out took some photos and suddenly the build was on. I certainly wasn't planning a WIP but I was talked into that as well. WIP Here Primed with Tamiya Flat White. Painted with Colourcoats FAA/RAF Yellow, Dark Earth, Dark Green, RLM 02, Tamiya Dark Iron, Rubber Black. Finished with Windsor & Newton Matt Varnish. Another enjoyable build and considering the age of the moulding it went together like a dream. Thanks for looking, Cheers, Alistair5 points
-
Hi, me again. With an NHS track and trace internment enforced, its into the shed for 10 days of merriment. What better way to cleanse the modelling palette after the pig's ear of an Airfix kit than a modern day, bang up to date release of this iconic ground attack aircraft. The kit has to be the easiest build I've had in a good long while. Its not Tamiya F-14 but it comes a close run contender for my kit of the year. I only added the Eduard seat belt set (ZOOM), the Eduard Canopy set (cos i'm lazy) and the utterly brilliant Two Bobs decals in a bright scheme. I'd highly recommend this kit and especially after seeing Spencer Pollards build and Ric Greenwoods Youtube build, I was keen as. A mixture of Hataka and Tamiya paints used, with Galaria Satin coat giving the final finish i was looking for. Now on to the Hobby boss MH-22B...5 points
-
Completed earlier this week, here is my model of the Chevron B12 Repco. This car was commissioned by John Woolfe. Chevron designer modified the basic Chevron B8 design to accept the Repco 740 V8 engine and Hewland gearbox, as used in the F1 championship winning Brabham BT24 of 1967. It also incorporated the larger, fifteen inch, Brabham wheels along with the bigger brakes this allowed. The wheel base was extended rearwards by two and a half inches, lengthening the engine bay to allow the Repco to fit, and he also greatly extended the engine cover. Unfortunately, it was not successful at Le Mans. A head gasket blew at the start of the third hour and the car was retired. I started this model two years ago with the Axel'R kit of the B12. It wasn't completely accurate behind the cockpit, having the same dimensions as a B8. I cut the tail off behind the wheel openings and added a box section of plastic card to extend it. I moved the rear axle line rearwards and made new wheel opening from plastic card. Everything was then faired in with Milliput filler and sanded to shape. At this point I realised something was wrong with the proportions. A double check against my references showed that the roof was too narrow and although the overall height was correct, the tops of the doors were too high resulting in a "squashed" appearance. The model then resided on the shelf of doom for a while until a solution arose. This came a few weeks later with the purchase of the JPS kit of a Chevron B8. The plan was to follow the modifications made to the B8 design to create the B12. The cockpit section of the B8 was far more accurate, other parts less so. Starting again, I removed the extended tail from the Axel'R kit. The engine cover of the JPS kit was butchered to create the opening for the engine, extend the axle line rearwards, and graft on the Axel'R extended tail. This was tough work as the JPS resin is very hard and difficult to cut accurately. I resorted to using a grinding bit in my mini-drill. The top line of the engine cover was set to its new profile with lengths of 30thou plastic card. The top line over the front wheels needed to be raised, and the front wheel openings were enlarged and new, extended, arches made from plastic card. The JPS headlight openings were inaccurate so I ground them out, cut the equivalent parts from the Axel'R kit and fixed them in place. The raised section ahead of the windscreen was made from sections of plastic card, as were the nose tabs and the NACA intake near the right headlight opening. At the back, the upper flank intakes, previously removed from the JPS kit were re-inserted at the correct positions, box intakes of plastic card were added and the recess for the filler cap was made and inserted into the engine cover. A lot of Milliput and sanding was involved during these processes! The wheels/tyres of both kits were poor, so I used some Microsport resin items (much like Marsh Models). I made a master wheel insert from plastic card tube and rod and created four moulds to produce resin inserts. I made two sets and picked best four for the model. The engine came from a die-cast model of the Brabham BT24 that I found on eBay. It was far more accurate than the Axel'R parts, with exception of the intakes. These are the turned metal Axel'R kit parts. The replacement engine is injection moulded (thankfully) and I drilled out the throttle bodies to accept the kit intakes. Painting was relatively straight forward. The body colour is Revell 52 enamel, with everything else done in Humbrol enamels. Final assembly was mostly OK. The Axel'R decals were inaccurate in some areas so I substituted with items from the (also not entirely accurate) Le Mans Decals sheet of the same car where required. The kit decals were also very inflexible, and did not want to settle over compound curves. A lot of Micro Sol was required. The auxiliary driving lights are from the Axel'R kit, the filler caps from the spares box, and the id lights, roof lights and Dzus fasteners are by Renaissance, with a Tameo wiper arm and blade. The yellow, wedge shape on the roof covers the cockpit vent holes and was made from 10thou plastic card. This was a much longer build than originally anticipated, but I think it turned out OK, despite to difficulties with the decals, and the fact that neither decal sheet is entirely accurate. Thanks for looking. Trevor5 points
-
The front wing edges and nose I masked off and hand painted the black - however I did get a fair amount of bleed under the tape, so I've touched up as best I can. I brush applied a couple of coats of Microscale gloss (thinned with Tamiya alcohol based thinners). It really showed up the 'roughness' of the paint (due to my previous woes with the primer). I applied most of the decals, though I've left off a lot of the smaller stencils underneath - this build is dragging a bit now and I really want to get it finished to make some room for other GBs! Once the decals were on, I gave it another coat of gloss, again thinned with X20a and added the wheels and props. The decals haven't conformed amazingly to the panel lines but that maybe due to lots of primer/paint/gloss filling them up, rather than them being overly thick, since the walkway strips have conformed very well to the raised bumps. I applied a coat of Mr Topcoat Flat from a rattle can (first time I've used the flat) - it initially looks glossy when it goes on (as can be seen in the photo above) though after some time drying it flattens off. I'll need to give it a second thin coat of flat I think - even though it was touch dry I managed to get a few rain spots on it whilst moving it indoors from the garage and that seems to have removed the flat where I wiped them off. I do like their gloss clear, I believe it's acrylic based so not harsh on decals but I have sealed them so hopefully not an issue, though using rattle cans does get expensive I've yet to manage doing a great job airbrushing clear coats. So hopefully it's almost done - another flat coat (the gloss really shows those bumps), remove the window masks then add some decals to the windows and maybe some washes if I get time.5 points
-
PS. Forgot to include a photo of today's paint shop assembly line in my last post. Love building car models, so much quicker gratification than 1/350 ship models full of PE and rigging!5 points
-
Finally got some paint on the parts: I used Tamiya TS-30 Silver Leaf rattle can (why?.....because....its the only silver I had in my paint stocks other than dull aluminum and like most modelers, patience/ planning aren't my strong points). I forgot how funky this paint is (sprays somewhat "goopy" for Tamiya lacquer) and afterwards realized I should have used something like Tamiya TS-76 Mica Silver. The Silver Leaf is pretty fragile/ delicate and I intended to use it as a base for a candy blue spray for a '41 Willys (S-W-C). Forging ahead, I decided to immediately clear coated it with multiple light sprays of TS-13 and then after a 6 - 7 coats and a 45 min. lunchtime cure, a final wet coat. In the past, I've waited days before clear coating metallic lacquers such as Tamiya TS-21 Gold and encountered cracking a day or two later. Keeping fingers crossed here but don't be surprised if I report having to strip and re-paint this body in a few days. My orange plug wires (with beautiful machine aluminum distributor) came in from Detail Master and I found some red seat belt material to work with so onto the interior next.5 points
-
Bah, you beat me by two hours Patrice! 😃 Here's my contribution to the Hellcat STGB - it's the 1/72 Cyber-Hobby kit (very fiddly) - the build thread is here:5 points
-
Time for this week's update, and catching up with friends today meant that it's a bit shorter this week. First of all, the obvious one - decals. Almost all the gold stripes are on now, just the roof to add. And apart from the valances they've all behaved surprisingly well. At the moment the rear valance decal is coated in Microsol to try to encourage it to sink into the number plate recess. It didn't want to go into there with just the Microset and water but I'm hoping that with this or one more application of the Microsol it will sink down right - it certainly seems to be behaving better than the Belkits decals of this time last year. The front valance decal also wasn't keen on sinking into place, but unfortunately without me noticing this one didn't go on centralised. Fortunately most of it will be hidden by the numberplate in the end, and the shot below makes it seem worse as the cocktail stick is offset the other way. I don't think moving it is an option though - it's fully settled in now and any attempt to move it is likely to damage it. Meanwhile, a little more progress with the engine. The oil pan has been finished and fitted to the engine now along with the starter, while the belt assembly is also painted up and the alternator added. This and the fan just need gluing in place now. Meanwhile, the exhaust manifolds are painted in steel, but I want to add blue paint onto the runner where they fit onto the block before gluing in place. And those cam covers are also nearly done, just one more coat of black to the end currently in tweezers and they will go on too. With paint started on the front suspension/subframe and the exhaust pipes I'm hopeful that better progress will be made next week. Nothing really interesting in terms of techniques here, it's just been cleaning up the parts, painting and gluing with no major headaches. Thanks for looking.5 points
-
One of the local hooligans in the garden demandin attention. This is Ted... He only likes to have a fuss when the sun is shining. Rest of the time he usually looks at me with total disgust! 😲 Regards, Steve5 points
-
So, back on track, and my somewhat discombobulated build progresses... Now it's FW199 not FL-210, some remedial work to do, undoing some of my previous amendments. First up, the three fuselage lights needed to be filled: An easy fix, relatively. Next up, re-installing the three lights under the SB wing: Some 2mm clear rod will do the trick, I think. The two sets of lights above and below the wingtips needed to be removed too, and repositioned on the wingtips. So they were scraped off: and the wingtips repainted: I've also had a go at the upper wing stripes, which were removed in the July 1944 period to make the aircraft less conspicuous from above on night time Ops. I've seen a couple of photos of the stripes, and they seem to have been scrubbed off, not always 100% successfully. Here's my interpretation, together with the overpainted USAF star and bar which the FW1**/FW2** Mitchells seem to have had done: I've used watercolour pencils to give an impression of the stripes. Maybe too much left, but easily knocked back. On to the fuselage, and here are the D-Day stripes for the rear: As with the wings, they were removed from the upper fuselage in July 1944, so here's the fuselage with the OD/NG added: Finally starting to look Mitchell-y...the stripes need some blending in at the top, but not too bad. I've also started on the installation of the FN64 turret, which replaced the Bendix under turret on FW199. I've very little references to go on, but did have a spare FN64 from the Airfix Lancaster II, which was fortunate. I'm guessing some sort of adapter ring was fitted, as the FN64 seems much smaller in diameter than the Bendix. So, I managed to find a section of drop tank from the spares box, with almost the correct external and internal diameters and after a bit of sanding and persuasion managed to get it to fit: With the turret: I'll give the ring and turret a coat of Medium Sea Grey - I'm guessing that would be the closest colour to Neutral Grey available at whatever MU did the conversion work. So, I'm slowly getting there (on FW199, anyway). More soon... Simon5 points


This leaderboard is set to London/GMT+01:00