
Leaderboard


Popular Content
Showing content with the highest reputation on 22/07/21 in all areas
-
F-4C Phantom II Tamiya 1:32 There is no point in writing about the model because it is a model that has been available on the market for many years. However, for the model I also used elements for the interior of the Eduard cockpit and resin nozzles. I made the masks for the side numbers on my own.36 points
-
Well thought out Airfix kit, Thanks for looking .30 points
-
Hi all I have been working on this kit. I have modelled DK438 a Mk1 of 1771 Squadron, HMS Implacable, task force 37.1 Pacific Ocean 1945. The Sqadron carried out strikes over the Japanese Mainland at the end of the war. The Grand Phoenix model is a limited run kit and has some astonishing detailing in the cockpits, undercarriage bays and radiator in the form of resin parts and although it is a limited run kit, goes together quite well. The model was brush painted in Humbrol enamels . I had a bit of Loss of Mojo early on in the build but overall it was an enjoyable build. I also used some aftermarket parts, a less bulbus spinnered prop, wheels cannons from Barracuda and also the rear cockpit glazing was a vacform part, but I couldn't get the windscreen right so used the kit front canopy parts. Anyway enough waffle here's the link to the WIP and some photos. A look through the arched window Some cruelly close Macro shots Thanks for looking in and thanks fofcyhe support along the way. Chris23 points
-
23 points
-
Waaay back in the 1980's a scrapped English Electric Lightning was bought as an attention getter for a scrap dealer/lorry park/advertising location (?) close to the A1 Great North Road near Grantham (The A1 was a kind of early British motorway which connects London with the North and still carries a lot of traffic). It had been chopped up, wings and tail cut off but the new owner splinted it back together with blooming great steel fishplates. This crude method wasn't strong enough to allow the main undercarriage to take the weight, as the legs were outboard of the weak joints. Accordingly, a framework was fabricated to hold it all up from under the belly. It was a good plan but not well executed and with each stormy night, the sharp edges of the cradle cut into the soft aluminium alloys of the Lightning's belly, rather as the eagles tore into Prometheus' liver (Look him up in Greek Myths if you have the time and curiosity). Slowly, the Lightning sank back onto its haunches and pointed its nose at the sky as if trying to rise once again into its natural element, a process greatly accelerated by the removal of the nose radar. Well, it sat there for years, fading and rotting away (much like your author - lol). The souvenir vultures arrived and pinched anything that they could remove, and the scribblers vomited their graffiti all over the airframe. By the nineties it looked like this... Eventually, it dropped from sight and fell to bits and I thought that was the end of it. But to my amazement, I discovered while researching this little essay last night, someone is actually restoring the nose/cockpit section of it right now. Here's a link to their website where you'll find much more of the story: https://www.key.aero/forum/historic-aviation/144402-the-ongoing-restoration-of-the-a1-lightning-xn728 And here's my version using the Airfix 1:48 kit. I intended to build a scrapyard diorama but then I always INTEND to build a diorama, and seldom do. Some things went well; I think I was close to nailing the faded, chalky look of the paintwork. Some things were rushed and unsatisfactory; the chipping, for example, and the improvised interior details seen through the purloined panels. But, I still like it, and I'll concentrate on the bits I am proud of and leave you to suggest things that I could have done to improve it. Note that it's not a faithful replica of the original but rather 'based on real events' as Hollywood would put it. Disembowled! Robbed blind! Pinioned to the ground! And pinioned as in wings clipped too! Weathering and oil staining was fun. The original might have risen but my version was determined to fall on its nose. I had to pack the jetpipes with lead to deliberately make it a tail sitter. That was a first! "So where's the graffiti then?" I hear you asking, "Was it too difficult for you?" Yes, it was way too difficult. This model made me sadder with every detail I added, and when it came to scribbling all over it as well, I just couldn't bring myself to do it. Fancy me getting emotional over a few tons of scrap metal; I must be getting soft. Well I how you like it and all comments, + and -, are welcome.21 points
-
Hello my modeling friends. 4th build this year and I think I wasted too much time on this one as I took nearly 4 months! Anyway, I was satisfied with the result although far from perfect. Got many experience handling the resin parts as they have to be cut and glued precisely. The fit and detail of the kit is excellent. Eduard's Brassin resin engine has the best details and enjoyed every moment assembling and painting it. The Variant of this Spit is Mk.VIII and the markings were the one flown by the Canadian pilot Paul Ostrander over Burmese skies. That's what pushed me to the finish line! Hope you like it. Enjoy and stay safe! TZW.20 points
-
Hey all, Here's my Tamiya Cromwell. I used Black Dog Models stowage set and hessian set along with Miniart's Tank Crew & Tank Rider's set. The Black dog set utilises an all new resin turret as well as a whole load of stowage. I used a figure from the Miniart Tank Crew set along with the original kit commander along with the tank riders that Miniart do as well. I painted the vehicle using Humbrol Enamels and I weathered it using a mix of oils, Ammo by MiG and pencils. Thanks for looking! Again, thanks for looking guys, Sam19 points
-
Yesterday was the 68th anniversary of the first flight on the Martin B.57A Canberra. This is my little tribute to that event. The Alpha and Omega of the Martin B.57 Canberra. EE. B.2 WD932, the first pattern aircraft for the B.57 development program. Alongside Martin B.57G Canberra, the ultimate expression on the Canberra bomber design. The B.57G was perhaps after 21 years finally what Teddy Petter had in mind for the Canberra. Both models are based on the Airfix 1/48 Canberra kits, the B.57G less so as it has the more accurate cockpit section from the Classic Airframes B.57B. John19 points
-
Hello all, Here is my latest project: HobbyBoss' 1/48 Grumman F8F-1 Bearcat. This is from the F8F-1B boxing and with decals by Superscale. In the end, most of the markings were masked and painted and only the stencils on the rudder are from that sheet. The wheels are by BarracudaCast. My additions were seatbelts (Eduard generic set), the whip antenna, underwing pitot, small pylons (from Hasegawa late F4U kits) and the light on the top fuselage. Paint is Mr Color 365 Gross (sic) Sea Blue. A write up of making this kit is available here: https://jonbryon.com/hobbyboss-1-48-grumman-f8f-1-bearcat/ Thanks for looking Jon17 points
-
Hi all, I thought you might like to see final build of a Mosca-Bystritsky MB bis fighter, flown by the Imperial Russian Air Force from 1916. The forum build is here: https://www.britmodeller.com/forums/index.php?/topic/235094316-132nd-scale-mosca-bystritsky-mb-bis-fighter/#comments The basic 1:32nd scale kit is resin and made by ‘Omega Models’ (Kit No: 32-003). The list of changes/additions to the model are: Engine: Detailed with Nickel-Silver valve push rods, copper wire ignition leads and replacement induction manifolds. Modified or corrected: All wing support, landing gear, tail skid and gun mount struts were replaced with handmade Brass tube struts with internal reinforcing Brass rod. Rigging is 0.08 mm or 0.12 mm diameter mono-filament with ‘GasPatch’ 1:48th scale turnbuckles and 0.5 mm or 0.4 mm diameter blackened Brass tube. Upper and lower rudders were replaced with scratch made rudders from plastic card. Aftermarket: ‘GasPatch’ spoke wheels and tyres used to replace the resin kit parts. ‘GasPatch’ Lewis Mk.1 Standard type (stripped front) used to replace kit part. ‘BarracudaCast’ British wicker AGS seat used to replace the kit part. ‘Kellerkind Miniaturen’ Russian pilot 1914-17. ‘Jadar’ WW1 1:48th scale control horns. Decals: ‘Aviattic’ Clear Doped Linen (CDL) bleached (ATT32044), ‘Aviattic’ Walnut woodgrain (dark and light) (ATT32060), ‘Airscale’ WW1 Generic instrument dials (AS32 WW1). The kit decals were replaced with corrected markings, printed from an Inkjet printer and on white decal paper. As usual I've created a downloadable build log in Adobe PDF format, for those who might want to refer to it for reference or build details. It contains full step by step descriptions of the model build, its modifications/changes and is also supported with illustrations and photographs. If viewed in Adobe Reader, each build log has book marked chapters/headings for easier navigation through the log. My model website has the gallery page, so to view any model, go to the gallery and select it. If it has a PDF build log, it will be available to download using the 'PDF' icon on that model photo page. For any photograph, just click the photo to enlarge or reduce the viewing size. http://igavh2.xara.hosting Mike14 points
-
Hello Here are a couple of 1/72 Grumman Hellcats from Italeri. This is not the best kit of this aircraft but I bought some of them when the price was very cheap. First is the F6F-5 of VBF-20 CO's aircraft in 1946. The decals came from the Blackbird BMD72012 sheet. Next is an F6F-5K from VU-1 with many colours on. When the decals were in place I discovered a nice picture of this aircraft and I saw that the wing tips were deeper. I could not modified the kit. Decals came from an old Hasegawa box. I started building both kits last year and this is the reason why I did not insert them in the Hellcat GB. Patrick13 points
-
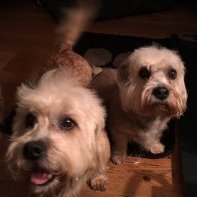
I was in the middle of my usual early morning commune with nature/BM catch-up when Rudi joined me via the open bathroom window. He'd obviously had a hard night terrorising the local wildlife and felt he was entitled to a good kip. Luckily, he found a cosy spot to settle in to. Personally, I would have thought this was "where angels fear to tread" territory but he seemed really happy with his new digs and was purring fit to bust. Craig.13 points
-
Ilyushin IL-62 is probably one of the most successful Soviet built intercontinental airliners. The plane carried max. 186 passengers to a max. distance of 10.000 km. Its maiden flight took place in January 1963 and a total of 292 planes were built during the years. Its main operator were Aeroflot and it was also the biggest plane used by Interflug, the East German state airline. The company operated a total of 24 planes. IL-62 was also widely used by many other Soviet block airlines. Ilyushin IL-62's were in use until the early 2000 but because of stricter noise regulations and new and more economical plane types they went almost totally out of commercial traffic. The only airline still using the plane for domestic tourist flights are Air Koryo of North Korea. I built the Interflug IL-62M from a Zvezda 1/144 kit with BOA decals I ordered from the web. I also used a photoetch set from Extratech. The Zvezda kit was of very high quality, very detailed and its fit was excellent. I primed the fuselage with white Tamiya Fine Surface primer which I then sprayed with Tamiya rattle can gloss varnish. The lower part of the fuselage, the wings and stabs were painted with Xtracolor X137 light gull grey. For the smaller details, wheels, lights, etc. I used Humbrol enamels and Vallejo acrylics.12 points
-
Invision have changed the ranking style with this version, so we're going to have to look into changing our little graphics as they've been around since 2007 when we started. I'll find out what the new shape is, and think of something different to put in there if we're no longer allowed a square pic. Maybe a bomb or something if they're supposed to be tall & narrow. I had to go out unexpectedly to deal with a parental emergency last night, so didn't get a minute to myself to have a looksee. I'm going to be having another look at the 500 errors too, as I've been avoiding dealing with that for a while, partly because it was so frustrating, but also because I've been busy with site and IRL things of late. Please be patient with me, as I've got a limited amount of time available, and half the time I'm awake, I'm not feeling too grand12 points
-
I never really take note of scores, ranks or whatever. I come here not to be competitive like that. I come to share, to learn, to make friends and the craic. All the other forum software nonsense really doesn’t matter to me. Still, if the upgrade fixes the 500 bug, all good, eh?12 points
-
Hello Guys, The kit is a generic Hasegawa kit, which is no problem in the building except for some minor parts which require little filling and sanding. But what strikes me or what is conspicuous is the marking when I saw this aircraft 2 years ago I wish someone did it and Hasegawa came out and I just bought it. Yeah, the decals were just awesome and blown me away. So here it is my favorite aircraft in my collections. The F-15J Eagle `305SQ 40th Anniversary' special markings. Cheers9 points
-
Latest off the bench......... without an upgrade in progress Eduard Profipack P51 D Mustang Iwo Jima. This kit gets all the thumbs up for quality and fit. So it must be me as I give it the thumbs down. Where do I start .... Flaps can only be in the down position. The undercarriage location is worse than the Airfix Mk5, decals are Ok apart from the excessive carrier film that curls when you take it off the backing paper. I wo's not a happy bunny with this kit so much I did the Airfix version along side. Airfix won by a mile. I do question the profipacks as the basic kit needs very little added. The weekend edition is better value. Any way it all turned out OK On to the photos. Please feel free to comment etc. Thanks for looking Cheers Dick9 points
-
The Mig-15 looks like a thick pumpkin next to the La-15. That's why I already have the La-15, but not the MiG-15 yet. The model, according to the Mars Models instructions, represents the first serial La-15. I hope it actually has ever looked like this one because, as I realized after applying the decals, the photos prove otherwise. However, I did not want to go back into the construction process. The construction ran almost without problems until it turned out that the cockpit and air intakes to the engine did not fit into the fuselage. The diameter of the front and rear part of the fuselage after pressing in the cockpit also differed quite significantly. Somehow these problems were managed by the strength and persuasion of the file. Besides these issues - a pure pleasure: nice details, the set includes photo-etched details and masks. Painting - MRP in the interior; for the rest, I used mainly AK Extreme Metal. Dark gray wash from Modellers World. The gun barrels are made of the AK brass tube. I hope you like it Hubert9 points
-
Ok so I was asked earlier for more details concerning the airbrush I have shown above. Here's a couple of pics which should help. Oh and it's a 0.5 needle and nozzle 🙂 Excellent bit of kit which I use for my 1/24 car builds as well. I couldn't resist test fitting the engine in the chassis and I'm pleased to say it fits like a glove. The engine has been removed know whilst I continue work on the chassis, radiator etc but I'm pleased with the results so far 🙂👍9 points
-
A few updates... Some windows need to be opened up for the USN PB4Y-2 version of the Privateer (as opposed to the RY-3 transport version) and these were opened up in the usual way. I have not test fit the clear parts yet, so let's hope I didn't make the windows too large! If I did, I'll have to use Micro Kristal-Kleer or whatever it's called instead of the kit bits. The new fuselage side panels for the ERCO waist turrets were removed from the casting blocks and test fit against the gaping hole in the fuselage side. Guess what? The resin panels are just slightly oversize. You can pop them in, but they bow out slightly. The way they are designed (following the kit parts) includes a lip which provides the gluing surface. Due to the lip, it would be difficult to sand the resin panels to make them smaller, so I decided to open up the hole in the fuselage instead. It didn't take much to create a nice fit. The ring that contains the gun turret is held in the side panel with a pair of resin retainers. For now, these are simply held in place with superglue, but I think this warrants some five-minute epoxy for additional strength. Once the ring is in place, it looks like this: Obviously, the remainder of the turret must be built first before being attached to the model. The fore and aft aerodynamic fairings that are so prominent in photos will go over the ring pivots on the outside of the fuselage and I reckon it might be possible, if you're really careful with the glue, to have the turrets actually pivot up and down. Shades of Monogram 1960! Imagine the fun you can have shooting at imaginary submarines that have just surfaced for a cocktail party. Nah, I think I'll just pose 'em and glue 'em. Leaving them moveable will just invite my grandson. Now, about those rings. I going to refer from now on to the Curse of the Calamitous Cobra Crud (C4). Seriously, someone should have taken the time to clean the moulds prior to casting this set of parts. I've already shown you some C4 - if you're squeamish you best look away now. 😱 On the left note the rather large chunk of C4 at the top, inside the ring. It's the bit that looks like an errant unconstrained sneeze. Both rings were like this when I started, since they were both made from the same tool. The ring on the right shows my attempt at cleaning out the crud. There is still more work to do here before I'm completely satisfied. You can also see some nasty "air pockets" in the protruding pivots at the bottom. Thanks to the putty fairy these will be taken care of. 🧚♀️ I know that Lone Star Models will be re-releasing this Cobra set either later this year or sometime in 2022. I trust they will clean out the moulds before they start casting. By the way, the first photos I've seen of their 1:48 resin kit of the PB4Y-2 look very nice indeed, and surely a model that will be quite popular. And expensive. 💷 Back to work... Cheers, Bill PS. I'm up to 30 minute sessions at the workbench, as well as walking each day for 30 minutes. I'm doing very well with my physio, or so Heather my therapist tells me. Science!9 points
-
My second attempt at motorcycles, a Tamiya 1/12 Yamaha XV1000 Virago. Better than my first attempt which went a bit doolally, probably me. Some of you may think a easy build but hey I'm still learning, I think I want to get a collection of bikes to build, obviously some harder than others, Decals is my nightmare.🙄🥵 Most of the build went well, clean cuts of the sprue as expected from Tamiya. One or two little niggles along the way, I thought the front brake discs could have done with a little more detail, pretty flat looking. Paint job on the fuel tank could probably be better, need to practice more on getting a high gloss. There is a sprue which had all chromium parts, I noticed Tamiya Extra Thin didn't stick too well to the chrome parts, super glue did the job. The one decal for each side of the fuel tank was a sorta lined oval shaped loop with nothing in the middle, I messed it up so off it came. I think what I should have done before dipping it in water was to slice it in half, put the top half on first then slide the bottom half up, I think that would have been easier. Overall I'm quite happy with the result.8 points
-
So with the temperature at a more moderate 82° at the bench 😳 I've managed a couple of hours on the Mustang. The first big piece of the kit has been started which is the chassis and this part left me a little confused 🤔. Why am I confused...well...my intention was to spray the whole thing black and crack on...however I simply can't bring myself to just leave the whole part black I'm gonna have to try and paint in some of the details even though once finished none of the extra details will be visible 🙄. This extra detail work is not my usual approach but for some reason although I'm not going OTT with it I have to add a bit extra to the build. So here's a few pic's of today's progress First up this chassis is a big sucker almost as long as my spray booth So I needed an airbrush fit for spraying a large part and the one below fits the bill perfectly A bit heavy duty perhaps but 5 mins later the chassis was painted I'm very happy with the results and will be using the airbrush above to paint the shell when the time comes. Just for scale here's the chassis with a jar of extra thin for comparison Next up to add a little detail i decided to tackle the heat shields and weather them slightly to add a bit of realism I'm happy with the way they turned out and plan to pick out more chassis details before fitting the engine. With the temperature having risen to 86° I've decided to call it a day as its now just too uncomfortable to continue however hopefully tomorrow I can carry on with the build. Not massive progress but a step forward thanks for looking back soon 🙂👍8 points
-
Interior fuseloge sidewalls finally painted . Spent that last few days gluing the airframe together. The fit is super great. Next to finish up the intakes and get those installed. Still plenty of exterior parts to get glued on. Stay tuned :) 58A99668-D67D-45B6-B83F-1BE9B9B43810 by b007scott, on Flickr 035484A6-675A-4D3A-8A1F-31BCFD772355 by b007scott, on Flickr 5AC86F0E-721B-4ABC-A0F4-240566FD0785 by b007scott, on Flickr 4B8CB3CD-B8D2-4B50-8DEE-A4E4439EEB61 by b007scott, on Flickr 4BF74BC7-2284-4CE6-B3A8-3632A6EA936A by b007scott, on Flickr 9F6B0169-CD60-427C-BDBA-8A6076F2E85D by b007scott, on Flickr A603F400-03D9-4470-9703-90CA179D5043 by b007scott, on Flickr CB2DDE99-9889-4AB9-AEDC-0042AE423FD9 by b007scott, on Flickr Brian8 points
-
Just a small update,first thing to do is prepare the body which wasn't too difficult. Remove all the rough parts and sand down the edges,the window frames are the worst as they can be quite delicate. It now has the primer coat,next will be Appliance white all over,then I have to mask and spray the rear end to match the blue of the decals. I forgot to add a small piece of photo etch on the boot lid,a slight lip or gurney flap if you like. I get the idea of a group build now,you have to actually build something,not just talk about it! Chris.8 points
-
After some work yesterday, removing the overscale strakes on the rear fuselage and tail-boom, replacing then with .4mm stretched sprue. This is where I am today. Enjoy... Colin8 points
-
Hello everybody, the next step was filing down the lampshades, which had been cut off but still sitting on the toothpicks, to a length of approx. 1,8 mm, as well as the subsequent deburring. Since the small beads for protection and better guidance of the LED wires were glued in with Pattex-CA, I have put a Teflon foil underneath as adhesive protection again in the tried and tested way. The lampshades could only be held in a scissors tweezer to glue them in, and in this position could be carefully dabbed with CA on the inner edge with a acupuncture needle, and then to put it over the upright standing beads, what had to work at the first go, which, with a few exceptions, also succeeded. Then the shades were turned upside down and pressed onto the top with the end of the cutter holder in order to level out any minimal overhang of the beads. With that the preparation for the upcoming airbrushing was almost finished. After I had found my well-stowed needle ledge from the first paint job, only the paint residue on the tips had to be removed, otherwise the needles would not have fit through the beads. And in a small box of course I've kept the ferrules with plastic collars, which were now threaded onto the needles as spacers to prevent the shades from sticking to the Balsa ledge. Since it was already foreseeable at that time that I would have to paint further lampshade series, I had already marked further slots in wise foresight. And since I've prepared twice the number of umbrellas this time, I only needed to expand the needle ledge accordingly and found and used both the pins and ferrules that were used at the time. Now only the shades had to be threaded onto the needles. In order to avoid a later light emission upwards, I brushed the shades with black paint again as I did back then. Although the autofocus of my digicam already had its problems with this macro shot, I didn't want to withhold it from you, especially since you can see a bit more like that, at least I imagine it.7 points
-
I've got some location photography on my job list at the moment, which after the recent dodgy spell we are keen to bang out with the fine weather. Unfortunately I struggle in the heat! Early starts and knocking off at lunchtime the order of the day, but today I took a break after seeing the temps. I wrapped up yesterdays shoot with a thumping head so will carry on tomorrow when hopefully the temps are dropping a few degrees 🥵 (being a mediocre photographer means I get to blame the weather for my lack of skills, it's either too sunny and the afternoon light is way too harsh, or it's cloudy and the subject looks flat and dull ... 😳 ) After a few light chores to keep my wife happy (she doesn't have the luxury of bunking off work) I spent a few hours slapping some paint on. It was an enjoyable afternoon and evening. I made a few gaffs, mainly down to impatience after so much inactivity on this build. The photos are hurried phone snaps that are hiding a multitude of sins! Of course I start with the easiest to mask, the flat wings. My method falls apart when complicated shapes like fuselages are involved, we'll see how that goes tomorrow if I get some time in. Starting to put the 1938 RAF camouflage on by Mike, on Flickr Starting to put the 1938 RAF camouflage on by Mike, on Flickr Starting to put the 1938 RAF camouflage on by Mike, on Flickr I'm still not entirely sure how this thing is going to go together (wings and rigging). Will cross that bridge when I get to it ... Still pondering getting a jig though.7 points
-
I finished this up in the fall of 2013 and have recently updated the photos to reflect the recently acquired knowlege of how to operate my camera. This is also one build before my Tamiya Fw190 D-9 so I was still learning how to take care of seams at this point in my model building. Aside from that I'll have to say that despite the severe warpage issues I had with the wings and fuselage, this Eduard kit was a joy to build. I've heard that the Eduard Fw190 line up is difficult and finicky to build but a few precautions and a little research on the web prior to building will help the builder avoid any unforeseen trouble. Depicted here is "Yellow 8" of II JG 4 in September of 1944. It was piloted by Friedrich-Karl Frank and was shot down 11 Sept 1944 in a fierce air battle over the Ore Mountains. Frank managed to bail out and the plane became a "lawn dart". Pieces of the plane were dug out of the ground fairly recently and some managed to find their way into the Royal Class Fw190 A-8/ R2 kit from Eduard which is what this kit is.6 points
-
Found this discussion on the WW2 Aircraft website while looking for the angle of incidence of the horizontal stabilizer. Lots of good factory diagrams and period photos as well as the restored airworthy B-25H that is based here in the colonies. I hope the information will be useful to many of you; very good photos of some SWP strafer aircraft as well as the ineffective ventral turret. Mike https://ww2aircraft.net/forum/threads/b-25-weapons-thread.10766/6 points
-
Build progression moves on to the wings - great care needed to follow the correct instructions. Wheel well detail is exceptional. It's like they tried to replicate as much of the interior bracing and rib detail as possible. The fit of these parts is also perfect. You just slot them in and glue it fast. There's so much interior detail in the wings as well. Again, all very clearly shown in the instructions and right and left wings mostly contained on one sprue each. This kit is precision engineered art. Alan6 points
-
Hi again, long time no update! Got the fuselage together - was a bit of a fiddle to line everything up: Not at all! Here's a Tamiya paint pot: And a 6-in ruler: While not the biggest model I've made, this scale makes everything seem big! Cockpit finished apart from washes and effects for the most visible bits: Airfix have managed the impossible - an accurate, precisely engineered kit cockpit with incredible levels of detail, all right off the sprue. I'll have more to say about this kit as the build goes on, overwhelmingly positive... This is one happy Hellcat! ...much like the builder. Cheers, Alan6 points
-
No worries at all. The method I use for painting rocker covers like this after stripping the chrome off of them, I paint the black of course....but I don't paint the raised details. I use a Prismacolor silver lead pencil to drag across the raised details. Painting the raised details, at least for me, presents alot of opportunity for disaster. lol Here's the engine in my Maverick as an example:6 points
-
So that's what you wear under the kilt. John.6 points
-
I'm calling this one done, thank you to @PeterB for the decals, to everyone else for the support and encouragement, I hope you like it. Cheers Pat6 points
-
Ran out of flat black so I had to buy a new spray can. Same brand but turns out the new one was more flat than the old one. The old one looked more like satin black so I painted satin black over the new flat black but now the other parts look more flat. Will have to respray the dashboard and interior tub to have them all match. Not much work done this week unfortunately hopefully more will get done next week.6 points
-
I'm a huge fan of Pink Floyd, so I tend to be critical of covers of their songs. This one passed passed the test for me (including the acknowledged chord flub), and the solo at the end is truly excellent:6 points
-
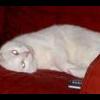
She's not exactly Torquemada, but she doesn't take any crap. 😬 Cheers, Bill6 points
-
Here are some updates. I created some shocks and return springs using stretched sprue and guitar steel "strings." I also used the guitar string to simulate the hose that runs between the pumper truck and the fuel trailer. Also, I applied several coats of white Stynylrez acrylic primer to get things started here.6 points
-
Granted she's an impressive beast, but she's not a Canberra, least not in the legal sense, She's General Dynamics not Martin, and most defiantly not a bomber! Having said all that, I still count her as one of the family, This is my 1/48 Airfix RB.57F The only true big wing Canberra was the RB.57D, though not as mighty as the F model, she's still quite impressive John6 points
-
Hey all. Big thanks to @Pete in Lincs for letting me have this one from the stash. My first Japanese aircraft. I'm planning on building a few more. Then onto Russian stuff. The build was lovely, managed to build most of it within one night. Then last night fiddling around with something else I managed to get a blob of poly cement on the canopy. In my frustration I then managed to snap a landing gear off. I forgot to put weight in the nose, but this actually stands by itself. On its very spindly fragile landing gear. So here it is. Apologies for the terrible photography too. I haven't fashioned a spinner, but a jet version was also on the drawing board for this aircraft. All in all a very pleasant build untill I lost my way after the little conopy accident. Thanks for looking 🐧5 points
-
Take it easy Mike, as I said in my first post this is just us moaning about an irrelevent first world problem - your health and that of your family are far more important... Keith5 points
-
Same here. Over the past few days of hot weather here in dear old Blighty, i've had to make extra sure none of the local cat mafia are ligged out under the car in the shade. Yesterday i was on my way out to get boss from work and had a squint under the car. Lo and behold there were 3 of em using it as a sun shade! These being Charlie and Ted who are a neighbours and a stray we feed called patch - due to having a black patch of fur over one eye. Patch legged it as soon as he saw me. The other two however steadfastly refused to shift. Ended up starting car and giving the gas pedal a couple of taps which soon got them moving 😀 Regards, Steve5 points
-
Thanks! I just poke a small starting point with a needle as center as possible - and hope for the best really If it ends up not quite center I enlarge the hole tiny bit to give me some wiggle room and let the glue do the rest. - - - - - -- Question about wheel well colous. It says here that the landing gear legs are aluminium/silver, wheel well covers (inside) are interior gray green and the wheel wells themselves are black. Does this seem right? Seems like a lot of colours some of which don't make sense (black) but I really don't know any better. It's quite hard to see because of the yellow tape on yellow paint but... it's masked! ... and painted! But you know what I think I will leave the great reveal until next time. That's ok, right? So, see ya! Bye! ..... byeeeee! . . . ... still here? Oh what the heck! Ta-da! I'm pretty happy, mostly worked out nicely, no big oversprays or paint sliding under the tape. Looks quite... weird! And dangerous! Not that it really was but anyways. Some parts were extra neat so I was really happy about that... ... but there were couple jagged edges and small imperfections in the mix too. Nothing that can't be easily sorted out though - I'm just happy that there isn't any big spills as trying to fix the yellow over black would be impossible. I will let it dry and work out the possible other details I've missed and I think we will put down some clear coat for the decals5 points
-
My build of the Airfix 1/72 Consolidated B-24J Liberator (05006-3) "The Dragon and His Tail" decals for B24J Liberator 44-40973, 64th Bomb Squadron, 43rd Bomb Group, August 1945 came from Xtradecal Set X72082. It was built for the ATF 15th Anniversary GB. Not my finest ever build but an enjoyable one nevertheless as it was more of an exercise in nostalgia than hyper-modelling. Apart from some added detail in the wheel wells and aftermarket decals it was an OOB build. BTW, the wings, cowlings, tailplanes, front and rear turrets are not fixed in place as the plane is going into storage, probably never to be seen again! Dave5 points
-
I've drilled out the hole in the front of the engine nacelle (which is not moulded in the kit part) and assembled it in what seems to be the correct order (the lower struts engage in the right place with the fuselage, and the upper struts with the centre section of the upper wing), and started rigging it. I'm following a high risk strategy of rigging this section before it's glued to the fuselage, for ease of painting. Looking at various walkaround images, it seemed to me that the rigging was attached either to the lower struts themselves, or at the junction of strut and fuselage, so I've been leading my monofilament down from the nacelle and hooking it around the locating lugs at the lower end of the struts, through a blob of CA. (The tape is holding the struts in very slight fore-and-aft compression, to make the fuselage alignment precise on dry fitting, so that hopefully I don't end up with slack rigging when I put the pieces together. We'll see how that works.. The upper struts are being rigged more conventionally, with the monofilament passed through holes drill in the underside of the centre section. Room for manoeuvre is quite cramped, so I threaded them all through before cementing the part into place on the struts. The above photograph was taken just before I started tightening and gluing. I've also managed to put together a scratch-built rear wheel from bits of styrene and brass, and paint the engine in an approximation to what I see in walkarounds. These will both go on fairly late in the build, after I've painted, decalled and sealed the main assembly. And I've drilled the wings for rigging. Also a single hole in the upper wing that will take a bit of 0.5mm brass rod for the radio aerial support.5 points
-
Yugoslav Capronis Ca.310 of first order after delivery on an airfield in 1938 Yugoslav Caproni Ca.310bis No.15 (1/72 decals instruction) NDH Ca.310 in what seems to be late Royal Yugoslav bomber camouflage of ochre, dark brown and green upper and light blue-green lower surfaces NDH Ca.310 in later painting of solig green upper camouflage with light blue lower surfaces NDH Ca.310 at Rajlovac (Sarajevo) airfield Royal Yugoslav Ca.311 brefore delivery5 points
-
today to warm in the mancave so very limited work sanded the dody down for first top coat and made the four wheels up, they are no glued and still require a lot of work before they see any glue5 points
-
Well, that didn't go well. When asked last night "What are you doing down there?", the answer "I'm fiddling with my Mustang" got me a night in the spare bedroom. Thanks for that. And for future information, no it doesn't piggin' well glow in the dark. I wasn't going to post pictures again until after the beast is primed, but I thought I'd show some essential pre-painting gluing. The front air-dam and rear lower valance need attaching prior to painting, and the only way to ensure they are in the right place (there are no locating holes) is to dry fit the front and rear chrome parts and then glue the lower bodywork in place around them. It seems to have worked well. I've also dry fitted most of the parts, and have headed off a lot of future potential problems by doing so now. I wanted to check the fit of the body to the chassis, as I don't want to keep handling the bodywork all the time, once it's had its lovely paint job. The give-away is immediately noticable out of the box, as the body shell, inner tub and chassis come dry fitted in a sealed bag (see post above). Immediately you can see that all three fit poorly together: it fits where it doesn't touch and doesn't fit where it does. Much filing and fettling got it into shape, and the body is now painted satin black inside and taped up ready for priming. BTW, the back seat (which can be fitted with the back raised or folded down) seems to fit so badly, it looks like it's from a different kit. I'm not really impressed with this kit. The beast has more scoops than an Italian Gelataria, and they have been added now so that hopefully the paint layers should blend them in nicely. If you're building this kit, the instructions are incorrect on the upper scoops: Part 22 goes on the passenger side, and part 23 on the drivers. Talking of instructions, they are pretty much useless. There are only 6 diagrams (and two of those are for the different engine options), and although the parts are numbered in the diagrams, some of the gluing location points are pretty vague to say the least. As for painting call-outs, forget it! There are 2 Cragar and 4 Goodyear decals (2 white, 2 blue) on the sheet, but there are no instructions as to where to stick them. I could make a few suggestions. Priming tomorrow. What could possibly go wrong? Stay tuned.5 points
-
Hi y'all! After adding some tiny bits such as different handles, here it is finished at last! Hope you'll like it. Thanks for watching and see you soon! Ciao Iwik5 points


.thumb.jpg.158e2e086d45b8f96b7d93b8bee8dc21.jpg)


.thumb.jpg.d3635a7ef6507d35f372dd09671fe96f.jpg)


.thumb.jpg.76f12b87ce9ca9929c9aabdcf8f9d2dd.jpg)


This leaderboard is set to London/GMT+01:00