
Leaderboard


Popular Content
Showing content with the highest reputation on 28/06/21 in all areas
-
Evening one and all, Thought I'd share a few pics of my recently completed new tool Airfix Bucc S.2B. The Bucc is an old favourite of mine, having lived in NE Scotland as a youngster for most of the 80's these were a common sight blasting around the countryside at low level, and a regular visitor at Aberdeen on practise diversions, our school conveniently right under the flightpath! I couldn't wait for the Airfix new tool to be released and have another couple of these to produce yet. Built out of the box except for the addition of a resin CBLS practise bomb dispenser. A stunning kit, lovely decals, 2 great marking options, plenty scope for aftermarket extra's but it really doesn't need much to produce a nice build. I built this from the outset with the intention of putting it on a base and showing it gear up doing what the Bucc does best - low level! I did some maths and have displayed the aircraft at a scale 25-30ft off the top of the base. To fly a jet at this height at 500kts over a featureless North Sea must have been a phenomenal experience and demand utmost concentration. And so, on with the pics..... Hope you like this one, all comments welcome, good and bad. Rgds, Eng51 points
-
Hi All, My latest completion is Special Hobby's Fairey Fulmar. The Fulmar was a carrier-borne reconnaissance & fighter aircraft operated by the Fleet Air Arm during the earlier years of the war, eventually being replaced by single seat aircraft such as the Sea Hurricane, Seafire and Martlet. Despite being slow relative to these aircraft, the Fulmar acquitted itself well in combat throughout the Mediterranean theatre, and at its peak equipped 20 squadrons of the FAA. The SH kit allows for 5 schemes. I have chosen to complete as N2015 of 805 Sqn, which flew from HMS Eagle during 1941. Here's a link to a photo of N2015 (kindly added to the WIP by @Grey Beema - thanks GB!): https://www.iwm.org.uk/collections/item/object/205046496 Here is a link to the WIP if anybody is interested: This scheme was notable for a few reasons: - The white sunscreen applied to the pilot's glazing - The lighter covers for the wing machine guns (which I mistakenly omitted) - Most notably, the locally applied 'spaghetti' camouflage applied to the leading edges and lower surface of the cowling. This was applied in order to confuse enemy troops during ground attack sorties This was one of my most complex paint schemes to date - sadly, it is almost certainly incorrect! @iang supplied some information during the WIP (thanks very much Ian!), which strongly suggests that N2015 had a Sky underside, rather than the B/W & Sky as I've depicted. Furthermore, the leading edges would have been painted in Sky, and the 'spaghetti' elements applied with paints which would have been in store onboard Eagle, such as Roundel Red and Dark Slate Grey. If anyone is considering this scheme I would strongly recommend that you have a look at Ian's very credible advice. I did briefly consider respraying to the correct colours but decided that I would likely make matters worse so pushed on regardless. The kit is the usual SH fare, with vague fit and engineering, but lovely surface detail. The resin cockpit, whilst beautifully detailed, was a woeful fit so much cursing and sanding was expended in getting the thing to fit. With all that said, I'm not displeased with the overall outcome. Anyway, on with the photos: Here's a final shot with another FAA Merlin-powered stablemate: I'm glad I've given this kit a bash - although it's a little frustrating to have knowingly finished the scheme incorrectly, I still think it looks pretty good, and it's good to have the type in my collection! Thanks for looking, Roger31 points
-
Hi all, Italeri's (ex Fujimi) F-4M Phantom FG.1. Out of the box build and painted with a combination of Tamiya and Vallejo paints. Excellent build and nice surface details, however oversized decals are a major down fall of this kit. I only realised after they were added... combined with a thick gloss coat accidently laid as used a too smaller needle for VMS Gloss HD and the incorrect use of a MIG AMMO panel liner as an all over wash, meant this wasn't a satisfactory build for me. Posed in the catapult position and some airwaves remove before flight tags added to spruce things up.23 points
-
Hello to all of you good people.I hope you are doing well.I have just finished this Hasegawa 72 scale F-111C in the colors and markings of the Royal Australian Air Force.I added the eduard PE set in the cockpit as well as the extirior.Painted with Gunze paints and varnished with Vallejo matt acrylic varnish. Regards,Dragan20 points
-
This is the Revell 1/72 Junkers Ju 88A-4 which I decided to build as the box art option as I just liked the look of it – a bit unusual for me as I generally build specific planes that I've done some research on. This plane was with 9./KG 30 in Sicily on an anti-shipping role in June 1941. This is a really good kit with lovely detail. The cockpit is great straight from the box but I'd bought a photo-etch set for the interior from Eduard so used that. I also got some Eduard canopy masks as all that glazing looked more than a bit scary. The one small modification I made was to pose the crew access hatch open (at the rear of the gondola) and I built a little ladder. Many photos of these planes on the ground show that – like this from the cover of the excellent AirDoc reference book: The hatch is also showed open on the box side: But the instructions have you build it closed: It's just a couple of small cuts to have it open and I'm happy with the way it turned out although my ladder is a bit over scale. Then my brain seems to have had a rest when I was finishing: the white fuselage band is too far towards the rear, the swastika (from the spares box - as there are no kit decals for that) is the wrong type – it should have a white surround I think – and lastly (and most daft) the eagle on the nose is diving backwards. Oh well. It still looks good on the shelf. Paints are xtracrylics on top of Ultimate primer, there's a small amount of chalk pastels for the exhaust stains and some oils for making the undercarriage legs, wheels and doors a bit mucky. All the best Mark20 points
-
Here some pictures of my latest build: Modelsvit Yak-9TD in 1:48. Built it OOB without any aftermarked parts. For painting I used Hataka Colors from their Orange Line.19 points
-
Hello Here is my Zvezda Lockheed C-130E #314 of the Israeli Defence Force in 2012. The kit is quite easy to build and I picked some decals from my huge stock. Patrick18 points
-
My Dad got his first car, a Mk 1 Ford Cortina in the mid-1960s and started to pack the whole family up in it annually to visit the RAFA air display at the famous ex-Battle of Britain North Weald airfield from then on and into the 70s. I can clearly remember sitting on the bonnet (hood) of the car with my feet dangling at the 1965 display when with no warning one of 111 Squadron’s Lightning F3s flew directly over my head from behind at low level in the middle of the display team in line abreast, before lighting the burners and climbing vertically up into the blue yonder to form a diamond nine formation. The infamous Lightning rapid pitch up and climb out. I well remember my guts resonating along with the 18 Avon engines and then after what seemed like an eternity of relative silence when they had climbed to altitude, only then did dogs start barking and the crowd start shouting! Quite the way to make an awestriking entrance to a display back then, which with the heightened display safety measures in force now would never be allowed. This was the moment in which I caught the aviation bug which persists to this day. On reading the Aeroplane Icon publication “Lightning” when researching the model, I learned that I was lucky to witness the third to last multi-ship RAF Lightning display ever! 111 Sqn had been selected to display at the Paris show that year and the North Weald show was presumably a practice outing for this, along with one further display at RAF Bentwaters. After 1965 the RAF only ever flew Lightning singleton displays as a cost saving. The Red Arrows formed in 1965 and took on the RAFs formation display role from then on. I’m sorry Red Arrows, but for me nine Gnats, or Hawks could never match the sheer body pummelling presence of nine Lightnings! “Lightning” also informed me that the F3 was the fastest of the Lightning marks, with uprated RR Avon 301Rs, the original 247 gal capacity ventral tank and the larger square tipped dorsal fin introduced to counter yaw instability caused by carrying the Red Top missiles, which were larger than the Firestreak missiles carried by earlier marks. F3s also lacked the decreased outer wing sweep and conical camber that reduced transonic drag. This improved wing planform was originally fitted to the P1B Prototype during early development, but only got fitted to the F2A and F6 later in the 60s! No cannons fitted either to the F3, and no Aden cannon ventral pack like the Mk 6, so entirely reliant on the two IR homing missiles. This model of the Squadron Leader’s mount - XR711 was built out of the box, but with the addition of some improved aftermarket seat and cockpit components, plus some photo etch dorsal radio aerials. This was my first foray into using airbrushed metalizing lacquers (Alclad 2) and the finish is a bit suspect in parts, especially so on the rear fuselage sides, but it’s still a worthy reminder of a key childhood experience. Maybe, just maybe, it’s the actual aircraft that flew directly over the top of me so many years ago? The Airfix decals are a bit thin, which makes settling them down easy, but the big yellow fin and fuselage decals proved to be a bit too translucent on top of the black painted sections. If I was to build it again, I’d make sure I applied a yellow undercoat before applying these decals or skipped using them altogether and just sprayed in the yellow sections. Interesting factoid. The 3 blades on the Maltese cross aren’t meant to be Scimitars, but Seaxes as also found on the County of Essex coat of arms. The Seax was the large single edge knife carried by every self-respecting Anglo-Saxon gent. A sort of East Saxon Swiss army knife?16 points
-
Was very sad to hear about the passing of Mel Bromley recently so this is a small tribute to Mel who ran S&M Models and gave us 72nd modellers a lot of pleasure producing kits like this, the Canberra B2 and the Sycamore. RIP Mel. This was a lovely little kit to put together with the one criticism being the very spindly prop which had broken on the sprue. I replaced this with a reshaped prop from an Airfix Skyvan. Not all Provosts have the ribbing on the control surfaces portrayed on the kit which seems to be restricted to certain serial blocks - check your references!! I decided I wanted to portray a machine in the silver and day-glo scheme with the CFS and finding pics that definitively showed the location of the code letters and the demarkation of the day-glo areas was quite difficult. There seemed to be a number of variations of day-glo around the tail area in particular. In the end this is a little bit of an informed guess - In know that XF892 carried the pattern shown and was coded "P-B" when in the earlier silver and yellow scheme and I know that many CFS Provosts retained the same codes when they switched to day-glo. The model was given an all-over coat of white primer and the day-glo was a 50/50 mix of Humbrol acrylic Orange H18 and Fire Orange H209. The day-glo was then masked off and Citadel Chainmaill was used for the silver areas. Markings came from the spares box. Hope you like. Pat15 points
-
I attach here photos of my recently completed Privateer, built out of the box (+ some home made improvisations) from an original Matchbox kit that has sat in the box for 40 years. The problems with this kit are well known, and as expected this was a troublesome build (if you want to know details, visit my personal webpage; link in my signature panel). Still, I really wanted to build a Privateer, the idea of converting a B-24 kit was just too daunting, and I found it for a bargain in eBay (currently these kits are going for more than $200 AUD - more than 3 times my investment...). Surprisingly, the decals performed like champs, even I opened the box though they were all warped, yellowed and stuck to the flimsy paper that was supposed to "protect" them. In fact, it was nothing that 8 weeks of exposure to sunlight could not cure. I also stuck with the original engine cowlings, even though sampling the internet would make you think these are gross abominations that misrepresent the original (I honestly could not see what the fuss was all about; pretty OK for 1/72 scale). Whereas the propellers did look wrong, I did my best to make this less visible using the time-honoured technique of sanding. One irritating aspect of this build was that Tamiya cement (both the normal and the quick-setting) did not work well with the plastic: seams that I thought were long sealed tended to pop up again days later. This created multiple cycles of re-sanding, re-gluing, re-masking and re-painting, particularly along the joint between halves of the fuselage, and half-wings. I am not sure what the solution is, but if you are lucky enough to find one of these to build (they have been out of production for a while), it may be useful to try a different type of cement. Anyway, this seems to be the only kit of the PB4Y-2 around, so if you (like me) really like this plane, it is worth investing the time and effort. There were a few things I would do differently if given another chance, but I think it makes a fine addition to my collection.13 points
-
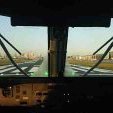
A couple of recently completed projects first being a refurb of the airfix L-1011 Tristar I build long ago complete with dodgy painting, no straight decals, unpainted and yellowing plastic. Since I had the decals still I refurbed from TWA to Cathay. Second is the 1:24 Harrier GR1 that was donated mostly unbuild to the museum I volunteer at (the donor got the kit in 1974 and never got round to building it instead was building the real thing) so I built the model for display at the museum to depict an engine change. Never tried my hand at diorama before so was interesting trying to build jacks etc. Tristar before After Harrier GR1 1:24 On display behind our GR3 Relaxing with his bottle of coke whilst others work.13 points
-
Most of the build aspects of this were documented in my WIP thread that can be found here, but my F-14A 162603 HIP Killer Wichita 103 is now complete and ready for inspection. I’ve posted a number of photos to illustrate various aspects, views and details and I’ll happily take any questions. Overall, it’s a nice build; a well engineered kit that gives a good level of detail with crisp panel lines and not an overly complex build; it’s a good compromise. Gripes are few. I’m sure the nose leg still looks a little long and I do wonder if measurements were taken from either a very light weight aircraft or one with an over pressurised oleo. It doesn’t detract too much, but I think it’ll look odd if you hung 6 phoenix missiles from it. The horizontal stabilisers have a clever means of attachment – well, nearly. There’s a nice little bit of frame just inside the rear fuse to support the inner section of the stab pivot, but it’s on the lower half rather than the upper half, so there’s nothing to support the weight of the stab when it’s right way up. Did I forget anything? Not sure – take a look at the WIP if interested. Anyway... a first photo to illustrate what’s been tackled, and then some general views. F-14A Wichita 103 Academy 1/72 - details by Jonathan Hughes, on Flickr Overview to scale by Jonathan Hughes, on Flickr Wichita 103 and crew by Jonathan Hughes, on Flickr USNavy deck crew. Reedoak figures now painted by Jonathan Hughes, on Flickr Painted kit seats with painted Reedoak pilot and RIO (still awaiting helmet details) by Jonathan Hughes, on Flickr Underside by Jonathan Hughes, on Flickr Starboard nose close up by Jonathan Hughes, on Flickr The hot end by Jonathan Hughes, on Flickr Short range goodies by Jonathan Hughes, on Flickr Pointy end close up by Jonathan Hughes, on Flickr Cockpit detail by Jonathan Hughes, on Flickr Nose details by Jonathan Hughes, on Flickr Canopy rail detail by Jonathan Hughes, on Flickr Canopy details by Jonathan Hughes, on Flickr Nose colour variations by Jonathan Hughes, on Flickr Nose gear bay by Jonathan Hughes, on Flickr Main gear detail by Jonathan Hughes, on Flickr Rear fuselage/beaver tail detail by Jonathan Hughes, on Flickr Underside details by Jonathan Hughes, on Flickr Upper surfaces details by Jonathan Hughes, on Flickr Wing upper surfaces by Jonathan Hughes, on Flickr Wichita 103 nose profile by Jonathan Hughes, on Flickr No.1 intake by Jonathan Hughes, on Flickr F-14A Wichita 103, VF1 Wolfpack by Jonathan Hughes, on Flickr Wichita 103 by Jonathan Hughes, on Flickr Wichita 103 with crew by Jonathan Hughes, on Flickr Feel the need... the need for speed by Jonathan Hughes, on Flickr Thanks for reading... Jonathan12 points
-
With the LCI nearly completed, it's time to turn attention to Starling Model's recent release of a Bangor class Minesweeper in 1/350. It'll be my first Starling model and I'm looking forwards to it with the excellent reputation for detail and precision. Nicely boxed... As provided it depicts HMS Rhyl well represented in this fine photo here I'll be building HMS Poole with it's very distinctive Camo scheme and a port side view, and to date these are the only photos I can find It's a later iteration than the kit representation with a scheme circa 1943 onwards well represented by this colour profile from "CB3098 may 1943" available from Sovereign Colourcoats and special thanks to Jamie Duff for permission to use the profile Elsewhere on the web the camo stripe has been intrepreted as B15, but I think the above as G10 is pretty compelling. It's always difficult to discern B55 in B&W pics but I'm happy the profile will have been followed so the supertstructure is going to be B55 unless someone directs me otherwise! HMS Seaham had a near identical scheme and there are clearer pics of the port side and layout. Build issues 1) The pennant number is 2 tone so that will necessitate the use of masks 2) HMS Poole has a significant "Conniing" tower, shared by many including Seaham, though Poole appears to have extensions sideways and backwards that have ?canvas spray dodgers around. 3) Early Bangor Class vessels do not appear to have carried Carley floats - Poole has at least 2 and probably 3, the first on the starboard side of the bridge and likely 2 at the aft superstructure that appear to b supported on built-out platforms. 4) Despite the later time, she is still carrying an aft 2 pounder 5) She appears to have 20 mm oerlikons in the bridge wings I have highlighted the areas of concern inthe following pic The hull comes as a single one piece moulding which is without flaw apart from possibly a misplaced porthole that is not "drilled" out. It's possible that it represents something different and there's a piece of tape to line up the lower row highlighting... There's a substantial moulding piece attached along the keel. First order of business was to remove this with clippers and a blade It really is beautifully moulded. Here's the rest of the kit which is complete and notably features 3D printed parts from Black Cat Models. The way to go. She'll be presented at anchor on a smallish base like so More soon Thanks for looking and feel free to add to any colour scheme debate Please Rob11 points
-
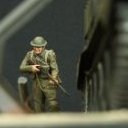
Afternoon all, After several months of on and off work, my first dio in quite a while is done - it's been an interesting journey so far trying a lot of new techniques building the tank, dio and even the wood base. But first, here are the two pictures which inspired me to build this: And my interpretation: I think I've matched the vague idea I had in my head for how this would turned out, and although there are bits I think don't work and need improvement, I'll save those for another project. With all the interior elements added and weathered, the building looks less like an empty shell and more like a house whose occupants have had to flea urgently! The chap in the shirt has knocked over his coffee much to his colleagues amusement.... Meanwhile, their very bored friend has been distracted by something else, scurrying around near them. And yes, I just noticed the chap leaning on the table has not settled down properly - I've fixed this now! The water is made from a couple of Woodland Scenics products and Tamiya X-22 to improve the gloss finish The bird is from Mantis Miniatures Thanks for looking!11 points
-
I made good progress today and managed to complete the cockpit. This is going to be a strictly OOB build, and I'm following the instructions (what a novel idea!) with only minor deviations, which I'll point out. I pre-painted most of the cockpit parts while still on the sprue, but it turns out it would have been easier to wait until after assembly, because nearly everything is green! Speaking of which, I don't have any Mitsubishi Interior Green, so I substituted US interior green, which I've read is not too far off. The forward bulkhead consists of four pieces sandwiched together, the last of which is the instrument panel. The kit provides an optional PE piece for the IP, but I did not feel a need to use it. A decal is provided for the instruments, which works very well! The rear bulkhead has framing for the seat. The seat sits on the little tab on the bottom frame -- I was concerned about getting the seat properly aligned, so I held off on attaching it until I had the cockpit in the fuselage. Speaking of the seat, this is what it looks like. PE is used for the belts. ClearProp would have you layer two pieces of PE together for each belt. I cheated and only used the larger of the two pieces. I'm very impressed so far with how well everything fits together. Nonetheless, some care must be taken to ensure proper alignment. A good example is the forward and aft cockpit bulkheads. It is essential to get the angles correct, as there is no room for error when you put the cockpit in the fuselage. The most expedient method is to use the fuselage as a jig when gluing the bulkheads: The instructions are sometimes vague about where, exactly, things go. When checking the cockpit's fit in the fuselage, I discovered I had glued a panel on the starboard fuselage wall too far forward and it interfered with the forward bulkhead. Fortunately, it came off with only a little effort and I was able to move it out of the way: I got lucky on the other side, and everything went together without any problems: I taped the fuselage together with the cockpit in position and then glued the seat in place, taking care that it was vertical and on centerline: As I mentioned, alignment is critical with this kit. Unfortunately, I discovered that I had glued the guns pointing a few degrees to the right of centerline. I'm crossing my fingers that this will not cause issues later on 🤞 I'm now ready to close the fuselage, and begin work on the kit's well-detailed engine.11 points
-
Revell 1/72 Nieuport 28 (99p): Built this weekend almost by accident. Figure converted from Dapol railwayman. WIP (such as it is) is here. ….and another pic:11 points
-
This has been one of my more enjoyable builds (despite a health issue getting in the way which, as I type this is yet to be resolved by surgery). In a way I’m sorry it’s finished, but onto the next one…… I purchased this kit cheaply off EBay probable because it was missing its decals - which I managed to purchase from Revell. It was in its original box and although the bag had been opened, the kit was complete. The quality of the parts was on the whole ok, but it had some flash here and there. For an old kit, it won’t together well with just the odd hitch along the way. Ive purposely not weathered it as I’ve depicted it as a museum quality paint scheme. The flaps are in the down position as they are movable (at least they were until I knocked on off and had to glue it into its down position. The decals put up some resistance going over the rivets with one Royal Air Force decal having to be scrapped as it tore and curled over and I couldn’t rescue it. I might have a way out of this predicament with thanks to Adrian who is sending me some Royal Navy letters with a couple of other letters to play around with. Anyway enough wittering - onto the photos taken outside as the light was better. The WIP is here And with an early Revell Avro Lancaster10 points
-
So today I've managed to finish off the interior and join the two main assemblies together. However fitting the shell and the chassis together turned out to be very tricky and tbh I can only keep my fingers crossed that everything lines up ok once the wheels are in place. Here's a few pic's of today's progress So like I say hopefully with the wheels in place the build will come together but atm I'm not sure of the outcome 🤔. Thanks for looking back soon 🙂👍10 points
-
I have been blogging this build. This is the Hasegawa 1/48 kit, with some modifications.10 points
-
Hi guys, here are some pictures of one of my lockdown builds: it is the Eduard Spit VIII in the Profipack release, coded DG-R in Burma. Nothing much to say about the build (its is my fourth Spit VIII sofar). I used Gunze and Tamiya paints for the camo, and weathered with oils, pigments and ink pens. I made a small base made with foam board covered with AK Dry ground product. have a nice day, Christian.9 points
-
Had this one sat on my shelf for a while looking a bit sorry so I thought it be about time I finished her: - Used a combination of flory washes, enamels and to create the weathering on this one. Overall I'm pleased with the result being the first of my ventures into modern AFV's (Excuse the wonky smoke discharger 😂)9 points
-
The model is from 1979, with all the limitations of the time, but it still remains in my opinion better than the Academy that appeared in 1998.. Of course the improvement and addition works are quite numerous, but, given the structure of the plane and the large glazed surfaces are worth making. The slats under the tail surfaces are to be repositioned, while the landing gear legs, too long, must be rebuilt, as well as the four long rods that connect the legs to the belly of the fuselage and the four shorter ones placed higher. The cockpit floor must be modified, while the structure on the sides must be rebuilt. To this must be added the seats (largely redone), the signal flares container applied inside the access door, and finally the typical equipment of a Fi156 for SAR in the desert (containers for water, rifle, tent ... ). The structure of the 'cabane' under the top of the roof must also be redone, including the 'lens' that closes the rear of unarmed versions. The engine cowling requires the opening of various holes and slots, as well as the construction of the engine itself. Identical speech for the engine exhaust pipes and the oil cooler, with its front ‘horn'. The tail skid will eventually have to be slightly modified. Hope you like it Criticism and suggestions as always welcome Giampiero Piva9 points
-
Fairey Seafox, Matchbox 1:72. Finished as from 765 NAS based at Lee on Solent in 1940. Finished with brush painted Xtracrylix with shadow shading, I used Camouflage Grey in lieu of Sky Grey. Then matted down with Liquitex matt varnish. Completely OOB.9 points
-
All good things come to an end, which is a shame! But on the other hand, even nightmares do end in the morning, and sometimes it's a good ending! As is here! So, as you might guess this wasn't the easiest build, which in this case isn't the kit's fault - in fact it is a rather easy one - or bad instructions, poor material, rusted brass, whatever there may be a reason, but solely the builders own. Maybe it was clumsiness, to many late night sessions, to less time or concentration, whatever; this build didn't go as I wanted. For those interested, it's here: In brief; it's the base model, Eduards PE set, with Montex masks and a Gaspatch Browning. Apart from lost parts galore (ever saved a part from the cat litter box?), I really could have bee a tad more clever in opening the canopy. But, I must say; I'm happy with the result, though it's many flaws, some missing parts, and you might have guessed, historical precision wasn't top of my list. So, here's the pictures:8 points
-
This is one of a group of "COVID-builds" I'm finally calling done. Started mid-last year, and picked at through the shutdown. All of these I'm posting are >30 year old< shelf queens: models I started and put away for one reason or another. When I vowed to complete them I also said I was going to build them pretty much out-of-the-box. Which of course didn't happen! LOL. But, I did also tell myself that I wasn't going to spend any additional money on them, so I had to use decals and paint I already had, and scratch build anything I wanted to add. So, this is a 1/72 Monogram P-36A, built from the 1979 boxing of the 1967 kit. I wanted to do a Finnish aircraft, but didn't have the decals to do any of those with squadron badges, etc. I found this one on this awesome site: https://www.asisbiz.com/il2/P-36/Finnish/pages/Curtiss-Hawk-75A-Finnish-Air-Force-LeLv32-Karhila-CU563-Finland-1942-01.html It's CU-560, the aircraft of Kyosti Karhila, and apparently it survived at least until 1944. Luckily the markings are simple, and I had the right numbers and national insignia from a 30 year old sheet! It's cool that it has the black-on-one-underwing... The kit is of course a familiar, simple gem. Brush painted with old but still viable Model Master acrylics. The only thing I added is a paper + plastic bits cockpit interior, using images I found on that site that are apparently intended to be used for computer wargaming. I just had to re-size them and glue into the fuselage sides: presto, instant cockpit interior. I used the wheel well images too. So, it's kind of an '80s-era build overall! The one problem I had was with the clear parts. The windscreen mold was pretty old even when I bought this kit, and it was pretty misshapen and just didn't fit. I didn't discover that till late in the game, so it's kind of gnarly, with canopy glue filler around it. Oh well...8 points
-
I promised some blue oval kit action. I think the Sierra XR4i was the first Tamiya kit I ever built and I built a second one when I was young. Let's see if I can finally do a decent job of it. I'd been following this one on eBay for some time, It had been priced at £70, then £100, then back down to £70 again with offers accepted. Another XR4i kit sold for just over £70 while this one was on sale but for some reason there was no interest so I put in an offer that the seller accepted.8 points
-
After a difficult start when I thought that this one would be a failure I am very pleased that I persevered as it has turned out really nice. I bought this one when the kit first came out as the Tempest was one of my favourites meaning to build it straight away but I was seduced by an MDC Typhoon and never got back to the Tempest. As I have quite a few PCM kits in the loft and have only ever built one (G55) I thought that this year I would build three of them, the Tempest, a fabric winged Hurricane and a Spitfire Mk.IX. Despite my usual routine of reading other peoples builds and reviews I was taken by surprise by some of the problems I encountered and was close to shelving the build but I have never given up on a build in 1/32 scale so carried on and it got better and I started to enjoy myself. The kit itself is a treasure trove of PE, Resin and a wonderful selection of decals, the instructions are also very good if a mite vague in parts, but it was the first 1/32 scale kit of a Tempest and PCM did made kits of subjects that other manufacturers have ignored to this day. I took an early decision not to use too much in the way of aftermarket parts and use what was in the box but I did use some Barracuda parts, the main wheels and the Typhoon/Tempest air intake ring are from them, Markings were painted on using Montex masks and Sovereign Colourcoats paints, the stencils were my first attempt at using HGW Wet Transfers and I was most impressed with them and have invested in quite a few sets from their range as I do not get on well with decals especially the tiny stencil ones. The main paint scheme was done with Xtracolor paints and for the camouflage pattern I used AML masks which I have used before. The main problem with the early part of the build was that I had just finished a run of three Hasegawa kits so I had been spoilt quite a bit and it took a while to get back to basics. I wanted to build a Tempest without invasion stripes and came across this photo on which I based my build, this is the caption from the photo "Budd Miller taxing his Tempest SD-R (EJ558) for another anti-diver patrol. Filmed at Bradwell Bay on 15 October 1944". Further research found that Flight Officer Budd Miller (RCAF No. R-140790, USAAF No. T-190924) was an NCO pilot of the USAAF, flying attachment with the RAF Here is the build thread. And so on with the photos. Cheers Dennis7 points
-
In tandem with my ...slowboat... Shavrov Sh-2 build here on BritModeller, this marvellous example of Flash engineering hiding a Hansa Brandenburg aircraft within must be revealed as precisely what happens when your moulds become "cream-crackered". EE certainly knew the problem well, evidently, as does Roden. I have, then, for your reading pleasure, started this thing without due praise and/or reward because the H-B D.I was an interesting plane in its own light and the kit is becoming rarer now, most probably because nobody but me wishes to spend all day cutting through whole acres of flash. Hannants has a few left at the time of posting, iirc. The aircraft: Our HB D.I wil be: from Flik 16D, Serial: 28.30 flown by one Erwin Funk, a brilliant name that anyone would give their left Schwarzlose to possess. Here's a profile: (The angled gun is a typical Flik 16D modification as well as the enlarged windscreen, allegedly). I like the simple cherry coloured band on 28.30 because it ties in rather absurdly with a song from my favouritest indie popsters and, well, it gives me a go at smothering raw ochre oil paints over feeble acrylic undercoats; always time well spent in the life of a modern day artisan with his (or her) moustaches, fan brush and paisley cravat. TBC with pics ... and Best Wishes to you.7 points
-
Hello All, Been working on the Airfix Spitfire Mk XIV since completing our move to a new home. You don't know how many kits, supplies or books you have until you have to move them. LOL In any case I hope you enjoy the pictures. The figure is not Airfix but will be displayed with the model when completed. All the Best! Don Don7 points
-
I then crept up on the look I wanted... Lots of lightened shades of gray.7 points
-
I think we're hijacking this thread! (Apologies!) The Spit XVIe was a favourite of mine back then, and I must have three or four in the stash ready to go. Me and my best mate at school were both keen modellers and practically lived in our favourite LMS. The owner enquired if we had tried a Heller kit before, and as we had never heard of them, he bagged our paper round money again. So I duly bought the Ar-196 and my mate bought the PZL P.23 and we were both hooked on Heller from then on. They just seemed streets ahead of our usual Airfix and Matchbox fare and the subjects were wonderfully quirky which suited us as we frequently tried to out do each other in the quirky subject department. This must have been around 1981/82. So when the Heller GB kicked off, it was like re-acquainting with an old friend. I decided to build them "old skool" right out the box and painted them a'la hairy stick as my 13 year old self would have done. Such a nostalgia kick. I ended up finishing 10 Heller kits for the GB and had a proper blast! So to keep the thread on topic, the Heller Storch is still a great build and I'll make sure I put in a RFI once it's done. Incidentally, Peewit do a canopy mask set for the Heller Storch which saves a lot of time (and swearing!) Steve7 points
-
Nice work! It's a big old girl once she's together- I'm keeping the wings and tail-planes detached so I can get the fuselage black masked off - are yours fixed yet? Anyhoo, In between witnessing Belgique despatch Portugal from the European Championships (Somewhat against the run of play!) I managed to get some Dark Green onto the Lanc. I love Mr Hobby Paint, it sprays like a dream, is touch dry in 30 minutes and I love the colours- it's one of my favourite aspects of the hobby- things are really coming together: So that's enough for tonight. More tomorrow. Lights out! Troffa7 points
-
PM models 1/72 Spitfire with water wings.7 points
-
Lower Wings Right - that thread got a bit 'drifty' for a while so it's time to get back to business. After a couple of rounds of 'inspect - fill - sand - prime' this is what the top half of the wing looked like. I'm happy with this. So now let's work on the lower wing which will be made in much the same way as the top. As you can see, before doing any contouring I cut out the undercarriage bays. I'm fairly determined to have a crack at building this jet with it's wheels down so this small bit of forward planning is important. Mark up the thickness contours just as we did for the topside and drill a hole at any critical locations such as the apex of triangles so that those reference points are permanently available. Cut a stop-line on the highest (thickest) contour and repeat the peeling process that we used to form the upper wing surface. I've included a couple more photos of the peeling process here since I didn't provide many when I wrote about the upper wing surface. Note that I've found a packet of extra-long razor-blades at the local barber's shop so I've found it's now possible for me to almost completely define the split in advance just by pressing a series of blades into position. In the photo below there's just one pushed into place , but I'm sure you can imagine half a dozen slotted into place all around the outside of the wing. Now just use a normal razor blade to peel back the wood to pre-cut contour line. Experience has shown that the peel will rarely progress without some irregularity or some bits that don't come off to full depth. A broad flat chisel cleans them up quick-smart. It doesn't take long to get to this point and a rasp and sandpaper can then be used to start smoothing the contours out. Then you can fill in any remaining steps with some of this stuff. Note that a 'true woodworker' would baulk at both using MDF or using wood filler. Most woodworkers take pride in allowing the grain of the wood to show through in their final product. This photo shows why I consider myself a model-maker and not woodworker. You do not need to be an expert woodworker to do this kind of work. I certainly aren’t! After some more sanding and filling and priming the result looks satisfactory. However, when the lower half is matched up with the upper half and we can see the wing is still far too thick. The red arrow is pointing to the main area of concern. Here the wing I would judge to be about twice as thick as it should be. It would be about right for an Avro Vulcan, but not for a supersonic jet. Luckily, there's an easy solution. Just cut the last few centimeters of the wingspan off the bottom half. Now when the two halves are stuck together the wingtips will be only be as thick as the upper wing half. Furthermore, since the whole wing is too thick, I chose to peel another mm or two off the bottom half. I also rounded off the rear of the new 'wingtips' of the lower wing shape and sliced off the pointy bit at the front (it was always surplus in any case). I actually really like this shape; it looks a bit like some sort of sci-fi 'bat-wing' submarine or something. Playing with these shapes really is getting me keen on the idea of doing some 'home-designed’ sci-fi stuff one day. Hmmm.... Looking thinner at least but inevitably there's still a very obvious step in the taper. That's no good. 🙄 Regardless let's glue the two halves together... and use car-body filler to fix the various steps in the taper and gaps between two halves. Car-body filler is truly great stuff, but my ongoing and extensive use of it is yet another reason that I cannot really consider myself a 'wood-worker'. From front-on the taper is starting to look a bit better but it's still not there yet. Here the graphite squiggles indicate areas that are still too thick and therefore require more rasping and sanding. Then it’s filling and sanding... filling and sanding... and finally priming. In truth there's still more detailed filling and sanding required but you get the idea. In front view the taper is looking OK now (no photos, you'll just have to believe me) and I'm happy that the very basic shape of the wing is now fairly close to right. At sometime in the future I still have to deal with the washout and the various droops and curves in this thing. I'm not exactly sure how I will do all of that but I think I'm coming up with a plan... 🤔 That's it for now folks, Stay safe and keep building stuff. Bandsaw Steve7 points
-
Yesterday, after finishing the model at the last minute, I attended an event at RAF Museum Hendon. It was organised by the Typhoon Entente Cordiale Trust, and was primarily for the visit of Peter Roper, a former Typhoon pilot who was visiting the last Typhoon with his family, before going to Normandy to dedicate a plaque to the French who aided pilots after they were, like him, shot down in the Normandy campaign. I was invited by David Ince, the pilot of 'photo M' who also developed its forward facing camera installation. The model had been built by me as a gift to him. Peter Roper (left) and David Ince with the last Typhoon. Members of TECT. Me presenting the model to David Ince outside the museum.7 points
-
Hello all, Here is my recently completed 1/48 Airfix Canberra PR.9 in the markings of XH168, 'Eastern Promise,' during Op Telic in 2003. Delivered in 1960, this Canberra served with 59, 13 and 39 Sqns. In 1981, the aircraft was placed into storage at St Athan for a number of years before being re-activated for service with the then new 1 PRU (39 Squadron) before being written off in a landing accident in September 2003. The build thread is below. Extras used included a Pavla resin cockpit, Neomega ejection seat, Hypersonic Models canopy correction, Eduard masks, Mastercasters corrected rudder, Eduard static discharge wicks and a mixture of Xtradecal and Model Alliance decals. Paints are from MRP and the light weathering is a mixture of Flory wash, Abteilung oils and Tamiya weathering sets. The comms wire running from the cockpit to the tail is EZ line. Oh it ended up being a bloody tail sitter! I've fashioned a bit of clear rod to sit underneath the rear fuselage to keep it level. 39 Squadron then and now: I also made some modifications which are highlighted below: Thanks for looking and stay safe Dave6 points
-
Hello fellow modellers, here you are my last built. It's the easy and relaxing IAR 80 1/48 Hobby Boss kit. Maybe not super accurate but to me good enough to have fun. I built it OOB with just some additional details in the cockpit and slight modifications to lower flaps and elevators. Painting done as usual with Tamiya acrylics and spray finishing. Enjoy the pictures and any comment is more than welcome. Cheers, Andy6 points
-
hi everyone !😄 this is my REVELL 1/25 '69 camaro,an very nice kit and easy to build!! hope you guys like it!!🙂 and here is the video build if you are interested..🙂6 points
-
Hi all, I thought you might like to see my 1:32 scale build - the French Ponnier M.1, Serial No:18 ‘Le Vampire’ of the Aviation Militaire Belge as flown by Abel de Neef from the Ten Bogaerde (Koksijde) airfield in 1915. The model build in the forum is here: https://www.britmodeller.com/forums/index.php?/topic/235093786-132nd-scale-ponnier-m1/&tab=comments#comment-4116386 The basic kit is resin and made by ‘Planet Models’ (Kit No: PL253). The list of changes/additions to the model are: Engine: Detailed with Nickel-Silver valve push rods and copper wire ignition leads. Modified or corrected: All wing and landing gear struts were replaced with made Brass tube struts with internal reenforcing Brass rod. The lower wings had 1.0 mm diameter Brass rods added to give adequate support at the fuselage. Rigging is 0.08 mm or 0.12 mm diameter mono-filament with ‘GasPatch’ 1:48th scale turnbuckles and 0.5 mm or 0.4 mm diameter blackened Brass tube. Animation of the ailerons, rudder and elevators achieved by cutting out with Brass rod supports. Aftermarket additions: ‘Xtradecal’ parallel black stripes (XPS1), ‘Aviattic’ CDL aged varnish (ATT32094), ‘Lukgraph’ Dark Plywood (DEC004) - from their Friedrichshafen FF.33L kit (32-30). ‘Wings Cockpit Figures’ Pilot adjusting goggles - (LSK02). ‘GasPatch’ 1:32nd scale Lewis MK.1 Stripped Half Heatsinks. ‘Model Scene’ Wetland Middle (F011). As usual I've created a downloadable build log in Adobe PDF format, for those who might want to refer to it for reference or build details. It contains full step by step descriptions of the model build, its modifications/changes and is also supported with illustrations and photographs. If viewed in Adobe Reader, each build log has book marked chapters/headings for easier navigation through the log. My model website has the gallery page, so to view any model, go to the gallery (in my link below) and select it. If it has a PDF build log, it will be available to download using the 'PDF' icon on that models photo's page. For any photograph, just click the photo to enlarge or reduce the viewing size. Mike6 points
-
Hi! For those who followed my thread, thank you. For everyone else I hope you like the results. Since I last posted on the WIP thread I've added some more dust pigments and shot the model with clear matt varnish. As always thanks for looking6 points
-
This is my RVHP 1/72 Beechcraft T-44A Pegasus advanced trainer. The T-44A is used to train future multi-engine pilots for the US Navy, Marines, USAF and Coast Guard. This is my second RVHP full kit and while it was better then the previous TC-12B Huron I would still rank them as middle of the road in quality for resin manufacturers. Pin holes were mostly confined to the lower side of both fuselage halves. The wing was a single casting that fit into a slot on the underside of the fuselage and was perfectly flat. This was unfortunate since wing should have a good amount of dihedral. I fixed that by running just the center section under hot tap water until is softened enough to give it some dihedral without distorting the rest of the wing. There is no indication at all of where the horizontal tail surfaces should go on the model and even the drawings were only marginally helpful. I think I got them close but your guess is as good as mine. This kit came with a fairly detailed interior for both the cockpit and cabin. The cockpit transparency is a nice clear vac canopy, but it is much too large for the opening. However with careful trimming it fit well. The cabin windows were translucent resin castings. For some reason I was missing 3 of them, I think the carpet monster got one. Usually I would fix this with Micro Kristal Klear, but the openings were kind of large for that and because the fuselage side was thick it would have shrunk down to leave a deep depression. However there was a layer of flash filling in the window opening on the fuselage inside, so I left that intact and painted it the interior color. Then I filled the opening with Kristal Klear and given the translucency of the other resin window I think it came out close to them. Hopefully that made sense and I should have taken pictures. They are the 3 rear ones on the right side. The decals were printed on a continuous very thin film so they required careful trimming. Because the film was so thin they were difficult to move around and position without them folding up on themselves, but once place worked very well. The 4 stars and bars had a white outline so did not require careful masking of the orange, but the white as not very dense so some orange bleeds through. So here it is: Next up is the Hasegawa EF-111A. Enjoy6 points
-
Alrighty folks! First a bit of history about this funky little machine! The first Air Baby prototype flew for the first time in September 1934 and appeared at the Czech National Flying Club Competition. After several demonstration flights within Europe it was displayed at the 1934 Paris salon. The Praga was produced before World War II both by ČKD-Praga in Prague and, under licence as the Hillson Praga, by F. Hills & Sons Ltd of Manchester in the UK. Approximately 150 E.114B models were built, including roughly 40 of the Hillson variant. Collective production of E.114 D, E and M versions was around 125 E1A9738C-B39E-49A5-80ED-42BA66FAF1E2 by Ben Brown, on Flickr The first Manchester-built Hillson Praga was exported to Australia. Demand for the type in the UK was subdued and over half went to flying clubs, including a batch of ten to the Northern Aviation School & Club (NAS&C), set up at Barton Aerodrome near Manchester by the manufacturers for this purpose.[8] The NAS&C also trained prospective pilots of the Civil Air Guard. The Praga B engines manufactured in the UK by Jowett Cars Ltd proved unreliable and at least five were replaced by the much heavier 30 kW (40 hp) AeroncaJapaneseJ-99 flat twin.[6][8] A Hillson Praga won the Manx Air Derby, flying three circuits of the Isle of Man on 1 June 1936 at 144 km/h (89.5 mph). Post-war Czech built E.114Ms were exported to France, Finland, Italy, Switzerland, Romania and the Saarland. Used as tourers and trainers, they also acted as glider tugs.[1] Five Hillsons survived the war but only two flew again. One crashed in Turkey in 1946 and the other, G-AEUT crashed in Italy in 1957. 4E2F1049-61EF-4EB5-B2DA-B885011B4B7A by Ben Brown, on Flickr As of 2017, there are two active flying Praga Air Baby in existence: HB-UAF, the aircraft is powered by a Walter Mikron III engine. OK-TAU58, reconstructed in 2016, former Swiss registered HB-UAD E.114M (part of the reconstruction included refitting the aircraft with an original Praga B2 engine). This is the KP kit - now anyone who has built a KP model will know that they produce some very esoteric subjects - often the only game in town - but with care they can build up very nicely for a 'short run' kit. A73755B0-6A92-4C75-A35D-DB7944EBB0E2 by Ben Brown, on Flickr Basic structure went together well albeit filler was required to fair in all joints. the Airbaby has an unusual cockpit - the leading edge is glazed in part about the cockpit and this hinges up to permit access - the two side windows fold down and the front screen is fixed. The leading edge part is sensibly moulded in clear plastic and was cracked in half in my example - it took 5 hands to juggle to make it fit the wing and also the front screen assy, I can see why most builds online have the leading edge part open! I left the side screens hanging down. Cockpit is well appointed, do remember to paint the wing spar behind the glazed bit... I forgot... painting was with Humbrol enamels- the silver is Humbrol Metalcote Polished Aluminium Acrylic Spray which is superb, tough, and very forgiving. I had my first ever problem with it on my Jetstream C10 but no repeat here - I love the stuff and prefer it to Tamiya TS12 which is too 'cold' IMHO - especially for silver dope machines. Decals were fantastic - two sets were provided - I left the suggested red trim off the cowling and fin as I'm not yet sure about the colour on EUT and I don't think the leading edge surround was painted despite what KP suggest. You only get the reg letters and Hillson logos no cheatline for the second decal option which is a bit stingy I think. With Mr Setter then some Microsol they just melted on with no silvering. A coat of Klear and she was done. 9326A437-AAF5-44E7-9B47-B7E765D64DF0 by Ben Brown, on Flickr Hope you like her - I seem to be addicted to obscure vintage civvy stuff at the mo! ATB TT6 points
-
1/48 Ford Flivver from the Williams kit. Mostly oob.6 points
-
Thanks for the kind remarks and not long to wait. Finished the colour coats and ready for a gloss coat. Up early this morning and was able to press on and get this done. This side we know: And this side we don't, so a little speculation on my part. Decals and details to come. Ray6 points
-
Morning all! That's tremendous @VooDoo-S8 and @Antti_K, brilliant stuff, thank you! I thought it might be a good idea to spend a few hours on the instrument panel, and ended up finishing it relatively rapidly (unfortunately forgetting to take one or two photos in-between). The kit part is nicely detailed but something just doesn't seem right about the shape of those displays (navigation and primary flying displays?). In reality it seems as though a larger gap should be present between the centre instruments/displays and the two outer screens. But just in case things turned south, I made a backup instrument panel template. First things first, I shaved off the displays i question and fixed the instrument panel to the coaming. Filler was then applied to clean up that gap, and replacement panels were fashioned from plasticard. Now, this is where I forgot to take photos... Taa daa! The paintwork has since been tidied up, and the area around the keys (at least they seem like a set of keys attached to a fob on many reference photos- on the left of the instrument panel coaming) touched up as well. I haven't the foggiest idea what this "lump" on the topside of the coaming is, yet it appears on many of the references so I thought I'd better include it. Again, the dust will be cleared away soon enough! But despite that I think it's starting to come together relatively well? So that's it for now- I have already made/painted/glued the fabled torch, friction brake, as well as the ELT, and have been progressing with the front seats (hoping to have them finished at some point today). Thanks again for dropping by. Best wishes, Sam6 points
-
Now, I decided to apply heavy weathering effects to my M-47, and until this moment I achieved this result... That´s all fot now...6 points
-
A busy week in the garden building composters, strimming and putting up trellis, but I did manage to get some time on the Grob today. More work in the cockpit, trying to emulate what I can see in reference pictures. The seats in particular. Also did some more dremelling. The area behind the rear cockpit needed to be hollowed out as one reference picture shows quite a void behind the rear seat. This is what we had: And this is after dremelling. Next I fashioned a flat shelf behind the seat and also made the seat side "cushions". These seem to be a combination of padding and moulding as part of the seat. The plan here is to smooth these side pieces into the seats with putty, probably very wet milliput or perhaps PPP. Then, having dremelled out the nose, a small bulkhead was needed which sits just in front of the front I/P The I/P's themselves are getting further refined. The ones supplied are IMHO too large, so I'm trying to fabricate something more to scale from the existing ones, plus scrap card. The decals provide two very neat I/P's which should look fine on the modified panels. So things are starting to look a bit better in the very small tandem office. Work still needed here includes: 1. Various sidewall and other additions in the form of cable release and spoiler/air brake levers. 2. Rudder pedals added from scrap. 3. Joysticks. 4. Side pouches. 5. Headrests. 6. Seat harnesses 7. Finish of I/P's and fabricate a fairing for the front one to merge into the new bulkhead to look something like this: Meanwhile I noticed that the tail fin seemed to have an unnecessarily steep drop away angle at the top rear: Compared to the drawing: And the real thing: It looks like the answer is somewhere in between, so a small plastic card fillet is needed I reckon. That's it for now, more soon. Terry6 points
-
Beech Traveller MkI. AZ Models kit in 1:72. Completed OOB as FT461 of the Fleet Air Arm. Unit unknown but probably sometime in 1944, possibly in the Pacific or Indian Ocean fronts. Unusual livery of Sea Blue over Intermediate Blue over White. A mixture of paints used, Xtracrylix White and Intermediate Blue and the Sea Blue was Citadel Leviadon Blue over Kantar Blue.6 points
-
My local club has a group build going on for next month's meeting, and although it's a late start (only 3 weeks away), I thought I would contribute something. The theme is WW2 in the Pacific. Originally, I had planned to build a P-38 Lightning, but given the short time available I reconsidered and selected this kit from my stash instead: Japanese aircraft are not my forte -- to be truthful, I've only built one before in my history of modeling (Tamiya's beautiful 1/72 KI61 "Tony"), which I posted here a couple years ago: Let's take a look at the ClearProp kit. 138 parts (including the photoetch) on five sprues: Surface detailing is excellent: Lots of little fiddly parts to contend with... For example, these are the instructions for the cockpit: Decals are provided for four aircraft. I plan to use the markings for the box art version: There is also a small set of masks for the canopy. More to come!5 points
-
Stewart is not impressed.5 points


.thumb.jpg.b4a5069fd2c2dd5708ce1694345c5b11.jpg)


.thumb.jpeg.512869d47e412449d69d30d0295c1ae8.jpeg)


This leaderboard is set to London/GMT+01:00