
Leaderboard


.thumb.JPG.2ce06c4ff2300a5faba93aaeacbdab25.JPG)

Popular Content
Showing content with the highest reputation on 24/06/21 in all areas
-
This is my latest semi long term project and I found it a delightful build throughout. Detail is more than adequate, particularly in the cockpit area and the 3 turrets are miniature models in their own right. The cockpit glazing is crystal clear too. You get 4 Merlin engines but as you'd need a fair bit of work to open the cowlings to show them off I just painted them black and left them. The bomb bay could do with a little more attention and I wasn't too keen on the 6 fictitious attachment points for the doors. I assume they are supposed to give some extra strength to them and of course the proper ones are also provided but they are very delicate so I suppose its a catch 22...? The surface detail tho' is excellent and very convincing, particularly on the wings. Care needs to be taken when cleaning up the fuselage as obviously most of it disappears but its easy enough to reinstate using a tiny razor saws teeth. Fit generally is spot on with just a little tweak required here and there on the engine nacelles to wing joints. But they could probably be down to me as well. One great added bonus I can vouch for is the fact that the wings are completely detachable and when fitted do so pretty much perfectly. It can be a bit of a tussle to separate them so during the build I sanded the very strong lugs down just to weaken them a little. It didn't have any effect on the strength either. The only extras I used were a set of generic seatbelts as I thought the kit ones were far too big and a little basic. The biggest aid I had was to use a set of Dead Designs canopy and turret framing masks. A bit like the Beaufort, it really does make the difference. As I built the 1/32nd nose art kit as Mickey The Moocher I thought I'd do the same with this one. The decals are from Kits World. Anyway a most enjoyable build and thanks for looking.. L4 L1 L2 L3 L5 L736 points
-
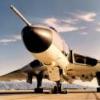
An old kit, but far better than I expected. Yes, there are i couple of errors, but the basic shapes are OK, and the kit was not that bad. I replaced the nose cone and seat, but the rest is mostly OOB. Decals are from my spares box, mostly from Revell's Tornado. Not perfect, but good enough for this build. I painted it with the excellent Mr. Paint colours. The nose cone weathering was achieved through the hairspray method and Gunze paint. Fit was not perfect. Especially the engine nacelles and a stupid part just behind the nose, the lower part of the body including the gun. But that was nothing that not could be solved with a little sanding and some violence. Almost no putty was used. Of course, the GWH Fulcrum is far better. But this one is cheaper and simple to build. Cockpit is a little too basic, hence the closed canopy and resin seat. And some panel lines are wrong. But not even a MiG addict like me can spot all minor errors. It looks very much like a Fulcrum to me! I like birds in "wrong" clothes. So a russian Cold War jet in NATO colours is of course irresistable! Thanks for watching! And now: French Fancy II GB!29 points
-
Hello! This is my redention of the Airfix kit. I believe it's the first one in this livery here. I don't know about the rest of you, but I find this maritime patrol camouflage simply adorable. Those Carribean Mitchells had an uneventful war service, patroling the Carribean Sea from Florida to Venezuela in vain, as they never found a single U-boat. But I doubt that the crews were complaining. Just think! While those others had to deal with flak and fighters and live in squalor, they had to battle with rum, and pina coladas, dance Rumba and fend off prostitutes on those tropical islands that are amongst the top destinations for the wealthy tourists today. The kit itself is simply not there yet (that is my general opinion of the new Airfix line of aircraft kits). Yes, it's the best kit of the early B-25 in 1:72, but next to the older Hasegawa B-25, it just doesn't cut the mustard. Clear parts are too thick and have too pronounced window frames, panelization is average at best and the pilot's seats are just terrible. The worst thing is that soft Indian plastic! Why did I put my model on the stand? Because the undercarriage legs were bending under the additional weight that I had to put in the nose to prevent tail sitting. Lovely plastic! Keep on using it, Airfix. The modifications were mainly in the dorsal turret ring and pilot's seats. The rest is OOB. Revell and Vallejo acrylic paints were airbrushed and some black dry pastel was smeared around the cowlings. The painting guide is wrong and one should check up the original wartime pictures to really nail the demarcation line. There was just two colors used; the White and the Olive drab. No Medium Green. Enjoy! Josip25 points
-
Evening all, Hot on the heels of the F-111, and continuing with the 48FW theme is the old but gold Hasegawa 1/72 F-4D. I added an Eduard zoom set to jazz up the cockpit whilst the main markings came from an Xtradecal sheet. I bought a Print Scale sheet for the stencils but ended up using the kit decals for those mostly, they performed pretty well apart from the odd one silvering.... Hataka lacquers used as usual, note the sage green in place of the tan except for a patch on the fin- from reading it seems they used a bad batch of tan paint. Certainly makes for a slightly unusual looking Phantom. Hasegawa 1/72 McDonnell Douglas F-4D Phantom II by Shaun Schofield, on Flickr Hasegawa 1/72 McDonnell Douglas F-4D Phantom II by Shaun Schofield, on Flickr Hasegawa 1/72 McDonnell Douglas F-4D Phantom II by Shaun Schofield, on Flickr Hasegawa 1/72 McDonnell Douglas F-4D Phantom II by Shaun Schofield, on Flickr Hasegawa 1/72 McDonnell Douglas F-4D Phantom II by Shaun Schofield, on Flickr Thanks for looking, comments welcomed as always Shaun23 points
-
This is the vacuum formed version of Welsh Model's Hastings modified with open doors and dropped flaps. The laser markings are of my own making with the addition of silk screen decals. My first submission, be kind. Vincent22 points
-
Hello, My name is John and I’m a Spitaholic Since returning to the hobby 5 or 6 years ago I’ve had a compulsion to build Spitfires, you can never have enough Spitfires right? Omitted from this page are a couple of aircraft “missing in action”. The first was a nearly completed, I’d just started the camo’, Eduard Aussie Mk.VIII, that my, then 6 month old puppy, decided to try and eat, I think he gave up because it didn’t squeak although he did learn some colourful Anglo-Saxon phrases… …and no he’s not a German Shepard. The 2nd missing aircraft is for much happier reasons, my then 4 year old, grandson took a shine to an Airfix Mk.I which still sits on his bedroom shelf, every time we visit he proudly shows me that its still in one piece! We’ve also made a couple of the Airfix/Lego type click together Spitfires, yes I’m trying to get him hooked at an early age. I currently have a 1:32 Tamiya Mk.IVc patiently waiting for me to give it my full attention. There is also a “long term” project that gets little bits’n’pieces done every now and again, of an Eduard build of a “base” kit with lots of added extras, Brassin cockpit, engine, radio and gun bays, this 1:48 build and so far has cost more than the Tamiya 1:32. Also I have a couple of the “new” Eduard Mk.I and an Eduard Mk.IX that I plan to depict in Russian livery. Here are my completed Spitfires, so far… Eduard Mk.VIII, 2nd attempt Eduard Mk.IX Rolf Arne Berg Eduard Mk.XVI Tamiya Mk.Vb TROP “Malta” George Beurling Tamiya MK.Vb “Malta” until next time as always, any suggestions, criticisms or comments will be gratefully received. rgds John(shortCummins)19 points
-
Hobby Boss 83832 1/35 US GMC CCKW-352 Wood Cargo Truck My latest build is this 2.5 ton 'deuce and a half' truck, which went together quite nicely and was an enjoyable build. The cargo is from a couple of Tamiya accessory sets. I would still class myself as an amateur with lots more to learn, but I think this is my best one yet.16 points
-
I wanted to get this one out the way before Eduard bring out their MkV or it would never get finished. I added the gun bays on one side from Eduard (I'll save the other side for another day, drilling out one wing was bad enough). The prop and spinner were left overs from the Eduard MkI Spitfire boxing. As were the wheels and hubs. And aerial. The 20mm barrels were from Master. A big improvement on the originals. The decals were from AML. The paint was Humbrol. 29 for the dark earth. I used 93 for the light earth. Probably not exact, but it was close enough and all I had in the collection. The Azure blue was mixed using the old Humbrol "Colour System" (#34x49 drops + #25x10 drops + #33x1 drop). Luckily they give the conversion of drops to ml. Enough waffle onto the pics. Tim15 points
-
Hello all, Here is my recently completed 1/48 Airfix Canberra PR.9 in the markings of XH168, 'Eastern Promise,' during Op Telic in 2003. Delivered in 1960, this Canberra served with 59, 13 and 39 Sqns. In 1981, the aircraft was placed into storage at St Athan for a number of years before being re-activated for service with the then new 1 PRU (39 Squadron) before being written off in a landing accident in September 2003. The build thread is below. Extras used included a Pavla resin cockpit, Neomega ejection seat, Hypersonic Models canopy correction, Eduard masks, Mastercasters corrected rudder, Eduard static discharge wicks and a mixture of Xtradecal and Model Alliance decals. Paints are from MRP and the light weathering is a mixture of Flory wash, Abteilung oils and Tamiya weathering sets. The comms wire running from the cockpit to the tail is EZ line. Oh it ended up being a bloody tail sitter! I've fashioned a bit of clear rod to sit underneath the rear fuselage to keep it level. 39 Squadron then and now: I also made some modifications which are highlighted below: Thanks for looking and stay safe Dave13 points
-
Evening all, It's been a while since I finished a model, so time to put that right with the latest off the bench, the Hobby 2000 boxing of the superb Hasegawa F-111F. Not a trouble free build- I had some issues getting all the internals to remain in place when joining the fuselage halves together- but overall a very pleasing kit to build. It certainly looks the part with the flaps and slats drooped. The decals are by Cartograf and performed flawlessly- I opted for the boss bird option to provide a colourful addition to my RAF Lakenheath theme I'm currently working through. I added a pair of AIM-9Js from a Hasegawa weapons set whilst the LGBs and ECM Pod are courtesy of Eduard Brassin. Finished as always using Hataka Orange Line and Alclad lacquers. Hobby 2000 (Hasegawa) 1/72 General Dynamics F-111F by Shaun Schofield, on Flickr Hobby 2000 (Hasegawa) 1/72 General Dynamics F-111F by Shaun Schofield, on Flickr Hobby 2000 (Hasegawa) 1/72 General Dynamics F-111F by Shaun Schofield, on Flickr Hobby 2000 (Hasegawa) 1/72 General Dynamics F-111F by Shaun Schofield, on Flickr Hobby 2000 (Hasegawa) 1/72 General Dynamics F-111F by Shaun Schofield, on Flickr Thanks for looking, comments welcomed as always Shaun13 points
-
What if? What if the Confederate States of America had survived the American Civil War? What if the CSA had survived right up into the present? Well, that's the premise behind this aircraft. I created a scenario in which today's CSA co-exists with the USA here in the 21st Century. For brevity's sake, I won't bore everyone with the whole story, but I envisioned CSAF squadrons that were named for Confederate war heroes. I imagined four Maritime Air Stations; Norfolk, Charleston, Tampa and Biloxi, Miss. These squadrons are named after famous cavalry commanders of the Civil War. This CSAF Mirage F-1 is assigned to the Nathan B. Forrest Squadron based at Biloxi. Their primary mission is anti-ship interdiction. My "what if" Confederacy requires imported aircraft due to an aircraft industry that still hasn't reached maturity, nor any sort of parity with their neighbor, the United States. I guess I might flesh out my what if scenario a bit. A negotiated cease-fire, and subsequent, somewhat uneasy peace, left the United States and the Confederacy sharing what had been the USA. A continuing reliance on agriculture still retarded economic growth and manufacturing technology in the CSA. Faced with a long coastline to defend, the Confederacy, with its new capital in Atlanta, turned wary eyes seaward and made maritime vigilance both a priority and a tradition. Texas seceded from the Confederacy in the early 20th century over economic issues and concerns about the intrusive reach of the Confederate government. I'm still working out how this event plays out geographically, with current possibilities including Texas "annexation" of Oklahoma and possibly a Republic of Texas reach for Pacific ports (and all that that might entail). Confederate forces have been involved in several incidences in the recent past. These would include clashes with Venezuela and Cuba in the Gulf and Caribbean as well as joint missions conducted with Republic of Texas forces against insurgents/narco-terrorists in Mexico. The Maritime Air Stations share defense of the coast and other airbases throughout the interior of the South maintain bomber and interceptor squadrons. The choice of the Mirage F-1 for the role shown here was based on economy, simplicity and of course availability. France had been a supporter of the Confederacy from its beginning and provided various models for purchase by the CSA. The United Kingdom is the other major aircraft supplier for Confederate needs, having sold Hawker Hunters to the South as their first high-performance jet fighter. In these pictures, we see a CSAF Mirage F.1 at a small airfield in the Republic of Texas (yes, there's a "what if" story there too, lol. At some point in the future we may see a Republic of Texas Vampire), making an unscheduled lay-over for some unspecified reason. The kit is the Italeri Mirage F-1 in 1/48 scale. The Exocet she's carrying came from the Monogram Mirage 2000, the rails and Sidewinders from an old Testor's F-18 and the drop tank from something long forgotten, and modified for its role here. I guess I might mention an experiment of sorts. I dipped the canopy in Future colored with MM teal acrylic to get a tinted look. It worked alright here but the first test canopy from the scrap pile actually looked much better. Oh well. I learned a new trick, thanks Swanny! The low-viz markings were created by me and drawn by my son on an Autocad program and I printed them on our home printer. Primary colors are Humbrol enamels, Gull Gray and Lt. Ghost Gray. What-if exercises can really free up one's creativity I've found. Freed from the bounds of reality and real history, it's fun to imagine different outcomes to history. I make no political statement with this build I assure you. I don't defend the Confederate ideology or actions. But for one or two different outcomes in battle or politics, the scenario of Southern survival might have been real history. Anyway, I hope you enjoy my little exercise in alternate reality and thanks again for your interest. Gary11 points
-
Either there is a lot of mislabeling going on, which isn't surprising given the internet, or the HAR10 was a mish-mash of mods and varying states. I'll just have to resign myself to the fact that this is not going to be an accurate build by any means, rather, a best guess at a HAR10 of 28 Sqn, sometime in HK. I have about 5, maybe 6 photos of 28 Sqn WW's, but none of them are of great quality - that one I posted up above is one of the best, so I am just going to have to interpret the photos as best I can. Progress has been progressing, and lego has been lego'd. There's the beginnings of a tropical fit nose in there somewhere. I was a bit concerned with the silicone - it seemed to have much greater viscosity than the stuff I've used previously, but it cured so that was heartening. The following day, this appeared, leaving a nice resin-ready cavity which was soon filled with the magic juice. and about half an hour later we have one of these! The resin cured in about 5 minutes, but it took me the remainder of the time to dremel-clone out the back end to fit over the floor and some other gubbinses I have in the fuselage. A promising start. The fit on the port side isn't quite as good but nothing a bit of filler won't sort out. On the first attempt I got a reasonable result although I did appear to have a bunch of bubbles on the upper side - so I had another few attempts. After this one I left a stirring stick in the cavity and poured the resin down the stick into the cavity in an attempt to remove the bubbles. Also, partially filling the cavity then rolling the mold around to make sure the resin got to all corners etc. None of my later attempts were any better. huh? What was confusing was that the bubbles were always on the same face - the upper side of the nose. I then examined the mold more closely and guess what? Yup, loads of small bubbles in the silicone mold. That viscosity had bitten me. On the Port, Stbd, and lower sides, which had an almost vertical orientation when the mold was being cast, had almost no bubbles, but on the top side of the nose, which was angled in the mold, the silicone had trapped a bunch of air bubbles. Damn. You would think that having those bubbles in the silicone would have produced lots of little bumps on the resin instead of voids but my theory is that the resin was too viscous to weep into the holes, and the exothermic reaction of the resin curing heated up the air trapped in the holes, expanding it to create all those bubbles on the finished part. There wasn't enough silicone left to cast another mold so I decided to run with what I have. (this is old school right?) A few coats of automotive primer and some sanding later brought us to this stage, which doesn't look too bad at all. All those dark grey spots are a bit misleading, as they are really small undulations in the surface as opposed to full blown bubbles So another application of automotive filler/primer followed and the part is now looking pretty good. Given that this is still to be attached to the fuselage and then there will be a lot more filling and sanding to come, I reckon this is good enough to be moving on with. In between the molding, resin-ing, filling and so on I started to feed the WW some greebles and once again I drilled another hole in the wrong place. That errant hole was filled with some runner and sanded back, then re-drilled with hopefully, the correct location. The two channels up front were made from some H beam where I just filed off one side of the H to leave a U channel. The two jacking points in the channel are some left over brass nuts and bolts I had lying around, but at this scale they look the part. Unfortunately, I can't go too far with the greebling as there is still a bucket load of plastic dust to be made with this when the nose goes on, so I don't want to add detail I'm going to be destroying in the next few sessions. Therefore, alternative entertainment had to be found - in the shape of that tubular sticky-outy-thingy that we're all aware of but the purpose of which, nobody knows. Cue the brass tubery. I found some of a suitable diameter but the wall thickness was too great at this scale, so I rotated the tube'tween thumb and fingers whilst holding an old blade inside the tube with my other hand - an easy way to scrape the edge down making it appear as if it is a thin walled tube. - yeah, the other one is what I started with. It really is quite simple and effective. Once I had the tube finished, I turned down a small piece of aluminum rod as a holder (and provide alignment) for the tube Which then got E6000'd onto a chunk of scrap plastic inside the fuselage. I was careful to make sure I did not glue the brass tube at this point as... I can remove it and fit it later once the paint job has been done on the airframe. That aluminum boss allows me to simply drop the tube in from the bottom later and know that it will align with the hole. The tube was then cleaned with wire wool and dipped in the blackening solution for a few seconds, then washed off and given a quick rub with brown boot polish Then once all the hard work is done it will only take a few seconds to fit and have everything in Whirlwind shape and Westland fashion. (The outer ring is some of the PE left over from the Vampire build) Lewis95 asked above about the SIHRSC and I mentioned that it was an invaluable modeling tool - another great tool, maybe not used quite so often, but invaluable when it's needed is this step down/up drill. They normally come in sets of three and are pretty reasonably priced. I find them great for opening up holes gradually to get to where I need it. I always use it by hand and if you're careful, you can also created stepped holes - I think you can just see the step inside the light opening This was just a trial run to see how effective the final result may be. I used some aluminum tape domed over the back end of a paint brush to use as a reflector. The reflector then sat inside the hole resting on the step, which was deep enough to allow me to fit a lens over the reflector, and a PE ring to finish it all off. and looking at that photo now makes me think I had the darned hole in the right place to begin with. Oh well. That's what I get for playing with old kits11 points
-
Hello, I hope you will like my very first post. This is a very old model, 20+ years old, which I completed when I was around 14-15 years old (see the last picture of original condition). Since then I have gained experience so I gave her new decals, fixed numerous errors on the paint job, treated the clear parts with AK Gauzy and eventually gave her a semi gloss coat. I also replaced missing parts, most notably the machine guns, which have been lost. Decals are from Kits World. I know she's not perfect, but I tried to do my best, I hope you will like her. Google Album: https://photos.app.goo.gl/xAMm6jHWi82yxQJY910 points
-
I have a corrected bomb door set already being mastered, plus other items for the Airfix kit. Colin10 points
-
Goodness me, what a long time it's been. A lot has happened. I got a Martini-Henry rifle and have been learning how to reload for it. This has been a resounding, albeit rather expensive success. I have not blown myself up. As you can see, I've also put on quite a bit of weight. That's the hell-times we're living in now. On the plus side, if the Zulus attack, I'm as ready as I'll ever be, and heavily incentivized to win the fight, since I certainly'm in no condition to run away. Mrs P got pregnant again and we lost the baby again, so it's been a bit rough on that front, but perhaps it's for the best, as we're both pushing forty pretty hard now and as I'm so fed up with my own children that I'm thinking of visiting the fate that Cronus reserved for his own fractious offspring upon them. I regret to say I haven't had much time for modelling, or rather haven't made much time for it of late. I've just been exhausted, I have no time to read (and the research is one of my favourite parts), because I'm always home with my children, and there seems to be some confusion over whether or not I'm a professional with a full-time job or merely a convenient free babysitter who can take over whenever Parent A is feeling like a nap, usually around bathtime, where the loud screaming of my hellspawn synergizes with my acoustically perfect bathroom to generate migraines of truly astonishing intensity. At any rate, I managed to find some time this evening to get a little work done on this: Canopy is now on. I also wanted to try and replicate the fuel filler cap, and I think I may have hit upon the absolute worst way to do this: I used a 1.6mm punch to punch out a tiny piece of plasticard (for the record, the filler cap should be 2.1mm but I don't have a 2.1mm punch). Then I applied it to the model, where it stands far too proud: I am not certain further sanding has improved it: Anyway, how are all of you? What did I miss?10 points
-
This is a placeholder while I get all the other Builds finished. Having too many Builds on the go at the same time is never a good idea but, life's too short not too and these GBs are too tempting. picture from Scalemates Good luck everyone Cheers Pat9 points
-
Hiya Folks, Although the Lysander is best known for its clandestine role of flying flying agents in and out of dark fields all over occupied Europe,...... another less well known aircraft also carried out the same duties but carrying a larger capacity of personnel,..... the Lockheed Hudson! 161 (SD) Sqn operated a number of Hudson`s in the agent pick up role where larger numbers of personnel needed to be taken in or out of occupied Europe and they operated alongside the units better known Lysanders. I have wanted to build one of these aircraft for a long time and have been collecting info and photos to help do this and when fellow Britmodeller Alistair (https://www.britmodeller.com/forums/index.php?/profile/24368-aligauld/ ) very kindly gave me the DK Decals sheet for 161 (SD) Sqn aircraft having built one of the Lysanders from it,.......(THANK YOU!!!!) ,....... all that remained to do was to dig out a Hudson kit from the stash! The Revell boxing of the Special Hobby kit will be used ere combined with a turret from a Revell Halifax as the kit turret is quite poorly shaped. The kit itself is not the easiest to build, but having a few of these under my belt,..... I`ll hopefully manage OK! So,.... here is the kit with the decal sheet; I`ve got a few other kits to built too, so this might be a slow build,...... which is probably the best way to build the SH/Revell/Italeri Hudson,..... with a few breaks along the way. I also have a set of resin ED Models P&W Twin Wasp engines which I may use for this kit,.... depending on whether I`ll be building a Cyclone engined Mk.III or a later Twin Wasp variant,..... I`m still double checking;, Cheers Tony9 points
-
Rigging on the Bristol is underway, this was done over a few sessions to allow glue to dry and to give my eyes a break 😀 Control cables for both the rudder and elevator are doubles so double the trouble9 points
-
This has been one of my more enjoyable builds (despite a health issue getting in the way which, as I type this is yet to be resolved by surgery). In a way I’m sorry it’s finished, but onto the next one…… I purchased this kit cheaply off EBay probable because it was missing its decals - which I managed to purchase from Revell. It was in its original box and although the bag had been opened, the kit was complete. The quality of the parts was on the whole ok, but it had some flash here and there. For an old kit, it won’t together well with just the odd hitch along the way. Ive purposely not weathered it as I’ve depicted it as a museum quality paint scheme. The flaps are in the down position as they are movable (at least they were until I knocked on off and had to glue it into its down position. The decals put up some resistance going over the rivets with one Royal Air Force decal having to be scrapped as it tore and curled over and I couldn’t rescue it. I might have a way out of this predicament with thanks to Adrian who is sending me some Royal Navy letters with a couple of other letters to play around with. Anyway enough wittering - onto the photos taken outside as the light was better. The WIP is here And with an early Revell Avro Lancaster8 points
-
I struggled to find a creative way to display the interior of this one. Then i thought why not make 2 dios in one (well 3 😁) so half is portrayed how it would potentially look back in 1918 and half in how it would look preserved as a museum exibit. Its a great kit, a long one so i broke it up with other builds but if youve got the will to tackle it id highly recommend it.8 points
-
Hiya Folks, The little Buffalo has a rather chequered history and has been vilified, but was it all justified? OK, it wasn`t in the same league as the Hurricane or Spitfire but it was still a modern, all metal stressed skin fighter and did see some success in British Commonwealth and of course Finnish service. The main problem with those in British service were their reconditioned ex civil engines as production of new Wright R-1820`s could not keep up with demand and added to this was problems with the armament, part of which was the inexperience of the armourers working with live ammunition and of course the lack of a modern integrated air defence system, as found in the UK. Most communications around the Malayan and Singapore region was by telephone but there were not enough lines available and it became almost impossible to keep open communications between the RAF stations and their HQ`s,...... and to add to this was a lot of peacetime nonchalance, despite a war raging in Europe combined with a large smattering of incompetence, as many of the best personnel were sent off to fight the war against Germany. Into this situation were added a lot of newly trained and very inexperienced pilots and ground crew from Australia, New Zealand and the UK and you can understand the problem. Despite their inexperience and the chaos into which they were thrust, many of these pilots performed well and took a heavy toll of the enemy,..... just imagine what they could have done if they had been controlled and deployed properly. Although it was formed on the Buffalo amidst this situation, 67 Sqn RAF was deployed off to Burma just before hostilities commenced with Japan and alongside elements of the AVG with their Tomahawk`s, they were responsible for the air defence of the entire country! Despite being totally outnumbered,.... this units Buffalo`s proved much more effective as a well organised, improvised reporting and air control system was set in place. The Burma front was swiftly reinforced by Hurricane`s from the Middle East and they eventually replaced the Buffalo while Singapore also received a large consignment of Hurricane`s too,....... but they were too late to save Singapore and the surviving Hurricane`s and Buffalo`s flew to Java, where the Buffalo`s were given to the Dutch who also flew the type. The Royal Navy also flew ex Belgian contract Buffalo`s which had been rejected by the RAF after 71(Eagle) Sqn flew them for trials and although flying in defence of the fleet at Scapa Flow from Hatston, most were deployed to the Middle East where they flew with 805 NAS from Egypt on convoy protection sorties, although three were deployed to Crete and captured by the Germans on the beach where they had been abandoned without engines. Anyway,.... onto the model; Here i the Hasegawa kit with the Pavla conversion which includes resin and vacuformed parts to build the British variants, plus decals for a number of RAF, RNZAF, RAAF & Fleet Air Arm aircraft; The Pavla set; The Hasegawa parts; I also decided to use another Pavla set of resin flying surfaces which included open gun bays,.... seen here with the decals and instructions from the other set; Work started with the cockpit,...... I know that some say that the interior was silver as in US Navy service,..... and being a direct purchase the RAF could also have specified RAF Interior Grey Green,...... but my gut instinct rightly or wrongly decided to use US Interior Green. I have assembled the nose and engine (and yes Chris,... I`ll paint the crank case grey later!) and the resin wing and flying surface parts can be seen laid out too,..... the kit rudder has already been removed ready for the new resin part; And then the fuselage halves were joined and the nose section added; And that is it for now, Cheers Tony8 points
-
Built 15 years ago,now upgraded a bit...: Hope you like it. Tks for visiting!8 points
-
This is a bit of catch up post as i started this Roden Bristol F.2b. a while ago, so here's where i'm up to at the moment... The kit comes with the same detailed engine as the felixstowe but in this kit there's 2 build options which is nice. You can either build normally with engine enclosed or cut the front off, fit some framework and display with engine on show. for this one i opted to build with the fuselage complete which means you don't fit the rocker assemblies or cooling pipes to the top of the engine otherwise it won't fit inside the fuselage. That all sounds great and this is how roden say to build the engine to fit inside the fuselage, i didn't go mad with the paint as it won't really be seen. This, in reality is what you end up with and this means the fuselage doesn't meet properly in places. So the ancillaries were cut off along with the barrels, the barrels are now glued directly to the sides of the fuselage and the crankcase is glued to the radiator and bottom of fuselage. It's the only way i could get the exhaust ports somewhere near where they need to be, get the fuselage closed and have the crankcase and thus the prop shaft sitting square. The interior has some nice details but everything was too wide to fit inside the fuselage, the paint looked a lot better before i had to get serious with a file. Seatbelts are 1mm masking tape painted in radome tan Managed to get the fuselage closed up this morning but some areas just didn't want to talk to each other so once the glue had pretty much set i cracked out the sprue goo and pasted it on. I'll leave that for a good 24hrs to go off and then start the cleaning up process made a bit of progress on the bristol the other day, after a fair bit of sanding back it's not looking too bad and i haven't destroyed any of the details. I need to go back over the seems behind the cockpit with a skim of filler to smooth out some of the pin holes prior to painting that area. The underside was trickier to sand as this area is not flat so only trying to sand the centre line was a bit tricky, definately another go is needed in this area The nose section wasn't looking too bad after a bit more sanding with a finer grit so i've given it 4 rather heavily thinned coats of gull grey, i'll buff it back once the filling is done and give it one more coat as the coverage is still a bit patchy in places. I decided to give the revell nato olive a go for the green, partly because it's close to what the colour should be and partly because i really liked the way the other revell enamels i've used went on. I really wish i hadn't bothered, no matter how much or little i thinned it, or whatever brush i used, or how much i put on the surface layer evaporated almost immediately locking in any brush marks. Luckily i'd only applied it to the wings so they spent a few days in a dettol bath and i switched to using oil paint. I used a different shade of black for the mix which has produced a different shade of green compared to the camel i did, i also put the parts in the airing cupboard for around 4 days between coats, this has cured the paint nicely (don't know why i didn't think of doing that before ) I need to do one more coat of grey for the nose then i can start to think about assembly. I've also got the prop painted, i just need to paint the retaining plate and then give it a couple of coats of varnish Unusually for roden they neglected to include the control horns for the elevators so i made some simple ones from evergreen strip. The rear stabs have been fitted, the 'linen' is mainly white with a few drops of revell beige silk and a dash of grey, the wings have been painted with the same mix. This is my second attempt at fitting the rather fragile undercarriage legs, the first attempt involved fitting them to the wings first as they need to fix on both the upper and lower surfaces of the wings plus the fuselage, so a fiddly job at best. The first method didn't really work, i thought i had it glued in place but the slightest touch and they broke free so for this attempt i thought i'd try fixing them to the fuselage first. It means i now need to slide the lower wing between the fixing points on the struts without breaking them, but for now they are on and square My second attempt seems to have worked and i managed to snuggle the wing between the legs and fuselage, i then fitted the remaining struts and although i think the fuselage is sitting at slightly the wrong angle (it should be level with the wing from front to back) it's as close as it's going to get and if i try and move it now things will break and then i'll be buggered. Once the upper wing and struts are on it shouldn't notice too much, i think the main thing is the undercarriage seems square and the wing is square to the fuselage. So a few touch ups to do then move on to attaching the upper wing It's finally starting to come together. On my last day off last week i did the touch-ups and stuck it in the airing cupboard for 5 days. It's now had the top deck fitted so it's officially a bi-plane I've also pre-rigged and fitted the elevator controls to the fuselage and the scarff ring is now in place Thought i'd get the decals on the tail end sorted so i can then rig the rudder etc. I splashed out my pocket money on the print scale Bristol aces of WW1 decal set in which you get 10 different schemes to choose from, i've opted for the scheme as flown by Sydney Dalrymple and his observer G Beagle. The decals went on quite nicely although the stripes were a bit of a pain to get lined up, also there should be an S under the scarff ring but the first one i tried looked awful as the backing film seemed too thick and the edges wouldn't sit flush so i made the decision to leave them off for now. I might get a general number and letters decal set and use an S from that later on.7 points
-
Hi all, I thought you might like to see my 1:32 scale build - the French Ponnier M.1, Serial No:18 ‘Le Vampire’ of the Aviation Militaire Belge as flown by Abel de Neef from the Ten Bogaerde (Koksijde) airfield in 1915. The model build in the forum is here: https://www.britmodeller.com/forums/index.php?/topic/235093786-132nd-scale-ponnier-m1/&tab=comments#comment-4116386 The basic kit is resin and made by ‘Planet Models’ (Kit No: PL253). The list of changes/additions to the model are: Engine: Detailed with Nickel-Silver valve push rods and copper wire ignition leads. Modified or corrected: All wing and landing gear struts were replaced with made Brass tube struts with internal reenforcing Brass rod. The lower wings had 1.0 mm diameter Brass rods added to give adequate support at the fuselage. Rigging is 0.08 mm or 0.12 mm diameter mono-filament with ‘GasPatch’ 1:48th scale turnbuckles and 0.5 mm or 0.4 mm diameter blackened Brass tube. Animation of the ailerons, rudder and elevators achieved by cutting out with Brass rod supports. Aftermarket additions: ‘Xtradecal’ parallel black stripes (XPS1), ‘Aviattic’ CDL aged varnish (ATT32094), ‘Lukgraph’ Dark Plywood (DEC004) - from their Friedrichshafen FF.33L kit (32-30). ‘Wings Cockpit Figures’ Pilot adjusting goggles - (LSK02). ‘GasPatch’ 1:32nd scale Lewis MK.1 Stripped Half Heatsinks. ‘Model Scene’ Wetland Middle (F011). As usual I've created a downloadable build log in Adobe PDF format, for those who might want to refer to it for reference or build details. It contains full step by step descriptions of the model build, its modifications/changes and is also supported with illustrations and photographs. If viewed in Adobe Reader, each build log has book marked chapters/headings for easier navigation through the log. My model website has the gallery page, so to view any model, go to the gallery (in my link below) and select it. If it has a PDF build log, it will be available to download using the 'PDF' icon on that models photo's page. For any photograph, just click the photo to enlarge or reduce the viewing size. Mike7 points
-
7 points
-
This is the ICM kit of the Cessna O2 in 32nd scale. A nicely detailed kit moulded in soft plastic. You get a nicely detailed cockpit, I added some after market seat belts & decals for the instrument panel. Also a couple of M-16 rifles. The kit has you fit four seats in the cockpit, but in this role only the two front ones are needed. There are a few fit issues, nothing major. The biggest let down is the decals. Poorly printed, pixilated, incorrect spellings, such as "RESQUE". I used the AOA set which is superb. You get sufficient decals to mark up two models. No stencil data for the weapons though. Painted with Tamiya acrylics & Xtracolor enamels. Thanks for looking Angelo7 points
-
Here is my attempt at a Tamiya 1:48 Spitfire Mk.Vb based at Malta around 1942. Built largely out of the box however, I did use a Montex mask set for the roundels and aircraft markings. The idea for this build came from a discussion with @bigbadbadge during a previous build of a Malta Spitfire. Chris suggested that the Extra Dark Sea Grey would look good over-sprayed the “original” green and grey camo’. This sounded like a good idea, at least something I wanted to try and I’ve got to say that Chris was on to a winner, I really like the way she turned out and its a technique that I’ll be doing again, thanks Chris 👍 Here are the photos… Here she is with my first “Malta” build. Link to my build log… until next time as always, any suggestions, criticisms or comments will be gratefully received. rgds John(shortCummins)7 points
-
Hi Darryl, Glad you like it. Feel free to use anything, even take it to the next level. You're right how quick they come together once the cockpit is done. I do spend quite some time dry fitting and making sure there are no surprises so the gluing bit is simple'ish. Just a quick tip for anyone building an Eduard G-6 for the first time. I meant to post this earlier. There are a plethora of options for the fin top. These are in the box, simply glue in the correct fin top piece. However, any misalignment of the fuselage halves can leave a gap at the join line caused by a step in the top of the fuselage lower fin section. Very noticeable when you swing the fin top perpendicular. This is easily done if you blaze ahead and glue the fuselage halves together. You can glue the fin in with the fuselage halves but I try to break it down and work small sections with my gluing. In the above image the fuselage halves are joined and the fin top is just sitting there. It will push in and close when glued. In Eduard's case, I start gluing the fuselage halves at the tail. I can then test fit the fin top making sure all is good. When happy I work to the other end. I know all this fits because all the components have been dry fitted and then cockpit halves glued on one side and test fitted together to ensure location. No balancing multiple sub-assemblies. The fuselage tabs I added at the start of the build also help. Then I can then drop the fin top in per the above image later in the build. Hopefully some find this post useful. Ray7 points
-
In my head its simple - inside M25 = London, outside M25 = real world. Cheers Colin7 points
-
You are a man of true refinement Giorgio 😀 - I just threw them on to go paint on the deck not thinking they'd end up in the pics ☺️. @John Laidlaw, I forgot to mask off the metal section on the tail for the Serial Number, so I decided to mask off and brush paint the Vallejo Metal Color over the orange. It brush paints pretty nicely; Duraluminum base (it had better coverage) with some 'regular' aluminum kind of 'dotted' on top. It's kind of tempting to try and brush paint my next NMF build - no 'orange peel' possible with brush painting! Got the cockpit together and canopy on - clean up required. Ah, my patented wavey re-scribed panel lines on full display in those two pics! Transfers started!7 points
-
Well here is a bit of reference,....... As I said..... 161 (SD) Sqn flew a number of Hudson`s and here ae a few,..... they were generally finished in the night intruder scheme of Medium Sea Grey and Dark Green with black undersides,.......with red codes,..... just like the Lysander. Hudson Mk.I, N7221, MA-P; Hudson III T9439, MA-R of 161 which landed in Sweden. And seen here again in Sweden after the national markings were painted out; This special Hudson Mk.IIIa, T9465 was later used by 161 (SD) Sqn (and appears on the DK Decals sheet),... seen here still at Lockheed where the employee`s paid for it, costing $90,000; And later in Iceland in 1941 as UA-N with 269 Sqn; For more info on this aircraft, T9465, check out this link,..... after its first agent drop off it diverted to North Africa and was wrecked by a Blenheim attempting to land on one engine after a new replacement engine fell off the aircraft in flight; https://www.lockheedmartin.com/en-us/news/features/history/spirit-vega.html Here is the DK Decals sheet; And some general reference pics,..... Turret; Engines,,, some Hudson`s had Wright Cyclones and some had P&W Twin Wasp`s,..... and those serving with the RAF & RAAF/RNZAF all had different designations for similar variants too which can throw the unwary! OK,.... Mk.I,..... Wright Cyclone, air intake at rear of cowling and lack of external exhaust pipe as seen on other variants; Some Mk.I`s had spinners too,... 269 Sqn; Mk.I,.... 208 Sqn; Mk.III/ IIIa,... Wright Cyclone,..... longer style external exhaust pipe and air intake above cowling; Mk.V,.... P&W Twin Wasp,...... AM683, 48 Sqn; and another 48 Sqn Mk.V; Mk.VI,.... P&W Twin Wasp,......EW890 at Eastleigh, Southampton prior to moving to the A&AEE; these are Pratt & Whitney Twin Wasp variant`s too,..... but RAAF Mk.IVa; Interior; RNZAF Museum Hudson; And general; And a very rare Hudson,..... a decoy on Kota Bharu airfield! I`ll add more later, Cheers Tony6 points
-
Well, not long after submitting my last report, my mojo bladder suffered a major decompression and work on the Pony was suspended in favour of gazing slack-jawed out of the window, and attempting to become the finest Ukulele player in the country. My wife's complaints about the puddles of drool on the soft furnishings, and a petition from the neighbours finally convinced me of the futility of both activities and so I dragged myself up the stairs to the mancave to put the finishing touches to the P51. Most of the remaining parts were attached including the undercarriage. At the start of this build all those years ago, Chris ( @dogsbody ) asked me if my undercarriage legs were warped. I replied that they seemed fine but on further inspection: it became clear that though the starboard leg was just about ok, the angle of dangle of the port leg was way off. Gluing the wheel to the door sorted things out to my satisfaction at least. Further evidence of the decrepit condition of the model moulds was given by the last part to be attached, the radio antenna: It's the part numbered 19 and I assume that's not the way it's supposed to look. Miracles of miracles, it came off the runner in one piece but disintegrated when I tried to tidy it up. It was replaced with some stretched and whittled sprue. Finally, the airbrush was charged with Xtracrylics finest matt varnish and directed towards the airframe. The canopy masking was removed, leaving Percy blinking in the unaccustomed light. To my great displeasure, I immediately noted that I had apparently missed a bit when I was painting the top of his seat but I'm unhappy enough with the fit of the canopy as it is so there's no way I'm prising it off again. We'll call it wear and tear or something. And so I'm calling the pony done! Some pictures: Inspecting the finished article, it's immediately clear that I need to be considerably more careful about removing detritus and especially cat hairs from my efforts before applying any paint. Overall though, I'm not too displeased with the final outcome and have learned a lot, especially about thinning Xtracrylic paints, which was the whole point of the exercise in the first place. My thanks to all of you who have chipped in with advice, encouragement and tales of your moggies. If you want more of the same, please proceed in an orderly manner to A build which is all Mark's fault! Thanks for reading, Craig.6 points
-
OK, so I now have something to show other than all the rigging holes that you will not be able to see anyway. I have got the wings glued together and the ejector pin marks eliminated. The instructions would have you trap the tail booms between the sections of the upper wings at this stage. There is no way they would survive all the handling during the clean up of the wings and would get in the way of painting. Fortunately, having built this kit before, I am aware of this issue and have a way round the problem. What I was not aware of, seeing as how I did not have internet back in the late 1990s, is that the centre section of the lower wing is not really part of the wing at all but part of the structure that carries the engine, fuel and oil tanks and crew seats. the wings being bolted on to this. This allows the underside of the centre structure to be seen from below. It was out drill and scalpel time and the offending areas of the wing cut away. This was a bit hairy from a strength point of view until the new structure was added from plastic strip. The lower wing is now nice and solid again. Depending on how much the opened out area allows us to see of the detail of the engine crew assembly, I might add a small mirror to he model's base when the build is completed. The kit makes an effort at replicating the engine controls but the detail is very wooly and two dimensional. Consequently, this detail has been removed from the kit part concerned and a new assembly will be built from scratch. I am far from convinced by the pilot's seat so that will be getting replaced and the rear seat will either be reworked or replaced as well. I wonder if I could make both seats from wood veneer? Who am I kidding? We all know that I am daft enough to at least try. And so to the pictures. The kit plastic is what I can only describe as "marbled" to look at and photographing it has been a right pig of a job. Try and imagine the colour one is likely to go having eaten one of @general melchett's plum duff. Doubtless he will try and blame Baldrick or Darling but I have it on good authority from Lady Melchett herself that the General's cooking would turn even Baldrick's stomach! 🤮 His half time curried egg and sprout sandwiches were not appreciated at the most recent performance of the Much-Snivelling-in-the-Swamp Ladies String Quartet, when they suddenly discovered that they had acquired a wind section comprising of the entire audience! I have done what I can by playing around with the images so at least you can get some idea as to what I have been up to. Fortunately, this build has to be painted as I go along so the horrible colour of the plastic should be getting covered up sooner rather than later. Thanks for looking Martian 👽6 points
-
http://scalewiki.ru/амт (a bit dated) or/and6 points
-
Fwiw, I believe that photo has far too much blue in it, I did some fiddling with colours in Irfanview till I got something far less saturated ,& realistic, to my eye, looking & the Yak took on a very normal looking dark & lighter grey appearance. The DC-3 looking aircraft had a much better looking OD type finish too. Not at all scientific but maybe indicating the weird shades are in the film/developing/copying, not real life. Steve.6 points
-
Again some work done on the pits.. Walls and floors recieved a subtle wash of matt clear varnish mixed with black waterpaint. Seatbelts from Eduard set FE812 used and the first two sets were installed wrongly..lets say bottom up😂 In the end they look good I think as these are quite nicely painted by Eduard. I managed to get them corrected quite easily, gunsights installed but two were missing their sighting glass... Still more work to be done but I think it is worth the effort.. Wrong way up🙃 And corrected😀 in the end I think no one probably wouldn’t noticed it ! Radiators installed ... cheers, Jan6 points
-
When I was a plane spotter in my teens some 50 years ago TWA and Pan Am were just about the only international US airlines I knew of. Unfortunately these nostalgic liveries have long ago disappeared from the skies. The story of Trans World Airlines ended in the 1990's when it went bankrupt and was purchased by American Airlines in 2001. As far as Boeing 727 is concerned, its maiden flight took place in 1963 and the production of the plane ended in 1984. In total 1832 planes were made. For me as a classic airliner modeller it was a must to have on my shelf models representing the both iconic airlines. For TWA's part I decided to build their Boeing 727-200 in the elegant delivery scheme. This three holer was quite an old kit by Minicraft in 1/144 scale, from somewhere in the late 90's. Detailwise it wasn't nearly the quality of Minicraft's current airliner kits. I had to do some puttying and sanding of seams but in all the model went quite well together. I also had to add some weight to the front so that the plane wouldn't be a tail sitter. I bought a Skyline Details' photoetch set for antennas, wipers, pitot tubes, etc. I also had to scratch build and correct several details. The decals I used were 26Decals for the livery, Authentic Airliners for the windows and Nazca decals for the stencils and coroguards. I painted the fuselage with white Tamiya Fine surface primer which I then sprayed with Tamiya clear gloss TS-13. The metal areas I primed with Humbrol gloss black and sprayed them with AK Extreme metal-aluminium. I finished the model by sealing the details with Humbrol Clear acrylic varnish and also used Vallejo and Humbrol colours for smaller details.6 points
-
Hi all. Mixed feelings about the kit the Pvc was a pain to build and get into shape and from some have said its not going to hold that shape but I have wanted one of these for years and when I was asked to build and paint this one I was over the moon. Dodgy video again and as always happy to hear your comments. Cheers Brian. Deleted - Link5 points
-
Wondered how to show off the interior of this one. So decided to do half as it would look in 1918 and half in a modern day museum. I also decided to 3d print a mini dio of the 1918 dio in the dio.5 points
-
Good day, colleagues. Heat(in Moscow +35C) - it's time to finish one of England's desert armored vehicles - AEC Armored Car Mk.I A car based on the AEC Matador truck, with a Valentine turret. They were mainly used during battles in Africa and Egypt. It's hard to say anything about the model itself. Just Miniart. Brittle plastic, joining of some parts gives a separate "pleasure" The only thing that really pleased me was the wheels. So pleased that I gave up buying epoxy. The assembly itself is out of the box, a couple of nuances have been improved, the main of which is the Headlight on the tower, "forgotten" by the Miniart. Guys - Miniart, Masterbox Some stuff - Miniart and a little "scratch" Coloring - AKAN. Oil & Pigments - Jimenez & Co. Thank you all for your attention, enjoy your viewing.5 points
-
This is Trumpeters 1/35 kit #01527 with box art modelled on one of the very few clear late war remaining pics of this vehicle mounted with the Flak 43. As the kit included trailer is a fictional bodge of two trailers it was replaced with Wiener Modellbau's excellent resin Sd.Ah57 kit. There are a few fragile items still to be added including the width indicators and some small chains, but these will be added once the vehicle is placed on its base. Likewise, the crew gear will be further weathered and awaits final placement. It is painted in a monochrome but well weathered Dunkelgelb scheme with Mission Model and Tamiya acrylics and weathered with Mig enamels and Abteilung oils. This is to depict a retreating vehicle set in Northern Italy during the last months of the war. The kit overall is not bad and although I haven’t built one, appears a much better offering than the Dragon equivalent. There are a few dimensional inaccuracies and an obvious issue with the cab armour which Trumpeter again have managed to mix up with the two types of armour plate that were used, but it is an easy fix to remedy. The flak gun has a gunner’s seat missing which needs to be sourced/scratched and added and as already mentioned the trailer included is pure fantasy.5 points
-
I've had this kit in the stash for almost 30 years, it was released by Hasegawa in 1991 when I rushed out to buy it. While it's been waiting patiently in the stash I have obtained an Airies resin and p/e cockpit set and some resin hollow exhausts by QuickBoost for it. Here is the box art and the AM. Here is the obligatory photo of the untouched kit parts. This is my third build in this GB and my first ever Luftwaffe desert build, I have bought some Mr Color RLM 78 and 79 paint so once my other builds are almost finished I can get this started. Thanks for looking, any questions or comments are always welcome.5 points
-
Have been very busy with work again and have managed only a little progress. However, any progress is progress, so I'll take it.5 points
-
this model is quite fun to build , especially if you listen to one of those vietnam war rock music compilations to get in the mood! 📻5 points
-
Treated myself on Fathers Day with two lucky wins on a certain auction site . This Audi kit is only just coming through in this country , so I was welled chuffed to win this at a good price . A rather odd choice of rally / driver , but there are already a good choice of decal kits available to rectify this . And this was won for just £41.50 . I should have got one when first released , now it seems to becoming rare to find at a decent price . I really wanted the Roger Clark car , but beggars can’t be choosers ! Gary .5 points
-
Although Chico was the more well known F-4E with gun pods: other Phantoms carried them as well: Jari5 points
-
Thanks! But no, I could have made it much dirtier... There was a great variety here, from freshly-painted examples, to extremely dirty birds. Here are more examples of both kinds: http://www.aviation4u.de/gallery/Deutschland/inService/Lfz-MiG29/MiG29.htm5 points
-
Morning all, I got a little carried away on the PE yesterday and have broken the back of it. All performed well, although I do struggle with those insanely thin ones that wrap around the funnel. The contact points are literally microscopic and they never really seem to hold. I’ve tried everything- Klear/ superglues etc. I think the thin CA would be best, but it’s next to impossible to apply without coating everything else at the same time! I'm thinking ahead to the rigging and I see some problems. If you use the kit’s plastic masts, then they tend to bend under any pressure. So the lovely brass ones seem great, but… I am worried about them breaking under light pressure from any elastic thread. I’ve used CA gel to attach cross pieces (you can tell I’m not a navy man!) and again, there’s not a lot of contact for it to be really secure. In hindsight, I could have soldered them, but I’m not an expert and would probably have looked like a huge blob under close up photos! Anyone else had this issue? Sticking with the rigging theme, any pearls of wisdom here? It’s been the weak link in the past and I’d like to improve on this. I start with a decently finished model that I’m pleased with, then end up with it covered in blobs of superglue! Anyway, a few more parts to prepare then I’m not a million miles away from the next stage - painting (I like that bit). Thanks, Guy ps the ship isn’t quite as far along as the photos show.. the sub sections are just placed at the moment like a pile of Jenga!5 points
-
Evening all, With the lower wings scribed, I have been working on making the internal wing spars this week. The plastic is reasonably thick but due to the sheer size of the wings, they have the structural properties of a windsock on a calm day so much is needed... First it was a case of using the plans to make the central spar from plastic card: With this 'master spar' it was relatively easy to fabricate the rest - and in turn each of these was attached to the stub-spars I'd made earlier and of course to the lower wing skins. I used good old fashioned poly-cement as it dries nice and slowly and allows careful alignment which CA, for example, wouldn't allow. Having each wing's dihedral the same as the other is obviously vital - even the slightest misalignment shows in this scale, so being a believer in the simple things in life I simply cut out a cardboard jig from the plans... ...and used this to align the wings: Here you can see how the main wing spars interlock with the smaller stub-spars that protrude from the fuselage: Now it'll be a case of scribing the upper wing surfaces and these will then slip over the internal spar structure and sandwich everything together, making a nice and solid wing... he says hopefully: Scribing the upper wing surfaces looks as if it's going to be a nightmare of epic proportions... I may be a while. All the best, Tom5 points


.thumb.jpg.d3635a7ef6507d35f372dd09671fe96f.jpg)


This leaderboard is set to London/GMT+01:00