
Leaderboard


Popular Content
Showing content with the highest reputation on 19/05/21 in all areas
-
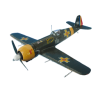
Haven’t posted on here for a while. This is one of a pair I did simultaneously last year (the other one motorised with sound) but I called it finished before I weathered it, and last week I decided to finish it so here it is. Used the Aires resin cockpit. Not the easiest kit I ever made. Quite poor fit in places. Anyone who builds one should know the guidance about weight in the nose it out by a factor of about 2, hence the bodged tail strut! Thanks for looking25 points
-
#14/2021 All good things come in three, so here´s my dad´s third and last 262 for now. Hobby Boss kit, "712" decals from Kagero book "Messerschmitt Me 262 In Defence of the Third Reich", rest of decals from the sparesbox, painted with different MRP metal colours, simulated all the filler stuff by airbrushing different grey tones. Brake lines and seatbelts added, EZ Line used for the antenna wires. Build thread here https://www.britmodeller.com/forums/index.php?/topic/235091248-naked-bird148-messerschmitt-me262a-2a-jv44/ In May 1945 the rest of JV44 ended up in Tyrol/Austria. A bunch of 262s and other aircraft, standing and lying around in the mountain valleys, partly destroyed, have been captured there by US troops. Can´t tell if this aircraft was an A-1 or A-2. It had racks like an A-2 but four gun openings like an A-1. DSC_0001 by grimreaper110, auf Flickr DSC_0002 by grimreaper110, auf Flickr DSC_0003 by grimreaper110, auf Flickr DSC_0004 by grimreaper110, auf Flickr DSC_0005 by grimreaper110, auf Flickr DSC_0006 by grimreaper110, auf Flickr DSC_0007 by grimreaper110, auf Flickr DSC_0008 by grimreaper110, auf Flickr DSC_0009 by grimreaper110, auf Flickr DSC_0010 by grimreaper110, auf Flickr DSC_0011 by grimreaper110, auf Flickr DSC_0012 by grimreaper110, auf Flickr DSC_0013 by grimreaper110, auf Flickr DSC_0014 by grimreaper110, auf Flickr DSC_0015 by grimreaper110, auf Flickr DSC_0016 by grimreaper110, auf Flickr DSC_0017 by grimreaper110, auf Flickr DSC_0018 by grimreaper110, auf Flickr DSC_0019 by grimreaper110, auf Flickr DSC_0021 by grimreaper110, auf Flickr DSC_0022 by grimreaper110, auf Flickr DSC_0023 by grimreaper110, auf Flickr DSC_0024 by grimreaper110, auf Flickr DSC_0001 by grimreaper110, auf Flickr18 points
-
Good day! Following my post of the radial engine Ro37, here is the in line version, the Ro 37bis. Equiped with the Fiat A30 engine, this version was very elegant and was used intensively by the Regia Aeronautica before some more modern planes were available. The pre-war scheme is a real headache to do as all the colors overlap each other with round edges, plus the benefit of a biplan! Model was built on commission some time ago. Best regards. 6A72CA9E-F45F-4ECA-92CC-E476BCBF9ADE_1_201_a by jean Barby, sur Flickr A236E00F-5BBF-4BD1-B9E9-FC071279E9A0_1_201_a by jean Barby, sur Flickr 410CF037-8670-4B79-9FB5-CCB52CC21E34_1_201_a by jean Barby, sur Flickr 918F8B14-542C-4406-9DE3-29421CEC4E00_1_201_a by jean Barby, sur Flickr 5F87B194-8443-4730-94A9-CCB52CC21E34_1_201_a by jean Barby, sur Flickr D1367CB3-6DC9-4CFE-A25E-714A0083F737_1_201_a by jean Barby, sur Flickr17 points
-
I`ve built this in parallel to my Tamiya based 1940 Romanian 109E-3. It represents the Yugoslav L-31 as it appared at the time of the Axis invasion of Yugoslavia. The RLM 70 - RLM 65 scheme with minimalistic markings may seem dull to some, but I find it beautiful. On the other hand, I think the lighting conditions have not been ideal for this photoshoot of a dark camo aircraft. A few years ago I`ve written a review for the book beneath the model, here on britmodeller: https://www.britmodeller.com/forums/index.php?/topic/235036842-messerschmitt-bf-109-the-yugoslav-story-volume-i-book-review/ It`s an awesome title and - I think - THE reference on the Yugoslav Emils of the April 1941 war. And three more shots when the sun came out of the clouds: I`ve used the ICM kit (72131) which is very similar to the Tamiya. It fixes some (not all) of the Tamiys issues, such as the width of the fussalge rings (not my photo): http://www.cartula.ro/forum/index.php?app=core&module=attach§ion=attach&attach_rel_module=post&attach_id=148777 but also introduces several of its own. All in all, the details are less crisp and it requires more man hours. I`ve made two so far and I think I`ve learned to live with the short fusselage of the Tamiya which is a joy to asssemble. I`ve replaced the undersized tailwheel with an aftermarket from Quickboost (QB 72 324) and I`ve added PE seatbelts from Eduard (SS 582). The Yugoslav Emils used the Oerlikon FF cannon and this looked noticeably different from the Ikaria made MG-FF/M that is present in the box. The solution was to replace them with the brass ones from Master (AM-72-017). They represent Japanese Type 99 20mm Mark 2 cannons, but look about the same. I took the MG 17 barrels from a FW 190 Master set (AM-72-013). I`ve also used the canopy masks from Montex (SM 72072) which worked well on the early, rounded E3 canopy. The decals are from the Lift Here! 708-LH “Emils” sheet. They are very thin, the colours are opaque, they conform beautifully to the model`s sourface and seem to react nicely to Micro Set and Sol. On the other hand, there is only one spot where you should place them and that is the correct one. They aren`t fragile and you could work with them, but they conform imediately and it`s a whole trouble to move the large ones around. Lift Here! instructions recommend using standard German stencils. There actually is a sheet from HM Decals (HMD72136) that contains Yugoslav 109E-3 stencils, but they seemed somewhat oversized and bolded to me so I`ve used the standard ones from Techmod (72055), apart from their nicht betreten lines which are a nightmare to keep intact. I`ve replaced these with some taken from a Matho Models decal sheet (80005 - Decal Solid Lines black) which are a pleasure to work with. All artwork I`ve seen shows these lines to be red, but on the L-61 wreck they are black. The consensus among Serb modellers, decal makers and book and magazine authors seems to be that the upperside of the Yugoslav Emils was painted in RLM 70. I`m not sure on what this belief is ultimately based because when you ask this question they start quoting each other. There are photos with the wreck of L-61 which the Germans never delivered to Yugoslavia and the green seems more like a RLM 71: https://www.jagdgeschwader4.de/index.php/flugwerft-hauptraum/jaeger/messerschmitt-bf-109/e-3a-l-61 The other standard is that the air intake cover was natural metal. The only colour photo (possibly colorized, though) of Yugoslav Emils, published in the book that my model seats on, shows these to be blue. I mentioned this on the forums here a few years ago and a whole discussion resulted from this: https://www.britmodeller.com/forums/index.php?/topic/235037073-bf-109e-blue-air-intake-cover/&tab=comments#comment-3014882 Anyway, I chose to follow the conventional wisdom and went for RLM 70 uppersides, RLM 65 undesides and natural metal air intake cover. The Paints used are mainly Lifecolor: RLM-65 - LifeColor UA 503 RLM-70 - LifeColor UA 501 RLM-02 - LifeColor UA 071 RLM-66 - LifeColor UA 133 Here it is together with its Tamiya, Romanian cousin:17 points
-
After some Revell Concordes I wanted to try the Airfix kit. Compared to Revell's offering,its simpler detailed,no optional nose installation and it has raised panel lines and open cabin windows. But I must admit that I like the Airfix kit more. Revell has its Concorde kit for decades in their catalogue and its really starting to get a bit long in the tooth. Besides the Airfix kit,I also worked on the Revell one simultanously.The Revell kit ended up in the bin in the end as the parts had a terrible fit and the wing seams kept cracking open,no matter what I did. The decals come from the ill fated Revell kit and are superb,both in printing quality as well as details. Painted overall white using Revell 04. Engine exhausts are a mix of semigloss black mixed with a few drops silver. Another Airfix Concorde and a Entex kit are currently on the bench as well which should show up here in some time to join her sister ship. On with the pics Cheers Alex15 points
-
This is the Belyaev OL-2 heavy fighter prototype built using two Eduard 1/48 scale weekend edition Bell P-39N. Saluti Giampiero15 points
-
14 points
-
Thanks Ced Yes, it makes sense to mask and paint the inside as well as the outside in this case, shame the Eduard set is one of the older ones without the new T-face option where you get inside and outside masks, but it should work out okay. Drilling the bombs was okay, I did it on a tray on my lap while watching a couple of episodes of the 60's American TV series "Combat!" on YouTube for a trip down memory lane (I was allowed to stay up late the evening that it was on to watch it with my Dad back in the early 70's ). Four-part bombs does seem a bit excessive but should produce a nicer result than a two-part construction... Indeed it does Rob, I'm not overly concerned about the coverage, I'll be spraying enamels and the Dull Dark Green is pretty pigment-heavy, but I don't want reflective internals I'm hoping not that much will be visible through the nose anyway, as I might need to stash some weight in there... I stripped the masking out of the interior of the cockpit windows, it's much easier to add the outer mask if you can see what you are doing The Eduard mask set fits really well and Hasegawa's canopy framing shows up well so this was done pretty quickly. I'll re-mask the interior side later: Unfortunately my liquid mask stuff for the astrodome seems to have turned to mousse. I've put a bit of water in the bottle and will see how it looks later, otherwise a trip to the Perth Road art shop might be necessary this weekend. The bomb factory assembly line has completed its contract. I don't think Liberators usually flew with the full 8000lb bomb-load, but that's what we get. Perhaps they are off to a target in France where range is less of an issue: They were then sprayed with Colourcoats ACUS15 - USAAF Olive Drab 41: I did think about just completing the assembly and fitting them to the bomb-racks, but as this build is a bit special and not just me building something for my own amusement I thought I'd better put my game-face on and add the yellow markings on the bombs, even though I assume that Jim isn't planning on displaying it upside-down, it ought to be done. For the yellow nose-tip I had an idea and tried it out. Attach a length of Tamiya Tape to some clear acetate: Punch out a hole of the approximate diameter: Cut the tape: Carefully place it over the nose of the bomb: Paint yellow and remove the mask: To do the yellow strip to the rear end of the bomb casing I used a fine brush and held it in place while revolving the bomb by rolling the cocktail stick on which it is mounted between my fingers. Not perfect by any means but it will do The fuse 'propeller' and mounting rack were painted: ... and the tailfins attached: No I'm not going to attempt the stencilling on top of the bomb. Yes I think that will do. Only 15 more to go then Cheers, Stew13 points
-
Another off the bench, this is the Tamiya kit. What can I say only that it's a take your brain out build. Thankfully one of the options is Zimmerit free (phew!!) Very enjoyable and you don't realise how big it is!!! Please feel free to comment etc. Thanks for looking. Dick12 points
-
Lufthansa took delivery of their first Boeing 727 in 1964 . I always liked their livery from that time so I wanted to build one of my many Revell 727 kits in that scheme. The decals are from Classic Airlines by Nick Webb. They are nicely printed and fit almost perfect on the Revell kit. The build was more or less OOB,I only changed the wheels and used the Airfix ones. The kits wheels are too big and have no real detail on them. The front gear doors were replaced with self made ones from evergreen plastic as well. Paints are Revell 04 white,Testors aircraft grey and Gunze Super Metallic Chrome,with a gloss black base coat.Some panels are painted with Revell silver 90 to give some subtle differences. They cant be seen well on the pictures but they are there. The details come from the extensive decal set of the 2016 Germania release. No weathering was done as I wanted to depict the 727 as she looked fresh off the production line. Cheers Alex12 points
-
Hello all, finished over the weekend these builds stemmed from a need to have a break from sanding down the hectares of filler on the Il-38N I'm making over in the WIP area. These two little mites were a pleasure to build, the only stress coming from trying to decide which markings to apply as both kits come with a choice of four. For the RS Models Yak-11 Moose I chose the Egyptian markings, mainly because there was a bit of yellow involved and I like the look of the protuberance on the front canopy. (don't know what it is). The aircraft depicted was based at Gebal al Basur in 1964. For the Special Hobby Yak-23 Flora I chose the Bulgarian Army Air Force version from the 1950's. They were straight from their respective boxes and were great little kits with lots of detail, I recommend them both. So without further ado here they are. Thanks for looking Pete11 points
-
With I’d gone for the Revell like my son did, shape looks better and crisper mouldings than these Italeri methinks. I’m not great with 1/72 so just a bit of fun with an unrealistically close pairs landing. Made & painted 6m apart hence different paints used & different shades. Eduard ASRAAMs on each, and put I pilot in each... PJ Productions I think? Thanks for looking.11 points
-
Thanks Roger and Thom - testing my patience it is! Obviously, if they're going to be in a museum, I want them to be smooooth. Some hope (fnaar!) Some more patience used up:10 points
-
This is the Hobbyboss 1/48 scale Mig-17PF built out of the box. Saluti Giampiero10 points
-
Today I present my Hurricane MK.I served in Polish Squadron 303 and 306. The kit from AH is nice but not perfect, I used "overtree set" without instruction, decals and PE parts. From aftermarket I used: exhaust, control stick and for UZ-V propeller from Quickboost, instrument panel from Yahu and seat belts from Eduard. Some additional parts are from spare. Decals are from TECHMOD and XTRADECALS, for UZ-V on right side of fuselage I used SP-DECALS code letter because Techmod cracked and was useless. UZ-V served 1941 in 306 " Torunski" Squadron Polish Air Force flown many times by Stanislaw Skalski best Polish Ace. RF-F from 303 "Kosciuszko" Squadron Polish Air Force, show us 126 kills, that this unit made in Battle of Britain. Models no.27 and 28 this year, but now lockdown is over...9 points
-
Dear All, Tamiya's interpretation of F-16 is an outstanding kit with pretty fine details and easy build. Added only resin ejection seat and PE from Eduard, painted with Mr. Color. The plane stationed in Japan, a few years ago I had the opportunity to see it and walk around at Yokota Air Base (friendship festival). (Some of the static dischargers were broken off, need to replace them.)9 points
-
I finally put the final touches on the my latest "two-fer". This is the first time I nursed two models along to the finishing line simultaneously. Not sure I'll do that again. Whenever I felt a feeling of accomplishment after a particularly challenging subassembly, I had to face doing it all over again. Case in point was the stretched sprue antenna. The first one, White 1, took 5 tries to attach, shrink with a glowing ember from a lit toothpick, position the cones then add insulators made with white acrylic paint. It would snap off at the slightest provocation. Next in line was Yellow 8, with not one, but three antennae. The center wire fought me through eight attempts. I was reduced to maniacal laughter more than once as the modeling gods toyed with me. After that multi-day ordeal, the two adjacent wires obediently worked at the first try. Go figure. Since I didn't post photos of my first SH 109 earlier, I will include some here. So what are my impressions of this kit? I hold it is as high regard as any other 109 in this scale. But for ease of assembly, Tamiya it is not. I wonder how many Tamiya E'S I could have cranked out in the same time period. But it presents so much of a challenge that I find myself inexplicably drawn to it. I've started two more during these builds but will have to take a break before moving them along. The sophistication in areas like riveting, panel lines, stitching on the flying surfaces and cockpit interior are state of the art. However, other problems are nagging; i.e. the canopy is too wide (although some of this may have been builder induced, but not all of it). The attempt at brake lines is commendable, but they resemble rain downspouts more than thin tubes. On the latter two builds I removed them (again, no small task) and replaced them with stretched sprue and lead wire. Thank you Giampiero Piva for that inspiration. Beware of the tailwheel strut. I broke it off during two of these builds. As a precaution I installed an Albion Alloys tube in the rear fuselage on the third one and inserted the strut after major assembly and painting was done. The plastic in this kit is very soft. I used it to stretch sprues for the replacement brake lines. I had the impression that after glueing this to the gear legs I would be able to press it into recesses for a natural look. That notion was correct. Other plusses are separate, posable flaps and slats, a first in this scale for the latter. Finally, the main landing gear struts are too long. Quite a bit too long. I removed a fair amount from the top of the gear then reprofiled the end into a peg to fit in the recess on the top wing. I think this dramatically improved the appearance of the model. Eduard says in one of their recent monthly newsletters that they worked with Special Hobby on this kit. SH started with Eduard's research on their 1/48th model and improved and adapted it to 1/72. I believe the too-long gear is a vestige of that. The same issue characterizes Eduard's large scale 109 E's, along with the brake lines. Finally, I just like the character of this kit. It LOOKS like a 109 E. Some have claimed online that it is too portly. Perhaps. But all of the other kits have their own shape issues, including the ICM and Tamiya kits. To me, this is the best of the lot. Now on the the last details. Much work was done on the canopy. I used the Rob Taurus vac center section for the Fine Molds 109 F. The kit part would be acceptable for the beefier 109 G, but the E was more delicate. I added some riveted sections at the base of both sides. These were actually bolts, but .005" plastic sheet embossed with a Rosie the Riveter does a convincing enough job. A locking handle was made from more .005" plastic and stretched sprue. More very fine sprue was dipped in superglue to make a bulb. This was painted silver and about .015" was cut off the end. I used these to represent the knobs on the canopy side panels which were used to slide them open. A retaining cord and spring were made from very fine wire. Canopy frames are strips of painted clear decal sheet. Weathering was done with various oil paints and dry pigments. Yellow 8 has the new replacement resin wheel set from SH. They look good, but so do the kit items. That's enough for now; on to the pics. I would be happy to answer any questions. 81EBFE95-2F72-4D69-A632-93918F32B23B_1_201_a by Barry Numerick, on Flickr C3D5ADB4-BA05-4F73-BFF4-554A41FC18CB_1_201_a by Barry Numerick, on Flickr 3F60AF03-09CE-4288-BF05-F68E4528E990_1_201_a by Barry Numerick, on Flickr FFBD7E23-283F-4C75-AD5E-1A46BF8ED70F_1_201_a by Barry Numerick, on Flickr 35B7C9E0-2FE9-4DAE-93E5-5EA605B28BEC_1_201_a by Barry Numerick, on Flickr B1A03634-0DFA-455F-8384-340CF89810E5_1_201_a by Barry Numerick, on Flickr AF742898-D85E-488F-AFC8-6D0EB6FA91AF_1_201_a by Barry Numerick, on Flickr F1D21E60-4191-460B-B79F-EF764B2308DA_1_201_a by Barry Numerick, on Flickr 22B80BDA-4265-4E10-8745-AE11C7D0C78E_1_201_a by Barry Numerick, on Flickr B8A64094-EACD-47FA-8298-607164BF8620_1_201_a by Barry Numerick, on Flickr 217CD45B-B735-45EF-B8E8-1302D9644655_1_201_a by Barry Numerick, on Flickr 175AB80C-27D8-475C-BA21-F069E13CD3F6_1_201_a by Barry Numerick, on Flickr 5E2D9EC1-7BDF-4C65-958B-B00DDC8363BC_1_201_a by Barry Numerick, on Flickr C2262719-FE94-4161-9943-80C79BE933B8_1_201_a by Barry Numerick, on Flickr 34D99201-61F7-4B9C-8BF4-C1BA47276764_1_201_a by Barry Numerick, on Flickr9 points
-
Hello, This is my recently finished 1/48 Hasegawa TF-104 with TuAF markings. Happy modelling9 points
-
Another A319 got finished. Its actually my last A319 from my stash unfortunately.As the kit is out of production by Revell,its not so easy anymore to get one for a reasonable price. There had been many builds and kit introductions,so I wont go to further detail on the kit here. Fit is great and its a joy to build. Everything was straight forward,only decalling the Airbus was a very time consuming task which needed careful planning,research and systematic application of the many decal pieces for the blue pattern. 15 decals each side for the blue patterns and many more for stenciling and other details. The decals come from PAS decals and have a great quality, are durable and easy to work with.And they are cleverly designed,which helps a great deal in the application process. They fit very well on the model,I had only little issues around the wings. As they have no white backing,the cabin windows will disappear on the blue,so there I used the ones from the kit decals,as well as most of the details on the wings. Rossia painted this Airbus in 2014 as it was the official carrier for the soccer club "Zenit St.Petersburg" Its a very striking livery in my opinion and I am happy that PAS decals produced such a wonderful decal set. I painted the model with Revell and Gunze enamels,coroguard panels are my own mix of Revell grey 374 with a few drops of Revell silver 90. Cheers Alex8 points
-
8 points
-
Hello everyone I've been busy with this for a few months now (where DOES the time go...?!), and finally it's done and dusted. The work in progress can be found here. A little background, then on with the piccies: It's Tamiya's Mosquito VI as RS504 DM-Z of 248 Squadron, and another aircraft with a local connection to the North East of England. RS504 became a quite famous Mossie in May 1945, when flown by F/Lt Gerald Yeates, with his Navigator being Thomas Cecil Scott, who hailed from Newcastle-upon-Tyne. From the 248 Sqn ORB: May 4th 1945 ORB Form 541: Airborne Banff, armed 8 x 25 lb A.P. .R.P., in company with 32 other Mosquitos of the Banff Strike Wing. During attack on ‘F’ [ex-Dutch Gunboat] Z/248 struck top of mast which became lodged in the nose of a/c together with the ships pennant; boat door was ripped off and nose of a/c smashed in, but a/c landed base safely with mast and pennant still in place. It's been mostly OOB-ish, but with a bit of extra detailing for the cockpit, as well as new seats and nose gun barrels from Quickboost, wheels from Brengun, and larger underwing tanks from Frightdog. The underwing rocket rails proved a bit of a challange, as I've done the 'Banff-style' two-tiered ones, for which I got a great deal of help from Terry at Aviaeology, for which I'm most grateful indeed. Anyway, enough blethering, on with the piccies: It really is a little jewel of a kit, and I'm really happy with how it came out. Simon8 points
-
Hello, here is my latest build, the Italeri 1/48 Harvard with the IAF. It's OBB. I hope you will like it. Thanks for looking. Cheers, Ilan.8 points
-
#13/2021 And my dad has finished the next 262. Hobby Boss kit, painted with AK Real Color RLM81/82/76, EZ line for antenna wires and brake lines. The kit includes decals for both prototypes. I don´t know why but HB printed the "V555" decals too large. Found no suiting replacement decals so my dad used the kit ones. He could have built "V484" too but there is only one half-frontal pic of that aircraft but a bunch of fotos of "V555". My dad prefers to have as many pics as possible of the original subject, so he built "V555". It seems this aircraft never had bomb racks mounted. On the pics you can see a box shaped apparatus? measuring device?, no clue what that thing was and how it exactly looked but my dad scratchbuilt a piece. Build thread here https://www.britmodeller.com/forums/index.php?/topic/235090779-speed-bomber148-messerschmitt-me262a-2au2-with-glass-nose/&tab=comments#comment-4082751 As mentioned, two Me262, V484 and V555, were converted to a bomber with a cabin in the nose for an extra bombardier who lied on his belly, flying the aircraft during the final approach. V555 was converted in January 1945, testflights began in February. Besides the glass nose, also a new autopilot, the "Baldrian" acoustic radar and windshield heating was tested. By the end of March, the aircraft completed 22 flights. On April 24th, the Lechfeld airfield was abandoned and V555 was transferred. Most probably from München-Riem/Germany to Hörsching/Austria and around May 4th to Prague-Ruzyne/Czechoslovakia. A few days later it was flown to Zatec/Czechoslovakia were it was captured by US troops on May 8th. DSC_0001 by grimreaper110, auf Flickr DSC_0002 by grimreaper110, auf Flickr DSC_0003 by grimreaper110, auf Flickr DSC_0004 by grimreaper110, auf Flickr DSC_0005 by grimreaper110, auf Flickr DSC_0006 by grimreaper110, auf Flickr DSC_0007 by grimreaper110, auf Flickr DSC_0008 by grimreaper110, auf Flickr DSC_0009 by grimreaper110, auf Flickr DSC_0010 by grimreaper110, auf Flickr DSC_0011 by grimreaper110, auf Flickr DSC_0012 by grimreaper110, auf Flickr DSC_0013 by grimreaper110, auf Flickr DSC_0014 by grimreaper110, auf Flickr DSC_0015 by grimreaper110, auf Flickr DSC_0016 by grimreaper110, auf Flickr DSC_0017 by grimreaper110, auf Flickr DSC_0018 by grimreaper110, auf Flickr DSC_0019 by grimreaper110, auf Flickr DSC_0020 by grimreaper110, auf Flickr DSC_0021 by grimreaper110, auf Flickr DSC_0022 by grimreaper110, auf Flickr DSC_0024 by grimreaper110, auf Flickr DSC_0025 by grimreaper110, auf Flickr8 points
-
8 points
-
All, MAC's Austrian Navy version of the Phonix DIIa. The kit itself is a good little kit that has fitted and gone together really well with no build issues to report. I'm not a super detailer but the kit from the box is simplified and therefore some obvious details are missing. However, none of these details were difficult (very basic work on my part) and I am glad I added them as I feel it makes the model look more complete/accurate. The biggest let down are the kit supplied decals - the worse I have so far encountered - they are pretty much unusable. This is annoying because this is not a cheap kit (and I was forced to hand paint markings freehand) so I would expect decals that are at least workable. For this reason, I will probably be reluctant to build another from MAC unless I knew I had others I could use in place of those supplied or the quality was better in the kit. Regards Dave7 points
-
Mirage 2000C (72073) 1:72 ModelSvit The Mirage 2000C is a forth generation Jet Fighter built by Dassualt for the French Air Force. Like its predecessor the Mirage III its main feature is a large delta wing. The aircraft was designed and built in a surprising 27 months by Dassault using a lot of data they already had developed for the "Future Combat Aircraft" and the so called Super Mirage, The C in the title for the fighter stands for Chasseur or Hunter. As well as two internal 30mm DEFA cannon the aircraft is armed in the air to air role with Matra R550 Magic, Matra Super 530D, MBDA MICRA Missiles. As well as the Mirage C there is a B model trainer, N model Nuclear Strike, and D model Ground attack version in service with the French Air Force. Mirage 2000 aircraft have been sold to Egypt, India, Peru, The UEA, Greece, Taiwan, Brazil, and Qatar. Kit This is the eagerly awaited new kit from Modelsvit. The kit resembles a high quality shorter run kit with fine surface details. While the parts resemble some more main stream manufactures in appearance they will no doubt need more care in the assembly. In the box we get seven sprues of light grey plastic, a clear sprue with both a one part and two part canopy, a sheet of PE and and a sheet of masks for the canopy, wheels, and false canopy for one of the decal option (these are not shown). La construction commence avec le cockpit (quelle surprise!). The seat is made up from 5 plastic parts with PE belts and seat cushions. Following this for some reason the exhaust nozzle is built up and put to one side. Once this is done its back to the cockpit. The cockpit floor is put together with the sides and the rear bulkhead. The cockpit floor also forms the nose wheel bay roof and the rear bulkhead for this needs to be fitted at this time. The instrument panel and control column need to be fitted. The instruments for the panel and side consoles are provided as either PE or decal, or a mixture of both if the modeller wants to do this. Lastly here the main coaming and HUD are built up from a mixture of plastic parts and PE. The cockpit can now be placed inside the main fuselage and it closed up. The inner parts of the main intakes are then applied to the fuselage sides. We now move onto the main wing. For the lower wing the main wheel wells are boxed in with the instructions showing where all the parts go, plus a view to show how it needs to look once its complete. Once these are boxed in the upper wing sections can go on and the whole wing joined to the main fuselage. The main burner nozzle is made up from 3 parts and this can be attached to the assembly made earlier and inserted into the back of the fuselage. Also at the rear the vertical fin is added (here tow are provided for different decal options). Different rear fairing parts are also used here depending on the decal option chosen. Moving back to the front the outer parts of the intakes are added. Flipping back to the underside of the aircraft the centreline fairing is aging different for the different decal option with there being 3 types, one of which includes a chaff/flare launcher. The flaps can be positioned up or down with different parts for each, the flap track fairings can then be added. The main under carriage is then next, standard two part wheels go on to the main leg with a separate retraction strut. The outer gear door attached to the main leg with the inner door attaching to the fuselage. Again these have retraction struts. At the front the nose gear leg goes in with its twin wheels. The gear doors are also fitted at this point. The last major item to complete the main aircraft is the canopy. A single part closed canopy and a split two part canopy are provided. Canopy masks for the edge are included and the centre will need to have the modellers own tape or masking fluid used on it. To complete the main airframe the re-fueling probe is added along with a selection of aerials and fences on the side of the intakes and tail. A nice selection of underwing/fuselage stores are provided in the kit. There is a centreline 1300L fuel tank, and two wing 1700L fuel tanks. There are two Magic-2, two Matra Super 530D, and four MICA EM.IR missiles provided in the kit along with their respective pylons. Decals There are 5 schemes provided in the kit; the decals are well printed by Decograf, the Indian Markings dont quite look correct with the colours. From the box you can build; Mirage 2000C 6-OB No.59 EC 2/5 "Ile de France" French Air Force, Saudi Arabia 1990 Mirage 2000C 5-OP No. 74 EC 2/5 "Ile de France" French Air Force, Saudi Arabia 1991 (Dessert camo) Mirage 2000C - 390-AS No.80 EC 5/330 French air Force 1993 Mirage 2000H (Vajra) KF123, 7th Sqn, Indian Air Force, 2012 Mirage 2000EG No. 226. 332 MPK (All weather Sqn) "Geraki", 114 Fighter Wing, Greek Air Force, 2014 Conclusion It is good to see a decent model of the Mirage 2000C available in 1.72, this should build up to make an eye catching model if care is taken with the build. Highly recommended. Review sample courtesy of7 points
-
Well a few more of the side deck structures assembled. Stay Safe beefy7 points
-
Box art in a proper size 👍 - ref. 4818 - North American F-82F/G Twin Mustang Release expected in Autumn 2021. Sources: https://www.facebook.com/modelsvit/posts/2965151153753916 https://www.facebook.com/stanilevichelena/posts/2958655521021060 https://www.aviationmegastore.com/?action=prodinfo&parent_id=212&art=182284 V.P.7 points
-
Long overdue an update No jokes about the driver being vertically challenged and not being able to reach the pedals ! Major assembly done but tank to truck fit is ...... well it doesn't really ! Homemade windscreen out of plastic packaging as one doesn't come with the kit Probably on reflection not the right paint colours, but it's what I have available, and there not much info to go on. Tank finally fits and looks right, always a bonus ! Cheers Pat7 points
-
I didn't realise quite how quickly I built this ship, it wasn't very difficult, except for some of the PE on the bridge. THAT was a royal fiddle. I just need to fit the anchor chain when it arrives, many thanks to @steve5 for his generosity. Just have to wait on the Australian/UK postal services. I'm still exploring the weathering (rust) technique, I think I'm making progress. The PE included in the kit was ok, some of the ladders were a bit fragile and didn't like being bent, I'm glad I added the MASTER Gun Barrels, much more in scale than the moulded ones. One thing would have been nice was a rigging diagram, Trumpeter don't seem to do this. I hope you enjoy the following pictures. Jon6 points
-
While building a couple of Tamiya Thunderbolts I had a look through the collection to see what I had done earlier. Somewhat to my surprise I found this quite old model. I can actually date it to the last quarter of 1969. It is the first Revell 1/72 effort from 1965. https://www.scalemates.com/kits/revell-kikoler-h-613-republic-p-47d-thunderbolt--1160823 I can see that I did it out-of-the-box but with a different colour scheme. It is a P-47D-25 so the kit is okay for that model. It represents KL315 flown by S/L WM Soutter of 42 Sqn in Burma. Here it is as originally recovered from my store of old models. That's the original IPMS Journal reference behind it. It's a bit of a quandary what to do with old models. Many of mine from the 60s and 70s I regard as only good for the recycle crusher. This one wan't so bad but it would have been nice if I had found a serial and not made it quite so shiny - that picture doesn't capture the bright silver finish. It appears to match the reference picture although the anti-glare panel may have been OD but Matt Black is quite possible. The old Revell kit is dreadful by modern standards and it's certainly not worth a rebuild. However I thought it was worth finishing it off - doing what I would have done in 1969 if I hadn't got (presumably) distracted by something else. So I added cockpit canopy framing, painted the wheel wells yellow zinc chromate, printed a serial, put the HS decals on the propeller and gave it a coat of mixed Dullcote/Glosscote. It's a historical curiosity now (although some people like @AdrianMF could probably make something brilliant from it) but I though it's worth putting here to show how modelling is really now in a golden age. Comments welcome but re-adjust your reference frame to teenage!6 points
-
Thxs Nikc hello fellow modelers made a front house today decided to give the model my own twist, pinch of Ian McQue pinch of maschinen krieger. Oh oh . my corner, the woman needs more space hihiiii I like to make an experiment out of paper. more than eight hours later. ready I thought. electricity cable with safety wire for the electricity in the cabin the grid is for the oil cooler of the transformers. magnetic pulse motor and now brainstorm again. have a nice evening and see you next time fellow modelers.6 points
-
Thanks Julien - in box review in your favourite forum https://www.britmodeller.com/forums/index.php?/topic/235093903-mirage-2000c -72073-172 modelsvit/ An you know what ? 🥇 https://www.facebook.com/modelsvit/posts/2966022880333410 V.P.6 points
-
This monstrosity parked out the front of my house. Our response to the VW Polo "Harlequin" Welding completed (New front wings, front panel, bumpers, inner wing repairs, inner "A" panels repaired / replaced, driver's inner sill, rear lower panels both sides, boot floor and inner rear wheel arch repairs, secondhand doors) now MoT'd, taxed and insured and Stepson is now enjoying driving it after owning it for 6 years. Went in for paint yesterday. IanJ6 points
-
Sorry Guys, one picture got put in the wrong file and got missed. Incompetent of Mars👽6 points
-
Actually, it´s already done but my phone, Google Pics and Flickr refuse to play together atm . Real black floor, NATO black bench, door panels and instrument panel upper lip, RLM 76 lower half. EDIT: A phone reboot helped, of course!6 points
-
I predict a listing of handbags and woman's shoes in the not too distant future followed by another for an unfortunate pet "free to a good home"! Mrs B recently put a 1/48 Hobby Boss Su-30MKK onto our website (where it promptly sold) thinking I'd forgotten to. Thankfully I hadn't put the aftermarket decals and stuff that I'd bought to go with it in the box or the customer would have had a very happy buying experience!! I now make sure I hide any stock that is going to be used for "advertising purposes" lol. Duncan B6 points
-
Thanks Antti, it is great having you here! Hmmm, tough call on what to use on the fuse sides on the Hasegawa kit. I would go with whatever you feel the most confident rescribing through. I find Milliput shrinks a fair bit over time Well, pretty much finished the top halves of the intakes now. I went to use my contour gauge to start matching up both sides and cannot find it So I ordered a new one off ebay. I got notification saying delivery eta 22 June! Ugh. Not a lot to see, but hopefully tonight I might finish putting a slight curve in my sides. Always stressful pouring boiling water on the resin section of this kit!!! Because of the primer you cant really see the new shapes, I will try and take some with the sunlihjt or something on them, I am pretty happy where they are at now. I just need to make sure I have both sides matching and then re-install all the surface detail As always, thanks for tuning in Anthony6 points
-
EZ Line for the antenna wire DSC_0005 by grimreaper110, auf Flickr DSC_0006 by grimreaper110, auf Flickr6 points
-
My stash has an R rate of 2 . For every one i build i buy 2 more . My stash should probably be known as the Devon Variant. Alistair6 points
-
Hi everybody. With the addition of a "supporting beam" the gear doors went on without fuss: (with just some surface sanding) Under (very) good lighting some extremely shallow sink marks became visible on the tailplanes (both sides) and flaps. Some sanding and a minimal amount of filler dealt with this:. The windshield was a tad too narrow around the corners and I had to sand the fuselage surrounding the offending part of it: With a bit of filler it shouldn't look too bad: With the clear part on, the front makes me think of a fifties SF spaceship ..... I hope you had a good day and wish you a satisfying modelling evening.6 points
-
I couldn't let that thought gain any ground! No turning back to single colour anymore!6 points
-
One fine evening I opened a box with all sorts of "garbage" from different models of T-34. And I had a somewhat crazy and interesting idea. Make a "Frankenstein's monster" out of this " garbage" lower part of the case-Maquette/MSD The top of the case - old Zvezda Front and rear armor plates, Dragon turret. Balance beam - Dragon. Support Rollers-Maquette/MSD Hub caps - old Zvezda Host and Sloth-Dragon Miniarm Hooks Trunks - Zedval Cable-made by yourself Changed all bolts, used the remnants of the PE from dragon. Box- Maquette/MSD Trucks- Maquette/MSD Identification signs and inscriptions - a homemade paint mask And here we are) The prototype is a T-34 with the inscription "Lazo" from the 145th separate tank Brigade. The car is either an early release of the STZ or a repair one. Coloring - Akan 4BO Oil-Mig and Co. Enjoy your viewing, thank you for your attention.5 points
-
Not much time for the build today but the rear end is complete and tomorrow I can start working on the decals 🙂. Here's a couple of pics of today's small amount of progress Thanks for looking back soon 🙂👍5 points
-
Same again, with cropped wings: What a nice pair (fnaar): While I was looking for some paint for something else I came across these: Recommended by a friend on BM this stuff does spray and brush nicely (as you'll see) but it pongs a bit. Not that 'Ah, I remember my childhood' whiff of Humbrol enamels. Or the slightly exciting smell of Colourcoats (my favourite). Just, you know, a sort of 'what's that smell?' pong. I'll try to be more articulate later when it gets sloshed around. When the Hurricane's built. That won't take long, once it arrives. Hopefully tomorrow? The daughters are coming down next Wednesday so I have a whole week to finish. Plenty of time then…5 points
-
Got the Hemp down, used VMA 71.023 Hemp/Tan Green. Hope it looks correct? Now need to distress the finish slightly, either using Tamiya Deck Tan or playing Nickleback's Greatest Hits to it, but that might be too extreme...5 points
-
Morning, A few pics and a little video from last Wednesday at RAF Waddington, sadly not much activity any more, but nice to get the Sentry departing Removed E-3D ZH103 RAF Waddington 12.05.21-5 by Jonathan Francis, on Flickr E-3D ZH103 RAF Waddington 12.05.21-3 by Jonathan Francis, on Flickr E-3D ZH102 + ZH103 + ZH106 RAF Waddington 12.05.21 by Jonathan Francis, on Flickr Phenom T1 ZM333 RAF Waddington 12.05.21-1 by Jonathan Francis, on Flickr Sentinel ZJ694 was dragged outside to join ZJ690 and 93 too Sentinel R1 ZJ694 RAF Waddington 12.05.21-1 by Jonathan Francis, on Flickr Thanks for looking Jon5 points
-
It's the last 20% of the model. The dreaded last 20%....or as the Model Geeks podcast calls it....MoJo Killers. Decals on, wash on, flat coat on. Canopy unmasked. Now its time for: Painting the pilot Painting and detailing the ordnance & Sniper pod Landing lights Mounting the weapons and stores Installing the engine nozzle Static wicks...a lot of them And a coat of graphite powder on the main body to simulate the shiny yet grimy look of the HG. Off we go....5 points
-
Hiya Folks,..... another update,.... Well I got the second coat of RAAF Earth Brown applied; Then,... I thought about the turret area. I`ve decided to model a Beaufort with nose art and quite like Beaufort Mk.VIII, A9-486 `Scotty`s Homin Pidgin' using decals from the Special Hobby kit,.... so looking into this variant I realised that I would have to alter the turret area. So,.... I sanded away the air baffle and added two triangular pieces of plastc card to the sides of the turret area, plus another section to replicate the solid rear section seen here; See,... I told you that I make it up as I go along!! Anyway,.... here we are so far,.... ready for another sanding then a further coat of Earth Brown,... the props will also get painted too; Cheers Tony5 points
-
This is my build of this powerful and handsome aircraft which I built from the nice Airfix 1:48 kit, Export versions. For this aeroplane, I chose the livery of the Koninklijke Marine (Royal Netherlands Navy) which in 1953 was part of an aerobatic team called AeroBats. I enjoyed very much this kit which reproduces quite well the compact and streamlined lines of this aircraft. The fit of the parts is very good and well engineered. For the Sky paint, I made of a mix of Tamiya XF-21 (4/5) with white XF-2 (1/5) while for the EDSG I chosed the Gunze 333 which reproduces this color without the need of concocting any mixture. This is the first time I use these Gunze acrylic paints and I was positively impressed by their quality. I hope you like it, best regards, Dan.5 points


This leaderboard is set to London/GMT+01:00