
Leaderboard


Popular Content
Showing content with the highest reputation on 14/05/21 in all areas
-
Hi all, Just finished my Airfix 1/72 Swordfish 😬 Firstly the good stuff - it’s a beauty of a kit. I ended up going off piste and constructed/ painted/ rigged the wings separately to the fuselage. I added them right at the end and - they just clicked into place! Not even any glue required. The decals were sublime, as good as anything I’ve ever used before. Secondly the less good stuff - the surface textures looked, frankly, awful! 🥴 So poor in fact I thought there must have been an issue with the moulding. Everything was gritty. I contacted Airfix with pictures and they very efficiently sent me a complete new set of sprues. However, these weren’t much better! I ended up having to sand down pretty much everything. This seemed slightly odd? Anyone else have that issue? But once that hurdle was crossed, a great fun build 👍 I’ve added a couple of pictures of the offending surfaces. It sits very nicely next to my recent Armstrong Whitworth Siskin and Hawker Demon ☺️ Anyway, here she is... Thanks Guy ...and the not so good....🤨50 points
-
Hallo Here it is my MIG-23 M Flogger B in 1/48 in Russian service. With aftermarket parts from Aires (cockpit and nozzle), Eduard Brasin wheels, Upwind metal gear, New Ware masks. The build is tricky, because the instructions are not quite explicit. Very often you are mislead by indication arrows. They are shown in invisible areas, as visible indication. Not dashed. Especially the gear parts are unfortunate displayed and shown. Anyway, a nice challenge. Further MIGs to build ahead. 27 will be the first on. Happy modelling19 points
-
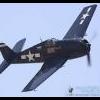
A late finish from the Vietnam GB and my favourite aircraft . The kit is the superlative Zoukei Mura F-4C. This airframe 64-0829 is probably best known as Robin Olds's Scat XXVII in the SEA scheme and he achieved two MiG 17 kills with it on 20 May 1967. However this is the jet seen in its twilight operational scheme with the Texas ANG before it was repainted in its better known SEA colours again as an exhibit at the National Museum of the US Air Force. Link Aftermarket used: Caracal Decals CD48038 Air National Guard F-4C/D Phantom Part 3 - Really good sheet with some interesting schemes of early Phantoms in their later years of ANG service. The decal quality, thinness and colour density are excellent. Looking forward to using their decals again, the fit especially on the fin flash was fantastic. @CaracalModels ZM F-4C/D Etched Brass - Made by Eduard for ZM's own label. Aires Martin Baker Mk.7 Seats. Eduard Fabric Ejection Seat Belts. HGW RBF Tags. Quinta Ejection Handles (from their phantom sets). Master Pitot tubes Paints are Gunze with levelling thinners, over a black Gaia Notes primer coat. Post lightening and shading done with adding greys and yellows. Alclad 2 for the metallic shades with lots of masking Matt finish is SMS Matt Varnish Original Build Thread: After this enjoyable build, I'm looking forward to see what Tamiya can do with the Phantom in 1:48 scale18 points
-
Hello. I have just finished this couple of 1/72 AIrfix MiG-17F. The first one #2609 is from No.89 Squadron Egyptian Air Force with two FAB-100 bombs and Sakr unguided rockets. The second one #453 is from No.7 Squadron Iraqi Air Force in Syria. Both of them were depicted in 1973 and inspired by profiles in Arab MiGs Volume 5 Harpia Publishing. Patrick18 points
-
Afternoon all.....seems I'm in a roll on finishing off some languishing projects. This one was waiting for it's Schürzen and a figure. The kit was a Border Model....their first kit they have done. I like them a lot and wouldn't hesitate in getting another of their growing range. Really nice detail and fit equal to Tamiya. Trying to get my hands on their new release Tiger 1 Early version. Looks stunning from the reviews.....anyway, here's the PZ.KPFW IV Ausf G build blog for reference.. Cheers all......17 points
-
Hi guys, here is my latest build a H 75 in Dutch markings. THis plane was piloted by sgt P. Van Breen in Java in 1941. The Musthave kit is the Academy kit with add-ons from "Hi tech". It's an old but good model. Hope you'll like it, Cheers, Manu.17 points
-
Going thru my stash I found I had the 2 kits Airfix have done of the Spitfire Vc. The first is based on the 1975 Vb, well regarded in its day, which added a sprue with a -c wing and armament in a 2005 reissue. The second is the 2020 boxing, a new mould specific to the -c. I thought it would be interesting to see how things had changed over 45 years. The kits were built mainly OOB. Eduard RAF seat belts were used in the 2020 boxing and Tamiya tape cut to length used to portray the harness in the 1975 kit. I also made up a joystick from scrap plastic and wire for the latter. As I don't have non clouding superglue I had to leave off the prominent rear view canopy mirror, neither boxing providing it anyway. I also assumed VHF radios were fitted to both so no aerial wire was needed. (My references say VHF was installed from late 1940 and the aircraft depicted were from 1943. I could see no wire in contemporary photos but noted some colour profiles on the Web did show it ) Decals were the options in the 2020 boxing as the older kits decals were very matt and less precise. (They also had a tendency to break up as I found when I used them for the stencilling of one of the options). For reference, the older kit had decals not only for a South African machine but also for an Australian, rather than an American, one Paints for the camouflage colours were Xtracrylix with Promodeller Sand Wash and Tamiya Weathering Powders also used. The initial photos are of the boxes and instructions for each showing the differences in parts and construction. Thoughts: The major difference is the level of internal detail. The older kit has no instrument panel in the cockpit, no decals for the instruments, no seat worth the name, no joystick and a pilot figure to hide their absence. The newer kit has all that missing detail and more. Proper bulkheads and gas cylinders for example. Indeed, it was so good this is the first kit I have ever made that has the canopy open to show off the interior. The moulding quality in the older kit varies from subdued, save for some strangely exaggerated rivets around the engine, to Matchbox like trenches in the -c sprue . The newer kit has options for spinner shape, prop blades, fuel tank, exhausts, oil cooler, canopy open, clipped wings and armament. The older one just has the wings and armament options. Despite all this, the choice was not as clear cut as may be supposed. The older kit was easier to build, seemingly accurate in outline and some parts just looked better. The 'sit' of the aircraft on the ground is, to my eyes, better captured in the older version for example..... Oh, who am I kidding, get the new one!14 points
-
Afternoon all. Decided to move away from Tiger 1 I'm on at present to finish the Sturmmörserwagen. I'd say it's 95% complete and maybe some very minor touches needed here and there and maybe some stowage; once figured out. I learnt a lot here on hand painted camo', and some do's and don'ts. The tracks are what came with the the kit, and were very nice to put together with a small pin each side; then add the guide horn. I'm considering getting a set for the Tamiya Tiger and the AFV tiger at present on the bench. Finally the interior. Enjoyebale, but the actual rocket racks were a pain and I think they need re-thinking by RFM for a better build experience that I don't think would effect the accuracy. Still have to weather the racks themselves..... I still have to install the fold down seat against the rear wall, once it turns up. Anyway, that's all folks for today. Any comments warmly welcomed..13 points
-
Hi, so I started a new industry again and this time I finished the Saturn V rocket. It's not exactly according to the model, but rather my own version more pleasing to the eye. The model is very old, which corresponds to the quality of the kit, but somehow I struggled with it. The size of the model is 115cm. It's a little bigger than I expected, the originally intended for the car collection :D. In the end, it turned out to be a nice decoration and a lamp to illuminate the living room, especially at night, it's nice 🙂 Maybe it will be liked.12 points
-
Russian classic оf the utility vehichals the rgular UAZ "Bukhanka" ("loaf of bread" as it has a similar shape))))) Pretty simple kit but the ecxellent quality of details and fitting. Paint with AKAN, weathered with oil paints and tamiyas wash. Possibly most of you have seen it in instagram at "snitok_models"12 points
-
Just finished this old short run kit from Aeroclub using Euro Decals 72.105 markings for 145 Squadron, based at Celle, Germany 1956. My Rareplanes FB4 is in the background - built in the Anything But Injection GB Thanks for looking. Steve11 points
-
Here is another from my unfinished starters. Airfix 1/72nd Sabre as an F,5 of 438 'Wildcat' Squadron RCAF. Decals by Leading Edge, Pavla wheel set and seat, Eduard etched cockpit set pre coloured. AK extreme dark aluminium paint finish and some silver decal for wing panels and cockpit frame which I carefully filed away the too low frame that Airfix done, painted black frame to about the correct depth and overlaid with silver decal stripe of right width and cut to size By the way I moved the position of the wing fence and pylons for the underwing stores too. Since the photos were taken I added the red warnning stripe around the rear fuselage. I kept the Main canopy that Airfix provide which, as well as the too shallow frame is too tapered at the back end> In the box with the kit were various Eduard and Pavla sets ( I bought the kit for a fiver as it had been started but not too far gone andworthy enough to finish) and among was a vacform replacement canopy which is a copy of the kit part with the sharp taper so it wasn't worth using. And so, another Sabre joins my collection of RCAF models. Enjoy.11 points
-
Hello everybody, as my first post I´m presenting you the F-105G Wild Weasel in 1:48 from Hobby Boss. I´ve started modelling one and a half year ago, after the common break of 25 years. This is my first big one 1:48. When I ordered it on eBay I was a litttle bit lazy and didn´t read the specs. Two days later it arrived, and I became aware that it´s about 45cm long.😲 As a result this project became very dominant on my workbench. The quality is quite good, even if there are no resin or photo etched parts in the kit. The decals are okay, but sometimes a little bit to large, as you can see from the yellow border around the cockpit windows. I build it completely oob. For the colouring I mainly used Tamiya an Mr.Hobby colours. The kit is very detailed. For example, the engine is made of nearly 20 parts. 18 of 20 you will never see in the finished model. All in all, I had quite a lot of fun with the kit, and 90% of the frustrating moments were caused by my impatience.11 points
-
Well it looks like I love decals but I’m not such a big fan of stickers. @giemme look away now. 🙈 So it wouldn’t stay put, I cut it to try and make it fit and only made it worse. 🙊 Nothing else for it. Giorgio you should be proud. 😇 I did it. 💪🤪 Here’s a closer one as it may never happen again. 🤣 While this was drying many other parts got masked and painted. Steering wheel. Nitro bottle. Head lights. Then everything got unmasked. 💆♂️ Rear box of tricks. Winch. Willy himself. Still have to hand paint all the details. Started on the helmet. Wheel turned out nice. Look at ma shaaarrney baalllls. 😂 Head lights look good. Wish they were see through mind. Really happy with the bottle. And last but not least. The star of the show. 🤩 A few touch ups but they will vanish under the top coats. 🥰🥰 Right then what was that I was saying about stickers. Nearly done. I can’t take her out and whizz around the garden. If it ever stops raining. ⛈ Thanks for looking in. Hope you’re enjoying the build. Happy modelling. Johnny.11 points
-
We must be thankful to Jules Bringuier for giving us models of some obscur types, never to be produced by a mainstream companies. The Romeo 37 is one of them. This reco/observation plane was Italy main tool before more modern planes were introduced. It is not an easy kit and there is room for a lot of scratchbuilding depending on your Doc and skill, but in the end you're with a seldom seen model. I have done this one some times ago and I joined some WIP pics to show what was done. In the meantime enjoy your We,best regards. 22A1E472-B223-487F-889B-993EA08B192C_1_201_a by jean Barby, sur Flickr 3D050084-9976-4B54-BAF0-CCB15B1CF10C_1_201_a by jean Barby, sur Flickr 978248C6-6815-46B5-81E2-9FB2EA75DBF9_1_201_a by jean Barby, sur Flickr DSC_0007 by jean Barby, sur Flickr DSC_0006 by jean Barby, sur Flickr DSC_0005 by jean Barby, sur Flickr DSC_0002 by jean Barby, sur Flickr DSC_0001 by jean Barby, sur Flickr10 points
-
Hi everyone!!🙂I am new from here, this is my fujimi 1/24 ferrari dino 246 GT,I build this kit few months ago,this is an old kit, I did some modification on it..I think the result is not bad. hope you like it!!🙂 and here is the video build if you are interested:10 points
-
I built this a year ago at the start of lockdown and thought i may as well post it, Its nice to have the addition of the figures in such dynamic poses even if my painting of them is a little clumsy.9 points
-
Handley Page O/400, RAF 207 Sqn, October 19189 points
-
I thought I'd already posted this here but apparently no. Well never too late I guess. Story behind this started last autumn when I was heating up my sauna and rolled a log of birchwood in my hands and wondered what this could be turned into. I had done some cutlery when I was young so this wasn't exactly new thing but I wanted to try it out. 15 minutes later I found myself with axe in my hand trying to make the log little bit easier to work with. After axe I used a sanding machine to make it relatively close to final shape. After that I used some P400 grit sanding paper and sanded the final shape. Oars were made from splinters left after the axe so that it'd be homogenous with the main "hull". Hull was treated with mahogany colour oil and covered with about a dozen layers of varnish. Oars are just varnished over. Everything else on top is evergreen plastics, steel wires etc. scratch built. This was the beginning before the axe. Rough shaping before final sanding with hand. And the shape after about 30 minutes of sand machining. Final result. Took maybe 10 hours within 2 weeks. Most of the time was just waiting the varnish layers to dry.9 points
-
Hiya Folks, Another cellar survivor that needed to be tarted up,...... this is a Glencoe Models Bristol Sycamore (not Dragonfly LOL!) which I built many years ago,..... it looks OK from a distance but really needs a new set of wheels at least! I have the 1/48th scale kit which I quite fancy doing in this scheme! Cheers, Tony9 points
-
A nice update in Workbench. https://uk.airfix.com/community/blog-and-news/workbench/hawk-flies-nhs-flag-and-mosquito-exclusives?utm_source=ActiveCampaign&utm_medium=email&utm_content=Hawk+flies+NHS+flag%3A+NEW+Workbench!&utm_campaign=Airfix+-+Workbench+-+Week+7+2021%2F20229 points
-
So I've added a couple of new recruits to the stash 🙂👍9 points
-
A bit of a wash and some exhaust staining this morning. Aerials, Pitot tube, wheels and propeller glued on. Flory Dark Dirt for the wash and Tamiya Weathering powders for the exhaust. The pictures showed up where I hadn't cleaned back the wash properly and this has now been done. She's sitting in the cabinet safe until tomorrow when I'll put a final clear coat on and if I get time rig the aerial wires. Thanks for looking, Cheers, Alistair9 points
-
Hi all, Thanks to the covid-19 measures and a surprise Christmas present from my wife I took up scale modelling again after over 25 years of absence! However, my skills were not that good anymore and things in the scale modelling business appeared to have developed considerably, and after two false starts on 1:72 RAF Phantoms (@iainpeden: I still have the tanks!) I tried to boost my self-confidence on this simple 1:72 Fokker D.XXI. The kit is very simple and doesn't fit nicely on most parts (check canopy), and an eyesore is the colour blue in the roundel and on the fin, which is too bright to my humble opinion. The '221' decals come from Print Scale, but judging the D.XXI photos I have in my collection the digits are too thin. Finally, I turned to Hataka Hobby for the correct colours, but painting with acrylics was a first for me. That was very, er, educational. Anyway, I did enjoy building the kit and indulging myself in Fokker D.XXI's history. I choose a livery that should represent 221 fresh from the factory, September 1938, so with red-white-blue roundels and absence of bar visor and radio. During the first day of the invasion by nazi Germany, May 10 1940, 221 was flown by lieutenant Doppenberg who shot down a superior Messerschmidt Bf109E. However, after the capitulation this aircraft was set on fire by its own personnel on May 14, and that was that. Cheers, Rob9 points
-
Wow. There's so many replies on this it seems like a Ced thread. In the interest of brevity, my sanity, and the next few years of my life, I'm going to answer most of them without the quotes and (sadly) only quote a select few that require specific answers. Here's the "without quotes responses": Yes, Yes Perhaps without a doubt My girlfriend keeps filling my trouser pockets with onions only at the weekends I should have killed you yesterday (was one of my friends business cards!) Yes We have the tech but we're not gonna use it (just yet - with apologies to Fuzzbox) Yes Turquoise Now to the specifics: Ex WSF (Wessex Servicing Flight as 28 Sqn didn't "officially" have a ground crew) at Sek Kong. Sad? yes, and obsessive only when required All you need to know is that it's better than scrapple, and better than mush. For our UK viewers, Scrapple is what they make from the floor sweepings and mouse droppings left over from making sausages. And they can't make sausages in the USA - not real sausages anyway. Mush is, well, hard to describe, other than to say it is what it says on the tin...mush. and the best black pudding comes from Stornoway. Black pudding, square sausage, (real) bacon, fruit pudding, or fried clootie dumpling, tattie scones. Optional slice of fried bread (airmens mess breakfast staple), fried tomato, and some left over beans Now the technical stuff. As happens in 95% of cases, upon reviewing my work I decided I was not happy with the bulkhead, and was convinced it appeared too short - so off it came! I moved the gearbox floor height up a few millimeters ("very small bits of inches" for my US colleagues), trimmed a bit off the gearbox housing, and rebuilt what I previously thought I was happy with. I think this looks much better I then dived (dove? duv?) into the rear bulkhead. Using the same profile obtaining method I described a few posts ago, I got a decent fitting bulkhead all ready to be greebled. I have a few photos of the rear bulkhead, but most of them have small differences, and in some cases I'm not sure exactly what mark of whirlwind they are from. Therefore, making an executive decision, I decided to opt for modelers licence and just greeble it up to look sort of rear bulkhead'ish To begin with, there are two prominent panels on the bulkhead with those strengthening fluted whatjamacallits (wish I could remember the tech term for them). I spent ages scribing a groove in some scrap card to get some plastic rod to lie in. It looked okay'ish but cutting the grooves into the card deformed it - but still usable thankfully. But for the second one I got fed up and just glued the rod directly on to the card and you can only just make out the difference. Other greebles were added from leftover Wessex/UH34 bits and who knows what else. Now I look at this photo I realize that I added more greebles later, but didn't take a snapshot THough sometimes I wonder why I bother as this is about as much as you are going to see once it's all closed up... you'll see less actually as there will be seats and a door in the way As I think about this build and the sequencing, I realized that I can't close up the fuselage until some of the windows are in place, and some of the windows have to go in before the interior is fitted, and upon examining the drawings I realized that as it stands now, some of the windows don't even have places to go. On the WW there are a couple of small windows above the driver and his chum - those were not molded on this classic, therefore, they had to be made. As I began to mark out the positions, there was some holes in the way, so next up was the usual drill of filling holes and making more holes. Runner goop was used as per SOP (pencil marks show window locations). I also took the opportunity when the goop was out to fill the gaps in the tail boom Referring to the drawings, I cut one of the copies up and used it as a template to mark out the window location. As luck would have it, I had a brass template that gave me the perfect window size Window number 1 achieved. At this point I glanced at my reference photos and realized that the drawings were wrong! The window (as per the drawing) extended too far towards the centerline of the aircraft and wasn't close enough to the sliding window rail. Fun and games was had while I glued yet more scrap back into the hole I had just cut, and when that had set up I recut the hole in a more accurate position (I think) Cutting the holes was the easy part. I now had to figure out how to make those titchy little windows. Over the next day or so I had a number of ideas, all of which sounded promising - as they do when they're in your head. Once they get out and start to get put into practice, oftentimes they are not so promising. One of my brainwaves was to use epoxy resin. I reasoned that I could simply fill the void up with this epoxy, then file and sand back to a window like finish. Easy huh? I have some "crystal clear" epoxy, so slapped some aluminum tape on the back side of the window and proceeded to fill the void. It looked great and was certainly crystal clear. The issue was that I could not get the bubbles imbibed my the mixing process out of the resin. Fail 1 Plan B: I had in my stash some casting resin - also listed as crystal clear. Unfortunately it has been in my possession for some time and when I went to mix it, it was clear (ha! see what I did there) that it had life ex'd and was no longer clear. Fail 2 Plan C - I have some thin clear styrene sheet... Fail 3 - I couldn't get the curvature to hold, and I wasn't prepared to start vacforming for something as small as this. Plan D - More of a fallback than an actual plan. What about using the kit windows to make a window? (stay with me on this one). It was obvious I was never going to use the kit windows for their intended purpose, but maybe I could use bits of them to make these small windows? The idiot self in me told me it could be done. Cure razor saw and sliced fingers The biggest problem facing me was the curvature of the fuselage. I had kept the edge of the window aperture perpendicular to the surface - it was the only way it looked decent - and was a real pig to achieve since the plastic is so thick. This was definitely not a 10 minute job. I realized I was never going to get a good fit on all sides of the window, but reckoned that if I could make a "wedge" shaped window that I could get close enough to jam into the aperture, I could file of any excess and polish up what's left. Have you ever tried to hold a teensy weensy little piece of plastic and file angles and radii on the little sucker? Like this... I have now! Once I thought I had a decent "fit", i jammed the plastic into the hole and ran superglue around the outside edges to fix it (hopefully) in place. As you can see it's not pretty, but some of the window is in the hole and that's all I need. Some filing and micromeshing later - they look clear enough to pass muster for me (you can see just how far out my first location was by the infill segment of plastic Both port and starboard side are eventually done As I was thinking about how to write this up it dawned on me that I also need to figure out how to replicate the prominent rubber seal around the windows. After much thought, the only feasible solution I have come up with so far is by masking. i.e. mask the windows, then mask the paintwork leaving a small gap between the two which I can fill with black paint. Then it dawned on me... If I am using masking to cover the window and provide the outline for the rubber seal, why did I go to all the bother of cutting 4 ridiculously small windows which were a real pain to get looking right when I could just have cut a huge chunk of plastic out of the roof, and filled it with one larger clear part, and sanded all that to the roof profile? The windows and surrounds would still be achieved by masking. That job would have been a whole lot simpler and much easier to achieve, and I wouldn't have wasted several modeling sessions getting razor saw cuts and eye strain. Well, I'm not going through that again. But now that idea is starting to gnaw at me. To stop thinking about windows I located the vent tube in the bearbox housing Which brought me back to windows. Those fuselage windows require to be fitted before I can fit the gearbox housing and close up the fuselage etc. etc. (I think we've been here before). Okay, it would be possible later but it would be a whole lot more complex, and this is a fun build right? The front window is the sliding door - that can be done later. The center window is just a flat plane, again, easy to do later, but that rearmost window is the culprit. It wraps around the upper deck curving in several planes simultaneously. Drats! A quick ratch around the spares box provided these likely candidates. These windows already have compound curves in them and I was hoping that there was enough curvature in them for me to apply the same process as before - cut them to shape, wedge them in, then sand off any excess, and polish up what's left. Never mind the green - that was a test spray of clear green some years ago and I'll be sanding these things anyway so can polish of any green remaining (in theory) About 45 minutes of fettling later... It's a fail! There's just not enough curvature or thickness to the transparencies to be able to wedge the window in and make contact with the fuselage all the way around. So close, yet so far. On the up side, getting the shape right wasn't too difficult at all, and now I have a "sortof" template I can use for the next iteration of hendie's failed windows attempts. The other left over windows may have more curvature in them - I'll check those later. I may also have some thicker clear styrene sheet left over from Pegasus that I can dig out and check. I think this idea is doable though. I'll try and get another update before the end of the weekend - I just found out today that I have to travel again so will be away all of next week.9 points
-
I've never done a work in progress - other than as part of a group build - so I thought that I'd be brave and start one. My last build didn't end well so this is a 'getting back on the bike' build to get something to the end. I recently acquired this kit at a reasonable price from a well known on-line auction site so since it was on top of the pile, comes with some resin, brass, a mask and decent decals I thought I'd give it a go. Weaponry will need to be added later. I'm going to build it as ZG479 a GR.7 with 100% LERX taking part in Operation Telic. Hopefully, this should be a reasonably problem free build.8 points
-
Well after putting forward some possibilities for my build in the chat section I revisited the stash and came upon a possibility which instantly went to the top of the pile as its one of my favourite aircraft of all time, the DeHavilland Mosquito. Not the more modern Tamiya tooling (if I found them for £10 or less I would need a wheelbarrow to carry the ones I wold "need") but the old Airfix 1/48 FB.VI in 1/48 scale one which I picked up a couple of years ago from the Kit Swap at Telford for the bargain price of £5. Now this may be an older tooling but there is nothing wrong with it as it is dimensionally accurate and actually quite nicely detailed for it's age. Here are the usual box and contents shots including one of the very handy price sticker proving the bargain price and the fact that it is eligible for the GB; The box top may have seen better days but the contents are still good; And the price sticker; Now the sharp eyed amongst you may have noticed the lack of something that is very important, decals! This had me rummaging through my decal stash for a part used Eagle Strike set which I know I have that has a nice SEAC example on it that I picked up for a couple of pounds as the set is incomplete. Now I know I have the sheet but can I find it? No is the answer. I have a sheet by Xtradecal but that would take the overall cost to around £13 so that won't do, but then I remembered my mini stash of Lift Here decals sent to me by my very good friend Sasha in Serbia over the years and all sent for free and in there is a set with a couple of Mossie's on it as well as a couple of P-47's, and as they didn't cost me a penny it keeps the cost of the package at £5!! Here are a couple of pics of the decal sheet and instructions; I shall be building the FB.VI at the bottom for this build, though I would very much like to do the T.3 at some point when I can work out what to do in the cockpit to convert it from an FB.VI. One very helpful point is the fact that according to the instructions there were no stencils visible! Which is excellent as I don't have any! A slightly deeper dive into the stash found a later stablemate from Airfix which I picked up from an airshow at RAF Waddington probably 15 years ago; Lets have a closer look at the price sticker on this one; £4.50! Even bigger bargain!! I could actually build them both in one thread and it still come in at less than £10!! I will see how I get on with my FB.VI before I make any commitment to building the NF.30 at the same time, though I will probably spray the interior at the same time as I do the FB.VI as it makes sense. For those of you unfamiliar with the Airfix NF.30 you actually get the full FB.VI kit with a new sprue to enable you to build the nightfighter from it with new upper wings, nacelles and radar nose. I am really keen to get started on this/these as I haven't built a Mossie in a long time. Thanks for looking in and as usual all comments and criticisms are gratefully received. Craig.8 points
-
Hiya Folks, There are a few conversion sets becoming available now for the Beaufort in RAAF service and the first that I could get my hands on is from Uncle Les in Australia,.... I will also be getting hold of at least one High Planes Models set when they are released. The Uncle Les set comes with printed instructions that are similar to a magazine article with photos and diagrams which talk you through the construction...... and show a completed model. The parts consist of two nacelles with integrally moulded u/c doors, separate engine cowlings with engine front moulded in, propeller blades, hubs, new fin and rudder and a set of twin machine guns for the nose. The parts seem to be 3d laser printed and although the cowlings and engines seem OK,.... the propellers do have a lot of lines, as do the nose guns,..... but we`ll deal with these later. The cowlings need to be carefully removed from their backing using a razor saw,..... and need a bit of cleaning up,..... but here they are along with the rest of the set, having been removed from the backing which is in the centre of the photo,..... the parts have been roughly pre painted too; One of the nacelles and cowlings with the propellers, hub and noe mounted twin Vickers K Guns; The main kit parts were also pre painted and construction started with the wings; After quite a bit of test fitting and fettling,.... the nacelles were attached to the kit wings; The interior was then completed and the wings test fitted to the fuselage parts; The fuselage were then joined,..... the wings have been left just test fitted for now to make it easier to remove them and sand the nacelles; While the main parts were left aside to dry,..... ready for the sanding stage,..... I moved on to the propellers. A quick sanding revealed that the 3D printing process had left lots of ridges much like woodgrain on these thin parts and the magazines of the Vickers K Guns are the same. I shall have a go at sanding each blade,.... but I may have to rethink using them and resort to the spares box? We`ll see,..... Cheers for now, Tony8 points
-
Hi all This is my 3rd model for this year This time I choosed the classical Mitsubishi A6M Zero. I build this model for a friend who has choose the A6M2 early model The kit is the Hasegawa kit. No major problem on this kit. The sole advice is to glue the upper wing on the fuselage before glue the lower wing. Some othe photos in the link bellow Mitsubishi A6M2 Zero8 points
-
I read the Aston Martin DB9 build by @johnlambert recently with sympathy as this model has tested my patience and fortitude in much the same way, particularly since the end of February when my attention turned to the body, I'm a novice in the world of cars (three down and quite a few to go) and after lavishing a lot of time on the modifications to the drive train and interior, I was feeling on a roll but the shiny bits didn't want to play, for a bit more detail my in progress is here - Anyway, I have decided it's finished, (it's not, there are things I know need to be added but my enthusiasm for the model is currently running on empty) so I've taken some pictures, tidied the workbench and put it away in a box! As with every model it's a learning experience so one just needs to move forwards. Excuse the rather poor photographs, I have an ancient iPhone and it wasn't as sunny as I'd hoped. Anyway, all critique is welcome, it's not my best work so anything you say won't be anything I haven't thought myself. Onwards they say and a 1977 spec Tyrrell P34 is next across the bench. Dave8 points
-
A trip into the dark side. First a Baade 152 (a what?) see here - https://en.wikipedia.org/wiki/Baade_152 1/72 scale all resin kit by Aero Modell of Germany. Essentially a sawn-off B-47 with seats. Now a 1/100 scale Tupolev Tu-104 from the ancient East German VEB Plasticart kit, with aftermarket decals from BSModelle in Ukraine Makes a change from the usual stuff!8 points
-
"What General Weygand called the Battle of France is over. I expect that the Battle of Britain is about to begin. Upon this battle depends the survival of Christian civilization. Upon it depends our own British life, and the long continuity of our institutions and our Empire." It also depends on me "finishing off this little lot" while crowbarring in as many film references as posible. First up four "Einkels". Three merlin Engined. One CASA in Spanish markings (Airfix Heavy Metal new tool), two Battle of Britain film (One Airfix new tool, one Revell) and one as nature intended (Airfix new tool). I'm using some Lancaster engine nacells and a merlin Beaufighter conversion.7 points
-
Hi everyone!!😀 always like muscle car,the mustang is one of my favorite. this is revell 1/24 1965 mustang 2+2 fastback a very good kit,I did some modification on it. hope you like it!!🙂 and here is the video build if you are interested🙂:7 points
-
Hi guys. I've been on a bit of a civilian vehicle kick so far this year, here's what I've built.7 points
-
To be honest I was dissapointed with this kit. Was very flashy, tooling obviously worn. Some parts were paper thin, the photo etch for the cockpit was overly complex and just not needed really, especially considering you can't see any of it. Vacform for the windscreen doesn't fit without butchering it into something that won't look right so I've abandoned it. I should have chosen the Italian camo scheme too as I'm really not very good at German mottled camo. Anyways, here goes. Might get a maachi 200 next to try the Italian camo. Thanks for looking 🐧7 points
-
Here are some pictures of the Breda Ba65 monoposto.It is the Special Hobby 1/48 scale kit in the markings of the later Italian ace Adriano Visconti from 159^squadriglia,50°stormo assalto based at Tobruk 2,Africa settentrionale in 1940. Saluti Giampiero7 points
-
Hi, One of the most important airplane of twenties and early thirties of XX Century was Fokker CV. It was a true workhorse comparable with Potez XXV, Fairey III family, Breguet XIX or Hawker Hart family... Italy was producing Fokker CVE under name IMAM/Romeo Ro-1. They almost did not survived in Regia Aeronautica till the outbreak of WW2, however took important part in the Second Italo-Abyssinian War (SIAW) which started in 1935. The Czech small short run company LF Models made a series of kits of Fokker CVD and CVE (with diffrent engines, undercarriages, decals etc). It is a remake of a wider in some aspects range of resin kits by they sister company Kora. Interesting modification of Ro -1 compared to original CVE was additional third seat behind the gunner position. It was done in almost all colonial used Ro-1s. The model presents machine from SIAW, namely from Squadriglia Somala in 1936, based on that photo: Here she is: The model was build within AFRICA GB, the WIP thread is here (joined with thread on Fiat CR 20 bis): I have post this thread by mistake initially in Work in Progress, instead of Ready For inspections, so if anyone see it twice I am very sorry about this... Comments welcome Regards Jerzy-Wojtek P.S. this is mine No 8/20217 points
-
A bit of detailing and a bit of scratchbuilding were the order of the day today. The Planters have had a bit of black added to the bases. I quite like the new look. A couple of tables were scratched together from plastic rod, bar and card with Molotow chrome and lime green rattle can paint for a finish. Background provided by a bit of orange card. Trying things out alongside a car gets me this picture... I'm not sure if the car is sat in a dealers showroom or shopping in Ikea. I'll be seeing how things look in the Showroom later.7 points
-
Cheers Fella`s,..... looks like nobody spotted my deliberate mistake,...... The tail,..... of course the Australian Beaufort`s had a larger tail fin and so the kit tailplane needs to be sawn away; And then after sanding the nacelles and wings they were fittedto the fuselage; Cheers Tony7 points
-
Gordon Bennett; I’ve even Steve “Hawk? Now that rings a vague bell” Fritag is joining in…7 points
-
Thanks guys - as usual, sometimes it just takes some time off to rewoke the mojo of a build. But right now things seem to go fine. A quick pic of dryfitting engine and canopy - still closed - but this starts to look like a duck, with decals and overall blue. Next I go hunting and see if I can source a fine Browning.7 points
-
When I was young I was poor. But now, after years of hard honest and painstaking work, I am no longer young.7 points
-
Thanks Peter. I am sure someone used them in a build recently ( @Retired Bob?) and they looked rather good. Definitely a brand to watch out for. 👍 Anyway while this thread is up here is how far I got with the Elefant. About 90-95% complete. Still a bit vanilla and needs a few more touches but quite happy with it. Part 2: Ferdinand should be up and running soon. Got a bit sidetracked with bikes and a Challenger.6 points
-
Hello, Here's my just finished 1/48 Kinetic F/A-18C Hornet, done as a VFA-81 jet from the 1991 Gulf War. I was originally going to build this for the DS GB here on BM, but I never really took in progress pics of it. Oh well... The kit is not the easiest to work with, especially around the nose and intakes, but I've learned from it, so a future build might be easier to put together. Other things used were a Walleye and data link pod from Astra Resin, a pilot figure from PJ Productions, and a laser spot tracker pod from the Hobbyboss Hornet kit. Painted with Mr Color mostly, and a VMS flat coat, which I really like. And the real one during ODS: Thanks for looking, I hope you like it. Pete6 points
-
Recent completion for a GB elsewhere. The F-4F was the mainstay fighter for the US Navy (and Marines) in the early phase of the war in the Pacific. When faced with the lack of suitable airfields in places like the Solomons, the approach the Japanese used by employing floatplanes was investigated and one single F-4F-3 was converted to a floatplane for testing. The floats and reinforcement knocked a fair bit of performance off of what the F-4F had. If it wasn't for the effective Seabees (CB - construction batallions) managing to rapidly roll out airstrips, this might have been a more common sight. Amodel's Wildcatfish is a bit of a rough kit - think short-run. Soft, soapy plastic that deforms somewhat easily. My example had some warpage in the fuselage and floats, but judicious employment of clamps, tape, brute force and filler meant I at least could deliver some semblance of an aircraft on floats Some light rescribing and riveting on the otherwise lacking details, Vallejo Model Air 71.298 M.485 NS Light grey, Mr.Hobby H51 Light Gull Grey on the undersides and topside: VMA 71.109 PRU Blue & AK Realcolour RC256 M485 NS blue grey6 points
-
Still waiting for a mojo fix for the fourth wheel but for now I had a play with my recent purchase of self adhesive lead sheet. The draw bar has several strengthener/stiffeners of wrought iron added in places and a fore end device that holds loops for the horses to be chained into harness The lead sheet was cut into a narrow strip and trimmed to fit, with added folds and drilled holes This slots in between the ferrotuckytock things with a drop pin to hold it all together I feel we are getting some place again This is the lead sheet, from a fisherfolk suppliers on the interwebbebay place Very fast response to the call too, thanked them, advising you.6 points
-
Boring little bits...6 points
-
First thing to try and suss out is the wheels I think. These were relatively simple on the Wolseley, being a flat plate on the front and a slightly tricker dished plate on the rear, but this time I need to make spokes. Also, I had the happy coincidence that the wheel diameter matched standard 22mm pipe and rubber O rings previously, whilst these new ones are not only larger, they’re also different front and back. I traced them from the drawing into CAD and printed out at 1/35. The front scaled out at 30mm diameter for the outer tyre, 28mm for the outer edge of the wheel rim and 24mm for the internal rim. The rear is a couple of millimetres larger at 32, 30 and 26 respectively. The rear can use a slice of standard waste pipe hopefully, but so far I’ve drawn a blank for the other sizes. The first alternative to pipes/tubes then, is to try cutting out circles from plasticard and laminating them together. I used my tried and trusted method of scribing using pin and then snapping/cutting out concentric rings: Oh dear, not good. Centering the rings is very difficult, the results are pretty awful (even using relatively thin 0.75mm card) and I’d need to cut loads to laminate up to the final thickness. If I had a lathe, this would be a breeze using thicker rod material, but without it’s a real challenge. I also had a go using a drill-mounted hole cutter, but that wasn’t great either. While I figure all this out, I had a stab at making the spokes on a centre hub. I snipped cocktail stick ends off and inserted them into holes drilled in the hub ring (a piece of ABS plastic tube, which unfortunately isn’t available in the larger sizes I need for the outer wheel elements). So the centres are progressing ok for now. Once I do get the outer wheel problem sorted, I will consider making up a single front and rear and then casting in resin for greater strength and consistency. Any good ideas for sources of tubes or pipes in the sizes I need?6 points
-
A couple of rare interior shots of the Stranraer just popped up on facebook https://www.facebook.com/aflyinghistory/photos/pcb.1624468367710248/16244585410445646 points
-
Oh sure it may start out all standard and uniform, armies love that kind of thing. Then they let these kids take 'em out in the mud and rain and sun, then ya gotta fix the durned things... They should let us keep them in museums so they don't get all dirty and chipped. Make for an easier paintjob in 1/35th scale too. Sorry, I was waxing all philosophical and some junk. Don't mind me. Nice pix.6 points


.thumb.JPG.3498f40362ff13ebfc4b2e45abbd545e.JPG)


(510x640)-Copy(95x120).thumb.jpg.33073138e01aa81779639a845926753e.jpg)


This leaderboard is set to London/GMT+01:00