
Leaderboard


Popular Content
Showing content with the highest reputation on 05/05/21 in all areas
-
Recently I've been working on Airfix's 1/72 Whitley Mk.V for the Unarmed Group Build, certainly one of my favourite builds. It's a joy to build, totally recommend it. I'll have to build another at some point, but probably with a bunch of etch in the cockpit. Only issues were one small missing part which I easily made a replacement for (easier than bothering with Airfix spares) and there were holes for the aerials missing. The instructions tell you to drill some for the coastal command version, but there's no instruction or semi hollowed out bit to drill for one of the aerials that is needed for both versions. Also no hole for the pitot, easily fixed. This was replaced with a metal pin anyway, it just looks better than the plastic one provided. And here's the cockpit. Once I applied the map decal I wasn't happy with it at all, it just looked flat, oversaturated and out of place. So similarly to what I did with my Dambuster Lancaster last year I decided to replace it with paper. I cut the image of the decal from the instructions and used that instead. Airfix should just give a printed sheet of maps on paper to cut out and attach with a bit of pva or superglue or whatever instead of a decal. But this wasn't enough, so I made a book, perhaps a manual or logbook or something. Justwish I added seatbelts. WIP thread here27 points
-
This was built as part of the Australian & New Zealand GB. The base model is Hasegawa’s lovely 1/48th A-4E/F model which just happens to have the bits required to build an early RNZAF A-4K. A few additional bits were added. The markings come from Gekko Graphics RNZAF Decal set. Unfortunately time ha not been good to my set and they had become very fragile! Some silvered badly other, others just split into a billion bits, so unfortunately they are not that great. She was painted using AK Interactives Real Color paint, an amazing paint (lacquer) that just goes on like a dream and gives you a superb finish. The scheme is unusual and quite cheeky. The story goes….. this aircraft was involved in the “Pitch Black” exercise held in Darwin (NT Aust) in 1984 and while there suffered a bird strike whilst and had to be parked up while waiting for a new engine to arrive. Sometime when it was left alone (never a good thing to do on a RAAF base, trust me! ), she was visited by some boy’s from 75 Sqn (RAAF Mirage squadron up there at the time) who decided to “Zap” her with their squadron flash, as you do. A USAF Phantom squadron who was there at the same time also “Zapped” with a wee Phantom badge on the tail. Can imagine the response when the NZ boys saw it! Thanks for looking, a link to the build is attached. Model: Hasegawa 1/48th A-4E/F Skyhawk Paint: AK Interactive Real Color, and MRP, Tamiya Acrylics, Model Master Metalizer Lacquer Extras: Aires – A-4E/F Cockpit set 4280 Eduard – A-4E/F Exhaust Nozzle set 648251 Eduard – A-4E/F Mask set EX-023 Gekko Graphics – RNZAF A-4K decals ResKit – A-4 Skyhawk early Wheel set RS48-012924 points
-
Irish leasing specialists CityJet were the only European airline with a fleet of Sukhoi SSJ-100s. Between 2017 and 2019 they operated seven SSJs on a mixture of their own services and wet-leases to Brussels Airlines. Four aircraft were painted in full Brussels Airlines livery but despite positive passenger reaction Brussels terminated the leases early without giving any public explanation. Complex maintenance and poor availability of spare parts were probably factors. Matters can’t have been helped by the SSJs not being able to serve LCY forcing Brussels to continue using their elderly Avro RJs. Following the termination of the Brussels leases CityJet disposed of the SSJs and replaced them with CRJ 900s. The Zvezda kit is OOB apart from a few small details from plastic strip. It’s a pleasant build, the only annoyances being the need to fill various sink marks without destroying the detail (thanks goodness for Mr Surfacer 500) and trying to detach the halves of the nose wheel leg from the sprue without breaking anything. White paint is Halfords as usual. Blue is a mix of Revell 54 and 350, roughly 1:2, plus a few drops of black. Light grey is Humbrol 196 with a tiny spot of 42. Natural metal is mainly Tamiya TS-17 Livery decals are available from Drawdecal and Nazca. I had both sheets in my stash. Neither is completely accurate and the best that can be said is Drawdecal are less inaccurate so I went with them. I added Authentic Airliners windows. Detail decals are mainly from the “technical lettering” sheet by Revaro plus a few from the spares box and the kit sheet. It has nothing to do with the build but when I was researching photos of Brussels SSJs I was amused to see EI-FWF apparently suffering from silvering decals on the fin proving that it’s not just a problem for modellers! Thanks for looking and as always constructive criticism is welcome. Dave G23 points
-
This was built as part of the Douglas A-4 Skyhawk STGB. This is the first of a series of IDF aircraft I’ll be building in the future. The Hasegawa 1/48th A-4N (and A-4M’s) is quite hard to find now and when you can they are VERY expensive!! But a few years ago Hasegawa teamed up with Creative Works to release a range of kits as part of the “Area 88” range. These were just re-boxing of popular Hasegawa models. Strangely this range sells for quite a bit less that the original boxing and is often easy and cheaper to find/buy. Plus Hasegawa likes to include all the extra bits you need to build other version as well. In this case though I did need the Armycast A-4N upgrade set. She was painted using AK Interactives Real Color paint, which in my opinion are only second to the Mr. Paint Lacquers which I think is the best paint out there. The Real Color paint needs to be thinned (and can be thinned down to 95:5 without issues) and just goes on like a dream and gives you a super finish. The decals were also from Armycast and are superb! Just clear coat them before you attempt any other work…… like washes… you have been warned! Thank you for looking, attached is the link to the build. Model: Hasegawa 1/48th A-4M Skyhawk “Greg Gates – Area 88” Paint: AK Interactive Real Color, and MRP, Tamiya Acrylics, Model Master Metalizer Lacquer Extras: Aires – Cockpit set 4280 Armycast – A-4N IAF Upgrade set Eduard – GBU-8 HOBOS 648649 Maketar – IDF Insignia Masks ResKit – A-4 Skyhawk late version wheels23 points
-
First one in a very long while, I picked this as I wanted something to practice on, that if it went really bad it wouldn't really have mattered. I was a very nice build which went together really well. My only problem was with the decals, they were so soft, wouldn't come off the backing, then they split. Horrible, so much so that I'm put off from building ICM again, at least there were only a handful of 'em.21 points
-
Hi folk's,unboxed,tidied and sadly had to bin a few 1/72 build's boxed up a few years ago,these three I was glad to be able to save as I love both the Revell and Academy offering's,thank's for looking.18 points
-
It’s been a while since I’ve posted on here, but I’ve finally finished the Eduard Profi 1/72 Zlin 37A Čmelák I’ve been building of late. This particular registered aircraft was noted for smuggling a family from East to West Germany before the wall came down and they were placed into the cramped hopper compartment behind the cockpit for the journey. The conditions just don’t bear thinking about! The kit is really easy to build and well detailed for such a small scale, however, the instructions are incorrect on a couple of instances with regard to the decals. The ‘Z-37A’ decal should be applied under the cockpit door both sides and not omitted, and the registration on the top starboard wing should be omitted as the full sized didn’t have it. Added to this the whole of the fin and rudder should be painted red, not partially painted as per instructions, but other than this I think everything else is correct. If you want something different from the norm I can thoroughly recommend this model, especially the Profi version as there are many different photo etch selections to choose from which will enhance the model.18 points
-
Sopwith Camel F1 B6401 No3 Sqn Royal Navy Air Service Walmer, Kent. December 1917 Lieutenant LS Breadner. Revell 1/72 Sopwith Camel. Mostly out of the box. Model seems to be better moulded on the right fuselage than the lefts which was a bit odd. I added internal cockpit frames and bracing, instrument panel, rudder bar and control column. Made a new seat, which I weaved with cotton thread (not that convinced with it. Made up some control wires from the rudder bar and control column (none of which can, of course, be seen). I also separated the machine guns, added the ammunition feed, added barrel ends and fitted the control actuator attachments. Paint was originally Lifecolour WWI British Uniform colour but later I went for AK WWI British Aircraft Set (PC10) and a Clear Dope set. I tried the framing tape but an not convinced (I’ll try it on a different model). Decals are from the box. Rigging is AK Superfine elastic thread. I don’t think I got the twin flying wires right but I live and learn.. It was a fun build. Quick and simple. Here are some pictures... Hope you like them. Thanks for looking in..17 points
-
Hello all, Here is my recently completed 1/48 Hasegawa Hurricane IIC, marked as HL608 'Sir Roderic' of 94 Squadron, based in the Western Desert in 1942. 'Sir Roderic' was one of three aircraft dedicated to a trio of brothers of the MacRoberts Baronetcy who were all killed in RAF service. Lady MacRoberts, the mother of the three men, donated £25,000 to purchase a Sterling Bomber in 1941 then, later, an additional £25,000 for four Hurricanes, three in memory of her sons, and one being named in her honour. Sir Roderic was killed flying such a machine with 94 Squadron in 1941. His dedicated airframe was initially LH851 before being moved to HL608. Extras used included Eduard cockpit etch, Eduard mask, AML camouflage mask and Skys decals. Paints are from MRP; weathering is a mixture of Flory wash, Abteiling oils and some Tamiya sets. The build thread is below: Enough waffle, some pictures. It's not the best Hurricane you'll ever see but I'm happy with it and sits well with my other Hurricane and Spitfires. Thanks for looking and stay safe. Dave16 points
-
I've been working on this model for quite a while and had almost finished it when I heard the sad news of the passing of Mel Bromley - the owner of S&M. So, inadvertently, this has turned into a tribute of sorts.16 points
-
Hi there, My first Russian aircraft and my fist model by G.W.H. Great kit, excellent detail and fantastic fit. Maybe my only criticism is the lack of weapons variety so I was force to use some from another kit... Even though the G.W.H kit is of a more advance variant I couldn't resist to do that awesome splinter camo of the 2nd prototype, so I'm ok with the minor inaccuracies... cheers and thanks for looking. Jorge16 points
-
Thanks Fellas. The important thing to remember about oils is that you have a lot of time to think and change your mind. You can scrub it all off with white spirit within 12 hours if you decide you don't like it. The funnels were finally glued down and then rigged with Infini 40 Dernier lycra. The kit railings fitted nicely and fitting nicely has been the norm for this Trumpeter kit that I've come to like a lot. Rigging as ever is made comparatively painless with Bob "Von" Buckle's wonderful ..............buckles The Bridge superstructure was stuck down as a single piece and the HACs platform was tuck with PVA glue to ensure there was time to get it straight and level The Shelter deck, supertructure is cluttered with Ammo lockers and Vents The Railings are painted as is my custom to represent wire /Stanchions - this simple move alone blends in the comparatively thick kit railings. The forward mast derricks were fitted and rigged The final splinter shields were fitted and studying the 2 pictures these for fore and aft guns are distinctly lower than the superstructure ones I know when I'm coming to the end of a build when it's time to paint the ship's boats... A simple neutral grey wash brings out all of the Micromaster details The aft (?mizzen) mast was stepped, one again the fit flatterd my modelling skills And finally - these arrived from Northstar with a delivery time of 4 weeks - compared with 14weeks from last year! Still the best figures, when will somebody produce some RN figures in steel helmets with lifejackets, duffle coats etc?? The end of this project is close - final details, rigging snd deck rails left to do.. Expect a Black Cat Models LCI (L) next; just released for my next project Thanks for looking Rob16 points
-
Takom 1/35 - FV432 - Soltau Ranges, British Forces Germany This is the first off the bench for me in 2021. The kit was great fun to build with its full interior and an excellent level of detail. It is all straight out the box with no extras (apart from the antennas). The scene is from Soltau Ranges in British Forces Germany. After a busy morning on the ranges the crew are queuing up at Wolfgangs for a hot fricky and a yellow handbag. If you know you know! Thanks for looking and please feel free to leave any comments or questions you may have.15 points
-
N1K1 from the 402nd Fighter Squadron, 341st Fighter Group. This is a very nice kit with great fit and low parts count. When I opened the kit I set myself a challenge; finish a kit in under a month. If you discount the 10 minutes it took me to attach the aerial this morning, the build took 15 days. Why oh why does it take me 3 – 4 months to do others? Innards painted with Tamiya XF-58 Olive Green lightened with XF-4 Yellow Green and an Eduard pre-painted seat harness set was added. While the paint was drying I joined up the wing parts and drilled out the wing guns. There were minor gaps along the wing roots which, to be honest, were thinner than the engraved panel lines beside them so I left them. There was a fine gap on the lower wing/fuselage join. This was only on one half which is odd as the rest of the fuselage lined up. Thin plastic card was used to fill. I sprayed the wing I.D. bands with Vallejo Model Air White and then their Gold Yellow. A Google search doesn’t seem to show the later available anymore in the Model Air group of paints. This was left to set-up for at least 24 hours before masking. Bottom done with Vallejo Metal Color 77.706 White Aluminum and again I let it set for 24 hours before masking. There is a small pattern under the stabilizers and to mask this off, I enlarged the instructions, laid a piece off Oramask 810 over the instruction area I wanted to use as a mask, cut it out, removed it from the paper and stuck it to the model. This stuff is pretty low tack but I removed a bit more. I sprayed the top coat done using Tamiya XF-11 J.N. Green and as is my wont, started to immediately remove the masking. Not one bit of Vallejo was harmed in the process. I noticed a bit later than I didn’t have full coverage on the left side so the next day I remasked and reshot. Once again no paint lift from Vallejo. I’ve read builds where people have used Liquitex Gloss for a clear coat so I bought some and figured I was use it for my first time of spraying clears. My biggest fear of spraying clear coat is “when do I know when the airbrush is cleaned out” so I triple cleaned it. A few observations here about Liquitex. It sprays great when cut with 25% water and dries fast. I noticed I had pebbling so I’ll put this down to fast drying and the fact that I was spraying about 6-8″ away. Next time I’ll get closer and go slower. The decals…those freakin’ Tamiya decals. I used everything in my arsenal including Walther’s Solvaset to try and get them to lay down in the panel lines and nada. The last attempt was to pool Walther’s on the wing decals and walk away. I went down the next morning and the decals stood proud. Finally I got some paper towel, soaked it in scalding water and pressed firmly into the decals…success. The next day I went down to put some more decals on on noticed that the previous decals, for the most part, had raised out of the panels lines and I raised the white flag. I clear coated the decals and then weathered with Tamiya XF-16. When dry I ran some Tamiya Grey Panel Liner along the panel lines. Watching videos about this technique shows various wait times up to half an hour before removing the excess but I remove it almost immediately with good results, about a half a wing or fuselage at a time. I let this dry overnight and then flat coated with Microscale Flat. The aerial was done using Uschi van der Rosten Super-fine thread15 points
-
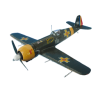
I`ve started this build three years ago and it`s finally done! The model represents the no.1 Bf 109 E-3 in Romanian service, as it appeared during the second half of 1940. I had long wanted a Romanian Emil in national/neutrality markings, but the earliest photos I could find were from the early 1941, when their cowling was already painted yellow to conform to the Axis identification markings. Then this beautiful photo appeared in a German language book who`s authors thought they were looking at a French captured Messerschmitt: http://www.cartula.ro/forum/index.php?app=core&module=attach§ion=attach&attach_rel_module=post&attach_id=142957 It actually shows the Romanian Emil yellow 1 next to the Hurricane yellow 1. Romania bought 50 Bf 109 E-3 in December 1939, but only one was flown in at the date of the contract signing. The Germans repeatedly delayed the delivery of the rest. Ten more aircraft arrived in crates during May-June 1940 and were assembled during the next two months. The rest were delivered until february 1941, but after Romania got dragged into the Axis sphere. That first batch of 11 aircraft was formed into the 57 squadron and together with the 53 squadron equipped with Romania`s 12 Hurricanes Mk.I it formed the newly constituted 7th Fighter Group. The no.1 aircraft, flown by the 57 squadron commander, Dumitru Popescu, was destroyed on 4 December 1940 in a tragic accident in which the pilot lost his life. During formation training it collided with a German 109 and the canopy failed to jettison properly. Popescu was an aerobatic champion and one the most appreciated military pilots. The subsequent enquiry found that both the squadrons` pilots and ground crew were unaware at that time that the canopy jettison lever was fited with a safety device. I started the model based on the photo and became aware of its history only after buying the book on top of which its seats, which I have thought to review here, on britmodeller: https://www.britmodeller.com/forums/index.php?/topic/235093077-messerschmitt-bf-109-e-3e-4e-7-vol4-of-the-illustrated-history-of-romanian-aeronautics/ Unfortunately, the photo on which I`ve based the model does not show the right wing. Many (but not all) of the Romanian aircraft of that time had the national markings placed assymetrically (Poland also did this) and unlike the Hurricanes, there doesn`t seem to be any rule for the assymetry on the 109 wings. I`ve painted the left wing stripe and cocard as they apear in the photo and I`ve extrapolated from a photo of no.24 for the right wing: https://www.asisbiz.com/il2/Bf-109E/FARR/pages/Messerschmitt-Bf-109E3-FARR-7-Grupul-Yellow-24-1941-01.html I`ve used the Tamiya kit (60750) with the correction tailwheel from Quickboost (QB 72 324) as the one from the kit is apparently undersized (left-Tamiya, right QB): http://www.cartula.ro/forum/index.php?app=core&module=attach§ion=attach&attach_rel_module=post&attach_id=148815 The Romanian 109 E-3 used the Oerlikon MG-FF wing cannons and the Tamiya kit (as well as all the other ones in this scale that I am aware of) only includes the Ikaria MG-FF/M. The Oerlikon FF cannon was also standard on the Yugoslav Emils and you can see it clearly on this Swiss plane:http://2.bp.blogspot.com/-f5CrYmAZft0/TnJVnW9ZOlI/AAAAAAAAAYo/XJjfpxHpaI0/s1600/bf-109+3+copy.jpg The solution was to use the Japanese Type 99 20mm Mark 2 cannon barrels made by Master (AM-72-017). They`re pretty much the same. For the sake of consistency, I`ve removed the kit`s cowling mounted MG 17 and replaced them with the brass ones from the dedicated 109 set from Master (AM-72-009). I`ve also added Eduard`s PE seatbelts (SS 582). The roundels (with the large blue dot) come from a RB Production decal sheet (RB-D72014). They`re not thin and they proved pretty resistent to Micro Sol. I took the 1 number from another one of their decals (RB-D72013). The stencils are from Techmod (72055). They seem very much to scale (as opposed to the large and bolded ones that you generally find in 109 kits) and are also thin, but they also stick to the model immediately and are very fragile. I had to paint over some of them and start over. Their nicht betreten lines on the wings in particular have been a nightmare to place and I just gave up. Perhaps using Decal Film might help, but otherwise I think it`s impossible to place them correctly without breaking them in many pieces. My solution was to buy a decal sheet from Matho Models (80005 - Decal Solid Lines black) that contains nothing but black lines of various thickness and cut those to size. It says Printed by BEGEMOT on their sheet and the decals are awesome! They are both thin and very resistent. With enough Decal Set/Water, you can move them for ever until you are happy and then they conform beautifully. By the way, I chose to have the wing lines black and not red as is popular with model makers because that`s how they appear on the Swiss J-355 (supposedly correctly restored) and the wreck of the Yugoslav L-61, both of which are export E-3s from about the same period. I`ve pieced together the Me 109 E stencil on the vertical stabilizer (barely visible on the original photograph and in my photos) from Kora`s Yugoslav 109 decal sheet (KORDEC7234). The painting was done by brush, mainly with LifeColor paints: underside - RLM-65 - UA 503 upperside - RLM-71 - UA 502 propeller - RLM-70 - UA 501 interior, wheels bay and main landing gear - RLM-02 - UA 071 control panel - RLM-66 - UA 133 The yellow for the stripes, tricolor and propeller cone is the LifeColor UA 042. It was recommended by some of the RB Productions instructions as a good match for the accompanying decals, but it doesn`t seem identical to me. It was also hard to brush and after so many layers I lost some details. I am aware that my build has several issues, most of which are unforced errors. Hopefully I`ll do better next time.14 points
-
Junkers Ju 87R-2 of 4./StG 2, Libya, circa March 1941. Like other early arrivals in North Africa she wears the European 70/71 splinter scheme. The white spinner tip is reportedly a Staffel-within-Gruppe recognition aid. Soon after the start of their desert service 4. Staffel replaced their original four-leaf clover badge with the more appropriate emblem of a Luftwaffe eagle superimposed over the Afrika Korps palm tree and swastika, carried on the starboard side of the cowling only.13 points
-
Thanks Eric and Pete - interesting stuff and more confusion… I guess these aircraft had lots of mods during their life and it's hard to model something at 'a point in time' eh? Thanks Marian and Bill - asked and answered! I'm in one of those moods today, again, where I start with good intentions and then something irritates me and I have to stop. Luckily I 'looked ahead' (rare, I know) and saw that the nose turret fairing gets added right at the end. Why, I thought. Better glue it on before the primer: There are locating pins in the bottom of the part. No holes in the fuselage (I checked the other one) and no instructions to drill them. Oh well, off with the pins and stick it on. Of course now, when I paint, I'll have to rotate the turret to paint the back. That's why. Grrrr. The broken arm on the ball turret support broke again. Glued, again: I've also noticed in the scheme the stencils that go on the ball turret. Better put those on before the ball gets stuck in eh? Assembly before close up and a last look at the internals on this one: I think I have all the bits ready: Nope, nose windows. More masking.13 points
-
Dear fellow Britmodellers, here's my 1/72 Hasegawa He-111 H-16 in colors of 4./KG 53, flown by Staffelkapitän Oblt. Dietrich Kornblum. This particular aircraft participated in the "Poltawa Raid", an attack on the USAF airfield in the Ukraine, which was used for shuttle missions. I built the kit from the box, adding seatbelts from tape and resin wheels from True Details. Painted with Gunze/Mr.Color acrylics, weathered with artist oils. All photographs by Wolfgang Rabel. I would like to express my thanks to the following Britmodellers: @Sky Keg who organized the out-of-production kit; @G.R.Morrison and @Han Solo for their help in research; and @JWM for color profiles and decals for squadron letters. Without you, this build would not have happened! Thank you for your interest. Best greetings from Vienna! Roman12 points
-
Hello to all.I finished this model a week ago.It is one of the most interesting airframes I have seen in my life.And I really enjoyed it despite it being difficult to assemble and work with.I have also made a video so feel free to watch it if you are interested. Regards and stay safe.11 points
-
This has been my “Secret project” for the past two years. She started life as Special Hobby 1/48 scale Saab AJ37 Viggen and then I added a bunch custom parts. Mainly stretching her nose to give it more of a F-4G look. This project has the most decals I’ve ever put on a model. Her stenciling was a daunting task. I broke it up to different sections and it took about a week or so. I’m really excited about how she turned out. [/img] Thanks for looking, Steven10 points
-
Barksdale Warthog 79-0152 Thank you for watching! Regards, Tjeerd10 points
-
'morning everybody Just a quick update; I eventually received the other AM decals set, for the Hellenic Air Force Phantoms: These are from Model Maker, as you can see. I'll be doing the airplane on the top, with Spook with lightnings on the fin. Luckily there's plenty pf pics on Internet of this specific airframe, at least of the exteriors. I'm going to search for detailed cockpit and IP pics, because these Phantoms were upgraded to the AUP version and they sport quite some differences in the office from the original version. There are many notable differences on the outside too, but I'll get to them later. Ciao10 points
-
Monty's Humber10 points
-
Strait from ZVEZDA box with EDUARD after market, AKAN collors... Cheers!9 points
-
Greetings, Hope everyone is in good spirit and doing well. I had this Avro Lancaster 1/72 Revell kits but without the decals, I brought it from yard sales so no decals, however, I got a Matchbox decal but sadly it just cracked away. I was on the verge of giving up the model and started something new. But then decided I need to complete what I have started, a friend of mine send me a pair of wing roundels it was a tad small but I can live with it and I used decals from other kits. Working on the matchbox decals which I have no option to work on it was a really challenging bit like building a puzzle. I am no Lancaster expert, however, I really like the aircraft and I hope if any error you guys will forgive me. For bomb, I wanted to have the Tallboy, so asked a friend and he printed a one for me. It was a bit rough but quite happy for the first-ever trial, so the future looks bright for the next project. Building the kit was great, a bit of extra engineering I would say but I can live with hehe. Painted using local paint. So without further ado, may present my Lancaster, bit of Frankenstein on the decal. Thank you for looking cheers.9 points
-
We are go for left intake, now JB Welded first stage....9 points
-
Ok I will just let the pics speak for themselves...mostly. Barley grey layed down...this colour is doing my head in! Initially too green, then used light aircraft grey over the top...better but still not happy. Then Med Sea Grey heavily lightened with white. That seems better to my eye as they seem to get quite light and faded quickly in service. Then when you see on photo's of touch ups of supposedly the same colour it is completely different again, different lighting different look! Happy with one result I went down the other end of the house and didnt like it . Some do look really greenish at certain angles, but to my eye I need more grey. Anyway I will persevere sorting this out as I continue with modifying the airframe. This is good enough for behind the intakes for now anyway, its close but not quite there to my eye The good news at least is that I am prepping the port intake for epoxying in!! Cheers Anthony9 points
-
Main paint colour is Humbrol H26 which indoors has a marked brown hue but outdoors it looks much more green to my eyes, no wonder we struggle to get these colours right. Track colour is Mig Ammo `Burnt iron` straight from the bottle.8 points
-
I've decided that I'm going all out for a functional mechanism with this. It's the aspect that interests me here, and it's the challenge. I've fairly well worked out what goes where and why, and I'm back tracking a bit to upgrade some items with metal parts. This is the main connecting rod with the sliding plate, It's all dry fitting at the moment and a test run with a cocktail stick. The extra coupling rod then reaches back to the rear wheel. In place of the cocktail stick will be an eccentric crank that operates the rest of the stuff in an elegant and elaborate manner which has an important function for the whole shebang I'm sure.....😜 I'm not enthusiastic about the main wheel bearings, and they are getting a makeover in brass tubes. The axle stubs are cut off and drilled out to take the bigger tube at 1/8th diameter. The wheel centres drilled to take the inner tube. Here's the bearing tube parts in position in the chassis, With one wheel fitted to the axle tube, it's slid through, the other wheel dropped on, and the required length marked.... Cut the tube and then it's a bit of dainty superglue work to attach. Straight and true running needs to be maintained and there's an offset between the 2 wheels on either side that is built into the original axle mouldings and is now lost. I should have taken notes.... 😕.... but going from memory they're not at 180° to each other (I'm referring to the position of the conrod pins in the wheels). They're about a 1/3rd of a rotation relative to each other, left and right. Well, that's what I've done. Bit of a gamble I guess, but the running of the wheels is MUCH better and less prone to wobble. So let's see what else I can mess around with....... 😎8 points
-
hi again, to present some advances related. basic detail made from fine wire and clean the old airwaves parts... every union with superglue and 5 minutes epoxi. a really hard work fit the peewer parts the access doors will be done with disposable plate plastic, like a sandwich, plastic-transparent-plastic the detail with fine wire (more will be added after the final touch an the paint (model master and humbrol used) thanks for your comments and a question about serial related. what are the serials of the Scout involved in the Falklands war ? the RED DANGER sign on tail was overpainted ? for your comments and answers, thanks in advance, Carlos8 points
-
Well, it's time to make a proper start on this one. But first of all, a bit from last weekend with some more work on the chassis. Now I know I haven't put up pictures of it before, but it has had a coat of primer, and satin black. Time to get those front wheel arches body colour, which meant lots of masking - Papa Johns leaflet to the rescue here It's had the colour coat since, clear coat should go on next weekend weather permitting. Always a bit of a pain having to mask up, but at least any paint which creeps under the masking shouldn't be too noticeable. And speaking of colour coats, I got the colour coat on the body this weekend. I had been thinking the paint might come out a bit lighter than I was hoping, but on the evidence of this it's pretty much the shade I wanted. Just got to hope the same is true once I get the clear on it: The last pic is really just to show that I have made a start. Theredoes look to be a couple of sink marked on the back of the engine, hence the filler. As far as I can tell it won't be covered up, but will be out of sight anyway being half-hidden by the scuttle, but I thought I'd try and get it straight and level anyway. Just need the filler to dry. All the other parts are still work in progress as far as paint is concerned, but at least I've started the XJS journey proper now. Thanks for looking.8 points
-
Just finished Hobby2000, actually Revell reboxed. P-47M s/n 44-21108, Cpt Witold Lanowski,61st FS/56th Fg, Boxted UK 1945. Hope you like.7 points
-
Hello everyone, Here's my latest completion. It's the 1/72 resin kit from North Wing Model Craft of the Kawasaki EC-1, which for those that don't know (and there are a lot of you), is a unique Japanese Air Self Defense Force electronic counter measures trainer. It is based on the Kawasaki C-1, and whilst it is not the world's prettiest aircraft, it is nevertheless very interesting. Until recently, this was the only model available in this scale and it is exremely rare, very expensive and very difficult to make. But, sometimes you just have to go for it, especially as it was obtained by a friend in Japan, who then passed away and sadly did not see it's completion. So, in memory of Wing Co, here's what i let myself in for. Bearing in mind that the masters for the resin casting are all hand-crafted, as the kit came out long before CAD design and 3D printing were common-place, the overall package is superb. Everything is contained in the smallish stout box, including decals and 1/72 scale plans. However, and its a VERY BIG however, whilst all the parts fit in the allocated places, there are many gaps to fill and finesse. To give you an idea, i used two tubes of Tamiya filler, two bottles of Mr Surfacer and a bottle of thinners on this project. Literally every large component needs several cycles of gluing, filling, sanding, priming and re-scribing. The only real dissappointment was the cockpit glazing section, which was cast in clear resin, but was very thick and opaque. I ended up plunge-moulding a new part using the kit item as a master. To my shock, this went absolutely perfectly, and meant that the details i then added to the interior of the cockpit could be clearly seen, with a good light source! When i got to the painting stage, i found that the primer and paint didn't stick to the resin in a lot of places, even though the model had been thoroughly cleaned. At times it was very depressing having to start again, but i was determined not to let it beat me. All of the walkways and white ECM blister stripes were sprayed and masked, as that was far easier to do than using decals. Once the paint was on, assembly of the highly-detailed metal-reinforced resin undercarriage went well, as did applying the decals, even though they were thick and didn't really settle into the panel lines. Weathering was carried out with Tamiya sets, Flory Models washes and pastel chalks. In real life, this aircraft is well-used and gets filthy even though it is well-cared for by it's ground crew. I've included a few in progess photos, so that you can feel my pain! Was it worth it? Too right. I'd recommend it to anyone, if you can get hold of one, but you need bucket loads of patience and perseverance. You also need a lot of space as it's big too. Hope you like it Andy7 points
-
1/48th A-4K Skyhawk – 75 Sqn RNZAF “Pitch Black” 1984 Darwin Model: Hasegawa 1/48th A-4E/F Skyhawk Paint: AK Interactive Real Color, and MRP, Tamiya Acrylics, Model Master Metalizer Lacquer Extras: Aires – A-4E/F Cockpit set 4280 Eduard – A-4E/F Exhaust Nozzle set 648251 Eduard – A-4E/F Mask set EX-023 Gekko Graphics – RNZAF A-4K decals ResKit – A-4 Skyhawk early Wheel set RS48-01297 points
-
Oh my goodness.... I’d forgotten just how bad these Trumpeter tracks are. The plastic does not like cement, at all !!7 points
-
Eurovision Song Contest Eurovision Song Contest7 points
-
Decalling on the fuselage is done and most of the decals on the wings and props are done aswell. Fuselage has been gloss coated;7 points
-
This is my personal interpretation of the Bf 109 G-10 called Rosemarie. It was a really dirty and weary G-10 U4. The Revell kit is good but uses some baffling shortcuts. Unreal rivets on the cowl, low details on the horizontal stabilizers, cockpit rear armor integral with the fuselage and more… As usual I used Gunze Sangyo Acrylic colors, RLM 76, 75, 83 and a mix of 76 and 75 for the lighter gray of the fuselage. Decals are from HAD, 72086 sheet. Cockpit interior is from Aires resin set. Weathering done with MIG powders and Carbhotello pastels. The colors of this aircraft have been much discussed, I hope this may be a correct interpretation. Thanks for watching! Pier6 points
-
Finally, I got to the finish flag with my LeO! 😊 The slow progress has been predominantly something that I’ve allowed while my over enthusiastic brain has concentrated on other projects. Note to self: limit my number of concurrent builds! A GB build thread here: As you can see, and you will all know by now, she is a LeO 453S (“S” for sauvetage, safety/rescue in English), modelled as one of the machines of the SASM99 unit based in Maison Blanche, Algeria, in the 1950s. This air unit emerged from the air sea rescue sections created after WW2 when France, signatory to the O.A.C.I. (International Civil Aviation Organization) acquired the necessary means to meet its international commitments. Consequently, the Superior Council of French Aviation Safety requested the attachment of the SAR to the Civil and Commercial Aviation Secretariat (SGACC). The military maintained operational control. It had the necessary materials and crews to immediately undertake any research within the areas for which it is responsible, including those located in French Africa. At the end of WW2, the Armee de l’air (the air force) therefore set up an air-sea rescue service (SAMAR) subsequently reinforced by an air-land search and rescue organization (SATER). This service was initially based in Provence (Salon de Provence) then in Algeria in Blida under the name of SASM in February 1946. It was placed under the dependence of the Air Defense Zone 903 having three Vickers Wellington as its fleet. A HP Halifax, detached from Bordeaux, then took over the interim while waiting for the provision of aircraft of the LeO 453. Three aircraft were first used and in 1953 the unit grew to six aircraft, enabling it to operate and fulfill its mission. The SASM. was then transferred to Algiers-Maison Blanche and, in March 1954, to Boufarik where it merged with the GLA 45 liaison group which included two squadrons; one for transport and another for sea rescue made up of eight LeO 453s. A re-organisation gave birth to GLA 45 and a new SASM99. In February 1955, SASM saw the replacement of the LeO 453, by four-engine Bloch SE 161 Languedoc which belonged to Air France. Ten aircraft were specially fitted out at Toulouse-Montaudran. Still in Boufarik, this formation again changed its name, to the EARS99 (Air Search and Rescue Squadron). In February 1956, it moved again to Algiers. Many problems were encountered with the Blochs. The squadron was reinforced by a Noratlas N 2501, loaned by the GMMTA (Groupement des Means Militaires du Transport Air). On a weekly basis, an aircraft (generally N 2501) was dispatched. By 1960 the Lockheed L-749 Constellation gradually replaced the Languedoc. Ultimately the unit went through more changes and new types. The unit eventually dissolved in 1969. The subject of this build, using the Heller kit (the only kit!), is No.21, coded 99-JC. Ten LeO 453Ss (Nos. 19, 20, 21, 22, 23, 24, 25, 30, 35 and 38) were operated by SASM99, some coming from the disbanded SASM98 and GLA45. No. 38 was lost in an accident near Mallorca in 1954. Specifically, No.21 was converted from LeO 451 No.457. She hadn’t been without incident as she had an engine issue over France in 1952. Finally she was retired with the remainder of the fleet in 1956. The only photo I have found of her is this tail-on shot. Therefore I post below a shot of the scrap yard at Blida where they all sadly passed on. Note that some of the fleet had de-icing boots, others didn't. No.21 was in the latter group. The LeO 453S was a heavily modified version of the versatile LeO 45 design, having a passenger compartment and observer positions. The upper gun “turret” was deleted. A number of aerials and antennas were added too. The biggest change was the change to R1830-43 (or 67) engines, driving Hamilton props. What did I use?: 1. Kit – Heller LeO 45 1/72 (80389) 2. Decals – Kit rudder stripes, Berna Decals roundels, and the remainder drawn by Giorgio @Giorgio N and printed by Arctic Decals. 3. Aftermarket & other bits – Renaissance Models main undercarriage assemblies and wheels (RF72064), DF loop bullet from a Heller T-6, Engines (with cowlings and props) from an Airfix C-47 (thanks @1903flight), EZ Line for the aerials. Various bits of Plastruct rod. I used a drop tank from a Special Hobby Super Mystere as the basis for the dorsal turret mods. I made the engine intakes from Mk82 bombs. The exhausts were made from sprue, bent over a flame and drilled out. The tail cone was extended with card. 4. Paints – overall Humbrol Polished Aluminium (27002), 33 Matt Black, 60 Scarlet, and others here and there. She was finished with Humbrol Satincote. 5. Weathering – Flory Wash (Dirt), Tamiya Weathering Powders, Prismacolor Silver pencil I must also acknowledge the help I got from Scott @Jinxman, James @1903flight, Wez @Wez, Mike @Michou, Tony @TonyOD, Martin @Lightningboy2000 and others. Thanks everyone. So here she is: There are a few glitches. I'm just glad to get her to RFI! Martin6 points
-
So a bit more progress today as I've managed to fit the chrome lights front and rear and the glass is now in place. Just some pieces of mesh to apply to the front and rear bumpers and then I can fit the body to the chassis 🙂. I've decided not to apply a clear coat at all on this build a decision i may or may not regret later. Here's a few pic's of today's progress I'm working the next couple of days which will slow me down a little but I'll try and sneak the odd hour when possible and see how things go. Thanks for looking back soon 🙂👍6 points
-
Slow progress on the Lee I’m afraid, but something has been achieved at least. I completed the main gun and added it to the hull upper. Everything got the usual grey acrylic chipping and black & burnt umber oil washes. I’ve just upgraded to W&N artist colours and they’re lovely – very fine pigmentation which really helps with very thin washes. I had been using Winton (W&N’s budget range) but these posh ones are noticeably better. I removed the gun barrel cleaning rods and added a couple of foil straps. I plan to use Miniart’s tank gun cleaning crew in a diorama. With all the internals in place I was able to glue on the upper hull. This required a gradual fixing using plenty of clamps and tape to close up gaps (as best I could) probably due to my deviation from the instructions, but it seems to have worked out ok. The last part of the main body panels to be installed was the front glacis. I painted a drop of dark grey into each dial and used a pin to scratch marks onto them, revealing the white below, before a drop of gorilla clear glue was added to each for “glass”. That’s all for now…6 points
-
Thats the end of using ebay for me. Righty or wrongly, I always saw PayPal as a safety net, which in my experience, worked fairly for both buyers and sellers. Having ebay directly accessing my bank is out of the question as I suspect money will just be removed from my account should a buyer complain - and should the buyer be in the wrong, it will take ages to get the money back I don't use my bank account online for anything. I always use a credit card for online transactions (which gives you some protection). I don't trust ANYONE'S security 100%, but, the credit card companies seem to have a much better track record of sorting things out when things go wrong than the banks. I'm certainly not going to give ebay my bank details. Cheers Colin6 points
-
Brush & water, with the work done relatively early before the chromate coat had cured too hard. I do sometimes use tooth picks as well - and may yet do so during the next stage - but this time it wasn’t necessary.6 points
-
Release expected this Summer - ref. 4809 - Yakovlev Yak-9D Source: https://www.facebook.com/modelsvit/posts/2954986421437056 V.P.6 points
-
I decided to paint up the figures, to complete the scene as Matchbox intended. 😀6 points
-
If Australia did from 2015, I am sure that the UK can still qualify, more is the pity! Ray6 points
-
Hi all,some slow progress made,I couldn't get a glossy finish to keep its shine so I ended up taking the bodywork to work and spraying it in 2k (I am a car sprayer buy trade) which seems to have done the trick.got the satin black done as well which is quite tricky as the engine cover,bonnet and all of the inside of the shell and some of the shuts are all black,some glass in too and some clear red and orange on the lights hopefully nearer the end now thanks for looking6 points
-
Finally got back to the bench yesterday and got some work done, so the various bits and pieces are finished I think. Next up is the cockpit...6 points
-
This has been one of my all time favourite builds, Airfix's 1:72 Armstrong Whitworth Whitley Mk.V in BOAC freighter markings. Cockpit with some added detail. Just wish I'd added seatbelts Build thread ^6 points
-
6 points


.thumb.jpg.b4a5069fd2c2dd5708ce1694345c5b11.jpg)


.thumb.jpg.ba34a9f6ddce411193946dbdcc7b5fe8.jpg)


This leaderboard is set to London/GMT+01:00